We remind you that attempts to repeat the actions of the author may lead to the loss of the warranty for the equipment and even to its failure, as well as to problems in the operation of the software and OS. The material is provided for informational purposes only. If you are going to reproduce the steps described below, we strongly advise you to carefully read the article to the end at least once. The editors of 3DNews are not responsible for any possible consequences.
In general, there are countless materials with tips on setting up Wi-Fi on the Web, but not all of them are equally useful. Strictly speaking, there is simply no universal advice on this topic: everyone different models routers and client devices, different working conditions, and so on. But everyone has the same problems: low connection speed, breaks, high delays. Nevertheless, we tried to collect the most relevant tips for solving them, with an emphasis on simplicity. There are no puzzling technical things here, and the terms are the very, very minimum. This is a deliberate simplification.
Please note that the most typical situation is considered in an ordinary city apartment with one router. However, for a private one-story house, the principles are the same, but for two or more floors there are already nuances. Options with signal repeaters, additional access points and other tricks like PLC are not considered. The material is built according to the following principle: at the very beginning there is a list of key points, and then more detailed explanations for each of them. Each section does not depend on the other, that is, you can follow the recommendations in the wrong order, which is given in the article. Go!
Proper placement of the router
Place the router in such a way that:
- if possible, it was equidistant from client devices and was not at the window;
- between the router and the clients there were as few barriers as possible from materials that strongly affect the signal;
- there were no sources nearby electromagnetic radiation and powerful electrical appliances - especially microwaves, baby monitors, radio tubes and their bases;
- at least at the level of a regular desktop/desk or higher, but not on the floor;
- the antennas or housing were located as indicated in the instructions (for external antennas, a vertical arrangement is normal);
- it was freely ventilated and cooled;
- devices that are most critical to network quality could be connected via cable rather than Wi-Fi.
Before digging around in settings or doing other shamanism, it's worth trying the easiest way to improve home Wi-Fi performance - correctly positioning the router. Often, users are not interested in this issue, and the provider's installers are not eager to do extra work, so that the router is placed where it is closest and the easiest way to get an external cable. As a rule, this is a hallway or a room closer to the shield on the site, which is far from always optimal. In general, it is difficult to give any advice that is universal for everyone, so it is better to experiment with the placement of the device. If it is possible to connect devices that are sensitive to network access by wire, then it is best to do just that. Wi-Fi is good, but "copper" is better!

The best option in theory is to place the router in the center of the apartment, at least somewhere at table level or higher. The thing is that antennas in home routers are almost always omnidirectional. To put it very simply, in the top view you can imagine that the signal from the router diverges in concentric circles, gradually weakening. So if you place it, for example, in the corner of a rectangular apartment, then three-quarters of the coverage will be outside it. It is clear that placing the device in the center is unlikely to succeed - it is necessary to somehow bring the provider's cable and power. But on the floor plan, you can at least roughly estimate where it can be placed so that the coverage is maximum. And at the same time, to assess where there will be the greatest concentration of clients or where the most sensitive to the quality of Wi-Fi devices will be located - that's closer to them and you need to put a router.

In doing so, several other factors must be taken into account. A wireless signal spreads well in open space, but in real life there are always some obstacles between its source and consumers that affect it to one degree or another - they absorb or reflect. These are walls, doors, interior items, Appliances and so on. Objects with a high metal content have the strongest effect on the signal: doors or beams, reinforced concrete walls and ceilings, metallized glass and mirrors, cases of large household appliances such as stoves or refrigerators, some ceramic coatings and products. A smaller, but still very noticeable effect is exerted by large volumes of water (a large aquarium, for example), brick and stone (usually as part of the walls), some finishing materials and insulation. Well, objects made of plastics, wood, ordinary glass, drywall, and fabric have the weakest effect.

Now the Wi-Fi standard can work in two radio bands: 2.4 and 5 GHz. Moreover, the 5 GHz signal decays faster than 2.4 GHz. A feature of both ranges is that they were not originally intended exclusively for Wi-Fi. On the contrary, these frequencies do not require licensing and separate registration of devices, subject to certain rules, primarily regarding the radiation power. In fact, in the same 2.4 GHz region, many signal sources coexist, which in this case are interference. These include various radio-controlled devices (from cars to drones), baby monitors, wireless music systems, cordless phones (non-DECT), keyboards / mice and other manipulators with their own adapters. In general, all kinds of proprietary and not very communication systems, as well as Bluetooth devices, although specifically for BT they came up with mechanisms for coexisting with Wi-Fi.

But this is actually not all. Do you know what is the scariest Wi-Fi beast? Ordinary microwave! It also operates in the 2.4 GHz band, and no protection can protect against leaks of powerful radiation, which at best simply reduces the speed and stability of data transfer over Wi-Fi, and at worst completely extinguishes the network. In the next place in terms of harmfulness are the same cordless phones and baby monitors, which, even in standby mode, seriously emit light. And we do not consider severe cases when all kinds of wireless systems naturally eat off the frequencies of several Wi-Fi channels at once, although they do not meet the standard. In general, almost any electrical equipment in one way or another generates electromagnetic noise, which does not necessarily affect Wi-Fi directly, but is quite capable of affecting other components of the router. And it is better to keep the router away from it - at least a couple of meters. There is, however, another source of interference directly inside modern routers - this USB ports 3.0! But they learned to deal with them a long time ago: they are isolated from the radio part, and in the settings you can always turn on the USB 2.0 mode. Also, problems with them usually help a good USB cable 3.0 with normal shielding.

And of course, your Wi-Fi can interfere with ... that's right, someone else's Wi-Fi! All modern routers without fail regularly scan the radio air in order to work better. We’ll talk about channel settings a little lower, but for now it’s enough to know the fact that your router is constantly “listening” to what is happening around. The example above with placing the device in the corner is bad not only because you yourself lose coverage, but also because in this way the router begins to better “hear” the neighboring Wi-Fi, which, most likely, does not have such a strong effect on your client devices. For the same reason, you should not put the router by the window and on the windowsill, since it will probably immediately “learn” about a bunch of neighboring networks, which certainly don’t “finish off” to the interior of the apartment. Residents of a number of cities can separately “thank” one large ISP, who - well, not himself, but dishonest subcontractors, strictly speaking - during the global network update, even grandmothers installed routers with Wi-Fi turned on, which they have not needed for a hundred years.

So, it is advisable to place the router taking into account the above factors. That is, put it in such a way that there are fewer obstacles between it and the clients, and the obstacles themselves affect the signal as little as possible. Well, so that there are no sources of interference nearby. In addition, you should pay attention to the orientation of the device and antennas - a typical location is usually drawn in the user manual. As a rule, the same external antennas should be extended vertically. Finally, one more important point - routers tend to heat up during operation, so they should not be placed near heating and other heated devices. Be sure to ensure proper ventilation of the device. No, you don’t need to start a separate fan for it, but there should always be air flow: the cases are made “perforated” for a reason.
Software and firmware update
To update the firmware and driver for all devices is:
- use the built-in mechanisms of the OS;
- go to the manufacturer's website, find, and then install latest versions BY.
From the general tips for placing the router, let's move on to more practical ones. And the first will be the most obvious, but for some reason they regularly forget about it: update the software on all devices! Seriously, decent manufacturers update drivers and firmware for a reason. You can’t call this a mass phenomenon, but still the developers really, if not radically improve the operation of devices, then at least make adjustments. For example, they update the settings to comply with the rules of individual countries and regions, which tend to change regularly. And in general, it has already been said many times that any complex modern device is largely software, and not hardware at all.

For smartphones, tablets and more mobile devices there are usually built-in firmware update systems. In extreme cases, they are also posted on official sites - along with enough detailed instructions which must be strictly followed. The same applies to the routers themselves - it is most important for them to have the latest software. macOS users have nothing to worry about, as all the latest drivers for native adapters come with updates to the OS itself. And even the old problem with Wi-Fi at Apple was finally defeated. Linux Users I really don't understand why people are reading this stuff. For Windows options some. If this is a laptop or a branded PC, then it makes sense to go to the manufacturer's website and look for the latest drivers in the downloads or support section.
If there is nothing like this on the site or it is a self-assembly, then you will have to tinker a little, figuring out which Wi-Fi adapter is installed in the system. In Windows 7, to do this, you will have to go to the "Control Panel\Network and Internet\Network and Sharing Center" section. public access\Change adapter settings". In Windows 10, the path is the same, only in the Start menu you first need to find the so-called classic panel controls (you can just start typing this name from the keyboard right in the menu). The section that opens will show all network adapters. We need an active wireless adapter that does not have a gray icon and no cross in the corner if you are already connected to your home Wi-Fi. Double-clicking on the adapter icon will open a window with its status, where you need to click on the "Properties" button. The full name of the adapter will be indicated at the top.

Further, there are also two ways. Or try to find the latest drivers - they are usually given in the form of a ready-made installer - on the adapter manufacturer's website, but, generally speaking, they are not always there. If they are not there, then it is better not to meddle in any unofficial sites, but use the built-in windows update drivers. In the same window, just click on the "Configure ..." button right under the name of the adapter and in the new window go to the "Driver" tab, where, in turn, click the "Update ..." button. And it is already clear what to choose automatic search. If you are afraid that something will go wrong, then before doing all the operations in the OS, you can make a restore point according to the instructions for Windows 7 or. If all this did not improve the situation with the home wireless network, then there is nothing to do - you have to turn to the settings of the router itself.
Channel selection and changeWi-fi
To select the appropriate Wi-Fi settings, you will need:
- use the Wi-Fi air analyzer and select the channel that is farthest from neighboring channels;
- remember that for 2.4 GHz there are only three non-overlapping channels for standard channel width and only two for extended;
- know that for 5 GHz, only channels 36 to 48 are likely to be suitable;
- try out the work Band functions steering, if any, and disable it if necessary.
It has already been noted above that the router always scans the state of the air around it. And why does he do it? We'll have to go a little deeper into the theory. Earlier, again, it was noted that there are dedicated radio frequency bands. For better use, they are divided into separate pieces, which are called channels. Depending on the region and country, the rules for their use may change, so it is important that the region is the same in the settings of both the router and other devices. Sometimes this is determined by indirect signs, such as keyboard layouts, interface language, time zone, parameters of neighboring Wi-Fi networks, and so on. There are 13 such channels in the 2.4 GHz band, but the operation of Wi-Fi on any of them affects neighboring channels too. In fact, channels with a step of five do not intersect and interfere with each other: 1, 6 and 11. Worse, but quite acceptable is the following distribution: 1/4/7/11 or 1/5/9/13. If we are talking about more modern standards with a double channel width (40 MHz instead of 20 MHz), then there is no room at all: for example, only the 3rd and 11th channels will work without intersections.

What does all this mean in practice? And here's what - only in modern routers relatively recently did the function of dynamic Wi-Fi channel selection appear, depending on what other wireless networks are nearby and what channels they occupy. The idea is to choose a channel for your Wi-Fi that is the furthest away from those around you. If the router has such a function, then it is definitely worth enabling it. Somewhere you can even choose an interval, often changing the channel once a day is enough. And if there is no such function, then you will have to do the channel selection manually. There are many utilities for this. Windows users can use inSSIDer Lite, Acrylic Wi-Fi Home, LizardSystems Wi-Fi Scanner. For Mac OS X there is WiFi Explorer Lite, AirRadar. There are good ones for android free analyzers WiFi Analyzer and . But for iOS Apple once banned such utilities, so there are no direct analogues, but if you find something worthy, share it in the comments.

The interface for all such utilities is approximately the same. You can view a list of Wi-Fi channels from your neighbors and see their signal strength on the graph, as well as how many channels overlap nearby wireless networks. The signal level is indicated in negative numbers — the closer this number is to zero, the stronger the signal. For regular 20 MHz channels, just its number is shown, and for 40 MHz channels, the numbers of the two 20 MHz channels that are actually used are actually indicated. At the same time, such utilities show which neighboring networks operate on the same channel as yours, and which channels overlap - both of which can interfere with Wi-Fi. What to do with all this information? It's simple: in the settings of your router, you need to set a channel that would stand farthest from neighboring networks both in number and in signal strength.

In the 5 GHz band, the principles are the same, only available channels there are more, and they themselves are wider (80 MHz or 80 + 80/160 MHz). All of them are divided into two large blocks: from the 36th to the 64th and from the 100th to the 165th channels. Formally, all of them are allowed in the Russian Federation, but in fact, even devices that can work with the second block of channels may not see them. Yes, yes, this is one of the main reasons why it is worth updating the software. The top unit is generally cleaner than the bottom unit, meaning there is less neighborhood Wi-Fi, but you'll have to check each client individually to see if they can connect to your home Wi-Fi. In addition, there is another nuance regarding the regulations regarding power and protection against interference for various third-party equipment. If you do not go into details, then all channels above the 48th may work worse than the rest.

In modern dual-band routers, a feature called Band steering, Dual-band Wi-Fi, Smart Connect, or something like that is increasingly common. Its essence is that the router automatically “pushes” clients into the range that it considers most preferable in this moment. Usually a prerequisite for this technology to work is the same name WiFi networks for both ranges, so you can disable it simply by renaming the network of one of the ranges. There is no single standard for this technology, and it works very differently. The best option, perhaps, is to consider the preferred connection to a 5-GHz network. Well, if this technology does not bring anything good to the work of home Wi-Fi, then you can turn it off.
Additional settings
What else can be done:
- discard older Wi-Fi-only 802.11b or 802.11g devices;
- select the correct Wi-Fi mode, i.e. 802.11n or 802.11g/n for 2.4 GHz and 802.11n or 802.11n/ac for 5 GHz;
- leave auto-selection of the channel width, i.e. 20/40 MHz for 2.4 GHz and 20/40/80 or 20/40/80/160 MHz for 5 GHz;
- try disabling non-standard additional Wi-Fi acceleration technologies;
- try to slightly reduce the power of the Wi-Fi radio module;
- on mobile devices, disable access to the 3G / 4G network when you are in the Wi-Fi coverage area;
- check the power saving modes of devices and adapters.
Now there are two modern Wi-Fi standard: 802.11n (2.4GHz and 5GHz) and 802.11ac (5GHz). However, users may also have old devices that support, for example, only 802.11g, or even the ancient standard 802.11b or even 802.11a by modern standards. The latter, however, are very difficult to find now, but if you suddenly have them, then it is best to completely abandon them (and if the router only supports 802.11b / g, then you definitely need to throw it away), since they can significantly slow down Wi-Fi operation. Why? Because the router always tries to organize communication, providing the most common opportunities for all clients, from which old devices can be comfortable, and new ones not so much. If there are 802.11g devices and you can also refuse them, then it’s better to do so. Some router models have special settings that, in theory, allow old devices to connect so that they do not interfere with new ones, but they do not always work correctly. The type of supported standard can be found in the description of the device or its wireless adapter.

So, for the 2.4 GHz band, the most preferred mode is 802.11n (only), followed by 802.11g/n. For 5 GHz, there is only one optimal option: 802.11n/ac. With the channel width, the situation is as follows: according to the rules, the router must understand and accept in general all devices that comply with the standard. So in the settings you should choose the option 20/40 MHz (for 2.4 GHz) and 20/40/80 or 20/40/80/160 MHz (for 5 GHz). Some routers allow you to force the maximum possible channel width. Yes, it sometimes helps to squeeze all the juice out of wireless connection, but not always and not for all devices. Moreover, if only stability is important, then it makes sense, on the contrary, to reduce the channel width. Similar settings can be checked on the side of the adapter by following the same steps as in the section on updating drivers, but selecting the “Advanced” tab at the end. However, in these settings, there is usually such a scatter of parameter names that it is better to change any of them very carefully, and if you are not sure, then do not touch them at all.

Routers have a number of additional features that are also worth paying attention to. Various "accelerators" can cause a lot of headaches, as these are almost always technologies that go beyond the standard. Older devices have XPress or TxBurst features, while newer ones have TurboQAM/256-QAM or NitroQAM/1024-QAM. Beamforming technology (beamforming), usually available in explicit (new devices) or implicit (old devices) formats, like all of the above, can improve the performance of some clients, but harm others. For now, you can not particularly remember about MU-MIMO, this technology is still not widely available on clients. However, you can and should experiment with these settings by enabling / disabling them and observing the behavior of client devices. It is definitely worth leaving the WMM option enabled, but with different classification systems (QoS) and restrictions (shaping), you will also have to check different scenarios or disable it completely.

There is another - completely counter-intuitive - setting regarding the power of the radio transmitter. Usually, you can either specify the power in milliwatts, or select/specify the power level as a percentage of the maximum. So, maximum power is not always good! Without going into details, let's say that a decrease, on the contrary, can significantly improve the quality of communication. For starters, you can try to throw off 15-25 percent - and see what happens. Exactly the same story with external antennas, having a higher gain (which is far from always true) and other Wi-Fi “improvers” like homemade or purchased reflectors - they can do harm. If you have good relations with your neighbors, then you can also set up non-overlapping channels for them in the same way, reduce power and place the router correctly - you will help others and yourself.

Finally, for smartphones, tablets and other mobile devices, there are a couple of very simple actions. First, when entering Wi-Fi zone on them it is necessary to disable access to mobile internet, as well as options like Wi-Fi Assist in iOS. Secondly, everywhere it makes sense to check the power saving settings both for the OS as a whole and for the wireless adapters themselves. Both can affect the persistence of your home Wi-Fi connection.
Conclusion
Finally, one more simple but important advice: if you are not confident in your abilities, then it’s better not to take it. And if you are afraid to forget what and where you changed, then use the function Reserve copy and restore settings, which is in almost any modern router. However, far from all and far from the most difficult settings for the average person are given here, and experts may not even agree with some of the tips. Nevertheless, if none of the recommendations individually (or all together) helped, then either they are not applicable to your situation, or it’s really time to take care of buying a new router, or even additional access points. We hope you are not in danger!

Today it is difficult to imagine a modern apartment, let alone an office, not equipped with an appropriate set of office equipment: computers, laptops, tablets, mobile phones. And where all these devices are available, there should naturally be the Internet. He firmly entered our lives, taking one of the most prominent places there. On the Internet, we study, work, have fun, relax, communicate. Therefore, comfortable access to the World Wide Web for yourself and your loved ones is a problem that sooner or later every person has to solve. Fortunately, now we have a reliable assistant that allows us to implement the most effective and simple solution to this issue without much additional intellectual and financial costs. We are talking, of course, about Wi-Fi technology.
But in order to use the "air" Internet, you need to know where to find and how to turn on Wi-Fi on your computer. We have tried to answer these questions in this article.
What is wifi?
Technology wireless internet has become part of our daily routine. We habitually identify Wi-Fi with convenient, reliable and fast Internet access, which we encounter at home, at work, in public places - at airports, cafes, shopping malls.
Answer the question "what is Wi-Fi?" the easiest way is this: this is a network protocol, with the participation of which communication is carried out between the “access point” and the “client”, or the “access point” and several “clients”, packet data is exchanged in local network or through the World Wide Web.

Currently, the abbreviation Wi-Fi does not mean anything and is not officially deciphered in any way, however, when creating this protocol, the developers “gave it a name” by analogy with Hi-Fi (High Accuracy). It stood for "Wireless Fidelity" - wireless precision.
Benefits of using
Of course, the “air” Internet is not an ideal technology. Several examples can be given at once of what difficulties may arise when using it. One of the most widely known is the so-called "noisy" connection. In the range used by this protocol, many household appliances emit (for example, microwave ovens), alternative connection devices work (for example, Bluetooth). Interference can also create walls and ceilings. All this negatively affects the speed and quality of access.

At the same time, there are no less positive aspects from its use in home and office conditions. Here are just a few of the more obvious ones:
- Low cost of wireless networks and installation of several access points that will provide stable coverage throughout the territory. At the same time, there are no cables, extension cords and adapters that constantly get confused and clutter up the space. "Air" connection is indispensable in premises of historical value, as well as in premises with obstructive architectural features;
- This protocol provides full access to the Internet to any device - whether mobile phone, tablet, laptop or desktop computer - without being tied to a specific location. Exit to the world information space through this protocol - this is the ability to comfortably use the Internet while lying on your favorite couch;
- Wi-Fi allows you to synchronously use a large number of active connections. By setting wireless connection, you don't have to worry about how many computers and mobile devices will go online at the same time.
What are the wifi modules for a computer?
All popular devices are now equipped with adapters by default. They can be connected to the Internet out of the box, but what about those who have a desktop computer? The answer to this question is obvious - you need to purchase an additional Wi-Fi receiver, install, connect and configure it.
We will talk more about how to install Wi-Fi on a computer below. Now we propose to decide what kind of receivers there are, what are their differences, specifics and advantages.

"Air" adapters are of two types: external and internal. External are the most commonly used and easier to operate. The external receiver is similar to a miniature USB drive (flash drive). It connects to the USB connector on the front or back of the computer, either directly or via a USB cable.

The internal adapter is slightly larger and you will need to open the computer case to install it. Therefore, buy an internal receiver only if you are sure that you will be able to figure out how to install it on your own. motherboard. When installing an internal module, you must first disconnect the antenna from it, insert the board into the appropriate port on the motherboard (the PCI interface is most often used for this) and return the antenna to its place.
Further manipulations for installing and turning on wireless adapters do not differ and do not depend on the modification and method of connecting to a computer.
How to install drivers?
Any Wi-Fi receiver is supplied by the manufacturer with a disk that contains the drivers necessary for the full operation of the device. In addition to drivers for specific device, the disk may also contain drivers for other adapter models, so during installation you need to be careful not to miss the choice of the device for which the drivers are being installed.

Otherwise, the procedure for installing drivers is standardized and provided with an intuitive interface with detailed tips from the Found New Hardware Wizard. Just carefully read the messages that will appear on the screen, and click the appropriate "Next", "OK" and "Finish" buttons.
Most adapters are automatically recognized by current computers and can work even without installing drivers from the bundled CD. It is enough to connect the device to the desired connector and wait a few seconds. As a rule, after that, a message will appear in the tray stating that new equipment has been found, identified and installed, which is ready for use. Nevertheless universal drivers cannot completely replace specialized software. Therefore, we advise you not to neglect the installation of drivers, even if everything seems to work flawlessly at first glance.
The driver disk for your Wi-Fi receiver model may also contain special utility from developers, which is designed to facilitate the process of setting up Internet access. Moreover, this utility will allow you to further control your Internet connection, monitor the speed and volume of data transfer.
How to set up wifi in WIN XP?
In this guide, we will assume that your home "Access Point" and the Internet distribution device are already configured.
So, to establish an “air” connection on a computer that has Win XP, you need to do the following:
- Open the "Start" menu;
- Select "Network Neighborhood";
- In the window " Network connections» find the icon «Wireless network connection»;
- Right-click on the icon and click "Properties" in the list;
- In the "General" tab, find the item "Internet Protocol TCP / IP";
- Click the "Properties" button.
If the use of specific ip and dns addresses is critical for your provider, then in the window that opens, check the box "Use the following ip address". If these settings are configured in automatic mode then don't touch anything.

At manual setting ip, you will need to fill in the following fields:
- IP address: 192.168.0.2 (You should check this parameter with your provider, the value may be different);
- Subnet mask: 255.255.255.0;
- In the line "Main gateway" you should enter the address of your router or modem, usually 192.168.0.1 or 192.168.1.1. But in order to avoid errors, it is better to check the documentation of your device;
- Click the mouse to activate the switch "Use the following DNS server addresses" and fill in both fields: the primary and secondary DNS server. Information about the DNS servers used by the provider can be found on the official website of the telecommunications company or by calling technical support;
- Without closing this window, select the "Wireless networks" tab at the top and check the box "Use windows to configure the network" in it. Next, click the "Wireless Networks" button. Here you will see a list of all available connections. Select the connection that is configured on your dispenser and click the "Connect" button. Now, in order to connect to the Internet, it remains to enter the username and password known to you.
How to set up Wi-Fi in Win7?
There are two ways to set up an "air" connection in Win7 OS: in automatic mode and manually. The second option can be useful if the network you plan to connect to is hidden from the general list for security reasons, but you know the name and password to connect your computer to it. Let's consider both methods step by step.
Installing Wi-Fi in Win7 OS in automatic mode
When loaded operating system In the lower right corner of the screen, you can see the "Wireless Network Connection" icon. Click on it. This will open a list of air connections available to you. you need to select from the list the one that is configured in your modem or router.

Installing Wi-Fi in Win7 OS manually
To configure the connection manually, select "Network" in the system tray, then "Network and Sharing Center". Click "Set up a new connection or network". In the next step, check the option "Connect a wireless connection manually" and click the "Next" button.
In the next dialog, fill in all the relevant fields: specify the network name, encryption type and security level. In most cases, the default settings can be left unchanged - use AES and WPA2. In the "Security key" field, you must enter the password for the connection. For more security, check the "Hide characters" box so that the password cannot be read over your shoulder.

The final touch - if you plan to use this connection as the main one in the future, then check the box "Start this connection automatically". Then click the "OK" button.
Installing the device in Windows 8
To enable a wireless connection in Win8, do the following:
- Click on the Wi-Fi icon in the system tree on the taskbar or call the Settings Charm through the Charms Bar (similar to pressing the win + I combination). The Wi-Fi panel will appear with right side screen;
- you will see the entire list of wireless networks available for connection. Select the one that is configured for you and click the "Connect" button;
- The next step is to check the network connection conditions. The system will check the requirements of the selected network and prompt you to enter the necessary data;
- After checking the network requirements, the system will prompt you to enter a password. Enter the security key you know and click the "Next" button;
- If the password is entered correctly, you will see the message "Connection complete", which means that the Internet connection has been established.
How to turn off the device?
To turn off Wi-Fi or edit the data entered earlier, select the icon of wireless networks in the tray (relevant for Win7 and Win8) and in the drop-down list of all available connections choose the one you configured earlier. To disable, use the "Disable" button, and to edit - right-click and select "Properties". In the "Connection" and "Security" tabs, you can either disconnect the device or make changes to the password, encryption type, or security level.

For Win XP, do the following:
- Start menu;
- Icon "Network Places";
- "Wireless connection";
- In the list that opens, select established connection and click the "Disable" button.
In this article, we will talk about how to set up WiFi on your own. Wireless WiFi Networks are forever ingrained in our daily lives. In shopping malls, cultural institutions, hotels and airports, a mobile device can easily connect to free or paid Wi-Fi hotspots. The connection is not only convenient, but also has a lot of other advantages that have influenced the spread of home WiFi networks.
Step one - enter the router settings
As a rule, the moment of connecting the router to a laptop or computer is not difficult for users, but setting up this device can shake your nerves. But in fact, everything is simple.
First, go to the device settings menu using any browser. In the address bar, enter "192.168.1.1" (the router's local address). Then enter your username and password (in both fields, enter "admin"), This will open the path to the settings.
The router menu is made in the form of a standard Internet site, so there should not be any difficulties in understanding the interface.
Step two - set up an Internet connection
We moved on to setting up a WAN connection, in other words, we help the router connect to the provider's network, which will give you access to the Network.

On this, the WiFi router setup has not yet been completed, let's move on.
Step three - set up a Wi-Fi network
It's time to set up your Wi-Fi network. To do this, we go to the category "Wireless mode" (Wireless), where in the subparagraph "Wireless Settings" specify the following parameters: 

So, setting wifi router came to an end. Now let's connect to it on the device itself.
Step Four – How to connect Wi-Fi on a computer or laptop
The final and easiest step. Just find the name of your Wi-Fi router in the list available networks and join it (a field will appear in which you will need to enter a password). Please note that you will have to purchase a Wi-Fi adapter for your computer.
That's all! Use the Internet with benefit and pleasure!
Before attempting or independently connecting to home network as many mobile devices as possible, you need to take care of the main thing: correctly connect and configure the transceiver, or router, Wi-Fi in the house. The user can choose any model from any manufacturer. The principle of setting up Wi-Fi on a PC is the same - and will be discussed in detail below.
Power and Ethernet cable
You can either directly, using a network cable laid by the operator in an apartment or private house, or through a router or router. The latter is more convenient - if only because the user gets a full-fledged Wi-Fi wireless network.
At the same time, it doesn’t matter whether he decides in the future to find the best company and change the old provider for a new one or leave everything as it is for a few more years; the cable for communication is the same, you just need to correct the "input data". To do this is no more difficult than to understand why; once having understood the intricacies of connecting and setting up Wi-Fi, the user will be able to repeat this operation as many times as necessary in the future.
The first step to take to connect to the Internet using a router is to open the box with the device and take a close look at its back wall. Usually all connectors are there; for example, a model from TP-Link was chosen, which does not differ significantly from the others.
On the back of the router, there may be the following connectors necessary to establish a wireless connection (from left to right):
- Pin for connecting the power supply. Routers for home use connect directly to the mains or source uninterruptible power supply; that is why the user must choose a place for permanent placement of the device according to the presence of outlets within reach, the ability to lay an extension cord, and so on.
- Button to enable/disable the Wi-Fi device. It can be placed on the front panel of the router, and also absent on the cheapest models.

- A button or lever to enable/disable the transmission of a wireless signal that does not affect communications with the Internet via cable. Very often absent from routers, but extremely useful - especially if you plan to use the device in order to reconfigure your home wired network.

- Connectors for connecting USB devices and indicators of their operation. They can be used both to update the firmware of the router from a USB flash drive, and to download files directly to removable media without using a computer as a middle link - of course, if such an option is supported by the device itself.

- A connector for connecting an “input” Ethernet cable, or LAN, brought into the house by a provider. In the vast majority of cases, it is painted blue and placed on the rear panel separately from the next block.

- Connectors for transmitting an Internet signal over an Ethernet cable, or WAN. Useful if you want to connect devices that are not equipped with wireless signal receivers to your home network; in addition, one of them (any) will be used during the initial configuration of the router.

- Button for pairing devices according to the WPS standard. It is found on most modern models and, like the power on / off button, can be located on the front panel of the device.

To connect the router to the Internet, the user needs:
- Connect the Ethernet cable to connector No. 5 (blue) until a characteristic click. This allows you to receive a signal from the provider. If in the future you need to remove the wire, you must first gently press the protruding plastic bow, which, depending on the location of the connectors, in the direction up or down - and only then pull the cable.
- Connect the short Ethernet cable that comes with the kit to any of the connectors No. 6 (orange), and the other end to the contacts of the computer or laptop that have the same shape. A wired connection is needed only during the initial setup; then, if the device has a module for receiving and transmitting a wireless signal, it can be removed.
- Connect the device to the network using the power supply offered by the manufacturer. At the same time, you can start a computer or laptop: the next step is no longer possible without a working device.
Advice: if the router is planned to be fixed in a high place (away from a stationary computer), and in the future the user assumes the need to reinstall the Wi-Fi network from scratch, it makes sense to get a long Ethernet cable that will allow you to switch devices, even located at a great distance from each other.
Authorization in "Settings"
Now, correctly and accurately connecting the device to electrical network and the signal of the provider, the owner of the router must go to the "Settings" of the router - a built-in program that allows you to set the optimal type of connection, and use the rest of the available functionality of the device.
For this you need:
- Launch any convenient browser on the computer connected to the router, enter the IP assigned by the manufacturer in the address bar and follow it. Most companies use the addresses 192.168.0.1, 192.168.1.1 and some others to connect the router and the end device; "Your" version can be found either on the bottom panel of the device, or in the instructions attached to it.

- Enter the username and password for administering the device in the dialog box that appears. Most often, manufacturers use the admin / admin combinations by default; other options are possible - like the IP address, the data for authorization in the "Settings" must be indicated on the sticker at the bottom of the router or in the instructions.

- Ready! The user who correctly performed all the described operations ended up on home page"Settings" of your router. Now you need to move on to the next step - familiarizing yourself with information about the router and the current Internet connection.

Advice: sometimes it takes from a few seconds to two to five minutes for the applied changes to take effect. If you connect to global network, following the instructions below, does not work, you should contact your provider: application ping commands, so recommended by a number of "experts", only allows you to make sure that there is no connection, but does not solve the problem.
Introduction to connection options
Before setting up wifi router, you need to thoroughly familiarize yourself with the current status of the device and the network presented on the main page. Sometimes the router connects automatically - and then no further changes are required; in other cases, the information provided by the device will help in a possible dialogue with the provider or in an independent search for answers to questions.
The owner of the router needs to pay attention to the following details:
- Model name and software version.

- Name network card(MAC address), availability of wireless data transmission, channel width and signal transmission type.

- The intended method of connecting to the Internet and the time elapsed since the device was connected.

- The specified information can be rewritten on a piece of paper at the time of setting up the router; in addition, they are always available in the "Status" section - or having a similar name.

"Quick Setup"
To get a stable, properly working Internet connection, it is not necessary to study every section of the main menu of the router; most often, a user who does not have the appropriate skills and knowledge just needs to find the “Quick Settings” / Quick Settings / “Set Up Now” section or similar and use the built-in “Wizard”.
To establish a Wi-Fi connection using Quick Setup, you need to:
- Go to the section of the same name by clicking on the link in the side menu.

- Familiarize yourself with the rules for using the "Wizard" and click on the "Next" button.

- In the drop-down lists on the next page, select your country in sequence.

- City or other locality.

- Provider.

- And the connection type - there can be only one or several items in the menu. In the latter case, it makes sense to immediately clarify “your” option in the contract (or call the provider’s office).

- By clicking on the “Next” button, the user will be taken to the next page of the “Quick Setup”. Here, in most modern router interfaces, it can enable or disable wireless data transmission (for arranging home Wi-Fi, of course, you need to select the “Enable” option).

- Set the name of the Wi-Fi network and indicate the country of residence - this is necessary to ensure a stable working connection to the Internet.

- Here you should also select the type of wireless signal protection. It is recommended to prefer WPA2 option - it is suitable for both new and relatively old devices. In the field below, you must set the network access code - it must be no longer than 63 or 64 characters and no shorter than 8 and can contain both Latin letters and numbers - or both at the same time.

- By checking the box "Additional parameters" (sometimes they are placed in a separate section), the user will be able to set the type of Internet signal transmission - it is recommended to either leave it by default, or select the menu item with the most parameters.

- Channel width - it is better to prefer "Auto" or set the largest value available.

- And the number of channels - here you can also either stop at the "Auto" item, or choose from the parameters "5", "7" or "9" - more, as a rule, is not required to ensure the smooth operation of the Wi-Fi network.

- Now by clicking on the "Next" button.

- The user will be able to complete the quick Wi-Fi setup. It remains to click on the "Finish" button and wait a bit - the Internet will be connected in a minute or two.

If no suitable parameters are found on the first page of the Quick Setup, you should:
- Mark this by checking the bottom checkbox (in some models, in this case, you will need to go to the "Advanced settings" - they will be discussed in the next section), and click on the "Next" button.

- On new page- choose your type of connection to the Global Network by placing a circle in front of the corresponding item.

- Further, if required, enter the login and password assigned by the operator in the text fields. They must be contained in the contract or can be obtained directly from the provider - just call or use the online support form.

- In addition, the user can, if the provider provides such an option, activate a secondary connection by specifying a dynamic (changing) or static (permanent) IP address on the same page.

- Now it remains to configure Extra options router as described above.

- By clicking on the "Finish" button, the owner of the router will be able to start working on the Internet; sometimes, as indicated on the final page of the "Quick Setup", you need to reboot the router.

Advanced settings
If " Quick Setup"The device did not give a positive result, or the user wants to spend more time setting the router parameters, you should follow a simple algorithm:
- Go to the next section of the main menu, WPS, and select by pressing the button whether this option for connecting to the Wi-Fi network will be used in the future.

- If so, click on the "Connect device" button and specify the pairing method: using a pin code containing eight digits, or by pressing a physical button.

- In the "Network" section, in the WAN subsection, set the type of connection to the global network. In the drop-down menu, the user can select a dynamic address - in this case, no more data will have to be specified.

- Static address - you will need to specify the permanent IP set by the provider and other data that can be found in the contract or clarified by calling the company's office.

- PPPoE connection - you will need to enter your username and password in the appropriate fields.

- And also determine the cable connection option: should it be activated by default.

- According to the schedule (at the specified hours) or each time manually.

- L2TP - you will need to enter a login in the text fields, double password and enter your IP address, as well as, if necessary, set the time to connect and disconnect the Internet.

- PPTP - similar to the previous one.

- Remembering to click on the "Save" button at the bottom of the page, the user can go to the next subsection.

- MAC Address Cloning. This step is needed if the provider "binds" the user to the address of the network card; by clicking on the “Clone” button, the owner of the router will set the device to the same address that the computer had.

- To return everything “as it was”, just use the adjacent button “Restore factory MAC address”.

- In the IPTV subsection, the client of the provider offering the Internet TV service can easily enable or disable the proxy for this option.

- It will also set the connection method - for example, by connecting a cable to the LAN connector.

- In the “Wireless Settings” subsection of the “Wireless Mode” section, the owner of the router will be able to configure the signal transmission mode, width and number of channels in the order described earlier.

- By checking the checkbox "Enable WDS", the user can easily configure his router as a "jumper" between already working wireless networks; for home use, this option is not needed in most cases - a signal from modern devices covers the entire area of the apartment.

- In the "Wireless Security" subsection, the user gets the opportunity to choose a data protection method (WPA2 is still recommended) and set a password.

- IN " Additional settings» - set the power of the wireless signal transceiver; We recommend using the High or Medium settings.

- In chapter " USB settings» - tell the system how the modem should be connected correctly.

- In the section "Control bandwidth» - set the maximum speed of data exchange with the Global Network.

- In the "Time Settings" subsection of the "System Tools" section, set the time zone for the router.

- And the rules for switching to daylight saving time and vice versa.

- Now in the "Diagnostics" subsection, you should check the quality of the connection - if such an option is provided for the router model.

- As a result, the owner of the device can change the default username and password required to access the "Settings" by looking in the "Password" subsection.

- Router setup completed; the user can either restart the device using the appropriate button, or start working after a few minutes.

- After closing "Settings", you can check the quality of Wi-Fi manually by calling " command line” and typing in it without quotes and extra spaces ping IP, where IP is the address that was used during the connection setup process.

- If everything is fine, after a few seconds the system will notify the user that there are no lost packets; if the latter is greater than zero or the signal does not pass at all, it is recommended to contact the provider for clarification.

Summing up
To set up a Wi-Fi router yourself, you need to connect it to the mains, an Ethernet cable provided by the provider, and to a computer. The easiest way to establish a connection is to use the "Quick Setup" section; following the instructions of the "Wizard", you can complete the process in a few minutes. A longer way - advanced settings that allow you to configure the router "for yourself", including setting the maximum speeds for incoming and outgoing connections.
Having connected to a new Internet provider, you are unlikely to rush to immediately connect the only end of the Ethernet cable to your computer. Much more convenient (and not much more expensive) will be the use of a router. With it, you can connect many devices to the Internet at the same time - from desktop computers and laptops to smartphones, tablets, TVs, even cameras and doorbells.

Router: pros and cons
What are the advantages of a router over other connection methods (for example, Ethernet modems?)
- Multiple devices connected at the same time (computers, smartphones, tablets, TVs, cameras, etc.)
- Multiple communication methods (Ethernet, Wi-Fi)
- Fine-grained network configuration, particularly security
- Routers have additional functions(for example, working with a built-in or USB-connected drive)
We will consider the most common option today: how to install a Wi-Fi router without additional hardware functions (servers, etc.) and configure it to work with wired and wireless equipment.
The best place
Where is it better to install a router in an apartment or in a house? The answer to this question depends on several factors:
- provider cable. If the experts left a not so long “tail”, you simply won’t be able to get the router somewhere in the kitchen.
- Workplaces. Of course, it would be nice to have optimal reception throughout the house or apartment, but if this is not possible, then you will have to put the router closer to the place where you usually work, be it an office, a balcony or even a toilet.
Try to think over the location of the router so that there are as few concrete barriers as possible between it and your workplace. For a wired connection, this is solved by simply laying the cable.
In some cases (for example, if you have a large house), you will need Wi-Fi repeaters. These are small and inexpensive Wi-Fi amplifiers that can be lifesaving in hard-to-reach places. However, for a relatively small living space (2-4 rooms) correct installation a router in an apartment solves all problems without the help of repeaters.
Connecting the incoming cable
Before installing the router yourself, make sure that the incoming Ethernet cable is properly crimped, that is, it has an RJ45 plug. An ADSL connection using a telephone line requires an additional splitter adapter that splits the signal to the Internet and telephone connection. In either case, the splitter will have the same Ethernet jack (RJ45) to which you need to connect the appropriate cable. It is not difficult to distinguish RJ45 from a telephone plug / socket: RJ45 is larger. 
Find on the router a port signed as WAN (Wide Area Network - external network). It is to him that you need to connect the provider's cable, although there are probably other similar ports on the router. Usually the WAN port is also highlighted in color.
Now you can connect your computer, TV, other devices that require a wired connection to the rest of the output ports.
Programmatically set up the Internet
Although you have already connected the router and the computer with a cable, you will not immediately have access to the Internet. First, find the instruction that you received from the provider: you will need the data from it before setting up a Wi-Fi router (TP Link or any other manufacturer).
Then you need to go from your computer to the router interface. To do this, in the address bar of the browser, instead of the usual address, you must type the IP address of the router. As a rule, this is 192.168.1.1 (if this is not the case with a particular router, you can check this on a sticker on its bottom or in the instructions). 

A page will open in your browser where you need to enter your username and password. As a rule, manufacturers do not philosophize and set the default login “admin” and the same password. Enter your login information, click "Login", and you will be taken to the control panel of the router.
First of all, you need the "DHCP Server" tab. 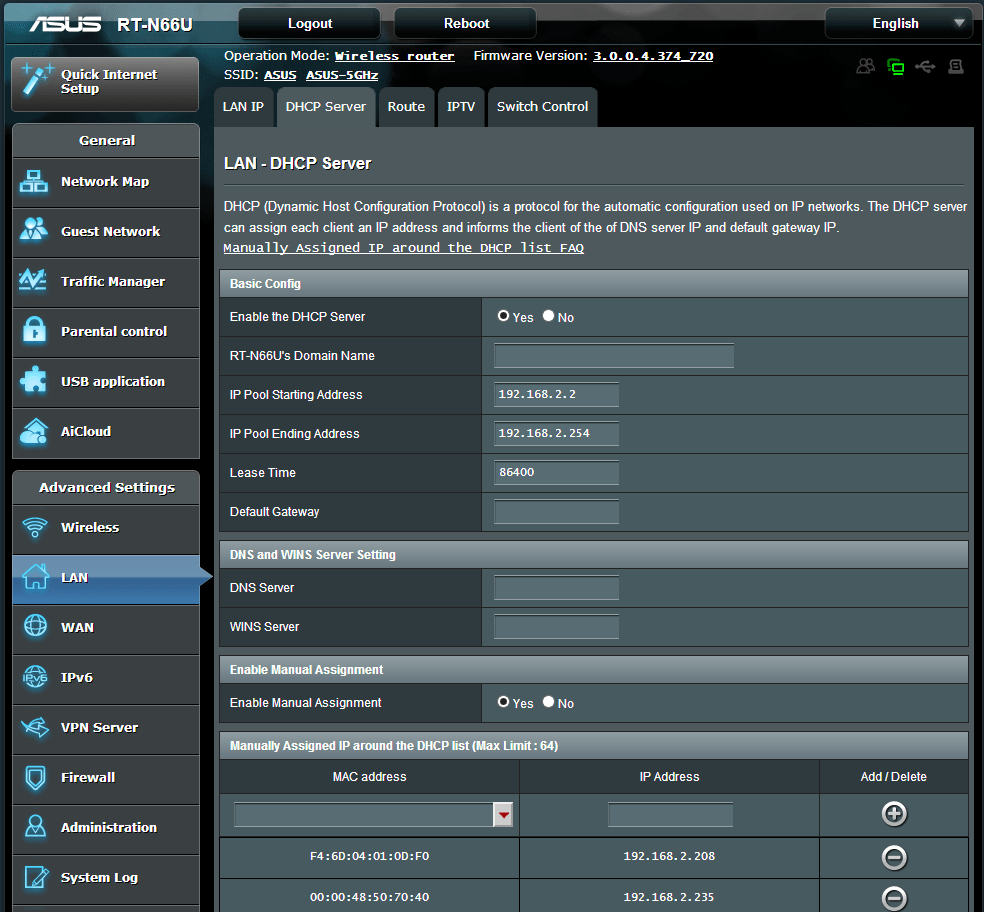
Enter this section and find the Enable button (or Enable) there. Then click "Save" or "OK". If there is no such button in the section, then the settings are saved automatically upon exit.
Specify in the provider's instructions what type of connection you are using - a dynamic IP address or a static one. Dynamic in our case is easier. All you need is to choose given type connections in settings and save them. Sometimes you may need to enter a Hostname.
ISPs rarely offer a static IP address. As a rule, it is needed when you need to remote access to your workplace or keep some publicly available materials on it. But it happens that providers simply offer only this type of connection. When static IP address you will have to manually enter a whole set of data: your actual IP, default gateway, subnet mask and DNS server. All this data must be in the instructions from the provider or in the annex to the contract.
There is another type of connection: PPPoE. If for some reason your provider has chosen it, then you will also have to enter your username and password (twice).
In the web interfaces of routers different manufacturers sections can be organized in different ways, however there is a search engine through which you can find keywords, or a list of sections where you can find the tabs you need.
An important point: even if your computer is a laptop with a Wi-Fi module, for initial setup you still have to connect it to the router using a cable. The fact is that the wireless connection in routers is inactive by default. And the next step is just to turn it on.
Setting up Wi-Fi on the router
As a rule, in the web interface of the router (we hope you have not left it yet?) There is a tab called " Wireless connection". Here you no longer need any data from the provider: how to install a router For WiFi devices- at your discretion.
Enter in the line "SSID" the name by which your network will be recognized by devices. The main thing is that you can later recognize it from dozens of others that today abound in every house in a large city. So come up with some catchy name.
Then come up with a password. Of course, it doesn't have to be "12345" or your first and last name. However, it should be simple enough that (if necessary) you can easily say it to your guests, and they will understand it unmistakably.
Some routers support the "guest access" function (an additional SSID is used for this). Through the guest network, the user can access the Internet, but the administrative panel of the router remains inaccessible to him. If your router has such a function, then it is better to name the SSID with full access somehow incomprehensibly and come up with the most complex password for it, but for guest access it is easier to choose a name and password.
Select a network standard. The more “later” the letter of the alphabet it is, the higher its speed: for example, “b / g / n” will provide faster Internet than just “b / g”. It would seem that what is easier: choose the most advanced mode, and that's it! However, can you guarantee that all your devices support it? Not to mention the gadgets of your guests. Therefore, it is better to leave the move for compatibility with older standards.
Select a security standard. The most popular option today is WPA-PSK/WPA2-PSK mixed. This type of encryption reliably protects data and does not slow down the work with them.
If your router is equipped with a built-in hard drive or a USB port for connecting it, then, of course, I would like to provide access to it from several devices. For example, you work on documents in the office, from a desktop computer, but later want to go to the balcony with a laptop and work in greater comfort, in the fresh air. Or you want to open downloaded movies directly on your TV. Then you will need to find a list of trusted devices and add all devices (laptop, TV) to which you give access to memory.
You can limit the number of simultaneous connections to the router. If you do not want to do this, leave the number 0 in the "Connection limit" line - this means no limits.
When choosing a place for a router in an apartment, do not forget: sometimes you will need to reboot it manually, so you should not hide it very high. Although if you have children or playful animals, then it's probably better to play it safe.


