Despite the apparent ease of access to the general Windows folder from Linux, some users, especially those who have just started using Linux, may encounter a problem that, at first glance, may turn out to be insoluble. At the same time, Windows users will say “I don’t know anything - bullets fly out of me.” To avoid the impression that Linux is “buggy”, let’s try to understand this issue.
The private issue of working in home network Linux with a Windows XP shared folder for the purpose of changing data in it, that is, writing and deleting. The content of the publication does not disclose work with later Windows versions(although the situation with them may be similar), as well as working in domain networks, that is, in networks with centralized management of the password policy and user database, for example, Windows Active Directory.
So, on Windows the folder opens public access. But when a Linux user accesses this folder through the network environment, it turns out that it is impossible to “reach” even the node.
At the very beginning, you may encounter the problem of lack of access even to the workgroup.

This may be explained by a slight inertia during the first access via the SMB protocol, which is used to access folders and Windows files from the network. Wait a little, at least a few seconds, and try again. Eventually you will “see” the computer.

Upon further access, a form for requesting access permissions will be displayed, for example:

The Linux user enters his password and... again receives the same request form on the screen. And this can continue indefinitely.
The reason is that in both Linux and Windows, in order to ensure security at the level file system The so-called rights to files and folders apply. And in this case Linux user tries to access a Windows folder using its name and password, which Windows has no idea about. You must access the resource using the data that Windows “knows” about. That is, using some username and Windows password, which Windows is familiar with.
Since in Russian speakers Windows names users can be Cyrillic, that is, for example, Administrator, Vasya, Petya, beauty, etc., then for the purpose of providing access to the folder, ask the administrator Windows computer create a user with a Latin login or rename an existing login to Latin letters. For example, you can create a special user
which will have a permanent password and will be in the "Users" group. This can eliminate possible further cases of “system misunderstanding” between Linux and Windows.
The permissions for the shared folder need some adjustment, since by default users are assigned read-only permissions.
Explanation. To see the full contents of the "Security" tab on a Windows system, open Explorer and in the "Tools - Folder Options - View" section, uncheck the "Use simple file sharing" box.


There is no need to set “Full Control” either on the “Access – Permissions” tab or on the “Security” tab, although many people do just that. Full control implies permission to change both the permissions on an object and its owner. And if to some extent this may be acceptable within a home network of 2-3 computers, then in other cases it is better not to do this.
It’s better to check the “Change” box (All are active, that is, not disabled, Accounts users on a Windows computer).

Next, you need to go to the "Security" tab and for Windows computer users, check the "Record" box.


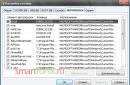
But that's not all. You need to click on the "Advanced" button and for the line with the change made (column "Permission - Write") add checkmarks in the fields "Browse folders", "Folder contents", "Delete subfolders and files", "Delete".


At the same time, check the box “Apply these permissions to objects and containers only inside this container” (see the figure above).
Wow, so many things. Some kind of Mexican passion. And all this must be done on Windows.

Now let's return to the issue of accessing the folder from Linux. Enter the correct values. Instead of
specify the username in the format computer\user. Since the computer being accessed is called H-38, and the DHCP server operating on my small network assigns the domain name vot, I enter the necessary data and finally receive a list of shared resources on the H-38 computer.


As you can see from the figure, the Samba client displayed not only the Data folder, but also the hidden ADMIN and C resources used by Windows system for administrative purposes (hidden Windows resources are displayed with a $ icon after the resource name).
However, when you try to access the Data folder, the system again prompts you to enter your credentials. By default, you are offered to connect anonymously.

Remember that the sharing was made for Windows users. Therefore, you must enter a specific username and password.
If the Windows user password will never change (and at the very beginning it was recommended to create a user on Windows with an unchangeable password), then you can select “Remember forever” and then the password will not be requested in the future when accessing the shared folder. The same is true for accessing a computer. In the examples given, the password is not saved.
In the process of working with a computer, a variety of tasks arise, one of which is setting up local network. In this article we will take a closer look at how to configure a local network in the Ubuntu operating system. So let's get started.
Setting up a local network in Ubuntu is done using commands.
Console network configuration in all Linux-like operating systems, including Ubuntu, is carried out using the special ifconfig command. If you simply enter this command in the terminal, the console will show all the network interfaces that are running on the PC at that moment. It looks like this:
eth0 Link encap:Ethernet HWaddr 00:04:75:c1:e2:ab
inet addr:10.2.10.32 Bcast:10.2.10.255 Mask:255.255.255.0
….
….
eth1 Link encap:Ethernet HWaddr 00:04:75:c1:e2:6b
inet addr:192.168.140.1 Bcast:192.168.140.255 Mask:255.255.255.0
….
….
lo Link encap:Local Loopback
inet addr:127.0.0.1 Mask:255.0.0.0
….
….

The first column contains the names of the interfaces, and the second - the settings of these same interfaces. The ifconfig eth0 command displays the settings for the eth0 interface only. To disable or enable the eth0 interface, enter the commands:
sudo ifconfig eth0 down
sudo ifconfig eth0 up
Please note that so-called superuser rights are required to manage interfaces.
To change interface settings, write the following commands:
sudo ifconfig eth1 inet 192.168.140.1
change the IP address of the eth1 interface to 192.168.140.1
sudo ifconfig eth0 hw ether 00:12:34:56:78:90
will change the MAC address to 00:12:34:56:78:90
sudo ifconfig eth0 netmask 255.255.255.0
change the subnet mask of the eth0 interface to 255.255.255.0
However, settings set in this way are reset after the computer is restarted. To avoid this, you should change the settings in the network interfaces configuration file, which is located in /etc/network/interfaces. This file looks like this:
# This file describes the network interfaces available on your system
# and how to activate them. For more information, see interfaces(5).
# The loopback network interface
auto lo
iface lo inet loopback
# The primary network interface
auto eth0
iface eth0 inet static
address 10.2.10.32
#hwaddress ether 12:34:56:78:90:12
netmask 255.255.255.0
network 10.2.10.0
broadcast 10.2.10.255
gateway 10.2.10.1
dns-nameservers 212.212.45.174
# The secondary network interface
auto eth1
iface eth1 inet static
address 192.168.140.1
netmask 255.255.255.0

To set the DNS server address, go to the /etc/network/interfaces file, but note that usually managing DNS server addresses in Ubuntu is done through the /etc/resolv.conf file, the syntax of this configuration file is extremely simple, and looks like this
nameserver 80.227.64.17
nameserver 80.231.56.1
After making changes to these configuration files, restart the network service using the command:
If you need the computer to receive network settings dynamically (via DHCP), write the following lines in the /etc/network/interfaces file:
To dynamically update network parameters, write:

To stop or start the network service, use the commands:
sudo /etc/init.d/networking stop
sudo /etc/init.d/networking start
If you look at the configuration file in question, in the eth0 interface settings the line that changes the MAC address is commented out. This is done because if you do not comment it out, the network service may not start, and to change the MAC address you may need to write:
sudo ifconfig eth0 down
sudo ifconfig eth0 hw ether 12:34:56:78:90:12
sudo ifconfig eth0 up
sudo /etc/init.d/networking restart
Alternatively, you can write a bash script.
In the /home/user folder, create a file called mynetconfig and copy the code into it:
echo “########OTKLYCHENIE eth0#######”
sudo ifconfig eth0 down
echo “#####MENYAEM MAC ADRES#####”
sudo ifconfig eth0 hw ether 00:13:8f:cb:10:21
echo “########VKLUCHAEM eth0#########”
sudo ifconfig eth0 up
echo “####PEREZAGRYGAEM NETWORKING####”
sudo /etc/init.d/networking restart
echo "KONEC"
Now, instead of these lines, you only have to write one command: /home/user/mynetconfig
Next, copy the mynetconfig file to the /use/local/bin directory. Now you can run the script simply using the mynetconfig command. To make the script run immediately when the system boots, copy it to /etc/init.d/, and then open the console and go to /etc/init.d/, then run the command:
update-rc.d mynetconfig defaults 99,
where mynetconfig is the name of the script;
defaults - execute in all boot modes from the second to the fifth;
99 - boot order.
To remove a script from startup, open the /etc/init.d/ directory and write:
update-rc.d -f mynetconfig remove
There is another way to add a script to startup. You just need to enter the name of the script in the /etc/rc.local file or delete it if you want to remove the script. The first method is somewhat more complicated, but you should give preference to it, since in this case you can choose the order and boot mode, which may be important in some situations.

Now let's look at how to connect network drive in Ubuntu. This is done quite simply. First, open the Go menu and select Connect to Server. In the window that opens, you will need to specify the type of service and other general data. Click the "Connect" button. Next, you will need to enter your password and click on the “Connect” button. Ready. Everything is quite easy and fast.
Now you will know how to set up a network yourself via the console in Ubuntu, as well as how to map a network drive. Write in the comments whether you managed to cope with this task, share your experience with other users, and ask any questions that interest you on the topic of this article.
Before you start setting up a network connection in Linux, you need to start by looking at what network settings are currently in use. To do this you need to use the command ifconfig. In information mode, it is also available without ROOT rights, although to fully use it it is better to obtain superuser privileges by entering the command sudo ifconfig. The result of its work will be a list of network connections available in the system and their parameters.
IN different versions Linux name network interface may be short for Ethernet - eth0, eth1, eth2, etc.
On the interface lo - short for loopback - that is, a local loop with the address 127.0.0.1.
For example, consider the Eth0 interface.
In line inet addr The current IP address of the computer on the local network connected to this network card is displayed. In the example this is: 192.168.1.144
Bcast- this is a broadcast address on the network, the so-called Broadcast.
Mask is the network mask.
HWaddr is the hardware address network card, also known as the MAC address used at the data link layer.
Information about current connections learned, now let's look at setting up a local network in Linux. You can do this in three ways:
1 - Through the graphical shell
2 - via command ifconfig or tool Network Manager
3 - through the configuration files of the Netork or Networking network service.
In my opinion, the last method is the most convenient and reliable, and therefore correct. To configure a network in Linux, you need to open the file containing the interface config. It all depends on what Linux distribution used.
Option 1. On Debian-based distributions (Ubuntu, Kubuntu, etc.)
File with network connection parameters:
/etc/network/interfaces
In order to change network settings in Linux, you need the file from root rights any text editor. For example, via nano:
Sudo nano /etc/network/interfaces
To automatically obtain addresses from a DHCP server, you need to write the following:
Allow-hotplug eth0 iface eth0 inet dhcp
If the address needs to be specified statically, then indicate the following:
Allow-hotplug eth0 iface eth0 inet static address 192.168.1.2 netmask 255.255.255.0 network 192.168.1.0 broadcast 192.168.1.255 gateway 192.168.1.1 dns-nameservers 192.168.1.1
This config describes an example of a regular home network, where the computer address will be 192.168.1.2, the address of the gateway and DNS server (their functions are usually performed by a wifi router).
Option 2. RedHat-based distributions (Fedora, OpenSuse, CentOS)
Linux network settings file:
/etc/sysconfig/network-scripts/ifcfg-eth0
We also open it via nano or vim:
Vim /etc/sysconfig/network-scripts/ifcfg-eth0
In case of automatic receipt of settings from the DHCP server:
DEVICE=eth0 BOOTPROTO=dhcp HWADDR=00-1C-1B-11-F6-07 ONBOOT=yes
Static IP address:
DEVICE=eth0 HWADDR=00-1C-1B-11-F6-07 IPADDR=192.168.1.2 NETMASK=255.255.255.0 BROADCAST=192.168.1.255 GATEWAY=192.168.1.1 ONBOOT=yes
In this case, the IP addresses of DNS servers are written in the file
/etc/resolv.conf
Here is an example for public DNS servers from Google:
Nameserver 8.8.8.8 nameserver 8.8.4.4
Network setup in Linux is complete. All that remains is to restart the network with the command:
Service network restart
That's all.
As a postscript, I’ll tell you how to turn the network on and off in Linux. This is done through the same ifconfig command. Disable network card eth0:
Sudo ifconfig eth0 down
Enable the network card back in Linux:
Sudo ifconfig eth0 up
Completely stop all network interfaces.
Service network stop
/etc/init.d/network stop
Turn everything back:
Service network start
/etc/init.d/network restart
To systematize information on setting up a network in Linux OS, it was decided to write this note. Here, the process of setting up a network interface is described in an accessible form using the Ubuntu OS as an example. Also this manual will help to “raise” the local network on any other Linux distribution.
To view the current network parameters and the status of network interfaces in Linux, there is a command:
Example output:
eth0 Link encap:Ethernet HWaddr 00:11:5b:91:25:3e
inet addr:192.168.1.18 Bcast:192.168.255.255 Mask:255.255.0.0
inet6 addr: fe80::211:5bff:fe91:253e/64 Range:Ref
UP BROADCAST RUNNING MULTICAST MTU:1500 Metric:1
RX packets:648009 errors:0 dropped:0 overruns:0 frame:0
TX packets:1075413 errors:0 dropped:0 overruns:0 carrier:0
collisions:0 txqueuelen:1000
RX bytes:70177943 (70.1 MB) TX bytes:1536487024 (1.5 GB)
Aborted:19 Base address:0xd000
inet addr:127.0.0.1 Mask:255.0.0.0
inet6 addr: ::1/128 Range:Node
TOP LOOPBACK RUNNING MTU:16436 Metric:1
RX packets:106 errors:0 dropped:0 overruns:0 frame:0
TX packets:106 errors:0 dropped:0 overruns:0 carrier:0
collisions:0 txqueuelen:0
RX bytes:13776 (13.7 KB) TX bytes:13776 (13.7 KB)
To view absolutely all network interfaces, run the command with the key -a:
# sudo ifconfig -a
From the above example it can be seen that the computer uses two network interfaces: eth0 And lo.
Interface lo is a local loop that has an IP address of 127.0.0.1 and is intended for network access to your own computer. This interface will not be considered further, since for efficient work does not require additional configuration.
Interface eth0 is an Ethernet network card that has network parameters: IP address - 192.168.1.18 , network mask - 255.255.0.0 and MAC address - 00:11:5b:91:25:3e. Meaning RUNNING shows that in this moment network interface eth0 is working.
To view the connection type, speed and parameters supported by the eth0 network interface, type the command:
# sudo ethtool eth0
Conclusion:
Supported ports: [TP MII]
Supported link modes:10baseT/Half 10baseT/Full
100baseT/Half 100baseT/Full
Supports auto-negotiation: Yes
Advertised link modes: 10baseT/Half 10baseT/Full
100baseT/Half 100baseT/Full
Advertised auto-negotiation: Yes
Speed: 100Mb/s
Duplex: Full
Port: MII
PHYAD: 1
Transceiver: internal
Auto-negotiation: on
Supports Wake-on: pg
Wake-on:d
Current message level: 0x000000c5 (197)
Link detected: yes
From the output you can see that the eth0 network interface operates at a speed of 100Mb/s with Full Duplex enabled. Full duplex differs from half duplex (Half Duplex) in that the first ensures data transmission in both directions simultaneously, and the second transmits incoming and outgoing data alternately.
2. How to stop/start or reboot the network interface?
To stop the eth0 network interface there is a command:# sudo ifconfig eth0 down
The command is easy to remember, since after the name of the command itself comes the name of the interface and then the action that needs to be performed on it (down or up).
To resume network interface eth0:
# sudo ifconfig eth0 up
To restart all network interfaces of the OS, enter the command:
# sudo /etc/init.d/networking restart
This line runs the networking bash script, which restarts the system's network interfaces.
Also, by analogy, all interfaces are stopped:
# sudo /etc/init.d/networking stop
And their launch:
# sudo /etc/init.d/networking start
3. How to change network settings?
To change network settings in Linux OS, you can go in two ways:- use commands to assign network interface parameters;
- edit the configuration file containing network interface parameters.
You can configure the network using one of the above methods. These two methods are absolutely interchangeable. To whom it is more familiar.
- Network setup using commands.
To configure a network interface without getting into the jungle of a configuration file, you need to use special commands.
To set the primary IP address and netmask for interface eth0:
# sudo ifconfig eth0 192.168.0.1 netmask 255.255.255.0
To assign an additional IP address to the eth0 interface:
# sudo ifconfig eth0:0 10.10.0.1 netmask 255.255.255.0
- Setting up the network by editing the configuration file.
We will edit the configuration file /etc/network/interfaces. To display the contents of the config, type the command:
# sudo nano /etc/network/interfaces
If the local network to which we are connecting implies manual setting IP addresses, then the contents of the configuration file should look something like this:
iface lo inet loopback
auto eth0
iface eth0 inet static
address 192.168.1.18
netmask 255.255.0.0
gateway 192.168.1.253
We leave the first lines as is, since they additional customization not required.
Line auto eth0 says that the eth0 network interface should start when the OS boots.
Second line iface eth0 inet static says that the IP address for the eth0 network interface is assigned manually.
Line address 192.168.1.18 says that the network interface eth0 is assigned the IP address 192.168.1.18 (this network address taken as an example and anyone else can take its place).
Line netmask 255.255.0.0 says the netmask is 255.255.0.0.
Last line gateway 192.168.1.253 shows that the network gateway is a computer with an IP address of 192.168.1.253. This line may be missing because its presence in configuration file depends on the parameters of the local network to which the computer being configured is connected.
If the connected local network uses automatic distribution network settings by the DHCP server, then the configuration file /etc/network/interfaces should be reduced to the form:
iface lo inet loopback
auto eth0
iface eth0 inet dhcp
4. Additional network settings: DNS servers, MAC addresses and network interface speed.
Setting up a DNS server.
Also, in many cases, for the local network to work correctly on the computer you are setting up, you will need to enter the IP address of the DNS server being used.
To do this, open the configuration file with the command:
# sudo nano /etc/resolv.conf
Conclusion:
# Generated by NetworkManager
nameserver 192.168.1.253
Line nameserver 192.168.1.253 says that a computer with IP address 192.168.1.253 is used as a DNS server.
Changing the MAC address of the network card.
To temporarily change the MAC address of the eth0 network card, you need to use the command:
# sudo ifconfig eth0 hw ether 00:01:02:03:04:05
The last number is the new MAC address.
To change the MAC address permanently you need to do it in the configuration file /etc/network/interfaces add a line with the new MAC address to the network interface settings:
iface eth0 inet dhcp
pre-up ifconfig eth0 hw ether 00:01:02:03:04:05Change the speed of the network interface.
To strictly set the network card speed:# sudo ethtool -s eth0 speed 100 duplex full autoneg off
# Force the speed of the network interface to 100Mbit and Full Duplex mode and disable automatic detection
# sudo ethtool -s eth0 speed 10 duplex half autoneg off
# Force the speed of the network interface to 10Mbit and Half Duplex mode and disable automatic detection
Random 7 articles:
Comments
- sergo
1 November, 23:27thank you very much for the article! I recently switched to Linux, it really helped, can you tell me if there are two networks in the computer, one has network dns-server 192.168.0.9, and the other, for example, 192.168.1.9, it would be correct to write resolv.conf in one file
nameserver 192.168.0.9
nameserver 192.168.1.9
Will network users understand which dns?
And is it possible to assign a name to a network card in Linux, for example eth0 is loc, and eth1 is prov? -
Mut@NT
2 November, 00:071. DNS can be specified both, but network masks should be specified as 255.255.255.0. Then they will use their own DNS.
2. I don’t know about the names of the networks. I think it’s possible, it’s Linux!!
- sergo
2 November, 03:44turn off the interface
ifconfig eth0 down
give the command
ifrename -i eth0 -n new_name (for example local)
ifconfig local up
then in your Linux you will probably need to change some eth0 to local in the /etc/network/interfaces file, I just have an alt, and this file doesn’t exist at all, I have /etc/net/ifaces/folders_with_interfaces, and now I need the eth0 folder rename it to local, and then
service network restart:) -
Mut@NT
2 November, 08:45I'll have to add it to the article, thanks))
-
GPS
14 May, 17:36I think it's worth checking the line: sudo ifconfig eth0:0 10.10.0.1 netmask 255.255.255.0
An alias cannot have a /24 mask (255.255.255.0), this is not an error, because in any case, the eth0:0 interface will be assigned a /32 mask (255.255.255.255)
In your case it will be: sudo ifconfig eth0:0 10.10.0.1/32 - Mut@NT
16 May, 12:02GPS: I think it’s worth checking the line: sudo ifconfig eth0:0 10.10.0.1 netmask 255.255.255.0 The alias cannot have a /24 mask (255.255.255.0), this is not an error, because in any case, the interface eth0:0 will be assigned a mask /32 (255.255.255.255) In your case it will be: sudo ifconfig eth0:0 10.10.0.1/32
Damn, you turned my whole mind upside down. We will have to redo the network interface settings on the computer, which have been working for almost 2 years.
Why then the team ifconfig does the mask that I set appear? -
GydruS
13 September, 23:32In simple terms! Clear and understandable! Thanks a lot!
P.S. Only in command input listings it would be nice to make the font one where 0 is visually different from O. - Mut@NT
14 September, 18:34GydruS: P.S. Only in command input listings it would be nice to make the font one where 0 is visually different from O.
Thank you, I'll take note. Although there seems to be a difference, to a point)
- andrey
18 September, 23:50thanks for your site. I like! everything is intelligible and understandable
I have the following question for you. If possible, please tell me how to set up the network so that LAN and DSL connections work simultaneously.
I can’t figure out how to do this???!! - Mut@NT
20 September, 07:18andrey: thanks for your site. I like! Everything is intelligible and understandable. I have a question for you. If possible, please tell me how to set up the network so that LAN and DSL connections work simultaneously.
To be honest, I haven’t encountered DSL connections for a long time. Tell us in more detail:
1. What local network? Behind the modem or on another network? - andrey
20 September, 18:38the most common connection is a city network
the computer is connected via a network card
Internet access is connected via a DSL connection - Mut@NT
21 September, 17:22andrey: The connection is the most common - city network; the computer is connected via a network card; Internet access is connected via a DSL connection.
In my opinion, you need to configure the modem itself. Look away Dual PPPOE
I did something similar on the D-Link DIR-320 router, but never on a modem. - andrey
21 September, 18:22Thank you!!! I will look for!
- Serpent22
3 November, 06:21Speaking of DSL over a local network: I spent a lot of time, rummaged through a lot of mana (I have Debian Lenny) and in order to save other people from the same rake, I’ll say that pppoeconf does not help everyone, for example, for me, the Internet appeared for a couple of seconds and miraculously disappeared . Configs and logs didn't help. But after two weeks and a lot of clumps of torn hair, I came across a simple command ifconfig ppp0 mtu 1372. I hope this helps someone. I spoke out and it became easier)))
- nick
7 December, 09:17Good afternoon, in my etc folder there is neither a network folder nor a net folder, I have centos 5.7, tell me what to do
- Marina
27 December, 21:12Hello, this problem happened. The computer is connected to the Internet via a router.. The problem is that some sites do not open - it says a dns conversion error.. What needs to be done. so that everything works fine?? Thank you in advance!!
- daddy
30 July, 17:05Artem: 2 network cards. one Windows network with a domain. the second one is plugged into an adsl modem with PPPoE connection. How can I make it so that I can work online and on the Internet?!
for example, write routing rules on the machine so that packets intended for the local network are sent to etn0, and all others to etn1
but this topic is beyond the scope of this article. -
Complover
29 August, 03:01Quite a good article. Thanks a lot
- valera
21 January, 07:20I've only been using Linux for 3 months, but I've already tried about 17 things, but no one wants a DSL connection\immediately cuts off the local connection\ I left zorin and now set ALT - I work like at home, but for the Hryusha network\7 - I demolished it like everyone else\.if- I wish I had a network on ALT for the rest of my life... I’ve only mastered a computer for about 7 years – I’m already old.