Which users have to meet most often. But, this time a specific situation will be considered, namely, what to do if, after replacing motherboard appears when the system boots blue screen with error 0x0000007B.
That is, for example, if you decide to improve your computer with a new motherboard or, if necessary, you had to replace it, due to the fact that the old one simply failed, then after connecting the hard drive and trying to boot from it, you will most likely encounter a blue screen that will display error 0x0000007B.
Even if you are going to completely update your computer, including HDD, and you decide to clone the operating system from the old HDD to it, then again, after the system starts to boot, error 0x0000007B will immediately appear on the screen. In some cases, of course, it happens that you are lucky and everything starts up normally, but unfortunately this very thing happens quite rarely.
Error 0x0000007B after replacing the motherboard, usually appears due to a change in bus controller ATA/SATA. That is, Windows after replacing the mat. the board cannot automatically select the necessary driver for the new controller, as a result of which, at boot, the system detects the absence of a driver as damage file system, denoting this problem error 0x0000007B.
In general, this manual details how you can replace the motherboard without reinstalling the system, and at the same time bypassing the 0x0000007B error. Below, two methods will be provided in the form of an automatic and manual way to fix this trouble.
Fixing error 0x0000007B after replacing the motherboard
I want to disappoint you right away that with the help of the operating system's own means, it will not work to restore its performance. Even installation disk with its recovery environment here will prove to be useless. Also, another important point that I forgot to mention earlier is that this method of fixing error 0x0000007B is not suitable for Windows XP.
essence this method the fix is that we will need to edit some parameters in the system registry, well, I think you yourself understand that you can do this with a non-working operating system only with using LiveCD disk.
For this task, you can use quite handy tool titled " ERD Commander". Of course, first, we will need to download it to our computer using one of the links provided below.
Now, using the image and USB drive, you need to create bootable flash drive with "ERD-Commander". You can find the procedure for burning a liveCD to a USB flash drive, and you can find a few more options by clicking on. Also, if you wish, you can burn this LiveCD to a regular .
So, I hope you managed to write ERD-Commander without any problems and your usb drive is ready to fix the error 0x0000007B that appears after replacing the motherboard.
So, having connected the drive to the computer, we try to boot from it using boot menu(F8 ... F11) or by setting the BIOS to boot from a USB flash drive in advance.
If you are asked about network connection, click " No (No)».
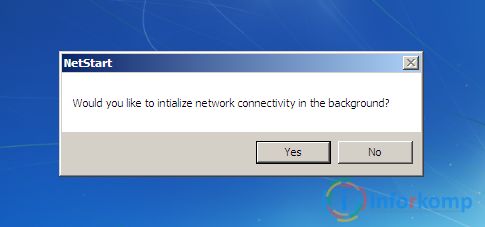
We answer the next question about remapping disks in the affirmative by clicking on " Yes (Yes)».

In the window for choosing the layout language, leave "US", go to the next step.

Detection starts immediately installed system, if you have one, and for sure this is the case, then just click on the button " Further". If there are several of them, select the one with which the download will occur and only then proceed to the next step.

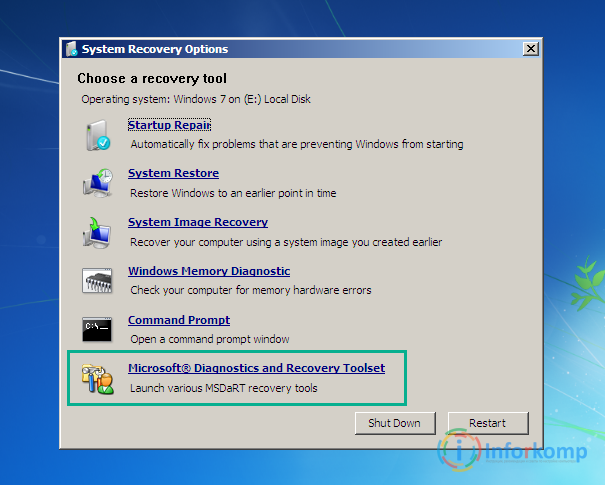
There is a possibility that the process of fixing problems that prevent the system from starting normally may start if the computer was not turned off correctly the last time. In this case, you can carelessly click on " Cancellation” and go directly to the menu of interest to us. If you are asked to confirm the completion of the restore process, you can click on " Yes».
In the list of available tools for system recovery, select the most last line:
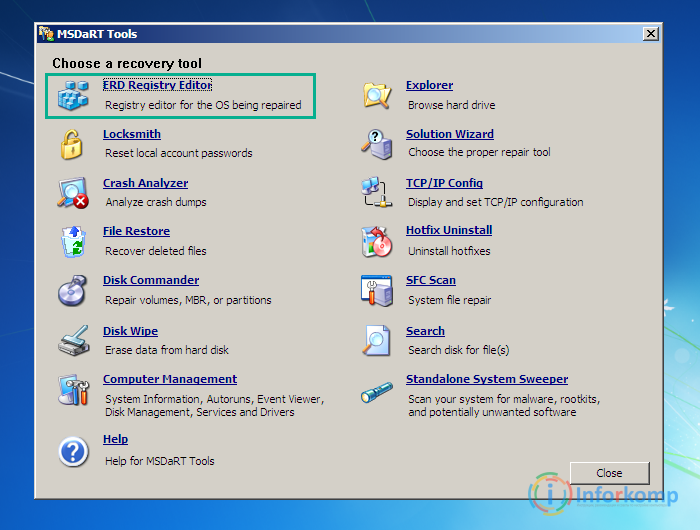
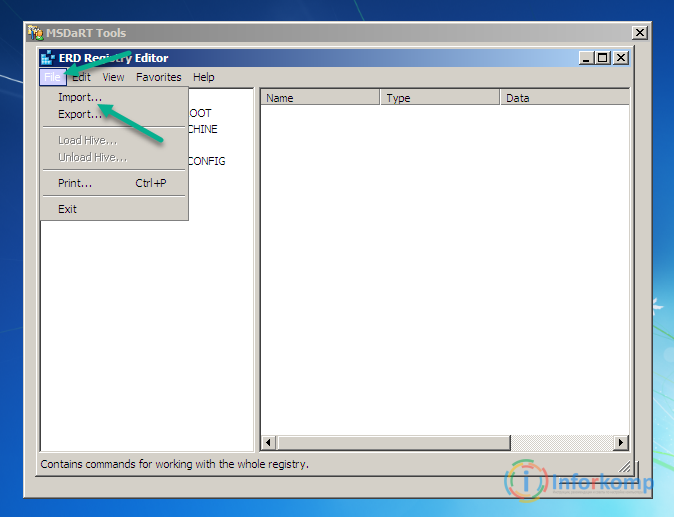
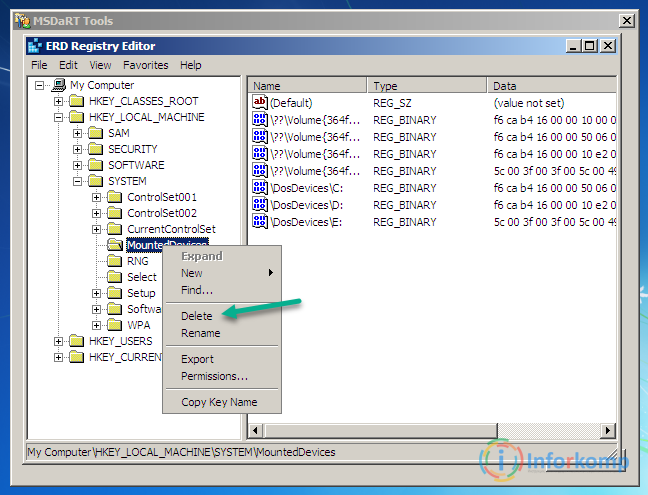
So, the Registry Editor window should appear. First, I recommend trying the method with automatically changing all registry settings by simply importing the .reg file. Well, and then if nothing works out, proceed to the manual correction of all the shortcomings.
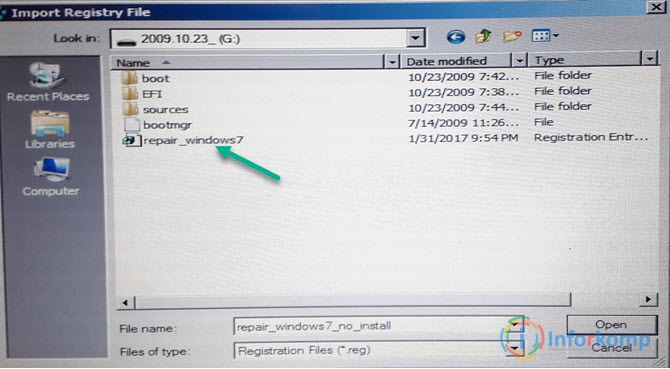
Download the reg-file with the keys already fixed and move it to the flash drive with ERD-Commander, leaving it right in the root of the usb-drive.
Now, back to the running registry editor, where we select " File (File)» – « Import».
An explorer will appear in which we click on the computer icon and open the USB flash drive.
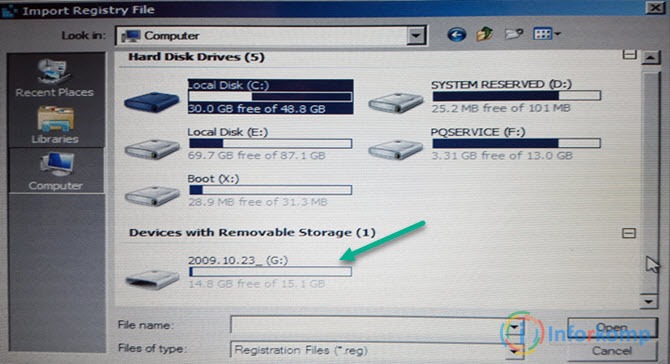
Immediately at the root you will find the reg file you saved. By clicking on it, click on the button " open».
After that, a message about the successful import of the file should appear. Now, we are trying to reboot and see if you managed to cope with the error 0x0000007B that appeared after replacing the mat. fees.
Manual fix for error 0x0000007B
So, if you did not succeed with importing a reg file with already fixed keys, then let's try to do it manually.
Error 0x0000007B still appears
If, after performing manipulations with the registry, after restarting the computer, a blue screen with 0x0000007B still crashes, then the necessary driver has not loaded, in this case, you can check a few more keys in the registry by enabling the loading of other available drivers.
The scheme is the same, we find the section, open the "Start" parameter and set the value to "0".
Sections to check the value of the "Start" parameter.
| We assign the value "0 × 00000000 (0)" to the "Start" parameter | |||
|---|---|---|---|
| adp94xx | HpSAMD | MegaSR | vhdmp |
| adpahci | iaStorV | nfrd960 | vsmraid |
| adpu320 | iirsp | nvraid | aliide |
| aic78xx | LSI_FC | nvstor | cmdide |
| amdsbs | LSI_SAS | ql2300 | nvraid |
| arc | LSI_SAS2 | ql40xx | viaide |
| arcsas | LSI_SCSI | SiSRaid2 | |
| elxstore | megasas | SiSRaid4 | |
After making the changes and restarting the computer, operating system should boot in normal mode, but the error 0x0000007B with a blue screen should disappear and no longer bother you.
If the system motherboard was replaced, most likely your operating system will not boot into normal mode. On the monitor screen, you will see a critical error in the form of a "blue screen of death" (BSoD). The common practice to solve this problem is to reinstall Windows. Many may be surprised, but motherboard replacement without pen Windows installation - problem solved and detailed instructions we will suggest later in this article.
The appearance of such a screen means that the hardware (controller driver) is incompatible, because the old hardware had a different kind of controller. In this case, you can solve the problem as follows: change the controller driver to the built-in Windows one. After such a substitution, the system will boot up and it will be possible to install the driver that comes with the new board.
Instructions for replacing the board for Windows XP
First way
If the board to be replaced is intact and it is possible to boot from Windows XP, then in this case it is necessary to install standard drivers for motherboard controllers. Select the desired controller, in the properties go to the tab " Driver” and click on the Update… button.

We refuse to search for a driver on the Internet, click Next\u003e, make a choice on "Install from a list or specific location", put the switch in front of "Do not search. I'll choose the right driver myself" and click Next >. According to the list of drivers, you must select " Standard Dual Channel PCI IDE Controller” and click Next > .

After the installation of the standard driver is completely completed, you must turn off the computer and replace outdated equipment to new. After Windows is fully loaded, install the necessary driver from the supplied disk drive for new equipment.
Second way
If for some reason your motherboard has stopped functioning and there is no way to log into the system from it, then you need to do more complex operations. This method requires installation disk Windows XP.
In order for Windows XP to boot after installing a new motherboard, you need to do some things:
- install new hardware (motherboard);
- do bootstrap from the Windows XP installation disk drive, press Enter to begin the XP installation process.
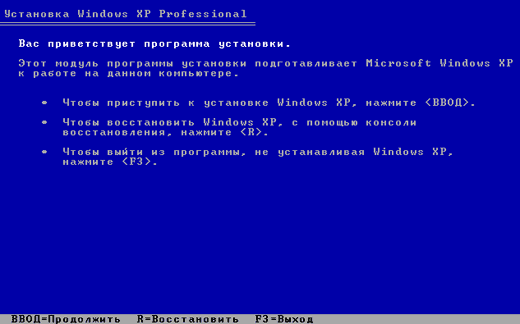
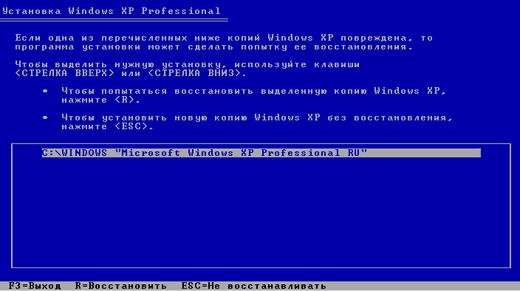
To restore the installed OS, select it and click on R. The recovery process is very similar to the Windows XP installation process.
After the recovery process, install required drivers For new board, the rest of the software and the user's personal data will be intact.
How to change the motherboard for Windows 7
There are several factors that affect the trouble-free replacement of the main board in a Windows 7 computer. The important factors are:
- motherboard model (differences in motherboards);
- the need to change platforms (Intel to AMD).
Preparation stage
Before starting any manipulations with the computer, it is advisable to do old OS image. This operation is simple and can save a lot of time and nerves in the future. The image is made by programs:
- Paragon Backup & Recovery Free;
- Norton Ghost;
- DriveImage XML;
- Acronis True Image.
Why does changing the board entail reinstalling the operating system? The most common reason is that the motherboard drivers are not suitable. The most whimsical ATA/SATA controller drivers, they don't work with new hardware. To avoid these problems, you just need to get rid of old drivers that may cause a conflict by removing them from the system.
Removing old drivers
Using the program sysprep, remove information from Windows along with drivers. It was for this reason that it was necessary to make an image of the system. This utility will not affect user settings and other programs. The program runs before connecting to a new motherboard hard board system disk.
To run the program, press the Win + R keyboard shortcut to open the Run window and type: C:\windows\system32\sysprep\sysprep.exe. Then click OK.
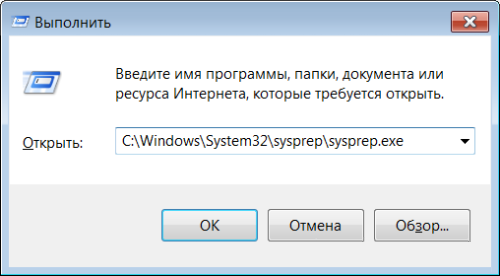
The utility window will appear on the screen, as shown in the picture, it also shows the necessary settings.

Then click OK and the system cleanup will begin. After the program ends, the computer will shut down.
Board replacement process
After the computer is completely turned off, it must be completely disconnected from the power supply and change the motherboard or connect a hard drive with Windows 7, processed by the utility sysprep.
The first time you boot your system, you will need to install drivers, so prepare the software disc beforehand. You will also need to reconfigure the regional settings, as they are removed by the utility.
At Windows startup will ask for a username. It is better to enter a new name, and then delete it - this will prevent unnecessary entries in the profile. After the first launch, you will be able to log in with the same settings.
Also, the system will ask you to make some more settings, which are usually done after reinstalling the OS. After their introduction, the desktop of the new user will be loaded, after which it can be deleted and at the next boot log in under the old name.
Program sysprep helps to replace system board without reinstalling Windows. The only inconvenience is that the activation of the seven will need to be done again. The reason is that the OS binds to the hardware.
Using the registry (video)
The motherboard is the largest part in a computer. It is the connecting link of all components: processor, video card, random access memory, hard drive, various expansion boards and drives. Because it's complicated electronic device, then its (motherboard) breakdown is not always possible to immediately install. For diagnostics, it is better to invite a knowledgeable person, or to figure it out yourself, since there is enough material on the Internet.
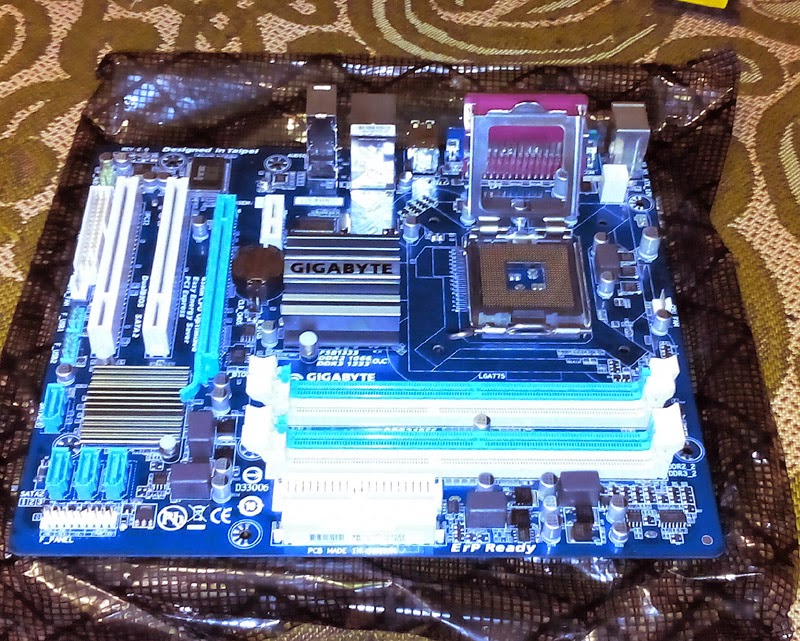
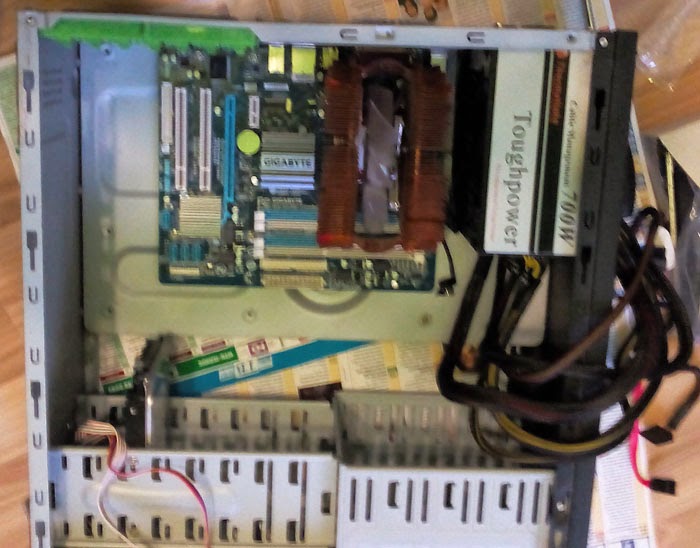
To replace the motherboard (when the cause is already established), you do not need a special tool, except for a screwdriver and some special skills. The system block is an elementary constructor with multiple "fool-proof". Further in the photographs, we will step by step replace the motherboard in the system unit.
Carefully take out all the power wires that come with the PSU (power supply), free from wires from the case, various usb and cables. Some connectors have latches, so no effort is needed if the connector "does not go". And of course we remove the video card, which also holds the RAM strips in the slot on a special latch.
2) After removing the motherboard, we are left with an empty case. The power supply and hard drive (dvd drive, etc.) can be left on if they don't interfere.

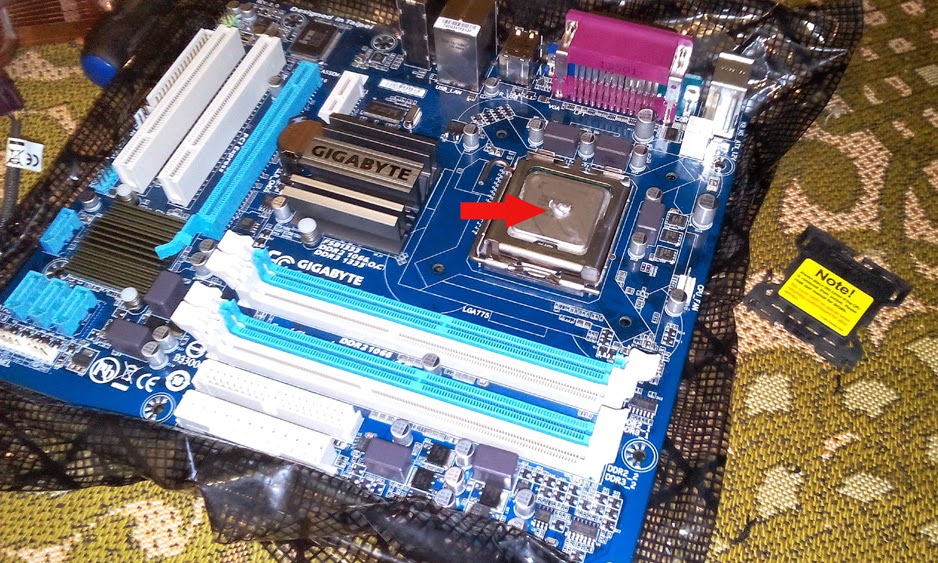
We take the removed motherboard to the side and remove the cooler with the processor from it:

At this step, you should carefully consider your actions. It is necessary to remove the cooler carefully, without applying force, to understand the mount. Same thing with the processor. In my example Intel processor Dual Core on the LGA 775 socket is attached through a pressure plate and a lever.
The surface of the processor will need to be cleaned with an alcohol solution (even a toilet freshener and a cotton pad will do) to a mirror state, removing a layer of hardened thermal paste. The same action is performed by the side of the cooler radiator adjoining the processor.
3) Old and new motherboards may differ in size, so the mountings in the case will need to be "twisted" into suitable grooves.
The photo is just an example of how motherboards can differ:

4) We complete the new motherboard in reverse order:
Remove the plug and install the processor. It has an arrow or a marking triangle (the same is in the slot). Also, by the location of the contacts and any recesses, you can figure out which side to put the processor on.

We fix the processor and apply a point slap of the new thermal paste:
Install the fan-cooler (carefully, Intel always has bad latches):

And immediately you need to connect the power of the cooler to the motherboard, so as not to forget later.
Without a fan, heatsink and thermal paste, the processor cannot be started. It will overheat and burn out almost instantly.
Even at this step, you can install the RAM strips, but as for me, it's more convenient to do it later.
5) We return to the case and put the overlay, which is attached by the manufacturer to each motherboard

6) We put the motherboard inside the case and fasten it:
7) According to the instructions or markings on the motherboard itself, we connect the buttons and light bulbs of the case:

It's good when the motherboard has a special adapter for this. But most manufacturers don't make them, so you'll have to dig up your butt.
The polarity of the contacts is also written in the manual or near the contacts themselves. As for the body wires, there is a standard: black (white) - minus, red (colored) - plus. Polarity is critical for LEDs and speakers, usb. Buttons are not.
8) The final phase of the assembly - "connect everything".
Replacing the motherboard, is it difficult?
Motherboard replacement may be required at any time of the day, regardless of your mood and the position of Jupiter. Replacing the motherboard is in many ways different from such simple procedures as, and even. Even experienced users may have difficulty here. In cases where you need a simple replacement of the MP, there should be no problems. But do not relax, one careless movement and new motherboard will no longer be as valuable as after purchase. I recommend paying attention to a couple of important factors, which I will now discuss.
Replacing the motherboard based on the form factor
The replacement of the motherboard is made taking into account the form factor. In any store you can find hundreds of various models with different dimensions. For example, the most popular brand "ATX" has a lot of such modifications - from the "mini" class to the "micro" class. Carefully study the characteristics of the selected motherboard before buying, in particular, pay attention to the dimensions. It will be very disappointing if the new MP does not fit under the iron box, and you have to go back to the store and ask for a refund. A "blind" replacement of the motherboard can lead you to a number of problems, for example, the purchased platform fits perfectly into the size of the iron box, but there is not enough space for other components. What to do with a bulky power supply, video card? Some motherboards have a water cooling system, like the MobileRack. Let me explain, if you have never seen such devices, there are several tubes and other minor elements installed on the motherboard. So, if everything does not fit under the iron box, then you can think about purchasing a new case. And remember that some MPs may not have enough PCI slots. Usually, such boards have their own audio and video adapters, but they are far from analog devices.
If this is not the first time you are getting acquainted with the “replacing the motherboard” section, then you probably managed to carefully study the device of your system block. If you remember that the interfaces for analog devices are located just on the back of the system unit. This technique is used on MPs that do not have built-in modules; instead, manufacturers take out separate ports for full functionality. Individual ports have a couple of advantages over built-in counterparts. For example, less heat will be generated inside an iron box, but this does not mean that I recommend saving on cooling.
Specifications
Remember that replacing a motherboard can be pointless if the rest of the hardware is not compatible with it. The drive and hard drive are usually suitable for any model. Other components may work intermittently or not work at all. Before buying, you should familiarize yourself with the characteristics, and do not forget about the processor. In addition to hardware compatibility, the new stuffing must be compatible at the software level. Not infrequently, users are faced with the fact that there are non-standard connectors on the board, so be careful.
After you have read the first part of the post on the topic "Replacing the motherboard", you can resort to the first stage of repair. Of course, you have already seen that the new MP is in perfect contact with the equipment already in use. And remember that the process of installing the motherboard is best to start by fixing it inside the system unit. After that, you can connect a RAM, a video card to the MP, and all Motherboards with remote connectors will greatly simplify the replacement of your PC's stuffing. By the way, for maximum comfort, I recommend using magnetic screwdrivers.
The next stage of replacement requires on the front side of the system unit. And don't forget the power and reset buttons. At this stage, the instructions should not be neglected, since the jumpers on the MP can be located in the most unpredictable places. If the software stuffing allows you to configure the functionality of the motherboard in the BIOS, then take advantage of this opportunity at the first start.
Motherboard Replacement: Software
At the first stage, there is no need to connect all the peripherals at once. For primary purposes, it is enough to connect the processor, RAM, video card and MP battery. This completes the physical replacement of the motherboard, let's move on to working in the BIOS. We start the BIOS immediately after turning on the computer for the first time. First of all, you will need to set up the safe start mode. To do this, you need to find the option "LoadStandard". In some BIOS versions, this option may have another name, it is not difficult to detect it. As soon as the user sets the necessary parameters, we exit the BIOS, save the changes and reboot. If you stumble across voltage settings and clock frequency, you can immediately set the optimal parameters. At this stage of replacement, in no case should you resort to overclocking.
Replacing standard settings in the BIOS to your own, you can install a hard drive, optical drive as well as a speaker. We will connect the rest of the peripherals a little later.
Finding drivers for a new motherboard
This does not complete the replacement of the motherboard, the user still has to work with the software firmware. The main organ on the MP is a small chipset, around it there are dozens of tiny details that play the role of a kind of “shell”. To avoid unpleasant consequences, it is best to replace the drivers of connected devices individually.
After that, you can proceed to By the way, it does not matter at all what OS you prefer, the standard drivers are already included in the software kernel. New operating systems are equipped with the most advanced drivers, so there will be no problems here. You will need to install new software if you do not want to upgrade to a new OS. At the same time, for sure, the performance will differ slightly from the maximum possible. Additional programs will allow you to use the full potential of the motherboard, then your PC will accelerate to the desired level.
Where can I find the correct driver?
Remember that replacing the motherboard will not bring any result if the drivers are not installed correctly. At the same time, the drivers from the old MP will not allow you to start the operating system in normal mode. In order not to add headaches to myself, I recommend installing a new OS immediately after replacing the motherboard. This is the ideal option.
As soon as you stand at the checkout in the store, check the contents of the MP box. Inside there must be a disk with basic drivers. Replacing the motherboard with original drivers is done without any errors. After starting the disk, a simple menu will pop up on the display, where the developers also offer a good selection of additional utilities. It is advisable to take advantage of free time and install a couple of programs, check them in action. Then the replacement will go with a bang.
Well, if there was no disk with native drivers in the kit, do not despair. You can replace them with other software products, the Internet is full of useful software that will help solve this problem. You will need to enter the chipset number on the manufacturer's official website. As a rule, such portals have drivers for all occasions. It also happens that drivers are supplied in one set for a whole line of MPs at once. At the same time, new models will have slightly limited functionality. If you don't know how to install drivers, you can read about it.
Finding out the chipset number is not difficult. In this case, you do not need to delve into the MP settings, just run any of the test programs recommended by the manufacturer. There is an alternative. You must be logged in to safe mode, then run the command line "mmc devmgmt.msc" and find the system devices section. If you find a couple of mentions of Intel, then your motherboard is built on an analog platform. Guarantee - 99%.
Below you can watch a video on how to properly replace the motherboard:


