The main problem Active use of laptops, especially in the warm season, causes overheating. This leads to their slowdown and periodic self-switching off. Standard settings laptop computers require coolers to operate at only half capacity maximum power. Therefore, if necessary, the fan speed of the PC cooling system can be increased.
Ways to overclock a cooler on a laptop
If a modern desktop computer has three fans installed (for the processor, video card and built-in storage), then laptops usually use only one. Although a high-power video card can also be equipped with a cooler. In this case, it is possible to overclock both one or both cooling devices.
You can control the fan speed in two ways:
- through the basic input/output environment (BIOS);
- by installing additional software.
Before increasing the speed of the cooler on a laptop in one way or another, it is necessary to disassemble the PC and clean the fan blades and all elements of the motherboard from dust, because dust impairs heat transfer, thereby increasing the temperature of the system.
Overclocking a cooler via BIOS
All modern motherboards allow you to monitor and control the operation of the cooling system. This is done using special drivers that come with the laptop. If the motherboard installed on your PC is equipped with this function, you can overclock the fan through the BIOS. This is done as follows:
Subsection appearance Hardware Monitor V different versions BIOS may differ slightly. However, if you know what to look for, you will have no problem completing the required settings:
Programs for overclocking the cooler in a laptop
If you do not like working with the BIOS environment, then to increase the rotation speed of the fan blades, you can use special software designed to control the cooling system.
The most effective programs in this area are:
- SpeedFan;
- AMD OverDrive;
- Riva Tunes.
Using the SpeedFan utility
SpeedFan is absolutely free application, which has a simple and intuitive interface. To overclock the cooler on a laptop with using SpeedFan, you will need:

Changing fan mode using AMD OverDrive and Riva Tunes
To control the operation of a laptop running under AMD processor, Advanced Micro Devices has developed a unique program that allows you to increase the performance of the chipset by changing its settings.
To increase fan speed using AMD OverDrive, you must:
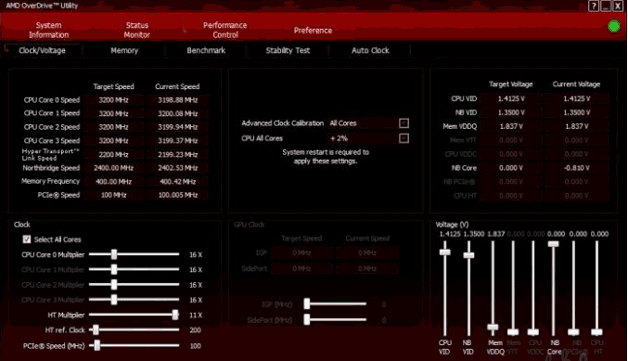
If your laptop is based on a processor from Intel, then instead of AMD OverDrive you need to install the Riva Tunes utility. The settings of this program are carried out according to the same principle as in the first case, so there is no point in emphasizing this again. 
Overclocking a fan on a laptop computer is quite simple. However, it must be remembered that As the speed of rotation of the cooler blades increases, the noise level also increases, which may cause some inconvenience when listening to music or watching movies. Another problem you will encounter when accelerated rotation fan, is increased power consumption. If the laptop is powered from the network, this will not affect its operation in any way. With local power, the battery will drain faster and its service life will be slightly reduced.
If you are interested in the question of how to set the cooler speed in the BIOS, then modern BIOSes offer a whole range of different options that allow you to optimize the speed parameters of the fans operating inside the system unit.
The question of how to set the required rotation speed of the cooler is far from idle - after all, a processor cooler, or more precisely, the fan included in the cooler, consumes quite a lot of energy; In addition, its rotation creates constant noise.
The noise produced by a cooler is sometimes not a big deal when the computer is running intensively. For example, against the background of sound effects that accompany many computer games, the cooler noise is unlikely to be noticeable. However, during periods when the processor is not busy with intensive work, the noise of the processor cooler will most likely only annoy the user. Other fans located in the system unit, for example, a fan located on the rear panel of the system unit, or a fan that cools the motherboard chipset.
Many coolers have a feature that allows you to reduce their rotation speed during periods when the processor is not too busy. Thus, at these times the cooler will make little or no noise. Such coolers are called “smart” and today have practically replaced old-type coolers that did not have rotation speed control.
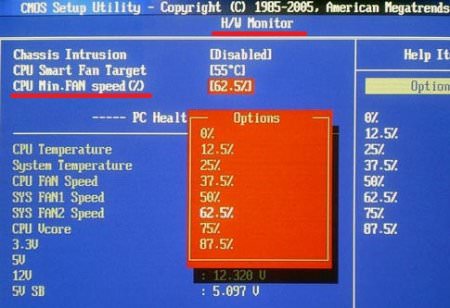
BIOS options that allow you to configure the cooler speed
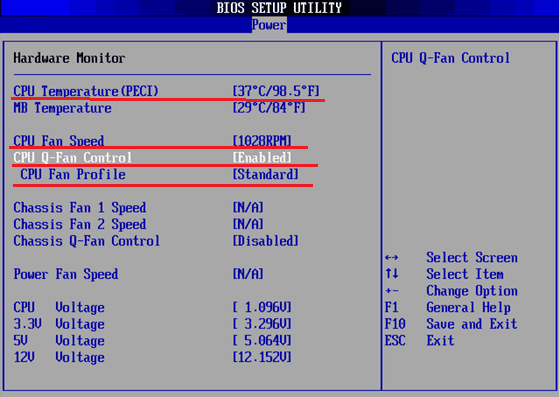
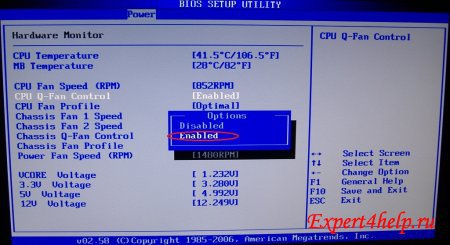
The user has the opportunity to change the operating parameters of “smart” coolers both programmatically from the operating system and using the BIOS. In particular, there are several BIOS options related to setting the cooler rotation speed. Typically, such options can be found in the BIOS section dedicated to configuring devices that ensure normal functioning personal computer or in the section where the monitoring functions are located hardware. For example, in the BIOS from Phoenix-Award, a similar section is called PC Health Status, and in the BIOS from AMI, it is called Hardware Monitor.
The Smart Fan Control option, like other similar options, is designed to enable support mode intelligent control fan rotation speed. In this mode, the fan rotation speed will depend on the CPU load.
Many users, especially those who overclock the central processor, are also interested in the question of how to increase the speed of the cooler in the BIOS. Methodology this process depends on each specific type of BIOS. It is not always possible to set the rotation speed in the BIOS directly. However, such options exist. For example, the CPU Fan Control option allows the user to enter a fan speed value, indicated as a percentage of the maximum possible fan speed. An alternative option for the user in this option is to enable the intelligent capabilities of the cooler, allowing the operating system to independently determine its speed depending on the processor load.
Some BIOS options, an example of which is Fan Profile, allow you to set a specific fan mode. In such options, the Performance or Turbo mode means that the cooler will always work at full power, cooling the processor even if this is not particularly necessary. Standard mode involves operating the fan at a load level designed for an average noise level. Silent mode allows you to give priority to the method of fan operation that creates the least noise.
Also, many BIOSes are equipped with options that allow you to set the dependence of the fan speed on the processor temperature. An example of such an option is Smart CPU Fan Target. In it, the user can select the required value of the processor temperature that the fan will strive to maintain.
In addition, there are a number of options that allow you to set the temperature at which the fan will turn on or operate at maximum speed. Examples of such options are CPU Fan Start Temperature and Full Speed Temperature.
Many BIOS also have options that allow you to configure not only the rotation parameters of the processor fan, but also the parameters of other fans located in the system unit, for example, a fan on the case panel, a chipset fan, etc.
Conclusion
Modern cooling devices have a wide range of customization options the best way their work, including setting the rotation speed of the fan included in their composition. The built-in BIOS tools can help the user in the process of setting them up. The BIOS of any personal computer, as a rule, offers several options for configuring “smart” coolers, allowing you to select a specific fan operation profile or set the dependence of the cooler rotation speed on the temperature of the central processor.
The cooler is an important component of the cooling system of any computer. It performs the function of removing warm air. Fan speed control is performed directly from the motherboard and depends on the readings of the processor chip temperature sensor. The higher it is, the higher the fan rotation speed. Self-adjustment of the speed is most often done due to the high noise that the fan creates.
Note: when adjusting the speed yourself, you MUST monitor the processor temperature, since as the speed decreases, it increases, which can ultimately damage the chip.
How can I independently adjust the fan speed through the BIOS?
You can adjust the fan speed in a standard way- via BIOS.To enter the BIOS, you must press the “Delete” key at the beginning of boot (in some computers it may be “F2”, “F12”, “Esc”). Depending on the BIOS type, fan speed control is located either in the “Power” or “Hardware Monitor” tab.
In this menu you can independently adjust the fan speed.
How to adjust fan speed in Windows?
On some motherboards changing cooler settings in the BIOS may be blocked, or the adjustment may be superficial. In this case, you can use special utilities, which are provided by the manufacturer along with drivers (MSI Afterburner, PCProbe). If these are not available, you can use third-party programs, for example, SpeedFan. It is very popular among users, is absolutely free and has an intuitive interface.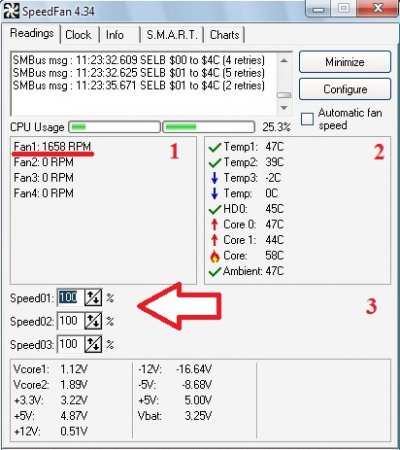
When you first start the program, it reads the current system parameters and fan speed.
Note: at boot time, the computer fan should be running at maximum speed, since the utility reads the current fan speed and takes it as 100%.
The first block displays information from detected cooler sensors. The second contains information from device temperature sensors. The third is for adjusting the fan speed. In the “Speed01” item you can set the desired speed level (in percentage).
When is it impossible to independently adjust the fan speed on a computer?
It is impossible to adjust the cooler rotation speed if the motherboard does not have such support. Usually these are coolers with a 3-pin connector. To make it possible to control the fan speed on your computer, you need to purchase a cooler with only a 4-pin power connector or buy a speed controller to which the fan is connected directly. In this case, the adjustment is performed directly on the removable block, which is called a reobass.Also, in most laptops, the speed control function is also not available (again due to the 3-pin connector). Only a few models that require the use of manufacturer’s programs have such support. This was done to avoid overheating, since the compactness of the components limits heat transfer. Therefore, it is not recommended to change the fan speed manually.
A cooler is used to maintain the desired temperature of the computer and its main components. A cooler is a small fan device connected to temperature sensors, the intensity of which depends on how heavily the central processor or video card is loaded.
In order to increase the fan speed on a laptop, you usually need to change the corresponding parameter in the computer's base system - BIOS. This method usually requires the user to have special knowledge and understanding of technical terms on English language, and also provides more options for customizing your computer and its components than similar actions performed using special programs in the working Windows environment. However, changing the parameters via operating system Windows is much safer and eliminates the risk of harming your computer due to setting the wrong settings.
Quick navigation through the article
SpeedFan program
To change the rotation speed of laptop coolers using a third-party software, required:
- Launch an Internet browser.
- Go to the official website SpeedFan programs(almico.com/speedfan.php).
- Using the appropriate buttons on the website, download the program and install it.
- To restart a computer.
- Launch the application.
- On home page program to adjust the values of the parameters “pwm1” and “pwm2”, which will correspond to the first and second coolers. If the computer has more cooling devices installed, the user will be able to configure them as well.
- Save changes and close the program window.
If the “pwmX” parameters are set to “0”, the corresponding fan will be stopped, and if the value is “100” it will always spin at full power. Both values are not recommended for installation, as they can lead to overheating or damage the cooler itself.
BIOS
In order to increase the rotation rate of coolers in a laptop through the basic I/O system, you must:
- Turn off computer.
- Turn it back on.
- Read the inscriptions that appear immediately after turning on and press the button indicated in one of the sentences (usually “F2”, “Del”, or “F12”). The BIOS menu will open.
- In one of the BIOS tabs, using the arrow keys on the keyboard, find the “Fan Control” or “CPU Q-Fan Function” parameter.
- Select an option and activate it.
- Select one of the cooler operating modes (the most intense, usually “Performance”).
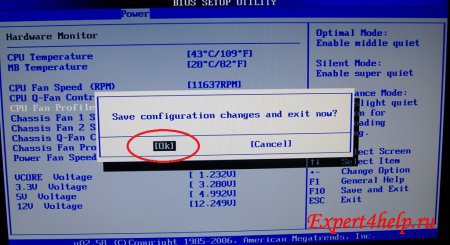
- Exit to the main BIOS menu using the “Esc” key.
- Exit the BIOS by confirming the changes by pressing the “Y” key.
- Wait for the computer to turn on normally.
I think everyone would like to somehow reduce the noise made by coolers in the case or in the power supply.
There can be three reasons that lead to noise:
1) An increase in fan speed, due to noise from its operation, may be especially true laptops
, and even when the temperature outside/indoors is higher than normal.
In most systems, the cooler adjusts speed automatically, depending on the heating of the components. And if the fan spins up to maximum speed and creates a lot of noise, then this is the first signal that the system is overheating.
Then you definitely need and or .
If the cooling system is cleaned and the thermal paste is changed, but the cooler does not regulate the speed automatically, then look at points 2) and 3).
2) An old cooler is poorly lubricated, then it needs to be lubricated, we wrote about this:
or
3) A new branded cooler was selected with a higher speed than necessary.
Exit from this situation is simple - reduce cooler speed.
So, we have found out that by reducing the number of revolutions of the cooler, we will reduce the noise it produces.
Of course, productivity will drop a little, but let’s say that in some “nodes” of the computer this will not cause significant deterioration in cooling. Thus, fans that are installed in cases and power supplies are high-sided, and the ratio is not always noise/performance be at the optimal level.
There are several ways in which noise can be reduced while cooling remains at an acceptable level.
So to speak, find the “Golden mean” in the noise/performance ratio.
Let's start with the simplest and cheapest methods:
Method number 1.
Enable a function in the BIOS that automatically regulates fan speed.
According to the principle, the greater the load on the computer, the faster the fans rotate.
This function is enabled by default in all laptops (to extend battery life) and if the fan does not automatically reduce speed when idle, then this is a serious signal about it.
Also, this function is supported by many motherboards: ASUS(Q-Fan control), Gigabyte(Smart fan control), MSI(Fan Control), etc.
Let's look at the example of a motherboard ASUS feature Q-Fan Control, with presets Silent/Optimal/Perfomans.
Where to enable Q-Fan in ASUS EFI BIOS, look at.
1) Go to the BIOS (Immediately before starting the boot, press the button repeatedly)
2) From section Main
go to the section Power

3) Select the line Hardware Monitor

4) Change the value of the lines CPU Q-Fan Control And Chassis Q-Fan Control on Enabled

5) As a result, the lines will appear CPU
And Chassis Fan Profile
.
In these lines you can select three operating modes:
- Performances
- this is a productive mode,
- Silent
- this is the quietest mode,
- Optimal
- This is an intermediate mode between productive and quiet.

6) Then save the settings via
Important! Automatic fan adjustment will be performed only on connectors CHA_FAN
And CPU_FAN
.
A PWR_FAN
not controlled by Q-Fan Control.
Similar adjustment systems are also present on other motherboards from other manufacturers.
If your board does not support this function, then I recommend paying attention to other methods.
Method number 2. Reducing cooler speed by switching.
In order to reduce fan speed, you can switch the fan to a lower voltage.
The nominal voltage for the fan is 12 Volts. And the entire specification (speed, noise level, current consumption, etc.) is indicated for the rated voltage.

We can switch our fan to three other voltage ratings: +12 Volts, +7 Volts, +5 Volts.
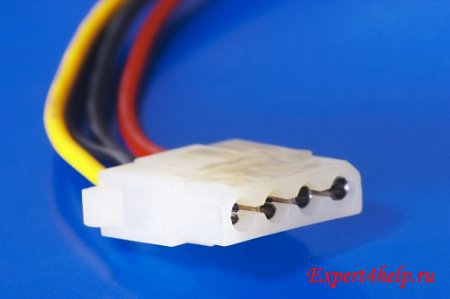
This is done using a regular Molex connector, which is present in sufficient quantities in all modern power supplies.
In order to switch the case fan you need:
1) Turn off the computer, open the lid and disconnect the desired fan from the socket to which it is connected.
2) Release the required legs, using a needle or awl, from the 3-pin fan connector.
3) Simply bite off the power supply fan wires at the board itself (usually two red wires are “plus” and black are “minus”), bring them out to the outside of the power supply, and also connect them to a free Molex connector.