Where can I get Photoshop CC?
. To do this, you need to click the corresponding button on the page that is dedicated to the application, or go to. Next, simply upload and save the downloaded file.By downloading Photoshop CC from our website, you guarantee yourself stable and reliable operation of the program, regular updates, as well as protection from viruses and other threats.
How to install Photoshop CC?
In order to install the program on your computer, you need to go to the folder with the downloaded program and activate the Setup.exe file. Then follow the installer's instructions.Also, during installation, you can choose which additional applications you want to receive: Lightroom CC, Illustrator CC, InDesign CC, Dreamweaver CC, and others.

If you want to get a licensed version of the program, then for this you need to register paid subscription on the official Adobe website. Your subscription will vary depending on whether you are an individual user or a business user. It is worth noting that after purchasing a license you will not need to reinstall the program again. It will update automatically.
For more comfortable work with the program, read
Quite often, PC users strive to learn new programs in order to be able to design images to their taste and even earn income. One of the most complex and powerful graphical tools is Adobe Photoshop. How to use it, where to start - all this will be described below.
Interface, tools and menus
First you need to run installed program. It is recommended for a beginner to go through the menu (horizontal at the top) and study the tools located on the left. To find out what the icon is and what it does, you need to move the cursor. A tooltip should appear. If you left-click on a tool, for example, “Fill”, it will be active. At the same time, settings will appear under the horizontal menu at the top of the screen. Experienced users almost always install required parameters tool.
You should pay attention to the triangle in the lower right corner of some tools. If you right-click on the mouse, additional options will open.
And now we should talk about the menu in Adobe Photoshop, how to use it when working with photographs and drawings. First, you need to go to the "File" menu to open an existing image for editing, or create a new document. In the same menu there is a function for saving the work done.
The remaining items located after “File” and before “Help” relate directly to working on the image.
First steps in work
It's worth starting to learn the program using an existing photograph. To do this, go to the “File” menu, click “Open” and find the desired picture. Once it is added, you can start working.
A small window with tabs will appear to the right of the image. When working, you almost always need the “Layers” tab, since all actions on the image take place there.

At this moment, every beginner asks the question:
- how to use Photoshop (Adobe Photoshop);
- why I can’t work with the picture;
- Is it possible to correct errors if they appear during work?
The second question should be answered immediately: by default open image locked, that is, it has To turn it into a layer (that is, unlock it), you need to double-click in the window on the right on the image and the “Background” inscription in the “Layers” tab. Now you can work.
Why are layers needed?
To understand how to use Adobe Photoshop, it's worth understanding layers. The fact is that they can serve both as a backup image (“create a duplicate layer”) in case of unsuccessful actions with the photo, and as an area for applying new effects. For example, you need to make an inscription for a wedding photo and an image of translucent doves and hearts. In this case, you need to create a new layer above the main photo and activate it. Next, you can either insert a new image with doves, or draw using the Brush and Pencil tools located on the left side of the toolbar.

Layers can be made transparent or translucent. To explain their meaning, you should imagine a real photograph lying on the table. Next, translucent or transparent paper with a print is applied to it. So the main photo is Layer 1, and the transparent paper with the design is Layer 2.
Effects and colors
Work with color and effects should be done using the horizontal menu or in the right window (the “Layers” and “Properties” tab). It should be noted that for a beginner there is no difference in how to use Adobe Photoshop CS6 or other versions. Almost any generation of Photoshop is suitable for learning the program. The same applies to color modes, filter galleries, and actions with images (for example, mirroring, rotating, moving).
Is Adobe Photoshop difficult?
Beginners often ask: is it difficult to master the program? It is impossible to answer unequivocally. You need to understand why a person needs this tool. Let's say you often need to make minor adjustments, for example:
- trim,
- mirror,
- make an inscription
- discolor.
In this case, it is enough to understand how to use Adobe Photoshop. But if you want to become a professional, learn how to make fabulous pictures from ordinary photographs, then you will need perseverance, a lot of time for training, including studying color theory.

Nuances often arise on forums, when watching training videos, where participants ask how to use Adobe Photoshop CC, how it differs from SC6. Don't let anyone be confused by the last two characters, which indicate the version of Photoshop. To apply simple operations with pictures, both versions have all the necessary tools, they are located in the same places.
Articles in the same category
Regardless of how you got the Adobe Photoshop CC program, whether you registered on the official website and rented it or downloaded it from Torrent, in any case you need to configure Photoshop.
Some in English, some in Russian. It doesn't matter either. We'll set it up any way you like. I will show it on my Russified version.
The interface, depending on the version of the program, may differ slightly. Don't worry, if some setting is missing in one section or another, it will still be reflected in the other.
Setting up Photoshop consists of the following steps
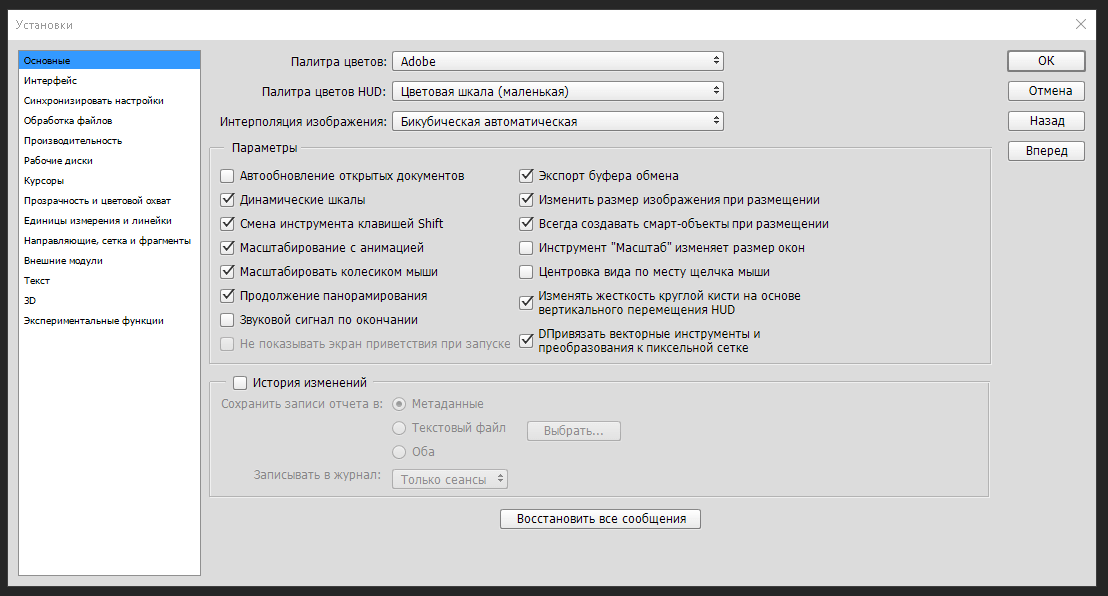
Go to the menu Editing – Settings – Basic
In the main settings it is better to leave everything as default
Working window interface
In the Interface menu, set up the color theme of your Photoshop. It can be completely black, or it can be very light. It all depends on the taste and mood of the person.

Here you can configure the language and font size. The most convenient is Small, but everyone can choose from the list to suit their monitor and their level of vision. We leave the rest as is.
We skip “Synchronize settings” and configure file processing
This section of the settings menu does not require editing at this stage. The developers tried to install by default optimal settings. Later, when you find out what it is used for RAW format, you may need this setting. And now we leave everything as it is

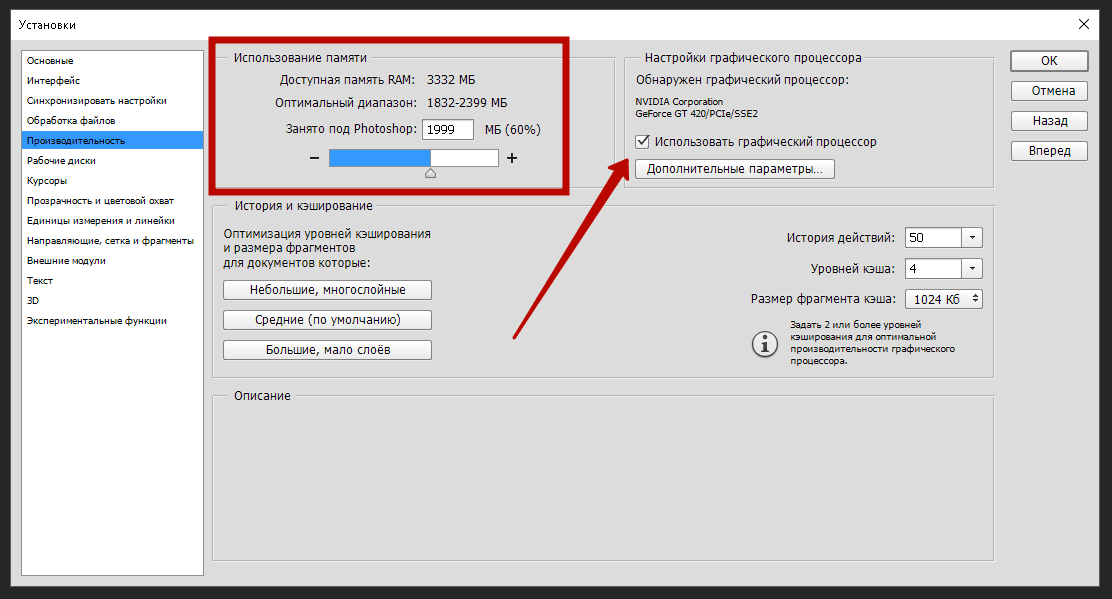
Check the Use box GPU. This is to help your computer's processor.
The fact is that image processing is a process that requires a lot of resources from your computer, so it uses all its capabilities. And if you have a good video card, which also has the same graphics processor, it should also be connected to image processing work. This is where we connect it.
Memory usage. This is the setting we define to use Adobe Photoshop CC as it runs.
Available memory determines how much your computer can run Photoshop in. this moment. And at the same time, to give other programs the opportunity
work. This is what we determine with the slider, setting the memory it occupies for the program.
60% is enough for stable operation. By setting it to 100%, we will doom parallel running programs to slow down.
We leave the remaining parameters in this section as they are.
Working disks for storing archives
If you install drive C, that is, the root one, then you will boot the system, which is not desirable.

This parameter is purely creative, over time it will be needed, but for now we will leave it as it is.
“Transparency and color gamut” are left as they are
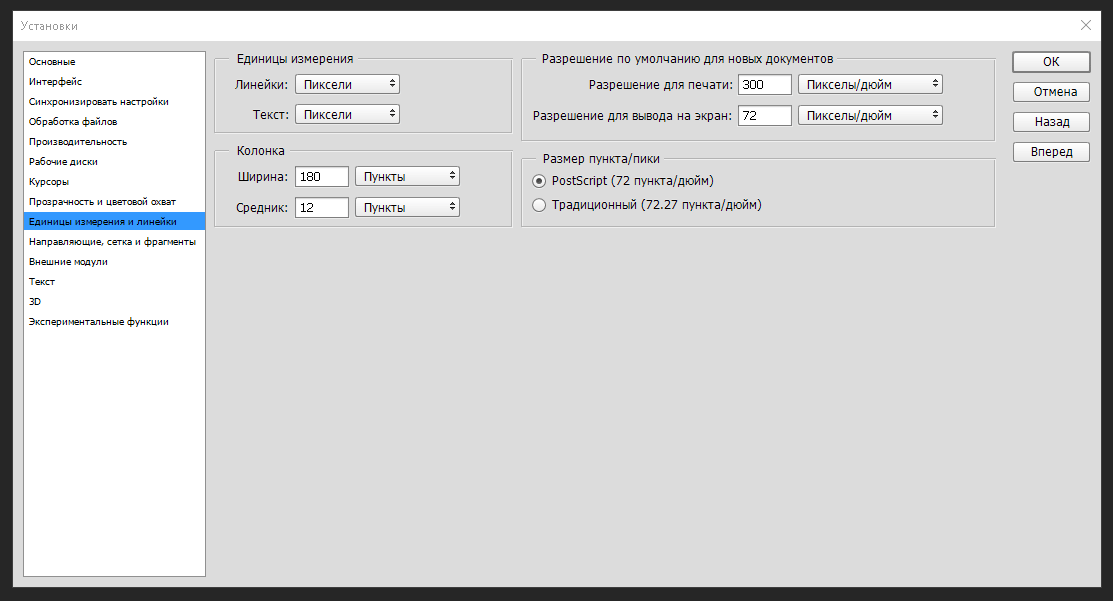
Units of measurement and rulers
Units of measurement are set in pixels, Columns in points
We don’t pay attention to the “Guide grid and fragments” for now and leave it in the same form.

“External modules”, “3D”, “Experimental functions” leave the default settings.
Make the settings for this parameter as follows:

We have successfully completed setting up Photoshop; in the next article we will look at Importing photos into the program.
Good evening. Finally it happened and I updated my Photoshop to version 2017. Honestly? The difference for me is colossal. Since I am now freelancing, developing websites and layout, I simply lacked the functionality of my CS5.
Here I’ll talk about why I updated and how it worked for me after a couple of days of use, as well as about the new features in general.
I updated because, as I wrote above, my good old CS5 was no longer enough for me. After all, the new Photoshop has excellent functionality for web developers; it gradually began to be adapted for web design, since previously it was not particularly intended for this.
Now I can finally work with the swf format, which is a trend now, and save objects in one click, since there is a function to save any layer with one button.
For example, how I previously saved the logo separately on the layout.
I selected the logo (by clicking on the layer thumbnail), copied it, created a new file, pasted it, turned off the background and saved it as for the web. Now I right-click on the layer, click export and save. Faster and more convenient. This can ultimately help save a significant amount of time.
In a couple of days I noticed only one drawback: it somehow works slower, compared to old version and takes longer to start. But, I'm sinning on my laptop, I'll update it a little and see, since this Photoshop was made on a new, more productive engine and everything should be fine.
What's new in CC compared to CS6
New filters have appeared, the “Image Size” and “Smart Sharpening” functions have been improved, but these are all trifles. The new Adobe Camera RAW, this is exactly what interests photographers and those who use Photoshop to process photos.
For a long time, it was possible to leverage the strengths of the RAW format for JPEG images by opening them as RAW. IN new version Photoshop RAW format is presented as a separate filter. This means you can now apply it to individual layers or even selected areas of layers!
New retouching options and radial filter.
The ability to correct distortions using the same Adobe Camera RAW.
New filter wizard “Camera Shake Reduction”.

Improved work with 3D and other features.
Well, let’s conduct a small survey, I’m interested in your opinion.
P.S.: I would be grateful for the support of my blog - .
Most recently, Adobe updated all programs from the Creative Cloud package: Photoshop received many new features, including those useful for photographers.
In these videos, professional photographer and teacher Chris Orwig will talk about how the updated Photoshop 2017 will help a photographer in his work.
You can download the files that you will need to complete the tasks at the end of the article.
Introduction
Welcome
Getting the most out of this course
Using the exercise files
Where Photoshop Fits in
Before and after views of images
Photoshop's role in today's workflow
Accessing your images with Bridge
Getting started with Lightroom
Setting Up Photoshop
Setting up your color settings
Fine-tuning your preferences
Choosing and customizing a workspace
Beginning with Camera Raw
What is Camera Raw
Camera Raw and Photoshop case study
Opening images into Camera Raw
Improving your images with the basics
Getting Started with Photoshop
Using the Start workspace
Opening, saving, and closing a photograph
Getting familiar with the interface
Using tools and undoing mistakes
Viewing Images
Zooming and panning on your photos
Expert zooming and panning tips
Choosing and changing the screen mode
Arranging and viewing multiple documents
Understanding Pixels and Image Size
Pixels and image sizing
Resizing an image to a smaller size
Exporting for email and social media
Challenge Resizing a photo for print and online
Solution Resizing a photo for print and online
Cropping and Straightening Images
Mastering the Crop tool
Cropping and straightening your photos
Fixing a crooked image
Cropping projects
Challenge Level and resize a photo to make a 5×5 print
Solution Level and resize a photo to make a 5×5 print
Increased Control with Layers
Why layers matter
creative layers case study
Creating new blank layers
Working with type layers
Improving color with adjustment layers
Applying layer style effects
Combining multiple images into one document
Combining multiple images and creating a color border
Organizing layers into groups
Challenge Using layers
Solution Using layers
Improving Exposure like a Pro
Adding brightness and contrast
Fixing exposure with Levels
Fine-tuning an image with Curves
Fixing an underexposed image
Correcting exposure with Camera Raw as a Smart Filter
Challenge Correcting exposure
Solution Correcting exposure
Fixing Specific Areas of an Image
Using the Elliptical Marquee tool to make a selection
Selecting and changing a rectangular area
Selecting with the Lasso tools
Working with the Quick Select tool
Quick Select project workflow
Making a selection with Focus Area
Challenge Selecting the subject from the background
Solution Selecting the subject from the background
Advanced Adjustments with Masking
Introducing masks
Improving an image with custom masks
Feathering a mask
Using a gradient mask to fix exposure
Copying a mask to save time
Challenge Creating a color effect
Solution Creating a color effect
Fine-Tuning Color
Changing colors in Camera Raw
Creative color adjustments with Camera Raw
Fine-tuning color with Hue and Saturation
Using Hue and Saturation with masking
Changing the color of a dress
Two steps to creating vivid and beautiful color
Using Color Balance to create vivid color
Challenge Advanced work with brightness and color
Solution Advanced work with brightness and color
Converting to Black and White
Converting to black and white with Camera Raw
Making a strong black-and-white portrait
Creating better black-and-white landscape photographs
Creating a black-and-white film grain effect
Making more dramatic black-and-white images
Challenge Black-and-white landscape
Solution Black-and-white landscape
Photographic Effects with Filters
Adding lens flare
Changing focus with the Blur Gallery
Creating a tilt-shift blur effect
Adding a creative blur to a portrait
Adding light with lighting effects
Challenge Adding blur
Solution Adding blur
Sharpening and Reducing Noise
Sharpening with Camera Raw
Reducing unwanted noise in Camera Raw
Reducing unwanted noise with high-res files
Reducing unwanted noise in Photoshop
Sharpening your photos with Smart Sharpen
Sharpening a multilayered document
Using Focus Area to select the area to sharpen
Selective sharpening with Smart Sharpen
Challenge Selective sharpening
Solution Selective sharpening
Retouching Away Problems
Using Content-Aware Fill to remove distractions
Removing an object with Clone Stamp
Quick results with the Spot Healing tool
Seamless retouching with the Healing tools
Fixing a large area with the Patch tool
Increasing image content with Content-Aware Scale
Challenge Removing a large object
Solution Removing a large object
Portrait Retouching Essentials
Improving skin with the Healing Brush tools
Wrinkle reduction
Whitening teeth with adjustment layers
Changing facial structure with Liquify
Changing shape with Liquify
Brightening the eyes
Improving eye shadows
Challenge Creating more beautiful skin
Solution Creating more beautiful skin
Making the Perfect Print
Getting ready to print – Resizing
Sharpening and brightening for final output
Selecting your printer and paper size
Choosing color management and printer settings
Conclusion
Next steps
Working files
You can download the files that you will need to complete the lessons at


