Hello!
It’s no secret that many of us already have more than one computer in our home; we also have laptops, tablets, etc. mobile devices. But there is most likely just one printer! And indeed, for most, one printer in the house is more than enough.
In this article I would like to talk about how to set up a printer for sharing on a local network. Those. any computer connected to local network- could print on the printer without any problems.
And so, first things first...
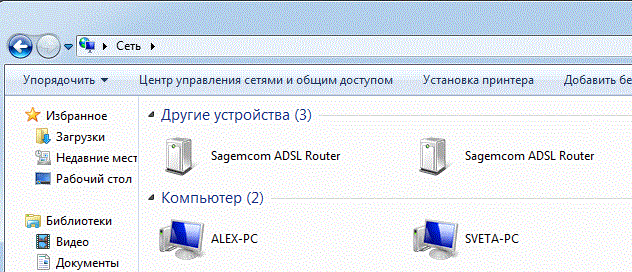
2) When you enter the explorer (for Windows users 7; for XP you need to go to network) at the bottom, in the left column, computers (network tab) connected to the local network are shown.
Please note whether your computers are visible, as in the screenshot below.
3) On the computer to which the printer is connected, drivers must be installed, the printer operation must be configured, etc. so that you can easily print any document on it.
1.1. Printer access
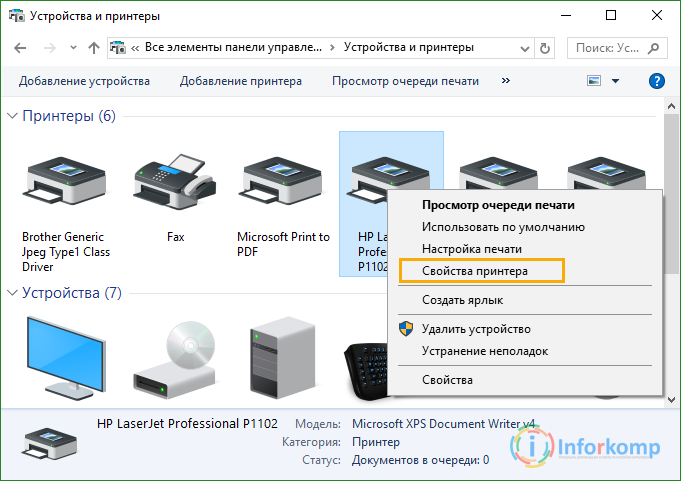
Let's go to Control Panel\Hardware and Sound\Devices and Printers(for Windows XP" Start/Settings/Control Panel/Printers and Faxes"). You should see all the printers connected to your PC. See screenshot below.
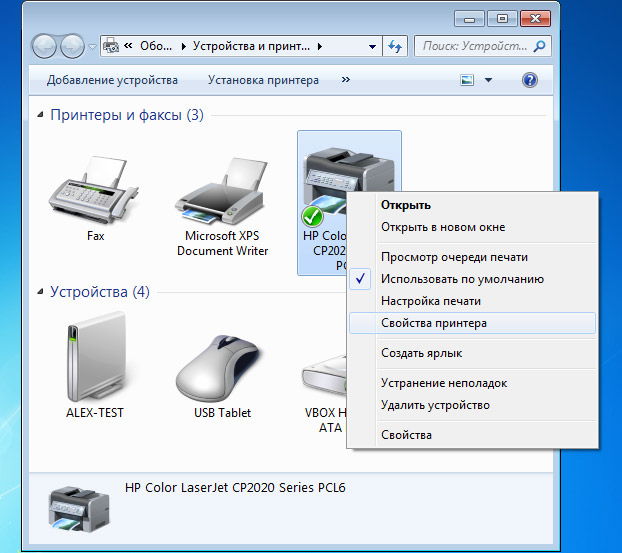
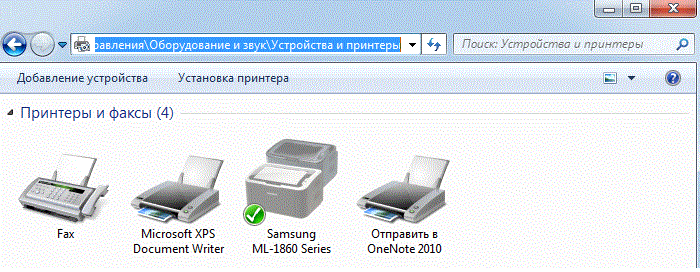 Now right-click on the printer you want to share and click " printer properties
".
Now right-click on the printer you want to share and click " printer properties
".
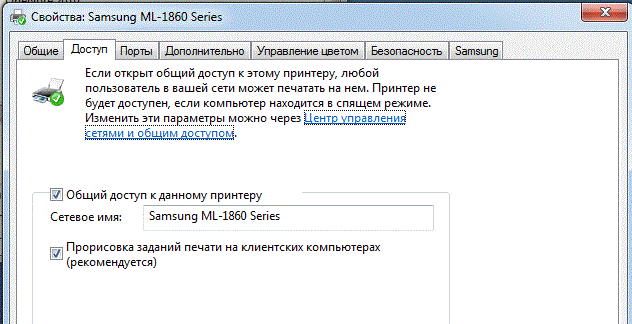
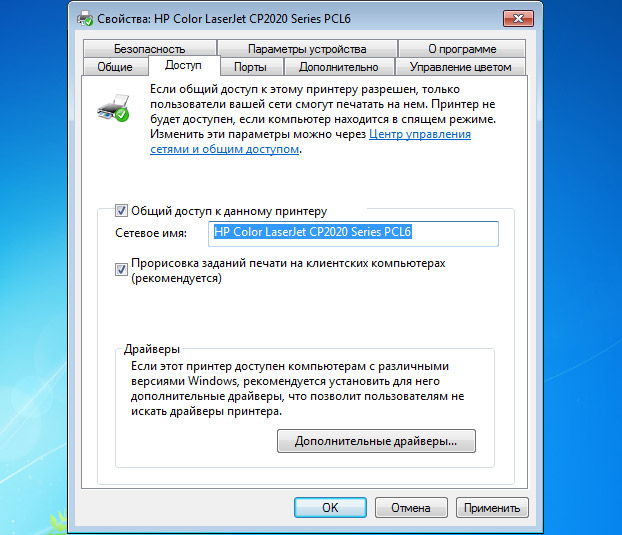
Here we are primarily interested in the access tab: check the box next to " share this printer".
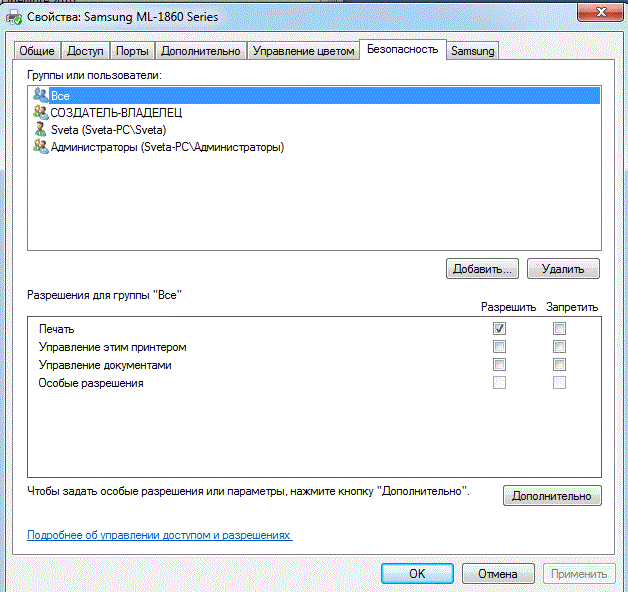
You also need to look at the "" tab: here check the "print" box for users from the "everyone" group. Disable other options for managing the printer.
This completes the setup of the computer to which the printer is connected. Let's go to the PC from which we want to print.
2. Setting up the computer from which printing will be carried out
Important! Firstly, the computer to which the printer is connected must be turned on, as well as the printer itself. Secondly, a local network must be configured and public access to this printer must be open (this was discussed above).
Let's say there is small office and several computers connected to the local network, there is no server, but there is one printer for the entire office. Now the task is to make sure that all computers have access to the printer, that is, they can print through it. This means that we will need to install network printer and configure it. There are three ways to accomplish the task.
Instructions
Connect the printer to a computer on the network and share it. The simplest method, but it has a significant drawback: if the computer to which our printer is connected does not work, then other computers will not be able to print through it. And if the PC breaks down, you will have to reconfigure everything and reinstall the drivers, which by that time may already be lost.
Connect the printer via a print server to the network. In this case, you only need to configure the printer once. It will be seen in the print server as a separate node. Each computer will print independently.
If the network printer has a built-in print server, it can be configured in the same way as in case number two. You just need to configure the printer itself, and not some separate device.
We will assume that the printer is already connected to one of the PCs. We will consider the operating system Windows XP. Let's start setting up sharing. First, go to the “Control Panel” and there, in the “Printers and Faxes” item, right-click on the icon installed printer. Select “Properties” from the drop-down menu. Now let’s switch to the “Access” tab and click on the “Printer sharing” button. Give the printer a name and click OK. A holding hand icon should appear on the printer icon. It means that
Hello.
I think the benefits of having a printer configured on a local network are obvious to everyone. Simple example:
If access to the printer is not configured, then you need to first transfer files to the PC to which the printer is connected (using a flash drive, disk, over a network, etc.) and only then print them (in fact, to print 1 file, you need to make a dozen " unnecessary" actions);
If the network and printer are configured, then on any PC on the network in any of the editors you can click one “Print” button and the file will be sent to the printer!
Comfortable? Comfortable! This article will tell you how to set up a printer to work over a network in Windows 7, 8...
STEP 1 - Setting up the computer to which the printer is connected (or how to “share” the printer for all PCs on the network).
To be able to use the printer on any PC on the network, you must correctly configure the computer to which it is connected.
To do this, go to the panel Windows management, to the section: Control Panel\Network and Internet\Network Center and shared access .
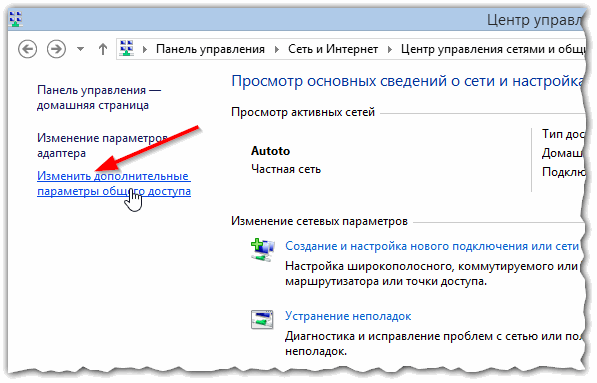
In the window that opens, you need to open three tabs one by one (Fig. 2, 3, 4). In each of them you need to check the boxes: enable file and printer sharing, disable password protection.
Rice. 2. public access parameters - expanded “private (current profile)” tab

Rice. 3. expanded "guest or public" tab

Rice. 4. expanded "all networks" tab
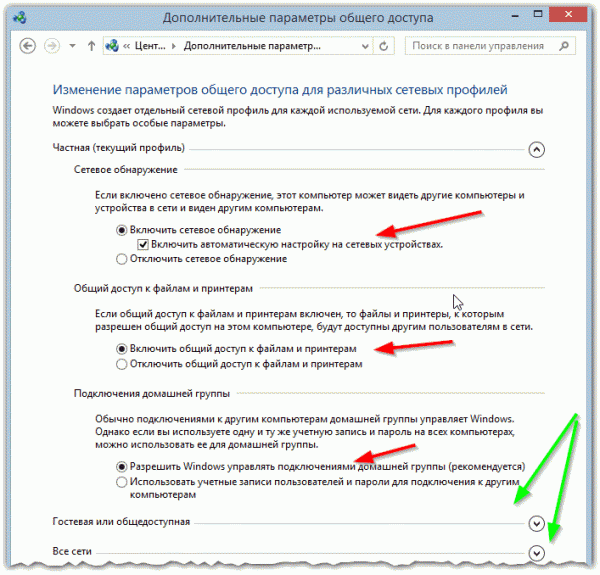
Here select your printer, right-click on it (right mouse button) and select the " tab Printer properties". In properties, go to the "Access" section and check the box next to " Share this printer" (see Fig. 5).
If access to this printer is open, then any user on your local network can print on it. The printer will not be available only in certain cases: if the PC is turned off, in sleep mode, etc.
Rice. 5. Sharing the printer for public access over the network.
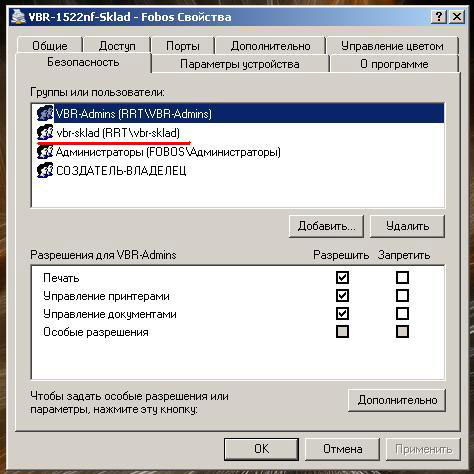
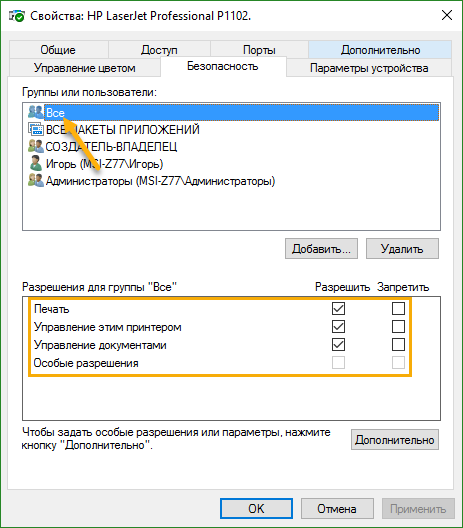
You also need to go to the “Security” tab, then select the “Everyone” user group and allow printing (see Fig. 6).
STEP 2 - How to connect a printer over a network and print to it
Now you can proceed to setting up computers that are on the same local network as the PC to which the printer is connected.
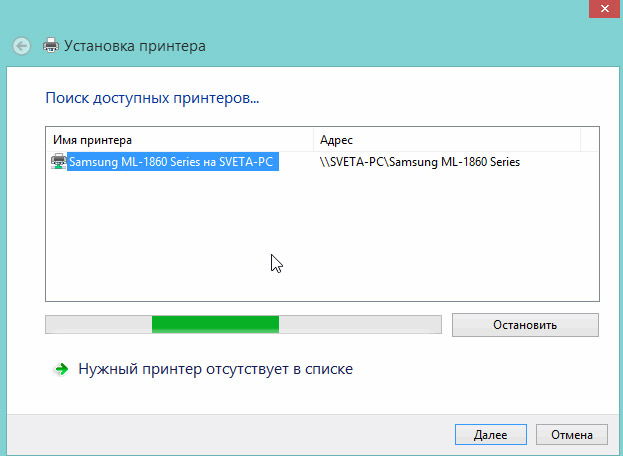
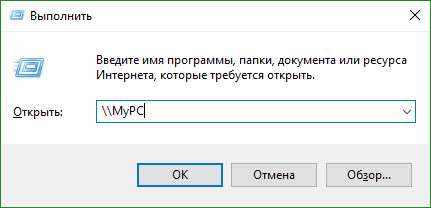
The first step is to launch a regular explorer. At the very bottom left, all PCs connected to your local network should be displayed (relevant for Windows 7, 8).
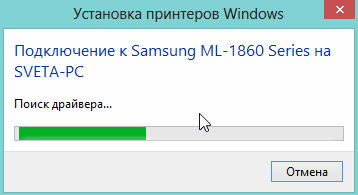
In general, click on the PC to which the printer is connected and if in step 1 (see above) the PC was configured correctly, you will see the shared printer. Actually, right-click on it and in the pop-up context menu select the connection function. Typically, connection takes no more than 30-60 seconds. (happens automatic connection and driver settings).
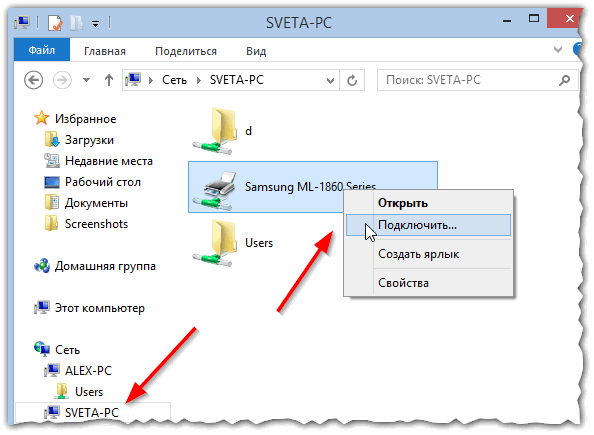
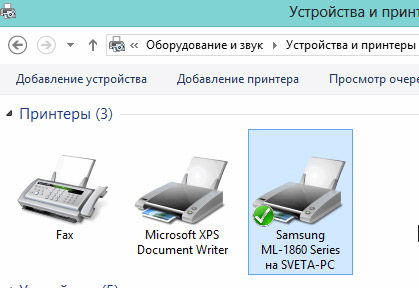
Then select the connected printer, right-click on it and enable the option " Use as default".
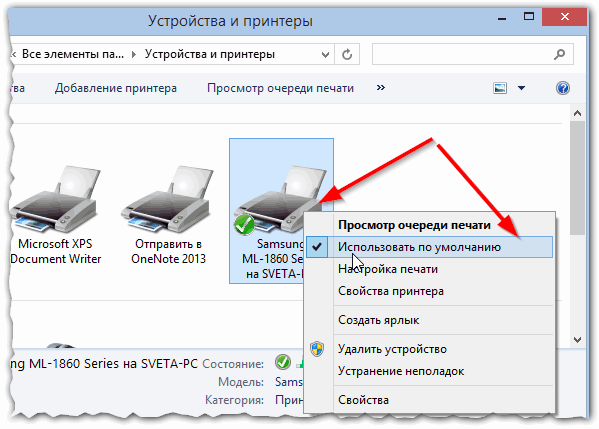
Rice. 8. use network printer as default
Now, in whatever editor you are in (Word, Notepad and others), when you click the “Print” button, the network printer will be automatically selected and you will only need to confirm printing. The setup is complete!
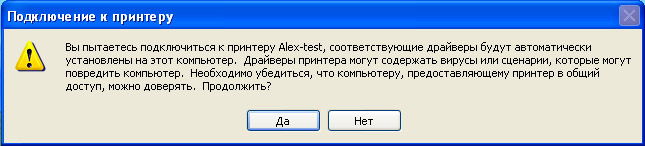
If when connecting printer an error appears on the network
For example, a common error when connecting a printer is the standard “Windows cannot connect to the printer...” and some error code is displayed (such as 0x00000002) - see fig. 9.
That's all. By the way, if the printer does not print, I recommend reading this article:
As always, thank you in advance for any additions to the article! Good luck!
Social buttons.
In office buildings, often in one office there are several workstations equipped computer equipment, allowing you to perform multiple production tasks. However, the printer for printing is often installed only in a single copy. Therefore, you have to use portable flash drives in order to be able to print various documents. Now there are many practical ideas on how to connect a printer over a local network. Focusing on one of the proposed methods, it is possible to provide comfortable and fast printing of documents to each user whose computer equipment is connected to the printing machine via a local network.
In large offices there is no point in using separate printers for each PC
To ensure that everyone can use the same peripheral, you need to make some changes to your printing settings.
Setting up a printer over a network begins with the fact that on the main page personal computer, to which a single printing machine is connected, changes are made to provide unhindered access via the network to all other office employees.
Adding a local device
When faced with the serious task of connecting a printing device to a local network so that every user has free access to printing, you must first determine which PC the printer will be connected to.
It is important to consider that such a computer must have acceptable technical resources to ensure effective work and prevent freezing. Next, you need to connect the device to computer technology via USB cable. The computer itself will detect the newly detected device and offer to install the appropriate drivers. Once you have completed installing the drivers and printing a test page, you can follow the further recommendations on how to set up your printer over the network.
It is very important to allow shared access to the specified printing machine over the created network. Initially, go to the Control Panel, after which you go to the “Printers and Faxes” tab. All detected devices located on the local network will be displayed there. You should indicate exactly the one to which you plan to provide public access.
Right-click on the required icon and go to the “Properties” tab. In the dialog box that opens, select “Access”. It is there that the function is located that provides access for the peripheral device to all other computers, and it is also at this stage that the network name is assigned.
On the “Security” tab, permission is set for all local users. This completes setting up the printer via a local network from the main computer, but it is extremely important to configure all other computers located in the local space without errors.
Setting up other local computers
The number of computers that can be involved in a local network is not limited. It all depends on production tasks or private interests. Each PC can use printing resources if it is configured correctly in advance.
Setting up network printing
It's important to remember that main computer and the printing machine itself must be turned on, otherwise printing will be impossible. It is this parameter that one also pays close attention to when choosing a computer to which peripheral equipment is connected.
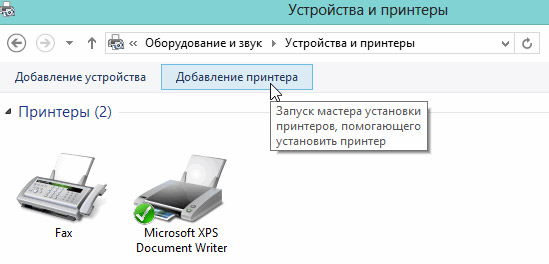
In order to connect a network device to make printouts, you need to go to the Control Panel, go to “Devices and Printers”, then find the “Add” tab on the horizontal taskbar. By clicking on it, the PC will automatically start searching for an available printing device, and after a while a list of all found peripheral equipment will appear.
In most cases one will be found available printer, although multiple devices may be detected. The user is obliged to select only the device from which it is intended to print documents in the future.
Fortunately, modern operating systems are designed in such a way that they are able to independently find the required drivers, so no special user interaction is required here, other than confirming the desired selection of peripheral equipment. The operating system itself will detect the drivers and carry out the installation itself, so you just need to wait for the process to complete successfully.
Only in extremely rare cases can it happen that the search for drivers fails; they simply will not be detected. This happens when there is no access to the Internet and the drivers are not saved on the PC hard drive. In this case, the user must either download the drivers from another PC that has access to the global web, or use the disks that came with the device for printing. Unfortunately, there is no other way out, otherwise it will simply not be possible to connect printing peripheral equipment.
Another important point: network equipment The “Default device” parameter must be set so that you can immediately start the printing process, without having to select the network name in the device selection window each time.
Installing affordable printing peripherals in the office or home is easy. It is very important to follow the recommendations of specialists, thanks to which printing documents from any PC will be carried out without problems.
Hello, dear readers! This article, or even instructions, will describe in detail the most reliable way setting up and connecting the printer via a network. We will also touch on all the system settings that are necessary to connect the printer and figure out why, when you try to log into your computer over the network, a message about access to the server may be denied (to a PC on which the printer is locally configured).
To put it simply, we will describe below how to connect two or more computers to one printer so that they both have constant access to printing. Of course, this option is most often practiced in various offices and enterprises. But it also happens that users at home, using even an ordinary router, create their own small network and connect several machines to one computer.
The instructions themselves will be divided into several parts. First we will deal with all the basic system settings, that is, what should be enabled or disabled so that another computer can connect via the network to the PC on which the printer is installed.
You do not have permission to log on to this computer
If you try to connect to a machine with a printer configured, you may receive this or a similar message, which means you most likely need to adjust some security settings.
I recommend making changes to the system parameters, which will be discussed below, on all computers on which the printer is installed, and on all those with which you will connect to it. This way you will definitely save yourself from encountering errors related to lack of rights or something similar.
So, what do we need to connect a printer over a network?
Step 1
The first thing you should do is to enable the local “Guest” account, which will be used to log into the PC from the network.
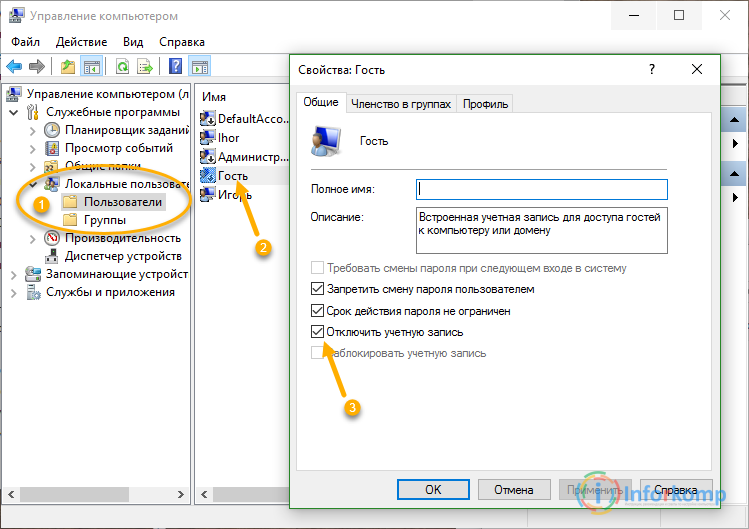
- By right-clicking on “My Computer”, select “Manage”.
- Next, go to “ Local users" - "Users".
- In the list of available accounts that appears, find “Guest” and double-click to open it.
- Now, in properties account, remove the check mark from the item “ Disable account", and "Apply" the changes made.
If later, every time you turn on the computer, you will be asked to select an account with which to log into Windows, no problem, this can be disabled by disabling local logins for the guest. Although after enabling the guest in this way, such a situation should not bother the user.
Step 2
The second point will be to disable the ban on a previously unblocked guest from entering a computer over the network.
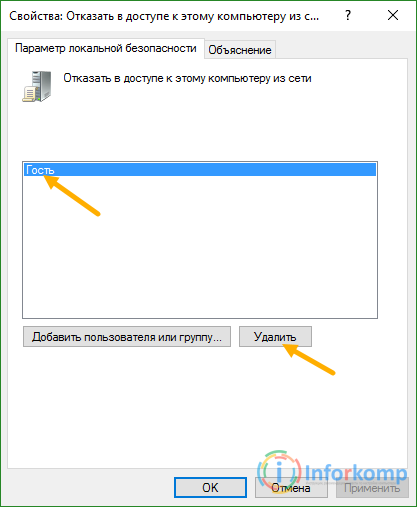
Actually, in this way we will exclude the guest from the list of users who will be prohibited from entering this computer. I note that in Windows versions"Home Edition" local policies There is no security, so on such versions you most likely won’t be able to share the printer, other than connecting to it using another computer.
Step 3
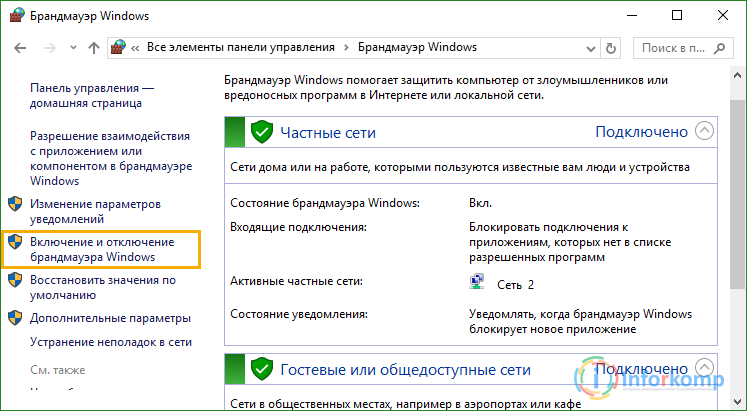
Well, the final point would be Windows firewall. This, of course, is a rather controversial point, as some recommend not touching it at all, while others insist on the opposite. As for my opinion, I, in principle, recommend that Windows XP users disable it, right down to the service that is responsible for this component.
Regarding users of Windows 7 and higher, everything is not so categorical here, and you should disable the firewall only in the corresponding section located in the control panel. However, you should not completely disable the service, otherwise you will not be able to share the printer in the future.
In general, usually in Windows 7 the need to disable or enable this component depends on the situation, so I recommend, just in case, checking the ability to connect to the printer in both cases.
Disabling the firewall in Windows 7 and higher:
Stop the firewall in Windows services XP:
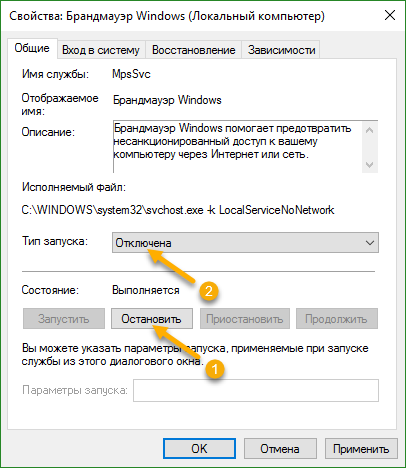
Once again, just in case, I repeat that in Windows 7 you should not disable the service, otherwise in the future you will have to encounter a problem when sharing a printer, which will be discussed later.
Setting up the printer
So, having finished with the system settings, you can now go directly to the printer itself. A little higher, we opened network access directly to the computer itself. Therefore, we will be able to log into the computer, but unfortunately we will not see the installed devices on it until the printer is shared.
In order to do this, you need to follow a few more simple steps:
But, do not rush to close this window; it is also recommended to set security rules so that other users, in the event of a failure, can at least clear the print queue.
Well, what about the printer and settings? operating system We figured it out, now you can safely move on to connecting the printer via the network.
Connecting to the printer from another computer
Well, we are already at the finish line, now we just need to connect all the other computers to our shared printer, this is done quite simply.
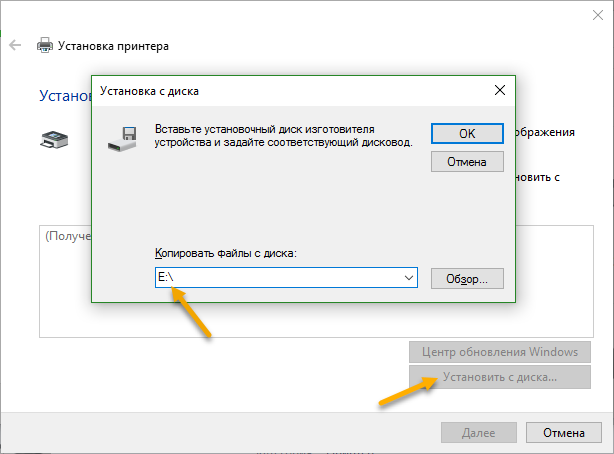
But it’s not always that simple; sometimes when you try to connect, the system may say that it does not have the necessary software for this device, so you will have to do it manually.
In addition to this option for connecting a network printer, there are several more truly good ways connections, which you will learn about in future articles, so there is only one recommendation, either subscribe to our blog updates or even better


