As a rule, problems of this kind are detected when trying to boot from a specific Flash drive. If your computing device does not see the flash drive in the BIOS, then most likely you have not made the necessary changes to the basic system of the computer, or your removable storage device is simply not bootable. However, let's take a closer look at this confusing situation: “the flash drive is inserted into the PC, but does not work properly.”
Do you know how to solve this problem effectively and easily? Now you can find detailed solutions in this article. Also, this article shows you how to manage partitions perfectly hard drive and perform data recovery on your hard drive. On the other hand, if you have other solutions to this problem, welcome to publish this essay!
Why the BIOS or computer does not see the flash drive - video
All other trademarks are the trademarks of their respective owners. Please read the following chapters carefully and follow the instructions and recommendations. This will ensure that your CCTV system is up and running as quickly and reliably as possible.
Is your USB Flash drive working?
Of course, you can suffer for a long time and conduct unsuccessful experiments in the BIOS system itself, which will ultimately turn out to be a waste of your valuable time. Because the flash drive may simply be inoperable. To verify the opposite, try enlisting the help of a testing device - insert the “capricious” flash drive into another PC.
Prepare for installation by ensuring the following information is ready. In addition, new release features are also documented on 6. The processor and memory requirements on your server depend on the size of your system. Currently you can use hard disks on server, network devices storage and other special storage devices. This means that all data except image data is backed up on the first two disks. The image data itself is not redundantly stored and is distributed across all available disks.

And in general, check whether the (seemingly faulty when you boot the PC) storage device is visible in Windows environment. That is, is USB memory detected in the operating system itself? If not, then the Flash Drive needs to be repaired. Perhaps everything will be resolved after using a special software tool, for example, a proprietary flash drive recovery utility from its manufacturer.
Updating the system BIOS - as a solution to the “invisible” usb problem
Section 18 Add a manually mounted image store to a page. It is recommended to open these ports for faster communication and lower communication costs. This is especially important for connections with low throughput with transcoding.
Every server is installed with this feature, but it is disabled by default. This is necessary for systems with grabber cards, where digitization performance deteriorates when interrupt lines are blocked. Freeing interrupt lines by disabling unused hardware elements may resolve this issue. Enter your installation preference. Warning: All data on your hard drives will be deleted! To store images, you need to configure external image storage. Select one of the installation options.
Priority BIOS settings or what, where and how...
- Insert the flash drive into the USB connector of your PC.
- Restart your computer.
- Enter the BIOS using the corresponding button on the keyboard (for those who don’t know how to do this -).
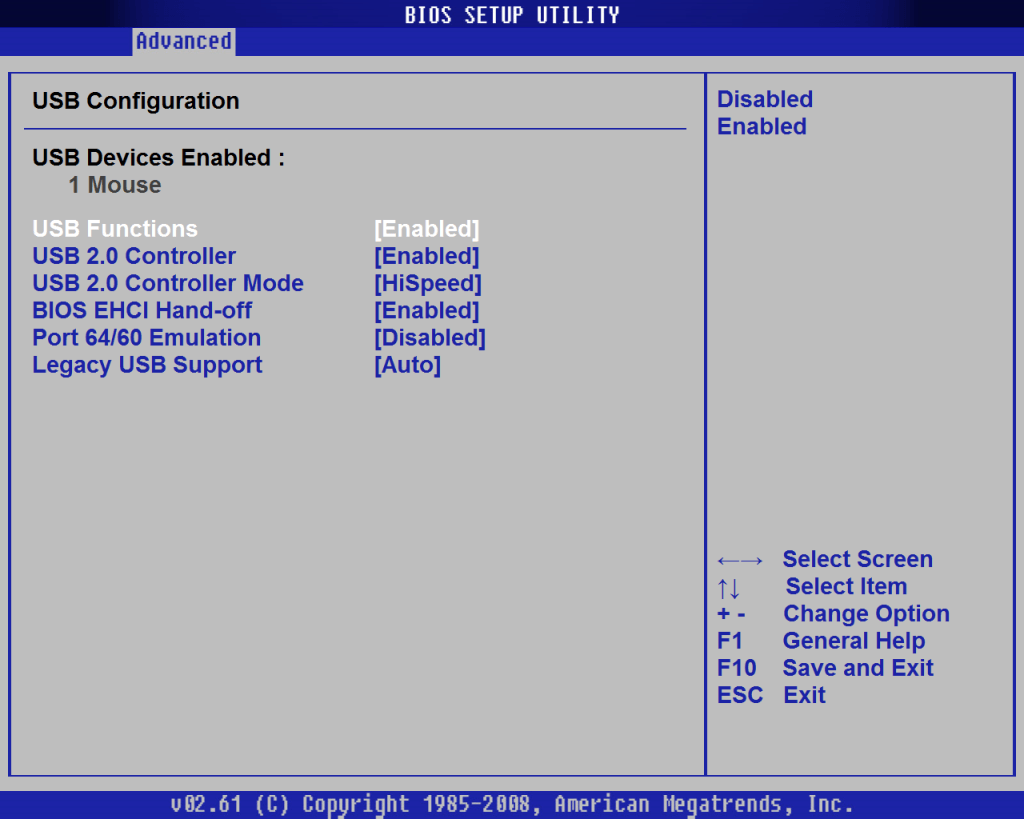
- Depending on the version of the basic microsystem, the name of the section in which the connected flash drive is displayed may be different from the “BOOT” tab discussed below. And yet, be guided by the abbreviation “USB” when searching for the required partition in the BIOS.

If you are upgrading, you need to select the upgrade option. Below. upgrades an existing system to a new version. In the "Browser Update" section of the page. Attention! Section 7 Dealing with broken disks and loaded servers on the page. The installation procedure automatically detects the number of connected hard drives and ensures the correct partitioning of available capacity. The image data itself is distributed across all available disks. In this case, no non-image partition will be created and all memory space can be dedicated to the database partition, especially the event database.
- Set to boot from a flash drive.
- Also check if the USB hardware controller is disabled.
- Save and reboot the computer.

Manual separation should only be selected in special cases and should only be carried out by specialists and trained people. Therefore, the swap partition should not be too large as it will slow down the system. 10. The size should be what you have. Starting from version 3, sections in images can have different sizes. If you plan to use external image storage, you should use this option. You must configure external image storage. You can navigate the list using the arrow keys.
Select your preferred language, e.g. You will then be prompted to specify the keyboard layout for your system. If you don't want to do this, select Skip. Once the media verification is complete, you can move on to the next step. 11. If you selected a manual split, you will be prompted to enter it. You'll be given options to choose a default layout, or you can manually create your own sections. To manually split partitions into HDD according to the above explanations.
Great if USB Flash Drive was detected and the PC switched to boot mode from the flash drive. Otherwise, move on to the next section of this article.
Boot properties of USB flash drive
Let's say you want to install operating system, the distribution of which is recorded on a removable storage device. However, in order for a flash drive to be defined as a bootable drive, it must be configured as such. In other words, during the recording process Windows installation files need to be used special utility, for example, “Rufus” (to download, click here ). Only in this case the flash drive will truly become bootable.
If you did not choose manual partitioning, you can ignore this step and continue. If it is an update, then perform as explained in the admin update command. Next, you need to set the time zone in which the system will operate. Otherwise, you do not need to enable this checkbox. Select the appropriate time zone using the arrow keys, for example. If the installation fails, make sure your hardware is installed correctly.
Then run the installation again. When installation is complete, a message indicating success is displayed. On your first reboot, you may be prompted to configure newly discovered hardware, such as capture cards. You will be prompted to identify each capture card chip. After this, the reboot will continue. Continue with 2 Completing installation and basic settings on page Completing installation and basic settings Completing installation Please log in as an administrator to manage the login system.
Storage device hardware incompatibility
In some situations, the system BIOS does not see the flash drive due to the outdated interface of the memory device itself. Make sure your USB drive is not an "ancient" 1.1 drive. However, new flash drives with 3.0 technological characteristics may also not be perceived by outdated computer systems.
Read license agreement and press Spacebar to scroll to the end. If the password you choose is shorter than 8 characters, a short message will let you know. Note: You must remember your administrator password or mark it somewhere. Subsequently, you will need to access the admin menu and change the system settings of your server. If you have lost your administrator password, please refer to the Lost Admin Password section on the page. Select the one you need file system. You have now completed the installation and you will be prompted for basic system settings.

So, detailed characteristics Your storage device can be found on the official technical support website - enter the model of the flash drive and read the information you are interested in. By the way, this action can help in solving problematic situations related to any malfunction of your USB devices(meaning the presence of a specific recovery utility on the site).
Prepare for installation by ensuring the following information is ready and continuing with the following steps. Basic system settings. Again, follow the installation program instructions according to these steps: The installation script suggests a hostname video system. So you need to assign a name to your current configuration: 13. If you need more configurations, you can define them later using the administration tool. If you do not want to use the default gateway, enter which is the local view of the server itself.
Updating the system BIOS - as a solution to the “invisible” USB problem
Sometimes it is advisable to carry out the process of software upgrading the BIOS of a microsystem. How to do this is described in detail here. However, in modern computers this operation produced by a fairly simple method.
- Visit your motherboard's technical support site.
- Download new version BIOS(a).
Note that you can easily change your time server configuration later. If you selected above that this server is a time server, you can use an Internet time server to ensure synchronization with the world. If you don't do this, your server's internal clock will be used instead. Your computer will then restart and ask you to run the post installation procedure again. Enter the appropriate address here. We recommend that you use and therefore provide the address of your system administrator.
- Using a special flasher, flash the BIOS of your computer.
However, before you begin the albeit not difficult, but still very responsible operation of “upgrading the version of the basic PC microsystem,” carefully and in detail study background information about a properly implemented update process (this may be an invaluable help for you - go to ).
The next part of the installation will ask you for certain client information required for licensing. Note that you can change the client name again in the license dialog before requesting a license. You are now prompted to set your screen resolution.
You can also configure the client to launch through the interface command line administrator. The server is licensed directly by obtaining a license key. The advantage of a floating network license is that you only need to license the total number of cameras on the network and then distribute the cameras across servers with complete flexibility. Cameras can be easily transferred between servers without retransmission. Besides, initial setup and subsequent license management of such a server network becomes much easier.
Bootable USB incompatibility of outdated computer systems - there is a solution!
Let's call such computers “exotic”. However, if you need to give your old computer the “boot from” properties USB storage", then follow the instructions below.
- Use this link - https://www.plop.at/en/bootmanager/download.html.
- After you have downloaded “Plop Boot Manager”, burn it to a CD.
- Set the BIOS to prioritize booting from the optical drive.

See below for more details. No information is transferred from your server to an external one. Remote licensing is enabled: camera # originated from remote host, user # used from local license key. There is no local license key on your server: remote licensing is disabled: without a license, you must obtain license 17. Only one demo license is possible on the server computer. Permanent license. The maximum number of users and cameras is limited only by the number of user and camera licenses you purchase. 3 Setting up floating licensing.
- Next, after the “Plop” workspace of the utility is displayed on the screen, insert USB storage into the appropriate connector (preferably the main one, which is located at the back system unit PC).

- Select USB in the bootloader window.
Now your “old man” can use a flash drive as a boot drive.
How floating licensing works. The license slave connects to the license master and checks licenses for the required number of cameras. When the master server is unavailable, the slave server continues to work for 1 week if the first connection was successful. During this period, a system warning event is generated once per day, indicating that there is no connection to the license server. After a 1-week period without connecting to the license server, the slave device stops working.
Storage device hardware incompatibility
In such a situation, you basically have 2 options: you can either ensure that the licensing server is reached, or you can disable remote licensing and enter a valid license key. In addition to this, one administrator user can always log in to the system. Setting up floating licensing. Obtaining and entering license information for a floating network license is the same as for a single server license. The number of users is also licensed. 18. As stated above, a custom server is usually best for this.
Summing up
So, the author of this article is confident that after you have read the material in the presented article, you will certainly succeed. And yet, I would like to note one important fact: most users make mistakes only because they misunderstand the problem and resort to sometimes meaningless advice from “kind Internet GURU”. At the same time, exposing your car to the critical danger of “complete failure.” Be wise when choosing one or another solution to your computer problems and your experience will always be productive!
Summarize all required cameras and user licenses and with this information, license your network by obtaining and entering a license key on the master license server. See Section 4 Obtaining and Entering License Information on page 19. Next, you need to ensure that the master server knows all the slave servers and that each slave server knows the master server. As stated above, repeat this step for all slave servers. Once you have done this for all slave servers, your network is licensed and you can continue configuring cameras and other settings. 4 Obtaining and Entering License Data To obtain license data, you need the number of cameras and users connected to your system.
In this article we will talk about a problem when a laptop only supports UEFI boot.
So, turn on the laptop, press F2 to get into the BIOS. Install the flash drive.
Now we've entered the BIOS. And when we go to the BOOT tab, here we see only UEFI mode. That is, there is no Legacy mode here.
We assume that the problem is that the Bios here is flashed without support.
You will see an input mask where you need to enter the license details: enter the name of your company or organization as the username, and then the number of users and cameras you want. Please note: for floating network licenses, you need to total all required cameras and user licenses of all connected servers. You then license the master license server with the specified amounts.
In section 3 Setting up floating licensing on the page. If you select "Permanent License", in the next dialog box you can choose between different editions with or without restrictions. You will then receive the license key by fax or accordingly. If you enter a valid license key, a message. License key was saved on the server. appears at the bottom of the license dialog box.
So, we see our BOOT MENU and here in the fourth position our flash drive should be determined, but we don’t see the name of the flash drive there.

In this case, two options are possible:
1) BIOS firmware.
2) Make a flash drive that supports UEFI boot mode.
We will use the second method. And after we have already inserted UEFI flash drive, turn on the laptop, press F2. Next, we go to the BOOT tab and here we immediately see that our flash drive has been identified. And now the download will go with it.

Press EXIT and ENTER and see if the download will work. And finally, we see that the download has started.

We hope that the information was clear and accessible. We wish you good luck. Watch the video below.
You can watch the video for the article by following the link:


