When using Yota high-speed wireless interior technology, our clients may encounter the problem of an insufficiently strong and high-quality network signal.
Yota is constantly improving equipment and improving signal quality, but decide to provide high speed internet coverage throughout the entire territory is not always possible.
The solution to the problem of insufficient Internet speed is to install a 4G antenna for Yota. An external, outdoor antenna will help strengthen signal reception and allow you to fully enjoy the benefits of using Yota mobile unlimited technology. You will receive a stable signal even where there is practically no signal.
Modern YS Service equipment is designed and manufactured in Russia. Mimo antennas for Yota and Megafon amplification are our company’s own development. You can be sure of high quality purchased products, because our 4G antennas are licensed, certified and patented.
YS Service company offers installation services for 4G LTE antennas in Moscow and the Moscow region. Our experts will visit your site at any time convenient for you.
We test the Internet speed and signal quality of all 3/4G operators (Iota, Megafon, MTS, Beeline) using special diagnostic and measuring equipment; they will find the most suitable place for better signal reception, install and configure the equipment.
Service cost
- The cost of installing a mimo 4G antenna is from 3,000 rubles. The price of the service depends on the type of antenna, the facility where it will be installed, and the complexity of the installation work.
- Please check with our operators for the cost of the service outside the Moscow Ring Road.
- Service cost for legal entities check with our operators.
Many users who have acquired a 4G mobile connection have already noticed that the market does not particularly pamper the buyer with accessories for LTE devices. There is a particularly shortage of assortment on the antenna market for amplifying the signal of a portable modem. However, a detailed study of products in the corporate segment reveals that the necessary devices are on sale, but their cost is several times higher than a decent 4G modem.
The focus of this article is a signal amplification system produced by Yota. The antenna is presented on the market in several modifications, which are present in different price segments. The reader has the opportunity to get acquainted with interesting products and learn about them specifications, and also find out how you can create from improvised means portable system to strengthen the signal.
Market leader
Undoubtedly, among all the manufacturer’s products there is a model that is awarded the title “Best Buy”. Yota (antenna) Connect 2.0 is considered a sales leader in the domestic market, because the manufacturer managed to combine many useful functions. Firstly, we are talking about mobility - the portable antenna is not only small in size, but also foldable, allowing the user to transport the device in a backpack or bag with a laptop.

The ease of connection also did not go unnoticed by the owners. For an LTE modem, there is a special USB slot on the antenna body, to which you need to connect a mobile phone. network device. But the modem is connected to a laptop or computer via an extension cord, which already comes from the signal amplification system.
You have to pay for everything
It would seem that the Yota antenna with a built-in modem has no flaws - buy a kit and enjoy broadband Internet. However, in their reviews, users express dissatisfaction with the fact that the signal amplifier only works with the device of the same name. That is, you cannot buy such a convenient and portable antenna for other modems (ZTE, MTC, etc.), since the gadget will not work at the hardware level.

Of course, there is a way out of this situation. The USB receiver on the antenna can be disassembled and the Yota controller can be carefully removed with a soldering iron. Then you need to connect the wire going to the controller with a copper cable to the antenna housing. True, the signal strength will deteriorate after removing the microcircuit, but this solution is still better than using a modem without an amplifier.
Directional system
Wireless Ethernet antennas have lost their relevance in the last decade, because many providers find it easier to extend a cable over a distance of 30-60 kilometers rather than sell expensive directional equipment. But faced with poor LTE coverage, the manufacturer had to use forgotten technologies. Yota, with the strange name Hite Grid, does an excellent job of amplifying the signal, located at a distance of up to 20 kilometers from the tower.

Yes, such a device is usually considered stationary, since it is large and bulky, and the design is not suitable for transportation. But here it is up to the user to decide what is more important to him - decent transfer speed or convenience. The peculiarity of such an antenna is the fact that there is no connection to either the provider or the manufacturer of 4G modems.
Higher, faster, stronger
But parabolic systems have taken root poorly in the domestic market. The thing is that Russian-speaking buyers are able to notice the difference between the satellite signal and the operation of the 4G network in which the Yota modem operates. The external antenna, made in the form of a dish, undoubtedly attracts attention appearance, but when it comes to signal quality, the device has nothing to surprise the user.
Directional antennas in the form of parabolic dishes are offered by Baltic, Polish and Chinese manufacturers. Externally, they are almost identical and differ only in the diameter of the disk and the name. On the domestic market, of the entire similar range, we can only recommend the Sky Flex brand, which is able to demonstrate signal amplification. When purchasing, you need to pay attention to the fact that the company logo is not made in the form of a sticker, but is painted on the plate. On the sign with serial number the inscription Sky Flex Yota is duplicated by the imprint.
Installation features
All directional antennas have one unpleasant feature - the high-frequency cable from the receiver to the modem is very expensive. It is not difficult to guess that for all owners of a Yota gadget, connecting an antenna installed on the roof of a house will not be cheap. The problem can be solved by purchasing additional accessories for the signal amplification system.

If a pigtail communication cord is used to connect the modem, you can install the modem (reliably fastened and protected from moisture) directly on the antenna housing. And ensure the connection to a mobile device or computer is active (10-30 meters). Alternatively, many users use it as an extension cord.
Alternative from folk craftsmen
Many users claim in their reviews that they use homemade antenna for Yota. They were forced to create the device with their own hands by the manufacturer himself, who set an inflated price for his products. The role of a directional system can be played by the usual TV antenna, popularly known as Polish. To do this, you need to disassemble the modem and, after removing the wires from the built-in amplifier, connect them to the terminals of the television antenna.
In fact, you can replace the Yota accessory (antenna) with any available device that can amplify the signal. Even an ordinary piece of fittings or copper cable is suitable as an antenna. The only thing the owner needs to know is the principle of operation of the receiver and the circuit, which should not close the circuit.
From improvised means
An ordinary tin can or colander will do just fine as an alternative. A directional antenna can be assembled in several ways: using an active circuit and using the line-of-sight principle. The most simple solution in extreme conditions for any owner mobile device and the modem can be used using ordinary aluminum containers from carbonated water or beer. The jar is washed, its bottom is cut off with a knife and the modem connected via USB interface, fixed in the hole with reverse side.

An advanced system using an active circuit requires the owner to disassemble the modem and remove two wires from the built-in amplifier. The designer will also need an empty cigarette pack, a nail or a large cross-section. You need to pierce a cigarette pack with a nail and secure one end of the cable coming from the amplifier to a metal cap. The second cable is connected to the can circuit. The pack must be inserted into the jar so that the metal does not come into contact with the outline of the jar. Such a simple mechanism can receive a 4G signal even at a distance of up to 20-30 kilometers.
Finally
As practice shows, there are many options to solve the problem of signal amplification for an LTE device. For people with unlimited financial capabilities, a solution from the Yota manufacturer is suitable. The antenna will cope with all the tasks and provide the owner with high-quality communication. Users who have a limited budget should not be upset either - it is very easy to make a directional antenna using improvised means; you only need a little knowledge in electrical engineering and desire.
Good afternoon. People living in a private house often face the problem of lack of high-quality Internet. ADSL is rarely used today, and the speed leaves much to be desired. It is especially problematic if the house is new and there is no telephone, then you will have to pull the wire for the sake of not very fast internet. And even if there is a telephone, it is not a fact that the line laid a long time ago will be suitable for the Internet. Fiber optics are expensive. Some add up with neighbors and then the costs may become acceptable. However, not everyone needs good internet. Remains Mobile Internet. 4G technology allows you to reach a maximum of 150 Mbit/s, but for such a speed you need high-quality signal reception. The built-in antenna (or rather two) of the modem is not always enough for this. So, today we will make a Kharchenko antenna for the Yota 4G modem. On this moment YOTA 4G LTE WLTUBQ-108 modems are available for sale.
We have to:
- YOTA 4G LTE WLTUBQ-108
- Copper wire with a cross section of 2.5 mm
- Sheet of iron
- Coaxial wire with a resistance of 75 Ohms, thin
- Double pigtail from MS156 to SMA Female
- SMA Male connector
- Drill
- Drill 3 mm
- Plastic tube or any dielectric
- Soldering iron
- Solder, rosin
- Hot-melt adhesive
- Clamps
- USB extension cable
Step 1 Prepare the modem.
Before you start making the antenna, you should connect the modem to the computer. Go to the modem settings at 10.0.0.1 and write down the SINR/RSRP values. This should be done to compare the change in signal level after connecting the antenna. The modem is quite easy to disassemble. You need to use something sharp, for example an awl or a knife, to pry and remove the top cover. This must be done very carefully, since there is a built-in antenna under the cover. The main thing is not to damage it. Removing the cover:


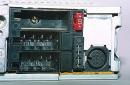
And on the reverse side it looks like this:

Our modem supports MIMO technology. MIMO (Multiple Input Multiple Output, multiple inputs, multiple outputs) is a spatial signal encoding technology that allows you to increase the channel bandwidth. When using this technology, two or more antennas are used for data transmission and the same number of antennas for reception. In our case we have two antennas. Each antenna has its own socket:

One socket is located at the top of the modem, the second is on the right side. It is not good to leave the modem open, so placing the case on the modem, measure the locations of the holes for the sockets and drill with a drill with a diameter of 3 mm:

It is quite difficult to become extinct. After drilling the holes, put the case on the modem and see if the holes match the sockets. If necessary, enlarge the holes with a knife in the desired direction. After making sure that the holes coincide with the sockets, put on the case and close the top cover.

We will connect the antenna to specially prepared sockets. For this we need an adapter. On one side, there will be two MS156 connectors (we connect one antenna to two sockets), on the other side there will be a high-frequency SMA Female connector. You can order it on aliexpress or buy it in a radio parts store:

Connect the pigtail to the modem:

At this point, we put the modem aside for a while.
Step 2 Antenna calculation.
There are a lot of antenna options. In my opinion, the most effective and easiest to manufacture is the Kharchenko Antenna. It is named after the engineer who developed and described the design of this antenna - Kharchenko K.P. We will make the antenna vibrator from copper wire with a cross section of 2.5 mm. You can use a wire with a cross section of 2 mm. The wire is easy to buy at an electrician. Before making the antenna, the insulation of the wire should be removed. The vibrator consists of two squares connected at one of their vertices and with the sides separated. The antenna wire is soldered at the connection points of the squares. The antenna input impedance is close to 50 ohms. I chose 75 ohm cable, although it also works well with 50 ohm coaxial cable. The length of the sides of the squares is λ/4, where λ is the wavelength. In our case it is 115 mm. We make a vibrator according to the following scheme:

Where:
Center frequency f: 2600 MHz
Antenna characteristic impedance ρ: 50 Ohm
Wavelength λ: 115 mm
Size L1 (outside square): 28.9 mm
Size L2 (inner side of square): 27.6 mm
Size L3 (total frame length): 81 mm
Size L4 (frame width): 40.5 mm
Size L5 (gap at connection point): 1.7 mm
Vibrator-reflector distance D: 13.2 mm
Dimension B (reflector width): 115 mm
Dimension H (reflector length): 115 mm
Vibrator wire diameter: 2.5mm
Total wire length (with allowance for turns): 237.9 mm
Step 3 Assemble the antenna.
Solder the wire to the vibrator. In the end it should look like this:

The reflector can be made from almost any metal sheet. It is also possible to manufacture a mesh reflector. I chose and recommend that you make it from metal from an old system unit computer. The thickness is sufficient and the coating helps a lot. Cut out a square with a side of 115 mm. You can cut more, I indicate the minimum required side of the square. We make a 6 mm hole in the center. In the corner of the reflector we also make a 6 mm hole for mounting the antenna. Then we take a small plastic tube or a tube made of any dielectric. We cut off 13 mm from it and, using hot glue, attach the resulting part in the center of the reflector, so that the holes of the reflector and the tube coincide:

We pass the wire with the soldered vibrator into central hole reflector. Use hot glue to fix the vibrator. Before installation, think carefully about the installation location. The antenna must be positioned so that the vibrator is horizontal. It also needs to be turned with a vibrator towards the receiving tower. It is better to place the antenna indoors. If you plan to use it outside, you should take care of waterproofing the antenna. I mounted the antenna on the window slope on the street. To ensure that as little rain and snow as possible falls on it, I secured it in the upper part. Thus, it is, as it were, under the visor:
Don't forget to drill a hole in the window frame and thread the wire through it.
Step 4 Connect the antenna to the modem.
We install an SMA Male connector at the end of the wire. The middle contact must be soldered, the outer braid is fixed with a metal tube, and insulated with heat shrink or electrical tape.
In this article we will tell you how to connect external antenna to the Yota modem.
Navigation
Today there is a special Yota LTE modem on sale with connectors for connecting an external antenna. As a rule, there are no more than two of them, so that you can connect an antenna with two or one input. The device is connected to the antenna via a pigtail in the same way as before with the Samsung SWC-U200 modem.
Standard Yota modem
It was created for users of a WiMAX antenna that connected to Samsung device SWC-U200. It allows you to quickly switch between WiMAX and LTE. By the way, to do this you only need to change the device itself and the pigtail.
By the way, today there is a lot of information on the Internet about the possibility of soldering an old Samsung connector, or even soldering a pigtail into modem connectors. Remember that you can do this by hand, which means you won't necessarily end up with the same result as the person who provided the instructions. But we will talk about ready-made versions.
3G/4G LTE modem ZTE MF820D with Yota SIM card

This modem works perfectly with the Yota network and fully complies with its standards. Modem brand – ZTE. Accordingly, no one blocked it, and it can work with all operators.
Advantages:
- Versatility. Due to its features, the device can work with any SIM card
- High sensitivity to signal perception
- The presence of two spaced antennas at an angle of 90 degrees
- Support for Yota network standards
- Lack of a company web interface. In this case, control is used through the standard modem menu
- The brand is not officially supported by Yota
The biggest advantage of the device is that it can work with different network standards, i.e. 3G and 4G. So, if a subscriber leaves the Yota service area, he can insert a SIM card from another operator and continue to safely use the Internet.
If you want, you can get an Iota SIM card included with your purchase.
Internet center GemTek Yota CPE

This device is multifunctional and can work as an LTE modem, router, access point wireless internet. In addition, it has two ports for IP telephony and two connectors for a local network. The router has been certified by Yota.
Equipment Features:
- You can connect an external antenna
- Built-in LTE modem
- There is a module for connecting to Wi-fi. Moreover, up to 250 computers with the N function can connect to it
- Two LAN ports
- Two ports for connecting a landline phone
- Opportunity remote control
Outdoor BOX for installing an LTE modem and router

It often happens when the signal level of the network is not so far from the location of the router and computer. For example, if the office is high or, conversely, low, the signal there will be poor, but outside the modem will perform its functions just fine.
A kit specifically for the street will help you here. It can be installed at a distance of up to one hundred meters from the nearest outlet. Then the signal and power will be transmitted only through one cable.
The kit includes:
- Street box with fastenings
- Lightning rod
- Power kit
- Kit for fixing the modem and router
- USB cable
- Antenna outputs
Features of operation:
- Outdoor placement at a distance of up to one hundred meters
- Connecting an antenna with two connectors
- Compatible with different models routers
- Compatible with any USB modem that does not have an antenna-free output
Yota router, LTE router – DrayTek VFL-200

This is already improved equipment from Yota. The router already has firmware that supports many modem models. The router has a special Yota company icon, which makes it possible to hope that new versions will be supported by the company.
The device has a built-in professional program that makes it possible to configure operating modes. You can change NAT to MTU, create several separate local networks, restrict access to some users or only new ones, and so on.
Features of operation:
- Yota company icon, ability to work with different modem models
- Several operating modes such as: NAT, DynDNS and Port Forwarding
- Remote access to device management
- Possibility of creating a backup access channel
- Strengthened Wi-fi signal
The redundancy function may be required when connecting wired internet and quickly switch from one service provider to another, and with the help of remote control you can easily monitor all devices at once from one computer.
In addition, the router is already configured to work with Yota LTE, but you will have to configure additional services yourself or contact specialists.
Video: How to connect an external antenna to a Yota modem?
There are situations when the Internet speed does not meet the needs of customers. In this case, it’s worth thinking about how to strengthen the Yota signal. But before you think about whether you need an amplifier Yota signal in one way or another You should first pay attention to the following factors:
- presence of obstacles in the room;
- station distance;
- weather;
- network stability;
- speed changes;
- number of devices used.
If none of the above appears, then nothing needs to be strengthened. Otherwise, you need to decide how to amplify the signal. Basically, an amplifier is required for the lu150 4G modem.

If the Yota signal level is low, you need to use an external antenna, which will help increase the modem signal and make it more stable. To increase the Yota signal level, the use of antennas is considered an effective way. But there are situations when it is enough to place the connected Yota modem on the street.
You can buy an amplifier at a communication store. Branded equipment for these purposes costs a lot of money and subscribers do not always have this amount available. If it is not possible to purchase an amplifier, you can make it yourself. Moreover, this can be done using improvised means. Yota signal boost completed with my own hands Much more effective than store bought.

Do-it-yourself signal amplification
A do-it-yourself antenna for Yota can be made from the following items:
- pots;
- aluminum basin;
- foil;
- beer can.

Before you begin directly creating an amplifier, you need to prepare the following tools:
- Screwdriver Set;
- soldering iron;
- glue gun
In order for an external antenna for a modem from Yota to live up to expectations for its construction, it is necessary to have a high-frequency antenna cable, copper wire, plastic pipe. Another important point worth knowing is the broadcast frequency and a diagram of how to connect the antenna to the Yota modem. There is a lot of information on how to connect an antenna directly to a device on the Internet.

The most effective is considered to be a home-made antenna for LTE Yota from Kharchenko. It is a figure eight made of copper wire that needs to be attached to the reflector. When making a figure eight, you need to strictly maintain its dimensions. The only drawback is that in this case you will need to connect the cable to the connector located on the case. If there is no such connector, you will need to solder the cable to the internal board. As for the advantages, your signal amplifier for the Yota modem can be placed at a high altitude, which will help enhance signal reception even more.
The Yota antenna can also be made from an old unnecessary pan with a capacity of about three liters. In addition, an aluminum basin or a cardboard box, which must first be covered with foil, may be suitable. The modem is located in the center. If necessary, you can change the orientation of the Yota 4G modem inside the reflector to the desired values. In this case, there is no need to solder. The device is attached with a glue gun or improvised materials.

Another option for designing an amplifier is to use an aluminum can. It requires cutting off the top and making a side cut 40 cm from the bottom. Place the modem in it and connect an external antenna to the computer. To check the indicators, you need to go to the page located at 10.0.0.1. and perform testing.


Now you know how to strengthen the signal of a 4g modem and you can easily and quickly use one of the methods described above to get maximum Internet connection speed from Iota.