With the release of the new operating system from Microsoft, many PC users are wondering: how to create bootable flash drive Windows 10? This is not surprising, because in our time, flash drives have almost supplanted optical drives, and many computers are produced without optical drive. In this article, we will describe in detail the process of burning a bootable USB flash drive, and also consider an example of loading it.
How to make a bootable Windows 10 flash drive using the UltraISO Disk Editing Utility
Utility UltraISO is a fairly popular tool for editing and burning various DVD and CD images to discs. To create bootable USB flash drive using the UltraISO utility, we need an image from a licensed dozen or a DVD with the original OS. In our case, we will use the license Windows disk 10 64bit. We will need this disk to create an ISO image for the subsequent creation of a bootable USB flash drive.
First of all, download and install the UltraISO program. Then install the license disk with the OS in the DVD drive. After that, we will launch UltraISO itself.
Now let's go to the menu Tools» and select the menu item « Create CD image...". You can also call the image creation menu with the F8 key.
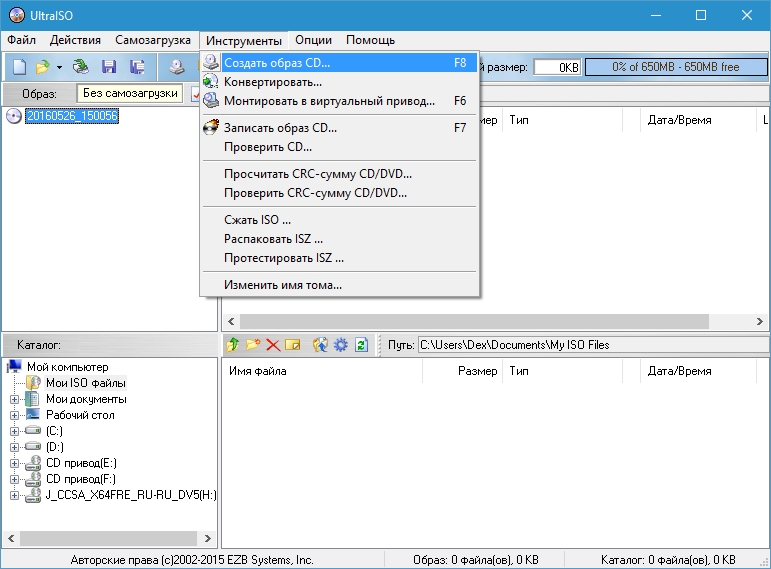
After the done actions, a window should open, as shown below.
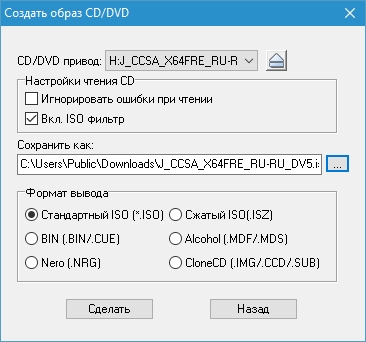
At this stage, you need select drivewith license Microsoft Windows 10 64bit. Specify the location to save the image and the type of image. In our case, this is an ISO image. After editing the settings, feel free to click the button Make, after which the process of burning the ISO image to the previously specified folder will begin.
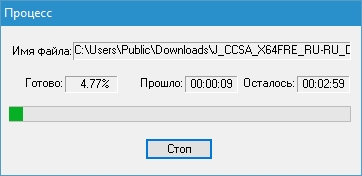
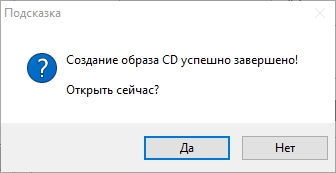
After finishing the recording, the UltraISO wizard will create the ISO image we need with Windows 10 64 bit.
After the work done, you can start creating a USB flash drive with using UltraISO. To do this, load the ISO disk image we created into the program and go to the menu "", where we select the item " Write image hard drive ».
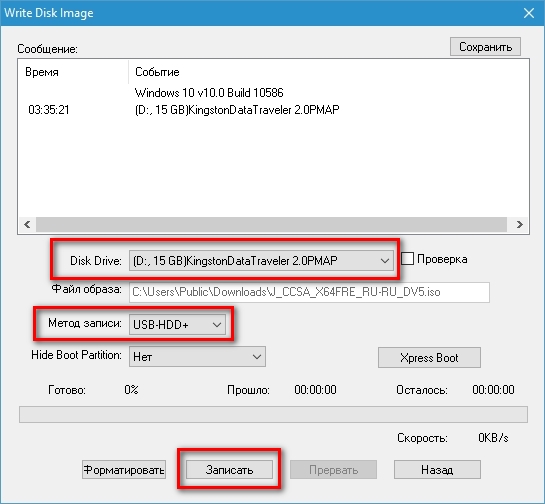
In the window that opens, you can see that we already have a flash drive installed. KingstonData Traveler 2.0PMAP". You can also see that the write method is " USB HDD+».
For the correct creation of a bootable USB flash drive, it is better not to change this recording method.
The final step will be clicking on the button Write, after which the creation of a bootable USB flash drive with a dozen will begin.
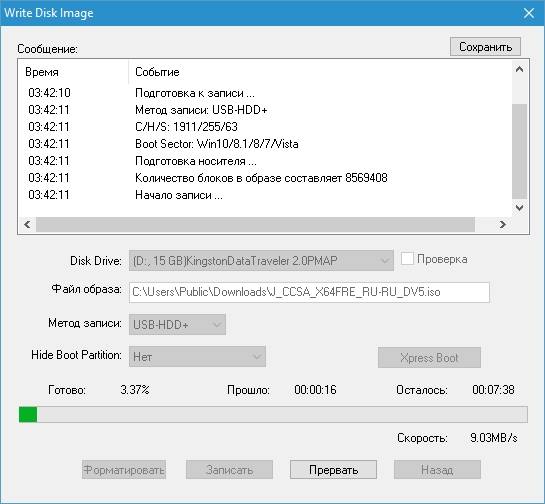
After the wizard completes, the bootable USB flash drive will be ready. The example shows that creating a USB flash drive using the UltraISO utility in question is quite simple.
We solve the problem with the help of a utility from developers from Microsoft
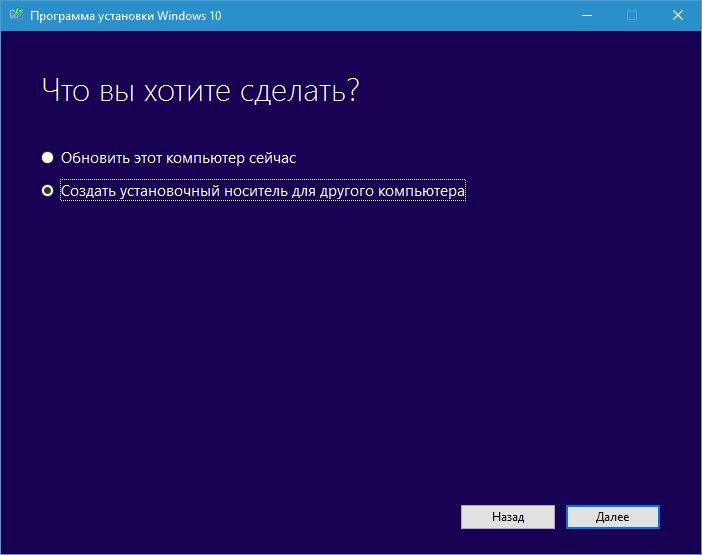
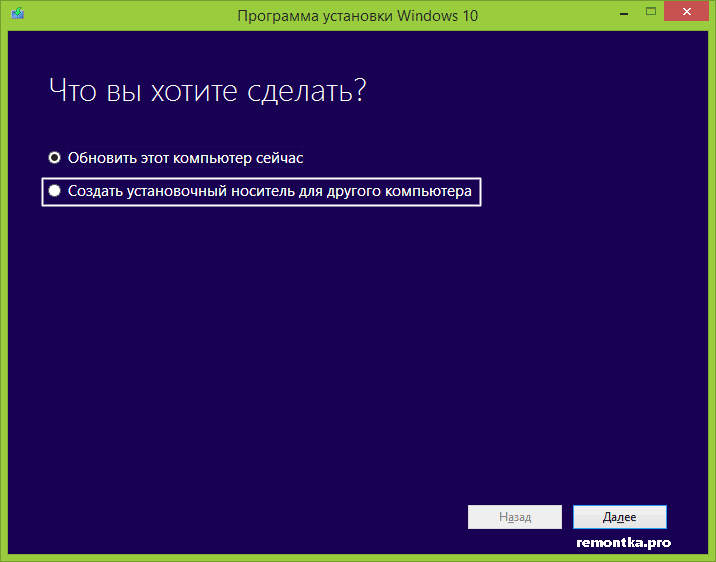
To make it easier for PC users to download ISO images and create bootable flash drives, the developers have released a utility Media Creation Tool. The application can be downloaded from www.microsoft.com. After downloading, the utility can be launched immediately, as it is portable and does not require installation. In the MediaCreationTool application window that appears, select the second item, which will allow us to download and burn the ISO image to a USB flash drive.
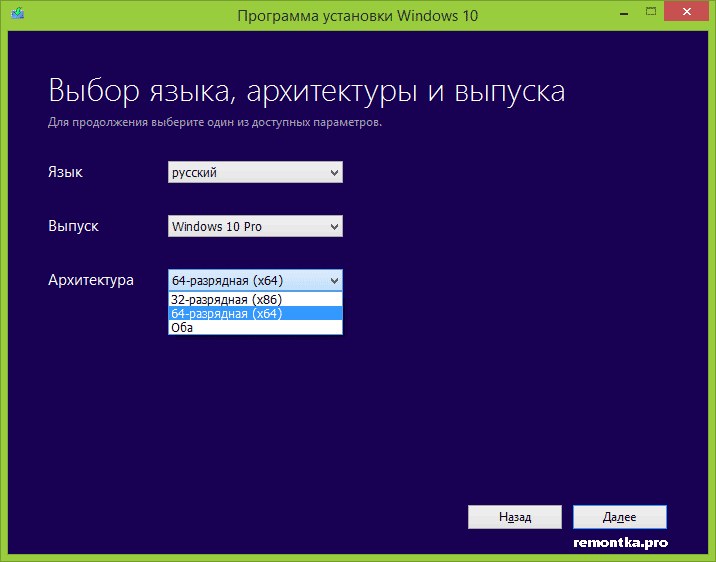
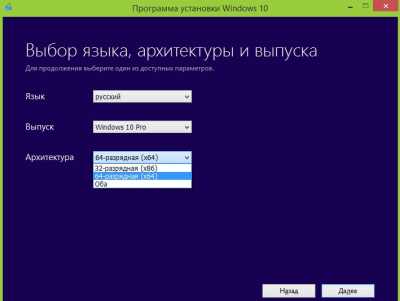
In the next window, we need to select the language, edition and architecture of the operating system. If in paragraph " Architecture» we will choose the value « Both”, then we can create a multiboot USB flash drive.
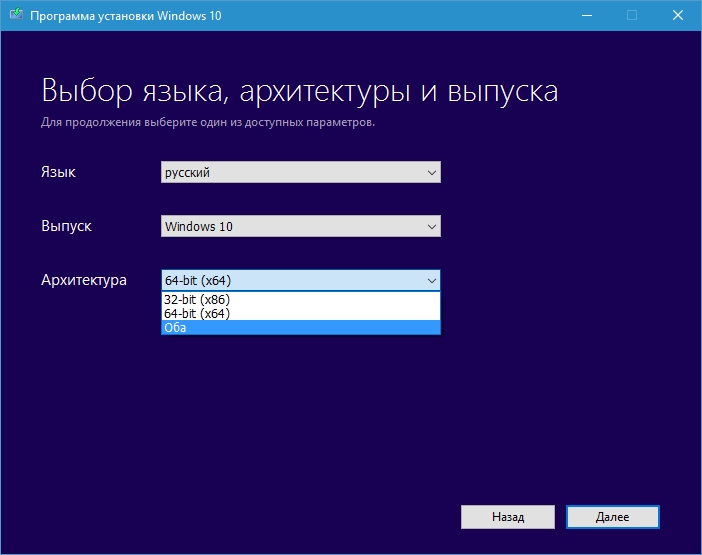
Such a multi-boot USB flash drive will include two versions of the OS, namely 32 and 64 bit. In our case, we will select the item " Both' and move on to the next step.
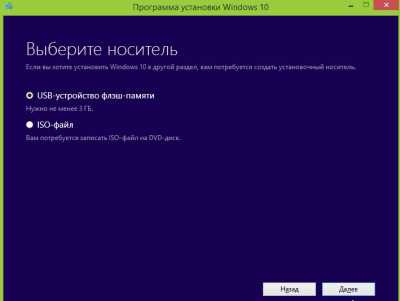
In this window, we will leave the first item, as it will allow us to create a boot drive, and continue the wizard.
![]()
At this stage, the wizard will prompt you to select the drive on which Microsoft Windows 10 64 bit will be written. The next step is to download and write dozens of files to a USB flash drive.
After the wizard completes, a bootable USB flash drive will be created.
The example shows that it is easier to create bootable drives using MediaCreationTool than in the UltraISO example.
The boot drive created by this program will support UEFI BIOS. After installing such Windows, it will be fully compatible with all motherboards that support UEFI BIOS.
The main benefit of using a UEFI compatible OS is security. In the following example, we will also look at an example of creating a bootable flash drive using the Rufus utility, in which you can create USB flash drives with support for the new UEFI BIOS BIOS format.
We solve the problem with the help of the Rufus utility
Utility Rufus a relatively young program, but has already won an army of fans due to its simplicity and speed. You can download it from the official website https://rufus.akeo.ie. Just like in the previous example, the utility does not require installation. Therefore, we can immediately run the downloaded installer.
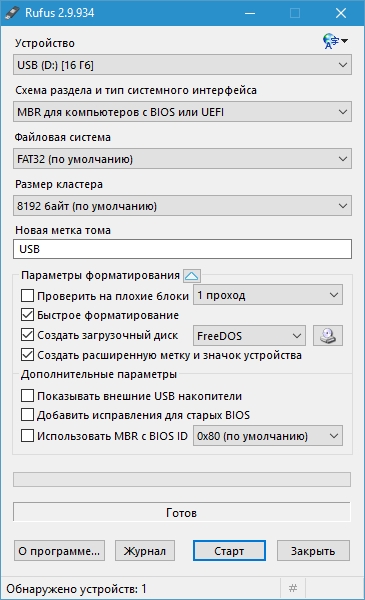
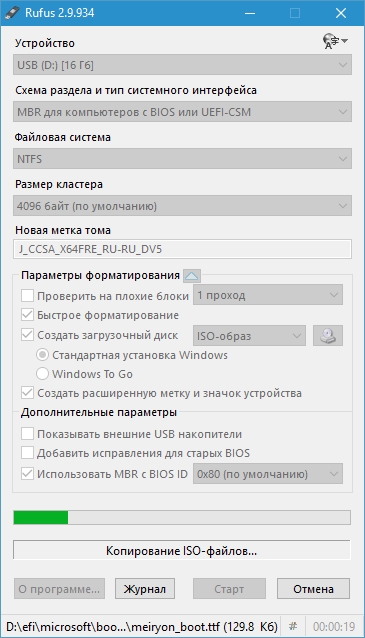
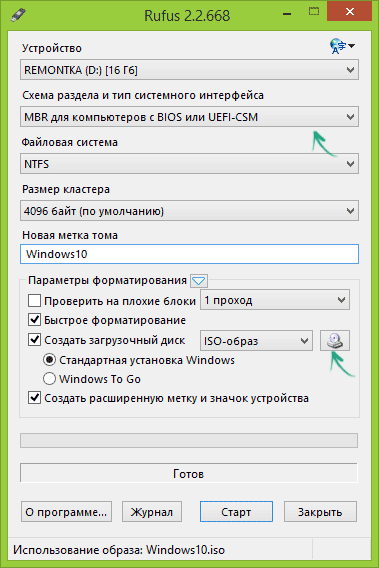
In the block " Device"You can see that we have a 16 GB flash drive installed. In the next block, you can select the type of supported BIOS. In our case, an item is selected that applies to both the old and the new UEFI BIOS. If necessary, you can choose the option for motherboards with regular BIOS, and with UEFI.
In the block " Formatting Options» You do not need to set any options, since after selecting an image with a tenth, the utility will configure everything automatically.
To select an image with Windows 10 64 bit, you need in the " Formatting Options» Click on the button in the form of an optical drive icon, and then select the required ISO image.
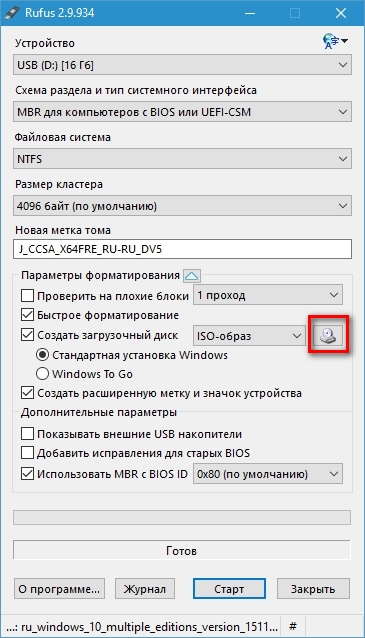
As you can see in the image above, the utility has configured all the settings automatically and is ready to create a bootable USB flash drive.
Pay attention to the item " Windows To Go» in the options that appear. By selecting this item, you can. In some cases, this is very convenient, but it is worth considering certain parameters of your flash drive. The flash drive must be at least 32 gigabytes and preferably USB 3.0 format.
Select the normal installation option and click the Start button. This action will start the process of writing the installation files to the USB flash drive and also make it bootable.
As you have already noticed, if instead of an ISO image you have optical disc with Windows 10 64 bit, then you will have to use other utilities to create it. To create an ISO image, you can use utilities such as DAEMON Tools, Alcohol 120% and the previously described UltraISO program. In addition, the image for Rufus can be downloaded by the MediaCreationTool utility described above. Generally Rufus program does its job very well and creates a bootable USB flash drive faster than other programs. In the following example, we will describe the launch of a bootable USB flash drive created by the Rufus utility.
Run the created bootable USB drive using Rufus
First of all, a bootable Windows 10 flash drive created with help Rufus, must be installed in a free USB port on the PC where the tens will be installed. The computer on which the installation will be performed is fully compatible with the UEFI BIOS. To install, restart the computer and when it starts, press the F11 key. This action is necessary to bring up the boot drives menu (BOOT MENU).
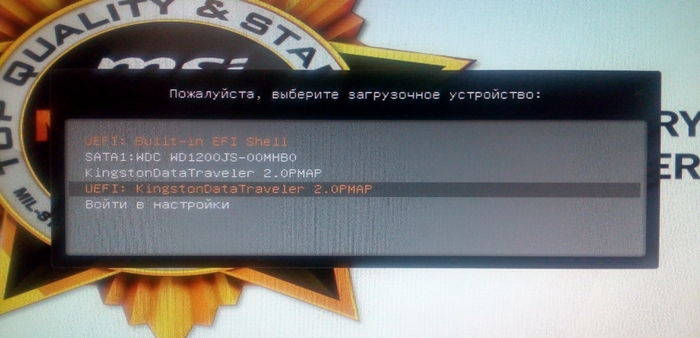
The image above shows that there is two options for launching a flash drive:
- KingstonDataTraveler 2.0PMAP;
- UEFI: KingstonDataTraveler 2.0PMAP.
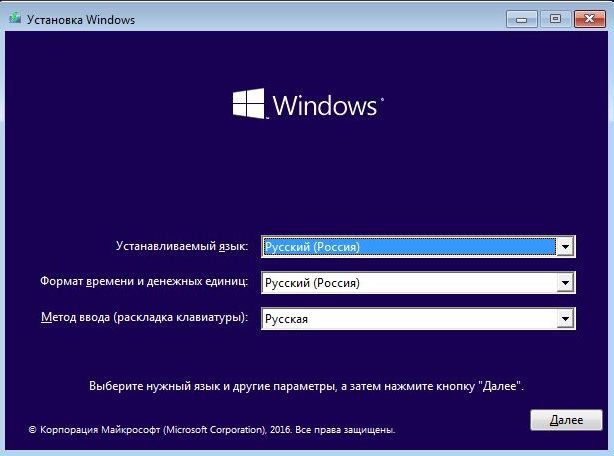
The first option will launch our USB flash drive with regular BIOS support, and the second option will launch it with UEFI BIOS support. In our case, we will select the item " UEFI: KingstonDataTraveler 2.0PMAP". By selecting this item, we will boot into the standard window Windows Installer 64bit.
I would also like to note that the BOOT MENU on different computers can be called with the F12 key or another.
In addition to the BOOT MENU, the launch of our flash drive can be configured directly through the BIOS. On motherboards, the section responsible for selecting the drive boot priority is usually called "". For example, below is the BIOS section "Boot" on an MSI motherboard.
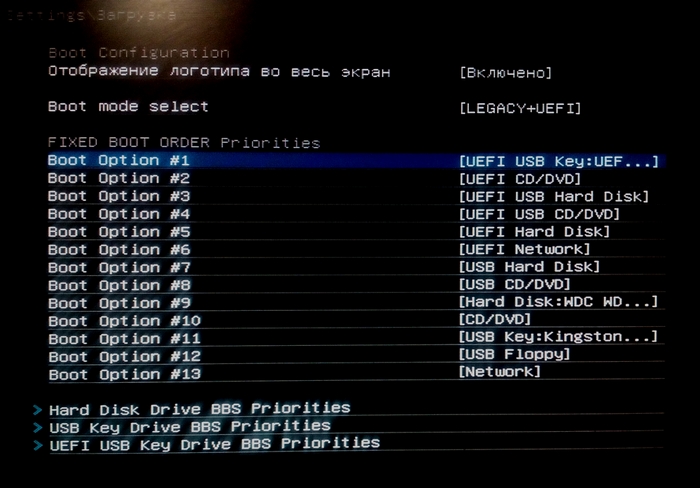
In this section, you can see that the USB flash drive with UEFI support is selected first for booting.
The example shows that with the launch of a USB drive with installation Windows files 10 any PC user can handle.
Summing up
In the article, we looked at three options for creating a bootable USB flash drive for Windows 10. All three options are simple, so even a novice PC user can handle them. Which option to choose is up to you. In addition to the considered examples of creating a bootable USB flash drive, we also considered an example of its launch. We hope the material described in the article will help you create a bootable USB flash drive with Windows 10 and you will be able to take full advantage of all the features of the new operating system from Microsoft.
Related videos
So, you are faced with the need to reinstall or install Windows 10, but you do not have a boot drive. How to be in this situation? On help will come bootable USB flash drive Windows 10. This instruction tells how to make a bootable Windows flash drive 10 in several ways.
There are many ways to create a bootable flash drive. Simple and not very, official and third-party. Let's consider a few of them.
Important: you must have a flash drive with at least 4 GB of free space.
Bootable Windows 10 Flash Drive Using Media Creation Tool
Create bootable Windows 10 flash drive via command line
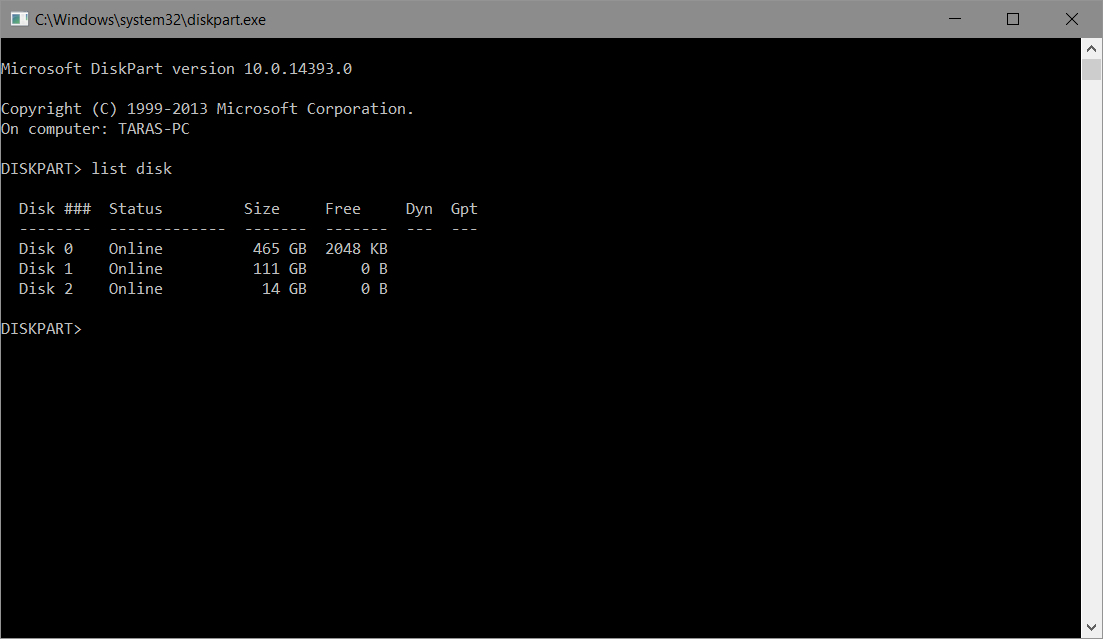
All methods above are for the weak. Real hardcore users burn installation media via . Here's how to do it.
Of course, for 99% of users, the first method will be the easiest, but to diversify your life or increase your experience, you can use any of the described ones. You never know what you will have at hand at a critical moment.
The new OS is on its way (already released), so let's talk about how to create a bootable Windows 10 flash drive. However, the methods have not changed much compared to the previous version operating system: just as before, there is nothing complicated in this task.
The article describes both the official way to make a bootable USB flash drive with the original Windows 10 Pro or Home using a proprietary utility, as well as other ways and free programs to help you burn the installation USB drive from ISO image and with Windows 10 to install the OS or restore the system. May be useful later step by step description installation process: .
Note: may also be of interest - ,
Bootable USB flash drive Windows 10 the official way
Immediately after the release of the final version of the new OS, the Microsoft website appeared Windows utilities 10 Installation Media Creation Tool, which allows you to create a bootable USB flash drive for subsequent installation of the system.
It is important to note here that with this program you get the original Windows 10 Pro (Professional), Home (Home) or Home for one language. And such a flash drive is fully suitable only if you either have Windows key 10, or you have previously upgraded to new version system, activated it, and now you want to perform a clean installation (in this case, skip entering the key during installation, and when it is finished, log in using your account Microsoft, the system will activate automatically).
You can download the Windows 10 Installation Media Creation Tool from the official page https://www.microsoft.com/ru-ru/software-download/windows10 , while downloading the version in the same bit depth (32-bit or 64-bit), which the system currently installed has.
Once launched, you will be prompted to either upgrade this PC now or create an installation drive. We are interested in the second option.
The next step is to select the language, version and Windows bit depth 10, which needs to be written to a USB flash drive. IN latest versions utility item Windows 10 Pro is missing. We simply select Windows 10, it will contain both professional and home versions (with a choice during installation). There is also a mark - use recommended settings, it means that the version that corresponds to the version on this computer will be downloaded.
The last step is to indicate that you need a USB device, select the connected USB flash drive and wait for the files to download and write Windows distribution 10 to your USB stick.
At the end, you will have a ready-made drive, which is useful not only for a clean installation of the system, but also for its recovery in case of failures. Additionally, you can watch the video on the official way to make a bootable Windows 10 flash drive below.
Create a bootable Windows 10 flash drive without programs
The first and easiest method requires that your motherboard (on the computer where the bootable flash drive will be used) be with UEFI software (most motherboards the last 2-3 years), i.e. supported EFI boot.
You will need: an ISO image with the system and USB stick suitable volume, formatted in FAT32 (mandatory item for this method).
The very steps to create a bootable Windows 10 flash drive consist of the following steps:
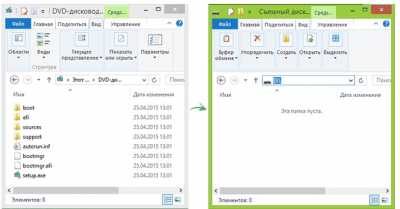
- Mount Windows image 10 in the system (connect standard means or with programs like Daemon Tools).
- Copy all contents of the image to USB.
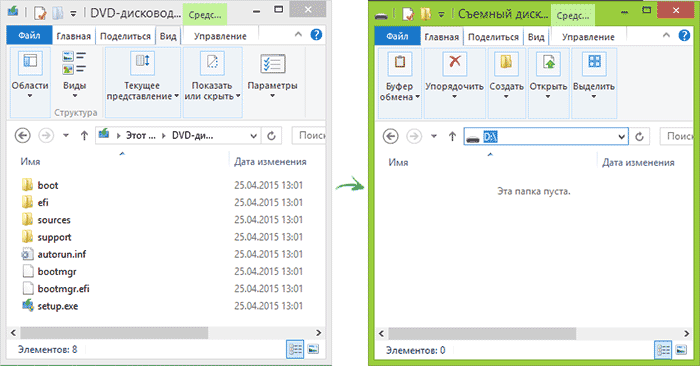
Ready. Now, provided that the computer is set to UEFI boot mode, you can easily boot and install Windows 10 from the manufactured drive. In order to choose to boot from a USB flash drive, it is best to use the Boot Menu of the motherboard.
Using Rufus to Burn the Install USB
If your computer or laptop does not have UEFI (that is, you have a regular BIOS) or for some other reason previous way did not fit, Rufus - great program(and in Russian) to quickly make a bootable USB flash drive for Windows installation 10.
In the program, just select the USB drive in the "Device" item, check the "Create a bootable disk" item and select the "ISO image" in the list. Then, by clicking on the button with the image of the CD drive, specify the path to the Windows 10 image.
You should also pay attention to the choice of the item in the “Partition scheme and system interface type”. In general, the choice should be based on the following:
- For computers with regular BIOS, select "MBR for computers with BIOS or UEFI-CSM".
- For UEFI computers - GPT for UEFI computers.
After that, just click "Start" and wait for the files to be copied to the USB flash drive.
Details about using Rufus where to download and video instruction -.
Windows 7 USB/DVD Download Tool
Official free utility Microsoft, originally created to burn a Windows 7 image to a disk or USB, has not lost its relevance with the release of new versions of the OS - you can still use it if you need a distribution kit for installation.
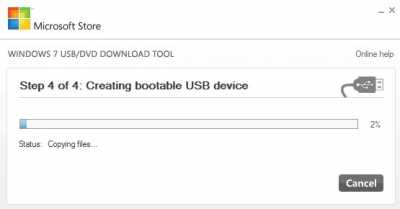
The process of creating a bootable Windows 10 USB flash drive in this program consists of 4 steps:

This completes the creation of the Flash disk, you can start using it.
Download Windows 7 USB/DVD Download Tool at this moment you can from the page http://wudt.codeplex.com/ (it is Microsoft that indicates it as the official program for downloading).
Bootable Windows 10 flash drive using UltraISO
The UltraISO program, which is used to create, modify and burn ISO images, is very popular with users and, among other things, can be used to make a bootable USB flash drive.

The creation process consists of the following steps:
- Open image ISO Windows 10 in UltraISO
- In the "Boot" menu, select the "Burn hard disk image" item, and then use the wizard to burn it to a USB drive.
The process is described in more detail in my manual (the steps are shown in Windows example 8.1, but will not differ for 10).
WinSetupFromUSB
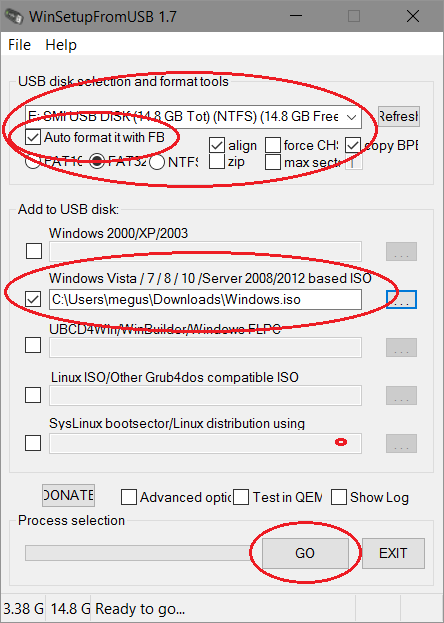
WinSetupFromUSB is probably my favorite program for burning bootable and multiboot USBs. It can also be used for Windows 10.
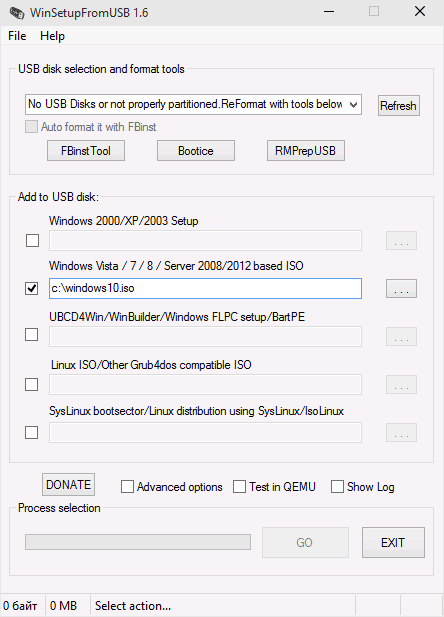
The process (in the basic version, without taking into account the nuances) will consist of selecting a USB drive, setting the “Autoformat it with FBinst” checkbox, specifying the path to the Windows 10 ISO image (in the field for Windows Vista, 7, 8) and pressing the “Go” button .
Conclusion
In fact, in order to make a Windows 10 installation USB flash drive, all the methods that work for Windows 8.1 are suitable, including through the command line, numerous. So, if the options described above were not enough for you, you can safely use any other for the previous version of the OS.
Making a bootable USB flash drive for Windows 10 is not difficult when you have detailed instructions in front of your eyes. And on this page you will find detailed instructions describing 4 methods how to create 32/64 bit. You do not need to use all 4 methods, you must choose only one that suits you. But in some cases specific ways creating an installation USB flash drive may not work and you are using another method to create a bootable removable media.
If you want to install Windows 10 on a device that does not have a CD / DVD drive, but only USB ports, then the only option is to install the OS using a bootable USB flash drive. There are over 5 various ways, how will you be able to do it, but 3 of them are official, and all the rest are paired using third-party software. The official ways to make a bootable USB flash drive include:
- Create a bootable flash drive using;
- Easy copying of data with preliminary "correct" formatting;
- Using the official Windows USB/DVD Download Tool;
- Creating a bootable FLASH disk using ;
- Creating a flash drive with Rufus;
How to make a bootable USB flash drive using the Windows 10 Installation Media Creation Tool
Windows 10 Installation Media Creation Tool - this utility appeared with Windows 10. The developer of this utility is Microsoft, which means you can completely rely on this software. Of course, if you download it from the official website of the company. Creating a bootable USB flash drive through the Windows 10 Installation Media Creation Tool is the maximum simple task. First of all, you need to download this utility, install it and accept license agreement. After that you can start creating boot disk. We recommend using the Windows 10 Installation Media Creation Tool in Russian, then the whole process will be intuitive, but let's go through it together. At the first stage, you need to select the item "Create installation media for another computer":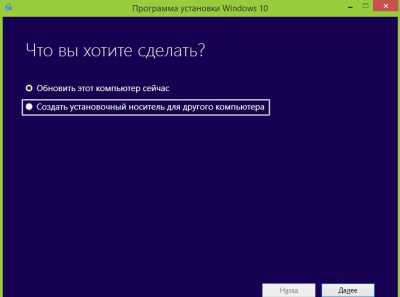
After that, the utility will prompt you to choose the language, architecture and release of the future OS yourself. You can already choose the Russian language at this stage so that you do not have to rack your brains in the future on how to install the Russian language on Windows 10. The architecture, which is also the bitness of the OS that you select at this stage, is not subject to change in the future. So please pay close attention to this item. If you do not know which bit depth to choose, then it is better to choose the 64 bit version. She is more versatile. And the release, or type of OS, choose based on your tasks.
When you decide on basic settings future OS, click on the "Next" button. You will find yourself in the next window where you need to specify "USB flash drive". The utility itself suggests that the flash drive must be at least 3 GB, or better, at least 4 GB.
After you have selected a USB flash drive, click on the "Next" button and then the utility will do absolutely everything for you. You will have to wait a little, as the utility will boot the system from the Internet. Use this way in the event that you do not have access to the network, unfortunately, it will not work. You will not be able to use this method if you want to make a USB flash drive with some version of Windows 10 that is different from the official one.
This tool only works with official version, and downloads it on its own from Windows servers 10. But in this case, you do not need to have your own ISO image. Also, do not forget that before writing the OS to a USB flash drive, the utility will format the USB flash drive. This means that all your data, if any, will be lost on the flash drive. More information about this method you will learn from the following video:
How to make a bootable USB flash drive by simply copying files
The second way, how to make a bootable USB flash drive, is striking in its simplicity. But he is the second, not the first, as he will not suit everyone. You can indeed create a bootable USB flash drive by simply copying system files, but only if your computer supports UEFI boot. You can find out about this in the specifications of your device or on the forums. Moreover, the computer where you are going to install Windows 10 from the USB flash drive that you created in this way must also support UEFI boot. If both devices support this technology then start creating.First of all, you need to connect the USB flash drive to your computer. If the flash drive contains the files you need, then transfer them to HDD. Then you need to format the flash drive in FAT32 format.
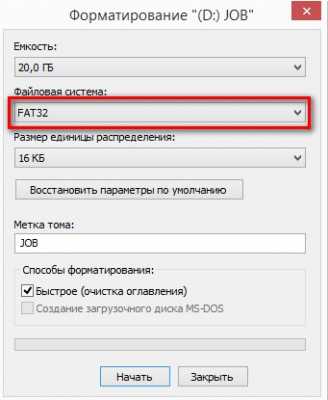
It is in FAT32, otherwise nothing will work further. After you have formatted the flash drive, you must unpack the Windows 10 ISO image. You can unpack it with a regular WinRar or use specialized utilities designed to work with the .ISO format. Of course, before that, you must acquire an ISO image of Windows 10. In this case, you can decide for yourself whether to use the original and clean version of Windows 10 for the bootable USB flash drive, or use the OS where the key is embedded. After you unpack the ISO image, transfer the data to a USB flash drive by ordinary copying.
When the copying of files is completed, safely remove the flash drive. After that you can use this USB Flash Disk as bootable.
Windows USB/DVD Download Tool
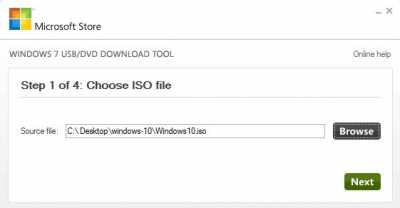
The last official way to create a bootable Windows 10 flash drive is to use the Windows USB/DVD Download Tool. Although this instrument created by Microsoft for Windows 7, it works great with Windows 10 too. So don't be scared that the original name Windows tool 7 USB/DVD Download Tool rather than Windows 10, the utility will still do its job just fine. The principle of operation is similar to the Media Creation Tool, but the utility allows you to independently specify from which Windows 10 image you want to create a bootable USB flash drive.First, download the Windows USB/DVD Download Tool and install the utility. Then we go in and in the first window we indicate the direct path to the ISO image of Windows 10. In this case, it will no longer be possible to automatically download the image from the Microsoft website, even if you want the original version. You will be forced to download any version manually.
After the path to the image is specified, you need to click the "Next" or "Next" button, depending on the language of the utility itself. And you will find yourself in a window where you have to choose which media you are creating. Option two - USB device or DVD. We decided to make a bootable USB disk, so click on the USB device button.

After that, we will be in a new window where we need to choose which flash drive to turn into bootable. As you understand, the flash drive should already be connected to the computer at this moment. Pre-formatting the flash drive is not required, but you need to remember that the utility will format it, which means that all data from it will be deleted. After you have selected the flash drive that you want to make bootable/installable, click on the Begin copying button.
Copying will take approximately 10-20 minutes. At this time, it is better not to load the computer with other tasks. After the copy is completed, the utility itself will notify you of the end, and then prompt you to remove the media. This completes the process of creating a bootable flash drive.
Using Third Party Software
If none of the 3 official ways does not suit you, then you can use software created by third-party developers. This method is less secure, since third-party software, albeit well-known, can still make changes to the installation image. If you decide to use it, then make sure you choose a reliable utility and download a clean version. We recommend using the free solution Ultra ISO. An equally well-known solution is Rufus or WindowsSetupFromUsb. All three programs are similar in that before you can start working with them, you must download the Windows 10 ISO image yourself.In this article, we will look at several ways to make a bootable Windows 10 USB flash drive. This article will be useful for anyone who decides to change Windows and does not have a Windows disk at hand. In principle, the methods for creating a bootable USB flash drive with Windows 10 do not differ from recording the previous ones. Windows versions. Consider the most convenient ways creating a bootable USB flash drive with Windows. The last method is only suitable for creating a bootable USB flash drive with Windows 10.
What you need for this:
- Windows 10 image (download)
- Rufus utility (download)
- Flash drive 4 GB
Create a bootable Windows 10 flash drive on a system with BIOS
Remember if you are creating a bootable USB flash drive with Windows 10 for installation in UEFI, then you must have an ISO image with a 64-bit system.
2. How to make a bootable Windows 10 flash drive using UltraISO.
You can also use to create a bootable USB flash drive with Windows 10 UltraISO program. The program also allows you to mount, burn images and much more. Below will be described short instruction creating a bootable USB flash drive with Windows 10. 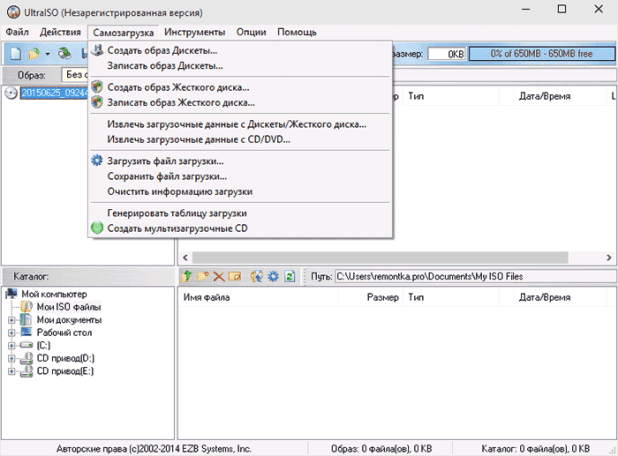
- Run the UltraISO program as an administrator.
- Open Windows 10 image in UltraISO. select item Write a hard disk image.
- In the window that opens, you can select a USB drive for recording, first. format it (for Windows, NTFS is recommended, the action is optional, if you do not format it, it will be performed automatically when recording starts).
- Then, using the wizard, write it to a USB drive.
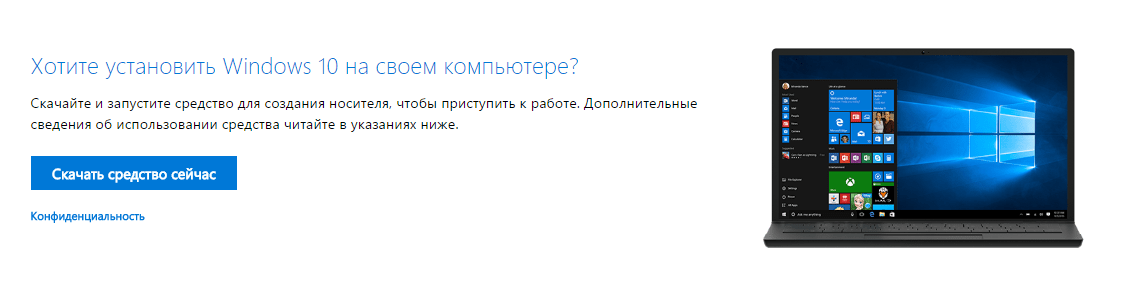
To download the Media Creation Tool go to this link
and press Download tool now
.
After opening the Media Creation Tool, the Windows 10 setup program prompts you to upgrade your computer now or create installation media for another computer. We have the second option. 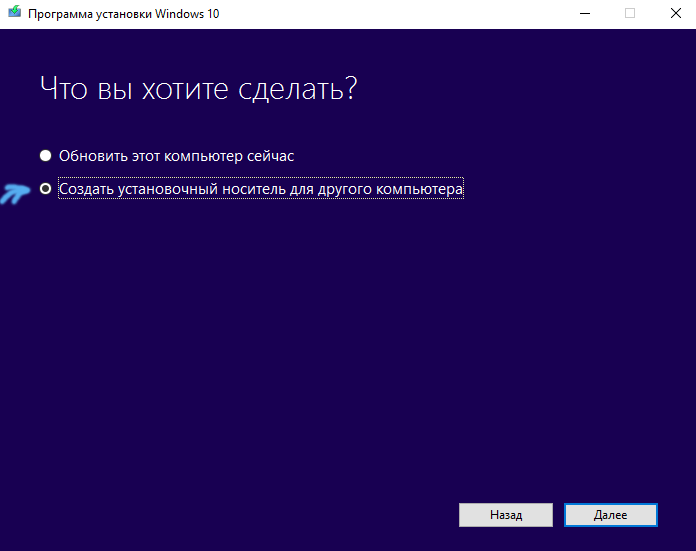 Select the required options and click next.
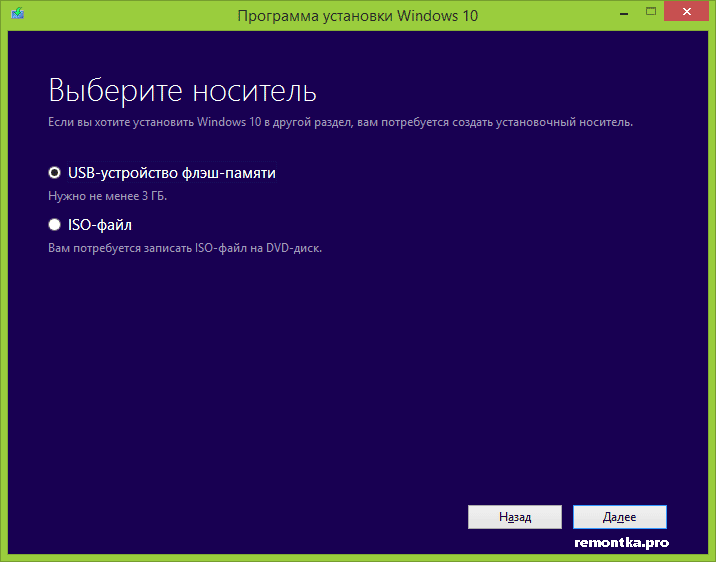
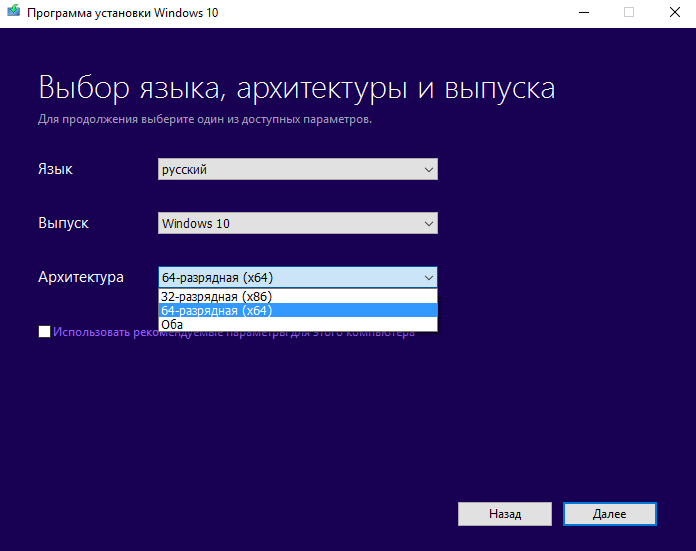
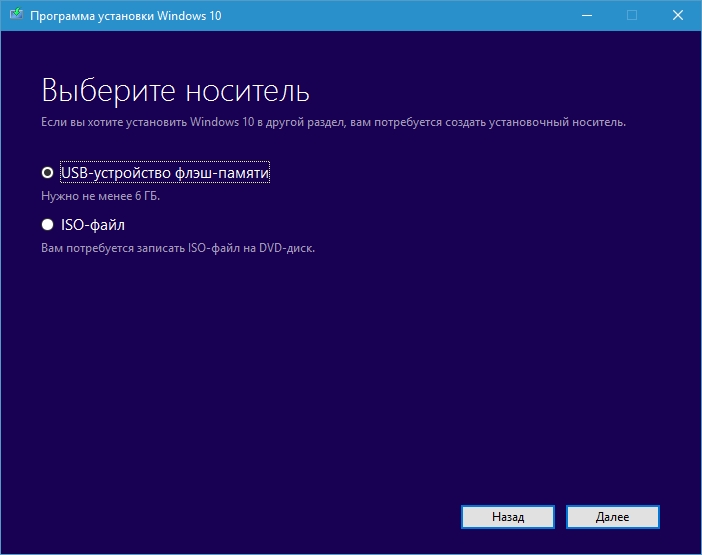
The next step is to select the item USB device flash memory. Please note that the size of the flash drive must be at least 4GB. Click next and select your flash drive to which Windows 10 will be written. 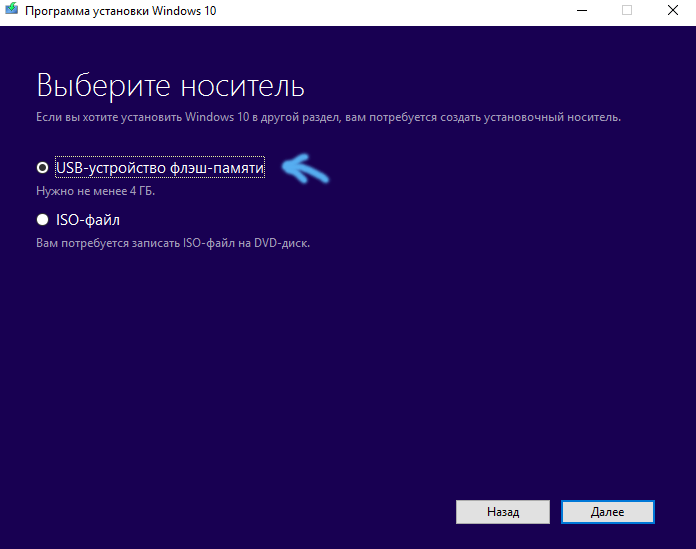
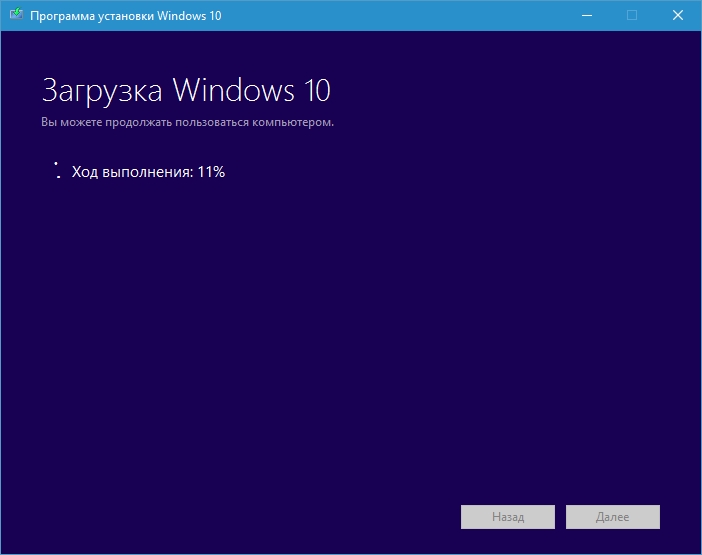
Wait for completion Windows boot 10 and write it to your flash drive. After the process is completed, you will receive a bootable USB flash drive with Windows 10.


