Instructions
Download a program for working with disk images. This may be paid or free utility. Among the free ones, the recognized leader is Daemon Tools Lite. From paid analogues I can recommend Alcohol 120%, in addition to reading disk images, it can create them and also write them to disks. To download, use trusted sources or the official website of the developer.
This way we can simulate these images on virtual disks, and it is from this stage that the gains are really felt. For connoisseurs of this ancestor it is not surprising. The interface is minimalist, as is its installation, which, by the way, in good taste, does not require a reboot.
This feature highlights the main advantage of this software: its simplicity! We hesitated for a long time between presenting this software in the "Creating it" section or in this "Installing it" section virtual disks"; and for good reason, do both!
Double click to launch installation file, answer the installation wizard’s questions by clicking the “Next” and “Finish” buttons. You will be required to reboot during the installation process, so save and close all important data and documents. Open the main module of the downloaded program by double-clicking the icon on the desktop. Or you can click the “Start” button -> “All Programs” -> Daemon Tools. The result will be the same.
Working with virtual disks and drives in the MagicDisc program
This aside, is actually a reference in its genre and it would be a shame to miss it: create, ride, ride! This is the first name that any slightly advanced user will give you by default when talking about this type of software.
This is therefore free version long line versions: it is stable, fast, efficient and in fact a little more than the others, because if it is more known and recognized than those previously presented in these versions of the lines, especially because it allows the emulation of certain protections, created by editors to protect their games or other illegal copy software.
A window with the title Mount`n`Drive Manager will appear. At the bottom of it, right-click on the free space and select the line “Add virtual SCSI drive”. Another way is to right-click on the program icon in the system area near the clock. The actions are no different, just select the line with the command written above.
If it's best known, it's certainly not in vain, and if you're not using it yet, there's still time to put yourself on the spot! With a disk image expression we identify those files that contain the entire contents of a partition or the entire hard drive. All data is "stored" on a disk image that exactly matches the structure and integrity information stored on the drive.
Among free programs to create a hard disk image we chose best solutions. By using incremental backups, the user can significantly reduce the time required to update a previously created image, as well as save a lot of disk space for storing data.
A message appears indicating that the virtual drive has been created. Wait until it disappears.
Open My Computer and check the list of drives. A new item should appear on this list. For example, if earlier you had the letters “C:, D:, E:”, then after that it should be, for example, like this: “C:, D:, E:, F:”.
Now you have computer There is virtual disk gadfly. It works with almost all types of disk images and integrates into the operating system. All you have to do is double-click on the file to automatically download and mount. In some cases, two or more virtual drives at the same time may be useful. If this is your case, repeat the steps starting from step 3. You can create about 20 disk drives using this program.
All offered programs allow you to create bootable media, which will allow you to backup or restore the contents of your hard drive directly when you start your personal computer by bypassing malicious operating systems.
DAEMON Tools Pro – program for virtual disks and drives
Sometimes, however, certain features - after appearing in a particular release of the program - are then removed and inserted into the paid version. My advice is to try them all, find the solution that best suits your needs. Since there are no classic bios anymore, two or three do not start. . Disk cloning and imaging are two very useful solutions for saving your data.
How complicated is life after all, if necessary in this moment a program or game does not start if there is no disk drive installation disk. Only a disk copied as accurately as possible can become a replacement for such a disk. At the same time, it is not at all necessary to spoil clean disks for these purposes. Using programs that allow you to create on your computer virtual drives and virtual media (disk images) you can forget about such problems. One such program is Alcohol 120%.
What does it mean to clone a disk?
Hard drive cloning is a process by which you copy everything that exists on the drive, not just the data but also the structure on another drive. When cloning, two hard drives contain the same information.
What does it mean to create a disk image?
Disk imaging is a task by which every element of a hard drive is copied into a file. A disk image, a disk image, is a copy of an existing hard drive that includes everything from files to a file system.Benefits of cloning and disk imaging
Please note that the most modern instruments use compression and allow you to reduce the size of the disk image. This means you can get a copy of a 10GB hard drive in a much smaller size. Thus, cloning and creating an image are two different operations, but with similar purposes and functions. At this point, you should understand what the advantages of these two methods are and what suits your needs.
You will need
- Computer running operating system, Alcohol 120% program
CD/DVD disks are among the most popular external storage media, but working with them in practice is not always convenient, and there are many reasons for this. These disks must be inserted into the drive and data exchange with them is noticeably slower than with a hard drive. As a result, launching a program from a CD will take significantly more time. CD/DVD discs become unreadable if bad sectors or a lot of scratches, and this will happen sooner or later during their active use. For mobile users, another difficulty arises - when going on a business trip, they have to take with them the entire set of disks that may be required for work, which is also unpleasant, since it increases the size of their luggage. You can avoid such problems by copying information from CDs to a hard drive, but this option will not work for every program. For example, discs with games, licensed databases, educational programs, audio discs, etc. when copying them to a hard drive, they often refuse to work. In such cases, you will have to take a different route - create virtual CD/DVD drives on your computer and place images of frequently used disks in them. Technically, this involves performing two operations. First you need to create necessary files disk images (that is, virtual CDs) - this can be done using programs for burning and copying CD-DVD discs (such as, for example, Nero Burning ROM) and saving these images on your hard drive. And then you will have to use a special virtual drive emulator program, with which you will need to create the required number of virtual CD/DVD drives and connect a prepared disk image to each of them. As a result, you can work with virtual CDs in the same way as with real ones. Moreover, it will be much faster and more reliable. Why? Everything is very simple. On the one hand, access to information will be faster, since it will be read from a hard drive much faster than from a CD, and to launch a virtual disk you will not have to insert a real disk into a physical drive. On the other hand, the likelihood of losing valuable data as a result of disk failure will be reduced, because the CD/DVD disks themselves are not inserted into the drive, and therefore their surface does not wear out. Moreover, it will be possible to work with several disks simultaneously.
We can make an example assuming that the main HDD The computer we are using is damaged. In such a situation, if we have cloned the disk, we can simply replace the damaged media with the clone. If we have a disk image available, we will have to buy another hard drive to replace the damaged one and then install the previously created image.
Programs for cloning a hard drive and creating disk images
In this case, having a clone on your hard drive saves time. However, disk images have the advantage that you can create and store multiple disk images without purchasing different hard disks. Let's take a closer look at how to use this feature. - Open the control panel. -Go to System and Security and click on “File History”.
DAEMON Tools 4.30.0305
Developer: DT Soft Ltd.Distribution size: DAEMON Tools Pro Advanced and DAEMON Tools Pro Standard - 11 MB; DAEMON Tools Lite - 7.4 MB
Spreading: shareware DAEMON Tools is one of the most attractive solutions for emulating virtual drives in terms of functionality. This package is presented in three editions: DAEMON Tools Pro Advanced, DAEMON Tools Pro Standard and DAEMON Tools Lite. The DAEMON Tools Lite edition has the most modest capabilities - it does not have a graphical interface (access is done through the system tray) and allows you to create up to four virtual drives and mount images on them. The other two versions already have a convenient graphical interface and provide the creation of from 16 to 32 virtual SCSI devices, and DAEMON Tools Pro Advanced can also emulate two virtual IDE devices, which is important for connecting some copy-protected CD/DVD drives. As for the images themselves, all three solutions provide for the creation of images from CDs, and not only from regular ones (Audio CD, Video CD, Mixed Mode CD, CD-Extra, Video CD, DVD-Video, DVD-Audio formats are supported ), but also from copy-protected ones, including SafeDisc, SecuROM, LaserLock, RMPS, Hide CD-R, CD/DVD-Cops, ProtectCD, StarForce and Tages. At the same time, almost any image file formats are supported (B5T, B6T, BWT, CCD, CDI, CUE, ISO, MDS, NRG, PDI, ISZ). If desired, the images can be easily protected with a password. Pro versions also provide image editing, which allows you to add files to the image, as well as replace and delete them. Working with images is implemented very conveniently - you can add them to the collection by specifying them manually or selecting them from the list of those found during an automatic search (images created in the program itself are added to the collection automatically), and in the collection itself you can place images in subdirectories (this is more convenient for further orientation). When creating images, compression is provided, which will be very useful if there are a large number of images on disk, however, only MDS images can be compressed - images in other formats will first have to be converted to the MDS format (possible only in DAEMON Tools Pro Advanced). Demo versions of the program (Russian localization available) are fully functional and operational for 20 days. The cost of commercial versions varies - for DAEMON Tools Pro Advanced it is 39.90 euros, for DAEMON Tools Pro Standard it is 16.90 euros, and for DAEMON Tools Lite it is 14.90 euros. However, the DAEMON Tools Lite version for non-commercial use is free. Since the easiest to use utility is DAEMON Tools Lite, we will start with it. GUI it does not, so all operations in this utility are carried out through the system tray. Connecting virtual drives in DAEMON Tools Lite is as easy as pie. First, you will need to install the required number of virtual devices - right-click on the program icon in the system tray, select the Virtual CD/DVD-ROM command and specify the required number of drives.
And then sequentially mount a virtual disk for each of the drives, simply specifying the corresponding image files for them on the hard drive (command Virtual CD/DVD-ROM > "Drive..." > "Mount image"). To remove an image from a virtual drive, you will need the "Unmount image" command.
Click "System" backup" in the lower left corner. First, you need to choose a path to save the image file. Once you have selected, you need to click on the “Next” button. On the next page, you must confirm the settings and start the operation by clicking the “Start Backup” button.
Therefore the operation is quite simple. Cloning a hard drive and creating a disk image is not as difficult as many people think. The programs we've reported on allow you to do this with wizards that are easy to understand even for less experienced users. This type of operation is useful in various situations, such as if you want to replace the hard drive installed on your PC faster or make more free space. However, you need to remember that the images on the discs are not suitable for regular backup copies.
The technology for working with DAEMON Tools Pro is somewhat more complicated. The window of this utility is implemented in the form of three panels - the information panel and two windows: the image window and the drive window. The images window is designed to perform various types of operations on images, and the drives window allows you to manage physical and virtual CD/DVD devices.
The first step in DAEMON Tools Pro is to create a collection of images. If the images were created earlier and you have not yet forgotten which specific folder on the disk they are located in, then you need to click on the “Add images” button and immediately place them in the collection. If you don't remember where they are, you'll have to use the automatic search(button "Search for images").
The image files are very large and take time. What does this mean in practice? operating system considers this a classic full-featured mechanic. Instead, the disk space will appear as if the already mentioned image files had already appeared. These files can be defined as media storage. This is why this method is very popular for games and programs on the Internet. Of course, there are a number of others for working with image files, but the small ones offer the same comfort.
There is a lot of support to support the number of virtual disks, additional functions and more complex graphics. For versions they are paid for and certainly not needed for regular user. Functionally, they can only issue payment products.
If there are no images on the disk yet, you need to create them. To do this, insert the treasured disk into the CD/DVD-ROM, click on the “Create an image” button, select the appropriate physical drive (of course, if there are several drives) and, if necessary, change the disk reading settings on the “Drive” tab. And then on the “Image Catalog” tab, enter the name of the image and indicate the output format, after which they click on the “Start” button and after a couple of minutes they get the desired image.
No other program has the ability to manipulate images with ease. After launching the installation package, you will be offered a language choice. There is already a family among the supporters, which certainly represents a lot of fun and ease of work.


Subject to licensing terms. 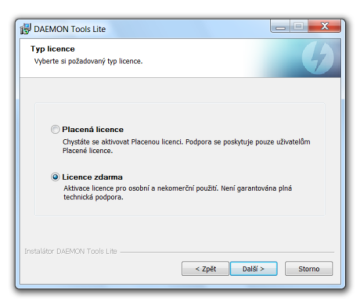
In the next window, select a free license. ![]()
Next comes the selection of the parts we want to install. Leave the settings as they are. 

At the last stage, you will have the opportunity to influence the installation of the program.
After the collection is filled with images in one way or another, install the required number of virtual drives by clicking the “Add SCSI Virtual Drive” button the appropriate number of times - the connected drives appear in the program’s virtual drives window. It should be noted that one virtual drive is created automatically during the installation process of the program.

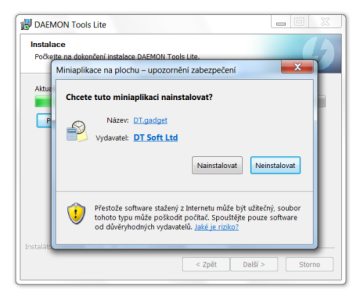
The program will still ask you if you want to install its gadget in the sidebar. If you don't use the sidebar, there's no point in installing it. 
The program can be launched, for example, through a desktop client or directly from the address where it was installed.
Management and maintenance of virtual drives

When you launch the program, click the "Add Image" icon. The icon's name appears after the mouse is placed over it. 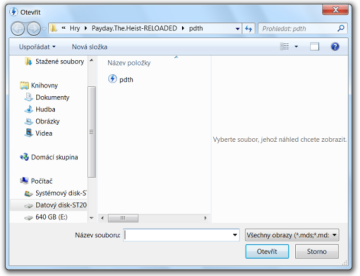
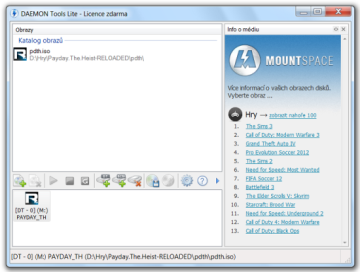
Thus, we have added a link to the painting catalogue. ![]()

After we finish the quest we will go to the desktop and we will see the drives through the computer.
Then install on each of the virtual CD/DVD devices virtual image. To carry out such an installation, you should activate the first image and apply from context menu the "Mount image" command followed by specifying the desired virtual drive. After this, a similar operation will need to be carried out with all other images. If you need to remove an image from a virtual drive, use the "Unmount" command from the context menu.
What is a virtual drive?
But new software can be easily purchased and downloaded online. You can simply use a virtual disk. What kind of painting did the author design for its production? Images are most often produced by burning programs. For example, he does not want to destroy any physical disk, so you can create an image of it on your computer and connect it to a virtual disk. You don't have to physically manipulate the origin and risk damaging yourself.
There are several programmers who can simulate a virtual machine. 
Right-click the virtual disk and select Eject. You may ask why we need another disc if we already have one and we can't play more than one optical media at a time. Reasons for use virtual machines- some. It allows you to create an image of any media that takes up some space on the hard drive, but then it searches the system, as if we had a permanent permanent media on the disk.
Alcohol 120% 1.9.8.7612 and Alcohol 52% 1.9.8.7612
Developer: Alcohol SoftwareDistribution size: Alcohol 120% - 12.3 MB, Alcohol 52% - 11.5 MB
Spreading: shareware The Alcohol 120% and Alcohol 52% programs are one of the most popular solutions for creating virtual CD/DVD drives. Alcohol 120% includes all the functions of Alcohol 52% and additionally allows you to burn CDs and DVDs from image files or on the fly from source CDs. It is possible to record to several drives simultaneously. In terms of virtual drive emulation, the programs' capabilities are identical. With their help, it is easy to connect up to 31 virtual drives on your computer and mount virtual CDs on them in almost any image file format. Source images are added in the image search mode or automatically - the latter if they are created in the Alcohol environment. Supports multiple CD formats (CD-DA, CD+G, CD-ROM, CD-XA, Video CD, Photo CD, Mixed Mode, Multi-session CD, DVD-ROM, DVD-Video and DVD-Audio) and various protection systems, including SafeDisc 2/3/4, SecuROM NEW 4/5/7, LaserLock, Starforce 1/2/3/4, VOB ProtectCD V5. When emulating, you can ignore the media type, the physical signature of the disc being written to (RMPS), the presence of bad sectors, etc. The demo version of the program (there is a Russian localization) is operational for 15 days and has restrictions on the number of virtual devices created (there can only be six of them). The cost of the commercial version of Alcohol 120% is $50, Alcohol 52% - $27. In addition, there is also a completely free version of Alcohol 52% FE 1.9.5.4, which allows you to create up to six virtual devices. The Alcohol 120% and Alcohol 52% window is implemented in the form of one vertical and two horizontal panels. The vertical panel is located on the left side of the main program window and is an operations panel intended for quick launch main components of the program. The horizontal panels located on the right side of the main program window are working database browser windows that provide management of images, virtual drives and physical CD/DVD devices.
Emulating virtual CD/DVD drives in Alcohol 120% and Alcohol 52% requires three steps. At the first stage, a collection of images is formed. If images already exist, then you can connect them directly by simply right-clicking in a free area of the browser window, calling the "Add images" command from the context menu and specifying the desired images. Well, if you don’t remember where exactly the images are located on the disk, then you can use the image search (the “Search for images” operation in the “Basic operations” group), and only then connect the images.
If the image files do not exist on the disk, you will have to create them. It is not difficult to do this in Alcohol 120% (or in Alcohol 52%). To do this, you just need to activate the “Create Images” operation, select a physical drive (only if there are several drives), determine the data type and, if necessary, adjust the disk reading settings, and on the next screen enter the name of the image and click the “Start” button.
After forming a collection of images, virtual drives are connected - this is the responsibility of the “Virtual Disk” operation from the “Settings” group, after launching which you will need to determine the required number of virtual devices. You can also enable/disable the checkboxes “Remount images on system reboot” and “Mount image on Device 0 by double-clicking”. Enabling the first checkbox will ensure that virtual disks are saved in their virtual drives after rebooting or shutting down the computer. Enabling the second one will allow you to mount the image file by double-clicking on it into the first free virtual drive. After this, you will still need to activate the “File Associations” subsection and mark those extensions of the image files that are supposed to be mounted into virtual devices. The result of these manipulations will be the appearance in the lower right subwindow of the program, in addition to the physical CD/DVD devices, of a list of virtual drives that have appeared. By the way, it’s worth noting that one virtual drive can be created during installation of the program, unless, of course, you uncheck the corresponding box during installation.
Well, now all that remains is to mount virtual CDs on virtual devices using the “Mount to device” command from the context menu. You can mount the image faster by simply double-clicking on it, however, this is only provided that the “Mount image on Device 0 by double-click” checkbox was not disabled when connecting virtual drives. To remove an image from a virtual drive, use the "Unmount image" command.
Virtual CD 9.3.0.1
Developer: H+H Software GmbHDistribution size: 56.4 MB
Spreading: shareware Virtual CD is one of the most multifunctional (but also the most difficult to learn) solutions for emulating virtual CD/DVD-ROM devices, managing virtual CDs and organizing network access to them. The program allows you to create up to 23 virtual drives and connect image files to them in a fairly wide range of formats. These images can be created directly in the Virtual CD environment, connected based on the results of an automatic search, or directly manually. Working with collections of virtual CDs is implemented in the program taking into account the fact that their number can be large - therefore, images can be divided into categories, sorted, grouped, searched in the library, etc. When creating images (CD-ROM, DVD, Video CD, Super Video CD, Photo CD, Audio CD, CD-Text, CD-Extra, Mixed Mode CDs formats are supported), their compression is possible, and very effective. In addition, images can be converted to VC4 format and, if necessary, protected with a password. It is also possible to edit images into which you can easily add new files or delete unnecessary ones - this function can be useful not only when using image files on virtual drives, but also in the process of testing them before burning them to a real CD. The latter is also implemented in Virtual CD; in addition, the program allows direct copying of data from disk to disk and deletion of data from rewritable CDs/DVDs. The demo version of the program (there is no Russian localization) is fully functional and operational for 30 days, the cost of the commercial version is $39.95. Virtual CD is a combination of two interface modules - Toolbox and CD Management (both modules are called from system tray, and Toolbox can also be launched from the Start menu). The Toolbox module provides direct access to all the main functions of the program.
The CD Management module provides management of virtual CDs and images.
In Virtual CD, it is more difficult to understand the options responsible for creating a collection, since they are scattered across different modules, and the total number of different settings is large. If we are talking about adding existing image files to the collection, then this can be done both through the Toolbox module and through the CD Management module. In the first case, open the Main Tasks in Virtual CD tab and launch the Find Virtual CDs automatic image search function.
In the second, call the Add command from the context menu and specify specific images from the folder.
You can also add a new virtual drive in two ways - using the Add/Remove Virtual Drives command, activating it from the system tray, or in the CD Management module, calling the Drive Editor command from the context menu. In both cases, a device selection dialog box opens, where additional drives should be enabled. By the way, if no more than four drives are required, then these operations will not be necessary, since by default the program automatically adds four virtual drives to the system during installation.
Mounting virtual CDs is easier, since this is done by simply dragging the image onto the drive in the CD Management window or installing the virtual CD on the drive through the system tray. The Eject command is responsible for removing an image from a virtual drive.
It should be noted that many operations in Virtual CD require the sequential opening of many windows (and this slows down the process) - you can speed up the work by assigning hotkeys to a number of actions, as well as active use system tray commands that duplicate the basic operations of the Toolbox and CD Management modules.


