Outsiders, unauthorized usb media in work computers can cause enormous harm to the entire corporate local network: from disabling the network as a whole to stealing corporate data.
Therefore many system administrators do not allow “users” to use so-called “flash drives” on workstations and, if possible, try to disable usb ports. This is not as difficult to do as it seems at first glance (and you don’t even need to fill the USB ports with foam, although this also happens).
You can simply disable or even remove the “usb controller” in the “Device Manager”, but normal installation drivers will bring all efforts to naught.
How to programmatically disable a USB port?
The method described below concerns editing the registry to block USB media, but without touching the keyboard, mouse and other working components of the computer.
So, you can disable USB ports on your computer as follows:
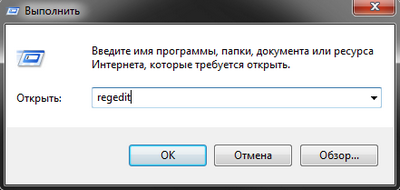
Open the registry by running the "regedit" command;
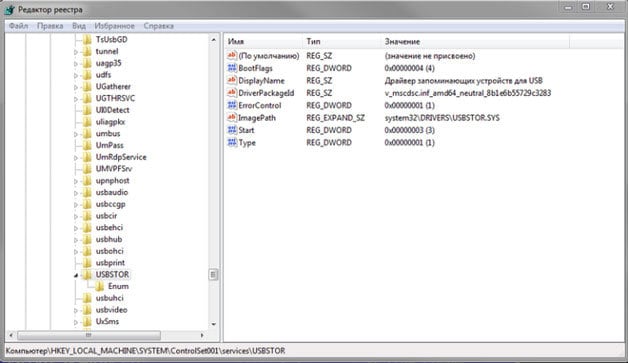
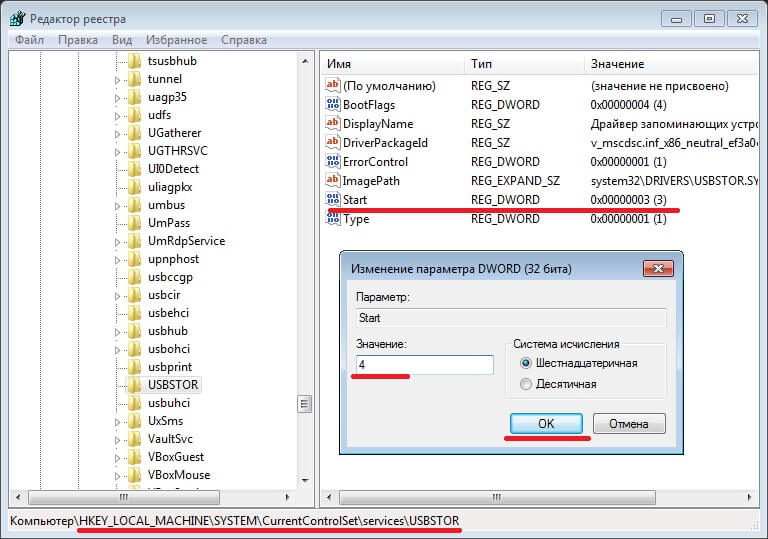
- - next, in the directory go to the address “HKEY_LOCAL_MACHINE\SYSTEM\CurrentControlSet\Services\USBSTOR”;
- - in the right part of the window, find the line “Start” and open it by double-clicking or right-clicking and “Change”;
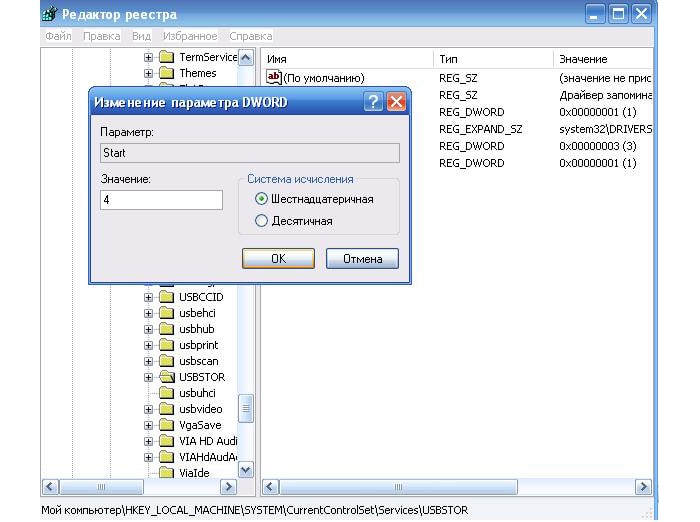
- - by default, the number “3” should be indicated in the “Value” line, i.e. she allows usb connection media to the computer with pre-installed usb drivers controller;
- - so, it is in this line - “Value” - that you need to change the number “3” to “4”, which will block connected usb media.
You must change the registry using this method on all computers on the local network.
How to turn off USB power on a windows computer?
And an important point: it is necessary to restrict the user’s rights to access the registry editor, since to allow connecting USB media, you only need to change the value back to the number “3”.
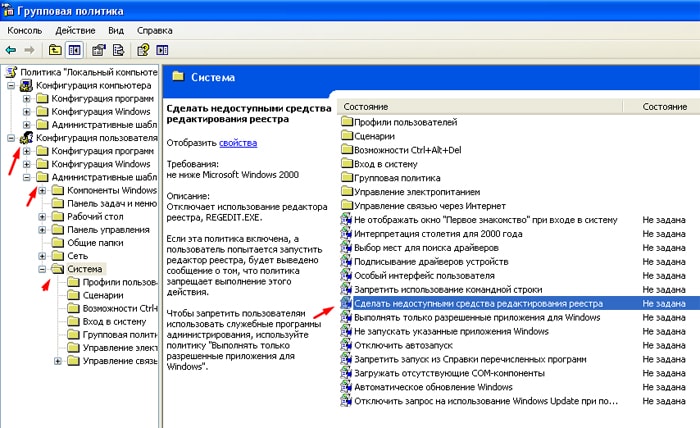
You can simply limit yourself to setting a ban on editing the registry using Group Policy and set the value to “Prohibit access to registry editing tools” (or “Make registry editing tools unavailable”)
This item is located in the section “Group Policy” - “User Configuration” - “Administrative Templates” - “System”
You can enable USB ports on your laptop through the BIOS, Device Manager, Registry Editor, or Editor group policies. If access to the USB connectors was intentionally prohibited using special software, then you can unblock it in a program where the interface is blocked. All methods are available ordinary users and do not require special training.
Disabling unnecessary devices
If the USB ports suddenly stopped working and you are now looking for how to turn them on, then the first thing to do is look to see if the device is connected to the laptop too much. When using a USB hub, the laptop may not be able to supply power to all devices, causing the USB ports to become unresponsive. Before performing USB setup in the BIOS, unplug any unnecessary hardware from the laptop and check if the ports work. If nothing has changed, then reboot the laptop and go into the BIOS.
Enabling ports in BIOS
For BIOS input When loading, press Delete, F2 or another key depending on the model motherboard. You can view it on the start screen. 
In the case of a laptop, this screen does not appear because the fast boot feature is activated. You can temporarily disable this technology in the power settings:
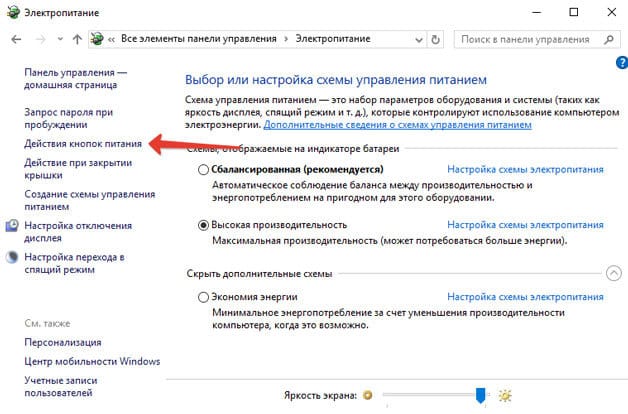
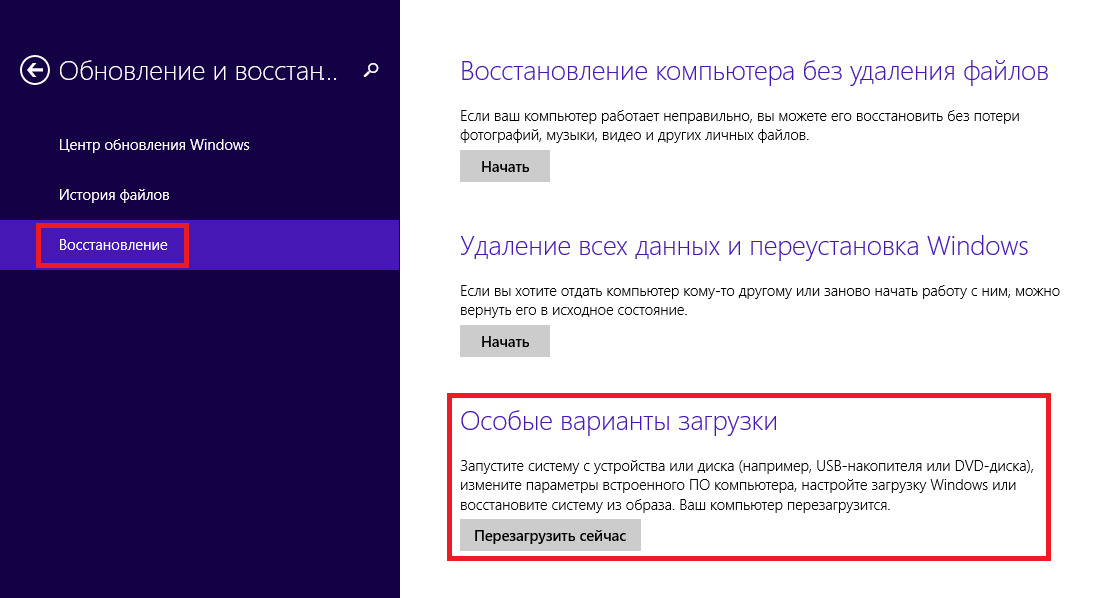
Restart your computer. Without quick launch you will see all stages of Windows boot and can get into the BIOS. If this doesn't work on Windows 8 or 10 with UEFI BIOS, try the following method:
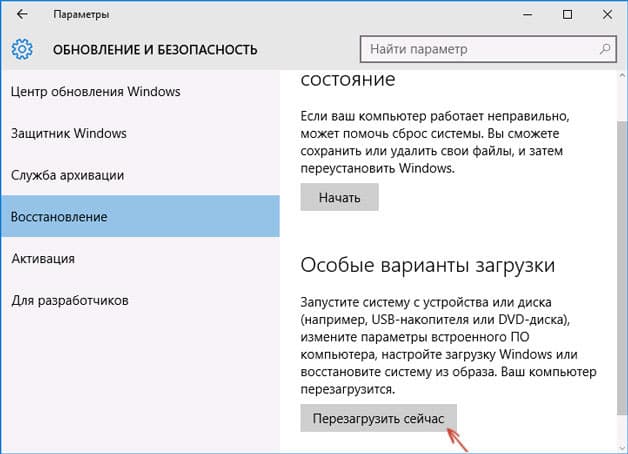
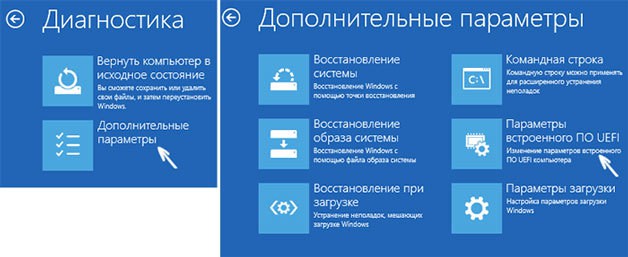
After reboot, select "Diagnostics", then go to " Extra options" and open the UEFI Firmware Settings. Click "Reboot", the next time you start, the BIOS UEFI interface will appear.
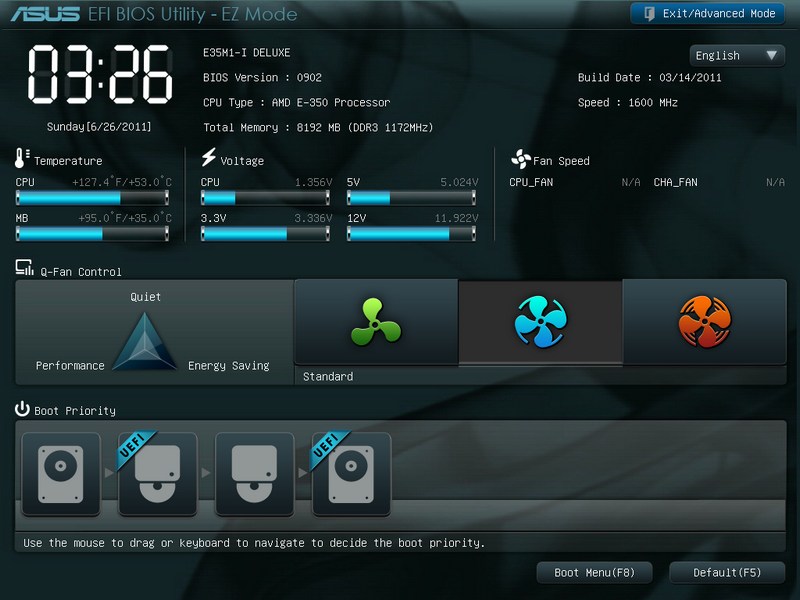
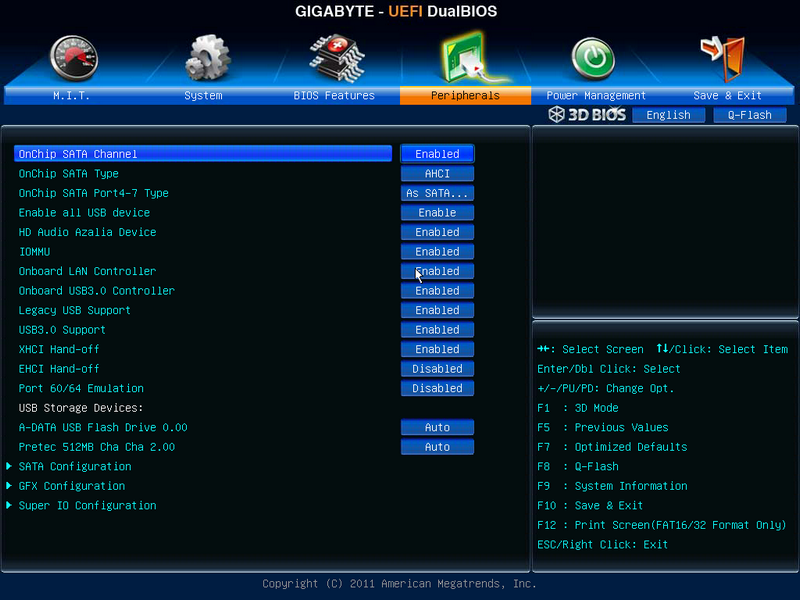
To configure USB ports in UEFI, you need to go to the “Peripherals” tab and set the “Legacy USB Support” parameter to “Enabled”. If support for USB 3.0 ports is required, activate the corresponding item (USB 3.0 Support). 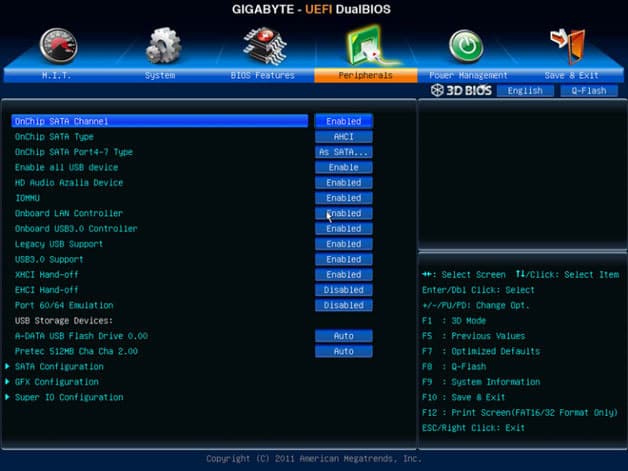
In the AMI BIOS, go to the “Integrated Peripherals” section and set the four options to “Enabled”:
- USB EHCI Controller.
- USB Mouse Support.
- USB Keyboard Support.
- Legacy USB Storage Detect.
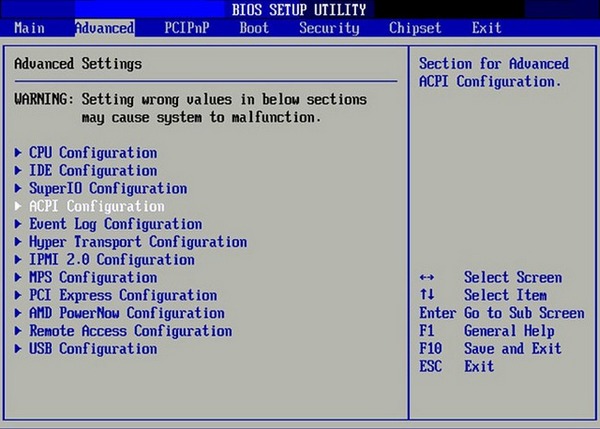
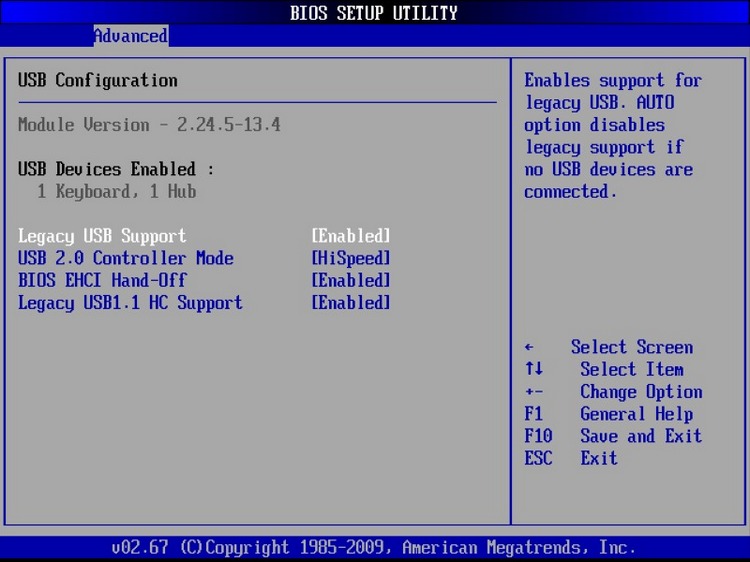
In Phoenix AwardBIOS, you need to go to the “Advanced” tab and go to the “USB configuration” section. All parameters inside must be set to “Enabled” for the USB ports to work. 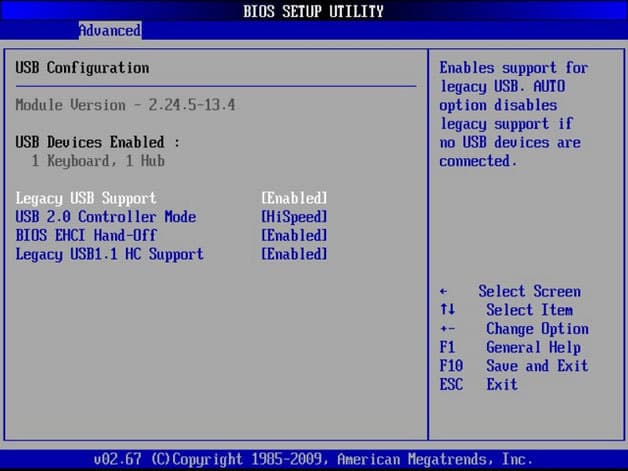
In all BIOS versions, to save the configuration, you must press the F10 key and confirm the selection by writing “Y”.
Windows setup
If in BIOS ports are enabled, but devices connected via the USB interface are not detected by the system, then check the registry editor, device manager and group policy editor. It is possible that changes were made to the system through them, due to which the ports are no longer working. You should start with the Registry Editor.
If the registry editor supports USB interface is enabled, then check the controller drivers in Device Manager.
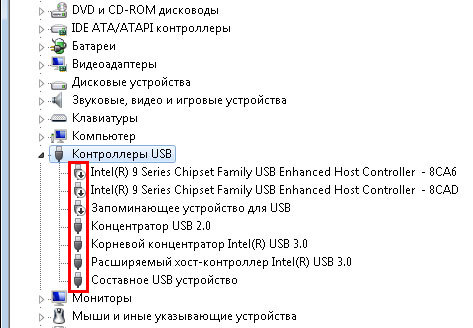
If you see an icon next to the controller that looks like exclamation point, and you are sure that the interface is supported in the registry editor, then this means that there are problems with the drivers. First try updating the software:
If update software controller did not help, update the motherboard driver. Download it from the manufacturer's website and install it manually. Another way to update the drivers of all controllers at once is to remove them from the system. Right-click on the controllers and select "Delete". After a reboot, the system will automatically install controller drivers, so you no longer have to worry about how to enable the USB ports - they will work just like that. 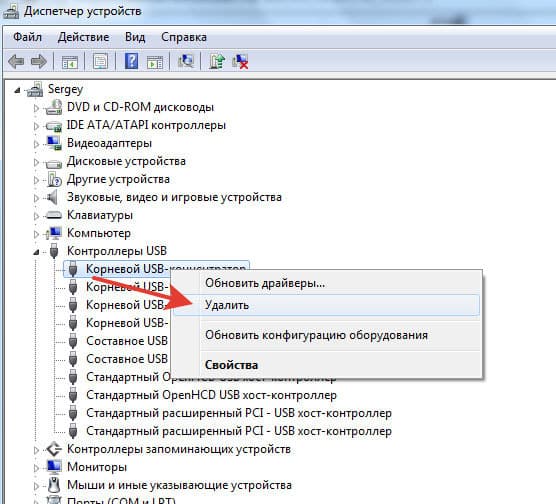
If only removable devices connected via USB do not work, check in the Group Policy Editor to see if a read ban is set.
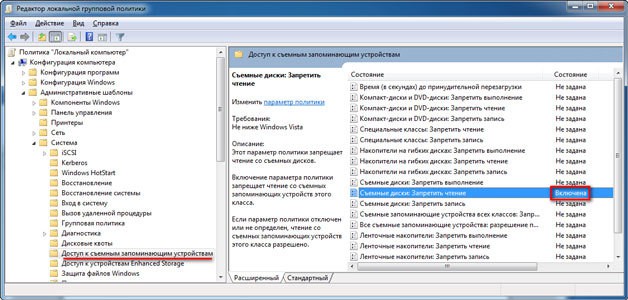
Find the Removable Devices: Deny Read option and set it to Disable. The problem with identifying flash drives and external drives should disappear.
Hardware damage to ports
If your laptop's USB ports are damaged or south bridge on motherboard, then no methods will help enable the interface. Therefore, if the connectors stop working after mechanical impact, liquid getting inside the case, short circuit or other negative factors, then you should take the laptop to a service center for diagnostics. 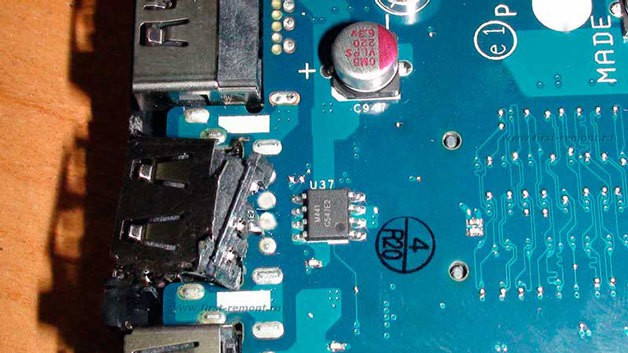
In case of system unit Some USB ports can be replaced independently, but this is not possible on a laptop because all connectors are soldered to the motherboard.
If the USB ports on your PC are not working and Windows settings and driver updates do not help, perhaps the controller was disabled in the BIOS. In this case, you will need to go to the configuration menu and turn everything back on.
There are many different versions BIOS with its own interfaces and subtleties of operation. Also, a more modern complex can work on your computer - UEFI, which supports a full GUI interface. This article discusses the distributions that are most often installed on motherboards.
Entering BIOS settings
To start changing the configuration, you need to go to the corresponding menu. It can be opened during power on personal computer- before it started Windows boot from the hard drive.
Turn on your PC. In case it is already running: reboot. Wait sound signal Speaker: A short single beep indicates that all internal components necessary for the computer to operate have been detected.
Now you need to click hotkey to call the configuration. This must be done before changing the screen. If you don't have time and Windows starts loading, reboot. The keys depend on the installed motherboard model and version BIOS firmware. You can find it in the user manual that came with the motherboard, on the manufacturer’s official website, or view on your PC screen when loading it:

If you don't know the board model, it's okay. Just try pressing the following keys: Tab, Delete, Esc, F1, F2, F8, F10, F11, F12. One of them will definitely do.
You don't have to try just 1 option at a time. You can quickly press all the buttons from the list without any problems. One of them will come up and launch the BIOS settings, and the rest will be ignored.
Entering the BIOS/UEFI settings of the latest PCs
Many modern computers boot up so quickly that you won't be able to access the keystrokes when you turn them on. This is also true for laptops. That's why latest versions Windows OS has a new launch feature. Let's show it using Windows 8.1 as an example.

Your computer or laptop will reboot into setup mode. After restarting your PC, you will also be able to select option to run from a USB drive or DVD.
Menu navigation
Almost all BIOS versions are devoid of GUI. This means that you will have to work only using the keyboard, as in, for example, Windows console. Navigation is carried out using the up-down and right-left arrows. To open any section, use the Enter key to go back - “Escape”. A small reminder of the keys used is always shown on the screen.
Firmware complex UEFI installed on the most expensive and powerful motherboards. It supports more drivers and can use a mouse. Its interface will be familiar Windows users and other modern operating systems.
Each version has its own interface and sets of options. Even the names of the same parameters may differ. The following article describes several popular BIOS releases.
AMI BIOS
A very common option that can be found on many modern computers. The main menu is divided into 2 parts: a list of categories and various actions, such as exit or save. You will be working on the left side.

You need to go to the section called “ Integrated Peripherals" There is no Russian version of the interface, so all commands are only in English. Use the Down arrow to highlight this item and press Enter.
Here you need to enable ( Enabled) 4 options:
- USB EHCI controller– main controller. If the motherboard has version 3.0 ports, this item will be divided into 2 parts: “Controller” and “Controller 2.0”;
- USB Keyboard Support– keyboard support;
- USB Mouse Support– mouse support;
- – work with external data storage: flash drives, disk drives, disks of smartphones and digital cameras.

In some older versions there are only 2 points " USB controller" And " Legacy USB storage support».
When you're done with the settings, press the F10 key to save your changes and restart your computer.
Phoenix AwardBIOS
Other popular version, which can often be found on modern laptops. Doesn't have home page, like AMI, but with convenient thematic tabs at the top. You can move between sections using the left and right arrows, and between items using the up and down arrows.
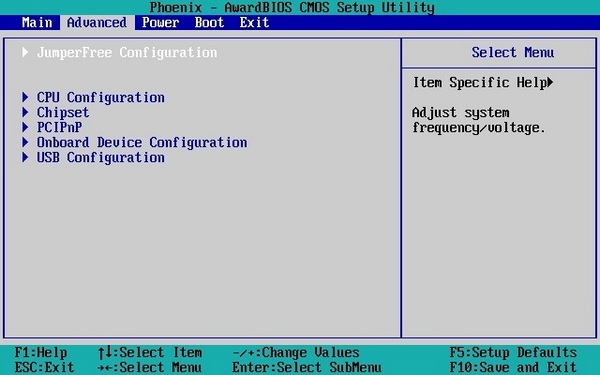
Go to the section " Advanced» using the Right arrow. In it, find the category “ USB configuration" All items in this section must be moved to the position “ Enabled" In some versions the category " USB configuration" may be located in the " tab Peripherals" and not in "Advanced".
To exit the menu, press F10 and confirm exit.
AMI BIOS for Asus
AMI version used on Asus laptops. Externally it is very similar to Phoenix - a similar bookmarks bar. Settings USB are in the section " Advanced" Go there, enable all options and exit using the F10 button.
UEFI
Contrary to popular belief, UEFI is not part of the BIOS. It can rather be called a more advanced, but less popular competitor. There are a large number of different versions, each with their own interfaces. However, here the controls are similar to the usual Windows, so you can easily find the options you need.
Windows Settings
If at the BIOS level all ports and controllers are enabled, but the USB ports still do not work, there may be a problem in the settings of your Windows system.
First, just try disconnect and reconnect the device. This will check if the drivers are correct. If there's something wrong with them, Windows will try to reinstall them.
If nothing happens when you reconnect, try turn on the controller V Windows registry. To do this you need to do the following:
Video: how to configure any BIOS to boot from a USB flash drive
All products Microsoft Windows Server 2003, Enterprise Edition for Itanium-based Systems Microsoft Windows Server 2003, Datacenter Edition (32-bit x86) Microsoft Windows Server 2003, Enterprise Edition (32-bit x86) Microsoft Windows Server 2003, Standard Edition (32-bit x86) Microsoft Windows Server 2003, Web Edition Microsoft Windows XP Home Edition Microsoft Windows XP Professional Microsoft Windows Server 2003 Service Pack 1 Microsoft Windows Server 2003, Datacenter Edition for Itanium-Based Systems
All products Prerequisites
Description of the problem
If you connect and remove several times in a row with short breaks USB device, the USB port may stop responding. When the port is in this state, it does not recognize the USB device and it stops working.
This article describes ways to resolve this issue.
The necessary conditions
To perform some of the troubleshooting steps in this article, you must be logged in. Windows system With account administrator. If the computer is personal, you are likely already logged in with an administrator account. If your computer is a work computer and connected to a network, you may need to contact your administrator for assistance. To ensure that you are signed in to Windows as an administrator, go to the following Microsoft website:
Solution
To resolve this issue, use the following methods in the order listed. After using each method, check to see if the problem is resolved. If not, move on to the next method.
This article also provides a workaround that you can use if other methods fail.
Method 1: Update hardware configuration using Device Manager
Update your hardware configuration using Device Manager. The computer will then be able to recognize the USB device connected to the USB port and it can be used.To update your hardware configuration, follow these steps:
- Click the button Start and select Execute.
Note. In Windows Vista, click Start and use the window To start searching.
- OK
- In Device Manager, click the computer name to highlight it.
- On the menu Action select item Update hardware configuration.
Method 2: Restart your computer
If updating the configuration did not resolve the issue, restart your computer. After this, check if the USB device is working.If you are able to resolve the issue, you can skip the rest of this article. If the problem persists, continue to the next method.
Method 3: Disable and re-enable the USB controller
Disable and re-enable all USB controllers using Device Manager. This will restore normal operation of the USB port. USB controllers present USB ports in Device Manager. If you are having trouble with advanced troubleshooting, go to the section.To disable and re-enable USB controllers, follow these steps:
- Click the button Start and select Execute.
Start and use the window To start searching.
- Enter devmgmt.msc and click the button OK. Device Manager will open.
- Expand the section.
Note: You may need to scroll through the list to find the item you want.
- Right-click the first USB controller in the section Universal Serial Bus Controllers and select Delete.
- Repeat step 4 for all USB controllers in the section Universal Serial Bus Controllers.
- Restart your computer. After the computer boots, the hardware configuration will be automatically updated, and all remote USB controllers will be reinstalled.
- Check if the USB device is working.
If you are able to resolve the issue, you can skip the rest of this article. If this method does not resolve the problem, see "Workaround" section.
Temporary solution
If the following methods do not resolve the issue, disable the temporary shutdown feature. Please note that this action affects all USB controller drivers (and therefore all USB ports and connected USB devices). Therefore, it is not possible to unplug USB devices connected to your computer and they will continue to consume power. In addition, the checkbox Allow this device to turn off to save power does not appear on the tab Power management for USB root hub.
For help disabling the sleepover feature, go to . If advanced troubleshooting is not a problem, you can disable this feature yourself. To do this, go to the section.
Get help solving the problem
To fix the problem automatically, click the link To solve a problem. In the dialog box, click Execute and follow the troubleshooting wizard.Note: The interface of this wizard can only be accessed on English language, however, the automatic fix works in other language versions of Windows.
Note: The troubleshooting solution can be downloaded to any computer, saved to a flash drive or CD, and then run on the desired computer.
Solving the problem yourself
This section is intended for advanced users.As a workaround, you can disable the USB kill switch by editing the registry. The USB device may not respond due to a race condition in the shutdown feature. Selective Suspend allows you to efficiently manage power by turning off USB devices. However, sometimes it may not wake up USB devices correctly. As a result, when you try to use the USB device, it does not respond.
You can also disable the temporary shutdown feature on a server for which power management is not important or is not required at all.
Important ! This section, method, or task includes steps to modify registry settings. However, changing them incorrectly can lead to serious problems, so be extremely careful when performing such actions. For additional protection create a backup copy of the registry. This will allow you to restore it if problems occur. additional information about the creation backup copy and repairing the registry, see the following Microsoft Knowledge Base article: To disable the temporary shutdown feature, follow the steps below.
- Click the button Start and select Execute.
Note: In Windows Vista, click Start and use the window To start searching.
- Enter regedit command and press the button OK. The Registry Editor will open.
- Locate and select the following registry subkey:
HKEY_LOCAL_MACHINE\System\CurrentControlSet\Services\USB
- If there is an entry in the registry DisableSelectiveSuspend, double-click it. If this entry does not exist, create it. To create a registry entry, follow these steps:
- On the menu Edit select item Create, then - DWORD parameter.
- Type DisableSelectiveSuspend and press ENTER.
- On the menu Edit select item Change.
- In the Value field, enter 1 to disable the sleepover feature and click the button
State
Microsoft is working to resolve this issue. Additional Information will be posted as it becomes available.
There are many ways to block and disable usb-porto in, as on level operating system, and at the BIOS level. Below are all the methods known to date. disable usb:
How to disable usb using BIOS options
There is a USB Function option for this; it serves to enable or disable the use of the USB controller located on the motherboard. This option has several values: Disabled, Enabled, Both, Primary, 2-4-6 and 8USB Ports. The default is Enabled, for disable usb ports, you need to change the value to Disabled.
Now you know, how to disable usb port
using BIOS. If you set the value to Primary, then only those ports that are located on the rear panel of the computer will be available. 2-4-6 and 8USB Ports are the number of ports you want to keep running.
Not in all BIOS versions this function has the name USB Function, you can also find names: USB Controller, USB 2.0 Controller, OnBoard SiS USB 2.0 Device and others.
Also in this section of the BIOS you can, for example, prohibit the use of USB 2.0 only or disable USB 2.0 mode and switch to USB 1.1, enable/disable support for keyboards and mice with a USB connector (Legacy USB Support option).
In order to do this you need to have administrator rights. Next, open the registry: Win+R →Regedit and click OK. In the window that opens, in the left column we look for the parameter we need, to do this, open the folder HKEY_LOCAL_MACHINE\SYSTEM\CurrentControlSet\Services and click on USBSTOR, find the Start parameter in the right column, right-click and select “Change”, enter “3” instead of the value (enable usb) value “4” (disable).
Disable usb You can disable ports 394 and others just when you change this parameter.
But the ports will not be disabled until you restart the computer, only then will the changes in the registry take effect.
With such programs, you have the opportunity to disable USB ports only for certain devices, for example, for flash drives, so as not to prevent the spread of viruses on the computer. You can also set protection for information transmitted via USB ports or lock them with a password. Most popular program to manage ports is USB Manager.

After the changes take effect, you will continue to hear a characteristic sound when connecting USB devices, but the system will no longer perceive the built-in devices.
Download USB Manager— http://www.softportal.com/get-39722-usb-manager.html