A bootable Windows 10 flash drive is designed to install, reinstall or restore the operating system. To perform these steps, the computer will boot the Windows image from an external USB drive (flash drive).
Bootable Windows 10 flash drive created using command line, will work on any computer. On my site you will find many articles about creating a bootable USB flash drive using various programs. In this article, we'll look at how you can do bootable flash drive Windows 10 using the operating system tools, through the command line.
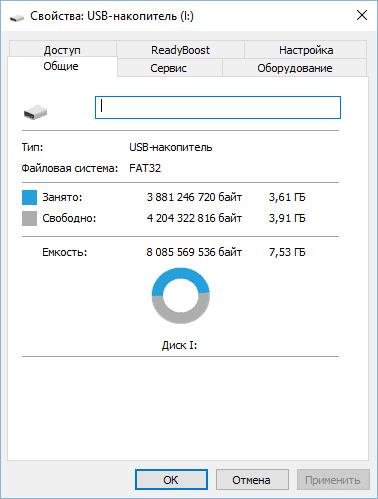
With this method, you can create a universal boot Windows flash drive without use third party applications. An operating system image recorded on a bootable flash drive can be installed on any computer with a regular BIOS and MBR, or with UEFI and GTP. Modern computers are issued with the UEFI interface and the GTP partition table, while, bootable media must be formatted to the FAT32 file system.
In this way, you can create a bootable USB flash drive with the operating system Windows 10, Windows 8.1, Windows 8, Windows 7, Windows Vista. Keep in mind that Windows 7 will boot without problems on computers with BIOS and MBR, and to install the system on UEFI and GTP, UEFI support and additional steps are required.
All work on creating a bootable Windows flash drive from the command line consists of two stages: preliminary USB preparation flash drive and copying files from the operating system image Windows systems 10.
Preparing a bootable flash drive on the command line
Prepare USB flash a drive large enough to record the Windows 10 operating system. Next, insert the USB flash drive into the computer's USB port.
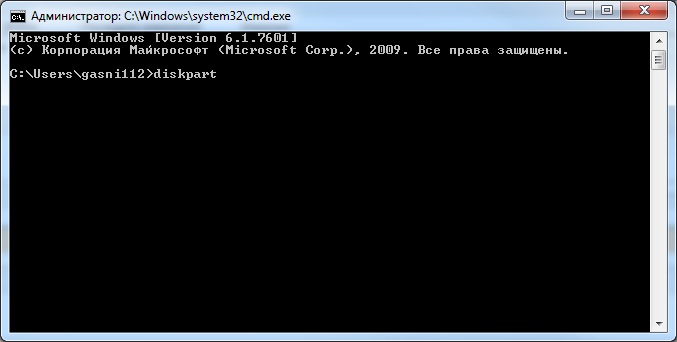
Then right click on the start menu context menu Select "Command Prompt (Admin)". This will open a command line interpreter window.
Next, you will need to sequentially enter the commands in the command line interpreter. To execute the entered command, press the "Enter" key. After executing the command, you will see information with system explanations about the action taken.
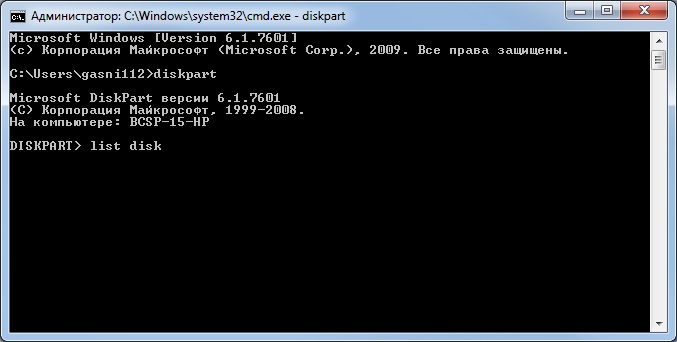
To run the DiskPart utility, enter the following command:
diskpart
Under the entered command, information about the utility will be displayed.
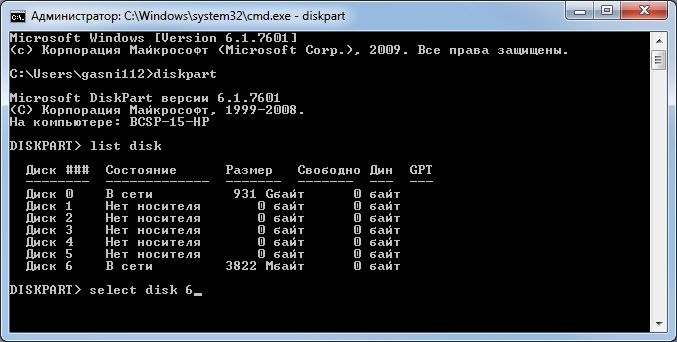
List disk
Pay attention to the disk number of the flash drive. You need to focus on the size of the disk. For example, I have 4 hard drives connected to my computer (two of them are external) and one flash drive. The size of the flash drive will be smaller than hard drives. This is clearly visible in the image.
Next, you need to enter a command to select a flash drive. Be careful! Your disk number will be different (I have Disk 4, as you can see in the image above), corresponding to the disk number of your flash drive. So enter your disk number:
Select disk 4
Disk 4 has been selected.
Now you need to run a command to clean the flash drive ( quick format):
Disk Cleanup completed successfully.
Enter the command to create the partition:
Create partition primary
The specified partition was successfully created.
Enter the command to select a partition (there was only one partition):
select partition 1
Section 1 selected.
Then enter the command to mark the active partition:
Format fs=FAT32 QUICK
DiskPart successfully formatted the volume.
Entering a command to assign a drive letter (flash drive):
Assignment of the drive name or mount point was successful.

To exit the DiskPart utility, enter the following command:
Shutting down DiskPart.
Now you can close the command line interpreter, you won't need it anymore. We proceed to the second stage of creating a bootable USB flash drive with Windows 10.
Copying files from a Windows 10 image to a bootable USB flash drive
The Windows 10 image will open in the virtual drive. First, select and then copy all the files of the operating system to a USB flash drive. The Windows copy process will take some time.
Otherwise, open Windows image to copy files, you can use an archiver, or use an imaging program (for example, UltraISO).
After copying is completed, the image of the Windows 10 operating system, written to a bootable USB flash drive using the command line, is ready for use.
A mounted Windows 10 image whose contents were used to copy operating system files can be extracted from virtual drive, it is no longer needed.
Right-click on the USB drive, name the bootable flash drive (for example, something like "WIN10PRO"), because the bootable flash drive is named after the drive letter.
After that, the Windows 10 Pro bootable flash drive will clearly appear in Explorer.

You can create a universal bootable USB flash drive with the Windows operating system by choosing an image with a 32-bit or 64-bit (Windows 10 x86 or Windows 10 x64) bit depth, or burn a combined Windows 10 x86 / x64 image, which can be downloaded for free from the Microsoft website using the program Media Creation Tool. You can read more about this.
Recreating a bootable flash drive
In this way, you can prepare the flash drive once, and then use this USB stick to capture different Windows images.
For example, you have a bootable USB flash drive with Windows 10, and you need a bootable Windows 10 Pro flash drive (systems may have different bitness), or you need to upgrade the system version to the current version. In this case, there is no need to prepare the flash drive again using the command line.
The order of operations with a bootable USB flash drive created on the command line:
- Format the flash drive to FAT32 (quick format). With this formatting, previously prepared partitions of the flash drive will not be affected.
- Copy the files from another image of the Windows 10 (Windows 8.1) operating system to the USB flash drive.
- The bootable flash drive is ready to be used on any computer.
Conclusion
The user can create a bootable USB flash drive with Windows 10 using the command line without using programs. The Windows Universal Boot Stick will work on any computer with BIOS and MBR, or UEFI and GTP.
Now it's time for us to learn make a bootable flash drive via command line so that it can later be used to reinstall the system.
How to make bootable flash drive via command line?
First, connect to the USB port system block flash drive that you are going to make bootable. I want to warn you in advance that this flash card will need to be formatted, so take care of the safety of important data by transferring them to your computer.- The first is by typing “Win + R” on the keyboard and entering “cmd” in the window that opens;
- The second is by opening the start menu → all programs → accessories and among finding the utility “ command line».
- By entering a command diskpart, run a program that manages disks and partitions;
- Display a list of all drives by typing list disk;
- Select your flash drive from the list that opens. If it is displayed under the name "disk 1", then, therefore, you need to enter select disk 1;
- Now to clear it write clean;
- Next, create the primary partition from which the boot will be made, for this, enter create partition primary;
- Select the primary partition you just created by typing select partition 1;
- Activate it with command active;
- Now format the flash drive, for this, enter the command format fs=ntfs. Formatting the flash card will take time, so you will have to wait a bit;
- If you want, you can assign a letter to your flash drive using the command assign letter=Z, where "Z" acts as a letter;
- And after the operations done, all that remains is to close the command line by typing exit.
Attention! If you are going to reinstall your computer system through this flash card, then the operating system files should be placed on it in unpacked form. In no case do not move the whole image to it, first mount it, I wrote about how to do this in the article:.And this is where my post comes to an end, today we learned how to make a bootable USB flash drive through command line, if you have any questions, then the comment form is at your service.
First of all, a bootable USB flash drive is designed to install, reinstall or restore the operating system. This article discusses the method of creating a bootable USB flash drive on the command line using the Diskpart utility.
plus this method creating a bootable USB flash drive is the use of standard operating system tools, as well as the fact that the bootable USB flash drive is universal and can be used to install on any computer or laptop. Modern computers and laptops come with a UEFI interface instead of a regular BIOS. The UEFI interface supports FAT32 as a file system, which means that it can only boot from media formatted with the FAT32 file system. You can also install from such a bootable flash drive operating system on a computer or laptop with a regular BIOS, which makes the bootable flash drive universal.
The process of creating a bootable flash drive consists of preparing a USB flash drive on the command line and copying files to it.
Preparing a bootable flash drive on the command line
Prepare a USB flash drive of sufficient size and insert the flash drive into the computer's USB port.
Run command prompt as administrator, to do this, press the key combination + X or right-click on the Start button in the taskbar and select the item in the context menu that appears Command line ( A administrator)

In the command prompt window that opens, you must enter several commands in sequence. To execute the entered command, press the key Enter↵
To create a bootable flash drive, we need a utility to manage disks, volumes and partitions diskpart
To launch the DiskPart utility, run the command:
To display all connected drives, run the command:
Next, you need to select our flash drive. You need to navigate by the size of the disk, in this case a 15 GB USB flash drive is indicated as Disc 2 (in your case it may be a different number).
To select a flash drive, run the following command:
Next, create a partition on the flash drive by running the command:
Then select the created partition by running the command:
Now we mark the selected partition as active, to do this, run the command:
Next, we perform a quick format of the flash drive to the file system FAT32 command:
And after successful formatting, it remains to assign a drive letter to the flash drive by running the command:
To exit the Diskpart utility, run the command:
To create a bootable flash drive, we will use programs from both a third-party manufacturer and a built-in interpreter Windows commands. Each method is different and has its own specifics, but I think that a simple end user will be able to cope with creating a bootable USB flash drive using any of the proposed methods:
- how to make bootable usb flash drive using command line
- how to make bootable usb flash drive UltraISO programs
- how to make a bootable flash drive using Windows7 USB/DVD Download Tool
If you are interested in information about creating a bootable USB flash drive for a family of operating Linux systems, then you can read the information at this link "bootable USB flash drive for Linux".
So, I propose to start creating a bootable USB flash drive in order, as defined in the above list, respectively, proceed to the first method.
BOOT USB flash drive using the command line (I method)
Further, we will use only those commands that we need to create a bootable USB flash drive. Therefore, the figure below shows the sequential input of commands to create a bootable USB flash drive. And please pay attention to the fact that the commands you enter are marked with a red underline!
Graphical representation of typing commands on the command line
Now let's describe the previously entered commands:
DISKPART- run the program, a text-mode command interpreter that allows you to manage objects (disks, partitions or volumes) using scripts or direct commands from the command line.
list disk- display the list disk drives connected to a personal computer.
select disk 1- select the disk numbered "1", since in our case it is a removable flash drive.
clean- clears all data from removable media - flash drives.
create partition primary- create a primary partition.
select partition 1- select the created section.
active- make the section active.
format fs=NTFS- format the flash drive in the NTFS file system.
assign letter=T- if necessary, in this way you can assign a letter to the flash drive.
exit- exit from the DISKPART program.
BOOT DRIVE IS CREATED!
NOTE: After you have created a bootable flash drive, you need to transfer the operating system files to this removable media. The files must be transferred unpacked, in no case do not just add an image of the operating system, for example, one * .ISO file, this WILL NOT WORK!!! Don't forget to install in the I/O system BIOS boot primary device, that is, make the computer boot from removable media - a bootable USB flash drive you created.
You can see the full list of Diskpart commands in the following table:
Command table of the program "DISKPART"
| TEAM | EXPLANATION |
| ACTIVE | - Mark the selected partition as active. |
| ADD | - Adding a mirror to a simple volume. |
| ASSIGN | - Assign a name or mount point to the selected volume. |
| ATTRIBUTES | - Working with volume or disk attributes. |
| ATTACH | - Attaches a virtual disk file. |
| AUTOMOUNT | - Enable and disable automatic connection base volumes. |
| BREAK | - Splitting the mirror set. |
| CLEAN | - Clear configuration information or all data on the drive. |
| COMPACT | - Attempts to reduce the physical size of the file. |
| CONVERT | - Convert disc formats. |
| CREATE | - Create volume, partition or virtual disk. |
| DELETE | - Delete object. |
| DETAIL | - View object parameters. |
| DETACH | - Disconnects a virtual disk file. |
| EXIT | - Shut down DiskPart. |
| EXTEND | - Expand volume. |
| EXPAND | - Increasing the maximum available space on the virtual disk. |
| FILESYSTEMS | - Display current and supported file systems for volume. |
| FORMAT | - Format the given volume or partition. |
| GPT | - Assign attributes to the selected GPT partition. |
| HELP | - Display a list of commands. |
| IMPORT | - Import disk group. |
| INACTIVE | - Mark the selected section as inactive. |
| LIST | - Displaying a list of objects. |
| MERGE | - Merge child drive with parent. |
| ONLINE | - Transferring an object marked as "offline" to the "online" state. |
| OFFLINE | - Transfer to the "offline" state of an object marked as "online". |
| RECOVER | - Update the status of all disks of the selected package. Attempting to recover disks in the wrong package and resynchronizing mirrored and RAID5 volumes with stale plex or parity data. |
| REM | - Doesn't take any action. Used for commenting scripts. |
| REMOVE | - Delete drive name or mount point. |
| REPAIR | - Recovery of a RAID-5 volume with a failed member. |
| RESCAN | - Search for disks and volumes on your computer. |
| RETAIN | - Placing a service partition on a simple volume. |
| SAN | - Display or set the SAN policy for the current booted OS. |
| SELECT | - Setting focus on an object. |
| SETID | - Change partition type. |
| SHRINK | - Reduce the size of the selected volume. |
| UNIQUEID | - Display or set the GUID Partition Table (GPT) code or Master Boot Record (MBR) signature of the disk. |
BOOT USB flash drive using the UltraISO program (method II)
The UltraISO program is designed to create and edit disk images. When creating a bootable flash drive, we will use the built-in functions of this program.
Hello dear blog readers. Today I want to tell you about such a wonderful program as. What is so wonderful about her? - you ask. And the fact that with its help you can easily create a bootable flash drive (data from a flash drive after formatting) or a disk, and the most interesting thing is that this program is available to anyone Windows user through the command line, in other words, does not require installation. And don't let the phrase "command line" scare you - using it is much more convenient and easier than it seems at first glance.
So, after we have inserted the USB flash drive into the USB connector, we launch the command line. To do this, press Start and in the search bar write cmd, and press Enter.

In the command line that appears, we write, thereby launching the program for managing disks. Click Enter.
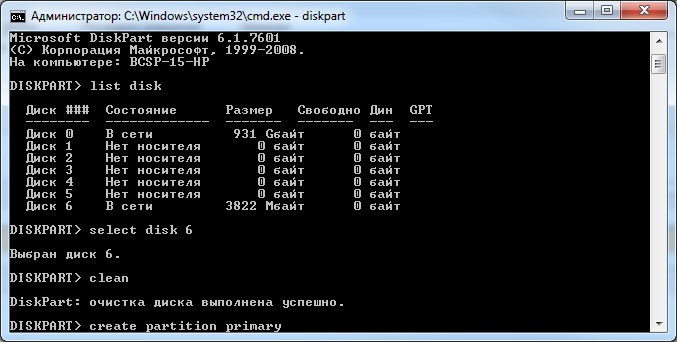
In the list of devices we find our flash drive - it can be recognized by its size. In my case it is Disc 6. Therefore, we write the following command. If your flash drive is number 4, then you need to enter the command. If under the number 2, then, respectively. Click Enter.
Then we enter the command clean, which will delete all files from a flash drive or disk. Click Enter.

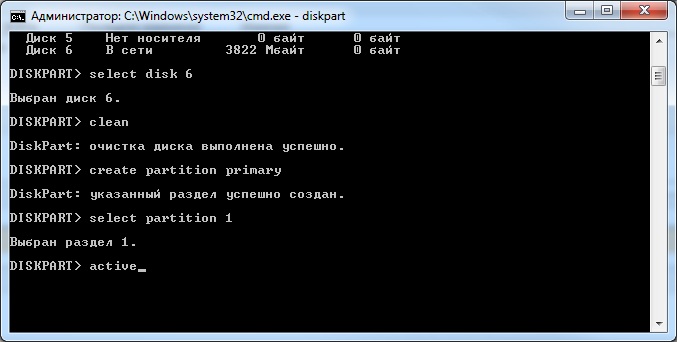
Then we enter the command. Thus, we select the specified section and move the focus to it. Click Enter.

Then we execute the command. The system marks the partition as active. Click Enter.
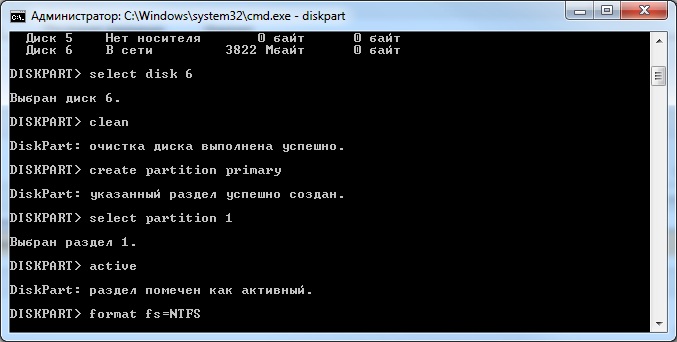
Now you need to format the flash drive to NTFS. It can be fast or complete. Full formatting executed by command format fs=NTFS. If you don’t want to wait and time is running out, then we do a quick format with the command format fs=NTFS QUICK. Click Enter.
We are waiting for the end of formatting.

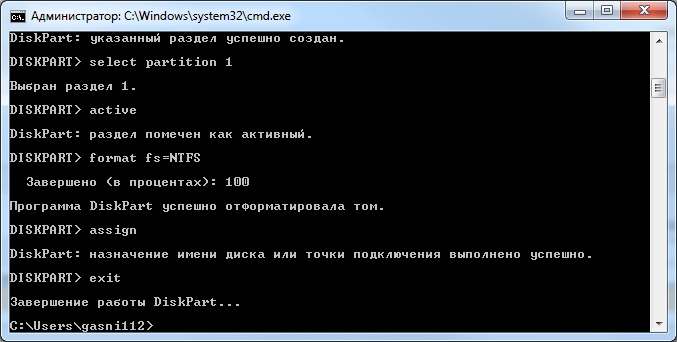
Now you need to assign a letter to the flash drive. We do this with the command assign. Click Enter.

The flash drive is automatically assigned a letter, and after that, the autorun of the media is triggered.

Now you can exit the program. We enter the command exit and press Enter.
The last thing to do is to copy the distribution files of the operating system (the one for which we made a bootable USB flash drive) to, in fact, our flash drive. After that, our flash drive will be bootable, and will boot absolutely everywhere, on any device. With its help, it will be possible to install your operating system anywhere.
I want to note that with the help of the program you can carry out a lot of manipulations both with hard drives(), and with flash drives. The example discussed today is only a small part of all the possibilities. I will consider other commands and examples of working with this program in the following articles.
Also read on this topic:
 Format flash drive to NTFS
 How to recover data from a flash drive after deletion or formatting?


