IN Windows XP boot information was stored in a file boot.ini, and to make changes to the boot menu, it was enough just to edit this file in text editor. Beginning with Windows Vista everything has changed, and now the operating system boot menu is in the boot store ( Boot Configuration Data, BCD). Some boot menu options can be changed in the usual way using GUI, but full access to BCD only possible from the command line.
We will look at several ways to make changes to boot menu. So, the first way.
Control panel applet System Properties.
In order to get to the parameters responsible for booting the system, go to the Start menu - Control Panel - System. The system properties window will open, in which you need to select the "Advanced system settings" item.
From the advanced system properties, select the "Startup and Recovery" section and click the Settings button.
In the window that opens, we can see:
1. List installed OS, and change the default boot system.
2. Set the timeout before booting the selected system.
3. Remove the display of the OS list at boot.
You won’t be able to add a new entry, change or delete an existing one from here (in XP there was also an “Edit” button, by clicking on which you could manually edit the boot menu in Notepad). 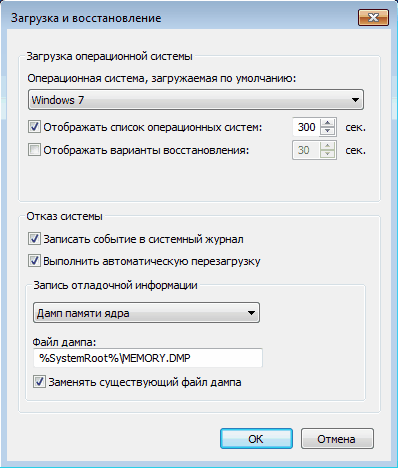
There are few settings, there is another way.
System configuration snap-in.
To open the System Configuration window, type the key combination Win + R, in the Run line, enter the msconfig command and click OK.
In the system configuration window that opens, go to the Boot tab. Here we can do the following:
view information about which system is currently loaded and which one is loaded by default.
change the default boot system.
edit the time (timeout), after which the default operating system will be loaded.
remove the entry from the boot menu.
We still cannot add or change an entry. 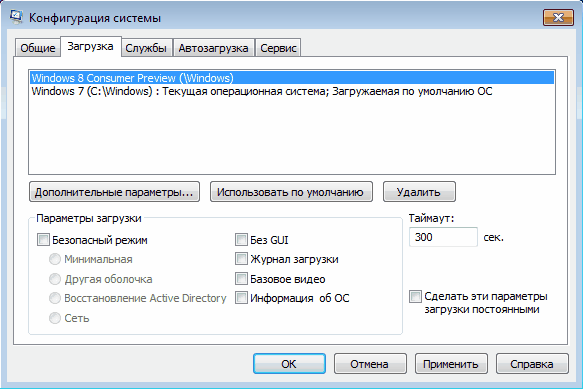
If you need to change the position of an entry in the boot menu or rename it? There is a third way for this:
bcdedit command line utility
The bcdedit.exe utility is located in system folder Windows\System32. To work, it needs administrative access to the computer, so we run the command line shell as an administrator (otherwise, an error will be generated when trying to start the program). 
If you simply enter the bcdedit command without parameters, then the information stored in the BCD will be displayed on the screen. The information is presented in the form of two columns: on the left are the names of the parameters, on the right - their values. 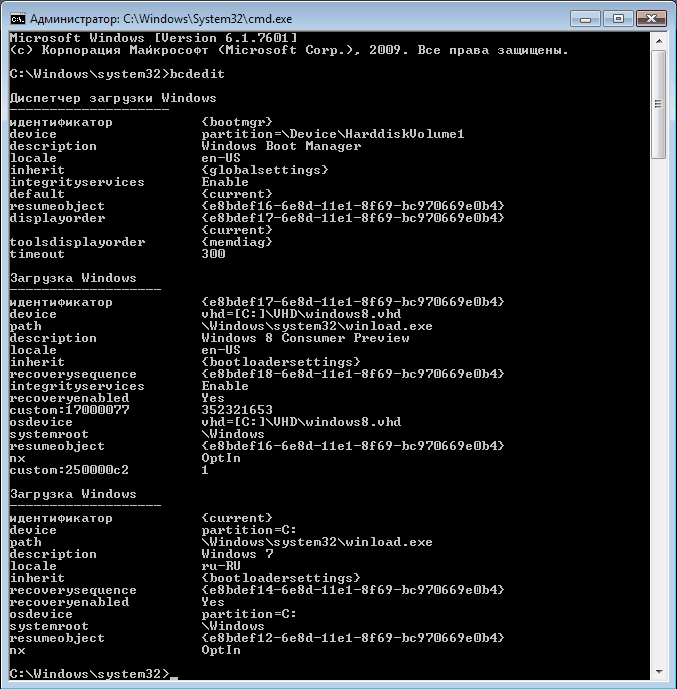
Here are the main parameters responsible for the download:
identifier - an identification number indicating the entry in the boot menu. Names are used for standard identifiers, for example (current) - the current system, (default) - the default system;
device - indicates the partition on which the operating system loader is located;
osdevice - indicates the partition on which the operating system itself resides. Typically, device and osdevice are identical;
path - the rest of the path to the operating system loader;
description - description of the operating system displayed in the menu at boot;
default - operating system loaded by default;
timeout - default time to wait before booting the OS;
displayorder - the order in which systems are displayed on boot.
And now consider the options for using bcdedit:
bcdedit /default (ID) - set the default boot system.
bcdedit / displayorder - control the order in which entries are placed in the boot menu:
bcdedit / displayorder (ID) / addlast - add the system to the end of the list;
bcdedit / displayorder (ID) / addfirst - add the system to the top of the list;
bcdedit / displayorder (ID2) (ID1) - specify the order in which systems are displayed in the list;
bcdedit /displayorder (ID) /remove - remove the entry from the boot menu.
Please note that deleting an entry from the boot menu does not remove the selected system's parameter information from the BCD and can be restored if necessary.
bcdedit /timeout XX - set the exit time in seconds.
bcdedit /set (ID) description ″System name″ - change the name of the system displayed in the boot menu.
bcdedit /create /d ″Windows Vista″ /application osloader - create a new boot record.
bcdedit /create (ntldr) /d ″Windows XP″ - create a boot entry for the OS previous versions(XP and older).
bcdedit /copy (ID) /d″ New system″ - copy the boot record. In this way, you can also add a new entry to the boot menu.
bcdedit / delete (ID) / cleanup - delete the boot entry. This removes all information about the installed operating system from the BCD and the boot menu. This command has one feature - if the name is specified as the ID, for example (default), then the command must be executed with the /f key, but if the ID is written in an alphanumeric code, the /f key is not needed.
bcdedit /export ″C:\Backup\bcd″ - export the contents of the storage to the specified file.
bcdedit /import ″C:\Backup\bcd″ - restore the state of the system storage from a backup created using the /export command.
A few examples
Adding a new boot entry, "multi-boot":
bcdedit / copy (current) / d ″New Windows 7 ″ - copy the current entry and name it in a new way;
bcdedit / set (ID) device partition=D: - specify the location of the system bootloader;
bcdedit / set (ID) osdevice device partition=D: - specify the location of the operating system;
bcdedit /displayorder (ID) /addlast - add an entry about the system in the boot menu, at the end of the list.
Adding a boot entry to boot the system from virtual disk(VHD):
bcdedit / copy (current) / d ″Load from VHD″ - copy the current entry;
bcdedit / set (ID) device vhd=\DIR\filename.vhd - specify the location of the system bootloader;
bcdedit / set (ID) osdevice vhd= \DIR\filename.vhd - specify the location of the operating system;
bcdedit / set (ID) detecthal on - turn on forced detection of a hardware-dependent layer (Hardware Abstraction Layer, HAL);
bcdedit / displayorder (ID) / addlast - add an entry about the system in the boot menu, at the end of the list.
Note. \DIR\filename.vhd is the full path to the VHD file and specifies the filename.
Adding a boot entry for Windows boot XP:
bcdedit /create(ntldr) /d″ Microsoft Windows XP″ - create a new boot entry;
bcdedit / set (ntldr) device partition=\Device\HarddiskVolume1 - specify the location of the system boot files;
bcdedit / set (ntldr) path \ntldr - specify the path to the system bootloader;
bcdedit / displayorder (ntldr) / addlast - Add a system entry to the boot menu.
In contact with
Microsoft engineers have implemented a boot store, also known as Boot Configuration Data (BCD), and a boot menu in Windows. The first contains the identifiers of the bootloaders of all available on the PC operating systems, and the second reads them and displays them as a list of operating systems available for launch. This greatly simplifies the life of a user who has several systems on his computer. He does not need to be smart about something to switch between them. It is enough to restart the computer and select the one you need from the list presented. Like other parts of the Windows OS, the boot menu is customizable. This guide lists available ways editing this section.
Note: almost all the actions described in this manual must be performed from under account with administrator rights. Otherwise, you must know the password for it.
Editing the Windows 10 boot menu in the bootloader window
The Windows 10 boot menu has a small settings section. It provides a minimal set of options - changing the value of the timer for the automatic start of the main system, changing the default boot OS, as well as an additional section with system startup modes and a computer shutdown function.
Editing the Windows 10 Boot Menu in System Options
IN additional options systems that you can enter through the properties of the OS, there is a section. It stores a small list of functions for editing the boot menu, which is suitable for undemanding users. So with its help you can choose which operating system will be loaded by default, set the display time of the list installed systems or turn off the timeout altogether, as well as activate the output of recovery options.

To get to the specified section, you need to do the following:

Editing the Windows 10 Boot Menu in System Configuration
If you need a little more customization, you can try the utility system configuration. In addition to the mentioned settings, it offers the function of deleting boot entries of operating systems, an option to display information about the OS, the ability to start Windows without a graphical shell, select boot options safe mode and a few other minor features.
You can edit the boot menu using System Configuration as follows:

How to Edit Windows 10 Boot Menu Using EasyBCD
EasyBCD- free utility, which provides a wide range of options for editing the boot menu. In comparison with it, all standard system tools (except the Command Line) look very primitive.
This compact program allows you to:
- Remove OS from the list of available to run.
- Add new Windows entries(including obsolete), Linux / BSD, Mac.
- Add entries to install systems using ISO images or separate partitions hard drive.
- Rename operating system entries.
- Set system as default.
- Change the position of entries in the list.
- Set boot menu language.
- Select bootloader interface shell (Metro or earlier from Windows Vista / 7).
- Set the timeout duration.
- Back up and restore boot storage (BCD) settings.
- View BCD content and boot menu.
The program interface is completely localized into Russian, and the program itself is quite easy to use and does not require any supernatural abilities from the user.


How to rename the system entry in the boot menu

How to move the system entry to the boot menu

How to choose a default boot system

How to change the boot menu display time

How to change boot menu language

How to Edit Windows 10 Boot Menu Using Command Prompt
If you don't trust third party programs and try to use exclusively system tools, then you should try out ways to edit the Windows 10 boot menu using the command line.
Create or restore a Windows Boot Store backup
Before doing anything, create backup download storage so you can restore it if needed. You can create a BCD backup in the following way:

How to add a system entry to the boot menu

How to remove the system entry from the boot menu

How to change the order in which systems are displayed in the boot menu
To edit the position of entries in the loader, use the command bcdedit /displayorder (ID2) (ID1) (ID3). Instead of all ID specify real codes entries in the order in which you want to see them when the computer starts up. 
Hello friends! In today's article, we will re-create the Windows 7 bootloader. In what cases can this be useful.For example, Windows 7 won't boot up and gives errors related to a bootloader malfunction, for example: "An operating system was not found" (Operating system not found), BOOTMGR is missing. Press ctrl+alt+del, NTLDR is missing when booting Windows 7. Or maybe you moved Windows 7 from your hard drive to solid state drive, but the system does not start from the SSD and displays an error or shows a black screen.You are trying to restore the boot of the operating system, but you are unable to do so.In such cases, you need to delete and then recreatehidden section - System Reserved (Reserved by the system, 100 MB), it is on this partition that the Windows 7 boot files are located.
When installing Windows 7 on a laptop or computer with a regular BIOS (MBR hard disk), a hidden System Reserved partition is automatically created (Reserved by the system, 100 MB), the purpose of which is to store and protect operating system boot files.This partition always has the following attributes: (Active, System, Primary partition), and it starts the operating system installed on your computer.
If you assign a drive letter to this partition and in the folder options (view) set the parameters "Show hidden files and uncheck the "Hideprotected system files", then inside you will see the "Boot" folder (containing the boot configuration storage file - BCD), and the boot manager file "bootmgr".

For the success of our business, let's remember the Windows 7 boot mechanism and the program will help us BOOTICE.
First of all, after turning on the computer, the BIOS subroutine receives control, which checks the functionality of all components. system block, then the BIOS looks in its settings for the boot priority device (hard drive, flash drive, DVD drive) and finding one (for example, a hard drive) reads the MBR boot record from it (Windows 7 is usually installed on an MBR partition disk).
MBR is located in the first sector boot disk, has a size of 512 bytes, and contains programming code NT6.x,
Which searches for an active partition (Active) from which the operating system can be loaded, this active partition After that, control passes


Operating system (in our Windows case 7) this is a program and in order for it to work (begin to load), you need to run the OS executable file:winload.exe or winload.efi. WThe loader launches these files. Wloader is a small program. Filewinload.exe starts MBR- loader and filewinload.efi starts the EFI bootloader. Windows 7 in most cases is installed on a disk with an MBR bootloader.

Windows 7 boots up in the following sequence,download manager bootmgr file processes the available information in the boot storage (BCD file), and this is the menu, display time, list of operating systems (if there are several), and so on, if the data is correct, then the operating system should be loaded. But! If at least one of the files I mentioned (bootmgr or BCD) turns out to be incorrect or completely absent, then we are guaranteed problems when loading the system.It often happens that the integrity of these files is violated for any reason (careless user actions, installation of third-party boot managers, viruses, etc.), in this case, the standard actions to restore the bootloader may not help, and then it is best to delete this partition completely, then format and re-create the boot files. How can I do that.
We delete the hidden partition System Reserved (Reserved by the system, volume 100 MB) and create it again using the built-in systemdiskpart command line utilities
Downloading from installation flash drive Windows 7. If you do not find the ISO image of the seven, then you can use the download. flash drive Windows 8.1 or Win 10.
In the initial system installation window, open command line keyboard shortcut Shift+F10.

We enter the commands in sequence:
diskpart
lis vol (this command displays letters, numbers, labels, size and file system. BUkva section 100 mb (С:). Volume 1. BUkva partition with installed Windows 7 - (D:).
sel vol 1 ( select the volume with which we will work - 100 mb (C:). Volume 1)
del vol ( delete volume 100 mb).
After deleting the volume, an unallocated area of 100 MB appeared on the disk.
creat par prim ( create a main partition in this unallocated area)
format fs=ntfs ( create an NTFS file system on the partition)
assign letter C ( assign the letter C to the created partition)
activ ( make the section active)
exit (exit diskpart)
bootsect /nt60 C: /mbr (this command writes to hard drive desired codes PBR ( Bootmgr) and MBR (NT 6.x))
bcdboot D:\windows /s C:( create a bootloader for Windows 7, located on (D :),bootloader location (c:))
The download files have been successfully created.


This method suitable for those who have several hard drives, and they have an OS installed with a bootloader.
On these discswe don't usebootrec /fixmbr and bootrec /fixboot toolsto update MBR and PBR codes. These commands only work with hard disk 0.
The bootsect command works with the disk we specify. T the same goes for bcdboot.Without the /s option, bcdboot works with the active partition on hard disk 0. ANDthe /s parameter we use points to the active partition of the desired hard disk.
For a long time, running from one operating system to another, if there are two of them installed on the computer, will not work. After carefully studying both, sooner or later you will have to choose only one of them - main, with which the work will be carried out primarily. If for the most part only one Windows system is used, its other versions or editions located on other disk partitions, not required to be deleted. Of course, provided that the hard disk space is not constrained in size.
The ability to work in the future with other computer systems can be left, but for convenience, simplify the entrance to the main one by removing temporarily unused ones from the boot. In this case, starting the computer will be simplified by automatically loading only the required operating system. Another option to make it easier to get started with the computer is not to remove the boot selection window for all systems, but to set the desired version of Windows as the default boot and reduce the time to select other options in the bootloader window.
How to edit the boot process of several Windows operating systems installed on the same computer - more on this below.
So, in our case, we have a computer with installed versions of Windows 7 and 8.1. When you turn on the computer, we see the bootloader window with a list of systems to choose from.
Each time you boot your computer, you can get into the desired system by making the appropriate selection. Otherwise, after a certain time - and by default this is 30 seconds- Windows will automatically boot, first on the list. In our case, this Windows 7, since it is the last one installed on the computer, and it is its bootloader, as we see, that meets us after starting the computer.
Well, let's change that. Let's configure the automatic boot of the main system - Windows 8.1. To do this, of course, you need to enter it.
We need a settings section, and in Windows 8.1 you can get to it using the context menu on the button.
In the system window, select Extra options.

You can also get to the settings section in Windows 7 using the context menu, but called on the icon "Computer" in the conductor. Among the commands you need to choose.
In Windows 7, also select Extra options.

Further steps in both systems are identical.
In the system properties window that appears, in the tab "Additionally" click the options button in the last section.

Now you can start editing the boot of several systems. Change the downloaded Windows default from the options in the dropdown list. In our case, we change the pre-installed Windows 7 to Windows 8.1.

As mentioned, by default the Windows bootloader waits half a minute to allow the user to select an operating system.

If predominantly work is carried out only in one system, it makes no sense to leave half a minute waiting for it to automatically load. Another operating system can not be deprived of the ability to start, but reduce the preset time for selecting boot options. In the display of the list of bootable systems, in our case, set 5 second waiting before automatically booting the Windows 8.1 core system. This time is more than enough to make a choice if you suddenly need to enter Windows 7 sometime.

To completely remove another system from the boot list, you must uncheck the option system list display. In this case, only the system selected for booting by default will boot without any time delays.

If a second operating system is ever needed, it will be possible to enter it by making this option active again.
After making changes, click "OK" at the bottom of this window, as well as at the bottom of the system properties window.

That's it - the operating system boot list has been edited.
Above, we looked at editing the boot of existing operating systems. But often when you start the computer we can see a list of operating systems that are already on the computer No. This is a natural development after the second operating system has been removed by simply formatting a disk partition or manually destroying system files, but at the same time the entry about the possibility of loading it in the system configuration was not removed. The bootloader may also display the option to launch a non-existent core Windows after the system has been reinstalled. This, by the way, is not the main, but one of the reasons why system experts advise to carry out the so-called clean installation of Windows - without saving files. previous system and formatting the disk partition.
It is better to remove the non-existent operating system from the boot options altogether so that it does not delay the process of starting the main Windows.
In the main system, we call the command. In Windows 8.1, quick access to it is implemented in context menu on the button.

We need system configuration section. Enter the value in the command field:
We press "OK".

In Windows 7, it is easier to launch the system configuration window by entering a key query in the menu search field.

The system configuration window will appear, go to the tab. We select the record about loading a non-existent system and delete it.

In our case, the download list contained different versions of Windows, and decide on the one to be deleted "Seven" We obviously didn't have a hard time. But if the load list contains entries for two identical Windows versions, in orientation with the one to be removed, descriptions of the systems will help. The Windows we are actually on will be marked as current.
The changes made are saved with the button. After pressing "OK" the system will prompt reboot.

After restarting the computer, we can observe the immediate startup of the main system.
Starting with Windows Vista, Microsoft has made the editing process more difficult. We have already touched on the utility bcdedit.exe. This article is dedicated to her in more detail.
To begin with, let's figure out why Microsoft decided to abandon such a simple understandable text file. boot.ini. The point, as is often the case, is safety.
To make it more difficult to access bootloader parameters, a special bootloader configuration data (BCD) store was invented. In Windows Vista and later, boot loader configuration data is stored as special program objects that are no longer simple text items. Each object in storage has a unique identifier (GUID) and is stored in a special format. Each ID is unique to a particular copy of the operating system. For the convenience of editing the loader parameters, some of the objects, in addition to identifiers, have been assigned aliases, by which they can be accessed using the bcdedit.exe utility. Here is a list of the main aliases:
| (bootmgr) | Specifying a Windows Boot Manager entry. |
| (fwbootmgr) | Specifies the Firmware Boot Manager entry in NVRAM, commonly used on UEFI systems. |
| (memdiag) | Specifies a memory diagnostic application entry. |
| (ntldr) | An indication of the Ntldr bootloader used in previous versions of the OS (before Windows Vista). |
| (current) | A virtual identifier that represents the boot record of the currently running operating system. |
| (default) | A virtual identifier indicating the default boot entry. |
| (ramdiskoptions) | Includes boot manager options when working with electronic disks (i.e., located in RAM). |
| (dbgsettings) | Contains global debug settings that are inherited by any entry in the boot application. |
| (emssettings) | Contains global settings for emergency management services that are inherited by any entry in the boot application. |
| (bad memory) | Includes a general list of defects random access memory, which is inherited by any entry in the download application. |
| (global settings) | General settings that are inherited by all entries in the download application. |
| (bootloadersettings) | A set of general settings inherited by all Windows boot application entries. |
| (resumeloadersettings) | A set of general settings inherited by all Windows resumes from hibernation. |
| (hypervisor settings) | Hypervisor settings that can be inherited by any entry in the boot application. |
Let's touch on the commands available in the utility bcdedit.exe. For a list of commands, open a command prompt and type
bcdedit.exe /?

For more detailed information on each command, use
bcdedit.exe /? [team]To view the current Windows boot options, just call the utility on the command line:
bcdedit.exe bcdedit.exe > C:\bootconf.txt
You can, of course, specify the path to save and the name, and others.
If instead of aliases you want to see the GUID, then the command can be modified:
bcdedit.exe /v > C:\bootconf.txtYou can use other formats to export information. For example rtf, doc (not docx) or csv. This allows you not to be distracted by problems with encodings.
Before editing a bootloader, it's always wise to make a backup copy of it. This is done with the command:
bcdedit.exe /export C:\BackupBCD\BCDfileYou can also choose any path and file name here. If there are spaces in the path, quotes must be used in the command:
bcdedit.exe /export "C:\My BackupBCD\BCDfile"Restoring the bootloader is done with the command
bcdedit.exe /import C:\BackupBCD\BCDfileLet's take a look at changing the basic settings of the Windows bootloader using the bcdedit.exe utility.
bcdedit.exe /timeout 15
The above command sets the boot list output time to 15 seconds.
If, in addition to modern versions of Windows, the computer also has old versions of the OS belonging to the NT family (2000, XP, Server 2003, etc.), you can install such an OS as the default bootable OS with the command
bcdedit.exe /default (ntldr)
If you want to use the current OS as the default boot, use the command
bcdedit.exe /default (current)In general, nothing prevents you from using the GUID of the system as well, in order to specify it as bootable by default. You can see the GUID in the text file that we previously saved to the hard drive. The command in this case would look like this:
Bcdedit.exe /default
In this case, the end should contain a GUID in the form of a set of letters and numbers. Remember that the GUID must be enclosed in curly braces ( {} ).
You can also edit the location of operating systems in the boot list. This is done by the following command
bcdedit.exe /displayorder (ntldr) (current)In such an example, the outdated version of Windows will be displayed first in the list, then the current one, from under which this command was entered. System GUIDs can also be used instead of aliases.
Now let's look at how to create new entries in the Windows bootloader using the bcdedit.exe utility. In general, the command to create a new record looks like this:
bcdedit.exe /create [( )] /d | /inherit DEVICE | /device]
Let's analyze the syntax of the command in more detail.
ID- identifier to be used for the new download entry. The identifier can be a GUID or an alias;
description- how new entry downloads will be displayed in the list;
application- an indication that the new entry is an application entry, in this case application_type can take one of the following options: BOOTSECTOR, OSLOADER, RESUME, STARTUP.
inherit- an indication that the new entry is an inherited entry. application_type can take one of the following values: BOOTMGR, BOOTSECTOR, FWBOOTMGR, MEMDIAG, NTLDR, OSLOADER, RESUME. If application_type is not specified, the new entry can inherit from any entry.
inherit DEVICE- an indication that the new entry is inherited and can only be inherited by the device parameters entry.
device- an indication that the new entry is an additional entry for device parameters.

Instruction
Press the "Start" button to call the main menu of the system and go to the "Run" item to edit the menu downloads.
Enter the value msconfig.exe in the search bar that opens and press the Enter key to confirm the command. (An alternative way to run the msconfig.exe utility is to use the Win+R keyboard shortcut.)
Go to the "Download" tab and explore all offered options downloads.
Select the desired configuration and remove all unnecessary menu items downloads.
Press the Enter key to apply the selected changes. It is possible to install several operating systems located on different partitions. To delete files from previous OS, perform the following operations.
Return to the main Start menu and go to the Run item to identify partitions containing unnecessary OS.
Enter the diskmgmt.msc value in the search bar and press the Enter key to confirm the command.
Select the operating system files whose partitions are labeled Primary Partition.
Files whose sections are marked "Active", "System" or "Loading" are not subject to deletion, because. refer to the current operating system and ensure the operability of a computer running OS Windows.
Delete all selected files and restart your computer to apply the changes.Another way to remove unwanted selections downloads operating system involves the following operations.
Return to the main Start menu and go to Run.
Enter the value of sysdm.cpl in the search bar and press the Enter key to confirm the command.
Click the Advanced tab in the window that opens and click the Settings button under Boot and Recovery.
Uncheck the "Display a list of operating systems" box in the "Load operating system" area and click OK.
Carrying out all of the above operations implies the presence of administrator access to the computer.
Sources:
- how to remove xp
All modern browsers are equipped with useful feature like a download manager. But sometimes you can get confused, where did the browser save the recently downloaded file?

You will need
- - browser.
Instruction
Another one popular program, which allows you to give the start menu appearance, which is specific to Windows XP and Windows 7, is called Classic Shell. This application also allows you to customize the Start menu to your liking. In addition, it can be used to change the appearance of the Start button, context menu options, and more.
On operating systems Windows families for most user actions are assigned sounds, which are combined into schemes. Such sound schemes can be edited or replaced with others, for example, that were copied from the Internet.

You will need
- Windows 7 operating system.
Instruction
The sound scheme includes about 30 different wav files. To listen to them, it is enough to use standard program viewing and listening to media files Windows Media Player. You need to listen to all the files to find the one that should be replaced.
Refers to several files that control the download at different stages. These are ntbootdd.sys, ntdetect.com, ntldr, bootsect.dos. And, of course, BOOT.INI itself. If any of them are renamed, dragged, deleted, or inaccurately edited, this can cause problems. The computer will endlessly restart, give errors, or simply not turn on. Therefore, the operating system's internal data must be handled with care. An incorrect number or a dash in the wrong place - and you will have to restore the OS.

How to find BOOT.INI
Let's talk about Windows XP first. Where is BOOT.INI in this model? It can be found directly in the root directory (where the main system distributions are). But you will not be able to see it if the display of hidden objects is not activated. To enable this option:
- Go to the "Control Panel" (in the "Start" menu).
- Open Folder Options under Appearance and Personalization.
- Find the "View" tab.
- Scroll the slider down. There will be a line "Show hidden files". Check the box.

You should now be able to see BOOT.INI. It is located right on system drive(usually this is the C:\ drive). The file itself has an icon in the form of a leaf with a gear. It will be translucent. This means that it is hidden, and it is impossible to remove this attribute from it.
If you have no idea where exactly your OS is installed, go to the "Start - Search" menu. Select "Files and folders" and in the input field write the name or part of the name. The window will display all results with that name.
If you are using Windows 7, in all models since Vista, these settings have been replaced with a "BCD" configuration file, which has no extension. It can be run as part of the registry, but it will be difficult to configure or change something in it. It contains a lot of parameters and values that are not easy to navigate. In Windows 10, BOOT.INI is also missing, so you will have to change the boot options in a different way.
BCD is much more useful and functional than its "predecessor", but this file is not intended for manual configuration. It is needed for the needs of the system, and it is not worth fixing anything in it.
How to edit?
BOOT.INI can be edited with any word processor. A regular Windows notepad or "advanced" Notepad+ will do. But before that, you must allow access to the file, otherwise, after making changes, it will not be possible to save it.
- Click on it with the right mouse button.
- Select "Properties".
- In the "General" tab, uncheck the "Read Only" checkbox.
- Click Apply.
After that, you can change the values in BOOT.INI. The file has a clear structure. It is not recommended to delete something in it, move operators unnecessarily, erase brackets or punctuation marks. Briefly about each parameter:
- "Timeout" shows how much time is given to choose an OS at startup (if more than one is installed). Write the number you need after the equal sign "=". The timer counts down in seconds.
- "default" indicates the default operating system. It will be downloaded if you do not choose which OS to activate within the allotted time. This setting might look something like this: "scsi(0)disk(0)rdisk(0)partition(1)\WINDOWS".
- "Scsi" is a controller that manages physical disk. If there are more than one, the second one will look like "scsi(1)".
- "Partition" is the partition where the OS resides. For example, "Partition(1)" points to C:\, "partition(2)\" points to D:\, and so on.
- Below the "operating systems" parameter is a list of installed operating systems. If you have one OS, there will be one line.
- Other parameters may also be entered. For example, "/SOS" to show driver names at startup, or "/debug" to debug the kernel. All possible commands is on the official website of Microsoft.

How to change boot order without BOOT.INI file
Since editing BOOT.INI in Windows 7 and later versions will not work due to the absence of this file, you will have to configure the boot order in another way. Of course, you can try to work with BCD, but understanding all its options will not be easy.
If you need to change the time that is given to the choice of the OS, or set a different system by default, you can do it like this:
- Open "My Computer".
- Click anywhere in the window with the right mouse button.
- Go to "Properties".
- Then - in "Advanced settings".
- On the Advanced tab, under Recovery and Boot, click Options. The options you need will be there.

Another way:
- Go to Start - Run.
- In the window that opens, write "msconfig" (without quotes). The configuration settings will appear.
- Downloads tab. A list of installed operating systems will open. You can decide which one to set as default and change the timeout on startup and system selection.
Unfortunately, these methods do not allow you to set specific parameters.
Use of programs
The tasks described above can be simplified. For this there are special utilities- download managers. They can be dispensed with without BOOT.INI. Here are some of these programs:
- Shell for BCD. It can be used to customize this file.
- OSL2000 BootManager. Supports work with a large number of operating systems (up to 100 pieces).
- Provides a quick restart to the desired OS.
In Windows XP BOOT.INI is responsible for the system boot order. It can be changed by writing commands manually. In subsequent versions of the OS, the file was removed. But setting launch options is still available. If you do not understand this issue, use the programs designed for this. This way you don't have to touch your own Windows information.
For a long time, running from one operating system to another, if there are two of them installed on the computer, will not work. After carefully studying both, sooner or later you will have to choose only one of them - main, with which the work will be carried out primarily. If for the most part only one Windows system is used, its other versions or editions located on other partitions of the disk, not required to be deleted. Of course, provided that the hard disk space is not constrained in size.
The ability to work in the future with other computer systems can be left, but for convenience, simplify the entrance to the main one by removing temporarily unused ones from the boot. In this case, starting the computer will be simplified by automatically loading only the required operating system. Another option to make it easier to get started with the computer is not to remove the boot selection window for all systems, but to set the desired version of Windows as the default boot and reduce the time to select other options in the bootloader window.
How to edit the boot process of multiple operating systems Windows systems installed on one computer - more on that below.
So, we have in our case a computer with installed versions Windows 7 and 8.1. When you turn on the computer, we see the bootloader window with a list of systems to choose from.
Each time you boot your computer, you can get into the desired system by making the appropriate selection. Otherwise, after a certain time - and by default this is 30 seconds- Windows will automatically boot, first on the list. In our case, this Windows 7, since it is the last one installed on the computer, and it is its bootloader, as we see, that meets us after starting the computer.
Well, let's change that. Let's configure the automatic boot of the main system - Windows 8.1. To do this, of course, you need to enter it.
We need a settings section, and in Windows 8.1 you can get to it using the context menu on the button.

In the system window, select Extra options.

You can also get to the settings section in Windows 7 using the context menu, but called on the icon "Computer" in the conductor. Among the commands, you must select .

In Windows 7, also select Extra options.

Further steps in both systems are identical.
In the system properties window that appears, in the tab "Additionally" click the options button in the last section.

Now you can start editing the boot of several systems. Change the default boot Windows from among the options in the drop-down list. In our case, we change the pre-installed Windows 7 to Windows 8.1.

As mentioned, by default the Windows bootloader waits half a minute to allow the user to select an operating system.

If predominantly work is carried out only in one system, it makes no sense to leave half a minute waiting for it to automatically load. Another operating system can not be deprived of the ability to start, but reduce the preset time for selecting boot options. In the display of the list of bootable systems, in our case, set 5 second waiting before automatically booting the Windows 8.1 core system. This time is more than enough to make a choice if you suddenly need to enter Windows 7 sometime.

To completely remove another system from the boot list, you must uncheck the option system list display. In this case, only the system selected for booting by default will boot without any time delays.

If a second operating system is ever needed, it will be possible to enter it by making this option active again.
After making changes, click "OK" at the bottom of this window, as well as at the bottom of the system properties window.

That's it - the operating system boot list has been edited.
Above, we looked at editing the boot of existing operating systems. But often when you start the computer we can see a list of operating systems that are already on the computer No. This is a natural development after the second operating system has been removed by simply formatting the disk partition or destroying it. system files manually, but the entry about the possibility of loading it in the system configuration was not removed. The bootloader may also display the option to launch a non-existent core Windows after the system has been reinstalled. This, by the way, is not the main, but one of the reasons why system engineers advise to carry out the so-called clean Windows installation- without saving the files of the previous system and formatting the disk partition.
It is better to remove the non-existent operating system from the boot options altogether so that it does not delay the process of starting the main Windows.
In the main system, we call the command . In Windows 8.1, quick access to it is implemented in the context menu on the button.

We need system configuration section. Enter the value in the command field:
We press "OK".

In Windows 7, launching the system configuration window can be easier - by entering a key query in the menu search field.

The system configuration window will appear, go to the tab. We select the record about loading a non-existent system and delete it.

In our case, the download list contained different versions Windows, and decide on the one to be deleted "Seven" We obviously didn't have a hard time. But if the boot list contains entries for two identical versions of Windows, system descriptions will help in orientation with the one you want to remove. The Windows we are actually on will be marked as current.
The changes made are saved with the button. After pressing "OK" the system will prompt reboot.

After restarting the computer, we can observe the immediate startup of the main system.


