It happens that the BIOS does not see bootable USB flash drive. This can happen on any personal computer with absolutely any operating system, be it Windows XP, G7 or G8. What to do if the BIOS does not see the flash drive? This is a very popular question among all users. In addition, any owner has encountered such a problem at least once in his life. personal computer or laptop. Some people in such a situation immediately contact service centers. And some even go to the store where they bought the flash drive, indignant and complaining that it doesn’t work.
Of course, it may also be that the whole issue is really a faulty device. But sometimes BOIS for a number of other reasons. And even if everything was fine before, the problems that have arisen now can be caused by various malfunctions that simply “accumulated” in the system. Or the flash drive may not have enough power for your system unit. Or... Below are the most popular reasons why problems arise with identifying flash drives and other USB devices, as well as ways to solve these problems.
Why doesn't BIOS recognize removable media?
When you connect external storage or a device via a USB port, it is automatically detected, and the “Device Manager” reports that a new device is connected. In some cases, it also asks you to install drivers or updates. But sometimes the BIOS does not see the bootable USB flash drive or cannot synchronize its operation. What to do in this case? There are several most likely causes and solutions to this problem.
USB controller: setup
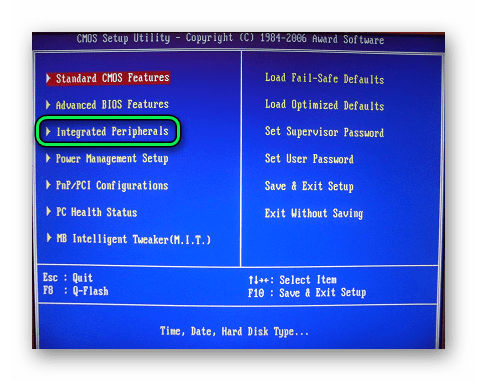
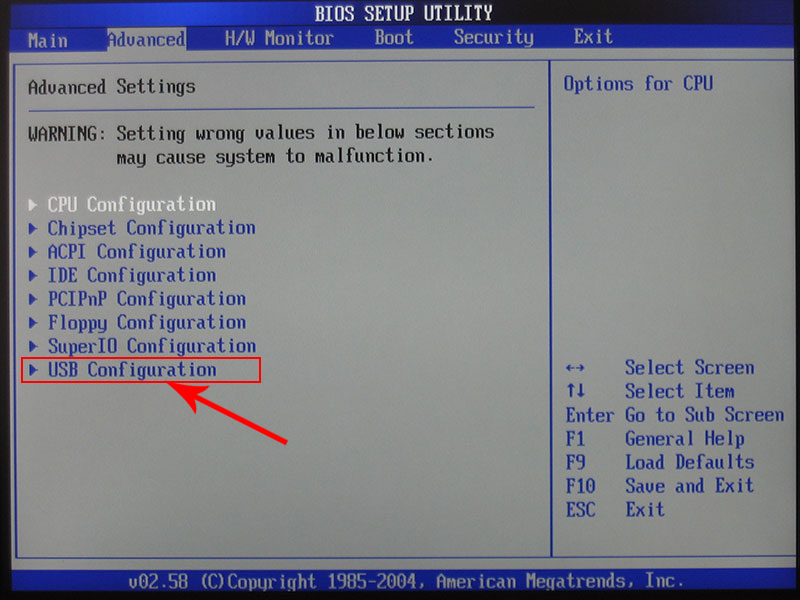
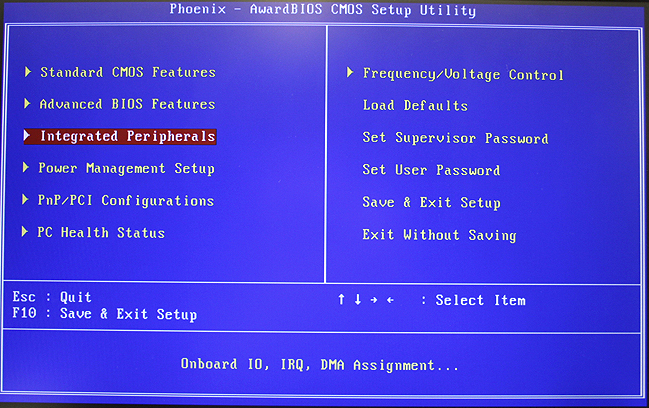
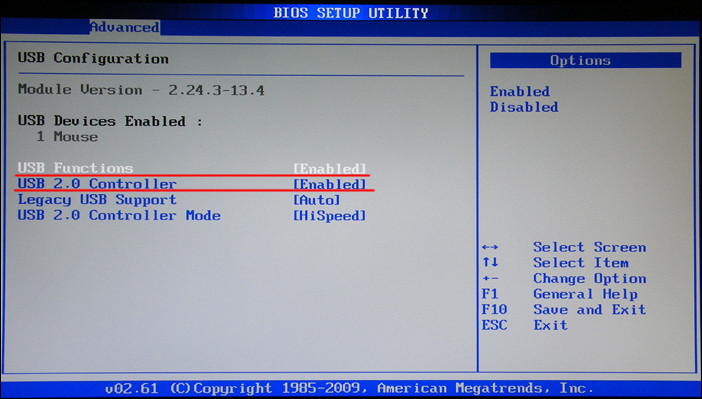
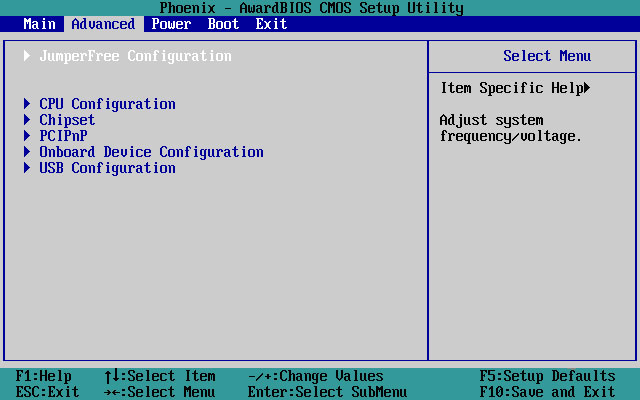
The BIOS is part of the operating system, which is where problems with a flash drive lie in most cases. Where exactly is the problem? The most obvious reason why the BIOS - USB controller is not working correctly or is simply disabled. How to deal with the problem? Turn it on! For this in the section Award BIOS find the Integrated Peripherals subsection, and then go to the second menu item - Advinced (where there will be advanced parameters BIOS settings). Then we find the USB Configuration category, go into it, press Enter and pay attention to the inscription that appears opposite the USB parameters. Disabled and Enabled may light up there. If the controller is in a disabled state, then you need to turn it on using the pointer buttons. To save the changed settings, be sure to press F10.

If the controller is connected, but the BIOS does not see the flash drive, you can try it on another port of the system unit. This one may be faulty or incorrectly configured, which is preventing it from functioning.
Sometimes none of the ports can detect the flash drive. In this case, the USB controller itself makes sense. This problem especially often occurs after a reinstallation or rollback of the operating system, when some of the necessary data may be lost or the settings are reset to “default”. Therefore, re-downloading all latest versions drivers can solve the problem with the flash drive.
Compatibility issues
The vast majority of modern peripheral devices only support USB version 2.0, which, of course, will not be recognized on computers whose interface is configured for 1.1. In this case, to solve the problem you just need to install the supporting software, which, as a rule, always comes with the device - on the same disk with drivers or separately. Sometimes required applications can be downloaded from the official websites of USB drive manufacturers.

System file INFCACHE.1 - the root of all evil
If you have tried all the above methods, but the problem has not disappeared, then you can try another, but more drastic method. Just remove it from your computer system file INFCACHE.1. You can find it in the WINDOWS root directory, on your hard drive C, or wherever your operating system is installed. The full path to this file looks like this: WINDOWS:system32DriveStore. You can also find it through a search or using If after deleting this file the problem disappeared, then all the problems were related to cache memory corruption. The next time you turn on your computer, the INFCACHE.1 file will be restored by itself.
Is it still a matter of BIOS?
Instructions for setting up this part of the system software will help cope with problems with a flash drive in some cases. For example, if, as mentioned above, the problem is a disabled USB controller. Correct setting BIOS is a simple matter, but important. Almost any user can cope with this, even with little experience working with a personal computer.

So, in order to get into the parameters, you need to press the F2 key (in some cases DELETE) at the moment when it loads BIOS system. Next you need to go to the Advanced tab, where you can manage advanced features, select the Integrated Peripherals section and press Enter. By performing these simple manipulations, you can see if the controller is working, as well as other means that affect the functioning of the ports and the automatic detection of connected USB devices.
BIOS does not see other devices connected via the port
If the computer cannot detect not only a flash drive, but also other external media and devices connected via USB (for example, a printer, speakers, camera or phone), then this case requires special and radical measures.

Remove the casing (protective side plates) from the computer. As a rule, they are either bolted to the case or fastened with “latches”, then we connect a flash drive or other device directly to the USB port on the motherboard. In most cases, this may be enough for the BIOS to see the device. But if this does not happen, then you can try installing the appropriate driver package for correct operation and eliminating incompatibility problems. If this doesn’t help, there is still a way out!
Other reasons why other USB devices
It often happens that a computer is connected to many different devices, requiring a large amount of energy. For example, a scanner or a powerful sound system. And just these two connected devices may be enough to cause a power shortage when connecting even such an economical medium as a flash drive. What can we say about trying to connect a camera to the computer in order to reset or view photos on the big screen. In this case, the BIOS does not see the flash drive (or other device) due to too low level electricity that can be spent on this port. In other words, the device may need more power than the USB connector can provide. As a result, it simply does not have enough power to turn on and function.
In order to eliminate this problem, you need to find out the USB controller of your personal computer. You can clarify this in the "Device Manager" on the "Properties" tab in the "Power" column. USB 2.0 devices typically require 500 mA, while newer 3.0 devices consume 900 mA. Based on this, it can be assumed that sometimes, in order to connect a device, you first need to disconnect one or even several previously connected but unused devices. this moment devices. If you charge your phone or player from a computer, and the flash drive is not detected at the same time, then you should try disconnecting the charging cord for a while. In 90% of cases, this will be enough for the BIOS to see the connected device.
Or maybe the flash drive is to blame?
Have you tried everything but nothing helps? Then there is a possibility that the problem is in the device itself. You can read reviews about your flash drive. BIOS may not be the reason why it is not detected if you come across a device with a factory defect, for example. It's also possible that this model requires some special manipulations or the presence of a USB-HUB for correct operation. There can be many options, so you should explore everything existing methods defining the problem.

Conclusion
If you identify a problem due to which the BIOS does not see the flash drive, and its solution is unsuccessful, then, of course, you should contact service center. But before that, simply disable the power management function of the USB controller from the operating system. To do this, go to the “Device Manager”, find the “Universal Serial Bus Controllers” tab, select the “USB Root Hub” subsection and double-click the “Power Management” window, uncheck the corresponding box and click “OK” to save the changes. And we repeat this procedure for each USB hub. Perhaps this is what will save you from going to the service center.
Modern laptops are getting rid of CD/DVD drives one after another, becoming thinner and lighter. At the same time, users have a new need - the ability to install an OS from a flash drive. However, even with a bootable USB flash drive, not everything can go as smoothly as we would like. Microsoft specialists have always loved to present their users with interesting problems. One of them is that the BIOS may simply not see the media. The problem can be solved by several sequential actions, which we will now describe.
In general, there is nothing better for installing an OS on your computer than a self-made bootable USB flash drive. You will be 100% confident in it. In some cases, it turns out that the media itself is not made correctly. Therefore, we will look at several ways to make it for the most popular versions Windows.
In addition, you need to set the correct parameters in the BIOS itself. Sometimes this may be the reason why a drive is not in the list of drives. Therefore, after we figure out how to create a flash drive, we will look at three more ways to configure the most common BIOS versions.
Method 1. Flash drive with Windows 7 installer
In this case we will use .
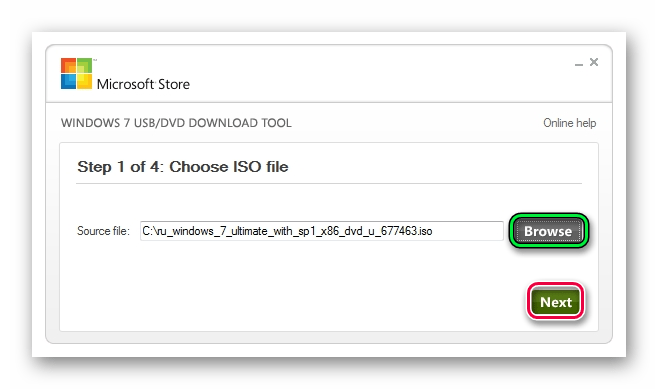
This method Suitable for Windows 7 and older. To record images of other systems, use our instructions for creating bootable flash drives.
In the following instructions you can see ways to create the same drive, but not with Windows, but with other operating systems.
Method 2: Setting up Award BIOS
To enter Award BIOS, press F8 while the operating system is loading. This is the most common option. There are also the following entry combinations:
- Ctrl+Alt+Esc;
- Ctrl+Alt+Del;
- Delete;
- Reset (for Dell computers);
- Ctrl+Alt+F11;
- Insert;
- Ctrl+Alt+F3;
- Ctrl+Alt+Ins;
- Fn+F1;
- Ctrl+Alt+S;
- Ctrl+Alt+Esc;
- Ctrl+Alt+Ins;
- Ctrl+S.
Now let's talk about how to properly configure the BIOS. In most cases, this is precisely the problem. If you have an Award BIOS, do this:
You decided to install Windows: you recorded a digital copy on a flash drive, configured the BIOS, rebooted your computer or laptop, but for some reason the installation did not start. What the heck? Why doesn't the BIOS see the bootable USB flash drive? It seems like everything was done correctly...
There are 2 most likely reasons here. The first is that the BIOS does not see the flash drive because it is not bootable. Second, you haven’t configured the BIOS quite correctly.
Although there is one more nuance - your BIOS is too old. It does not support USB drives, and therefore does not see them. In this case, you can install Windows from a disk.
As for the first two reasons, we will look at them in more detail.
Did you write the bootable USB flash drive correctly?
Questions like “why the BIOS doesn’t see the bootable USB flash drive” are probably asked by every second user. This is especially true for those who install Windows on a computer or laptop for the first time. There are usually no such problems with a disk, but with a USB flash drive they happen all the time.
The fact is that it is not enough to simply copy files. In this case, it will not be considered bootable. This is why the BIOS does not see the flash drive. You only need to write it using special programs. There are plenty of them, but personally I use UltraISO. Why? Because she:
- Free (with a 30-day trial period).
- Records both Windows 7 and Windows 8.
- Easily writes images to a 4 GB flash drive (some programs only support USB drives with a capacity of 8 GB and higher).
And most importantly: create a bootable USB flash drive in UltraISO is easier simple. First, you need to install the program (link to the developer's website) and connect the USB flash drive to your laptop or computer. And after that there are only a few steps left to complete:
During recording, all information from the USB flash drive will be deleted. The program will also warn you about this. Therefore, if there is important data on it, copy it to another location.
Correct BIOS setup
If you did everything according to the instructions, then rest assured that the USB flash drive was written correctly. And now it really is bootable. Try it - it might work Windows installation. BIOS still doesn't see the bootable USB flash drive? Then in this case the problem lies in its parameters. And this needs to be checked.
Therefore, restart your laptop or computer and go into the BIOS. To do this, you need to press a certain button several times. Most often this is Del or F2, although it may be different (depending on the model motherboard and laptop brand).
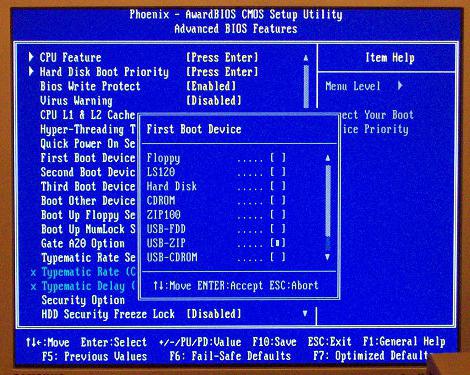
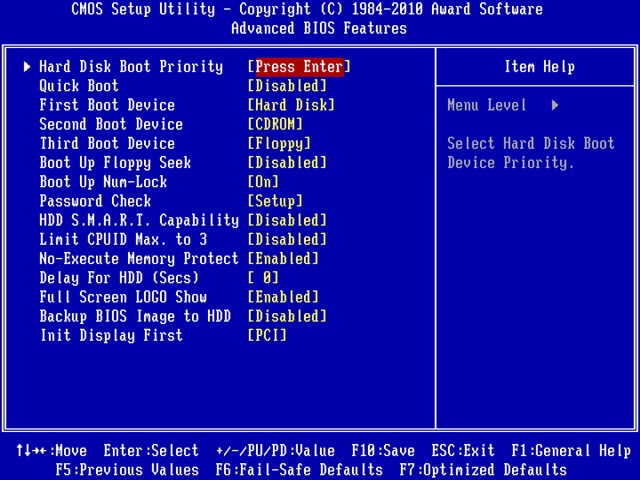
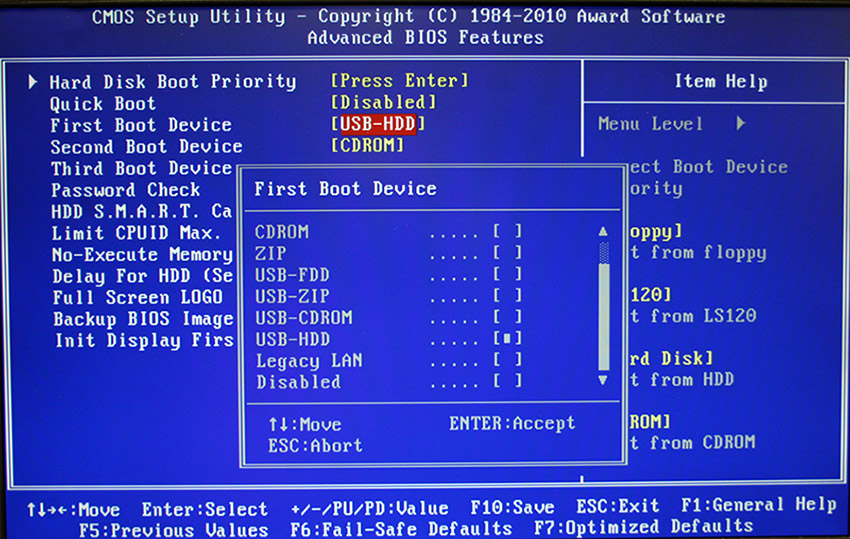
Next, you need to go to the tab whose title contains the word “Boot”. This is where you configure the boot priority of devices when you turn on your PC or laptop. By default, First Boot Device boots HDD, next comes the disk drive. In this case, you need to put the flash drive (USB-HDD) in first place, and temporarily lower the hard drive (Hard Disk) to second.
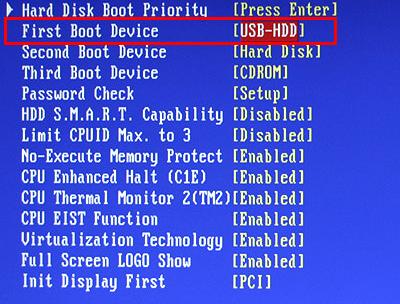 Example of setting up BIOS on a computer
When exiting the BIOS, be sure to save the new settings! To press the button that is responsible for the “Save and Exit” item.  Example of setting up BIOS on a laptop
That's all. Now, if the USB flash drive is connected to a computer or laptop, and the BIOS is configured correctly, Windows installation will begin.
P.S. If this is all too complicated for you, then you can go to the Boot Menu. This is one of the BIOS options, which is designed specifically to quickly configure booting from a flash drive. This option is much simpler and more convenient, and you definitely won’t have questions like “why the BIOS doesn’t see the bootable USB flash drive.”
P.S. If the BIOS stubbornly refuses to recognize the USB flash drive, then it may be damaged. But before you throw it away, read it. Perhaps everything will work out and it will last a couple more years.
In order for the computer to start not from the hard drive, but from a USB drive, you need. Such a flash drive is used for system recovery, password reset and other “rescue” missions. But how to select a media if it is not displayed in the BIOS settings? You can solve the problem yourself. Provided that the drive is working properly and data is being read from it.
How to fix the problem: BIOS does not “see” the USB flash drive?
Check if USB device support is enabled. How to do this depends on the motherboard model. After turning on the computer, the message “Press [key] to enter Setup” will appear at the bottom of the screen. Click it to enter BIOS. And look for a menu that has “USB” in its name.
New BIOS versions
You can work with new BIOS versions using a keyboard and mouse. There is also support for the Russian language. You will quickly understand the parameters. But even if it is not there, you will be able to configure the boot order and launch via a USB flash drive.
Award-BIOS
After starting the BIOS, do you see two lists on a blue background? Then you have the Award version. You won't be able to navigate through the menu by clicking the mouse. It can only be configured using the keyboard. Below or on the side there will be instructions on which buttons to press for this.

Now let's take a look at boot priority.
When you are finished working with the drive, return to the previous BIOS settings.
AMI-BIOS
The BIOS AMI interface has a gray screen, blue font and a row of tabs at the top. The information block is on the right. Mouse control is also not available.
Now you can change the bootloader parameters:
Phoenix-Award BIOS
In BIOS Phoenix-Award there is also a gray screen. Information about which keys to press is located below and highlighted green. If the computer does not boot through the drive:
UEFI
You have turned on USB support, but for some reason the flash drive is not in the BIOS? The problem could arise due to UEFI - a mode that “protects” the bootloader from malware and foreign code. This module will run operating system, even if you have configured the BIOS correctly. What to do? Disable UEFI.
Settings depend on the motherboard manufacturer. First way:

Second way:
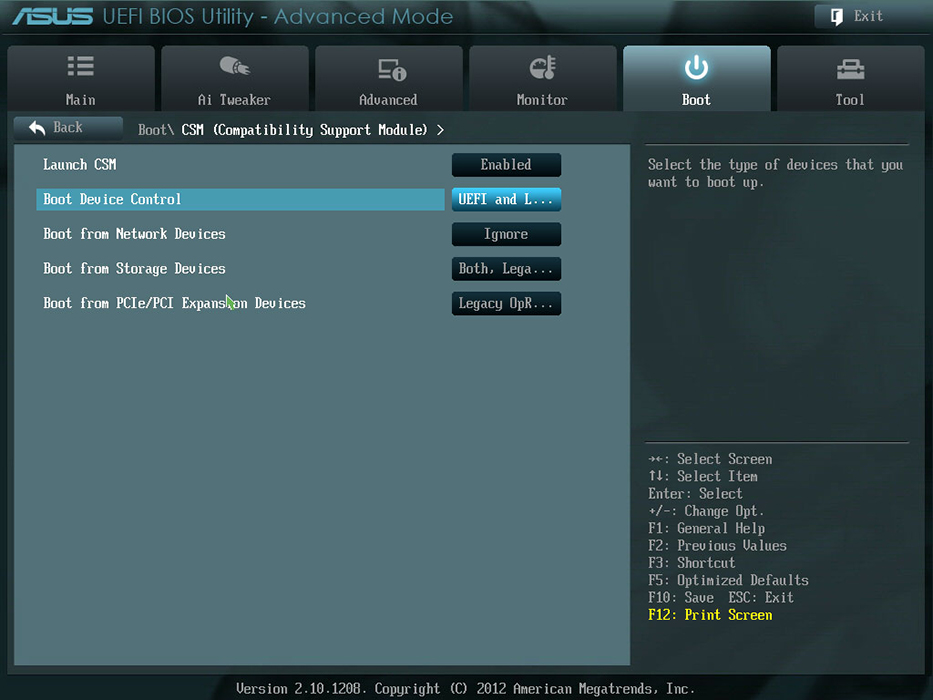
After working with the media, re-enable “boot protection”.
You need the “right” flash drive
Perhaps it's the flash drive itself. More precisely, in the way it is written. If you copy information onto it directly, nothing will work. But why is it necessary to create a “bootable” drive? To run it, you need some kind of “software script”. Without it, the system will not understand what to do with the media.
To create a bootable USB flash drive from the LiveUSB utility:
- Insert the drive into the slot.
- Run the installer.
- Select your Flash media from the list.
- Confirm installation.
- Now through this drive you can “reanimate” the system.
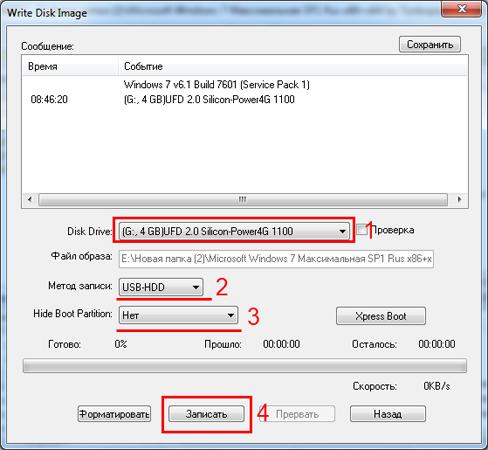
To install a third-party OS, you need a ready-made ISO image and a burning program. For example, UltraISO or Rufus. Let's look at the second one:
- Insert the drive into the USB port.
- Launch the program.
- Check the “Create a boot disk” checkbox.
- Click on the disk button.
- Specify the path to the image.
- Click on “Start”.

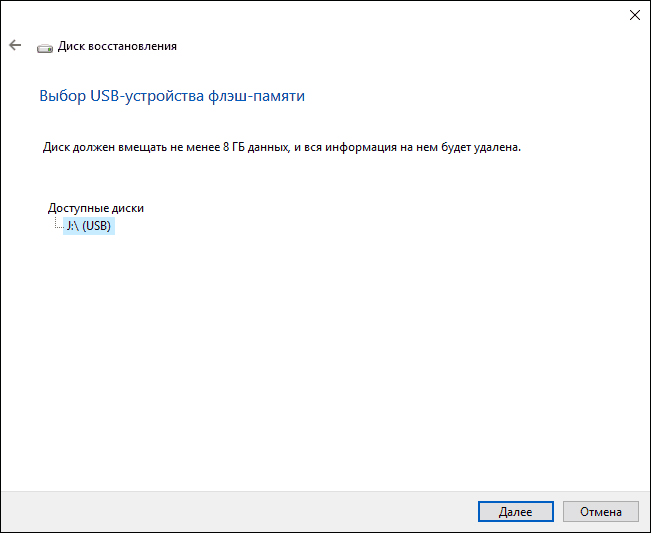
You can create a bootable USB drive using Windows.
If the BIOS does not “see” the bootable USB flash drive, perhaps the problem is not in it, but in the settings. There is no need to throw it away ahead of time. First try changing the BIOS configuration.
In this article we will talk about a problem when a laptop only supports UEFI boot.
So, turn on the laptop, press F2 to get into the BIOS. Install the flash drive.
Now we've entered the BIOS. And when we go to the BOOT tab, here we see only UEFI mode. That is, there is no Legacy mode here.
We assume that the problem is that the Bios here is flashed without support.
So, we see our BOOT MENU and here in the fourth position our flash drive should be determined, but we don’t see the name of the flash drive there.

In this case, two options are possible:
1) BIOS firmware.
2) Make a flash drive that supports UEFI boot mode.
We will use the second method. And after we insert the UEFI flash drive, turn on the laptop, press F2. Next, we go to the BOOT tab and here we immediately see that our flash drive has been identified. And now the download will go with it.

Press EXIT and ENTER and see if the download will work. And finally, we see that the download has started.

We hope that the information was clear and accessible. We wish you good luck. Watch the video below.
You can watch the video for the article by following the link:


