Hello, dear readers, today I would like to share with you my experience in WINDOWS setup 7. This idea came to me after I was asked to speed up several times. windows work 7, for example, for browsing the Internet or improving performance in games.
The issue of reducing resource consumption by the WINDOWS 7 operating system is quite relevant, as everyone remembers; even after the release of Windows Vista, many users had problems due to excessive resource consumption by the system. But in today's article I would like to tell you HOW TO SPEED UP WINDOWS 7.
PROLOGUE
Let's try to understand why we need to optimize our work operating system WINDOWS 7? Someone will say that it is already well made and works well, without failures and quickly, but those who don’t know how much will say so unnecessary services sometimes it is enabled in his system and the one who does not know how much faster it can work. This article is written more for users who value every percentage of performance random access memory and processor. I am sure that such people have already tried many ways to speed up their Windows 7 operating system, but I will still tell you my methods, which are quite effective and have been tried by me personally.
Most often, acceleration and optimization of Windows 7 is needed either by GAMERS who want to run more “heavy” games on their computers without glitches and freezes, or by people who use resource-intensive software. Both will find a lot of useful information in my article.
VISUAL OPTIMIZATION
We need visual optimization in order to reduce the consumption of processor and video card resources by disabling unnecessary effects and animations in the system.
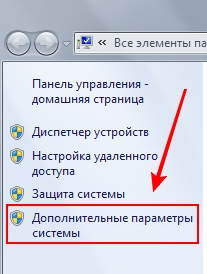
We need to open the “System Properties” window; this can be done in several ways, for example by using the Win + Pause (Break) key combination: +  or you can launch the “System” window by right-clicking on the “My Computer” icon on the desktop.
After the window opens, left-click on the item “ Extra options systems” in the upper left corner of the screen. As shown in the picture below:
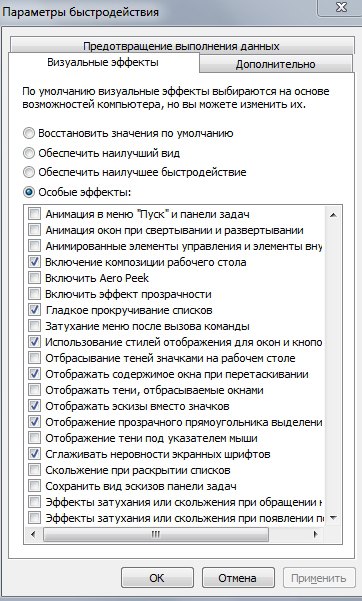
Disable loading effects
After this, a window with settings will open, in which we need to disable all unnecessary effects so that the effects do not steal valuable computer resources and to speed up the operation of the Windows 7 system itself.
In the “PERFORMANCE” section, click on the “SETTINGS” button and DISCONNECT checkmarks as shown in the image below:
Click the “OPTIONS” button in the “BOOT AND RESTORE” section and disable everything as shown in the figure:
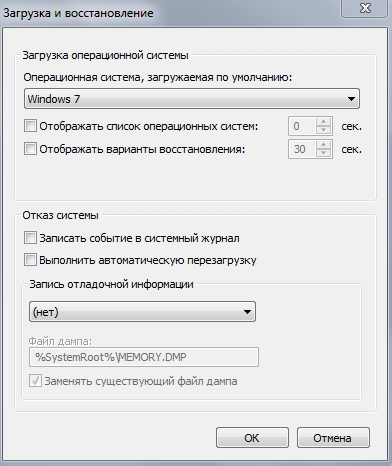
The “DO NOT DISPLAY LIST OF OPERATING SYSTEMS” checkbox should only be unchecked if you do not have other operating systems installed on your computer, otherwise you will not be able to boot into them.
These settings will not negatively affect the operation of the system, and now we will not have to waste resources on maintaining debug logs and unnecessary visual effects.
CLEANING THE SYSTEM
A very important step is cleaning the system, since I am sure that everyone’s system is clogged with unnecessary unused files and “dead” shortcuts, and very often unused entries remain in the system registry after uninstalling some programs.
To clean WINDOWS 7 OS we use free program CCleaner.
First you need to download the program, you can do this using the link below:
Those who do not have access to torrents can use the instructions to bypass site blocking
After we have downloaded the program, install it in any way convenient for us from those available in the archive folder and perform cleaning as shown in the images below:
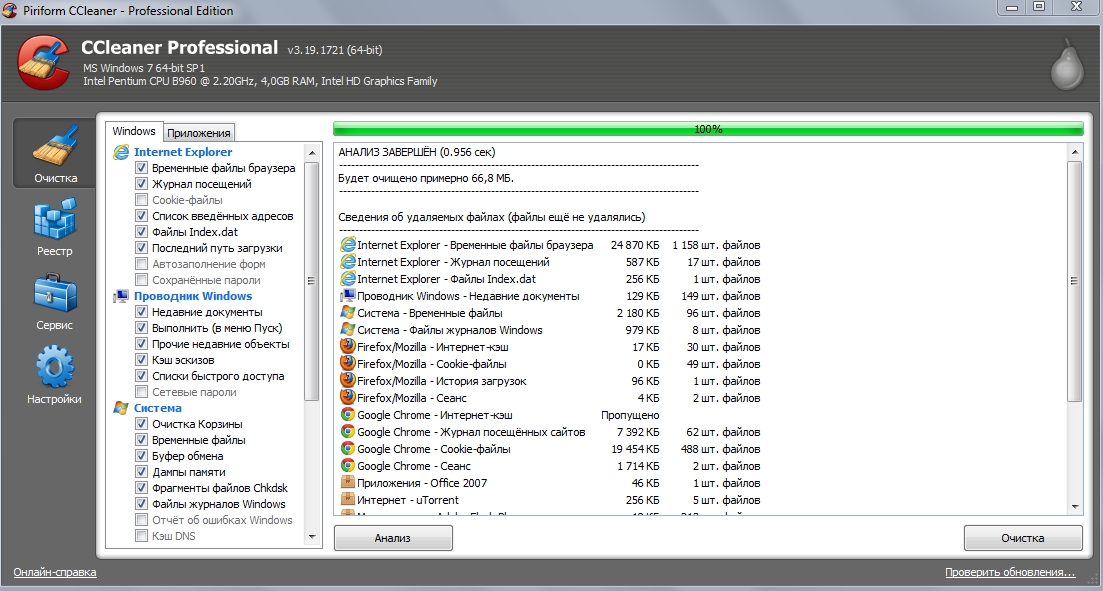
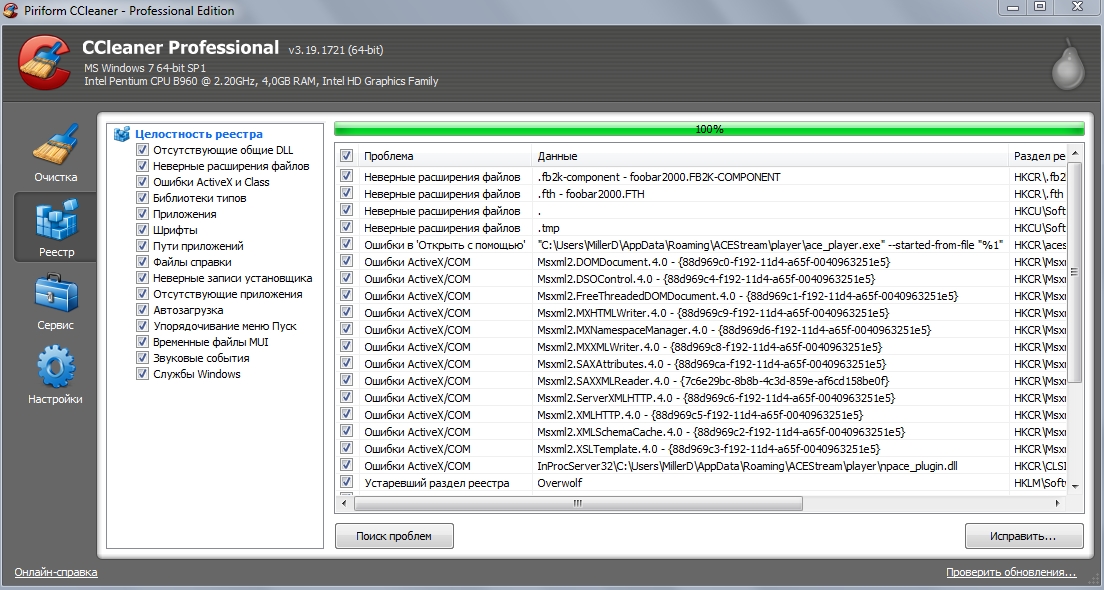
Also in the CCleaner program, in the “Tools - Startup” section, I advise you to exclude unnecessary programs from startup.
DISK SPACE OPTIMIZATION
In this section, we will look at how to properly optimize the available disk space, what functionality to disable, and what work to do with the file system.
We'll start by disabling unnecessary functionality and that for Windows 7 is “Indexing files” “Archiving files”
Disabling file indexing
For DISCONNECTIONS“File indexing” we need to go into “My Computer” and right-click on one of the partitions of your disk and uncheck the box as shown in the figure below:
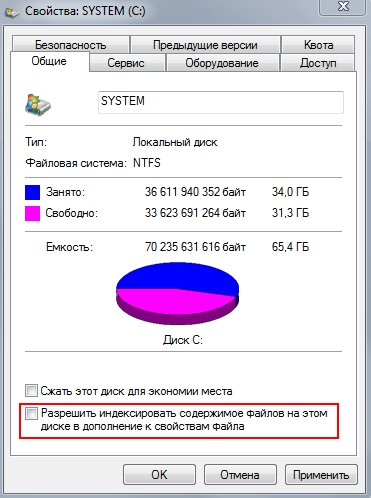
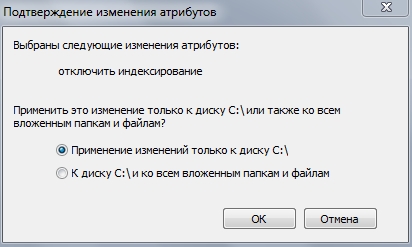
Select as shown in the image and click “OK”.
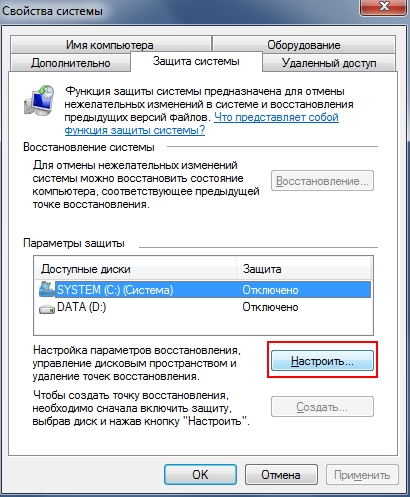
Disable data archiving
We go to the “System Properties” window as described in the “” section and in the “SYSTEM PROTECTION” tab, select the desired section and click the “Configure” button and in the window that opens, check the “Disable system protection” checkbox as it is shown in the screenshots below. We do this for all sections.
![]()
Defragmenting files
The next point, Defragmentation of the file system, is an important point, but only if defragmentation is performed correctly.
We will carry out defragmentation using the program “ Perfect Disk“, which in my opinion, and not only mine, is the best program to defragment disks!
After downloading, we defragment your partitions, for the partition with Windows 7 OS, select “SmartPlacement defragmentation”, for the remaining partitions “Consolidate free space”.
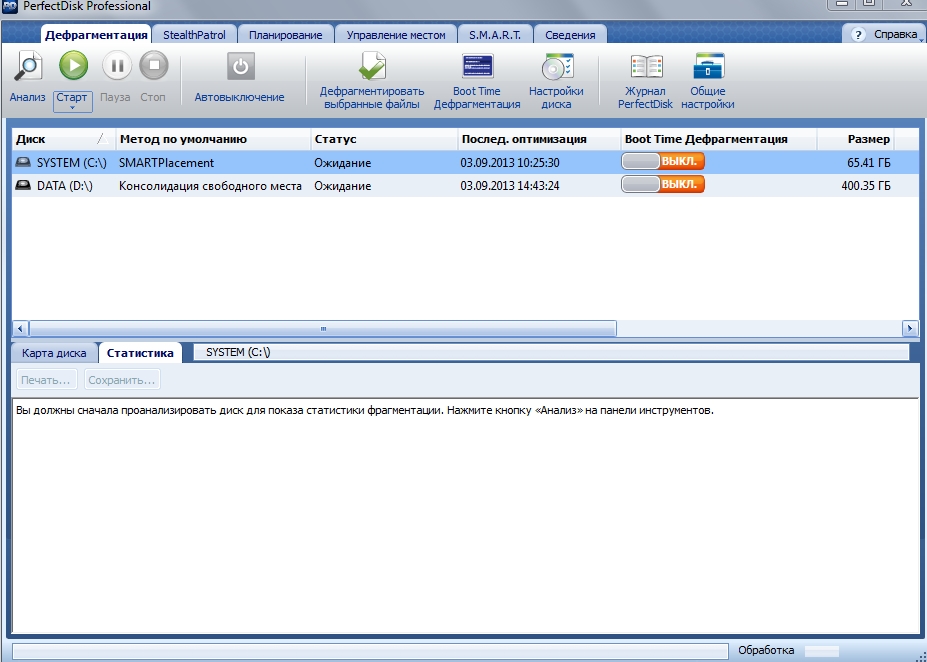
This completes the optimization of disk space.
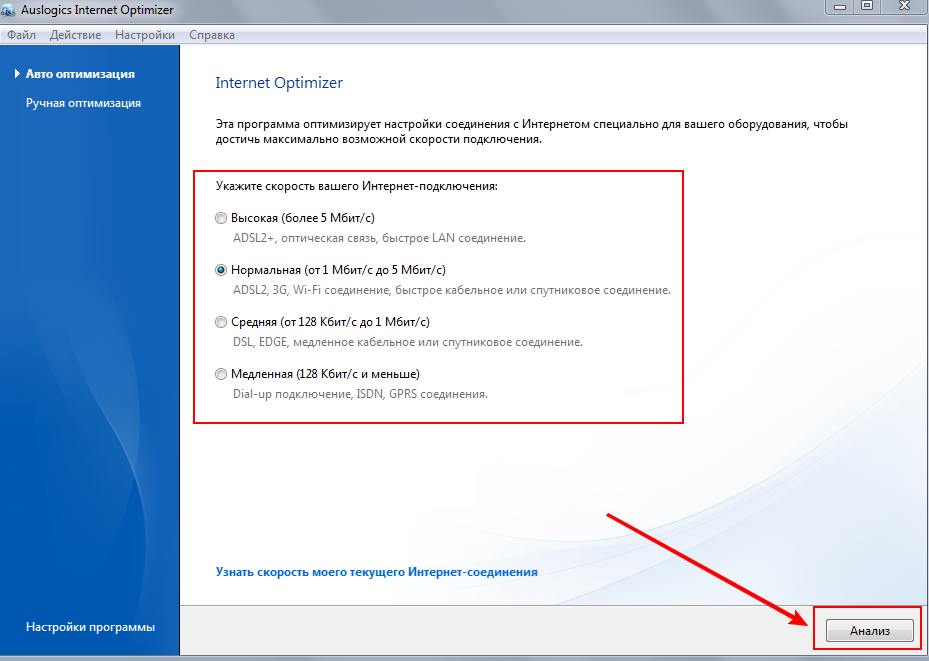
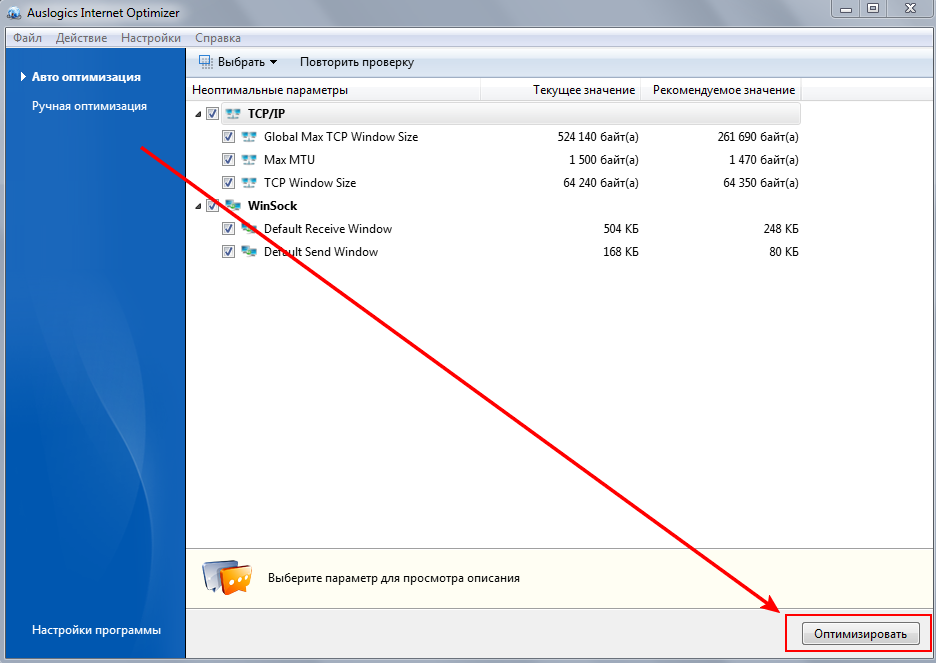
OPTIMIZATION OF SERVICES Correct the marked
After analysis, leave all parameters selected and click the “OPTIMIZE” button
This completes the optimization of your computer or laptop on the Windows 7 operating system for games or program loads.
CONCLUSIONS
So, in the article we learned how to optimize your equipment using the WINDOWS 7 operating system. I tried to explain everything to you as simply and clearly as possible using images, if some steps in the pictures are not clear to you or somewhere I missed the thread of explanation and you If you don’t understand what needs to be done, you can easily write in the comments below and I will explain to you what and how to do to improve the speed of your OS.
Disk system optimization
This article is an attempt to answer questions about how to create an optimal system from existing software and hardware components. We will talk about the performance of the disk complex - about the method of connecting hard drives and CD/DVD drives, about IDE controller drivers, about where it is best to place the virtual memory file and what size to allocate for it, and about many other performance issues.
The material in this article is quite universal, since most of the problems discussed relate either to hardware or to the general principles of constructing modern operating systems. However, where I can do this, I will try to give specific advice on changing the settings of specific systems.
IDE interface
Hardware connection of devices
The vast majority of modern computers have a disk system based on IDE interface(ATAPI). A traditional motherboard has two IDE controller channels—primary and secondary—each of which is essentially a separate controller. Each channel has its own connector on the motherboard and a separate cable to which you can connect one or two IDE devices. One of them will operate in master mode, and the other will operate in slave mode, and these modes are set by jumpers on the drive or drive. I will not reveal any new facts - everything I say in this section has already been said in various documents and FAQs. Despite this, the question of what and where to connect comes up quite often, and since the operation of the disk system directly depends on this, I will try to put together everything that can be said on this topic.
I’ll immediately add that it is not possible to describe the performance of SCSI-based systems in this article - mainly due to the vastness of this topic and the presence of a huge number of particulars.
How do two devices placed on the same channel (loop) work?
Unfortunately, the existing protocol for working with IDE devices does not allow two drives operating on the same channel to operate completely separately from each other. It's not even that they use a common cable (cable) to connect to the controller. The problem is somewhat more acute - the data transfer protocol itself (controller device) and the driver operating mode, used in the vast majority of IDE systems, do not allow the use of one of the devices until the other device has executed the command given to it. In practice, this results in a very unpleasant thing: for example, the hard drive received a command to read the sector. Often he cannot do this right away - for example, because the heads hard drive are in a different area, and to read the sector you will have to perform mechanical operations. While searching for the necessary data - about ten milliseconds - the device is simply silent, executing the controller command. Unfortunately, during this period the second IDE device located on the same controller (channel) is simply unavailable. Problem of two hard drives located on one IDE controller is not so scary, because HDD in any case, he is able to execute the commands given to him quickly enough. In the case, for example, with a CD-ROM drive, the problem can be much more serious. When the CD-ROM searches for a track (about hundreds of milliseconds, in rare cases - even more), performs some of its own manipulations, such as calibration, or even simply experiences difficulty reading a sector (up to ten (!) seconds), the second device , operating on the same channel, is simply not available.
The conclusion, unfortunately, has to be drawn is this: if possible, place devices with which you will work simultaneously on different controllers. If you have only two devices, you simply put them on different controllers, and each of them will work separately from the other, and, therefore, in an optimal way. What if there are more devices?
- Two hard drives and a CD/DVD-ROM? Most likely, it makes sense to leave one - the main, system, hard drive alone, so that nothing can interfere with access to system files and virtual memory. What if you want to install some programs or a virtual memory file on another hard drive? In this case, it would still be better for you to separate these hard drives into different controllers to ensure their simultaneous operation. On the other hand, if you often use CD/DVDs - for example, you often listen to music (MP3), then it may make sense to install a disc-reading drive on a separate controller - in this case, the difficulties of reading data from a CD will not hinder your background work and the main ones will not freeze hard disks, and therefore the entire computer.
- Burner drive (CD-R/-RW/DVD-ROM)? Think about what media you will be recording from to this drive. If, for example, you often rewrite discs on the fly (from a regular CD-ROM to a CD-R), then it is highly advisable for you to separate the CD-ROM and the CD-R drive into different controllers. If your drive has a large enough buffer, then this is not very important, but in case the buffer of your write drive is small, then it would be extremely good to place it on a separate controller alone. Or not alone (if this is impossible), but at least paired with a device that will not be used during the recording process - for example, you can pair it with a hard drive that stores data not related to the recording process.
We will return to the question of how to place several hard drives to create an optimal system for performance, and what benefits can be obtained from several hard drives.
Slave or master?
Two devices placed on the same loop cooperate in one way or another to ensure their operation. Each IDE device has a slave or master switch, and two devices running on the same loop must operate in different modes. Does it matter in practice which device is the slave and which is the master? At this point, we can say fairly confidently: it doesn't matter. The operation of the IDE protocol in the form to which it has come to date is practically independent of which device will be the slave and which will be the master. Set jumpers in a way that makes sense from the operating system's point of view (by default, most systems assign letters to drives in the order in which they are physically present in the system - that is, master will go first, then slave). The only thing that can be said about the hardware aspect is that if you have a very old hard drive or CD-ROM (say, more than five years old), try not to set it as master to a more modern device. This is unlikely to cause a loss of performance, but it can cause fundamental compatibility problems, due to which the second device (slave), or even both drives, will work incorrectly or not work at all. One more note - if one controller has two drives capable of reading CDs, then you will not be able to boot from the second (slave) drive. The last problem has already been solved in the latest motherboards (in BIOS AWARD 6.0, for example, you can choose which device will be considered a CD drive when choosing the boot sequence), but so far such motherboards are far from the majority. If you have two CDs on one controller (for example, CD and CD-RW), and you want to be able to boot from the CD drive, it is advisable to set it as master - this will work regardless of the board and BIOS version.
Which device should be connected to the middle connector of the cable, and which to the outer one?
This is also not decisive. Yes, some electromagnetic moments make one or another combination preferable, but in practice another aspect is much more important: simply connect the devices so that the cable runs as freely as possible, without bending or straining. Excessive mechanical deformation and stress on the cable can lead to weak contact in some place (for example, in the connector) or (partial) damage to the wires of the cable itself, and this can lead to data loss or unreliable operation of the drives. Another unpleasant thing - if the cable partially comes out of the connector during system operation - can also bring a bunch of unpleasant consequences, including physical damage (this, however, is unlikely). Therefore, the advice will be simple - connect the devices so as not to strain the cable. It is still unlikely to be possible to take other factors into account.
Bus Mastering Drivers
The second important aspect of the operation of a disk system based on an IDE controller is the controller driver. The overall performance of the system greatly depends on how the driver, and therefore the operating system, works with devices and the controller, and in what mode data will be exchanged.
Currently, there are two strategies for the operation of disks, controllers and drivers: the “standard” mode for older devices, in which all IDE drives are required to operate; PIO (Programmed Input/Output) mode, in which the central processor is used to transfer data between the drive and the system . This mode works on all IDE controllers, and is, in fact, the original operating mode, regulated in the very first standard. However, in the last few years, the vast majority of controllers and devices have an alternative operating mode - the so-called Bus Mastering mode (DMA / UDMA), in which data transfer is controlled by the controller itself, without the participation of the processor. This mode not only frees up the processor, which is very important in multitasking systems, but also removes the data transfer speed limit imposed by the processor and software. In Windows NT4.0 and Windows 2000, for example, the driver running in PIO mode on my machine (Celeron 333A, BX chipset) cannot provide data transfer rates greater than 5 MB/s from any of the three modern drives (Quantum 10 GB, Seagate 6 GB and Seagate Barracuda 30 GB). In Bus Mastering mode, on the contrary, the Seagate Barracuda, for example, produces the required 10 - 15 MB/s, which is almost three times (!) faster, and other drives reach their theoretical limit of 7 - 10 MB/s. Add to this the fact that to work in normal mode The processor load (for me personally) is 100%, and in Bus Mastering mode it is about 20%, and you will understand why your system simply must work in this mode.
Fortunately, all systems (motherboards) released since the Pentium era, and even more so nowadays, support Bus Mastering (hereinafter referred to as BM) without any problems. The only problem that remains is to use this particular mode of operation of the equipment. Unfortunately, there are still some pitfalls here to this day.
Windows 98/Windows ME
Modern computers based on these systems, in the vast majority of cases, already have drivers capable of working in BM mode - this especially applies to Windows ME. You can verify this in the following way: go to the control panel, select “system”, and in the device manager read the name of the hard drive controller. If you have a motherboard on an Intel chipset, and the name contains the words “Bus Master” or, sometimes, an analogue in Russian (“bus management” or something like that), then necessary drivers already installed. Users of modern (Pentium and higher) systems based on VIA chipsets can rest assured - if you have a driver that mentions VIA, and not a standard IDE driver, then you are guaranteed BM. If you still only have the standard IDE controller driver installed, then you most likely need to install newer drivers. Windows users 95, unfortunately, you will have to look for drivers - there are no standard BM drivers in this system.
All that remains to be done now is to make sure that all your devices are working in this mode. To do this, in the same device manager, you need to go through all hard drives and CD/DVD drives, and set the “DMA” mode for them in the “Settings” tab. Different systems have different default settings, and it's possible that several of your devices will still continue to operate in PIO mode. It is worth paying attention, however, to the fact that some devices (especially older CD or CD-R[W] drives) may not work in DMA mode, or may not work entirely correctly. Sometimes it happens, for example, that a CD drive in DMA mode stops playing VideoCD or copying audio data. I have also encountered cases where the CD-RW drive stopped working in DMA mode altogether. Take note - if something stops working the way it used to, you'll unfortunately have to stop using DMA on that device.
Windows 2000
In the vast majority of cases, this system already has Bus Mastering drivers, and even uses them. All you can do is try to make sure that all devices use this access mode: the fact is that removable storage drives (CD, for example) are often set to PIO mode by default during the system installation process, just in case. which is not always justified. You should go to the device manager (it can be found in the tree, which is launched, for example, by right-clicking on “my computer”, select “manage”), find the IDE ATA/ATAPI controllers there, and check the settings for both controller channels ( Primary/Secondary IDE channel). In the Advanced Settings tab, you can both control the current operating mode of the device and set the mode you need - DMA if available (DMA, if possible), if it is suddenly not installed.
Windows NT4.0
Users of this OS in the vast majority of cases will have to take more active steps in order to get work in BM mode. Standard drivers for NT systems with SP3 and higher already have BM support for Intel PIIX3 controllers and higher (used in i430/i440 line chipsets), but, unfortunately, in the vast majority of systems they cannot use it independently due to an unsuccessful automatic definitions of this mode. To determine whether BM works in your system or not, for example, the ConfigNT program will help you, which will show the current operating modes of devices. If you see that BM on your controller does not work, you have two options - either forcefully enable this mode (right in the same program - only for Intel chipsets i430/i440, which are, however, very common), or install drivers with BM support.
Users of other chipsets (for example, from the same VIA, or the new Intel i8xx line) will have to install special drivers with Bus Mastering support.
- Attention 1: Both options could theoretically lead to your system not booting for some reason, and this will be very difficult to restore. For experienced users who know what to do in this case, I can advise you to create an emergency recovery disk just in case (command rdisk /s), but in general I can console you with the fact that I have never encountered a situation where, after turning on the BM mode, either otherwise the system would not boot. If the driver detects that there is no BM on your system after all, it will simply continue to work as usual.
- Attention 2: Keep in mind that old BM drivers for NT4.0 - for example, from Triones, or old Intel drivers - do not work with drives larger than 8 GB. Installing such drivers can be disastrous - for example, NTFS volumes that have areas extending beyond 8 GB from the beginning of the disk have a chance of being irreversibly damaged, since the system will create "bad" clusters even when trying to read from inaccessible areas, which will lead to loss your data. I strongly recommend using drivers released at least in 1999 for Intel chipsets - version 4 and higher (the first digit of the version number).
Other OS
Fortunately, other modern operating systems (Linux, FreeBSD, BeOS, etc.) have more comprehensive support for Bus Mastering. All these systems, or rather, their standard drivers ( latest versions systems), have Bus Mastering support for almost all Intel controllers (and some for VIA), and themselves use all devices in the most optimal mode. Users of Unix systems, for example, will be able to verify this by monitoring the messages that the driver produces upon boot (if, of course, their system produces this information - Unix can be configured in any way). BeOS enables this mode by default, so sometimes you even have to solve the opposite problem: turn it off manually (if you have problems booting the system). With IDE controllers ( motherboards) from other manufacturers other than Intel and VIA, the situation is somewhat worse, and sometimes, unfortunately, not at all - but you can only get answers to these questions by independently studying your situation.
Sufficiently recent Bus Mastering drivers for all common chipsets for Windows systems can be obtained at www.bmdrivers.com or on this website in the “Media” or “Motherboards” section - IDE Bus Mastering drivers.
Virtual memory settings
All modern operating systems use virtual memory - a special paging file that compensates for the insufficient amount of physical system memory. The main parameter related to the virtual memory system is the size of the paging file (or several files).
- The Windows 95/98/ME system has a dynamic virtual memory file by default, which changes its size in accordance with the current needs of the system. Does it make sense to interfere with this mode of operation by setting the minimum and maximum sizes manually? Yes, there is some meaning in this. If you set the minimum paging file size to around 200 - 300 MB (the maximum is at your discretion, but preferably at least 500 MB), you will save the system from unnecessary manipulations of dynamically changing the file size. If after this procedure you also defragment your disk with a modern defragmenter that can work with a virtual memory file, you will get a little more performance. What is the minimum virtual memory file size to choose? As much as you don’t mind, but more than 300 MB is probably not worth it.
- Windows NT4.0 and Windows 2000 systems have a slightly different strategy for working with virtual memory - although dynamic change in the size of the virtual memory file is provided, it is not a standard mode of operation. What is the general minimum page file size to choose? The only thing that is certain is that the default value is too small to work effectively. For ordinary systems, I recommend a minimum of somewhere in the region of 200 - 300 MB, and for complex computers such as publishing or, for example, graphic workstations, 500 MB would not be out of place. I also recommend not skimping on the maximum size - numbers on the order of a gigabyte will be just right. This will have virtually no effect on the operation of the system in normal mode, but will allow you to avoid surprises and failures at the most critical moments, for example, when working with huge documents.
- Users of other operating systems can be given, in general, the same recommendations: try to ensure that the virtual memory file does not change its size dynamically, as this reduces system performance and increases fragmentation.
Does it make sense to set the swap file to the maximum possible size? Unfortunately no. If the file contains all the necessary data (i.e., does not grow during operation), then the system performance is maximum, and it will not be possible to increase it by increasing the file size. Yes, as the virtual memory file increases, some effects will come into play that affect the performance of the paging system, but they will be both pros and cons, and will not affect practical performance in any noticeable way.
Where and how to place the swap file?
- If you have several logical drives, try to place the virtual memory file on the partition that is closer to the physical beginning of the disk. The performance of read/write operations there is traditionally a little higher, or, in extreme cases, no worse, than in other places on the disk. Unfortunately, placing virtual memory on a different logical drive in an attempt to isolate it from operating system files is pointless—as long as the virtual memory file is on the same physical drive, you gain nothing by changing its logical location.
- Virtual memory on a multi-system hard drives is a more flexible question. Try to place virtual memory where there are no program files - that is, outside system partition. This will greatly improve performance. Many modern systems(for example, Windows NT4.0 and Windows 2000) can use virtual memory on multiple disks - but keep in mind: you should not place even part of the virtual memory on the same physical disk as the system itself. If you have three physical disks, then do not pay attention to their comparative speed, but place swap files on both non-system disks - this will also greatly increase performance, and the system itself will balance the load on the disks in accordance with their speed. Just keep in mind that it is strictly contraindicated to place a virtual memory file on disks operating in PIO mode.
- On which file system should I place virtual memory? This has no practical significance. It would be better if the cluster size on the disk where the virtual memory file is located was larger - but this is actually not very important.
- Avoid creating virtual memory from scratch on partitions that are more than two-thirds full—this will almost always result in a fragmented page file. If you have no other choice, try to at least defragment the disk before increasing the size of the virtual memory files.
Logical drive structure
Which is better in terms of performance - one 10 GB logical disk, or 3 GB allocated for the system, and 7 GB for some data? From a performance point of view, it will almost always be much better to allocate a separate small partition (2 - 4 GB) for the system. This step will result in system files, accessed more or less simultaneously, will be located in areas of the physical disk that are close to each other - that is, the physical “mutual fragmentation” of system files will be much lower. This point is especially worth considering for those who have system disks measuring several tens of gigabytes. If you allocate 10% - 20% of the capacity of a large disk (i.e., about 2 GB) for the system logical disk, then the time it takes to search for a track when moving the disk head between system files will be several times less than the time that needs to be spent for moving the head around physical disk. If the system is installed on a disk of ten or two GB, system files will certainly be chaotically dispersed throughout this space, which will create unnecessary difficulties with simultaneous access to these files.
Is it worth splitting the disks in any other way? No, it's not worth it. Each logical drive, when used by the system (mounted), forces quite a lot of service information (hundreds of KB) of service information to be stored in memory, and this reduces the amount of memory available to the system. Although this is not a very big loss, from a performance point of view there are still fewer advantages in creating many logical disks. This rule, however, has one exception: if you use the FAT32 system (and Windows98/ME users do not have another standard file system), then you should not create logical disks larger than 10 - 15 GB. If you have a hard drive, say, about 40 GB, then it would be wiser to make several volumes in addition to the system one, and it is very desirable so that large volumes are not used at the same time. Other modern file systems do not have such restrictions.
Conclusion
The disk system of specific operating systems can be further optimized - for example, by managing caching, changing the operating modes of file system drivers, etc. But, unfortunately, these settings are too specific for each specific operating system. This article talks about general considerations that are common to all operating systems, and we may return to the issue of optimizing specific systems.
Speed increase
Defragmenting hard drives
An effective way to improve the performance of hard drives is to organize the program files and data stored on these devices. Indeed, during computer operation, files are often recorded, erased, and changed in length. Repeated execution of these actions leads to the fact that a significant number of files turn into broken chains, parts of which, or otherwise fragments, are randomly scattered across the working space of the hard drive. The process of such file fragmentation is due to the fact that files are written to the hard drive taking into account the free space that appeared on it in the process of erasing other files. In addition, the continuity of files is often disrupted when their size increases during the modification process. When searching for and reading such disparate chains of files distributed across the disk - fragmented files - the hard disk head is repeatedly mechanically shuffled and positioned. This, of course, requires significantly more time than searching and reading a continuous file, when the spatial change in head position is minimized.
You can increase the speed of reading fragmented files by first defragmenting the disk. It is advisable to carry out this operation periodically using special software. For example, using the files defrag.exe from the MS-DOS 6.xx package or speedisk.exe from Norton Utilities. Windows 9x systems have special programs to perform this operation - Disk Defragmentation (Defrag). It should be noted that before defragmentation, it is advisable to scan the disk using ScanDisk.
Launching the Disk Defragmenter (Defrag) program in Windows 95/98 illustrates the sequence of pictures (Fig. 2.7-2.10) representing fragments of images on the computer monitor screen.
It should be noted that the problem of reduced performance due to fragmentation of files located on hard drives is typical not only for the Windows 9x operating systems, but also for the more advanced Windows NT 4.0, Windows 2000 and Windows XP. There is a widespread belief that the NTFS file system, which is supported by these operating systems, is designed in such a way that files are practically not fragmented. Contrary to this opinion, file fragmentation also exists for NTFS, although this problem is not as severe compared to the FAT16 and FAT32 file systems.
Rice. 3.7. Startup sequence for the Disk Defragmenter program (Defrag)
Rice. 2.8. Selecting a logical drive to defragment
Rice. 2.9. The process of defragmenting the selected disk
Rice. 2.10. Dialog box after disk defragmentation is complete
Unfortunately, the Windows NT 4.0 operating system does not have a built-in defragmentation program like, for example, Windows 95 Windows 98. Therefore, Windows case NT 4.0 to defragment files located on hard drives, external programs specially designed for this operating system are usually used. Hat, Norton Speed Disk programs have become more widespread. This ms could be, for example, Norton Speed Disk version 5.1. This program is well suited for the NTFS file system. An example of how this program works is shown in Fig. 3.11.
Rice. 2.11. Calling the installed file defragmenter Norton Speed Disk 5.1
The advantages of this program include the following features:
- MFT (Master File Table) optimization;
- the ability to place any file either at the beginning of a section, or at the end of a section, or at the end of all files (after data);
- defragmentation of folders and swap file (only for NTFS partitions);
- work according to a schedule (scheduling);
- the ability to defragment several partitions simultaneously;
- disk diagnostics and error correction using the built-in check program;
- displaying detailed information about disk fragmentation and work results; P analysis of the degree of file fragmentation (Fig. 2.12).
Rice. 2.12. File fragmentation analysis with Norton Speed Disk 5.1
It should be noted that the specified Norton Speed Disk program is not the only program that defragments files on computer hard drives on the market software There are other software tools that can defragment files in the Windows NT and Windows 2000 operating systems. Examples of such tools include programs such as Diskeeper, O&O Defrag, Contig, PerfectDisk, etc.
As for the Windows 2000 operating system, unlike Windows NT, it has a built-in defragmenter based on the well-known Diskeeper program. This program has a simple interface and has similar characteristics to the well-known Norton Speed Disk tools. However, Diskeeper works through a so-called API, which is not always optimal, especially for the NTFS file system. It is generally accepted that Norton Speed Disk, which operates differently than Diskeeper, is more efficient and reliable.
Calling the file defragmentation program built into the Windows 2000 operating system is shown in Fig. 2.13.
Examples of working with the file defragmentation program in Windows 2000 are presented in Fig. 2.14-2.16.
Calling the file defragmentation program built into the Windows XP operating system is shown in Fig. 2.17.
Examples of working with the file defragmentation program in Windows XP are shown in Fig. 2.18.
![]()
In addition to defragmenting files, you can increase the speed of hard drives if you take into account some of the features of their operation. For example, when distributing files, it is advisable to take into account different read/write speeds depending on their location on the drive disks. Files that need to be accessed for reading and writing in a minimum amount of time should be placed at the beginning of the hard drive - in areas corresponding to the minimum cylinder numbers. The farther programs and data are located from the beginning of the hard drive, the longer the access time to them (3-5 times). This can be done, for example, through an operation such as performing a certain sequence of initially writing files to the hard drive. The files written to the hard drive first are placed by hardware and software at the beginning of the data storage area, which provides the fastest access to them.
Sometimes you can improve your computer's performance by increasing its speed. work hard disk for some files due to their regrouping. Changing the location of files on an already full hard drive is done using a series of special programs new funds. For example, you can move files for MS-DOS and Windows 3.1* systems by using the file defragmenter utility (speedisk.exe) in Norton Utilities. To do this, after starting this program, you need to select the commands in the Configure menu - Directory Order, File Sort, Files to Place First and set the necessary parameters. Similar settings are available in the reviewed Speed Disk program for Windows 9x/NT/2000. The appropriate selection of program parameters will ensure not only defragmentation of files, but also changing the order in which they are placed on the disk, and, consequently, the time of access to files for reading and writing information.
It should be noted once again that organizing program and data files stored on hard drives, as well as accounting different speeds access to information, depending on its physical location in the workspace of these devices, can significantly increase the speed of the disk memory subsystem. And this ultimately increases the performance of the entire computer.
Modern hard drives use different ways hardware and program control, providing high speed reading and writing data. This is supported by the appropriate hardware and software of the computer: the use of algorithms and hardware caching tools, the use of writing, reading and exchanging blocks, etc. As a rule, such capabilities are provided in the BIOS Setup. There are also corresponding software tools. Often, tools that provide such capabilities are managed by modern operating systems. All this, of course, smoothes out the data flow and increases the speed of drives.
Manufacturers of hard drives are constantly improving their designs and improving their parameters. At the same time, not only new samples are released, but previously released devices are maintained for quite a long time. On the Internet, on the websites of large hard drive manufacturers, you can often find new drivers for both newly released models and quite old ones. Often, new drivers can significantly improve the performance of hard drives.
You can increase the speed of hard drives using various software tools, such as accelerator programs. An example is the Drive Rocket Date Accelerator v.1.14 program from Ontrack Computer Systems Inc. This program is often used in conjunction with the Disk Manager program from the same company to manage hard drives, for example, Western Digital. Another option for accelerator programs is XStore Pro (busmaster drivers for Windows 9x, recommended by Chaintech) from HighPoint Technologies. Depending on memory and system configuration, growth hard performance disk compared to using standard drivers from Intel or Microsoft can be up to 60%, and overall computer performance up to 10%. XStore Pro programs are based on post-lookup read-ahead caching technology. To achieve maximum results, it is recommended to use it on computers with 64 MB of RAM.
It is difficult to imagine the operation of modern operating systems without such a resource as virtual memory. Virtual memory allows you to run more programs simultaneously than your computer's physical memory (RAM). However, virtual memory takes up a significant amount of disk space, and when data is swapped, the speed of program execution is significantly reduced. Virtual memory is designed for computers with MP 80386 and higher and is the hard disk space that modern systems work with, starting with Windows 3.1x. This space is used as if it were real memory - RAM. This is achieved through a special file - the swap file, into which information from RAM is periodically placed (pumped up). It should be borne in mind that writing and reading data when using the fastest hard drive is more than 10,000 times slower than working with the slowest RAM. Therefore, increasing RAM is the most effective method reducing the load on hard drives and increasing computer performance. This is due to the fact that reducing the frequency of access to virtual memory allows you to reduce the time it takes for hard drives to process requests from application and system programs.
You can increase the speed of hard drives (and, if necessary, CD-ROMs and floppy drives) by introducing a procedure such as software caching of data reading and writing processes. As
Tools that provide this can be used, for example, programs from the MS-DOS suite, the Norton Utilities package and Windows 9x tools.
Sooner or later, every user is faced with the problem of slowing down the speed of their computer. And it doesn’t matter how powerful the system’s hardware potential is: if you do not perform routine diagnostics and do not adhere to certain rules for working with software, over time the performance drops significantly. In this case, the most radical measure is to reinstall the operating system. However, this procedure is associated with many inconveniences - the need to install drivers, software, copy the necessary data from the system partition, and personal registration information is usually lost in such a situation. An operating system, like a car, requires periodic maintenance. In this article I will tell you where and what should be cleaned, tightened and adjusted for maximum performance.
System performance is usually affected by two parameters - CPU load and RAM usage by programs. If you have gaming applications, then you can add the speed of the video adapter and the power of the power supply to this list. For the most comfortable work, you should check that your computer meets the recommended system requirements.
Let's say the operating system runs on a suitable hardware platform. The user notices that basic operations (working with windows, copying files and folders, launching programs) are too slow. The reason for this may be:
The work of “heavy programs that consume a lot of resources;
. A critical number of applications running simultaneously;
. System failure caused by incorrectly functioning programs or drivers;
. Disk subsystem problems;
. Viruses.
What to do?
First, let's try to eliminate possible sources of system inhibition. We will take the first steps according to the standard scheme: optimize the user environment (Desktop design, shortcuts), remove unnecessary programs, check startup, identify the most resource-intensive processes, set up anti-virus and anti-spyware software.
Optimizing the graphical interface
The simplest thing you can do is remove everything unnecessary. You can start from the Desktop. See which icons you haven't used for a long time. They can be deleted or moved to some folder. But be careful: the Desktop may contain not only shortcuts, but also files themselves - for example, important documents. So be sure to keep it in a safe place.
There is also a little trick here, for example, my desktop could look like this:
This is purely a habit of saving all files to the desktop (by default in browsers, files are saved here), but as you understand, I have no desire to rack my eyes in this “trash”, especially since I use file managers like FAR and Totall Commander through them and open the “Desktop” folder, and the desktop itself has a wonderful option “display desktop icons”, uncheck this box - this is guaranteed to give you a noticeable increase in starting the operating system in case of my “mess”!
If on the panel quick launch Since a lot of icons have accumulated, removing rarely used shortcuts will also slightly improve the loading speed of the Desktop.
It is not recommended to install many fonts unless they are required for daily work (usually only professional designers need this). By default, there are about 200-300 styles available. If their number exceeds 1000, you can expect deterioration in application performance, especially office packages, since such applications constantly read fonts installed on the system, which, at a certain critical mass, can completely “hang”, for example, MS Office.
If the speed of displaying the Desktop is important, we do not recommend installing alternative shells for it - for example, “StyleXP”, “ShpereXP” or “WindowBlinds”. This factor is especially important for average performance systems. On powerful graphics stations you will hardly notice any difference in performance. Here you should understand either beauty and frills or comfortable and fast work your computer as a whole, if the computer is not modern.
Also, just in case, let us remind you that to increase the speed of work Windows interface possible by eliminating some visual effects. To do this, right-click on the “My Computer” shortcut on the Desktop, select context menu"Properties", open the "Advanced" tab, and then " Visual effects" The same can be done using the “Control Panel” -> “Display” -> “Appearance” tab and the “Effects” button
As a rule, when the operating system starts, some programs are loaded into the computer's memory. These include both service applications that are responsible for the operation of built-in and peripheral devices, for example, a program for setting up a mouse or touchpad (on a laptop), monitor settings, video card, and those that are not at all necessary for everyday use, such as a CD emulator, a multimedia player, and etc. Moreover, each application not only uses RAM, but also the processor, and is also cached on the hard drive.
It's up to you to decide whether you should spend precious resources on all applications from autostart or prohibit the start of “unnecessary” ones. You can check and systematize autorun using standard using Windows. The msconfig.exe utility is designed specifically for adjusting the autostart of processes and applications. You can open it through the “Start” menu -> “Run” -> “msconfig” -> “OK”.
The “Startup” tab provides a list of programs that start when the system starts. Here you can find out which command a particular application uses and the location in which it is registered (startup folder or Run registry keys).
Unfortunately, there is no single recipe for identifying unnecessary programs not in Startup. Let us only note that applications that perform the auto-update function and various multimedia add-ons “like” to be registered in autorun. As a rule, they are located in the registry branch \SOFTWARE\ Microsoft\ Windows\ CurrentVersion\ Run. In order to find out which program belongs to which application, it is better to use an Internet search. To avoid unwanted consequences, I do not recommend disabling unfamiliar programs and changing settings in others in tabs.
Cleaning out the tails
Another important factor that helps improve computer speed is correct work all programs. Removal unnecessary applications must be done strictly through the “Add or Remove Programs” item in the Control Panel. After all, during installation, files are copied not only to the Program Files directory, but also system folders, plus changes are being made to Windows registry. Therefore, only the uninstaller program for a specific application knows which files should be removed from the system and which registry branches should be cleared.
If the program was nevertheless uninstalled incorrectly, for example, in case of a failure or due to incorrect user actions, it must be reinstalled and then uninstalled using the “Add or Remove Programs” item (or a native uninstaller from the “Start” -> “Programs” menu -> “Program folder”).
However, there are situations when the application is not uninstalled in the normal way. In this case, you need to delete those branches in the registry that relate to this program (the registry editor is called up in the “Start” menu -> “Run” -> “regedit”).
They are usually located in HKCU\Software\<разработчик программы>\ <название программы>.
Eliminate all keys related to the incorrectly uninstalled application, but it is recommended to make a backup copy first so that you can restore them if problems arise due to something needed being removed. To do this, right-click on the key and select “Export”.
In the dialog box that appears, you will need to save a file to disk; it will contain the parameters of all subkeys. If you need to recover deleted data, you just need to run it. After the backup registry key, the file can be deleted.
After operations with the registry, you must manually delete the application files. By default, most programs are installed in the \Program Files\ folder<имя программы >.
Please note that these steps can only be carried out for programs that cannot be removed correctly.
The registry as a whole also needs optimization. Windows does not provide such a service, so it is better to use special free utilities such as “Wise Registry Cleaner”, “TweakNow RegCleaner”, “Auslogics Registry Defrag” or “RegCool”.
The first symptoms of viruses
First of all, you should check all processes on your computer for resource consumption. Close all applications, open Task Manager by simultaneously pressing the "Ctrl", "Shift", "Esc" buttons, open the "Processes" tab, filter the processes by the "CPU" column so that the highest values are at the top. If a process constantly loads the processor by more than 50%, it is worth checking what exactly it is doing and whether it is a virus (by the way, an antivirus that automatically scans disks can also consume a lot of resources). Try to interrupt such a process by clicking on the “End Process” button. Just to avoid system crash, do not terminate the svchost, system, winlogon, explorer, services processes.
You can check your suspicions about the virus by looking at the list of active network connections. Close all applications that may receive or transmit data to the Internet or local network, wait a few minutes, open the command line (Start -> Run -> cmd -> OK).
In the window that appears, enter the command “netstat” and press “Enter”. After this, a list of active connections will be displayed. If there are too many of them (more than a dozen), and all applications are closed, it is worth performing a full virus scan.
Disk space optimization
Practice shows that there is always not enough space on the system disk, and its lack affects the performance of the computer. It is recommended to ensure that the system partition has at least 10 GB free. After all, this disk, as a rule, contains both the system cache (the space where the contents of RAM are temporarily written) and all software.
Usually the place under system disk selected during installation of the operating system. But if Windows has been installed a long time ago, and space has only just begun to run out, then you can repartition the logical drives, increasing the size of one logical drive by reducing the size of another. Without the risk of data loss and system performance degradation, this can be done using the Acronis Dick Director Suite utility or another similar program.
The safety of system and user data depends on the hard drive, so sometimes you should check it for errors. This can be done using the built-in Windows utilities, which runs like this: “Start” -> Computer” (or “Start” -> My Computer”). Then right-click on the desired drive, select “Properties” in the context menu, in the window that opens, go to the “Service” tab and click on the “Run scan” button. Then mark the required parameters and click on “OK”.
The interface of the built-in utility is truly spartan, but with its help you can carry out the required minimum of diagnostic procedures. If you want more visibility and capabilities, there are alternatives - for example, “Hard Drive Inspector”, “HDDScan”. And if you need more options, then the built-in command line utility “chkdsk” is at your service.
Another potential bottleneck in computer performance is disk fragmentation. File system is designed in such a way that parts of a document, especially large ones, can be written to different parts of the disk. To read such a file, the system will require significantly more time than if its fragments were located sequentially. Therefore, it is necessary to regularly defragment disk space. This can be done built in Windows utility by selecting “Start” -> “Run” -> “dfrg.msc” -> “OK” (in Windows Vista - dfrgui). This process may take a long time, depending on the size of the disk and the degree of its fragmentation. It is advisable to disable the antivirus while the utility is running. For successful and comfortable defragmentation, it is necessary that the disk has at least 20% free.
In addition to the standard utility, there are other programs, such as “Diskeeper 2009 Pro”, “PerfectDisk Pro”, “Defraggler”, “SpeeDefrag”, “IObit SmartDefrag”.
The built-in Disk Cleanup utility, which can be launched from the Start menu -> Run -> cleanmgr -> OK, will help free up disk space. , or utilities from the cleaner category
Conclusion
The above recommendations, of course, are primarily addressed to the novice PC user. By following the recommendations above, you are 90% likely to significantly increase the productivity of your personal computer or laptop. However, you must remember that any thoughtless decision can completely disable the system. If you are unsure of your determination to learn all the intricacies of the operating system, entrust the diagnosis and correction of errors to a professional. And, of course, don’t forget to store particularly valuable information on backup media - this will save you from the worst that can happen to your computer.
Just recently, we published an article on our website about the Windows Registry, which explained what it is and how important it is to keep it in order. After all, the speed and uninterrupted operation of the operating system, as well as the efficiency of interaction between the software and hardware components of your computer, directly depend on the state of the registry.
Unfortunately, over time, almost any OS begins to show a decrease in the speed of its operation, which is expressed in an increase in system load, application launch time, inexplicable freezes and thoughtfulness when running several programs simultaneously. In addition, users may encounter the constant appearance of dialog boxes reporting that files were not found in the specified folders and other incomprehensible errors.
One of the ways to return the system to its former speed, or at least significantly increase the overall speed of operation, is to turn to special programs that clean up all sorts of things. system garbage, which is often the cause of all the troubles described above.
MAIN PURPOSE OF THE PROGRAMS
The work of almost any user on a computer is always accompanied by the procedure for installing or uninstalling various types of software, be it device drivers, general-purpose programs, games, anti-virus solutions and others. During all these actions, the system constantly makes entries in the registry about all the parameters of installed programs, their locations and other important things.
Unfortunately, the process of uninstalling applications does not completely clear the system of their former presence. As a rule, after deleting programs, many “traces” of them remain in the system registry in the form of incorrect links and paths or unnecessary entries. Over time, there are more and more of them, which ultimately leads to a general decrease in productivity, errors and other troubles.
The main purpose of programs designed to improve your system health is to clean the registry of accumulated garbage and remove temporary and unused files from your computer’s hard drive. It is these two functions that underlie this class of utilities. True, in the struggle for the sympathy of users, many developers are trying to make their products, especially paid ones, more attractive by adding additional means for optimizing the system and adjusting its parameters.
APPLICATIONS TESTED
For testing, we selected 8 of the most popular free and shareware programs in this area. Their degree of popularity was determined based on the most downloaded and rated applications of this kind on well-known software file-sharing services. And also based on the frequency of mention of these applications on various thematic portals and blogs.
So, our top eight includes:
- Reg Organizer
- Vit Registry Fix
- jv16 PowerTools
- TweakNow RegCleaner
- Auslogics Registry Cleaner
- Wise Registry Cleaner
- Free Registry Cleaner
One of the most popular free utilities in this area, with a pleasant and concise user interface. The program can clear hard disk space from unnecessary files, for example temporary files different browsers, visit logs, cookies, recent documents, Index.dat files, and many others. Also, if necessary, the user can clear the clipboard, thumbnail cache, recycle bin and Windows log files.
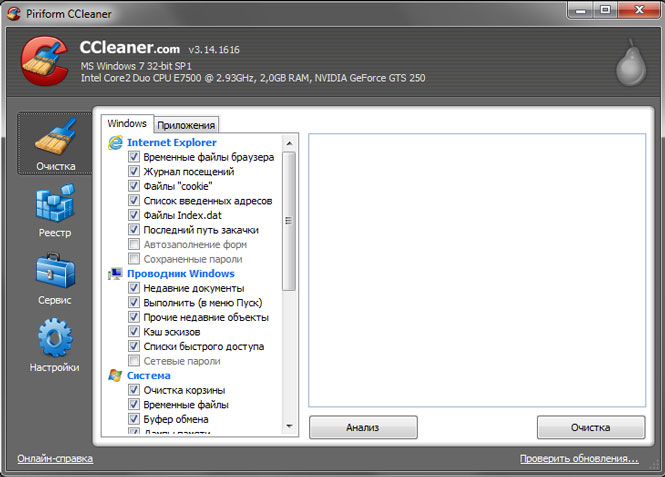
The second important function of the program is to check the status of the system registry and correct any errors found in it.
Additional features include the ability to uninstall programs, change startup, manage system restore points, and securely erase free disk space.
Reg Organizer 5.3
Multifunctional program for maintaining the system registry and configuration files. Previously, until version 2.5, this product was distributed free of charge to users from the former USSR. Nowadays its cost for residents of the CIS is 500 rubles per copy.
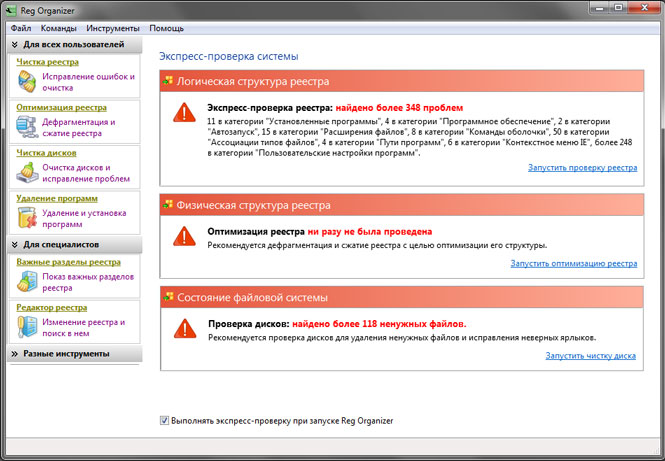
Reg Organizer is equipped with quite rich functionality that can satisfy the needs of both novice users and experts:
- Fixing registry errors and cleaning it
- Defragmentation and compression of the registry
- Show important registry keys
- Advanced Registry Editor
- Registry Snapshots
- Cleaning disks and fixing problems
- Uninstalling programs
- System fine tuning
Vit Registry Fix
A powerful tool for ridding the registry of outdated data and more than 50 options for all kinds of errors. The program has both a paid version (170 rubles) called Professional, and a free version with the Free prefix.
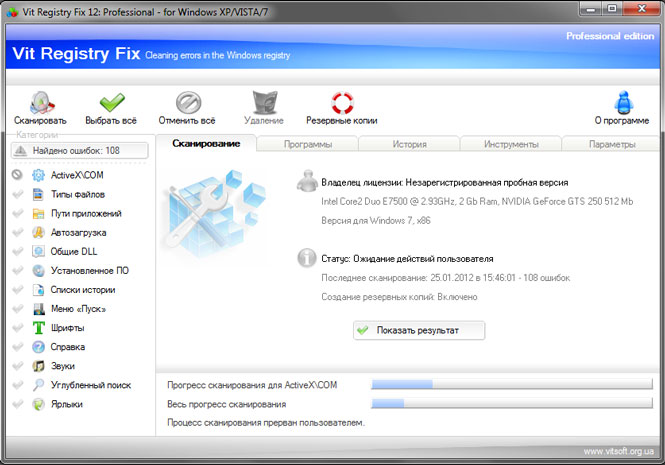
Vit Registry Fix includes 6 additional utilities that can be used to: optimize system registry files (Registry Optimizer), create full or partial copies of the registry (Registry Backup), as well as search and delete data in it (Registry Search). The developers did not ignore such useful features, like, cleaning temporary and unnecessary files (Disc Cleaner), managing applications in Windows startup (StartUP Manager) and deleting installed programs(Uninstall Manager).
The free version lacks two utilities: Vit Registry Backup and Vit Registry Search, and also has basic functionality and error detection capabilities compared to the professional edition.
jv16 PowerTools
This full set a variety of utilities that combine 24 components designed to monitor the condition of your computer and, if necessary, correct problems found. The program has a trial period of 60 days for free trial. For further use you will have to pay $29.95.
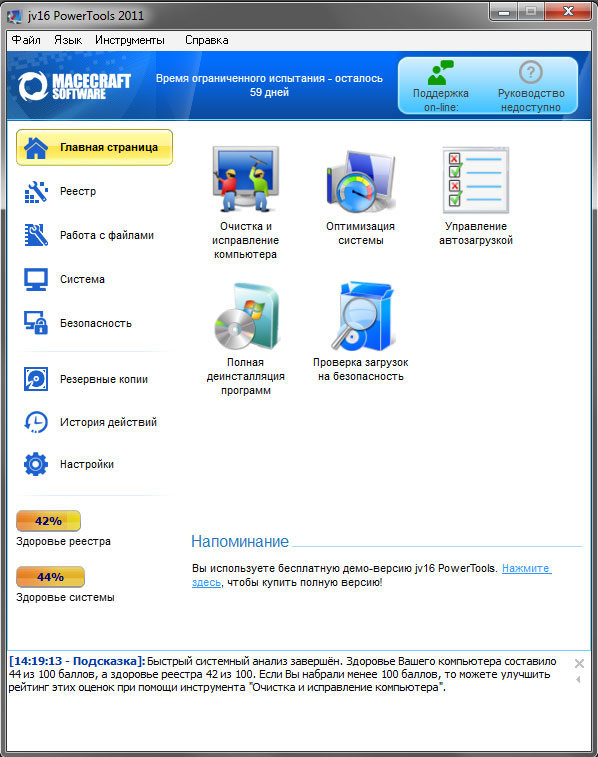
Immediately after installation, a pleasant interface catches the eye, which can be simple for beginners or advanced for experienced users.
The program has really rich functionality. For convenience, all components included in this package are divided into several thematic groups:
- Registry. Using the utilities of this group, you can clean the registry of unnecessary garbage, compress it, search for and replace the necessary components, and also get detailed information about it. There is also a registry monitoring tool, and a backup tool is placed in a separate group.
- The working with files section contains various tools with which you can rid your hard drive of unnecessary files, restore files, and also search for files, folders and their duplicates. This also includes a file organizer.
- The system section contains a program uninstaller, startup manager, services manager, Start menu cleanup manager and system optimizer.
- Using security utilities, you can clear the history lists of your favorite applications and wipe the contents of certain folders, the entire hard drive, or just free space.
TweakNowRegCleaner
Another one comprehensive program, which cleans the registry and hard drive. The developers are asking $24.95 for their creation, although before purchasing you can use the utility for 30 days for free.
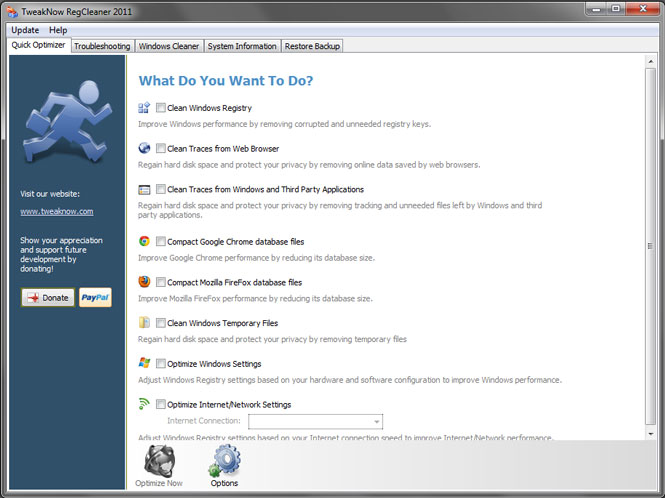
The program interface is devoid of Russian, although it is quite understandable and concise. The quick optimization window offers users, without going into details, automatic mode optimize system settings and Internet connections, clean the registry, remove temporary files and traces from web browsers.
If you are not satisfied with the result of quick optimization, you can go to the system cleaning window, where a standard set of components is at your service: disk space cleaning and analysis, registry defragmenter, registry cleaner, startup manager and program uninstaller.
In addition, with the help of TweakNow RegCleaner you can find out details about system parameters, as well as monitor latest versions video card drivers.
Auslogics Registry Cleaner
This utility is highly specialized and is aimed at optimizing only the system registry. It will help you remove unused keys from it and get rid of errors. Moreover, the program is completely free.
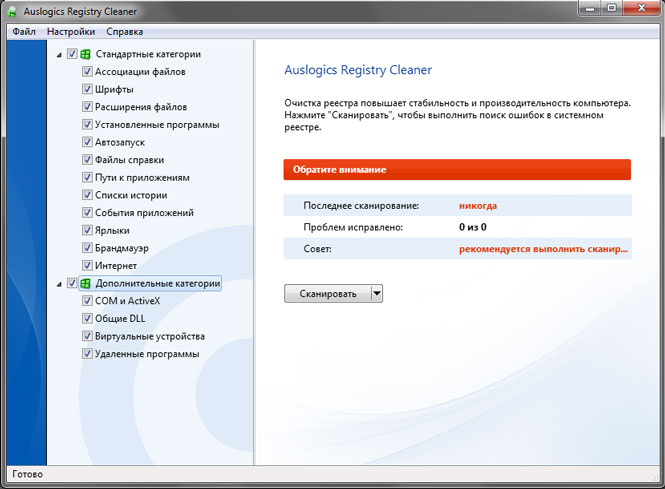
The application interface is very concise and understandable, which is understandable due to its low functionality.
Wise Registry Cleaner
Another free specialized utility for cleaning the system registry and defragmenting it. At startup, it suggests creating a backup copy of the registry in case of a system failure after the optimization procedure.
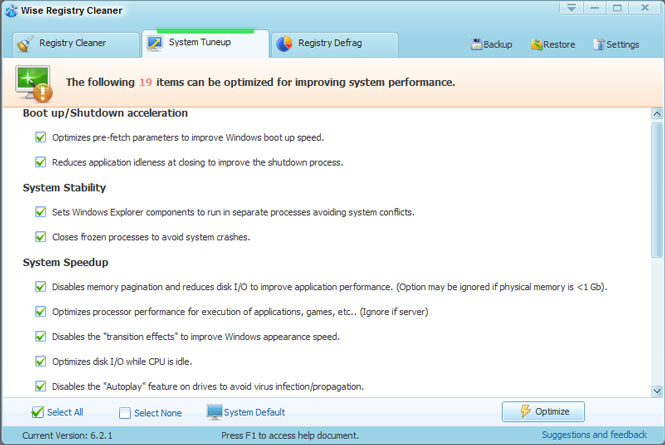
The application interface seems somewhat old-fashioned and does not have a Russian language, however, if desired, it is possible to download a localization language. The program does not clean the hard drive, although at the end of the installation it offers to download another free application - WiseDiskCleaner, which is designed specifically for this.
As an additional feature, users are offered the opportunity to optimize the system according to 19 parameters.
AMLFree Registry Cleaner
A free computer optimization program that has a classic set of functions for this kind of utility.
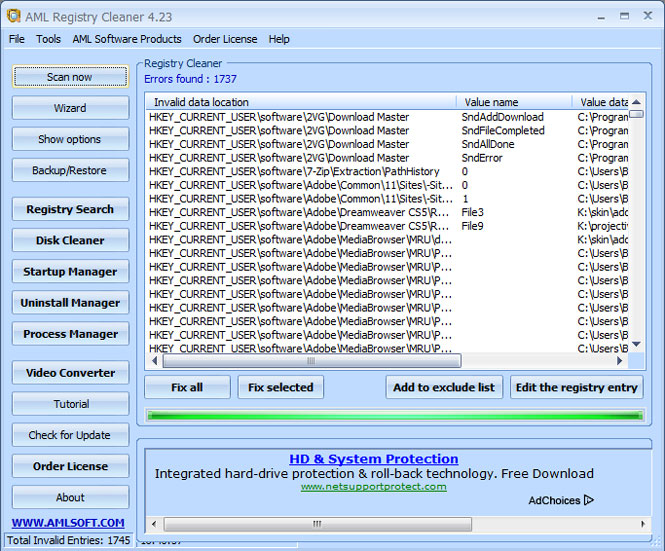
The interface of this application does not speak Russian and does not shine with originality. But, in addition to standard registry cleaning, users will be able to delete temporary files from the disk, edit the automatic download list and uninstall unnecessary applications.
TESTING PROCEDURE
To test our subjects, we specifically chose a computer with a fairly heavily littered Windows system 7, which was installed about a year ago. Before testing began, a backup copy of the system partition and OS registry was made and the system boot time was measured. To eliminate all kinds of errors, the Windows startup time was measured three times and averaged. The size of the saved registry was also recorded.
Then, the utility under test was installed. It was used to clean the system registry and computer hard drive from unnecessary garbage automatically. Next, the system boot time was again measured, the size of the optimized registry and the volume of deleted unnecessary files were recorded. After which, the operating system was restored from the backup to its current state and the same actions were performed with the next program.
The system boot time, for the purity of the experiment, was measured in two ways. In the first case, the counter built into Windows 7 was used, located in the event log, which can be found in the following path: “Control Panel -> System -> Counters and Performance Tools -> Additional tools-> View performance information in the event log.” In the second case, the time was recorded special utility BootRacer.
At the end of testing, all indicators were summarized in several diagrams, on which we can see the results of our competitors and identify the winner.
TEST RESULTS
Operating system boot time
First of all, let's look at how the operating system boot time changed after the system registry was optimized by the tested programs.
![]()
The first diagram shows the OS boot time, which was measured using Windows' own tools, which can be viewed in the system event log. The time shown before system optimization is highlighted in red, the fastest boot is in green.
At the same time, time Windows startup measured using a special utility BootRacer.

In the first case, the best result was demonstrated by the system that was optimized CCleaner program. At the same time, time Windows boot decreased by 11 seconds, which can be called a very good result. TweakNow RegCleaner and Reg Organaizer are just a little behind.
As you can see from the second chart, the time recorded by BootRacer is slightly different from previous results. Here the jv16 PowerTools application is in the lead, improving download performance by 11 seconds. Second place went to Auslogic Registry Cleaner, and Reg Organizer again took third place.
To get a more unambiguous result, it was decided to average the obtained loading time indicators.
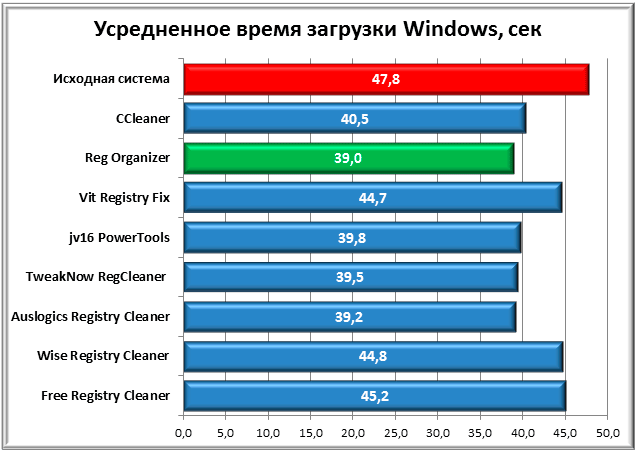
As a result, Reg Organizer becomes the winner, which is not surprising, since it was this application that showed the most stable results in both cases of time measurement. It was followed by Auslogic Registry Cleaner and TweakNow RegCleaner by a fraction of a second. Free Registry Cleaner has the worst average score.
System registry size
Before testing, we had assumptions that after cleaning, the size of the registry could change significantly. But in practice, everything turned out differently. The size of the non-optimized registry in our case was 64.2 MB, and the optimized registry was 61.52 MB. Thus, the maximum value of data deleted from the registry was 2.68 MB, which is only 4% of its total volume.
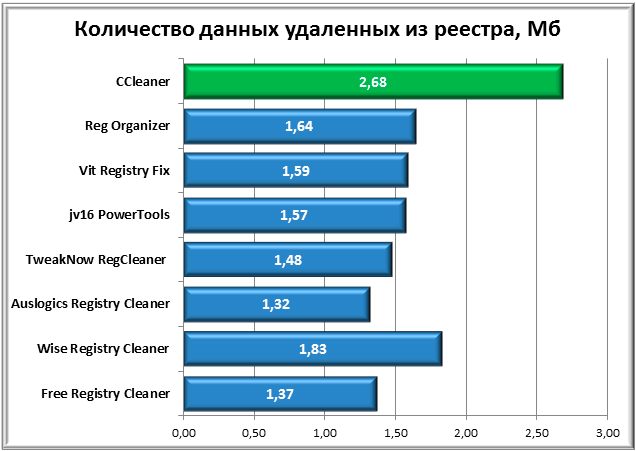
The leader in this dispute was CCleaner. Second place went to Wise Registry Cleaner, third to Reg Organizer.
Freed disk space
Not all programs that took part in our testing have the function of cleaning the hard drive from temporary or unnecessary files. However, where possible, we recorded the amount of space freed up after garbage collection.
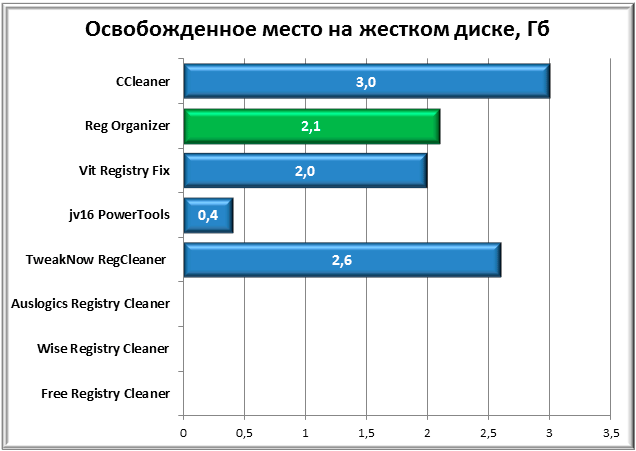
As can be seen from the chart, three representatives from this review were unable to participate in this trial. Of those who did participate, CCleaner had the best result, followed by TweakNow RegCleaner with a margin of 400 MB. Third place, traditionally, goes to Reg Organizer.
ASSESSMENT OF THE USEFULNESS OF USING THE PROGRAMS TESTED
Now, after finishing the tests, let's first try to answer the question: “Is there much benefit from programs of this class and is it necessary to use them on your computer at all?”
The system load average improved by almost 9 seconds compared to the original result, which is really not bad. But bad luck, having carried out a basic defragmentation of the hard drive using standard Windows tools, we managed to achieve almost the same result as in the case of its optimization using special programs. Why did this happen?
In the test results, we saw that the volume of the registry after optimization did not change much, which means that the system boot time in our case did not particularly depend on its size. Perhaps it was the greater fragmentation of the registry files that was the reason for the increased boot time of the PC. For those who do not understand, let me explain. The file that contains the Windows registry is stored on your hard drive in pieces rather than as a single unit. And these pieces on the surface of the hard drive can be located quite far from each other, which slows down the time it takes to read the file as a whole. When carrying out defragmentation, parts of one file are collected together, and due to the fact that the hard drive's reading heads have to move less in space, the time it takes to read the file is reduced and, accordingly, the system boots faster.
Clearing your hard drive of all sorts of “unnecessary” or temporary files, oddly enough, is not always beneficial. For example, after this procedure, you may lose passwords remembered by browsers, the history of visited web pages, data cache files, which in some cases speed up the process of launching programs or searching necessary information on the computer.
Still, the usefulness of programs of this type should not be underestimated. Despite the fact that many of the actions that they offer, you can do without their help using standard system tools, friendly user interface, memorization Windows status before optimization and various tips will help you avoid critical errors. Plus, all these utilities work quite quickly and allow you to assess the health of the system in a matter of minutes and offer treatment options.
In our opinion, it is most effective to use system cleaners only as aids in maintaining the optimal condition of your Windows. In order not to be unfounded, we will give an example.
One of the most common reasons for your system's slow operation and startup is applications that are added to Windows startup. Before cleaning the registry, check how many programs automatically load with it.
For this purpose in command line, which is called by the Win+R key combination, type “msconfig” and press Enter. In the window that opens, click on the “Startup” tab. Most likely, you will find a fairly impressive list of programs there. To experiment, disable them all (the “Disable All” button) and restart the computer. We think that already at this stage, the result will please you.
Remove all unnecessary programs from the system, or at least remove them from startup, leaving only the most necessary software that you use very often (for example, antivirus). Then optimize the registry using special utilities. Finally, you can clean the system disk of unnecessary files and defragment it.
After all these procedures, most likely your system will start working much faster and more responsive.
CONCLUSION
Well, now, let's return to the tested programs and summarize our review.
It is quite difficult to name a clear winner here, but I would still like to mention several competitors who left positive impressions of their work.
We will start with a domestic development - Reg Organizer, which showed the most stable results throughout all tests. The friendly user interface and rich functionality have, for quite a long time, allowed this utility to be a leader among programs of its class. The only shortcomings include the lack of editing the system startup menu. And its paid price (500 rubles) may scare off many users.
CCleaner has been one of the most popular for many years. popular programs, aimed at optimizing the system registry. At the same time, being free, the application has a clear and concise modern user interface, good functionality and a high-quality problem search algorithm.
And finally, TweakNow RegCleaner. Good optimization results, additional features The system settings and modern user interface make it convenient to use this product as a cleaner of unnecessary garbage from the OS. But the cost of almost 25 dollars and the lack of Russian language make you think about the advisability of purchasing this application against the background of other, no less worthy solutions in this area.
The small utility Auslogic Registry Cleaner has proven itself quite well, but its poor functionality allows us to recommend it only when you only need to clean the registry of unnecessary entries.
Wise Registry Cleaner and Free Registry Cleaner are unattractive graphical interface, and the latter, with completely weak results.
The remaining Vit Registry Fix and jv16 PowerTools, despite what they have in their arsenal Beautiful design and the rich declared capabilities, in fact, did not show anything outstanding. At the same time, the results of Vit Registry Fix can be called one of the weakest among the competitors.
In conclusion, I would like to say that, regardless of which assistant you choose to maintain a healthy state of the system, first of all you should not forget about basic safety net. After all, programmers, like other people, make mistakes. This means that after using such programs, there is always a chance of a system crash due to an incorrect deleted system registry parameter. To avoid such unpleasant things, before making any changes, try to do backups registry, with the help of which, if necessary, it will be possible to correct possible sad consequences.