Many users have found themselves in a situation where the system began to work slowly, and "Task Manager" showed the maximum load on the hard drive. This happens quite often, and there are certain reasons for this.
Given that the problem can be caused by various factors, there is no universal solution. It’s difficult to immediately understand what exactly affected the operation of the hard drive so much, so only by elimination can you find out and eliminate the cause by performing certain actions one by one.
Reason 1: Service "Windows Search"
To search for the necessary files located on the computer, the Windows operating system provides a special service "Windows Search". As a rule, it works without any problems, but sometimes this particular component can cause a heavy load on the hard drive. To check this, you need to stop it.

Now let's check if the problem with the hard drive has been resolved. If not, restart the service, since disabling it can greatly slow down the Windows search function.
Reason 2: Service "Superfetch"
There is another service that can greatly overload the computer's HDD. "Superfetch" appeared in Windows Vista, it works in the background and, according to the description, should improve the performance of the system. Its task is to track which applications are used most often, mark them, and then load them into RAM, making them launch faster.
In fact, "Superfetch" A useful service, but it is precisely this that can cause a heavy load on the hard drive. For example, this can happen during system startup, when a large amount of data is loaded into RAM. Moreover, HDD cleaning programs can delete the folder "PrefLog", where data about the operation of the hard drive is usually stored, so the service has to collect it again, which can also overload the hard drive. In this case, you must disable the service.
Open Windows services (use the method described above for this). In the list we find the required service (in our case "Superfetch") and press "Stop".

If the situation does not change, then, given the positive impact "Superfetch" system operation, it is advisable to start it again.
Reason 3: CHKDSK utility
The previous two reasons are not the only examples of how standard Windows OS tools can slow down its performance. In this case, we are talking about the CHKDSK utility, which checks the hard drive for errors.
When there are bad sectors on the hard drive, the utility runs automatically, for example, during system boot, and at this moment the disk can be loaded at 100%. Moreover, it will continue to run in the background if it cannot eliminate errors. In this case, you will either have to change the HDD or exclude the check from "Task Scheduler".

Reason 4: Windows Updates
Many people have probably noticed that during the update the system starts to work slower. For Windows OS, this is one of the most important processes, so it is usually given the highest priority. Powerful computers can handle this with ease, but weak machines will feel the strain. Updates can also be disabled.
Open the Windows partition "Services"(we use the method described above for this). Finding a service "Windows Update" and press "Stop".

Here you need to remember that after disabling updates, the system may become vulnerable to new threats, so it is advisable to have a good antivirus on your computer.
Reason 5: Viruses
Malicious programs that get onto your computer from the Internet or from an external drive can cause much more damage to the system than simply interfering with the normal operation of the hard drive. It is important to promptly monitor and destroy such threats. On our website you can find information on how to protect your computer from various types of virus attacks.
Reason 6: Antivirus program
Programs designed to combat malware, in turn, can also cause your hard drive to overload. To make sure of this, you can temporarily disable the function of checking it. If the situation has changed, then you need to think about a new antivirus. It’s just that when it fights some virus for a long time, but cannot cope with it, the hard drive experiences a heavy load. In this case, you can use one of the antivirus utilities that are designed for one-time use.
Reason 7: Synchronization with cloud storage
Users familiar with cloud storage know how convenient these services are. The synchronization function transfers files to the cloud from a specified directory, providing access to them from any device. During this process, the HDD may also become overloaded, especially if large amounts of data are involved. In this case, it is better to disable automatic synchronization so that you can do it manually when it is convenient.
Reason 8: Torrents
Even the now popular torrent clients, which are ideal for downloading large files at a speed significantly higher than the speed of any file hosting service, can seriously load your hard drive. Uploading and distributing data greatly slows down its operation, so it is advisable not to download several files at once, and most importantly, turn off the program when it is not in use. This can be done in the notification area - in the lower right corner of the screen, by right-clicking on the torrent client icon and clicking "Exit".

The article listed all the problems that could lead to a full hard drive, and also provided options for eliminating them. If none of these help, it may be the hard drive itself. Maybe it has too many bad sectors or physical damage, which means it is unlikely to work stably. The only solution in this case is to replace the drive with a new, functional one.
Today in this article we will look at ways to solve one very unpleasant problem, which manifests itself in excessively high load on the hard drive (HDD) or solid state drive (SSD). Users of computers running Windows encounter such anomalous system behavior quite often, and recently I had to look for ways to solve this problem. In particular, at some point my Windows 10 laptop started freezing and not responding for minutes. Having opened the Task Manager, I discovered that the SSD disk load reaches 100% even when idle, and for no apparent reason.
According to the Microsoft engineer whose advice ultimately helped me solve my problem, on some systems the culprit may be the Message Signaled Interrupt (MSI) mode - it is enabled by default. Some may not complete I/O operations successfully when MSI mode is enabled. By waiting indefinitely for unresponsive reads or writes, the Windows storage stack begins attempting to reset the disk device. It is these reset attempts that lead to Windows starting to load the disk at 100% and, therefore, the system stops responding.
The issue can be resolved by disabling MSI mode for the Advanced Host Controller Interface (AHCI).
Step 1: First we need to open the Device Manager snap-in. Press the + R keys and enter the command devmgmt.msc and press Enter.

Step 2: In the Device Manager window, find the “IDE ATA/ATAPI Controllers” node, expand it and open the properties window of the standard SATA AHCI controller.

Step 3: Go to the “Driver” tab, click “Details”. Now note that the Driver Files field should mention storahci.sys. If this is the case, then the SATA AHCI controller uses the so-called Inbox driver (certified by Microsoft, included with Windows), therefore, MSI mode can be disabled.

Step 4: Click “OK”. We return to the properties window, switch to the “Details” tab and select “Path to device instance” from the drop-down list. Save the value somewhere, we will need it later.

Step 5: Launch the registry editor with the command regedit.

Step 6: We follow this path:
HKEY_LOCAL_MACHINE\SYSTEM\CurrentControlSet\Enum\PCI\ Controller valueAHCI\Device Parameters\Interrupt Management\MessageSignaledInterruptProperties
"Controller valueAHCI» we received at stage 4 of the manual.
Now in the registry window on the right we find the parameter MSISupported, open it by double clicking the mouse and change the value from 1 to 0.

That's it, close the registry and restart the computer. After rebooting, the problem of 100% disk utilization should disappear.
Other ways to solve the problem
The reason for the high load on the hard drive (HDD) may be the Windows Search service (file indexing service) or Windows Superfetch.
To permanently turn them off, use the command services.exe open the “Services” snap-in, find the Windows service, double-click to open the service properties and select “Disabled” in the drop-down list. Also click Stop to stop the service immediately.

Then do the same with the Windows Search service.

After this, the load on the disk should decrease noticeably. If that doesn't help, try other steps. In particular, check your system for malware. It is very likely that viruses are creating a load on the disk, and an anti-virus scanner like Malwarebytes Anti-Malware can help you detect them.
Alternatively, you can check the disk for errors using standard system tools. To do this, open the command line and run the command in it chkdsk.exe /f /r, just keep in mind that your computer will need to restart to complete the scan.
There is also an opinion that 100% hard drive usage in Windows 10 and Windows 8.x can be caused by the Flash plugin included in Google Chrome. Moreover, the Flash player is one of the most vulnerable aspects of modern computing. So it makes sense to disable it, especially since Google itself and other Internet giants have already begun to abandon its use in favor of the modern and much more secure HTML5 technology.
So if you are using Chrome, enter the command chrome://plugins in your browser's address bar and press Enter. Then find Adobe Flash Player in the list of plugins and click Disable.

I hope these tips helped you solve the problem.
Have a great day!
The Windows 10 operating system has received a huge number of updates over the past few years, which, of course, is great on Microsoft's part, but here's the problem - the disk is 100% loaded. To put it more precisely, when the system installs updates for itself, it often loads your disk at 100 percent. Once the installation is complete, the disk usage should drop to zero, but sometimes this does not happen and the user's disk can get stuck in this endless cycle of congestion.
Some users, in fact, sometimes do not even suspect that their disk is working at full capacity, but simply experience a slow system performance. It's incredibly easy to check disk usage using Task Manager. Don't know where to look? Let's explain.
You can check your disk load in the Task Manager in the tab with running processes. You've probably already used this system program, but you just didn't pay attention to the disk load column (meaning those new to Windows).
- Click ALT+CTRL+Delete on your keyboard.
- Select "Task Manager" from the list of actions.
- Select the Processes tab.
- In this tab you can see a column named “Disk”. This is where the total load on your disk will be indicated.
Method #1 Disabling Windows Search
Disabling Windows Search has proven to be the most helpful action for most users in dealing with this problem. In more detail, Windows Search scans your files and folders, and then enters the information recorded from them into an index file. It is for this reason that this service is also known as SearchIndexer.
The benefit of Windows Search is that it speeds up the process of finding your files. But, disabling Windows Search will not have any noticeable effect. The only downside will be a slight increase in the time it takes to search for files and folders. Although, if you do not perform frequent searches on your computer through tons of different files and folders, then you have nothing to worry about.
Follow these steps to disable the Windows Search service:
- Click Win once.
- Right-click on the result that appears and select “Run as Administrator”.
- Once the Command Prompt opens, type exe stop “Windows search”(with brackets) and press Enter.
- Wait while the system stops the Windows Search service. You should see a message indicating that the service terminated successfully.
Keep in mind that disabling Windows Search is not permanent, but only temporary. Open Task Manager and look at the disk load. If it has decreased, then you can start the newly disabled service using these steps:
- Click Win+R.
- Register services.msc and press Enter.
- You will see a huge list with services that operate on your operating system. Find in the list Windows Search.
- Double click on Windows Search.
- Click the Startup Type drop-down menu and select Disabled.
- Also click on the "Stop" button if the service has not yet been stopped.
- And finally,
In fact, disabling this service is not a recommended action. But, if you want to try to cope with the problem of disk utilization at 100%, then everything is in your hands. One way or another, if all else fails, then use the steps described above and enable the service.
Method No. 2 Disabling Message Signaled Interrupt mode (firmware bug)
Disabling Message Signaled Interrupt can also help deal with this problem, according to claims from users online. StorAHCI.sys is a driver with which a firmware bug can occur, causing high disk load.
- Click Win+R.
- Enter devmgmt.msc and press Enter.
- Double-click on “IDE ATA/ATAPI Controllers.”
- Double click on “Standard SATA AHCI Controller”.
- Go to the "Driver" tab.
- Click on "Details".
- If the driver name matches StorAHCI.sys, then the so-called “driver out of the box” works for you and you need to make a couple of changes in the Registry Key.
- Go to the "Details" tab of the "Standard SATA AHCI Controller" properties window.
- Click the Property drop-down menu and select Device Instance Path. Write down the knowledge shown somewhere or simply leave the window open.
- Click Win+R.
- Enter regedit.exe and press Enter.
- As soon as the Windows Registry Editor window opens in front of you, go to the path HKEY_LOCAL_MACHINE→System→CurrentControlSet→Enum→PCI→“Path to device instance”→Device Parameters→Interrupt Management→MessageSignaledInterruptProperties.
- Click LMB twice on the key MSISUpported on the right side of the window.
- Change the value of this key from 1 to 0.
- Click "OK".
Restart your computer and your problem should now be resolved. If you see several controllers in the Task Manager, then repeat all the steps above for each of them.
Method #3 “Use tooltips to speed up page loading” feature in Google Chrome
Sometimes, the problem with 100% disk utilization may occur due to the Google Chrome browser and its “Use hints to speed up page loading” feature. Users complained that this function was quite resource-hungry. So disabling this feature in Google Chrome can help take the stress off your drive.
Follow these steps to disable the "Use tooltips to load pages faster" feature in Google Chrome:
- Open Google Chrome.
- Click on the “ ” icon in the upper right corner of the browser window.
- Select Settings.
- Go to the very bottom of the settings and click on the “Advanced” button.
- Find the option “Use tooltips to speed up page loading” in the advanced settings and uncheck it. The function will be located in the “Privacy and Security” column.
Now close Google Chrome and check your disk usage percentage in Task Manager. It is possible that this particular function was at the forefront of the problem that arose.
Method #4 Disabling Skype
A huge number of users were able to fix the high load on their disk by simply turning off Skype. There are some programs, such as Google Chrome or Skype, that can at times use up all your disk resources (especially Chrome). So disabling some features or the entire program may help solve the problem. If not, you can enable them again.
- Click Win+R.
- Write in line C:\Program Files (x86)\Skype\Phone\ and press Enter.
- Right-click on the Skype executive file and go to “Properties”.
- Go to the “Security” tab, and then click on the “Change...” button.
- Select "ALL APPLICATION PACKAGES" in the "Groups or Users" section.
- Check the box next to the “Record” option in the “Permissions for the “ALL APPLICATION PACKAGES” group” section.
- Click on “Apply” and “OK”.
Go to the Task Manager again to check the problem with the disk being 100% loaded. You can also try turning off Skype altogether and see if the voltage drains from the drive.
Method #5 Uninstalling Flash updates
The next possible reason for the huge disk load could be Flash updates. This can be resolved by simply deleting these Flash updates from the Windows Update History.
The thing is that the downloaded and installed update could contain a bug, which causes excessive disk usage. Also keep in mind that Internet Explorer, Microsoft Edge and Google Chrome also come with a Flash plugin. So, even if you didn't install Flash yourself, it may already be installed through Windows Update.
Use the following steps to remove Adobe Flash updates:
- Press Win on your keyboard.
- Select Settings from the Start menu.
- Select Update & Security.
- Select Update History.
- Click on "Uninstall updates".
- Find Adobe Flash Player and click Uninstall.
- Follow additional on-screen instructions.
Restart your computer once the updates are removed. Check if the 100% disk usage problem has been fixed.
Note: Do not try to completely remove Flash using uninstallers available on the manufacturer's official website. Complete removal of Flash may well cause serious problems in the system.
Method #6 Unlinking OneDrive
It looks like the problem may also be coming from OneDrive, based on claims from users online. A huge number of Windows users complain that when working with OneDrive, high disk usage can occur. Unlinking from OneDrive may solve this problem.
To disconnect from OneDrive, follow the steps below:
- Right-click on the OneDrive tray (bottom right corner).
- Select Options".
- Go to the "Account" tab.
- Click on the "Unlink OneDrive" link.
- Click on the “Unlink account” button.
Now restart your computer and check for the problem.
You can also completely remove Microsoft OneDrive using the Programs and Features functionality located in the Control Panel.
Method #7 Disable Windows notifications
Disabling Windows notifications was able to solve the problem with 100% disk usage for many users on the network (as, indeed, all the methods in this article). To disable Windows notifications, use these instructions:
- Click the button Win on keyboard.
- Select Settings.
- Click on "System".
- Go to the "Notifications and Actions" tab.
- Turn off all notifications under the Notifications section.
Wait a few seconds and then head to Task Manager to check your disk usage again. Well, is the disk still in a 100% loaded state? Ok, let's move on.
Method No. 8 Reviews and diagnostics
Setting up Feedback and Diagnostics options is a pretty good way to reduce the load on your disk. Typically, your Reviews and Diagnostics are set to either Basic Details or Full Details. Changing the setting to Basic Settings may reduce disk usage. To do this, do the following:
- Click Win+I.
- Click "Privacy".
- Go to the “Reviews and Diagnostics” tab. Click the "Send device information to Microsoft" drop-down menu and select the "Basic information" option.
Check the load on your disk. The actions taken should have reduced the load at least a little.
Method No9 Cancel Windows Performance Recorder(WPR)
Windows Performance Recorder, as its name suggests, is a tool that is used to record and report your performance directly to Microsoft. It is located in the %SystemRoot%\System32 directory and is pre-installed software. Unregistering Windows performance can help you knock 100% of the disk load off. To do this, do the following:
- Click Win.
- Type “Command Prompt” into the search bar.
- Right-click on the search result and select “Run as Administrator”.
- Enter WPR –cancel and press Enter.
Well, this should have helped. However, be aware that this step will have to be repeated every time the system is rebooted.
Method #10 Disabling the Connected User Experiences and Telemetry service
Disabling a service Connected User Experiences and Telemetry can also help you solve this problem.
- Click ALT+CTRL+Delete and select Task Manager.
- Go to the "Services" tab.
- Find the "DiagTrack" service.
- Right-click on it and select “Stop”.
- Then right-click on it again and select “Open Services”.
- Find “Diagnostic Policy Service” in the service lists and double-click on it.
- Click the Startup Type drop-down menu and select Disabled.
- Go to the "Recovery" tab.
- Click the First Failure drop-down menu and select “Take no action.”
- Repeat the same for the Second and Subsequent failures.
- Click on “Apply” and “OK”.
This action is permanent, so you don't have to repeat it every time you restart your computer.
Found a typo? Select the text and press Ctrl + Enter
In this article I will talk about all the reasons why a disk in Windows can boot 100% and what can be done to make the disk work normally.It looks like this:Finding and Indexing Files in Windows
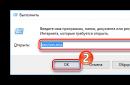
In order to quickly find and open any files on your computer in Windows, there are several services that provide this. These are file search and indexing services; these services should work fine, but often they cause problems with disk load up to 100%. Disabling these services helps a lot. To disable them we do:
- My computer - right click on the disk - properties - at the bottom uncheck "allow file indexing"
- Control Panel - Administration - Services - find the "Windows Search" service and disable it
But I want to warn you right away that if you disable these services, the search will not work, and Windows will also take longer to access the necessary files!
SuperFetch Service
Those who often clean their computers with various programs for cleaning the screw also face the problem of loading the disk at 100%. the problem is that cleaners can delete the PerfLogs folder in the root of the system disk. And after that, the Superfetch service has no data on the operation of the disk and it begins to collect it again, thus loading the disk at 100%. There are two ways out: either add the PerfLogs folder to the exceptions in the cleaners, or disable the Superfetch service, do it like this:
- Control panel - administration - services - find the "Superfetch" service and disable it
In general, this service should maintain and improve system performance. But due to many users not knowing how it works, it leads to disk load. Another point, for those who have HHD running for more than 3 years, or have hardware problems, it is also advisable to disable this service. It will not be able to increase performance on an old or dead disk!
Windows Update
Many people have noticed that when updating Windows, their computer begins to freeze. The problem is the same; when updating, the disk can be loaded at 100% because Windows OS gives high priority for installing updates. In general, such freezes go away quite quickly, but for those with weak computers or damaged disks, the process can last for hours. In this case, you can either wait until all updates are installed and always wait until new ones arrive. Or disable Windows updates once and for all, you can do it like this:
- Control Panel - Administration - Services - find the "Windows update" service and disable it
And one more warning, after disabling updates, your system may become vulnerable to new threats. In any case, you do this at your own peril and risk. And the site is not responsible for what you do.
Damaged disk and chkdsk check
Many people use Windows without even knowing that they have disk problems. Windows often signals such problems, but users either do not notice or ignore these problems. Have you ever noticed a black disk check screen before booting into Windows? Many people skip this check to avoid wasting time. But they do it in vain. This is a chkdsk disk check, it runs both before Windows boots and after boot, but in hidden mode. During this check, the disk is checked for errors on it and it is natural that during such a check the load on the disk will be 100%. In this case, I can only recommend two solutions to the problem - check all the disks completely or simply replace the disk since it probably already has problems. If you don’t want to change the disk and wait, then you can disable the chkdsk check in the task scheduler. We do it like this:
- Control panel - administration - task scheduler - task scheduler library - find the chkdsk task and delete it
After disabling this task, Windows will not be able to scan the disk and fix errors on it automatically.
Viral activity
Everything is simple here, viruses that have entered the computer actively carry out their activities, so they can load the disk up to 100%; most often, this problem arises due to worms and ransomware viruses. To reduce the load on the disk, you need to remove all viruses from your computer, you can do this using our wonderful tool, which has already helped millions of our readers!
Antivirus activity
There is another side to the coin: an antivirus, when checking a disk for viruses, can also load it 100%. It’s easy to check and get rid of this problem; you can turn off disk check and look at the load. If this does not help, then you should probably choose another antivirus that will not load the system, including the disk. Also, sometimes when an antivirus tries to neutralize a virus on a computer, but cannot do this, the load on the disk increases. In this case, the check should be performed either in safe mode, or from under the resuscitator, or with special boot anti-virus utilities, for example.
Recently, many people have been writing about problems with Defender on Windows 10. The Defender service loads the disk at 100%. Most often, this problem occurs on already infected computers. A complete, total cleaning of viruses will help, or maybe my little comrades will bring the defender’s operating algorithms to normal mode.
Synchronization with the cloud
Many people use synchronization with the cloud; at the time of downloading and synchronizing files, the load on the disk increases greatly, especially if there are a lot of files. To avoid the problem, do synchronization manually when it is convenient for you.
Installing drivers
Often, those who install Windows themselves do not install the disk driver (ACHI, Storage tool) and the motherboard chipset. And they get the same problem - disk load. I think you already understand that the solution is driver installation.
Severe fragmentation of files on the disk
If you haven’t defragmented your disk for over 100 years, then you are 100% guaranteed to have a disk load problem! When files are scattered in parts throughout the disk, it is difficult for the system to find them and open them quickly. Just defragment it.
Using torrents
If you use a torrent to download files to your computer, then while the torrent is running and files are being distributed, the disk can also be heavily loaded! Do not leave a large number of torrents on distribution, this will slow down your disk. As a last resort, you can turn off the torrent program altogether.
Serious hardware problems with the drive
And lastly, if your disk has a lot of slow sectors, and even worse bad sectors. So you shouldn’t expect normal operation from such a disk. Check your disk for problems using . In this article you will learn how to check your disk for errors, bad and slow sectors.
In this article, I collected all the problems known to me that can cause the disk to become loaded, and also provided methods for solving these problems. Don't forget to like and repost if the article helped. Well, if you have any questions, write them in the comments.
Hi all! Recently, in my practice, cases of incorrect operation of the hard drive have become more frequent. The most popular problem in this category is 100 percent hard drive loading. As a rule, owners of Windows 10 are faced with such a problem and it looks like this: if you look at the task manager, we will see that the hard drive is completely loaded for no apparent reason and, as a result, strong brakes of the operating system appear.
Today I will try to describe the most common reasons for this hard drive behavior and ways to solve them.
So, let's start with the basics. In order to monitor the status of the hard drive without third-party software, you need to press Ctrl+Alt+Delete simultaneously and you will be taken to the task manager by selecting the appropriate item in the context menu.

In order to determine the cause of the load, sort the processes by simply clicking on the “Disk” column.

Now it is very easy to determine which program loads the hard drive the most. The higher it is in the list, the more strongly it affects the operation of the hard drive. Very often this turns out to be an antivirus - performing a background scan of the system, a torrent - leading an active download, a defragmenter - updating drivers, and so on. In this case, only shutting down the program will help, or if the utility starts when you start the operating system, then simply remove the program from the startup list.
However, sometimes everything is a little more complicated than simply closing the process that is loading the HDD. A very common case is that the Windows search engine does not work correctly. The most common symptom of this disease is the disk is loaded with conductor (as in the screenshot above, only at 100%). If you do not use the search built into the system, you can easily disable the service responsible for this. To do this, click Start > type “command prompt” in the search field > right-click on it and select “run as administrator.”


After this, the service responsible for the search will be stopped. We return to the task manager and check the load on the hard drive. If the problem does not disappear or if it appears again after some time, then you can try completely disabling file indexing.
To do this, go to my computer. Right-click on the problem disk and go to properties.


Disabling the Superfetch service may also probably help you. The fact is that the popularity of third-party software for cleaning system garbage is very popular among all types of users, but the issue of optimization and interaction of such software with services built into the operating system is very controversial. The most common case is when a third-party cleaner deletes the “PerfLogs” system folder, which in turn is necessary for the “Superfetch” service to work correctly. Superfetch can improve system performance by prioritizing frequently used applications. But for this, it needs data on the operation of the disk, which is stored in the above-mentioned folder. If the necessary data is missing, the service itself begins to automatically collect data again, thereby loading the hard drive. In general, there are only two ways out of this situation: either add the folder to the exclusions of the cleaning software, or disable the “Superfetch” service.
This is done as follows. Press Win+R simultaneously and enter services.msc in the field that appears.

In the window that opens, find the service we need and double-click on it.

After that, change the startup type to “Disabled”, accept the changes and exit.

Let's move on to the next possible reason. This is an incorrect operation of AHCI drivers. Usually, controllers are able to work adequately even without additional drivers, especially on the top ten, but there are exceptions. In order to check whether you have the necessary driver installed, right-click on my computer and go to properties.


In my case, the driver is installed and the controller model is written. If you have something written like “Standard SATA AHCI controller”, then you need to install drivers and this is quite likely the reason for the disk load.
In order to install drivers for the controller, you need to go to the website of your motherboard manufacturer and find the latest version of the software. If you couldn’t find what you were looking for, you can use additional driver installation software.
If none of the above methods help, then the hidden operation of malware is quite likely. Check the task manager for processes unknown to you, and if there are any there, then this is another reason to scan the entire hard drive for viruses. I also recommend that you always disable automatic updates not only of the system, but also of all kinds of drivers and programs. If all these three start at the same time without your notification, then system brakes will inevitably occur. Perform updates manually from time to time.
In cases where the incorrect operation is not due to software, you should pay attention to possible hardware problems. You should check the hard drive itself for errors using the simplest method - the built-in CHKDSK utility. To do this, in the command line running as administrator (I have already described how this is done above), enter the following:
chkdsk C: /f /r (The letter C is the letter of the problem drive)

We agree to the conditions and enter "Y". Close the command line, and the next time you reboot, a scan will be performed. If this method does not give a positive result, then you should use heavy artillery in the form, about the power of which we have many articles, but in In my practice, it has extremely rarely come to this, usually the problem was solved by one of the above methods. Perhaps there are other ways to solve the problem, if you know about them, then write in the comments. That’s all, see you soon!