Quite often, users are faced with what they think is a big problem when it becomes necessary to convert the partition style from GPT to MBR. This may be due to many factors, among which the main one is the impossibility of installing some OSes in such partitions and compatibility with the new standard of the UEFI primary input/output system, which replaced the BIOS. There are several ways to convert partitions with more modern GPT markup to MBR and vice versa. But you can replace one style with another either with or without saving the data. Let's consider each of these options, since some actions may be useful even for the first or reinstallation operating system on the computer.
Difference between GPT and MBR styles
First, let's look at what exactly is the difference between these styles, and what each of them can be used for. The MBR (with boot record) partitioning is considered to be obsolete today, and has been replaced by a new one GPT style. This type of partitioning on a hard drive is mandatory if the hard drive has a capacity of 2 TB or more. But to ensure correct operation with such sections and using their full volume is necessary updated version primary system, referred to as UEFI.
In case of using MBR and BIOS installation on modern computers disks of this size become simply meaningless, since the BIOS does not support them, and if UEFI mode is disabled, despite the media being detected in the primary system, the full disk space will be inaccessible. So, think a hundred times to what extent it is advisable to perform the actions described below.
Problems with operating systems
But the most the main problem The problem is that outdated operating systems like Windows 7, which are still popular among many users, are not installed on partitions with GPT partitions, and do not even support the main UEFI operating mode. To carry out the installation, some users suggest disabling UEFI to use Legacy mode, as for a regular BIOS. On the other hand, if you purchase new computer with the primary UEFI system already installed instead of the BIOS, G8 will not install with UEFI disabled either. Thus, we get two mutually exclusive factors. However, you can get around such obstacles using fairly simple methods, but you will have to work a little.
Conversion during Windows installation
First of all, let's focus on whether to install Windows or vice versa. In this case, the safety of the data on the disk is not guaranteed, since it will have to be formatted during the installation of the operating system. Despite the fact that these questions are only indirectly related to the main topic, it does not hurt to have knowledge on them.

At one stage after starting the installation process, the installer of the same “seven” displays a message stating that installation to the selected partition is impossible. In this case, the simplest solution is to delete absolutely all partitions on the disk and install Windows in the unallocated area.

You can also create a system partition for Windows yourself, and use the rest of the space for logical volumes. However, this will not automatically create a special reserved partition, which will affect the fault tolerance of the installed OS. The installation section will be automatically converted to the desired style.

Thus, if we are talking about how to change GPT to MBR, you need to use the command line tools (Shift + F10), in which the following commands are written, shown in the image above. After this, you can continue installing the system as usual.
How to change GPT to MBR: creating a bootable USB flash drive and selecting the start mode of the primary I/O system
Now let's go back to the starting point and determine the steps that may be required to convert styles from an already installed OS (for example, Windows 8/1). To do this, you will first need to create bootable USB flash drive With Hard program Disk Manager version 15 from Paragon or a similar utility from Acronis (Disk Director). The media itself is simply created in a small Rufus application, and then placed first among boot devices.

Immediately in the settings of the primary system, you must immediately change the boot mode (Boot Mode) from UEFI to Legacy and disable safe start ( Secure Boot). Such actions are only necessary if a regular bootable flash drive was created for MBR, and not EFI.
Partition conversion process
Now you need to boot from the created media. The essence of how to change the GPT style to MBR comes down to deleting all partitions in the program at the first stage, including those reserved by the system for recovery, leaving only the one on which the installed OS is located.

When deleting backup partitions, in the confirmation window, be sure to check the box to not request a volume label next time. Once these steps are completed, only the base GPT partition will remain. How to convert GPT to MBR at this stage?

To do this you need to use RMB in additional menu select the appropriate conversion item and confirm your actions. Since the operation will be transferred to the deferred category (as well as in other utilities like Acronis Disk Director), you need to click the “Apply” button, after which the conversion process will start.
Additional steps to create a backup partition
But that is not all. The fact is that after changing the style, the system simply will not boot, and besides, you need to create a backup partition for it with boot data of the installed OS itself with a volume of about 300 MB. This can be done through the RMB menu on an unallocated area and selecting the option to create a partition, after which you will need to specify its size and file system(NTFS), and after completing operations through the same menu, make the partition active.
Creating a configuration to boot the installed system
At the final stage, it remains to create a configuration so that the same “eight” could boot with the new partition style without problems. In this case, you need to restart the computer, boot from installation media and call command console. In it you need to determine which letter is assigned to the active boot partition. To do this, first enter and then - lis dis, which will display all active sections.

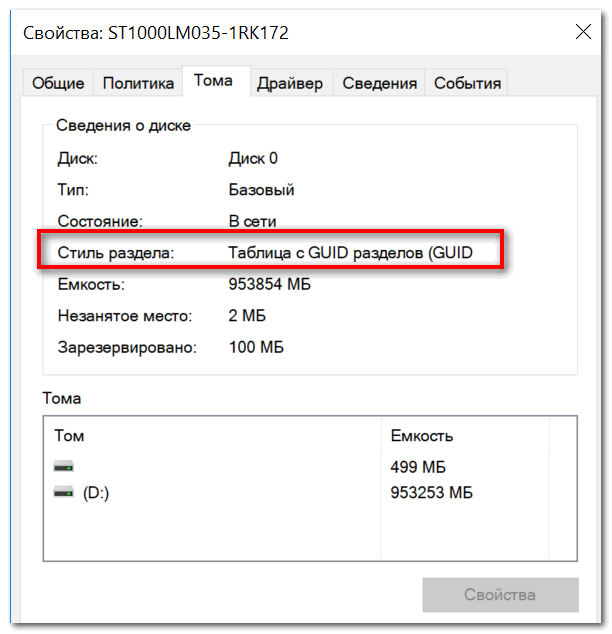
We remember the drive letter on which the system is installed, execute the exit command for the main tool, and after it enter the line bcdboot N:\Windows, where N is the letter of the system partition. After this, we reboot the computer again, but this time normal mode, setting to normal UEFI boot, and we rejoice. You can check the changed style directly through the partition properties on the volume tab.
Windows Tools
In principle, speaking of how to change GPT to MBR, one of the solutions for running OSes can be their own tool in the form of the disk management toolkit (diskmgmt.msc).

Here, too, you can delete unnecessary sections, and then through the RMB menu on the unallocated space, select the conversion from one style to another. True, the only and main limitation is that such actions can only be performed for non-system disks or logical partitions, that is, it will be impossible to change the style of a Windows disk directly in the system.
Changing section style using third-party programs
And finally, a few more words about how to change GPT to MBR. As more convenient tools than those available in Windows, you can use special disk programs from Acronis, AOMEI, Paragon and other developers. The operations performed, in general, do not differ much from those just described for Windows tools and boil down to converting unallocated space into the selected style. However, the conversion is much faster and more efficient. The interface of such programs is very similar to the Windows disk management section, but some operations (for example, redistributing disk space) are performed much easier by using the most common fader (slider), by moving which you can select the required size of each partition.
Brief summary
That's all briefly about style conversion. As is already clear, if we are talking specifically about performing transformations while preserving a working system and data that may be located specifically in system partition, should be used exclusively disk utilities with preliminary creation bootable media. If saving information is not required, you can convert both at the stage of reinstalling the OS and using Windows, and with the help third party programs. But you won’t be able to change the main partition in a running system even with their help, no matter how much you might want it. It will be impossible to remove it!
Details Updated 12/26/2016 11:35 Published 02/10/2016 16:32 Author: nout-911When might it be necessary to convert GPT to MBR? The most likely situation is to display an error message like this:
This can happen when you try to install Windows system 7 with x86 architecture onto a logical disk with partitions under the GPT system. Sometimes the reason may be the lack of UEFI BIOS on the PC.
There are also standard Windows utilities(including those that work during installation) and special software from third-party manufacturers to solve this common problem. IN this manual we will try to explain as clearly as possible options for changing GPT to MBR. It’s also worth knowing that it doesn’t exist effective way GPT to MBR conversion on a logical disk with the system, without possible loss of information on it.
This option is feasible if you have already received the dialog box described above about incompatible GPT partition styles. The obvious advantage of this method is that it can be used not only when installing a “clean” system, but also while working in it (only if HDD not systemic).
Attention! All information contained on the HDD will be erased! Knowing this in advance, you can follow this sequence:
- By time new installation Windows (at the stage of being able to select volumes for installation), you need to hold down the Shift + F10 buttons to open the command line window.
- Type the command diskpart, after that - list disk. These actions will make it possible to display a list of all physical disks on this computer
- Run a new command - select disk N, the letter N in this case is the number of the disk that will be converted.
- Next, you are given two options to choose from: score the team clean, for complete disk cleanup (deleting all partitions) or the option to delete specific partitions selectively using commands select volume, detail disk, and delete volume(the picture shows exactly this moment). The first option is preferable due to speed and simplicity.
- After deleting partitions, enter convert mbr on the command line - this will change the style of the disk partition to MBR.
- When finished, type Exit to exit Diskpart, close the command prompt window and you can continue with the current installation of the system - the error about partition styles will no longer bother you! You will also have the opportunity to create new partitions - just click “set up disk” in the partition setup window.

This option is only suitable for non-system hard physical disk. To do this, you need a valid operating system (Windows 7, 8, 8.1).
From the desktop, hold down the Win + R keys to launch the Run window and enter diskmgmt.msc in the input field and go to the system disk management routine.

In the Disk Management view that opens, you need to find the disk that requires conversion. It is necessary to delete absolutely all partitions on it. This is done by right-clicking on the required partition and selecting the “Delete Volume” option. This procedure must be performed for each hard section disk!

At the end of the above described manipulations, you need to click on the disk name item using the right button and in the context list click the option “ Convert to MBR disk».

As a result, you will have the opportunity to develop the required volume structure on the HDD yourself.
Specialized paid utilities for changing GPT and MBR partitions with the ability to save all data on logical volumes.
In addition to the above-described “native” options provided in the system itself, for any conversion of GPT partitions to MBR and MBR to GPT, there are programs from third-party manufacturers - Minitool Partition Wizard and Acronis Disk Director. The only disadvantage of this software is that they are paid.

There is another one free analogue programs with similar capabilities - Aomei Partition Assistant. But this program cannot be recommended by our experts. To ensure 100% data retention when updating section styles, especially if the information is on HDD disk important, we strongly recommend contacting our service center "
Good day everyone!
It sometimes happens that when you try to install Windows OS on your computer, you may see an error like: "Windows cannot be installed on this disk because the disk uses an MBR partition table. On EFI systems, Windows can only be installed on a GPT disk" . Or it is possible that your system simply does not see a disk larger than 2 TB.
In these cases, you need to convert MBR to GPT partition table to fix this problem. This can be done in different ways and ways, in this article I will look at how this can be done no data loss (see method 1 and 2)!
As a remark!
Difference between MBR and GPT. MBR supports partitions up to 2 TB. If your disk is, say, 4 TB (which is no longer uncommon), then when using MBR - 2 TB on such a disk will be listed as an unallocated area (and will not be used).
How to convert MBR to GPT
Method No. 1: step by step in the AOMEI Partition Assistant Standard Edition program
AOMEI Partition Assistant Standard Edition
Excellent and free program to work with hard drives. Allows you to literally change the file system, partition sizes, clone, etc. in just 2-3 clicks. Moreover, many operations are performed without loss of information (which is so lacking in the tools built into Windows).
Addition (from 11/10/18): the option for converting MBR to GPT in the 7th version of the program became paid (in the 6.6th version it was free, and it was this that I relied on when writing the article).

I don’t consider downloading and installing the program - it’s standard. After launching, in the main window of the program you can immediately find out which of the available disks in the system are in GPT and which are in MBR (see screenshot below).

As you noticed, "Disk 3" is MBR and I am converting it to GPT.
To do this, just right-click on the disk itself. (where it is directly written that this is “Disk 3”, see screenshot below), and in the menu that appears select "Convert to GPT disk".


After that, in the left corner of the screen you need to confirm all the commands that we gave to the program in the current session: click the “Apply” button.

A reboot will be required to complete the current operation. Therefore, first of all, save all your open documents, and then click the “Go” button in the program window (see example below).

The final touch: we agree to reboot...

After rebooting the device, instead of Windows boot special will be launched. conversion utility (see example below). Literally within a few seconds, my 1 TB disk was converted to GPT (I note again: without data loss).

That, in fact, is all the action.
Addition!
If you want to convert system disk(i.e. the drive on which you have Windows installed and from which you are in this moment loaded) - then you won’t succeed. In this case there are two options:
1) remove the disk from the PC/laptop, connect it to another device and perform the conversion operation;
2) create a bootable USB flash drive (can be done in the same AOMEI Partition Assistant Standard), and after booting from it, carry out the operation.
Make bootable CD, master

Method No. 2: using the MiniTool Partition Wizard utility
Multifunctional program for working with hard drives. Allows you to split, format, resize partitions hard drives. Free version The program supports conversion from MBR to GPT (which is what we need).
Perhaps one of the significant disadvantages for the majority will be the lack of Russian language.
Note: the screenshots in the article were made from version 10.3.
After launching the program, you will see a list of all drives connected to the system (HDD, SSD, USB flash drives, etc.). Please note that next to the disk name its partition table (MBR, GPT) is indicated.
To convert from one to the other: just right-click on to the desired disk and in the menu select "Convert MBR Disk to GPT Disk" (example in the screenshot below).


Then another warning will pop up, after confirming the operation - the disk will be converted. If you are converting a non-system disk (that is, not the one on which you have Windows installed), then the operation takes 1-2 minutes. (see screenshot below).

Method No. 3. From the command line or disk management
Important! This method will delete all your data on the disk!
If you encounter an error "On EFI systems, Windows can only be installed on a GPT disk" when installing Windows: then in order to open the command line, press the button combination Shift+F10.
In other cases, to launch the command line, open the task manager (key combination Ctrl+Shift+Esc) , press "file/new task" and enter the command CMD(check the box that the task must be completed as an administrator!).

Windows also has another good tool for working with disks. That's exactly what it's called - disk management .
To open it, you need:
- press a combination of buttons Win+R ;
- enter the command diskmgmt.msc and press Enter.

To find out what partition is on the disk (MBR or GPT), just right-click on the disk (in the place where it says “Disk 0”, “Disk 1”, etc., see the example below), and open properties .

- "Partition table with GUID..." is GPT;
- MBR markup will be explicitly stated.
To convert MBR to GPT - you must first completely delete all partitions on the disk (important! when deleting a partition, you will lose all data on the disk!) . If the partitions are not deleted, then the “Convert to GPT” button will simply not be active (as in the screenshot below).


That's all for me today.
Often when windows installation When selecting a target disk, you may come across a message like “The selected disk contains an MBR partition table. On EFI systems, Windows can only be installed on a GPT disk."
Example of MBR error when installing Windows
The Internet is full of advice, ranging from the strange “you need to press esc very often at a certain stage of installation,” to quite passable, but not always applicable.
Let's try to figure out what can be done in this situation, how best to proceed, and in general the reasons for this error.
Reasons for the error
A long time ago when hard disks were small (less than a terabyte) and used a BIOS, they used something called a master boot record (MBR). Any operating system Windows family firmly settled in this entry in order to successfully load. This post was located in a specific area hard drive, and accordingly was limited in size. Over time, the BIOS was replaced by the UEFI system. And the screws got bigger. And bright minds realized that MBR is very outdated and that its volume is small. What if a cunning user wants to install ten operating systems on his multi-terabyte screw? That's how they came up with a replacement for MBR - GPT. And new ones Windows versions(starting with eight exactly) require that the hard drive, if the computer does not have BIOS or UEFI, be formatted in GPT - just in case.
What to do?
Option one is to enable a special boot mode - Legacy. This mode will let the Windows installer know that this computer is compatible with older systems and can use the MBR. Unfortunately, it is impossible to say how to enable this mode in a specific BIOS - every developer hides it as best he can. Here is one example:
 Example of switching boot mode in Legacy
 Minus this method— if at some point the installer stops responding to Legacy mode, then the method will stop working.
What to do if the previous method cannot be used? The obvious answer is to convert the disk to GPT format. Windows Installer provides this option, but - all data on the disk will be destroyed. There is also a third method - but more on that later.
So, you are ready to convert the disk to GPT, erasing all data. Here are the steps for this:
- IN Windows installer we reach the disk partitioning stage
- Click Shift+f10. The console will open (black window with white letters).
- Enter the following commands sequentially (after each line, press Enter and wait for a new prompt to enter a command):
- diskpart list disk select disk
clean convert gpt exit
- diskpart list disk select disk
- At the select disk stage, you need to enter the number of your disk, which is exactly what the list disk command shows. Most likely the disk number is 0. But if you boot from a flash drive, the number may differ.
- That's it, the disk is formatted
This is all great, but not everyone wants to destroy all the data on their disk. In this case, a wonderful utility will help us. Naturally, for it to work you need a downloadable working copy of windows. You can install old XP for this purpose, you can use some kind of assembly that allows you to run programs. In general, the sequence of actions is as follows:
- Download the utility and unpack it into an accessible place. windows place(for working Windows - anywhere, for an installer with running programs - most likely on a flash drive with the installer)
- We get to any place by any means Windows console. In a working copy, this can be done with the “cmd” command in the “Run” window.
- Go to the folder with unpacked gptgen (for those who do not know how to use the console, google the CD command).
- Run the following command gptgen.exe -w \\.\\physicaldrive0
Naturally, instead of the zero at the end, you need to substitute the number of the disk that needs to be distilled. How to find out the disk number is described above. Most likely you will still need to confirm the conversion, but the program will kindly ask you for this. All! The disk is converted, the data is in place. The only thing is that the windows boot loader will most likely crash. But you can either restore it, if necessary, or install it new windows, for which actually all this was started.
Read, how to convert MBR and GPT in Windows 10. Why does this lead to data loss and how to avoid it. Historically, during the initial boot of a computer, the BIOS initialized devices and transferred control to the operating system (hereinafter referred to as OS). To do this, he accessed the logical partition table, which is stored in the Master Boot Record of the disk. The disks described in the MBR had a maximum size of 2 TB and their number did not exceed 4. The capabilities of modern hard drives require improvement software and MBR was replaced by GPT.
Content:
GPT is an abbreviation for GUID Partition Table, which has a limit of 128 partitions and a disk size of 9.4 zettabytes. But in order to boot the OS from a GPT disk, the computer must operate in UEFI (Unified Extensible Firmware Interface) mode, which replaced the BIOS.
Why convert MBR and GPT on Windows 10?
From the above, it is clear that MBR supports partitions up to 2 TB. What does this mean? For example, if the logical disk size is 3 TB, then 1 TB will be defined as unallocated area in Windows 10 and you will not be able to use it. To overcome this limitation, users need to convert MBR to GPT.
In addition to hardware limitations, 32-bit operating systems (Windows XP, Windows 2003, Windows 2000, Windows NT4) also do not support GPT disks. In these operating systems, the GPT disk will be shown as protected, and you will not have access to the data on it until you convert it to MBR.
However, progress does not stand still and many Windows users 10 will have the ability to convert MBR to GPT and vice versa, depending on their needs.
How to convert MBR and GPT on Windows 10?
For Windows 10 users, there are two ways to convert MBR to GPT and vice versa. Let's look at it in detail.
Disk management
Disk Management is a built-in Windows tool 10, which gives you the ability to modify (create, delete, increase, shrink) partitions, convert them to GPT or MBR.
Use this tool:
- Open the window by clicking “This PC” > “Manage” > “Disk Management”;
- Right-click on the drive you want to convert (for example, “Disk 0”). In the pop-up window, you will see the “Convert to GPT disk” function inactive.
With this tool you can convert to MBR or GPT only if there are no partitions on the disk. You need to delete all partitions on Disk 0 and then convert MBR to GPT and vice versa.
Command line
Command line is a built-in Windows 10 tool that can organize partitions and convert MBR to GPT. The command line allows you to convert MBR to GPT and vice versa only if the disk you plan to work with does not have partitions.
So, we do the following:
- Click "Start"> enter "Command line" and run it as administrator;
- Enter "diskpart" and press "Enter";
- Enter "list disk" and press "Enter";
- Enter "select disk N" and press "Enter". "N" is the number of the drive you want to convert (for example, "Disk 0");
- Enter "clean" and press "Enter" to delete all partitions or volumes on the selected disk;
- Enter "convert mbr" and press "Enter" to complete the conversion with GPT V MBR format.
Both of these methods make it possible to convert an MBR disk to GPT and vice versa. But both methods require deleting all partitions from the disk, and you are at risk of losing data. Therefore, before starting the conversion process, do backup copy all data that will be deleted, and then restore it.
Reasons for data loss
There are a number of programs from different manufacturers that allow you to carry out such conversions without losing data. They do not require deleting all partitions. But nevertheless, the risk of data loss still exists, and you need to be prepared for it. After all, there is a possibility of information loss during any operations with partitions and/or disks. For which, as stated above, it is necessary to at least make a backup copy of the data.
But if you do not have the opportunity to use such programs or you realized too late that you made a mistake by not using them, you can restore your files using special programs for data recovery. And in this case, Hetman Partition Recovery is perfect for you! After all this program finds all previously created disk partitions and displays them to the user for further analysis and search for deleted information.
Reasons why your data will not be accessible after converting from MBR to GPT:
- You need to install a 32-bit OS, which will not install on a GPT disk;
- The computer uses “old hardware” with a BIOS, and you plan to install a 64-bit OS on this hard drive;
- You plan to use an external USB drive as a boot drive for computers with a BIOS system;
- You have several operating systems installed on your disk with a bootloader that does not support GPT;
- Do you plan to use a USB drive as file storage with a router, TV, car radio, etc.;
Reasons why your data will be lost after converting from GPT to MBR:
- Partitions larger than 2 TB cannot be described in the MBR;
- If the disk is divided into more than 4 logical partitions, it will not be possible to convert it to MBR;
Therefore, our advice is to approach the issue of converting disks from MBR to GPT and vice versa, thoughtfully and with understanding.