Installing Windows 8.1 is not fundamentally different from installing its predecessor Windows 8 and Windows 7. This is exactly the same step-by-step installation process with hints for choosing certain settings. Let's look at it below.
1. Preparing for installation
If we are talking about installing Windows, while there is an even more or less workable system on the system disk, it is important not to forget to transfer the necessary files from the system libraries (folders “Downloads”, “Videos”, “Images”, etc.) to the non-system one disk or cloud storage. You can also export the settings and data of all desktop programs that provide this, so that after installing a new system, the process of setting up these programs consists only of importing previous developments.
So, the safety of the data is ensured; there is a boot disk or flash drive with the Windows 8.1 distribution. We can start reinstalling the system. We reboot the computer, go to the BIOS, and set it to boot from a disk or flash drive.
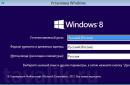
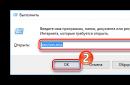
The Windows 8.1 installation process begins with choosing a language. The language, time and currency format, as well as the keyboard layout must be specified in the first welcome window of the installation process after the computer boots from the removable media. Click " Further».

The next window will offer a choice of system recovery and installation. Select " Install».

If the Windows 8.1 distribution includes several editions of the system, during the installation process you will be asked to select one or another edition. Click " Further».

We agree to the license terms. Click " Further».

In the installation type selection window, you are offered a choice of installing the system with saving user files in system libraries, some settings and installed Metro interface applications. Such a gesture of care from Microsoft, alas, will last longer, since the system will still work to save data. And the system disk will subsequently be cluttered with files of the old system in the “Windows.old” folder. It is better to temporarily place the necessary files on a non-system drive in advance so that you can format the system drive and perform a “clean” installation of Windows. Therefore, in our case, we select the installation type – “ Selective».

2. Partitioning and formatting the disk
Next we will see the disk layout and the new system will ask where it should be installed. In our case, Windows 8.1 is installed on a clean, not yet partitioned disk. Let's mark it using the options below. Click the button " Create».

A small sign will appear where you need to indicate the size of the first (also known as system) disk partition. Set the size and press the button “ Apply».

The system will notify you that it will grab several megabytes of disk space for its needs. Click " OK».

The newly created system partition of the disk will now be visible in the tablet as partition No. 2, and partition No. 1 will be defined as the very space seized by the system that it has reserved for its needs. The remaining unallocated disk space can be allocated to another disk, it will be non-system. You can allocate as many such disks as you like, as much as the hard drive capacity allows. Press the button again Create", set the size and click " Apply».

Now the table displays a partitioned disk with separate partitions. This will also be the case when the system is reinstalled on a work computer with a partitioned disk. Before installing Windows 8.1, the system partition needs to be formatted. Select it in the table (as a rule, it comes in section 2 immediately after the system-reserved space field) and press the button “ Format" After formatting the system partition, click “ Further».

3. Install Windows 8.1
The process of copying files to install Windows will begin. This is the most time-consuming stage of system installation. The user does not take any part in it.

The device preparation stage will last a little faster.

Next, a window will appear to enter your Windows 8.1 key. You can enter it right away so you don’t have to worry about it later. But you can enter it later; this will not affect the system installation process in any way. Click " Skip».

In the system personalization window, you need to decide on your color preferences for the Windows 8.1 start screen and name your computer. Click " Further».

Then you need to decide on the system parameters. Button " Use standard settings» is designed to be both time-saving and suitable for most use cases. Let's press it.

Next, you will be asked to sign in to your Microsoft account. By and large, this will not provide any serious advantages, except for the same wallpapers or screensavers that were installed in the previous system with a connected Microsoft account. In addition, it can be connected at any time later. Therefore, we press “ Create a new account».

In the next window, click " Sign in without a Microsoft account».

Set a username and, if necessary, a password. If there is nothing on the computer to hide from loved ones, a password is not needed. Click " Ready».

The final stage of installing Windows 8.1 will follow and after a few minutes the desktop of the new system will appear on the monitor screen.

4. Russification of Windows 8.1 for English editions
Above we considered the option of installing the initially Russified edition of Windows 8.1. English-language editions, for example, the trial version of Windows 8.1 Enterprise on the website of the Trial Software Center from Microsoft, the distribution kit of which can be downloaded absolutely free, also require setting up a Russian-language interface after installing the system.

In general, the installation process for the English version of Windows 8.1 is no different from the Russified version. At the very beginning, we select the date format, money, and Russian keyboard layout.

And we launch the installation.

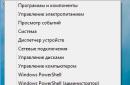
We go through all the installation stages in English, and after the system starts, call “ Toolbar» — « Control Panel" In Windows 8.1, this can be done using the context menu on the " Start».
- Note: Right now you can download and install the latest Windows 8.1 Enterprise Preview from the official Microsoft website. You can use it absolutely free and without restrictions for 90 days. Read our article "". If anyone has a desire, please follow the link and read. Anyone who wants can also read the information, and maybe someone will be interested in our article.
But I also want to say this: if you already have Windows 7 installed on your computer or laptop, then upgrading to Windows 8 would be a more acceptable and economical option for you; at the moment it will cost you pennies.
- As I noted in the previous article, until January 31, 2013, Microsoft is holding a promotion, using it you can switch from your installed Windows XP SP3, Windows Vista or Windows 7 to the new Windows 8 operating system. In this promotion there are three price options: 469 rubles, 1,290 rubles, 2,190 rubles, which you will agree is inexpensive. Details in our article.
In connection with all this, many people have another question. What should those who want to have two operating systems on their computer, Windows 7 and Windows 8, do? Or for those who assembled their own computer and want to install Windows 8 on it again.
If you go shopping now, you will find that most of the products on sale are boxed versions of the upgrade to Windows 8, from previously installed Windows XP SP3, Windows Vista or Windows 7.
Also available for sale are previously unavailable to the average user (OEM) versions of Windows. In the process of correspondence with readers of our site, I realized that quite a large number of users want to install Windows 8 (OEM), but few of you have any idea what this letter designation OEM (Original Equipment Manufacturer) carries, so in my article I will reveal this concept for you.
Before moving on to the article itself, let’s read two letters that came to our mail.
Installing Windows 8
- Admin, could you tell me how Windows 8 is installed on a computer or laptop? I'm installing an operating system for the first time in my life. The installation itself starts normally, first of all I set the priority in the BIOS to boot the computer from the disk drive, then Windows installation begins, click Install, enter the key, then accept the license agreement and select the installation option - Custom: Windows installation only (for advanced users). Next comes setting up the disk, and this is where, unfortunately, I begin to experience difficulties. That is, I need to create a partition (C:), which is where I want install Windows 8, as well as section (D:) for my personal data. How to do everything and what size should both created sections be? Next, another question, they say before installing Windows 8, you must create a Microsoft account, since it will be needed during the installation process? Max.
- Second letter. I read your article admin “Upgrading to Windows 8”, a good article, I personally have no questions about upgrading to the new eight. But at the end of the article you promised to tell everything about installing Windows 8 Professional 64-bit Rus (OEM). I also want to install it on a new computer, since a boxed version is not expected yet, but one thing confuses me. They say that when installed on a computer (OEM) version is tied to the motherboard, and what happens if the motherboard fails and has to be replaced. After replacing the mother, Windows 8 will have to be reinstalled and I am interested in whether it will be possible to reactivate Windows 8 or not. Regular reader.
How does the (OEM) version of Windows 8 differ from the boxed version of Windows 8 (which is not yet in sight).
As soon as Windows 8 came out, Microsoft revised the licensing scheme for the new client operating system. (OEM) versions of Windows have appeared on sale, which users can purchase for installation on their home computers, which they assembled for themselves; previously this was prohibited. Windows 8 PRO 64-bit Rus (OEM), this is a normal professional version of Windows 8, PREVIOUSLY unavailable to ordinary users. It was bought by special organizations specializing in the assembly and further sale of computers; the price for it was always cheaper than the regular boxed version. Windows 8 PRO 64-bit Rus (OEM) does not have official support, but you can ask any question you are interested in in the Microsoft product community and of course you will receive an answer.
Individual users can purchase and install OEM versions of Windows 8 on their personal home computers under a Personal Use License.
If you read this license carefully, you will understand that using the (OEM) version of Windows carries with it some features that you need to know. Previously, only organizations specializing in the assembly of computers and their further sale encountered these features. Naturally, operating systems had to be installed on such computers, and these organizations purchased similar OEM versions of Windows, at a price almost half the price of regular boxed versions. It must be said that OEM versions of Windows are no different from regular Windows, except for one thing - OEM versions can only be used on the computer on which they were ORIGINALLY installed. That is, Windows is tied to the computer, or rather to the motherboard.
And you will not be able to change the motherboard to a newer one over time without losing activation, since this will already be considered an upgrade, that is, tantamount to purchasing a new computer. This means you can change almost all components on your computer without losing activation, except the motherboard.
Note: Friends! This article was written six months ago, and my motherboard and processor still failed; in short, I had to replace the entire computer except the hard drive. Windows 8 PRO (OEM) had to be reinstalled and after installation the activation failed. I had to activate it by phone. Activation was successful, I wrote about all this in the article, you can read it.
As an exception, such activation is allowed only when replacing the motherboard under warranty with the same or similar board. But I want to say that after replacing the motherboard under warranty, you will naturally have to reactivate Windows 8 PRO (OEM). Re-activation will have to be carried out over the phone and you may be asked to send a copy of the relevant document from the service center. Read in detail here


In short, if you purchased a new computer, then accordingly you purchase a new copy of Windows (OEM) for it. You cannot transfer an OEM license from an old computer to a new computer, even if you no longer use the old computer, the OEM license will remain tied to it. By the way, you can sell it directly along with the OEM license.
I hope now you understand why (OEM) versions of Windows are much cheaper than boxed ones. If you purchase the BOX version of Windows and install it on your computer, then not only can you replace all the components on this computer, including the motherboard, but you can also transfer the boxed version to a completely different computer. Installation of Windows 8 Professional 64-bit Rus (OEM). So, friends, we go to the computer supermarket and declare our intention to buy the OEM version of Windows 8 PRO 64-bit Rus, but they tell us that they have never heard of such a thing. Here's an update to Windows 8 please.
And only in the third specialized computer store did I have a choice
Windows 8 Pro 64-bit Rus (OEM) professional version
Windows 8 SL 64-bit Rus (OEM) monolingual
Windows 8 64-bit Rus (OEM) simple
I managed to buy what I needed, the issue price was 4,650 rubles. Quite expensive, friends, so I once again advise you to read the article Upgrading to Windows 8. Before paying, the sellers asked me to read the license agreement located on the front side of a rather unpretentious box.


If you are installing this product on your PC for personal use:

It contains another smaller box and there is already a sticker with an activation key on it.

We take out the shiny disk, insert it into the drive and the installation of Windows 8 PRO 64-bit Rus begins.
You already know how to boot from disk, if not, you can read our detailed articles: or. Also, in order to boot from disk on many computers, you need to press the F-8 key when booting, then it will exit boot menu, in which you need to select your drive and press Enter.
If you and I have set everything correctly in the BIOS and we have an installation disk with the Windows 8 operating system in the drive, then the next time we boot the computer we will see this window Press any key to boot from CD or DVD, before it disappears, you need to press Enter on the keyboard, this will confirm your intentions to boot from the installation disk and start installing Windows 8.
So we are in the installation program for the Windows 8 operating system, very similar to installing Windows 7, click Next.


We enter the license key, it is located on the inner box of Windows 8. We accept the license terms.


Custom: Windows installation only (for advanced users), which we certainly are.

In this window, we will divide our hard drive into two partitions (C:) and (D:). To install the operating system, I chose a 250 GB hard drive, why the Windows 8 installation program shows a smaller volume of 232.9 GB, you can read. Click the disk setup button.

Create.

In this window, we need to select the size of our future disk (C:), the Windows 8 operating system will be installed on it. Select the size for the system disk (C:), a size of 110 GB will be enough. Apply.

"To ensure that all of its features work correctly, Windows may create additional partitions for system files." We agree and click OK, so we definitely need this hidden section, it contains and protects the download files of the Windows 8 operating system.

As you can see, we have a small hidden and reserved Partition No. 1 of 350 megabytes and a second Partition No. 2, which will be the system drive (C:), its volume is 107.5 GB.

Now let's create the drive (D:). We move with the keyboard or select unallocated space on disk 0 with the mouse and click Create.

We leave the size as it is, 127999MB, which is what we will have on the disk (D:), 125 GB. Click Apply.

In this window, select the future drive (C:), volume 107.5 GB and click Next, the main installation of Windows 8 begins.

Copying and preparing files for installation.

You don’t need to click anything in this window, otherwise you will boot again from the Windows 8 installation disk and the installation process will begin again.
You and I already need to boot from the hard drive. Microsoft account Preparing devices.

Let's configure the basic settings of Windows 8.

We select the color we need and give the computer a name.


You can use the standard parameters.

Friends, if you have your own Microsoft account, then indicate in this window the mailbox you specified during registration. A Microsoft account is a combination of email address and password that you use to sign in to services such as the Microsoft Community, Hotmail, SkyDrive, Windows Phone, Xbox LIVE, and so on. Creating a Microsoft account is very easy and can be done here. But even if you don’t have an account, you can still continue installing Windows 8 and an account will be created automatically.
Let's say we don't have a Microsoft account, enter your email in this window and click Next.

Setting up a Microsoft account. We create an account, fill out all the fields, indicate the real mailbox, enter the password to log into your Microsoft account not out of the blue, but to remember it,

After successful installation of Windows 8, we will receive a letter from Microsoft Account Help Desk, asking you to confirm the creation of your Microsoft account, click Verify and sign in with your email and password to your account.

I want to say that the account will be useful to you, because if you have questions while using the operating system, you can ask them in the Microsoft community and you will definitely receive an answer. So if you ask me a question on the site, and I start being stupid, feel free to go to the Microsoft community and demand an answer. Well, okay, all this will happen after installing Windows 8, but it’s not over yet.

Adding information to protect your account. You don't have to specify a backup email address.

Enter the captcha.

Create an account.


In the next article, we will install Windows 8 PRO from a flash drive, and then I will tell you, since the new operating system has a new system recovery function - Refresh Your PC. In short, it will be interesting.
Perhaps it's time to write about that how to install Windows 8. In general, this version of the OS turns out to be quite versatile: it can work both on regular PCs or laptops, and on tablets. In this article we will figure out how to install Windows 8 on a computer or laptop. About the details of purchasing Windows 8 Pro at a discount.
The new version of Windows gives the user even greater security, modern design and technology. The removal of the Start button is perhaps the most important visual innovation in desktop versions of Windows 8.
So, there are four known editions of Windows 8:
- Windows RT
- Windows 8
- Windows 8 Pro
- Windows 8 Enterprise
Desktop PC owners should only be interested in the "8" versions, since Windows RT is designed for mobile devices.
Preparing to install Windows 8 correctly
Before installing a new operating system, it is necessary to perform a number of preparatory measures - create a DVD disk, or a flash loader, or boot from a hard drive with unpacked OS installation files. You can buy a disc in a store, or you can buy a digital version of Windows 8 and burn it to a disc or create a bootable USB flash drive.
Before installing Windows 8, you need to save data and program settings from drive C.
If your hard drive is new, then there is nothing to copy.
Insert the disk/flash drive with Windows 8 into the drive/usb and restart the computer.
To boot from disk and install, you need to go into the BIOS of your computer, to do this you need to reboot and almost immediately press the DEL button; on some motherboards it is replaced by the F2 button.
After the BIOS has opened, you need to install the boot from your media on which the OS is recorded (DVD disc or flash - depending on what media you use to install Windows 8). This section can be located in different places - it depends on the manufacturer of the motherboard and BIOS, but it always contains the word BOOT: look for FIRST BOOT DEVICE, BOOT or BOOT DEVICE. As soon as you find it, install your media there first - either DVD or flash.
Windows 8 installation steps
If you did everything correctly, the message “Press any key..” will appear on the black screen, which means press any button. Press any button (except the shutdown or restart button) to move on. The updated Windows 8 logo will appear, followed by the first installer window.
At this stage, you need to select the language to install, time format and input method. Select or leave the default and click the “Next” button.

Click the “Install” button. After this, you can breathe easy - you have already done almost everything important in order to correctly install Windows 8. In the next window, you need to enter the key to activate Windows 8. This key is located on the disc box or in the form of a sticker on your computer. On laptops, a sticker with a key is placed on the bottom of the case. After entering the key, click the “Next” button.

We accept the terms of the license agreement by checking the box next to “I accept the license terms.” Click “Next”.

In the next window, the installer asks how we will install Windows 8.

There are two options available: “Update” and “Custom Installation”. The first is designed to update a previous version of the operating system. We recommend selecting “Custom Installation”. We will talk about the possibilities of updating from other versions of Windows in the following articles. Keep in mind that the information contained on your device will be deleted, so take care to save important information on removable media.
In the next window, select the drive on which you plan to install the operating system. If the computer is new and has never installed Windows on it, most likely there will be only one item “Unallocated disk space”.

In this case, you need to go to “Disk Settings” and create two partitions: the first for the system, the second for data. For Windows 8, it is better to allocate at least 35 GB, plus don’t forget about space for programs. To avoid running out of space in the future, leave the system partition at 70-90 GB, since hard disk space is cheap now. Leave the remaining space for the second and subsequent sections. If there is little space on your hard drive, there is no point in partitioning it, so it is better to allocate all the free space to one partition. This could happen, for example, if you install Windows 8 on an SSD drive.

If any system has already been installed, then the window will look something like this:

You can repartition the hard drive into the number of partitions you need, or leave it as is and simply select the partition on which another system was previously installed. Typically, this drive is called "Local Drive C:". Partition letters are not displayed here, but the required disk is easily calculated based on the specified dimensions. In this case it is “Disk 0 Partition 2”.

When copying is complete, the computer will reboot. The black screen will again display “Press any key..”. The computer will restart and as it boots, the computer screen may flicker and go completely black. That's how it should be. We are waiting for the “Personalization” inscription to appear.

The installation of Windows 8 on your computer is almost complete. All that remains is to complete the initial setup and you can get to work. On the first setup screen, you must select the color scheme that will be used for the Metro interface and specify the computer name. Click “Next”.
The next screen prompts you to go to settings or use standard settings.

You can configure the settings later and go straight to work by clicking the “Use standard settings” button. On this Windows 8 installation is complete.
Now you do you know how to install Windows 8 on your computer?, all that remains is to follow the above steps of the installation guide and install the new system in practice.
THEORY
In this article we will show a practical way. Installing Windows 8 from disk will not take much of your time, besides it will be clean Windows 8 installation. But before we start installing Windows 8 from disk It would be good to make sure that your computer, laptop, netbook meets the minimum system requirements.
So, the minimum system requirements:
- processor with a frequency of 1 GHz and higher;
- RAM: 1 GB for 32-bit and 2 GB for 64-bit version of Windows 8;
- hard drive: 16 GB of free space for 32-bit and 20 GB for 64-bit version of Windows 8;
- disk drive or USB port (BIOS must support booting from USB);
- screen resolution 1024x768;
If your computer meets these parameters, then you can safely proceed to installing Windows 8.
note: If your computer does not have a disk drive, you can install Windows 8 from a flash drive. To do this you need to make a bootable USB flash drive. Read more about this in the article: How to make a bootable USB flash drive with Windows 8. I think this is all clear.
To install Windows 8 from disk need to:
- blank DVD;
- working DVD drive;
- Windows 8 image in iso format;
- Ashampoo Burning Studio program, you can download it at the end of this article.
PREPARING A DISK FOR INSTALLING WINDOWS 8
Let us immediately note that if you already have a disk with Windows 8, then we skip this point. But if not, then you need to burn the iso image to disk. As mentioned above, you need the Ashampoo Burning Studio program. Download and install it. After installation, the main window of this program will open. To burn the image to disk, go to Create/burn disk image → Burn CD/DVD/Blue-ray disc from disc image. Let's look at the screenshot:
Now specify the path to the Windows 8 iso image. To do this, click on the button Review

If you made no mistakes, the result will be something like this:


Don't forget to put a blank DVD in the drive and press the button Burn DVD. The disc will begin recording. Screenshot:

After recording is complete:

The Windows 8 image was successfully written to disk. So now we have a boot disk for Windows 8 installations.
WINDOWS 8 INSTALLATION PROCESS
We put the disk with the recorded Windows 8 in the drive and boot the computer from it.
note: if your computer does not want to boot from the disk, then you need to make some settings in BIOSe. More details about this are written in the instructions for the motherboard, laptop, netbook, etc.
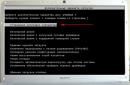
When the computer boots from the disk, a window will appear (sorry, the screenshots are not very high quality):

After waiting a little, a window will open Windows installation(English version Windows Setup):

The installation language is already Russian, click to continue Further(or Next if the installation language is English), then press the button Install. The Windows 8 installation process is progressing successfully:

We are asked to enter the serial number, we enter it:


The license agreement is also present in Windows 8. To continue Windows 8 installation we accept it.

And here we indicate the second point: Custom: Install Windows only (advanced):

In this window we indicate the drive we want to go to install Windows 8. It wouldn't hurt to format it.
note: Formatting will destroy ALL data on the selected drive. If you need them, save them somewhere else.
To start formatting, click on the inscription Drive Options (advanced):

To format, click Formatted:

After formatting, click Next:

Files are being copied. We wait... Windows 8 installation is nearing completion. After this, your computer will reboot. Now you need to boot the computer not from your Windows 8 disk, but from the hard drive to which the Windows files were copied. If this does not happen, then go to the BIOS and put booting from the HDD (hard drive) in the first place. So, after Windows restarts, you will see the following window:

A little more and Windows 8 installation will end:

And, of course, the settings, where would we be without them... In the white line we indicate the name of the computer (you need to come up with a name yourself), you can select the background color and click Further(Next):

Click on the leftmost button:

Enter your username, and you can also enter a password for it (optional).

We are welcomed :)

Here is the new interface of the new Windows 8 operating system. Congratulations on your successful installation of Windows 8! We hope how to install Windows 8 from disk Now it is completely and completely clear. It would also be a good idea to make a backup of your system. How to do this and why you need it was discussed in the article: System backup and recovery. We wish you a pleasant experience with Windows 8!
I think you will agree that it would be nice to watch a video of how the process of reinstalling Windows 8.1 goes. There is a useful course especially for you, not only on how to reinstall Windows 8, but also with a lot of other useful supplementary video instructions.
Installing Windows 8 is a very simple process. During the existence of the Windows operating system, developers have significantly improved and simplified the installation process. Now all you need to do to install Windows is insert the disc and follow the instructions that appear on the screen. In this article we will look at all the steps of installing Windows 8 in as much detail as possible.
Preparing a disk for installing Windows 8
The first thing we need is a disk with Windows 8. If you don’t have one, you’ll have to burn the ISO image to a blank DVD. We have already talked about this in one of our articles. But in order for this guide to installing Windows 8 to be complete, we need to touch on this topic.
To create a bootable disk from an ISO image, we need any disk burning program. For example, let's take the ImgBurn program. It can be downloaded from the official website imgburn.com.
Launch the program and select Write Image to disc.

After this, a new window will open. Here we need to select the ISO image that we want to burn; for this we need to use a special button. Once the disk image is selected, you can burn the disc. No other settings are needed, working with the ImgBurn program is very simple. Before recording, do not forget to insert a blank DVD into the drive. The following picture shows a button for selecting an ISO image and a launch button.

BIOS setup
After the program has finished working and you have a ready-made disc, you can insert the disc and begin installing Windows 8. As before installing any other operating system, you first need to make sure that you are set to boot from an optical disc.
If you have an AMI BIOS, then these settings are on the BOOT tab. As you can see in the screenshot, opposite the item 1s Boot is set to CD/DVD, and opposite to 2s Boot is set to Hard Disk. This means that the computer will first try to boot from the CD/DVD disk, and if this fails, then it will boot from the hard drive.

Start installing Windows 8
So, insert the disk with Windows 8 and restart the computer. If everything is correct in the BIOS settings, the computer will start booting from the installed disk. “Press any key..” will appear on the black screen, press any button. After a few seconds we will see the word Windows and the first installer window will appear.

Here you can select the language to install, time format and input method. If “Russian” is specified, leave the default values. If other countries are indicated, select the ones you need and click the “Next” button.
On the next screen, the installer prompts you to proceed to system recovery or install Windows 8. Click on the “Install” button and move on.

The next screen requires you to enter your Windows 8 activation key. This key is located on the disc box or on a sticker on your computer if you purchased your computer with Windows 8 pre-installed. If you have this key, it is most likely located on the bottom of the case.

After you have entered the key, click the “Next” button. The next installation screen is about the Windows 8 license.

Here we check the box next to “I accept the license terms” and click the “Next” button.
Windows 8 installation type and disk selection

There are two options “Update” and “Custom installation”. The first point is intended for upgrading a previous version of the operating system to Windows 8. Using this installation method is not recommended. As a rule, after such an installation, Windows does not work very stable. Therefore, select the “Custom installation” item.
In the next window, we are asked to select the drive on which you plan to install Windows 8. If you have a new computer on which Windows has never been installed, most likely here you will only have one item “Unallocated disk space”. In this case, you need to click on the “Disk Setup” link and create two partitions. One for Windows 8 and one for your data. Under Windows 8, it is better to leave at least 25 GB, if the hard drive is large, it is better to leave it with a large margin, for example 100 GB. The remaining free space is allocated to the second section.


If you already had Windows installed, then this window will look something like the following picture.

In this case you you need to select the partition on which Windows was previously installed. As a rule, this drive is called “local drive C:” in the system. This name is not here, so you need to recognize the disk by size and its location relative to other disks. For example, in our case it is “Disk 0 Partition 2”.
The disk on which the old version of Windows was installed needs to be formatted; to do this, select the desired disk and click on the “Format” link. At the same time, you need to understand that all data from this section will be deleted and Windows 8 files will be written over them. If you have important data on Drive C: that you do not want to lose, you need to copy it before installing Windows 8.

This process can take anywhere from 15 to 45 minutes, depending on the performance of your computer.
When the copying is complete, your computer will restart. On the black screen there will be the inscription “Press any key..”. We don’t press anything, we wait until the computer boots itself. After this, the computer screen will turn completely black several more times. Don't panic, this is how it should be. We wait until we see the inscription “Personalization”.
Initial setup of Windows 8
That's it, now the installation of Windows 8 is almost complete. All that remains is to configure it and you can start working with the new operating system.
The first setup screen in Windows 8 is Personalization. Here you need to select the color scheme that will be used for the Metro interface and enter the computer name.


If you really want to quickly get to work with the system, you can cheat and click on the “Use standard settings” button. But we are not looking for easy ways, so we click on the “Configure” button.
After this, the system offers several screens with settings.

Working with these screens is very simple; we indicate the necessary parameters and click “Next”.
On the last settings screen we are asked to enter a Microsoft account. It is needed to synchronize data and download applications from the built-in Windows 8 store. It is also possible to log in without a login.
But in the future, in order to fully work with Windows 8, you will still have to enter your Microsoft account information. Therefore, enter the data; if you do not have such an account, click “Register”.

After manipulating the account, the computer will pause for a few more minutes, after which the start screen will load. That's it, Windows 8 installation is complete, you can get to work.