So you have a damaged HDD. The first thought that comes to mind: give HHD for restoration in service center or try to repair the disk yourself? The question is quite complex, since HDD regeneration is possible, but not always appropriate. However, it's worth a try! Today I will tell you about a utility that allows you to recover data on a damaged hard drive, making it work better. Program HDD Regenerator rus will help us. As an example, let's try to restore my 120 GB hard drive.
What is “regeneration”, introduction to the program
Regenerator hdd is distributed in Russian, downloading the program is free and easy, although there is also a paid version of the product that regenerates damaged areas of the hard drive with even better quality. In addition, I tried to describe the process as clearly as possible, so that the reader would not have any questions about the restoration hard drive in the presence of bad sectors and other artifacts that interfere with the proper operation of the HDD and, even worse, can lead to the loss of important information.
Therefore, first we will consider the main theses: what is regeneration, what is the role HDD programs regenerator in this process. The program took its name from the process of regeneration - restoration, renewal. The essence of the process, however, is not in the real “revival” of dead areas of the disk (that is, bad sectors), but in shifting them to an unused area. Thus, there will be no problems when writing files and then reading them, since all sectors will be suitable for work.
The HDD regenerator works at a low level of scanning, working with bad sectors - in addition to Windows, you can boot from a live CD or DOS OS. In this regard, the hard drive recovery program is universal. That's why this tool successfully used in data recovery firms.
Where to download HDD regenerator?
The program in Russian is a small problem to download on a torrent; the program is also available on various sites with programs for HDD disk recovery. However, I advise you to download the free (trial) version of Regenerator in my catalog or on the official website and, if you like the Regenerator (read: it shows real results), feel free to purchase the professional version.
First, download the program and install it where the connected HDD is located. Then we read a short guide to using the program, russify the hdd regenerator program and move on to further steps to restore the disk. Be sure to follow the instructions in the manual, disable all unused applications, since the process of further working with the regenerator requires low activity on the hard drive.
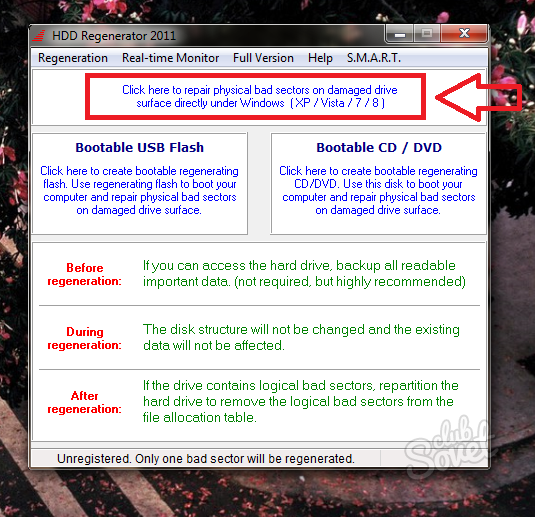
Once you install the program, launch it. The main window of HDD regenerator rus 2011 will appear in front of you with a selection of key options:
- creating a bootable flash drive
- recording a disc (CD or DVD) for subsequent HDD analysis
In addition, you can run a scan of your hard drive to check for bad blocks on it. However, you can safely skip these steps, since this moment we don't need a bootable USB flash drive or disk.
Let's start restoring HDD sectors
Next, you need to execute the command “Regeneration – Start process...”. Then you will see a list hard drives, among them you need to choose the one that will be used for subsequent recovery.
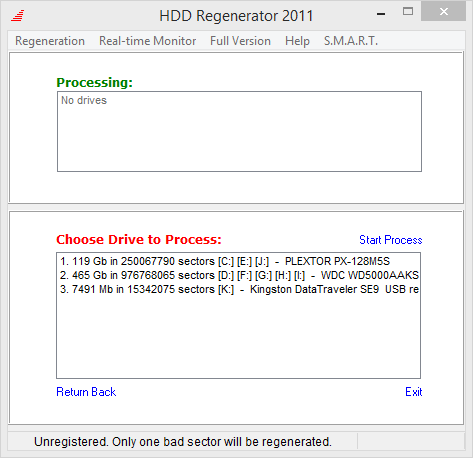
After that, click “Launch”. At the same time, the size of free HDD space is shown, as well as the total number of sectors that are available for processing and scanning, respectively. Depending on how many sectors are on the hard drive, the processing time varies, but in general this process is not too long.
Be careful! It is very important that the hard drive at this stage is not used by other applications and processes, since HDD regenerator 2011 otherwise will not be able to gain full access to the disk, as a result it will still display a message and you will have to close interfering programs running in the background.
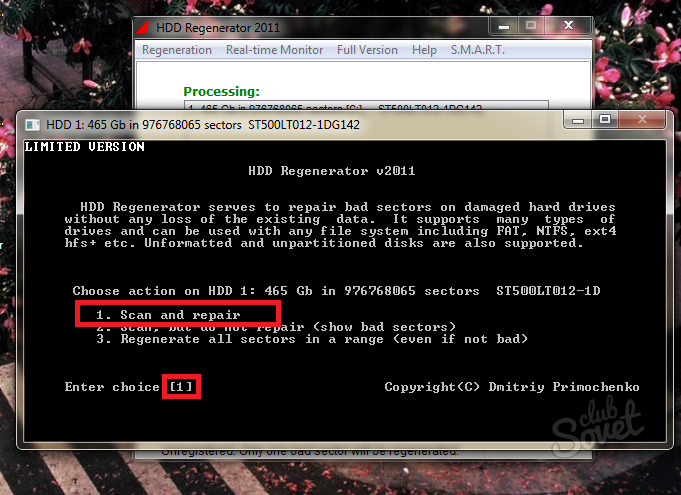
The next stage of working with Regenerator is very important. A menu will appear in front of you where you need to select one of four actions:
- and restoration of bad sectors
- Diagnostics and skipping the recovery stage
- Recovering bad sectors in a specific area of a hard disk
- Displaying statistical information after regeneration
We select the second item in the regenerator program, that is, we will use diagnostics and bypass the stage of actually restoring sectors on the hard drive. Therefore, select this option and press the Enter key.
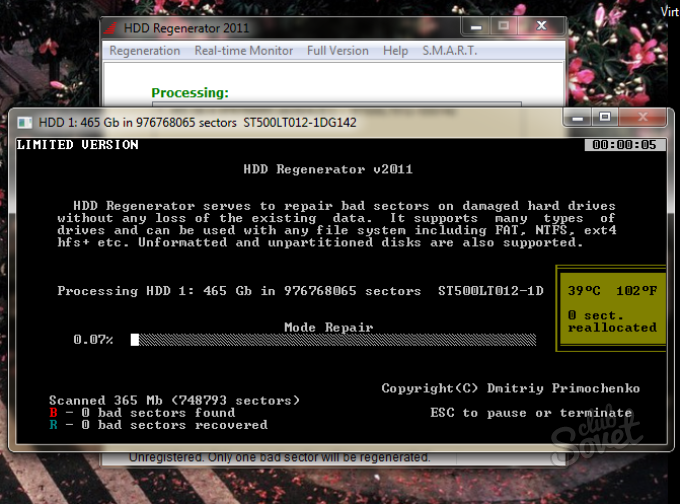
Let's move on. The HDD Regenerator 2011 application requires you to specify an area, a segment, which will serve as the starting point when scanning and analyzing the occupied space of the hard drive. At this stage, the disk is scanned looking for bad sectors.
After the analysis of the hard drive is completed, the results will be displayed. From these statistics, the program extracts a lot of valuable information: this is the number of sectors restored, bad blocks of the HDD device, as well as those segments that are not restored due to objective circumstances.
Conclusion
Thus, the tool did its job, helping to revive the HDD, as far as possible, on its own. As already noted, the free Russian version hdd regenerator You can download it on our website, in, or on the developer’s official resource.
February 22, 2017 Views: 5199We recently told you, and today we’ll talk about restoring damaged sectors. Even the most reliable hard drive begins to malfunction over time - it works slowly, “loses” folders and files, makes strange clicks, and starts checking itself every time the operating system boots. In most cases, such symptoms mean one thing - so-called bads - damaged sectors - have appeared on the hard drive. This may be caused by viruses, logical and physical defects.
There is no need to panic and run to the store for a new drive - in most cases the situation can be corrected by recovering damaged hard drive sectors.
This procedure is performed using the operating system or third-party programs, and is a remapping (overwriting) of bad sectors with free sectors built into the hard drive design by the manufacturer specifically for such cases.
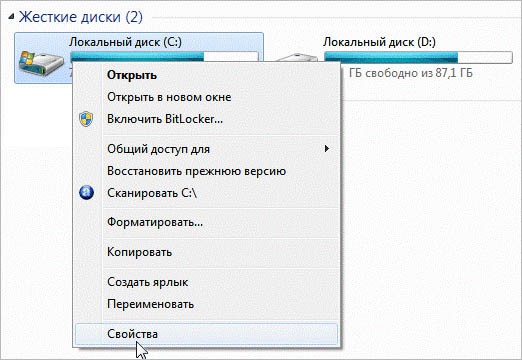
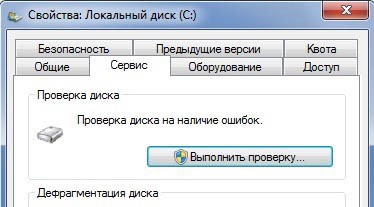
If there are minor malfunctions in the hard drive, you should try to “fix” the faulty sectors with standard Windows utilities CHKDSK and SKANDISK. To do this, you need to open the “My Computer” folder, select one of the logical hard sections disk, call context menu and go to “Properties”, then open the “Tools” tab and click the “Run check” button.
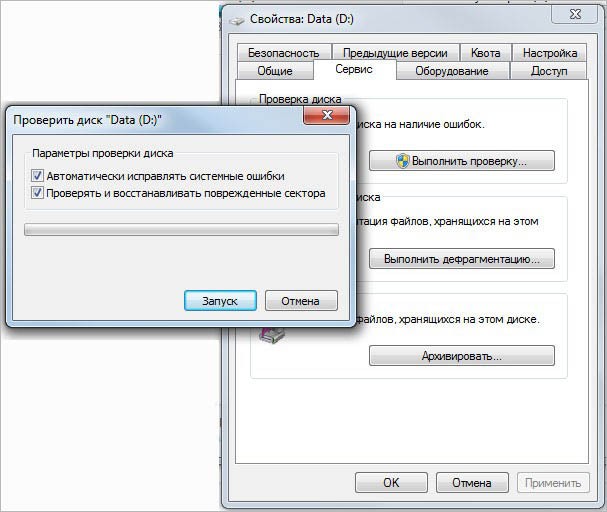
A window will open in which you need to check the box next to Scan and repair bad sectors, and then click “Start”.
Will begin recovery of damaged hard disk sectors. This procedure must be done with all logical partitions of the hard drive; Sometimes an OS reboot will be required to complete the scan and recovery.
If you work with bad sectors hard drive standard using Windows for some reason does not suit the user, then you can contact third party programs.
For example, use the Victoria utility. It is worth noting that effective work it is possible only when running in a DOS environment - for this you need to create bootable USB flash drive or a disk with the Victoria program, restart the computer and set this drive as a priority in the BIOS. After loading DOS, you need to launch Victoria, select the desired hard drive in the program and run the surface test by pressing the F4 key. Moreover, if it is already known for sure that there are bad disks on the hard drive, you can immediately select the function of overwriting them - “Classic REMAP”, after which the user can only wait until the restoration of damaged sectors of the hard drive is completed.
Another one program for working with bads – MHDD. It is also advisable to run it in DOS mode from a bootable flash drive or CD.
MHDD performs low-level hard formatting disk with erasing bad sectors, so you need to take into account that during the procedure all information will be deleted from it. To perform the process of restoring bads, you need to boot the computer in DOS mode, run MHDD and type the “Erase” command, which will perform formatting. After this, you need to type the “Remap” command here in the program - it will automatically scan the hard drive and replace damaged sectors with backup ones.
A hard drive is a fairly fragile device. Bad sectors are damaged cells for storing information on a hard drive. After a while using hard The disk may have a problem with bad sectors. This is why it is so important to repair bad sectors from time to time.
This can be easily done using various programs, but first you need to determine whether there is bad sectors. Our article is about this, as well as how to restore the boot sector of a hard drive.
How to recover damaged disk sectors
There are many ways to repair bad boot sectors on a disk. Let's look at several of these methods in detail.
How to restore sectors via Windows
If it is possible to enter the OS, then restoring the hard drive will not require much effort. To do this, you need to call the context menu of the hard drive and select “Properties”.
In the new window that opens, select the “Service” tab, where we click on the “Run check” item. Check the boxes next to “Automatically correct” system errors" and "check and repair bad sectors." After this we run the check.
If the disk is a system disk, a reboot will occur and the verification process will begin. If the disk is not a system one, then the check will pass without reboot.
The system itself will find all errors and perform recovery. After which it will display statistics of the work done.
But sometimes it happens that the OS does not boot due to bad sectors.
How to recover bad sectors if the OS does not start
If Windows does not start, you can take a disk with virtual system and download the virtual OS. It contains all the actions restoration of hard disk are produced in the same way as in the previous section.
If you don't have virtual disk with the OS, it will help installation disk Windows. After downloading it, you need to select “System Restore”. The recovery console will appear, where you need to select local disk from your OS. Usually this is the “C:” drive.
After the reboot, a console will appear where you need to enter the command “CHKDSK [drive:]”, where:
- /F is disk check and error correction,
- /R is a search for and recovery of bad sectors.
After this, press “Enter” and wait for the recovery to begin. Then we exit the console and restart the computer. All is ready.
How to restore sectors using programs
To restore bad sectors on a hard drive, there are many programs that can be easily downloaded from the Internet. Let's look at their operating principle using the HDD Regenerator program as an example.
The program restores bad sectors by remagnetizing them again. This is achieved by creating a virtual flash drive.
After installation, launch the program. In the window that opens, several options will appear in Russian. You can restore bad sectors just like in the most Operating system, or using a flash drive or regular disk from the console.
The program will check bad sectors (broken) and restore them. To make the most of the program, it is better to use a bootable USB flash drive or disk, which is created after installing the program.
Repairing bad sectors will help extend the life of your hard drive and even recover some previously lost files. However, you should remember that this is a responsible and rather risky business, since by pressing the wrong buttons, you can completely ruin your hard drive. Follow the instructions provided in this article strictly and you will be able to recover some bad sectors. Before starting work, select the software with which you will restore sectors. There are many for you to choose from convenient programs: Victoria, HDAT2, HDDregenerator.
How to recover bad sectors of a hard drive using HDAT2
Working with this utility requires the presence of a boot disk or bootable flash drive. You will learn how to write them down in another article. Must be installed on your computer Daemon program Tools or Ultra ISO.
- Download the HDAT2 program from the official website https://hdat2.com.
- You need the "CD/DVD Boot ISO" partition.
- Download the latest version, which comes in ISO format, not SFX.
- Find your file in your downloads folder and open it with Daemon Tools, or other software for mounting images.

- Take a blank disk and click on the “Burn image to disk” field.

Please note that all your further work with this utility will take place entirely in the BIOS. Read carefully the fields you click on.
- To begin, turn off your computer and enter the BIOS. Each brand of computer has its own login buttons. Try holding F12 or F7, or better yet, read about it on the Internet.
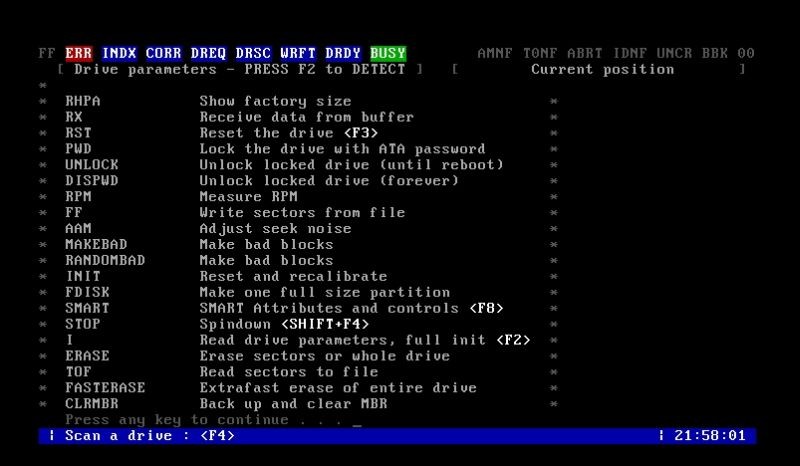
- After entering the BIOS, select the system boot method - CD/DVD, and then enter the HDAT2 command, as in the screenshot below.
![]()
- After this, a menu will appear in front of you with hard drives that are connected to your computer. If he is alone, then you should not have any problems with the choice. Click on your hard drive and press Enter.
- In the window that appears, select the line “Hidden areas menu”.
- Now test your computer for bad sectors. Even if you know their exact number, you will still have to run the test, since the program needs it to further fix the problem. Click "Powerful test READ/WRITE/READ/COMPARE"
- That's all. Click on the very first line, as shown in the screenshot, to repair your sectors. Please note that this will take quite a long time, so you can move the laptop aside and go about your business. As soon as the program finishes working with Bad sectors, do not forget to return the system boot not from the CD, but from the hard drive.
How to recover bad sectors of a hard drive using HDD Regenerator
When starting to work with this utility, you can read a lengthy article about its work in order to roughly understand the structure of the program: . The advantage of the utility is that you do not have to create a bootable USB flash drive or disk and log in from the BIOS. Experienced users note that this program actually corrects the problem by degaussing, rather than simply disabling bad sectors.
Download the program on the Internet, keep in mind that only its first use is free. If you want to heal bad sectors again, you will have to buy the software.
Installing the program takes just seconds.

Look carefully at the window interface:
- Left button "Bootable" USB Flash» will help you create a bootable USB flash drive for working with the program in the BIOS.
- The right "Bootable CD/DVD" creates boot disk for the same purposes.
- The top line allows you to work from under the Windows axis, which saves a lot of time.
Click on the top line.
Select your hard drive. The model, amount of memory and all sectors will be written on it. Just double click on it.
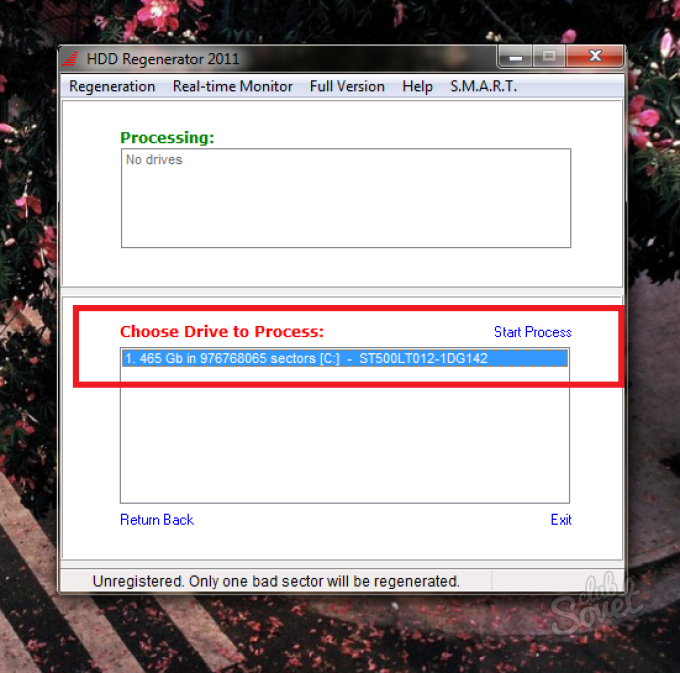
Please note that all windows must be closed and all processes stopped. Only then can you start working with sectors - the hard drive should be unloaded as much as possible.
Select the second item in the menu that appears - “Normal Scan (with/without repair)”. This option repairs bad sectors while scanning all sectors of the hard drive. Please note that the mouse does not work in this program. You need to enter the number 2 and then press Enter.

Now you need the “Scan and repair” item to confirm your intention to fix all sectors. Enter number 1.
You can also enter the number 3 to activate the “Regenerate all sectors” item. This option carries out preventive maintenance on absolutely all sectors, even if they are not damaged. This is more suitable for experienced users who can handle it on their own. possible problems during the regeneration process.
Now you have to select the start of the scan:
- Point number 1 “Start sector 0” starts scanning and treatment from the very beginning.
- The second option “Start sector ***” continues the previous scan if it was interrupted for one reason or another.
- And the third item “Set start / end sectors manually” allows you to enter the sector checking range manually.
It's better to start from the very beginning by choosing the first option.

The process will start instantly, all you have to do is wait.