The RT G32 router is designed for broadcasting Internet traffic wirelessly and wired. Setting it up takes about 5-10 minutes for an experienced user, but a beginner will have to follow the instructions.
By setting up the router, you can use the home Internet from any mobile device without any wired connections. You just need to log in to the Wi-Fi network.
In this article you will learn how to configure the ASUS RT-G32 router.
Connecting a router
The package contains all the elements necessary to connect the router:
- complete cord (jack-jack) for connecting the device to a PC;
- power unit;
- the router itself.
The picture shows all the necessary ports.
To connect, you must perform the following steps:
- plug your Internet cable into the designated “INTERNET” port (usually it is marked with blue edges);
- The supplied cord must be used to connect any output “LAN” port of the router to the corresponding connector on the computer;
- Plug the mains charger into the “DC 12V” power connector.
Thus, we implement the chain: Internet - Router - PC. In this case, an additional path will be a separate power source.
Authorization
To go into the settings of the ASUS RT G32 router, open your browser and enter http://192.168.1.1 in the address bar.
After pressing Enter, a window will appear asking for authorization:
- Login (User name);
- Password.

Before the first setup, you must enter the value “admin” in both fields. By default, this is both login and password at the same time.
In the menu that appears, select the interface language. The language selection is at the top of the page between the general information and the exit panel.

Internet setup
This is the main adjustment that will allow the router to receive and send traffic to your ISP. It will require detailed information about your Internet connection.
Most users prefer not to carry out such an operation themselves and give money to those who will do it for them. There is nothing terrifying here. But think about it, is it worth paying decent sums for actions that, once you gain experience, will take no more than 5 minutes?
If you come to the right conclusion and take up the matter yourself, read the general information. In fact, there is little of it, and therefore it is easy to learn.
Each provider uses one of the allowed connection types:
- PPPoE;
- L2TP;
- DHCP.
This information is indicated in the “WAN” menu (the very first item).
You need to follow the chain to get to this menu:
- "WAN";
- "Internet connection".
Here you specify the type of connection.

The setup procedure is greatly simplified if your provider uses dynamic IP technology. If you have this technology, just specify the connection type “Dynamic IP”. Then the router will automatically gain access to the Internet.
In other cases, you must further follow the instructions. If you do not understand where to get the information to fill out the required fields, contact your provider by phone. It can also be placed in your written contract (account details with the provider).
PPPoE connections (Rostelecom, Dom.ru)
When setting up a WAN, for example, for the Rostelecom provider, you should use the following parameters:
- select PPPoE as connection type;
- in the IP address settings, set to receive automatically;
- connection to the DNS server should also be automatic;
- in the account fields you are required to indicate your login and password issued by the provider;
- Be sure to enter "rostelecom" below in the "Hostname" field.

After entering the data, check the visual prompt and click “Apply”.
L2TP connections (Beeline)
After selecting L2TP (L2TP + Dynamic TP) as Beeline data transfer type, continue filling out the fields:

If the data is entered correctly, click “Apply” and try using the Internet.
The visual table of parameters corresponds to the image above (Rostelecom Connection).
Please note that for Beeline you must specify the server and hostname.
PPTP (VPN) when automatically obtaining a local IP address
Specify communication technology:
- Internet setup;
- connection type.
Make the settings:
- “YES” to automatically obtain an IP;
- “YES” to automatically connect to DNS;
- enter the login and password received from the provider;
- fill in the Server.. field in the service provider block (the data is indicated in the contract or you can check with the provider over the phone).

PPTP (VPN) with a static local IP address
This technology does not provide for automatic data acquisition. Therefore, you will have to enter all the information manually. Use the written agreement with the provider as your source.
Proceed to setting up the Internet by selecting the appropriate connection type:
- Internet setup;
- connection type.
- automatic IP acquisition – “NO”;
- specify the IP address;
- Subnet mask;
- main gate;
- DNS server 1 and 2;
- indicate the login and password for the provider;
- fill in the Heart-Beat or PPTP/L2TP(VPN) Server field.
Video: setting up a router
NAT when automatically obtaining an IP address (DHCP)
This is the same data transmission technology that does not require any additional information.
The only configuration step is to specify the connection:
- proceed to the options menu;
- select the WAN connection type Dynamic IP.

After making your selection, click “Apply” and use the Internet.
Setting up IPTV on the ASUS RT G32 router
This manipulation is carried out if you want to broadcast programs to your TV via the Internet via wire. After all, it’s much easier than paying for a separate television service.
Before directly setting up IPTV, make sure that the corresponding port is specified in the WAN connection (find the port number under the cord that you plugged in to broadcast TV). This item is located immediately below the connection type.
- Route.

Indicate "YES" everywhere. After a couple of seconds, the TV will play the image.
If the image does not appear, consider several possible reasons:
- your provider does not provide this function (check with your service provider);
- the device parameters do not match the parameters of your TV (which happens in rare cases);
- The provider uses a special connection type.
WiFi
Setting up a wireless network is the final step in preparing the device for full operation. The only exceptions are the additional capabilities of the device.
To install a Wi-Fi network, follow the chain:
- wireless network;
- are common.

There are many fields here, some of which are required to be filled out:
- SSID is the name of your Wi-Fi network (you can specify anything);
- by selecting “YES” or “NO” opposite Hide SSID, you will determine whether the network will be visible to mobile devices when searching;
- The country code nominally identifies the location;
- the channel establishes the connection flow and, if you have many networks nearby, you should independently determine the free channel to avoid interference with the Wi-Fi connection (if there are no networks near you, select “Auto”);
- authentication method – security level (the most common is WPA2);
- WPA preshared key is your password for using Wi-Fi.
Video: ASUS Wireless Router RT G32
To complete the setup, click Apply and reboot the router. After which it will successfully distribute traffic wirelessly.
Setting up a connection with the DC++ client
When using a router, in most cases the problem occurs when working with the DC++ client. This problem is caused by the fact that the traffic translation function is redirected from the computer to the router. And this complicates interaction with torrents.
To fix this problem, go to the menu:
- Virtual server.
- “YES” on the item enable virtual server;
- service name – any;
- choose the range of ports yourself (for example, 3211 or 3333);
- the local IP address corresponds to the one on which the DC should operate;
- local port – any from the specified range (it must be unoccupied);
- protocol – BOTH (you choose both).
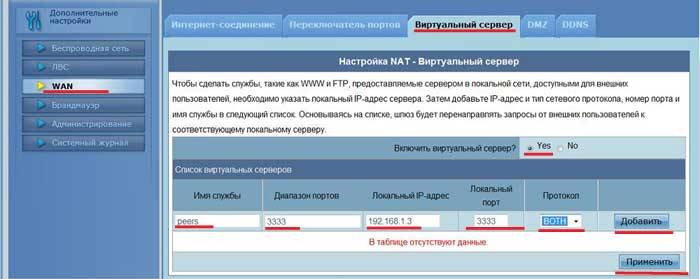
To finish, click Add and then Apply.
With this you have completed the first step. Now proceed to the second one.
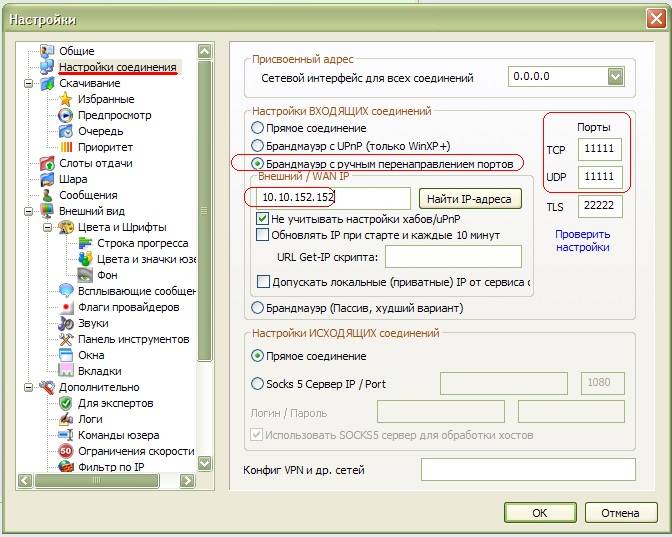
Client DC synchronization:
- connection mode – firewall with manual port forwarding;
- indicate your external IP address in the field (you can find out through the router “System log” “System status”);
- TCP/UDP ports – indicate the one that was selected in the preliminary configuration of the virtual server on the router (3333 was indicated as an example).
After the operations performed, the problem should be resolved.
Saving or restoring settings
Quite often it happens that the device settings are lost.
There may be several reasons for this:
- accidental change of settings;
- There is an error in the router firmware.
To avoid repeated manipulation of settings, you should use the recovery function.
To do this, you need to follow the menu chain:

Note! If the router firmware is faulty, there is a possibility that you will not be able to use the admin panel. For such cases, there is a “Reset” button on the back panel of the device. It is located deep in the case and therefore you will need to use a thin object.
Here you will see all three available operations:
- restore – will lead to a complete reset and return to factory settings;
- save – allows you to make a copy of all settings in a special file on your hard drive;
- load (can be Send) – will help return saved parameters from the saved file.
Don't panic if the settings are lost for some unknown reason. If you did not foresee such a situation the first time, be sure to save the next time.
Firmware update
Firmware is the software side of the device, which is responsible for its functionality. The router you purchased may not match the latest firmware. But the updates contain fixes for problems found in previous versions.
To update the firmware, you must first find this file on the manufacturer’s official website. All you need to do is specify the operating system version and download the file.
Then go to the router menu:

In the "New Firmware File" field, click "Browse.." and select the downloaded firmware.
After clicking Submit, the router should update and reboot on its own. If the reboot does not occur, do it yourself.
Important! If you updated the firmware, the router will have to be configured again.
Setting up the ASUS RT G32 Wi-Fi router is quite simple. The manufacturer did a good job with visualizing the menu so that the user could understand where the required tab is located. Using this approach, you can configure it yourself after just 3 manipulations.
It should be remembered that information that is not included in the options offered by the customizer is 100% likely to be found in the agreement with the provider. Basically, these are your Login and Password. This can also be the connection type and server addresses in the case of non-automatic data acquisition.
>Step 1. Check for yourself the parameters of your ISP - Internet service provider, which will need to be entered on the router configuration page:
- On what Protocol your operator provides you with Internet ( PPTP, L2TP, PPPoE, - Static or Dynamic);
- Automatically or manually your PC is assigned an IP address and DNS;
- Is access provided via Login and password;
- Is there a connection between the PC’s network card and the operator’s server? physical address (MAC address).
Step 2. In the properties of the local network connection, in the properties Internet Protocol Version 4 (TCP/IPv4), if you see numbers, you should copy them into a notepad, and then set the automatic configuration of the IP address, mask, gateway and DNS from the provider:
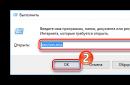
- Start – Control Panel – Network Connections or Network and Sharing Center – Change adapter settings – Local Area Connection – right-click properties:
Step 3.Physical adress You can find out if you right-click on the icon:
- Local network connections – Status – Details – In the window, third line in the list – Physical address
Let's start setting up the router (router)
Turn on the router, insert the cable from the operator into the connector INTERNET, connect with a cable (usually included in the kit) the network cards of the router (LAN connector 1) and the PC (Ethernet network card connector). The router should light up at least power diodes (PWR), active first port and WLAN ( AIR), although it happens that the latter is disabled in the router settings. Before setting up, we recommend that you perform a complete reset of the router; hold the button in the hole on the back for about 10 seconds. Reset.
Setting up the RT-G32 wireless router
Step 1. Launch on PC Internet Browser(default, Internet Explorer, but there may also be Mozilla Firefox, Google Chrome, Apple Safari or Opera). In the address bar we indicate the IP address of the router, which is usually indicated on the bottom of the router: http://192.168.1.1
To enter the router configurator, use Username, usually, admin And Password – admin, but it’s better to check the information on the bottom of the router or in the instructions for use.

Step 2. If your provider provides you with Static IP address and exactly 192.168.1.1 , which matches the IP address of the router, in this case you should enter the section “ LAN"and change the router IP address to 192.168.100.1 , then press “ Apply"and reboot the router:

Step 3. After changing the address, you can begin the basic configuration of the router. On the page in the section " WAN» from the list, select your operator’s protocol and specify the IP address parameters WAN:


According to Figure 6, you can change the network name default whatever you like. We choose encryption in order to protect our home network from connections from inquisitive neighbors :) WPA-PSK TKIP - reliable encryption that will ensure our security. All you have to do is come up with and indicate a password in the “ WPA Preshared Key", remember it and write it down in your notebook.
Step 6. Click " Apply", after applying the network parameters, click "", then " Exit»
After the reboot is complete, our router is ready for service.
WHEN SETTING UP YOUR WIRELESS NETWORK, THINGS TO BE CONSIDERED:
- We recommend changing the Wi-Fi signal broadcast channel from automatic selection to a specific one, for example, 6 or 9 .
- To achieve maximum data transfer speeds over the network, do not use encryption types
Asus is a manufacturer of high-quality electronics, including routers for Internet access.
The Asus modem RT-G32 is recognized as a classic budget model.
This device is sold at any electronics store. It is inexpensive, which is why it is one of the best-selling modems. For a professional, setting up an Asus RT router takes about 10 minutes. For beginners, convenient instructions have been compiled, thanks to which Asus can easily and quickly prepare itself for work.
Technical characteristics of the Asus RT wireless router:
- Type – WiFi access point.
- The communication standard is 802.11n, the access point is on the usual frequency of 2.4 GHz.
- Connection speed 150 Mbit/s.
- Encrypted with WEP, WPA and WPA2.
- Power 18 dBm.
Appearance Asus
 The G32 has a sleek, modern look and can be mounted on a wall or flat surface. RT-G32 is available only in white. On the front of the Asus there are power indicator lights, as well as wireless and global network lights. On the back panel of the G32 there are reset buttons, starting a WiFi connection, connectors for connecting network devices, and a power supply. The RT-G32 router is equipped with one external non-removable antenna. The dimensions of the Asus device are 110 x 33 x 167 mm.
Connection and preparation for work
The G32 modem comes with all the necessary elements for connection: a network cable for connecting to a computer, a power supply, the router itself, connection instructions and an installation disk. 
To install the RT-G32 router, you need to complete several steps:
- Connect Asus to the power supply and plug it into the network.
- Connect the Ethernet cable to the WAN connector.
- Connect the network card to the LAN1 port on the modem using an Ethernet cable.
- Perform a factory reset by clicking Reset.
Using these points, the path is implemented: “Internet - Asus Router - Computer”.
Settings
To work with the Asus modem, you need to configure the computer card. For this:

Automatic setup
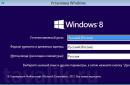
The G32 is configured via a Russian-language web interface. First of all, enter the IP address in the browser: 192.168.1.1, then press Enter. The windows that appear require you to specify a username and password. By default, in both cases, the word admin is entered for Asus devices if the login/password has not been changed. In the latter case, the changed data is indicated. 
A window will appear on the monitor where the interface language is set at the top of the page.
Connecting to the Internet manually using the example of some providers
 The Internet connection is the main part that allows the modem to receive and send traffic. For correct adjustment, you need to carefully read the general information. Each of the existing providers uses one of several types of connection:
- PPPoE.
- L2TP.
- DHCP.
This data is indicated in WAN (first menu item). After authorization, the next steps are identical. General operating algorithm – WAN; Internet connection (here you must indicate the type of connection). Next you need to follow the instructions. If you do not know any information to fill out, you should call your provider.
 "Dom.Ru", "Rostelecom"
To configure these providers in the WAN, you need to specify the following parameters:
- Select PPPoE connection type.
- Set up automatic acquisition of an IP address and automatic connection to DNS.
- Specify the login and password issued by the provider.
- In the “Hostname” field, enter rostelecom.
- Click "Apply".
 "Beeline"
The Beeline provider uses an L2TP Internet connection. To connect G32, fill in the following items:
- Automatic IP acquisition.
- Enter the login and password issued by Beeline.
- In the “Service Provider” line, indicate tp.internet.beeline.ru, duplicate it in the “Host Name” (these items must be specified).
- Click the “Apply” button.
NetByNet
The Asus router model RT-G32 is connected to NetByNet via PPTP (VPN). There are two connection options: with automatic local IP and with static local IP.
 For automatic IP:
- Automatic IP acquisition.
- Automatic connection to DNS.
- Login and password from the provider.
- The “Server” field for the service provider is filled in.
 With static IP:
- The communication technology is indicated: WAN, Internet settings, connection type.
- "No" for automatic IP.
- The required IP address is indicated.
- Subnet mask.
- Gateway.
- Servers 1 and 2 DNS.
- Login and password.
- Fill in the “Server” HeaRT-Beat or PPTP/L2TP(VPN) items.
 To configure WiFi, you need to open the “Wireless Network” tab and set the following arguments in it:
- Enter the Wi-Fi network name in the SSID field.
- To protect access to the “grid”, enable “Hide SSID”, in which case the name of the access point will be known only to those in the know.
- Select WPA Personal from the Authentication Method menu. In the “Encryption” line, select TKIP. These methods of protection are currently the most modern, reliable and widespread.
- In the “Pre-shared key” line, specify the password for authorization on the network. The combination must contain at least 8 characters using any symbols. It is recommended to set a password that is difficult for third parties to guess. In this case, there will be maximum protection against hacking for fans of free Wi-Fi. At this point you can change your password in the future.
- Click "Apply".
When the adjustment is completed, you need to reboot Asus and check the router's connection to the network.
Setting up Asus RT in repeater (repeater) mode
A repeater is a device required to increase the range of a network. Many modern modems are capable of operating in repeater mode. You can configure it for Asus by following the algorithm:
It is important to note that in repeater mode it is impossible to change the values at address 192.168.1.1. This is due to the fact that the G32 router assigns a certain IP address to the repeater. There are three ways to access the Asus control panel:
To return the repeater to normal operation, you need to go to the “Administration” tab, select “Wireless Router” and click “Save”. The window indicates the new network name and password, after which the Asus RT-G32 will reboot.
IPTV
In the additional settings of the G32, access to IP television is established. In the WAN menu, select the port to which the TV is connected, set a dynamic IP address. These changes must be saved by clicking the "Apply" button. 
Then turn on the TV and check its functionality. If the image is not visible, it means:
- The provider does not provide such a service.
- The Asus G32 modem settings do not match the TV settings.
- Requires a special connection type.
DHCP
This technology does not require any additional data; the only point is to indicate the connection. To do this, go to the WAN and select the “Dynamic IP” connection type. 
Security Settings
The Asus RT router has additional security features:

This data allows you to work safely on the Internet and implement parental controls.
Setting up the printer
There is no direct connection to the printer for the G32; connection is only allowed through network printers with IP.
Setting up DLNA on the router
DLNA provides access to audio, video and photo files for a TV that supports this server. If the model has a USB connector, then you need to connect a storage device to the USB connector, which will be accessed from the TV. Then you need to go to the settings of the Asus G32 router at 192.168.1.1, specify the username and login. In the “General” menu, select “USB Application” and then “File/Media Server”. 
In the “Media Server” item, set the On switch next to the Enable DLNA Media Server item. After that, click the “Apply” button. 
To enable access from a computer, smartphone or other device, go to the “Network Neighborhood” tab, set On next to “Allow sharing of a resource”. After these steps, the drive connected to the Asus G32 will appear in the “Network” window in Explorer.
Basic mistakes when setting up the RT-G32 router
If the RT-G32 does not work after setting the settings, the following problems may be the cause:

If the problem cannot be solved by these methods, you should contact the technical support of your Internet service provider.
Firmware update via web interface
Firmware is a program downloaded from the official website that is responsible for the functionality of the device. Older Asus routers do not comply with the latest version of the program, this should be taken into account when downloading.
To flash an Asus device, you need to download the file with the program, install and run it. Then go to the router menu in “Administration” - “Firmware update”. In the field that appears, the address with the downloaded firmware is indicated. Then click the “Submit” button and the device will begin flashing. The Asus router will update itself and reboot. If the Asus RT does not reboot, you should do it yourself. Setting up the G32 after the update will require repeated steps. 
When purchasing a new G32 router or experiencing problems, it is recommended to reset the settings to factory settings. To do this, the Asus router has a “recessed” Reset button, which must be pressed with a pin or wire and held for 10 seconds. 
You can also reset the settings through the Control Panel. To do this, enter: 192.168.1.1 in the address bar of the browser, go to the “Administration” tab - “Manage settings”, click the “Restore” button and Ok. The factory reset will begin, you need to wait until the recovery process is complete. 
Sometimes the installed settings may fail. This happens accidentally or due to a bug in the G32 router firmware. In order not to re-enter the configuration data, you must use the recovery function. To do this you need:

Conclusion
"Asus" is a simple and inexpensive device for connecting to the Internet. Setting up the Asus RT-G32 router according to the instructions and connecting to the “global network” is quite simple. The web interface is made in Russian and has an easy, intuitive menu. Asus RT is a good option for home use with average Internet speeds. For high speeds, it is better to choose a more professional device. Compatible with many existing Internet providers.
Pros of Asus RT
The G32 device has the following advantages:
- Easy to use.
- Low cost.
- Availability of security settings, including protection against Internet attacks.
- Friendly interface.
- Internet TV support.
- Sold in any store, since RT-G32 is a common modem.
Cons of RT-G32
The main disadvantages of the RT-G32:
- Not suitable for high speed connections.
- Small coverage area, which leads to low Wi-Fi power.
- No power button.
- The device may overheat.
The RT-G32 router allows you to create up to four WiFi networks simultaneously. As with other Asus router models, the connection is configured through a web interface that can be opened in any browser. A large number of adjustable parameters and wireless network speeds of up to 150 Mbps make the Asus RT-G32 suitable not only for home but also for office use.
Login to router settings
The standard IP address where you can access the Asus RT-G32 control panel via a browser: 192.168.1.1. To authorize, you will need to specify the username and password of the router. By default this is admin/admin, but if someone has previously configured the router, they may have changed this information. In this case, it is recommended to confirm the new login and password with the person who set up the device.

Advice! If you are unable to find out the changed account settings, use a reset. This is done by long pressing the “Reset” button on the back of the router.
The control panel home page contains a menu, a quick network map, and access to quick changes to basic settings. Using them you can:
- Change SSID (WiFi name).
- Limit the maximum WiFi speed.
- Turn the radio module on or off.

Changing Internet settings on RT-G32
To configure the Internet, open the “WAN” tab in the left menu. At this stage, it is advisable to have access to information about your connection that is provided by your provider. Depending on the technology used, this may include the IP address, subnet mask, DNS server addresses, and account login information.
Select your WAN connection type from the first drop-down list. When using IPTV, mark the port to which the equipment that provides digital television is connected. It is recommended to leave the “Enable UPnP” parameter unchanged (set to “Yes”). It makes it easy to add new network clients.

To automatically connect to domain name servers, select the “Yes” option in the appropriate item. Below, enter the IP of the primary and backup DNS servers. Enter your account details if the connection type you are using requires them to be entered. The remaining settings of the Asus RT-G32 router for a specific provider can be clarified on the website of the company providing Internet access.

Note! You can use the addresses of Google Public DNS or Yandex DNS services as DNS servers.
Training video: Some nuances of setting up the Asus RT-G32
Additional router settings
You can configure WiFi on the Asus RT-G32 router in the “Wireless Network” tab. In the “SSID” field, enter the desired name of the wireless network. The network can be made hidden by checking the “Hide SSID” checkbox. The optimal encryption method is “WPA2-Personal” protocol, “AES” type. The WiFi password is specified in the “WPA Pre-Shared Key” line.

Important! 1.
The ASUS RT-G32 router is configured and works in the freedom network if the firmware version V3.0.2.1 Ru09 is installed on it; problems arise with other firmware, up to the inability to save the settings made.
2.
Unfortunately, this router does not support WAN connection speed switching mode. Therefore, there may be problems due to speed mismatch with devices where the speed is forced to 10 Mbps.
After connecting the cable entering your apartment to the access point, you need to make initial settings on your network card. To do this, you need to go to the properties of the network card, then to the properties of the Internet protocol TCP/IP and set the parameters according to the picture:
We will configure the router and the wireless network properties in the router through the device’s web configurator. To set up Wi-Fi for the first time, connect to your router via an Ethernet cable. Launch Internet Explorer and type 192.168.1.1 in the address bar.

Attention!! For the IPTV+Internet connection to work correctly, the router must be configured using the PPTP protocol.
Next, go to the Internet connection tab, WAN item. Here you need to set the following settings:
1) WAN connection type: PPTP
2) Take the IP address, mask and gateway address from the subscriber’s registration card or check with technical support. (Example: IP Address - 10.0.x.x; Subnet Mask - 255.255.255.192; Default Gateway - 10.0.x.x)
3) Connect to the DNS server automatically? – No
DNS server1: 195.98.64.65 DNS server2: 195.98.64.66
4) User name - Your login (account name)
5) Password - Your password
6) pptp server: l2tp.freedom
Next, click Apply.


Next, go to the LAN – Route tab.
To watch IPTV TV shows, set Enable multicast routing? to position Yes
Apply to routing table? (Enable static routes?) – Yes
Then we enter a permanent route. To do this, we sequentially enter in Network/Host IP – the IP address (according to the figure), in Netmask – the mask (according to the figure), in Gateway – your gateway, Interface – “MAN”. After entering the first line, click Add (the line will be added to the Static Route List) and enter the second line in the same way, then the third. Then click Apply.

Then go to the Wireless Network - General tab.
To ensure a secure wireless connection in your router, specify the following settings:
SSID - HOME
Channel – 10
Wireless Mode – 54G Only
Authentication Method – WPA-Personal
WPA Encryption – TKIP+AES
WPA Pre-Shared Key - Enter an encryption key between 8 and 63 characters. The key used will need to be specified when clients connect to the access point.
WEP Encryption – None
Key Index – Key2
Network Key Rotation Interval – 0
Then click Apply.

Now you need to set up a wireless network connection on your computer. To do this, go to the Start menu/Control Panel/Network Connections. Right-click on the network card (“Wireless Connection”) and select “Properties” from the context menu.

Use the scroll bar to select “Internet Protocol (TCP/IP)” and click the “Properties” button.