Installing Windows 7 from a USB flash drive It doesn’t work, help, I looked up everything I could on the Internet, DVD drive I don’t have one, I live in the area, I have no one to ask for advice and I need to prepare for exams, I wrote to everyone, no one answered me.
That’s it, no more, no less, let’s try to help, and the most impatient can read at the end of the article the advice that helped our girl install the operating system.
Installing Windows 7 from a USB flash drive
Let's start at the very beginning of why you and I might fail.
- Firstly, it is difficult to understand the girl, she does not have a DVD drive, it may not be in the netbook, almost all netbooks support booting from a USB device and she simply cannot change the boot priority from the hard drive to the flash drive, then read our articles and another one. Or she has a simple computer without a disk drive and the motherboard installed in it does not support booting from a USB device, but let’s hope that it’s not so tragic.
- I once observed how a user without proper experience... installed Windows 7 from a flash drive to your netbook. He suffered failure after failure, as it later turned out due to an incorrectly prepared Windows 7 distribution kit on his flash drive, read how, which details how to prepare a distribution kit with Windows 7 on a flash drive in nine simple and free ways.
- Use only original builds of Windows 7 from Microsoft, and you will get rid of many problems, it could also be the flash drive itself, if it is many, many years old, try replacing it. The process itself installing Windows 7 from a USB flash drive, no different from usual, let’s take a look at our article.
- Try also changing the USB port into which you insert the flash drive; it is advisable to use the one located directly on motherboard, read
- The flash drive must have a capacity of at least 4 GB; all your files from it must first be copied to a safe place, because it will be formatted.
You should also prepare your netbook for installing Windows 7 from a flash drive, from the partition on which you will install the operating system, you also need to copy all the data to a secluded place, it will be formatted like the flash drive. - Friends, if you have new computer, laptop, netbook with USB ports 2.0, as well as USB 3.0 and you decide to install Windows 7 on it from a bootable USB flash drive, then you need to know that you need to insert the flash drive into USB port 2.0, since Windows 7 does not support USB 3.0 (ports are usually colored blue). If you insert a bootable USB flash drive into a USB 3.0 port, then Windows installation 7 will end with this error.
"The required driver for the floppy drive was not found optical disks. If you have a floppy disk, CD, DVD, or USB flash drive with this driver, insert this media" - You may also be interested in our other interesting articles: and.
And finally, a method for creating a bootable USB flash drive with Windows 7 in just four steps from Microsoft, the Windows 7 USB/DVD Download Tool, this method is not in the article on our website “How to Make a Bootable Windows flash drive 7".
Download the utility from the direct link Windows 7 USB/DVD Download Tool; by the way, it can also create an installation DVD.
Requires Microsoft . NET Framework 2.0 (download)
Launch the program, then click Browse and specify the file ISO image and Windows 7
Now you can independently install Windows 7 recorded on a USB flash drive. Just follow the step by step instructions. From the procedure Windows 7 installations, professional work with a computer begins. It is assumed that the installation will be carried out with flash drive. Flash drive or HDD, to install a boot image of Windows 7, must be at least 8Gb in size.
Steps to install Windows 7 from a USB flash drive
Download the latest version of the Windows 7 operating system maximum
At the moment, Windows 7 maximum x64 is one of Microsoft’s successful developments, along with the almost retired XP and the increasingly popular Windows 10. It is stable and ready to fulfill user requests of any complexity. On this moment Windows 7 holds first place in terms of the number of downloads and users.
To create a flash drive with an image of Windows Seven, we recommend using the official utility from the corporation that produces and maintains the Windows OS.
Advantages Windows Utilities 7 USB DVDs
1. Simple and intuitive program interface
2. Designed specifically for creating boot images Windows Seven operating systems
3. Completely free utility only 2.6 Mb in size.
How to create a bootable USB flash drive with Windows utility 7 USB DVD:
Download the utility from the official website using the link above. Install Windows 7 USB DVD on your computer following the installation wizard. And we launch the utility about Microsoft. In the main program window that launches, you need to select an iso image, we see two buttons for creating bootable Windows 7.
- The first button is “Browse” for browsing and selecting an iso image of Windows 7 x64.
- The second and last button is “Next” to go to the next menu.
And so we select the downloaded system image and press the button number two (Next) 
In the next window you need to select the media type for the image and there are already three buttons:
- "Start over" to go (return) to the previous menu, to select the Windows Seven installation image.
- « USB Device» to go to selecting a flash drive or portable hard drive, where the image will be installed.
- "DVD" to go to select clean DVD disc, where the system image will be installed.
We are interested in button number two "USB Device" click and move on to the next step. 
Insert a portable hard drive or flash drive into USB input on the computer. All information from the USB drive during Windows boot to the flash drive, it will be permanently deleted!
Select the drive defined by the system and click on the button "Begin Copying" to start copying Windows files to a flash drive. 
In the next window, the Windows 7 USB program asks for permission to format a flash drive or portable hard drive. We agree and click “Erase USB Device” to delete all information from the flash drive. Having formatted the flash drive, the installation of the bootable Windows Seven OS will automatically begin. After successful completion of copying Windows files, the program will remind you of this in the next window with the message Bootable USB device created successfully
Close the program with the “Close” button in the upper right corner. Bootable USB flash drive with Windows 7 is ready.
Changing BIOS settings to select boot from a flash drive
In order for the system to boot from a flash drive, you need to set it to BIOS parameter priority launch from external storage. To do this, when you restart the PC, at the moment when lines with information about technical specifications computer, press the Delete and F2 keys repeatedly. Other options for key operation are also possible, for example on different laptops you need to press the Win+F12, F10 buttons. The result of pressing the correct key will be the appearance of a window. 
After that, in the menu that appears, you need to look for the “Boot” option, which changes the boot priority of the operating system. The word can serve as a guide "Boot". The boot device is selected using the Up/Down arrows on the keyboard. The first position is placed on the Flash drive with the name of the flash drive on which you installed Windows Seven, and by pressing the F10 key you must exit the BIOS, answering “OK” (“YES”) to the question about saving all changes “save configuration and exit?”  At this point, work with the BIOS is completed, and if everything was done correctly, and the flash drive with the operating system to be installed is inserted into the USB drive, then after rebooting the PC the following window will appear.
Installing Windows 7 from a USB flash drive with boot via BIOS

Here you need to press an arbitrary key, which will start the installation process.
In the next dialog box, select the system language. By clicking the “Next” button, select “Install” in the next window.


Then you should check the box next to the line indicating acceptance of the terms of the agreement, and click on the “Next” button. In the next interface window, make a choice - “full installation”.


Then you will need to select the partition in which to install the system. By clicking the mouse, you select the desired partition, and then click the “Settings” link, clicking on which will open a window with disk partitioning tools, where you should click the “Format” link. This action will result in a warning.
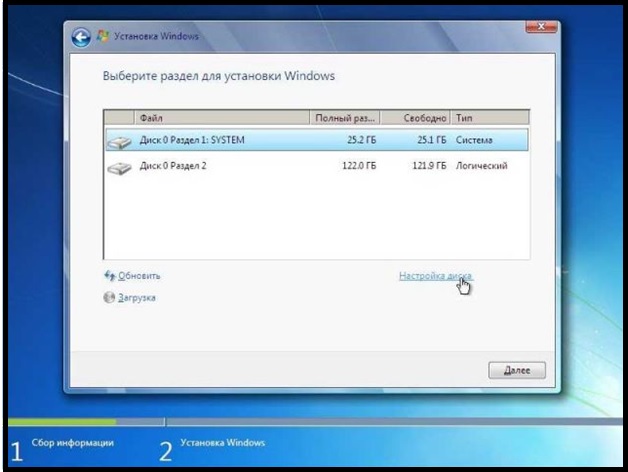


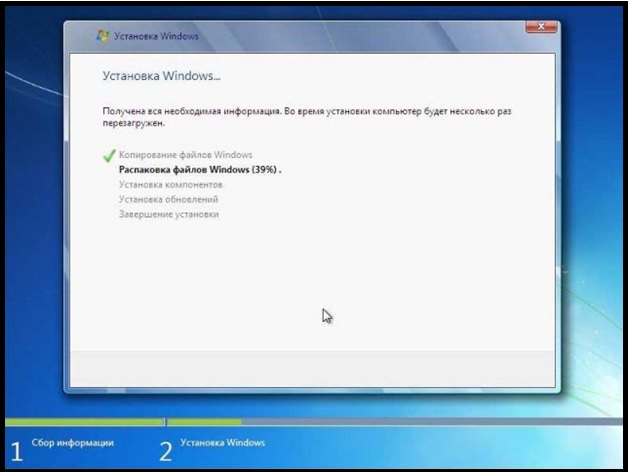
After confirming your choice by clicking the “OK” button, the process of formatting the logical partition will begin, upon completion of which you will return to the last window. Clicking on the "Next" button initiates the unpacking process installation files, followed by their installation. The installation progress can be observed by the filling of the green bar at the bottom of the window, as well as by the green checkmarks appearing next to each line at the top of the window. After installation is complete, a message will appear indicating a reboot, which can be done immediately by pressing the corresponding button or waiting for the automatic reboot after 15 seconds.
IMPORTANT POINT!
When you restart the PC, you need to enter the BIOS again and change the initial boot from the flash drive to “Hard Disc”. And save the changes, otherwise the installation will start from the very beginning.

At the end of the installation, the system will ask:
Enter your username and PC (you can come up with anything you want)

Generating a password for an account

Operating system activations

Selecting a security mode

Date/Time Settings

Select an option network connection. The last window will only appear if there is an active network connection.

After which a user profile is created and the desktop is loaded

Activating Windows 7 using an activator
If you don't have a key windows activation 7 download the activator (archive password: 1111)
Step-by-step installation of Windows 7 from a flash drive!
Are you planning to install Windows 7, but your DVD drive refuses to work? Or do you not have one at all, since you use a netbook? Indeed, the situation is not pleasant, but there is no need to despair. A great way to get out of this situation is installing Windows 7 from a USB flash drive.
Please note that for the installation process you will need:
- Flash drive, the volume of which must be more than 4GB.
- ISO image with Windows 7.
- Windows 7 USB/DVD Download Tool 1.0.
For simplicity, we will conditionally divide the entire process of installing Windows 7 into several stages:
- Creating a bootable USB flash drive.
- Installation of the operating system.
Go to the “Start” menu, select “Control Panel”, then click on the item “ Accounts Users and Family Safety”, and lastly, select “User Accounts”. Here we click “Change User Account Control settings”.

Move the slider to the very bottom, then click OK.

We confirm our decision by clicking Yes.

Congratulations, you have completed the first stage - disabling User Account Control.
2. Creating a bootable USB flash drive
There are several ways to install the Windows 7 operating system. Installation from a flash drive using Windows program 7 USB/DVD Download Tool 1.0 – the simplest and fastest. Connect the flash drive to the computer, having first copied all important information from it. Next, launch the USB/DVD Download Tool and click Browse.

Select the operating system ISO image and click Open.
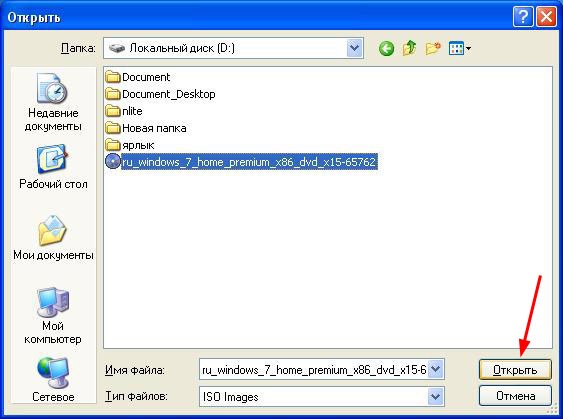
After you have specified the ISO image on your computer, click Next.

Click USB device.

In this window, select the connected flash drive and click Begin copying, which will start the copying process.

Click Erase USB Device to format the flash drive.
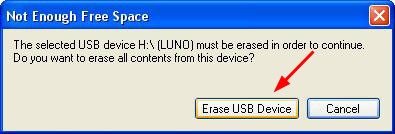
Click Yes to confirm your decision.
The process of writing the image to the flash drive has begun.

Once recording is complete, Backup completed will appear. You can safely close the program.

That's all. You created a bootable USB flash drive yourself. As you can see, installing Windows 7 from a flash drive is not at all difficult if you follow these steps.
Before you start installing Windows 7, you need to set the flash drive to first place in the boot priority in the BIOS. To get to the BIOS menu, you need to start a specific key when you boot your computer. This could be Del or F2. When loading, you may see this prompt at the bottom of the screen:

In Bios, look for the Boot tab. Here, in the boot order, you need to put the bootable USB flash drive first. To do this, use the arrow keys, as well as F5 and F6. Use the arrow keys to select the flash drive, and use the F6 key to bring it to the first position. Next, save your changes and exit this menu by pressing F10.

A window will appear where you need to click Yes, confirming your intentions to put the flash drive first in the boot order. If you did everything as described here, then after restarting the computer, the installation of Windows 7 from the USB flash drive will begin.

Select the basic installation options and click Next.

Click Install.

We agree with license agreement by checking the appropriate box. Click Next.

At this point, you will be offered several installation types. We recommend choosing the full installation.

Here you need to specify the partition (disk) on which Windows 7 will be installed. Please note! Do not install the operating system on hidden sections, if there are any.

After selecting the partition where you plan to install the OS, click Disk Setup.

Click Format. Note! Formatting will permanently delete all data on this drive.

If there is no important information, feel free to press ok.


The installation of Windows 7 from the USB flash drive will begin.

If all files are copied, the computer will reboot for the first time. If you don't want to wait for the 10 seconds to pass and the computer to restart itself, click “Restart now.” During the reboot, be sure to return the hard drive to first place in boot priority, otherwise you will start installing the OS again.


Here you need to enter your Username and Computername. Let's move on.

If you wish, you can set a password for your account.

Enter license key in field. Please note that you can enter the key after installing the system. Click Next.

Here we specify the security settings.

Enter the Date and Time.

Specify network settings.

If you followed these steps, then you will see this image, which indicates that the installation of Windows 7 is complete, with which we congratulate you!

Video tutorial on installing Windows 7 from a flash drive
Write in the comments below if something doesn’t work out for you or if you have any difficulties - we’ll figure it out together!
The next article will be about how to burn and install Windows 7 from a flash drive. This is a really relevant way to install today Windows 7, since it’s much more convenient with a flash drive than with a disk. In order to install Windows 7 from a flash drive First you need to create a bootable flash drive from which we will install the operating system.
To create a bootable USB flash drive we will need:
1. Image of the operating room Windows systems 7
2. Flash drive at least 4GB
3. Windows 7 USB/DVD Download Tool, download.
Create a bootable USB flash drive:
1. Format the flash drive. Be careful, as formatting will delete all data from the flash drive. Go to “My Computer”, right-click on our flash drive, select “Format” and where the file system is, select NTFS and click “Start”
2. Launch the Windows 7 USB/DVD Download Tool program.
3. Click on “Browse” and Select the disk image. I will say that it doesn’t have to be Windows 7, XP is also possible.


5. Select the flash drive you want to burn Windows 7 to and click “Begin copying”

6. That's it, all that remains is to wait until the creation of the flash drive is completed to install Windows 7.
Now you will always have a flash drive with which you can install the operating system. All new computers support installation from flash drives, you just need to select a special boot item in the BIOS.
We will look at two methods of recording an image Windows 7 to a flash drive
- Write an image to a flash drive using Ultra ISO.
- Write an image to a flash drive using tools command line.
This article only discusses how to burn an image to a flash drive.
- detailed instructions For installation instructions, see this article: Installing Windows 7.
- How and where to download the image legally is described in the same article, in the chapter on how and where to download the original image of Windows 7 64 or 32 bit.
If you are not sure how many digits Windows version 7 (32-bit ( x86) or 64-bit ( x64)) you will need for the upcoming installation, then you can learn more about the difference between Windows 7 x32 and Windows 7 x64.
Before you begin installing the operating system, you must determine what type of media you will be installing from. IN Lately this question becomes especially relevant, since in the market computer equipment compact ones have become widespread Netbook"and not equipped optical drives, and flash-large-capacity drives that have become so popular and at the same time cope well with the task of a boot disk for the operating system.
If you have it on hand flash- storage (4 GB capacity , because The installation image takes about 2.5 GB), then after carefully studying and following the steps described in this article, you can install the operating system using flash- drive like boot disk. This does not require any additional software: everything will be done using the command line and the mounted image Windows 7. At all installing Windows 7 from a USB flash drive- faster (albeit a little more complex option).
Burning an image to UltraIso on Flash
After you have received the image with Windows 7 you need to record it on some medium. The question arises "How to do it?".This article will tell you how to burn an image to a flash drive ( USB-Flash or HDD-Flash) using the program UltraIso.
Step 1. Let's install the program Ultra ISO(this lesson covers the version 9.31
, although there is no fundamental difference in other versions).
located at the end of the article, in the block Attached files.
 Figure 1. UltraISO installation wizard
Click "Further", simultaneously indicating the necessary installation parameters.
On the last window NOT uncheck the boxes “Associate .iso file with UltraIso” And “Install ISO CD/DVD emulator (ISO Drive)”.
 Figure 2. Additional tasks For UltraISO programs
Step 2. After installation, launch the program and select in the offer to register the product "Trial period", which will give us the opportunity to use this program for 30 days (which is quite enough to burn our image).
 Figure 3. UltraISO installation completed
Step 3. Before we begin manipulating our image, we need to insert into a free USB-output flash drive or external hard drive to which recording will be made.
Step 4. We open our image using "File - Open". Next we go to point "Boot - Write Disk Image (write disk image)".
 Figure 4. Burning a Windows 7 image to a USB flash drive
Step 5. In field Disk Drive you need to select your media (if several flash drives are inserted into the computer). Also check that the selected image in the line is correct "Image file". In line "Recording method" choose USB-HDD. When everything is selected correctly, you need to press the button "Record". Before the process begins, you will be asked: “Do you really want to continue the process? All information on the flash drive will be destroyed.". Check the contents of your flash drive, and if there is nothing important on it, feel free to click "Yes". Once the recording is complete, you will be notified that the recording was successful: "Burn successful!". Yours bootable flash drive ready.
Burning a Windows 7 image to a USB flash drive using the command line.
- So, to prepare the image, connect flash-disk to usb-port of your computer. Make sure that the flash-the drive does not contain the data you need because flash-the disk will be formatted.
- Now run command prompt Windows. You can find the launch shortcut at:
Start -> Programs -> Accessories -> Command Prompt.
You can also press the key combination "Windows + R", then in the window that opens "running the program" you need to enter the name of the program "cmd" and press "Enter". - Now in the command prompt window that opens, run the command "diskpart". After this, the system disk management utility will launch. Using this program, we will clear the contents of the disk and create a partition on it. After this we can make it active, format it and write the contents of the image to it. Then all we have to do is place the bootloader files on the disk: after that, when loading the operating system, our flash- the disk will be defined as removable media– we can start the installation from there Windows 7.
After the system utility loads diskpart, you will see a prompt as a line DISKPART>.
Now you can proceed to executing commands.
Using the command "list disk" you can see a list of all drives of this computer(Figure 5).
 Figure 5. Preparing to install Windows 7 from a flash drive: creating a bootable flash drive
Now if you run the command "select disk number» , Where "number" is the number of the disk that is flash- drive, then we will choose this disk to apply all subsequent commands that we will enter when working with the utility diskpart.
As can be seen from Figure 1, in our case this will be the command "select disk 3".
But be very careful - you can select any hard drive and delete all data on it.
- Next we will delete all data and partitions on our flash- drive. To do this, run the command clean.
- The next action would be, using the command create partition primary create on flash- new partition on the drive.
- Let's select this section for further application of commands to it using the command select partition 1.
- Let's make it active using the command active.
 Figure 6. To format the disk, run the format fs=NTFS command.
Now all that remains is to initialize the disk connection using the command assign(an autorun window will open, as if we had just connected it to the computer flash- disk) and exit the utility using the command exit(Fig. 7).
 Figure 7. Initializing disk connection with the assign command.
The final step remains - we must copy the bootloader to flash- storage device.
To do this, mount the image Windows 7, which you want to install on your computer.
Now use the command line to navigate to the given (mounted) drive. After that go to the folder boot and run the command bootsect /nt60 K:.
note to the fact that instead of a letter "K" this command must contain the letter that was assigned to your flash drive when executing the assign command.
This command will run system utility bootsect with 2 parameters:
- the first one indicates the bootloader version OS (/nt60– parameter required to create a bootloader OS Windows Vista And Windows 7).
- the second parameter is the letter assigned to our flash- drive.
If you mount a 64-bit image Windows 7, then you will not be able to run bootsect if your operating system will be 32 bit - because this version bootsect is 64 bit.
Copying files to a prepared flash drive.
After the flash drive is prepared, the files are copied from the image:you can mount the image you have with the program DAEMON Tools Lite , and then copy all the files from the mounted disk to the flash drive.
Installation
Now if you restart your computer, then by going to BIOS, you can install your flash drive to boot and install from it Windows 7 (first boot device).You can now move on to the next chapter, which will go into great detail about further installing Windows 7.
Detailed instructions for installing Windows 7 are in this article: Installing Windows 7.
You can also pay attention to recording the image using the utility


