Crashes in Windows work, emergency shutdown of the computer power supply, experiments with software for managing disk space, consequences of virus penetration - these and other problems can lead to the automatic launch of the standard Windows utilities Chkdsk, designed to fix errors file system hard drives. Incorrectly completed job operating system with files leads to file system errors, and sometimes even to damage it altogether.
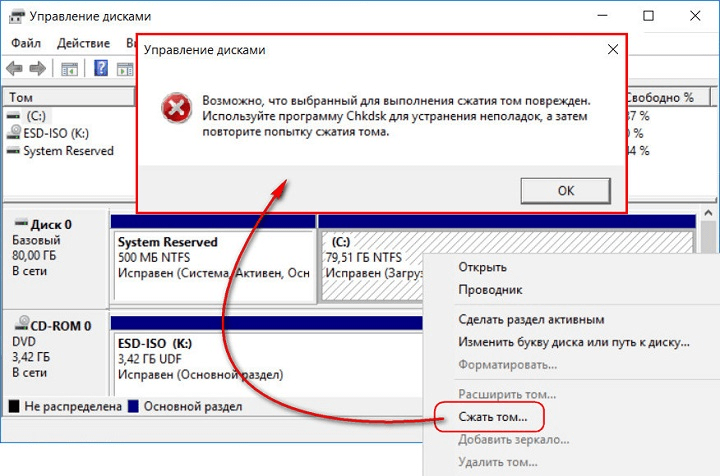
In case of emergency Chkdsk utility turns on itself before starting Windows, scans disk partitions and corrects errors. However, the fact that there are problems with the file system may not make itself felt during normal use of the computer and only become apparent when trying to manage disk space. So, for example, trying to reduce a disk partition with standard using Windows, we may receive the following notification: “It is possible that the volume selected for compression is damaged. Use Chkdsk to troubleshoot the problem, and then try shrinking the volume again."
In this case, disk check will not start automatically. How to run Chkdsk manually in Windows 7, 8.1 and 10? Like with using Chkdsk fix disk errors if this problem is the reason the operating system is unable to boot?
Inside Windows, the Chkdsk utility can be launched in several ways.
1. Run Chkdsk using Windows GUI
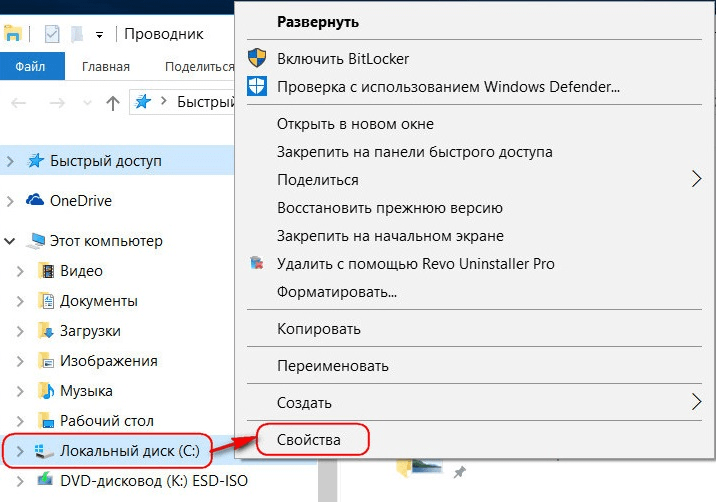
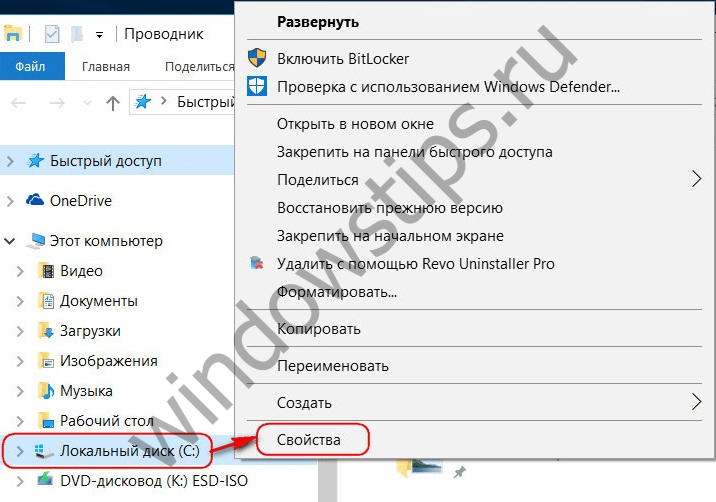
To run Chkdsk, in the system explorer on drive C, right-click and open “Properties”.
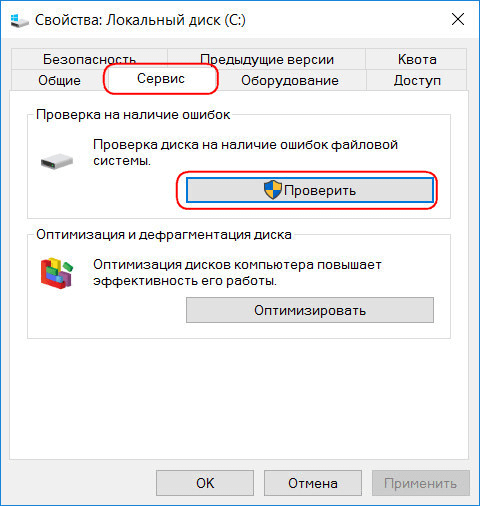
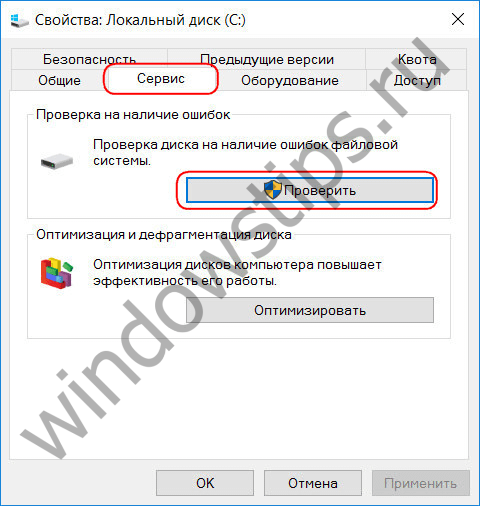
In the disk partition properties window that opens, go to the “Services” tab, and in it click the “Check” button (or “Run check” for Windows 7).
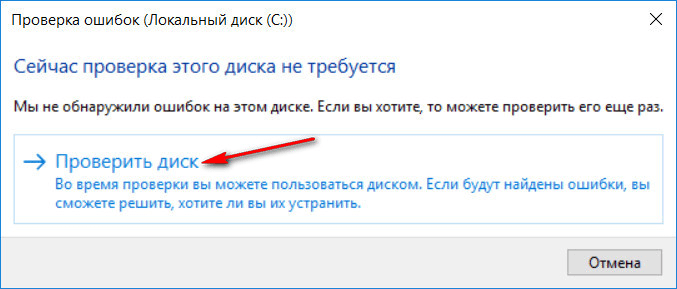
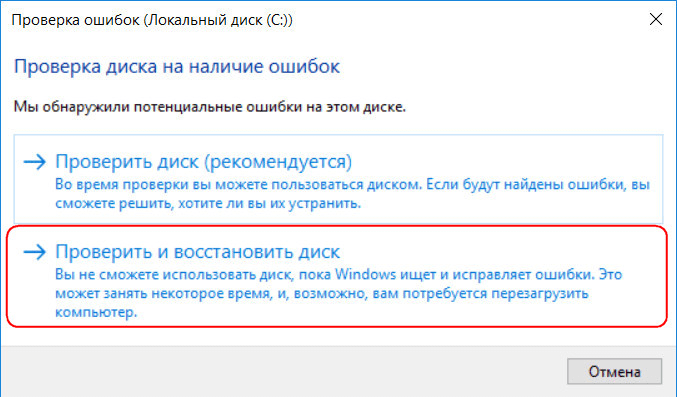
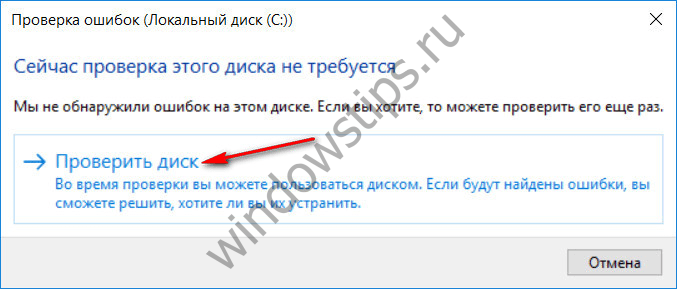
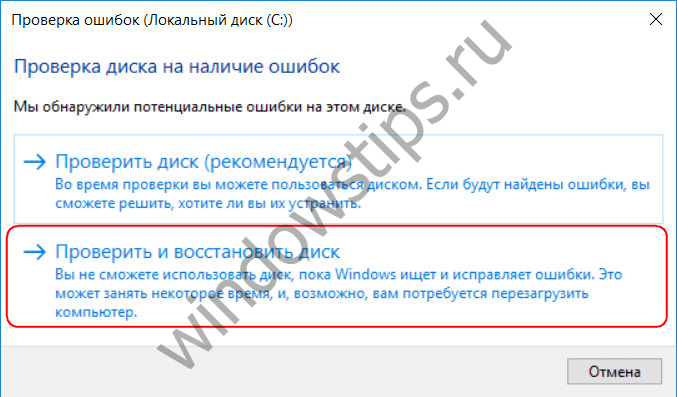
In versions of Windows 8.1 and 10, if everything is in order with the disk file system, in the window that appears next, we will see a notification that checking is not required. But if you wish, you can start checking the disk with the Chkdsk utility by clicking “Check disk”.
If the system suspects file system errors, this window will contain a button to start scanning and repairing the disk.
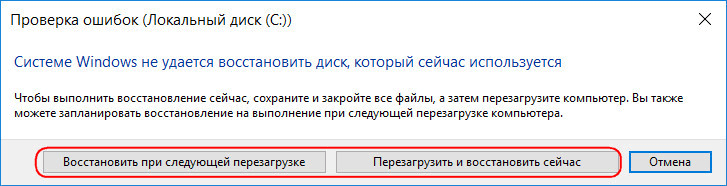
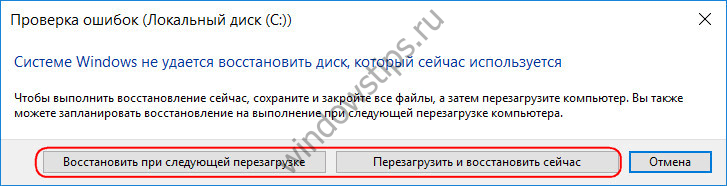
For Chkdsk to work relative to drive C, you must restart the computer. You can do this immediately or delay running the scan until the next reboot.
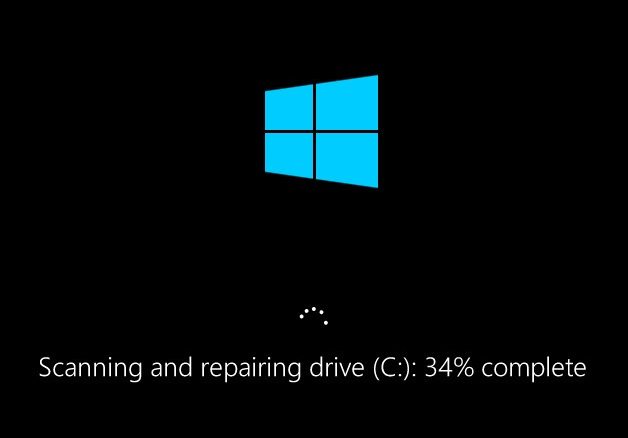
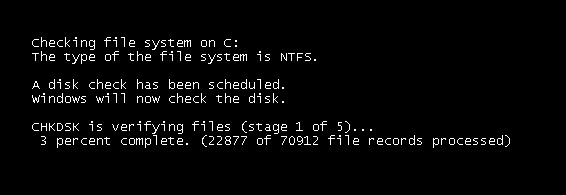
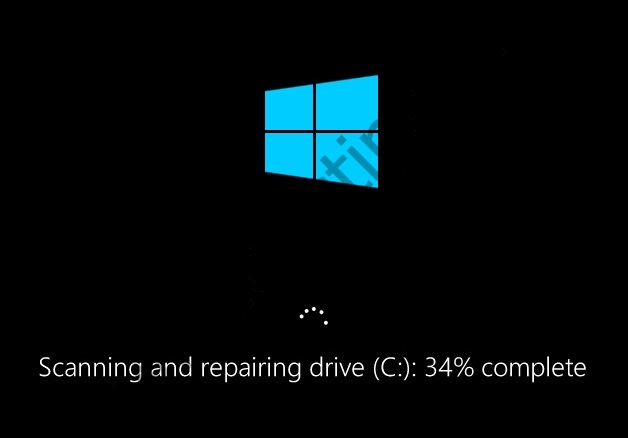
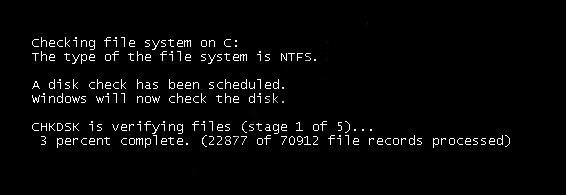
After restarting the computer, we will be able to observe the operation of Chkdsk.
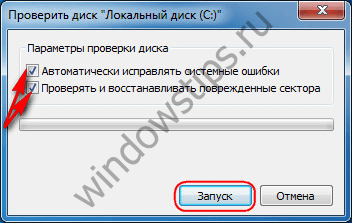
In Windows 7, starting Chkdsk is slightly different: to the preset option of automatic error correction, you can add another possible option - scan and repair bad sectors hard drive. When activating this option, it is worth considering that in this case Chkdsk may take longer to run.
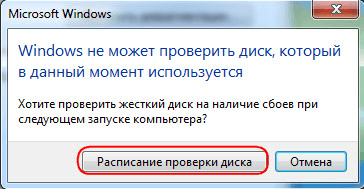
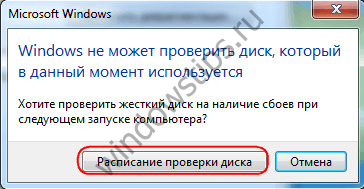
As with Windows 8.1 and 10, version 7 system disk C cannot be verified within a running operating system. To start the scan, the computer must be restarted. Click “Schedule disk check”.
When checking a non-system partition of a disk, if it is used by some programs, the situation is simpler than with the system partition. In a window with a notification that the disk is in this moment is used, you just need to click the “Disable” button to, accordingly, disable this section for the duration of the test.
2. Run Chkdsk using the command line
To run Chkdsk using the command line, first, accordingly, launch the latter.
IN command line enter a command like this:
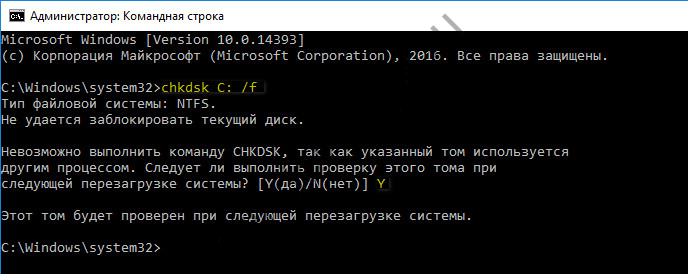
In this command, instead of drive C, we each time substitute the letter of the desired partition on which the scan is required. If Chkdsk should check system partition With, as when working with graphical interface, you will need to restart your computer. When a message appears in the command line about the impossibility of locking the specified drive, you need to enter “Y”, then restart the computer.

In addition to the /f parameter, which is responsible for correcting disk errors, Chkdsk can be run with the /r parameter, designed to search for bad sectors and restore data. As a result of Chkdsk running with this parameter, hard disk clusters with unreadable sectors will be listed as damaged (bad blocks) and their functions will be transferred to a new cluster. Therefore, it is recommended to run Chkdsk with the /r parameter only when the usual error correction - running the utility with the /f parameter - does not bring the necessary results. Using the same drive C as an example, the command would look like this:
3. Running Chkdsk on a non-booting Windows
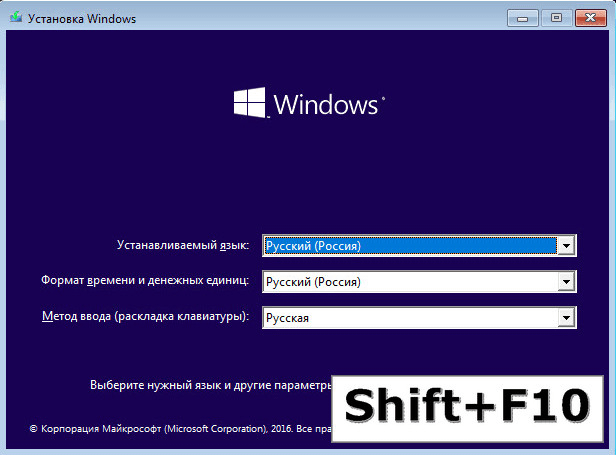
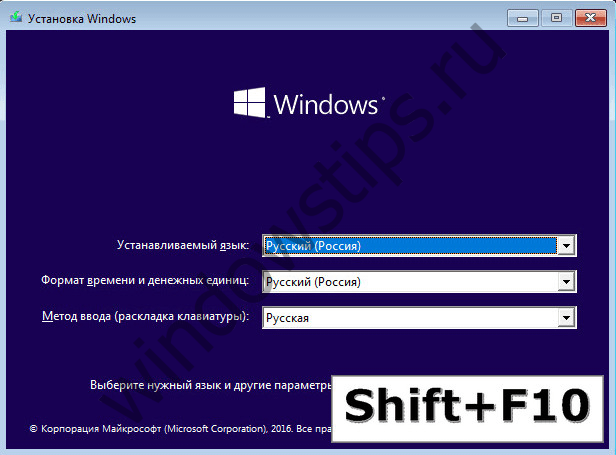
If Windows freezes at a certain point in the boot process, one of the possible reasons This problem is file system errors. In this case, you need to run Chkdsk by booting from the rescue media. As such, you can use the usual installation media With Windows versions 7, 8.1 or 10. With its help, we will launch the Chkdsk utility inside the command line. At the first stage of starting the system installation process, press the command line launch keys – Shift+F10.
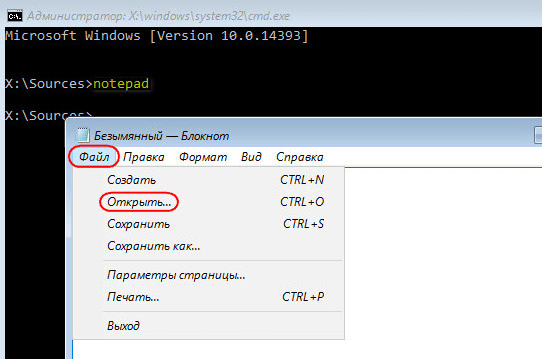
In the opened command line before starting Chkdsk commands It is necessary to clarify which letters define the disk partitions. This is easy to do using a notepad. I launch it with the command:
Click the notepad menu “File”, then “Open”.
In the explorer that opens, remember the new drive designations. As a rule, in Windows 8.1 and 10, the C drive partition (as it exists inside the running operating system) is listed as D, since the letter C is assigned to the first technical partition of the system. And all other sections are shifted by one letter of the alphabet.

Having decided on the letters of the disk partitions, close Notepad, then, returning to the command line, enter a command like this:
As with Chkdsk inside Windows, you must first try to fix disk errors by running the utility with the /f parameter. And only if the problem is not solved, only then run the command with the /r parameter, as indicated in the previous paragraph of the article.
In cases where Windows is unable to boot, you can pre-burn an emergency Live disk with a selection of various tools to restore the operating system. Among these, for example, is AdminPE based on WinPE. Its image for recording on a disk or flash drive can be downloaded from the official website of the project Adminpe.Ru. Using AdminPE, you can launch a command prompt and enter the Chkdsk launch commands discussed above. But in this Live disk, the Chkdsk utility has its own interface and is launched using a script. The shortcut to launch the utility is placed directly on the desktop.
In the drop-down list to check the disk, select the desired disk partition. Next, activate the checkboxes for restoring damaged sectors and forcibly disabling a partition (volume). Let's check the launches.
The AdminPE toolkit includes a number of other utilities for working with hard drives, as well as famous Hard programs Disk Sentinel and Victoria.
Windows malfunctions, emergency shutdown of the computer, experiments with disk space management software, the consequences of viruses - these and other problems can lead to the automatic launch of the standard Windows Chkdsk utility, designed to correct errors in the file system of hard drives. Incorrectly completed operation of the operating system with files leads to file system errors, and sometimes even damage to the file system. In emergency cases, the Chkdsk utility turns on itself before Windows starts, scans disk partitions and corrects errors. However, the fact that there are problems with the file system may not make itself felt during normal use of the computer and only become apparent when trying to manage disk space. So, for example, when trying to shrink a disk partition using standard Windows tools, we may receive the following notification: “It is possible that the volume selected for compression is damaged. Use Chkdsk to troubleshoot the problem, and then try shrinking the volume again."
In this case, disk check will not start automatically. How to run Chkdsk manually in Windows 7, 8.1 and 10? How can I use Chkdsk to fix disk errors if this problem is the reason the operating system is unable to boot?
Inside Windows, the Chkdsk utility can be launched in several ways.
1. Run Chkdsk using Windows GUI
To run Chkdsk, in the system explorer on drive C, right-click and open “Properties”.
In the disk partition properties window that opens, go to the “Services” tab, and in it click the “Check” button (or “Run check” for Windows 7).
In versions of Windows 8.1 and 10, if everything is in order with the disk file system, in the window that appears next, we will see a notification that checking is not required. But if you wish, you can start checking the disk with the Chkdsk utility by clicking “Check disk”.
If the system suspects file system errors, this window will contain a button to start scanning and repairing the disk.
For Chkdsk to work relative to drive C, you must restart the computer. You can do this immediately or delay running the scan until the next reboot.
After restarting the computer, we will be able to observe the operation of Chkdsk.
In Windows 7, launching Chkdsk is slightly different: to the preinstalled option of automatic error correction, you can add another possible option - checking and repairing bad sectors of the hard drive. When activating this option, it is worth considering that in this case Chkdsk may take longer to run.
As with Windows 8.1 and 10, in version 7 the system drive C cannot be scanned within a running operating system. To start the scan, the computer must be restarted. Click “Schedule disk check”.
When checking a non-system partition of a disk, if it is used by some programs, the situation is simpler than with the system partition. In the window with a notification that the disk is currently in use, you just need to click the “Disconnect” button to, accordingly, disable this partition for the duration of the scan.
2. Run Chkdsk using the command line
To run Chkdsk using the command line, first, accordingly, launch the latter.
In the command line enter a command like this:
In this command, instead of drive C, we each time substitute the letter of the desired partition on which the scan is required. If Chkdsk needs to check the system partition C, as with the GUI, you will need to restart the computer. When a message appears in the command line about the impossibility of locking the specified drive, you need to enter “Y”, then restart the computer.
In addition to the /f parameter, which is responsible for correcting disk errors, Chkdsk can be run with the /r parameter, designed to search for bad sectors and restore data. As a result of Chkdsk running with this parameter, hard disk clusters with unreadable sectors will be listed as damaged (bad blocks) and their functions will be transferred to a new cluster. Therefore, it is recommended to run Chkdsk with the /r parameter only when the usual error correction - running the utility with the /f parameter - does not bring the necessary results. Using the same drive C as an example, the command would look like this:
3. Running Chkdsk on a non-booting Windows
If Windows freezes at a certain point in the boot process, one of the possible causes of this problem is file system errors. In this case, you need to run Chkdsk by booting from the rescue media. As such, you can use regular installation media with versions of Windows 7, 8.1 or 10. With its help, we will launch the Chkdsk utility inside the command line. At the first stage of starting the system installation process, press the command line launch keys – Shift+F10.
In the command line that opens, before running the Chkdsk command, you need to clarify which letters define the disk partitions. This is easy to do using a notepad. I launch it with the command:
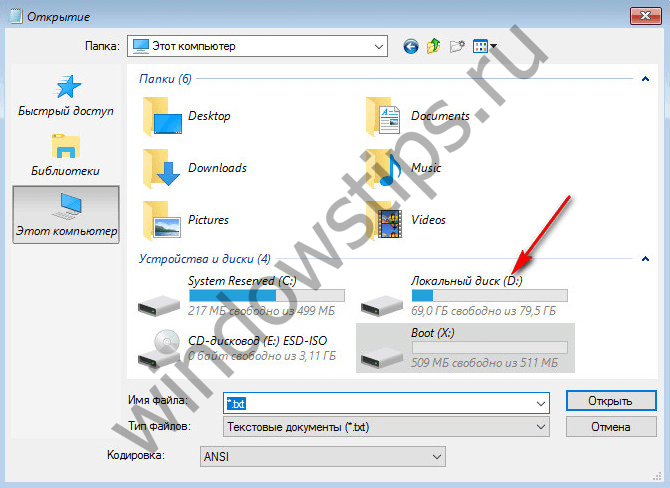
Click the notepad menu “File”, then “Open”.

In the explorer that opens, remember the new drive designations. As a rule, in Windows 8.1 and 10, the C drive partition (as it exists inside the running operating system) is listed as D, since the letter C is assigned to the first technical partition of the system. And all other sections are shifted by one letter of the alphabet.
Having decided on the letters of the disk partitions, close Notepad, then, returning to the command line, enter a command like this:
![]()
As with Chkdsk inside Windows, you must first try to fix disk errors by running the utility with the /f parameter. And only if the problem is not solved, only then run the command with the /r parameter, as indicated in the previous paragraph of the article.
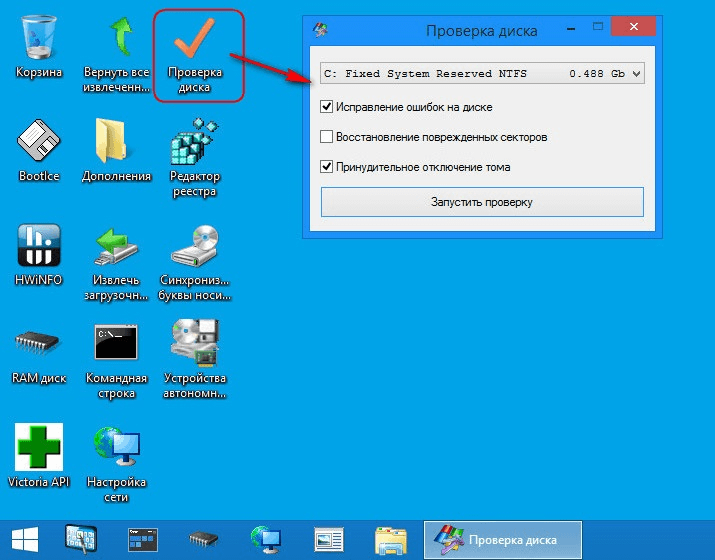
In cases where Windows is unable to boot, you can pre-burn an emergency Live disk with a selection of various tools to restore the operating system. Among these, for example, is AdminPE based on WinPE. Its image for recording on a disk or flash drive can be downloaded from the official website of the project Adminpe.Ru. Using AdminPE, you can launch a command prompt and enter the Chkdsk launch commands discussed above. But in this Live disk, the Chkdsk utility has its own interface and is launched using a script. The shortcut to launch the utility is placed directly on the desktop.
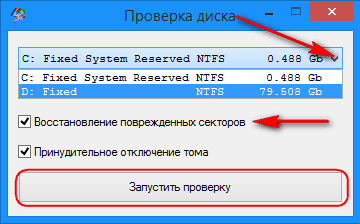
In the drop-down list to check the disk, select the desired disk partition. Next, activate the checkboxes for restoring damaged sectors and forcibly disabling a partition (volume). Let's check the launches.
AdminPE's tools include a number of other utilities for working with hard drives, as well as the well-known programs Hard Disk Sentinel and Victoria.
Have a great day!
Computer using standard program“check disk (chkdsk)”, included in operating systems from Microsoft.
I don’t know how it is at work or at home, but for our IT department, work increases immediately after a sudden blackout on one of the floors of our organization. I remember one time an electrician was changing the socket and, without being at all embarrassed, turned off all the automation on the staircase, and that was about fifty computers in one wing of the floor, two 50-port switches and wireless wifi access point in the wiring closet :)
And as winter approaches, such things, alas, happen more and more often (people begin to abuse heaters of all kinds and power). Operating systems really do not like such manipulations with energy supply, and not all user computers are equipped.
What usually happens is the following. After another similar mass blackout, there are always one or two computers on which, after the power supply is restored, . At an arbitrary stage of loading, the operating system goes into a cyclic “reboot” (reboots) and here our intervention is urgently required :)
In such cases, as a rule, you need to scan HDD computer with the check disk program, which checks the integrity of the OS file system and tries to eliminate any errors or inconsistencies found.
Let's first see how you can check your hard drive using a graphical Windows interface?
To do this, right-click on the icon the desired disk and select “properties” from the menu that opens. In the window that appears, go to the “Service” tab.
And there we click the “Run check” button.
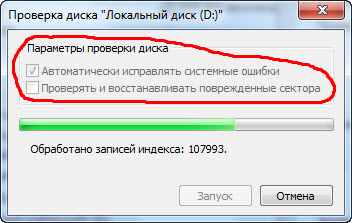
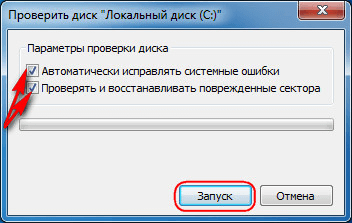
Under "Check Disk Options" we have two checkboxes:
- automatically correct system errors
- check and repair bad sectors
We can select any of them (or both) and click the “Launch” button.
This graphical interface launches the standard “check disk” utility to hard checks disk using the "chkdsk" command. Moreover, if only the first checkbox is checked, the program checks the hard drive in three stages, and if there is a second one, it adds two more levels of checking to these.
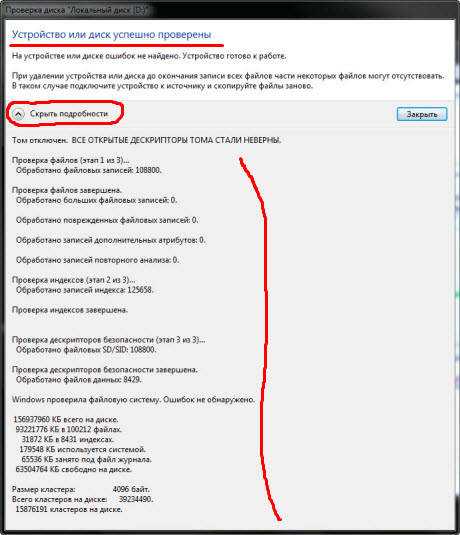
After completing all (three or five) stages of the scan, the program will notify us that the procedure has been successfully completed and (for Windows 7) offer to review its results. By clicking the arrow next to “Show details”, we can see a list of all the checks that the utility has done.
Graphics, windows, buttons... all this is great, but let's dive a little deeper with you and see how you can check your hard drive using the command line " cmd»?
Note: we discussed working with the cmd command interpreter in one of the .
There is a task - to check the hard drive of a computer that has stopped booting (usually after a sudden power outage) and restore the operating system to functionality.
What do I do in such cases? I remove the drive from the “victim” and connect it as an additional one to my computer. I click the "Start" button (for Windows XP - run) and in the field that appears I enter cmd.
Note: a similar procedure can be carried out on the same (damaged) computer, booting from some kind of recovery disk like a “Live CD”, but for me personally, it’s more convenient. I, to the fullest, carry out general preventive maintenance for the “patient” and test the drive for the presence of . They also like to appear after such “surprises”.
I suggest now typing the following in the command interpreter line: chkdsk /?
Design " /? " will allow us to view all the available arguments (keys) that we can apply along with the main command chkdsk.
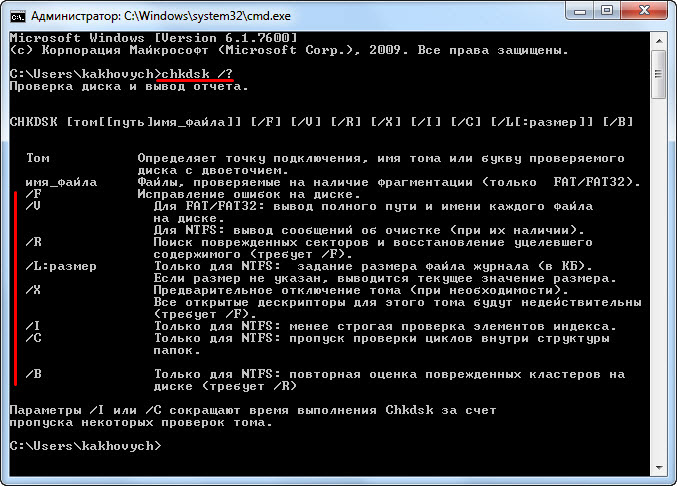
As you can see, the explanation for each “key” is given in Russian, so it won’t be too difficult to figure it out. Additional arguments are introduced through the sign “ / "(right slash). Now let's try to check the hard drive with the chkdsk command.
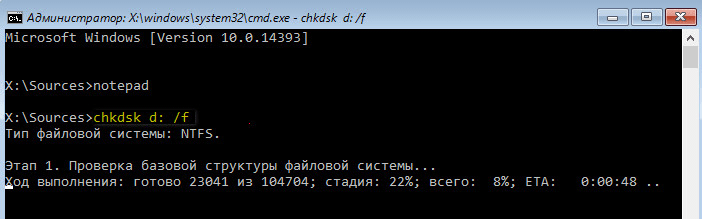
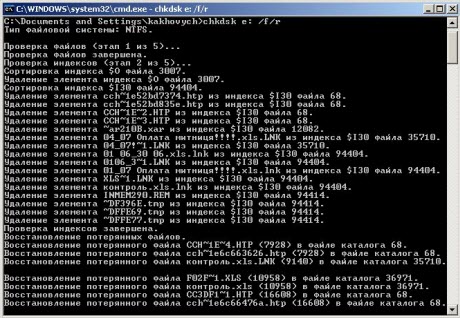
Take a close look at the screenshot below:
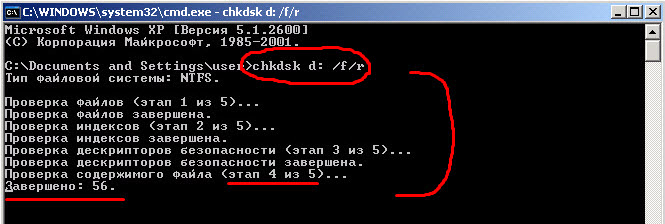
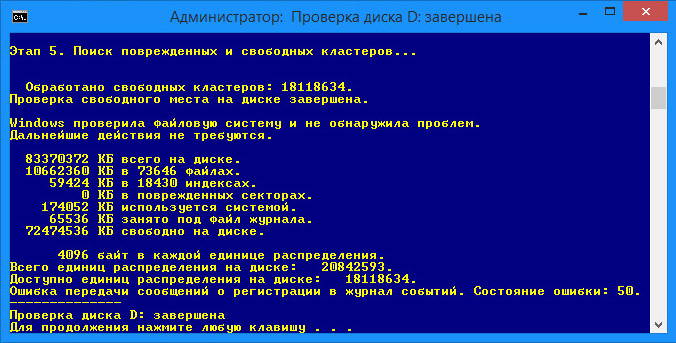
Circled in red at the top is the structure “ chkdsk d: /f/r"What does it mean? Check (chkdsk) drive d (d:) by applying the keys " f" And " r"(what they do can be found in the previous screenshot). Just below you can see the completed stages of this check and the number of remaining ones (stage 1 of 5, stage 2 of 5, etc.), as well as the percentage of completion of the current one.
What's interesting is that running the chkdsk command with the attribute /f starts a check in three stages, completely similar to what happens after selecting the first checkbox in the graphical interface:
![]()
Adding a "key" /r identical to checking the second box in the screenshot above (check and repair damaged sectors). In fact, to check the hard drive, the same utility is launched. It’s just that some people find it more convenient to use graphic windows and a mouse, while others make do with the command line.
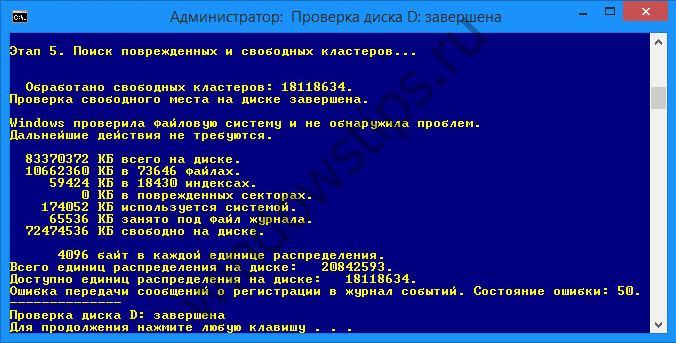
The check window at boot and before the operating system starts is slightly different, but the essence remains the same:
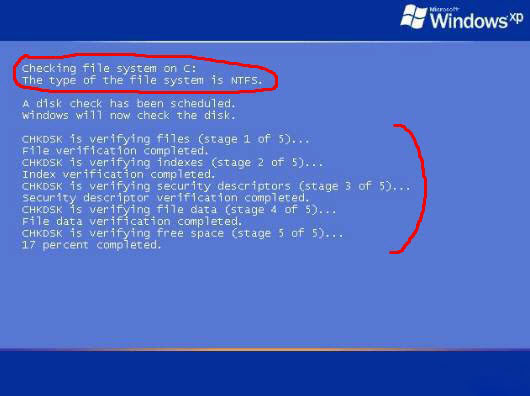
At the top it is indicated which logical drive is currently being scanned, what type of file system it contains, and below are the verification steps that are already familiar to us. For Windows 7, similar information is presented on a black background.
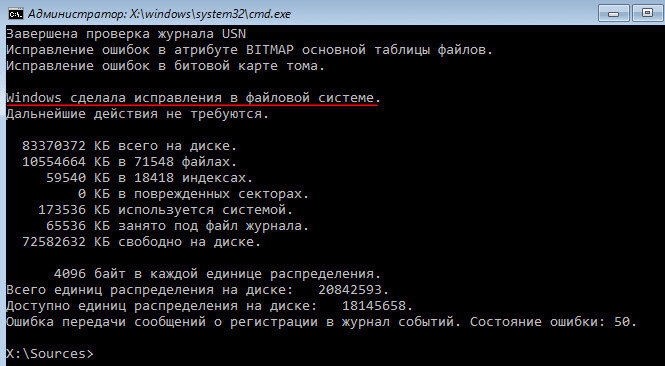
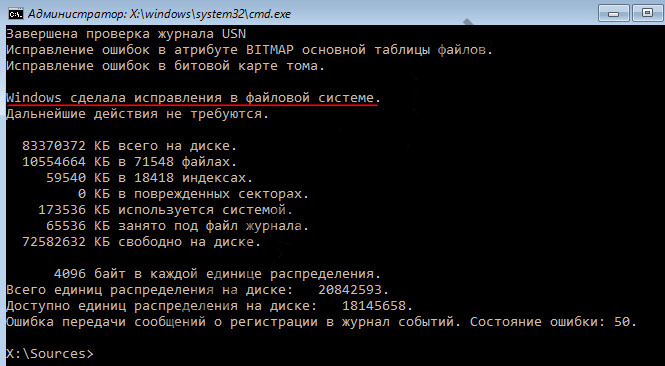
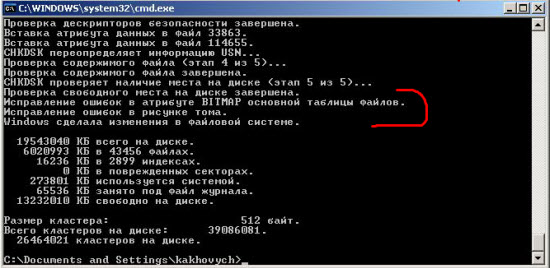
So, let's go back to our console. A complete program report might look like this:
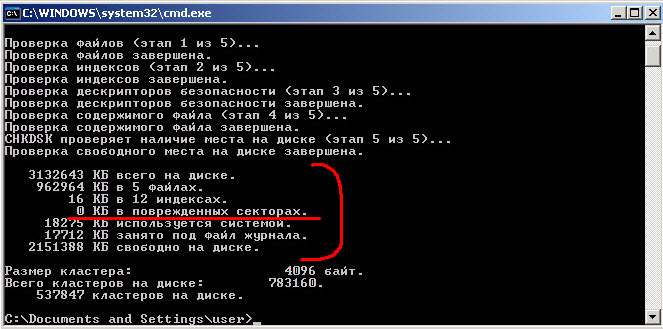
The item marked in red is of paramount importance to us here: the number of kilobytes in bad sectors. If there is “0” here, then everything is fine :)
Let's take a quick look at what exactly each of the hard drive verification steps does?
The first pass checks the files. During this phase, CHKDSK checks the entry information for each file in the main table MFT.
Note: MFT - Master File Table, which contains information about all files and their attributes located on a volume with the NTFS file system. Approximately 12% of disk space is reserved for it.
The first stage is checking each file for internal consistency (ex: the same data sector is marked as belonging simultaneously to two different files)
During the second stage, the indexes are checked. What it is? These are the directories of the file system, it is checked whether the record segment for each directory and file is contained in the main file table, as well as the date of the modification time of the files and their size. The CHKDSK command checks to see if any files are orphaned (empty) or have an incorrect MFT location record.
Further (at the third stage) of checking the hard drive, security descriptors are analyzed. They contain information about the owner of files (directories) and access rights to them at the file system level. Verifies audit information for user data sets.
If the fourth stage of checking the hard drive is used, it includes a search for bad sectors (bad blocks). If one is detected, the program automatically adds information about it to the MFT table and no more entries are made to it and the sector is excluded from the file table.
The fifth step is to check the free disk space. There is nothing special to comment here :)
This way we can check our hard drive for the correctness of all the metadata it contains.
The term "metadata" in this case means "information about data." Metadata ensures the integrity of the file system and also contains information about all its files and directories. It contains information about the clusters that make up each file, which clusters are free and which are busy, contain bad sectors, etc.
And now - the harsh reality! :) Unfortunately, it happens that the metadata structure is so corrupted that using the command chkdsk not only does it not help, but it can further complicate the situation in restoring the operating system.
On the other hand, there were times when my inner instinct told me to check the hard drive using this tool and I got the result I needed. So try it and decide for yourself whether to use this recovery tool or not?
The screenshot below is a photograph of one of the longest verification cycles in my practice. The utility worked for more than two hours, while the following picture was constantly displayed on the monitor:
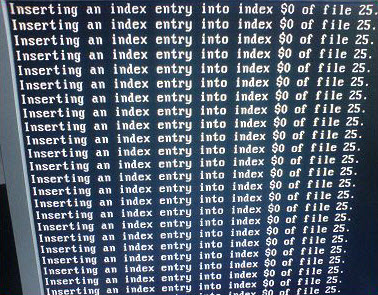
But by the blinking LED hard indicator The disk on the front side showed that there was an active exchange of data with the drive, so I waited stubbornly and finally waited for the complete completion of this process. After rebooting, Windows was restored!
The CHKDSK command actually does a lot of checking and can fix a wide variety of errors found in the file system and in individual files. For example, you may see these “scary” messages while scanning a disk:
The second is another example from practice:
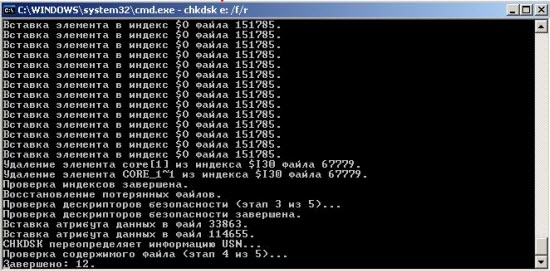
And now the team is making corrections to the file itself hard system disk.
In all cases, the final scan result is positive.
Windows malfunctions, emergency shutdown of the computer, experiments with disk space management software, the consequences of viruses - these and other problems can lead to the automatic launch of the standard Windows Chkdsk utility, designed to correct errors in the file system of hard drives. Incorrectly completed operation of the operating system with files leads to file system errors, and sometimes even damage to the file system. In emergency cases, the Chkdsk utility turns on itself before Windows starts, scans disk partitions and corrects errors. However, the fact that there are problems with the file system may not make itself felt during normal use of the computer and only become apparent when trying to manage disk space. So, for example, when trying to shrink a disk partition using standard Windows tools, we may receive the following notification: “It is possible that the volume selected for compression is damaged. Use Chkdsk to troubleshoot the problem, and then try shrinking the volume again."
In this case, disk check will not start automatically. How to run Chkdsk manually in Windows 7, 8.1 and 10? How can I use Chkdsk to fix disk errors if this problem is the reason the operating system is unable to boot?
Inside Windows, the Chkdsk utility can be launched in several ways.
1. Run Chkdsk using Windows GUI
To run Chkdsk, in the system explorer on drive C, right-click and open “Properties”.
In the disk partition properties window that opens, go to the “Services” tab, and in it click the “Check” button (or “Run check” for Windows 7).
In versions of Windows 8.1 and 10, if everything is in order with the disk file system, in the window that appears next, we will see a notification that checking is not required. But if you wish, you can start checking the disk with the Chkdsk utility by clicking “Check disk”.
If the system suspects file system errors, this window will contain a button to start scanning and repairing the disk.
For Chkdsk to work relative to drive C, you must restart the computer. You can do this immediately or delay running the scan until the next reboot.
After restarting the computer, we will be able to observe the operation of Chkdsk.
In Windows 7, launching Chkdsk is slightly different: to the preinstalled option of automatic error correction, you can add another possible option - checking and repairing bad sectors of the hard drive. When activating this option, it is worth considering that in this case Chkdsk may take longer to run.
As with Windows 8.1 and 10, in version 7 the system drive C cannot be scanned within a running operating system. To start the scan, the computer must be restarted. Click “Schedule disk check”.
When checking a non-system partition of a disk, if it is used by some programs, the situation is simpler than with the system partition. In the window with a notification that the disk is currently in use, you just need to click the “Disconnect” button to, accordingly, disable this partition for the duration of the scan.
2. Run Chkdsk using the command line
To run Chkdsk using the command line, first, accordingly, launch the latter.
In the command line enter a command like this:
In this command, instead of drive C, we each time substitute the letter of the desired partition on which the scan is required. If Chkdsk needs to check the system partition C, as with the GUI, you will need to restart the computer. When a message appears in the command line about the impossibility of locking the specified drive, you need to enter “Y”, then restart the computer.
In addition to the /f parameter, which is responsible for correcting disk errors, Chkdsk can be run with the /r parameter, designed to search for bad sectors and restore data. As a result of Chkdsk running with this parameter, hard disk clusters with unreadable sectors will be listed as damaged (bad blocks) and their functions will be transferred to a new cluster. Therefore, it is recommended to run Chkdsk with the /r parameter only when the usual error correction - running the utility with the /f parameter - does not bring the necessary results. Using the same drive C as an example, the command would look like this:
3. Running Chkdsk on a non-booting Windows
If Windows freezes at a certain point in the boot process, one of the possible causes of this problem is file system errors. In this case, you need to run Chkdsk by booting from the rescue media. As such, you can use regular installation media with versions of Windows 7, 8.1 or 10. With its help, we will launch the Chkdsk utility inside the command line. At the first stage of starting the system installation process, press the command line launch keys – Shift+F10.
In the command line that opens, before running the Chkdsk command, you need to clarify which letters define the disk partitions. This is easy to do using a notepad. I launch it with the command:
Click the notepad menu “File”, then “Open”.
In the explorer that opens, remember the new drive designations. As a rule, in Windows 8.1 and 10, the C drive partition (as it exists inside the running operating system) is listed as D, since the letter C is assigned to the first technical partition of the system. And all other sections are shifted by one letter of the alphabet.
Having decided on the letters of the disk partitions, close Notepad, then, returning to the command line, enter a command like this:
![]()
As with Chkdsk inside Windows, you must first try to fix disk errors by running the utility with the /f parameter. And only if the problem is not solved, only then run the command with the /r parameter, as indicated in the previous paragraph of the article.
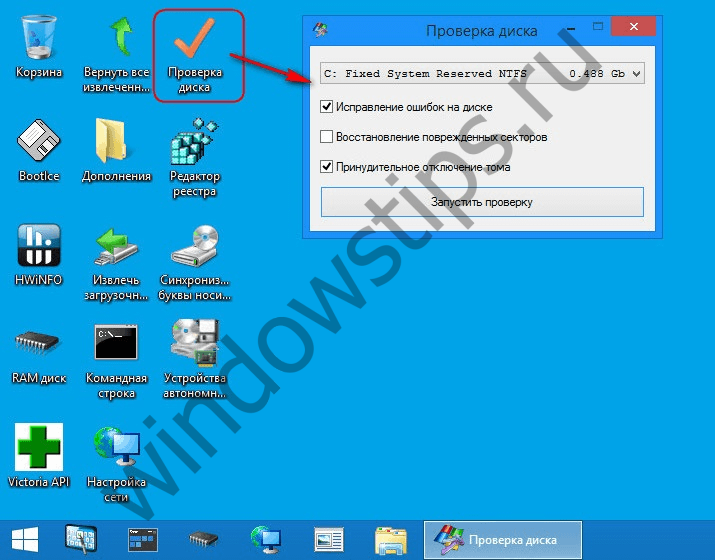
In cases where Windows is unable to boot, you can pre-burn an emergency Live disk with a selection of various tools to restore the operating system. Among these, for example, is AdminPE based on WinPE. Its image for recording on a disk or flash drive can be downloaded from the official website of the project Adminpe.Ru. Using AdminPE, you can launch a command prompt and enter the Chkdsk launch commands discussed above. But in this Live disk, the Chkdsk utility has its own interface and is launched using a script. The shortcut to launch the utility is placed directly on the desktop.
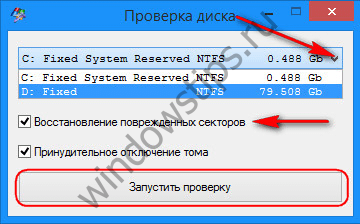
In the drop-down list to check the disk, select the desired disk partition. Next, activate the checkboxes for restoring damaged sectors and forcibly disabling a partition (volume). Let's check the launches.
AdminPE's tools include a number of other utilities for working with hard drives, as well as the well-known programs Hard Disk Sentinel and Victoria.
Have a great day!


