The Apple TV multimedia set-top box, like other electronic gadgets, may at some point stop working normally - display an error on the TV screen or, even worse, not turn on, while the indicator on the set-top box will blink. Don’t panic and immediately take it to a service center; most likely this is a software glitch that you can solve yourself.
To fix problems with Apple TV, you need to connect the set-top box to a PC or Mac and restore it using iTunes. But it happens that when connected to a computer, the set-top box does not want to be detected by iTunes; for this, like the iPhone and iPad, it needs to be switched to a special DFU mode to completely reinstall the software (flashing).
How to reflash Apple TV in DFU mode and what you need for this
To flash the console firmware you will need:
- Apple TV set-top box;
- a computer with macOS or Windows with the latest version of iTunes installed (the latest version of the program can be downloaded from the official Apple website);
- Micro-USB or USB Type-C cable (Apple TV 4th generation and above).
If all the components are there, let's start transferring the Apple TV to DFU mode and further flashing it.
Step 1 Disconnect the Apple TV from the TV and connect it to the computer using a Micro-USB or USB Type-C cable, depending on the model of the set-top box
Step 2 Launch iTunes on your computer
Step 3 Restart your Apple TV. To do this, press and hold the Menu and Down buttons on the old remote control, and the Menu and Home buttons on the new one (Siri Remote - Apple TV 4) for 6 seconds until the indicator on the set-top box starts blinking quickly, then release the buttons

Step 4 When the device starts to reboot, this will happen when you release the buttons, put the set-top box into DFU mode - press and hold the Menu and Play/Pause buttons (about 10 seconds) until a message appears in iTunes indicating that the Apple TV is in DFU mode recovery (DFU)

Step 5 Click Restore Apple TV and iTunes will download the latest firmware from Apple servers and install it on the set-top box

If you want to flash your Apple TV to a new beta version or install a different version of the software, an earlier one, if it is still signed by Apple, then in recovery mode, press the ⌥Option key on your keyboard on Mac, ⇧Shift on Windows and click Restore Apple TV in iTunes. After this, you will have the opportunity to select on your computer the already downloaded file with firmware for the set-top box.
After these steps, all data on the Apple TV will be deleted, the settings will be reset to factory settings, and the latest iOS or tvOS firmware will be installed on the set-top box. Connect Apple TV to your TV and enjoy it.
With all the hype surrounding it, the Apple TV device (as always) has remained in the shadows of the news highway. However, despite the lack of any news regarding the jailbreak of this device, some modestly suggesting the possibility of a jailbreak in the future.
And although at the current time I would not take these rumors seriously, nevertheless, perhaps this will be useful for those who use Apple TV 4 with tvOS 10.1.1 firmware and want to downgrade the firmware to tvOS 10.1. Read this guide for more details.
This guide will help you restore the original firmware on your Apple TV of any year. This process will be useful not only when updating or downgrading firmware versions that are still being signed, but also in cases where it is necessary to restore a device that is experiencing serious problems and there is a need to restore such a device as new.
Requirement:
- Apple TV device.
- A Micro-USB cable or a USB-C cable, depending on the year of your Apple TV device.
- A computer with the iTunes application installed.
- IPSW file with firmware for installation on your Apple TV device. The firmware version must match the requirements of your specific Apple TV device. The firmware version must be signed.
The process of restoring the Apple TV firmware
1) Download the IPSW file you need:
2) Disconnect all cables from your Apple TV device. Connect Apple TV to your computer using a Micro-USB or USB-C cable.
3) Connect the network cable to your Apple TV device.
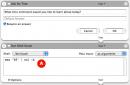
4) Launch the iTunes application on your computer and wait until your device is identified in the list of connected devices. As you can see from the screenshot, we are restoring a device with “tvOS 9.0” firmware.
If iTunes doesn't recognize your Apple TV, you may need to put it into recovery mode.
5) Find the "Restore Apple TV..." button.
6 a) If you are working on a computer running OS Windows, then hold down the " Shift» , and then click on the button Restore Apple TV...» .
6 b) If you are working on a computer running MacOS, then hold down the “ Option/alt» , then click on the button Restore Apple TV...» .
7) A file browser window will appear. Specify the path to the “IPSW” firmware file that you previously downloaded and select it.

8) In the dialog box that appears, check that the firmware version number you are restoring the device to is correct and click the " Restore» .

9) The recovery process will begin on your Apple TV device. Do not disconnect the device from the computer or network cable until the recovery process is complete.

10) Once the restore process is complete, the following message will appear: “Your Apple TV has been restored to factory settings. Please disconnect your Apple TV device from your computer and connect it to your TV device."

In this guide we will talk about jailbreak Apple TV 3 and why it is necessary perform an operation on this console. For Apple TV 3, Jailbreak is performed using special utilities. Using one of them, you can view many online media services. You can also play music, watch movies, videos or photos through tvOS devices using the Airplay feature. Through Air Play Mirroring, you can stream and stream videos to your set-top box if you have a new Mac. And not to mention, the Apple TV 3's user interface is currently arguably the best in the world, beating the competition by a wide margin.
While Apple's TV 3 has some truly amazing features to offer every user, it doesn't take long to notice that it offers quite limited content compared to other similar set-top boxes. And you won’t be able to miss this fact unless you’re actually in the Apple ecosystem. For example, compared to its competitors, TV does not offer such a wide variety of channels. Broadcasting options are also very limited.
But still, despite some restrictions, this does not mean that you cannot bypass them. There is a way that will allow you to get much more available content, more features and the most from your Apple TV 3. You just need to follow the jailbreak procedure.
The term Apple TV 3 Jailbreak may sound a little scary. But this is not true, because we are not talking directly about hacking. We're just talking about gaining access to tvOS Apple TV 3. Jailbreak for Apple TV 3 is a popular method of bypassing tvOS restrictions. Although many people may question its legality and safety, this will not stop you from completing it. In addition, jailbreaking a tvOS device is not that difficult (if you know the algorithm and strictly follow it).
Overall, the procedure is very easy. Its implementation will not be difficult for anyone who has installed the software on a PC at least once. The operation is safe for the device itself and should not cause negative consequences. So don't worry about anything and follow the steps suggested below.
Why hack Apple TV 3?
The first question that may arise in your mind about jailbreaking is what will this operation do? Is it worth doing this and will it be harmful to the device? By performing this simple operation, you will significantly expand the capabilities of the set-top box. Until then, its functions will be limited to playing only standard types of music and videos.
If at Using Apple TV 3, if you want to transfer media to your TV, you'll need iTunes. In other words, you're limited to the type of media and apps Apple chooses. This applies to software available in the official store iTunes. It's also possible to install popular applications such as XBMC, making it much easier to stream digital content onto your home network.
Know that after completing Jailbreak Apple TV 3, none of the “native” programs will be erased. And none of the functions included in the operating system. won't disappear. In other words, you'll be able to make premium movie rental purchases through iTunes and access some video streaming apps like Netflix.

Benefits of hacking Apple TV 3
The result of hacking depends on the initial goals. Let's say if you wanted to expand the functionality of Apple TV 3, then you will undoubtedly achieve this. And if at the same time you have a huge library with media files, installation XBMC or another manager will allow you to view content of any type.
If you want to access video streaming, you will need to install XBMC and Plex server.
But if you want to access all the free TV episodes from popular movie networks like NBC, SyFy, FXmYSAmThe CW, ABC... It would be a good idea to install the Bluecop repository which will be installed in XBMC and this will allow you to access all the free TV episodes from popular television networks.
Also, if you are interested in changing the navigation menu layout, changing some other options, or adding other custom backgrounds, then by doing the hack you can get it all. Moreover, there are many other benefits that you will get by simply having this surgery. It will only take a few minutes of your time. After jailbreak, the device will not have any restrictions and will be able to support and play all file formats. This is a truly recommended thing that everyone simply has to decide on. user .
How to jailbreak Apple TV 3?
The method of performing the operation on an Apple TV is not complicated. Any user will complete the process in no time using Pur Jailbreak Apple TV 3 Tool. You don't need to have advanced technical knowledge, just use the instructions below. The method has been tested and confirmed to take no more than ten minutes.
At present, it is quite obvious that the third generation of televisions from the company in question is already available on the market. And if you didn't know, let us tell you that the main reason for this is the free jailbreak tool for Apple TV 3. If you think about what is the best media player in the world, you can without a doubt decide that it is Apple TV 3. And all this because the set from Apple allows you to watch movies, play videos, listen to music directly from your tvOS device.
AND the only requirement to access the content is to download it from the company’s resource on the Internet. Plus, if you choose to subscribe to Netflix, you can watch the world's best TV series. But if you decide to jailbreak, you also have many other options. Once jailbroken, you can easily install the latest and greatest apps, services, and systems on your Apple TV 3. And it's all completely free. If you are interested in hacking Apple TV 3 then just follow the instructions below.

Instructions for hacking Apple TV 3
Start downloading software. Unzip it on your computer and install it. The jailbreak tool is compatible with Mac and Windows computers.
- Once you have launched the tool, select “Create IPSW” and continue with Jailbreak for Apple TV 3.
- Once you have created the IPSW, open the IPSW file on your device.
- Connect your Apple TV 3 using a USB cable to your computer. While you're doing this, make sure to leave the Power Disconnected and after that just press Play/Pause for about 5-10 seconds.
- As soon as you complete the previous step, the device will start the automatic reboot process. Once it is completed, your Apple TV 3 will be successfully jailbroken.
All the steps described above are quite simple and easy to follow. We are absolutely sure that you will not have any problems with hacking Apple TV 3 and carrying out the procedure yourself.
To many users have already managed to jailbreak Apple TV 3. Just download the free tool and try it yourself. Why limit Apple TV 3 to playing only content from the cloud when you can access all types of media and streaming content for free. Hacking Apple TV 3 is the ideal solution. Don't put off surgery until later and do it right away Now.
It does not turn on, and the indicator is blinking - do not rush to contact service. In most cases, this is due to a software failure, which can be resolved by restoring (flashing) the set-top box in DFU Mode.
In contact with
As with the iPhone and iPad, this procedure will detect the device in iTunes and restore factory settings or install new firmware.
It is worth noting that if the Apple TV does not turn on (while the indicator on the front panel is blinking), the set-top box may not be detected in iTunes on the computer, which makes the standard recovery process impossible. In many cases, in order to “see” an Apple TV with a software glitch in iTunes, you need to put the set-top box into DFU mode.
What do you need to reflash (restore) software on Apple TV in DFU mode?
- Apple TV;
- Mac or Windows computer;
- iTunes with the current (latest) firmware version (you can download);
- Cable (for set-top boxes of the fourth generation and higher) or microUSB (for older versions). Please note that they are not included with Apple TV.
1 . Connect Apple TV to your computer using a USB-C cable. A simultaneous connection to the TV via HDMI is not required.
2 . Open iTunes on Windows or Mac.
3 . Reboot the device: press and hold the buttons Menu And Home on the Siri Remote (Apple TV 4) or Menu And Down on older models for 6 seconds until the indicator on the set-top box starts blinking quickly.
The moment you release the buttons, the device will reboot.
4 . Literally 1 second after you release the buttons Menu And Home press and hold the buttons Menu And Play/Pause until (about 10 seconds) iTunes tells you that the Apple TV is in recovery mode (DFU).

5 . Resetting (flashing, restoring) Apple TV to factory settings (all data from the device will be deleted!) is done by pressing the button Restore on iTunes. After that, the latest version of tvOS will be automatically downloaded from the Internet and installed on the set-top box.
6 . If the firmware for Apple TV has already been downloaded to the computer earlier (for example), then to flash the firmware you need to click the button Restore along with the key ⌥Option (Alt) for Mac ( ⇧Shift + Restore for Windows). Next, specify the path to the firmware file.

After installing the software, a reboot will occur. To activate the set-top box, you will need Internet access.
Today I will tell you how to flash Apple TV 2 version 4.4.4, install XBMC, add-ons and NitoTV on it.
What we get as a result:
1. Ability to watch videos in any format over the network (no conversion or iTunes required)
2. The ability to watch films and TV series from the site Zoomby.ru
3. Ability to install various add-ons that will expand the capabilities of Apple TV
We will need:
1. Apple TV (second generation), connected to the Internet in any way (my atv is connected via WiFi)
2. Remote (Apple remote)
3. miniUSB - USB cable (I used the original cable from HTC Desire S)
4. Computer (I have a MacBook pro, mac os x 10.7.3)
5. Telivozor
6. Sofa
If you have everything you need, we can get started.
1. Check and update the current version of the device
We connect the ATV to the TV and the Internet.
In the main menu, select “Settings” -> “General” -> “About Apple TV”.
On the information screen, look for the line “Apple TV software”, it should not contain the value “4.4.4 (more numbers)”, if so, go to step 2, if not, update the software through the menu item “Settings” ->” Basic"->"Software Update", make sure that the version is 4.4.4 and move on.
2. Jailbreak
Download the program Seas0npass (version for Mac), and use it to flash the device’s firmware.
Launch the program and select "Create IPSW"
The program itself will download the required firmware version, make some changes to it, in a word, prepare the correct version. The entire process is accompanied by text messages, from which it is clear what the program is doing at the moment.
As a result, the program will ask you to connect the atv to the computer and enter it into firmware update (DFU) mode. Please note that There is no need to connect power to the atv, only usb.
After connecting the device, the light on the front panel will start blinking quickly, pick up the remote control, point it at the device and simultaneously hold down the MENU and PLAY/PAUSE buttons for 7 seconds, then release (put a watch, stopwatch, chronometer, whatever next to you , the main thing is to accurately time 7 seconds, I didn’t succeed the first time, I even had to close the program and do it all over again). If everything went well, the text in the picture will change, iTunes will open and the firmware process will begin. Don't be alarmed by opening windows, that's normal. The whole process happens automatically, but apparently something went wrong with me and everything stopped at the open dialog box for selecting the firmware to restore, I just clicked the "Open" button and then watched as iTunes flashed the device, as a result an iTunes message appeared that everything was completed successfully , you can turn off the device, close the program and iTunes.
To check the firmware, connect the atv to the TV, if a red square with white letters FC appears in the lower right corner of the screen, then everything was successful, if not, try repeating the process again.
3. Install XBMC
Our set-top box is firmware, connected to the TV and the Internet, it's time to install XBMC, but first we need to find out the IP address of the atv, to do this, go to the "Settings" -> "General" -> "About Apple TV" menu and look at the value in the line IP address (mine turned out to be 192.168.1.124).
Next, open a terminal window on the computer (you can press ctrl+space and enter terminal, the application will appear in the list), in the terminal window that opens, write:
ssh [email protected] (substitute your value for 192.168.1.124)
if there is a prompt that requires yes/no options, write yes and press enter. When prompted for a password, you must enter alpine and press enter (it should be noted that no asterisks or other symbols appear when entering the password. This is normal). If everything went well, the line in the console should change to Apple-TV:~root#
Now you need to copy the commands below and paste them into the terminal window:
echo "deb http://mirrors.xbmc.org/apt/atv2 ./" > /etc/apt/sources.list.d/xbmc.list
apt-get update
The Terminal window will show the progress of the application list being updated and will also show the overall percentage complete. Upon completion, you need to enter the command to install the XBMC application itself:
apt-get install org.xbmc.xbmc-atv2
After the installation is complete, atv should reboot and a new “XBMC” item will appear in the main menu. (I installed xbmc in another room, so I can’t say 100% that atv will reboot after installation, I didn’t reboot it manually, but XBMC appeared in the menu)
4. Add network folders with movies to XBMC
First, we need to enable folder sharing over the network on our Mac. To do this, select any folder in which we will store movies, open its properties and in the “Sharing & Permissions” section for the Everyone user change the access rights to Read only.
Open the system settings (System Preferences), select the "Sharing" menu, check the "File Sharing" item on the left in the list, click "+" in the "Shared Folders" window on the right and add the folder that we selected earlier. IN
In the same window, click the "Options" button and check that the "Share files and folders using AFP" checkbox is checked. This completes the computer setup. All that remains is to add movies to the folder.
Let's return to ATV. Go to the "XBMC" menu (the language can be changed in System -> Appearance -> International) select the "Video" menu, then "Files" and "Add video...", in the window that opens, click the "Browse" button, the panel will slide out on the right, it will contain a list of possible locations, we need “Zeroconf Browser”, another panel will open, it will contain a list of available network resources, in our case there should be the name of our computer and the protocol (AFP) in brackets. We select the line of our computer, press the center button on the remote control and see a list of available folders. We select the one we need and press the “OK” button in the interface, the panels will disappear and the full path to our folder will appear in the window, then select “OK” again. A window will open with a choice of the contents of the folder, I selected “Movies”, click “OK” again, the request “Update information for all items in this folder” will be issued, we agree.
Now we have a line in the video menu with the name of our folder on the computer, you can safely go into it, select a movie and watch.
5. Installing an add-on for watching videos from zoomby.ru
I myself didn’t understand it deeply, but there are sites that provide the opportunity to watch videos online, good people write add-ons for xbmc so that videos from these sites can be watched on atv, apparently there are quite a few such sites, but I’ve tried 1 so far, the main thing is I’ll tell you how to install the add-on, and then you can look for interesting sites and options yourself.
First, download the add-on itself from the developer’s website (it’s called Plugin for the site Zoomby.ru), get a zip archive with a name similar to plugin.video.zoomby.ru_2.0.1.zi p, no need to unpack the archive. Now we need to write the file to the atv disk, for this I used CyberDuck, everything is simple, create a new SFTP connection, login root, password alpine, device IP address. After connecting, drop the downloaded archive into the \User\Documents folder on atv. Disconnect from atv by closing CyberDuck
We return to the set-top box, in XBMC select the menu "System" -> "Add-ons" -> "Install from ZIP file", the atv folders open in the window that opens, find our archive (I had it Home folder/Documents) and click "OK" , XBMC will display a message indicating that the add-on was successfully installed. All that remains is to check, go from the main menu to “Video” -> “Add-ons”, select “ZOOMBY” from the list, and then everything is very clear, select the desired section, select a movie/series and watch.
6. Install NitoTV
The process is practically no different from installing XBMC.
Open the terminal, connect to the set-top box
ssh [email protected]
We write:
echo "deb http://apt.awkwardtv.org ./" > /etc/apt/sources.list.d/awkwardtv.list
apt-get update
apt-get install com.nito.nitoTV
press enter, wait for completion and write
killall Lowtide
press enter, the set-top box should reboot and the NitoTV item will appear in the main menu
7. Conclusion
If everything went well, we became the owner of Apple TV 2 with the ability to watch movies directly from the Internet, not worry about file formats and not be tied to iTunes, while maintaining all the native functionality of the device.
If something fails, try turning everything off and trying again.