Why and how do you need to create a Windows image? How to restore the system and everything installed programs without reinstallation? And also, what tools will be needed for all this? Read about this in the article below.
And again about our long-suffering Windows, which loves to break down and glitch in every possible way :) They say that the best “cure” for all failures is to reinstall the system. In principle, it is difficult to argue with this, since in this case we get a practically new OS, devoid of any “brakes”.
You'll begin the recovery process from the same System Protection tab where you configure system recovery options. The next page shows the available restore points. By default, the only metric will probably be the automatic weekly restore point and any manual restore points you've created. Select the "Show more restore points" option to see any restore points automatic recovery, created before installing applications or drivers.
The lower list shows programs and drivers that can be repaired by the process. Again, even programs and drivers that are restored may not work correctly until you completely reinstall. You will then be asked to confirm the restoration.
However, reinstallation always involves the need to install various drivers and programs, which, together with the settings, can take several times longer than the reinstallation itself! Therefore, most users do not like it, trying with all their might to delay the “demise” of Windows with the help of all sorts of other system utilities.
Other ways to troubleshoot system problems
It's time to check if it has solved all the problems you had. If the problem is caused by a recent update, you may want to take a look. If you installed an update or hardware driver and the problem started after that, you can block them from automatic installation again.
Recovery from more serious problems
You can boot into safe mode and try running System Restore again. One big caveat though, as a Straspey reader, was good enough to point out. However, System Restore is almost always worth trying before you resort to more drastic measures. Watch the video below to find out more. System Restore will usually be successful. Regardless, you should make sure you have a backup of your important files before using this option, just in case.
As for me, I believe that reinstallation is an extreme and most radical measure, which in most cases can be replaced by system recovery. How this can be done will be discussed further.
Windows recovery options
If a preliminary check shows that hidden section If you don’t have a system image, you will have to first create one, as described below. But under no circumstances try to reset the system, otherwise you will get a black screen and the need to really reinstall everything.
You'll see a list of apps that will be removed and ask you to confirm your selection before moving forward. Selecting a restore point in system recovery mode. It also helps to make it very easy. Below are three separate procedures: one for or, one for or, and one for. If so, select "Choose a different restore point," assuming you're not here to undo. Select the restore point you want to use from the list in the list. Unfortunately, there is no way to “restore” old restore points. The report is for informational purposes only, but may be helpful in troubleshooting if this system restore does not resolve the problems you are trying to resolve. Your computer will restart as part of a system restore, so be sure to close everything you have right now. If you don't use the Desktop and don't connect there automatically, go there next. You will see a small System Restore window on your desktop that says: System Restore completed successfully.
- Continue to step 4 if you end up this way.
- However, this is something you should be aware of.
- Note.
- In general, this will probably take about 15 minutes.
- Important: what you are sitting here is a real system Restore process.
- Do not turn off or restart your computer during this time!
- Wait until your computer restarts.
System restore points
I won’t say for sure, for more early versions, but already in Windows XP there was such a function as “System Restore”. It was located at “Start” - “All Programs” - “Accessories” - “System Tools” and allowed you to roll back Windows settings to an earlier state through the use of so-called restore points, which stored a “snapshot” of system settings at the time of their creation .
Ideally, you want to select the one that was there before you noticed the problem you are trying to reverse, but not afterwards. If you need to, check the "Show more recovery points" or "Show recovery points older than 5 days" checkbox to see more than most of the latest recovery points. Do you want to continue? dialog window. Step Note: If the problem still persists, you can repeat the steps above and select a different restore point if available. If this restore caused the problem, you can always undo that particular system restore. If not, you can always try an earlier restore point if you have one.
- This may take a few minutes.
- Once the restart is complete, log in as usual.
- If System Restore makes the situation worse, you can always undo it.
In new Windows versions this function is also available and can be used if system instability occurs after installing an update or some driver. You can access its settings from the Properties menu of the Computer icon on the desktop. In Windows XP, Vista and 7, in the window that opens, you will need to go to the “System Protection” tab, and in Windows 8, first click the button of the same name on the side toolbar:
Using a recovery disk
If, for example, strange things happen to your computer when installing a driver, you may find that restoring the system to previous state before installing the driver fixes the problem because system restore undoes the installation. As another example, let's say you restored your computer to the state it was in a week ago. Any programs you installed during this time will be removed during system recovery. It's important to understand this so you don't assume your computer is in an even worse state when you find a program or two missing after recovery.
![]()
On the tab that opens we will have two sections. In the first one, which is higher, there is a "Restore" button, which serves to launch the Windows recovery system. The second section is “Protection Options” (below). It displays a list of disks indicating their security, as well as buttons for setting parameters and creating manual recovery points.
Important: System Restore does not guarantee that the problem will be resolved. Say you're just now having a problem with your driver, so you reset your computer to a few days ago, but the problem persists. It's possible that the driver was corrupted three weeks ago, in which case restoring just a few days ago, or any point in the last three weeks, will not help in fixing the problem.
What System Restore Doesn't Do
System Restore does not affect your personal files such as your photos, documents, email etc. The same concept applies to file uploading, video editing, etc. - all this will remain on your computer. This or what you need to back up your files. If you accidentally deleted a folder full of important documents and you can't recover it from the Recycle Bin, System Restore is not what you want to use to get those things back. Get the bug fixed.
In various illegal assemblies Windows function Creating restore points is disabled by default. To enable monitoring of the desired (usually system) partition hard drive, select it in the list, click the "Configure" button and set the size of disk space for recording recovery points. Since these points are not full-fledged system images, they require much less space (minimum 300 megabytes), therefore, 5 - 6 gigabytes for Windows 8 is enough to store several backups.
About "System Restore did not complete successfully"
The error messages, warnings, warnings and symptoms below are associated with this error.
Symptom 1: "System Restore has not completed" error when completing System Restore
Follow this guide, fix System Restore if it shows the following error: System Restore did not complete successfully.System Restore did not complete successfully. Your computer's system files and settings have not been changed. This is probably due to the fact that the computer is running an antivirus program. Temporarily disable antivirus program and try system recovery again. An unspecified error occurred during system recovery. You can try restoring the system again and selecting a different restore point. If you continue to see this error, you can try the advanced recovery method.
If the backup service is activated, the System Scheduler will periodically (by default once a week) create restore points. Also, points will be created when installing system components, drivers and some programs. Moreover, if the volume of stored data approaches the maximum specified in the settings, then the same Scheduler will automatically delete the oldest points to overwrite them with new ones.
Reason 1: Antivirus software is preventing system recovery
In the section What is recovery? This error is known to occur as a result of one of the following reasons.
Reason 2: System protection settings are corrupted
Another possible reason This error is a System Protection Service that is preventing System Restore from completing.Reason 3: System files are damaged
Another possible cause of this error is a damaged or missing system file. This can happen due to disk write errors, power failures, or virus attacks.
System restore failed
Fix #1: Disable Antivirus software. If you are using antivirus software, disable it.Now for the rollback Windows settings to the previous state, we only need to launch the “System Restore Wizard” using the “Restore” button mentioned above or from the Toolbar and, following the prompts, specify the desired restore point:

The computer itself will perform all the necessary actions, reboot and return to previous settings without affecting your personal data and documents. Only programs that you installed in the period following the time the restore point was created can be lost.
Fix #2: Check your system protection settings
To verify that your system settings are correct, follow these steps:
Fix #4: Run System Restore from Safe Mode
To bypass System Restore failed to complete successfully error, you can try running System Restore from Safe Mode.These procedures do not require technical expertise, but instructions should be followed carefully. Just work through the sections until you find something that relates to your problem. If your computer is having system problems, you should first make sure that you have updated backups of all your own files. Some recommendations are provided in this separate document.
This method of restoring the system will not give the effect of a complete update (as when reinstalling or rolling back to factory settings), however, it can be useful if problems arise caused by a conflict of drivers or programs.
Using a recovery disk
The recovery method described below is the most preferred, but, alas, is not available in Windows XP and earlier systems. Since Windows Vista, Microsoft company took a pretty good step forward to a simple user. They made it possible to restore not only temporary parameters (as is the case with restore points), but also the entire system, including personal data, as well as programs installed and configured properly.
If adware protection has been disabled on your system or spyware, or you have uninstalled some antivirus products, you may find that the machine will no longer be able to successfully connect to the Internet. The communication software has been damaged. To display this menu, you need to shut down your computer and then restart it. Immediately start pressing the key until the advanced options menu appears as shown below.
It may take you a few reboot attempts for this menu to appear. If your computer's problem is so severe that it hasn't reached the advanced options menu, skip to the section below. To perform a repair installation. This process should be fairly clear. Select "Repair your computer" and follow the steps provided.
We are talking about the standard ability to create a full-fledged image system partition hard drive. For this task, we will need a medium on which we can record our backup. The ideal option would be removable HDD or a flash drive with a capacity no less than our Disk C (or another one on which the system is installed). If desired, you can also use several DVDs, network storage, or a separate partition of your hard drive (unoccupied and completely formatted in NTFS).
This is quite a time consuming activity as it will likely require you to do so.
- Backup own documents and data.
- Reinstall all your applications.
- Recover all your own documents and data.
System Restore performs the following tasks. Restores your computer to its previous state. Restore points are saved states of your computer. You can also manually create restore points to record your computer's state and settings before you make changes to your computer. This allows you to restore your computer to a previous state by selecting a restore point to a date or time before you made the changes.
Next I will describe everything in Windows example 8.1, and the differences for previous systems(where they exist) I will indicate in parentheses. So, we find the “File History” section in the Control Panel, wait for it to fully load and in the lower left corner click the “System image backup” button (for Win7: Control Panel - Backup and Restore - Create a system image):

In the dialog box that opens, we need to select the location to save our backup. As already mentioned, it is best for this to be an external hard drive, which you need to connect and select in the first drop-down list. Click “Next”, confirm everything and wait for the successful saving of your backup. It's so simple :)
Now about the recovery. If you have access to the system itself, then to enter the recovery panel on Windows Vista and 7 you will need to enter “rstrui.exe” in the Command Prompt without quotes and press Enter, then follow the prompts of the recovery wizard.
In Windows 8, everything takes a little longer. First of all, call up “Settings” in the miracle panel and, while holding down the SHIFT key, press the “Shutdown” button, and then “Update and restart”:

The computer will reboot, and after turning on it will go to the diagnostic mode launch menu. Here we need to sequentially press the buttons "Diagnostics" - " Extra options" - "Restoring the system image". The computer will reboot again, and after turning on it will prompt us to select our account, confirm logging in using a password and only after that the recovery wizard will launch backup copy with the ability to choose the desired image.
Actually, then everything is the same as in previous Windows: we indicate the path to the image, confirm our intentions and wait until the system is restored. Once the recovery is complete, the computer will reboot again, after which it will turn on in normal mode and like new :)
I recommend creating a system image immediately after installing Windows itself, drivers and the necessary set of software. So after restoration you will always get the fastest possible system without unnecessary “brakes”, as if you had just reinstalled it! The only thing you need to remember is that before restoring, copy and save all the necessary documents and files on another partition, since the system one will be formatted!
Third-party programs for backup and recovery
As I already said, standard Windows recovery tools will satisfy the needs of most users. However, there will always be those for whom existing opportunities are not enough. Therefore, there are many third party solutions for a complete system backup and recovery.
The most popular of these solutions is Acronis True Image:
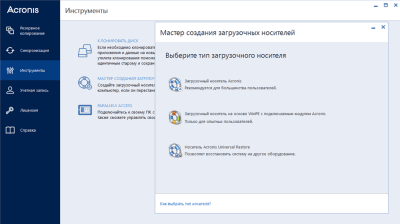
The principle of operation of the program is essentially similar to the principle of operation of the standard recovery system described above. The only difference is that we are not tied to the operating system, since all actions are performed using the boot disk.
However, True Image can also work in conjunction with its own Windows client. In the latter case, the user has the opportunity to create an incremental backup (which is automatically updated when new files appear in the specified folders).
And everything would be fine, but Acronis True Image is a paid program and, if you don’t want to piracy, you’ll have to shell out 1,700 rubles for it... Therefore, as an alternative, I recommend using free analogue Acronis - :

Compared to yours paid analogue, Clonezilla is clearly inferior in terms of usability. Firstly, it does not have a window interface ( GUI at the DOS level, although the program itself is developed on a Debian basis), which may scare away beginners who are accustomed to mouse control. Secondly, Clonezilla does not have a Russian-language interface, which makes it somewhat difficult to understand what needs to be done in a given situation. Thirdly, the speed of creating and deploying an image of this instrument slightly lower than that of the standard recovery system and the same Acronis.
However, the advantage of Clonzilla is that it is completely free, platform independent and can be used in any organization. In my time, this program made my life a lot easier when I was working at a local vocational school as a PC technician. With its help, I quickly deployed Windows XP on several new computers purchased for accounting needs :) And my own old Windows I have “raised” XP more than once from a ready-made image, so the program definitely deserves attention!
In addition to such “giants” of backup and recovery as Acronis and Clonzilla, as usual, there are a number of small utilities that allow you to perform the same operations, but are much smaller in size. Among these, first of all, I would like to mention the program (short for Open Disk Imager in a Nutshell):

This program takes up less than a megabyte, but at the same time has two interface options: graphical (for launching in Windows environment and Windows PE), as well as console (for working in DOS or FreeDOS, for example). You can create a system image with ODIN directly from your working OS in graphical mode. To do this, simply indicate which partition of the disk and where it should be saved, and the program itself will quickly pack everything into a standard disk image in IMG format.
It is best to restore the system by booting from a LiveCD such as Windows PE, in order to maximally protect the recovery process from the influence of external factors from the installed OS.
For more advanced users, there are utilities, such as the original console program from MicroSoft ImageX and its graphical implementation GImageX:
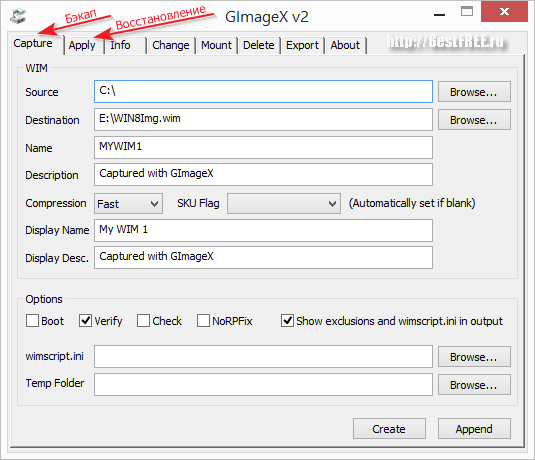
Advantage using ImageX and its graphical implementation GImageX provides a large number of different fine-tuning options for creating and restoring an image. In addition, unlike its analogues, ImageX allows you to update your images, supplementing them with the necessary changed ones. system files with time.
The only drawback of GImageX is that it is only in English and has a rather extensive interface, which you may not be able to figure out right away. However, you will have to read the manuals in any case if you are committed to serious work.
conclusions
The proverb says that if a person knew where he would fall, he would have laid out straw in advance. So, creating restore points in advance and Windows image, just can become that saving “straw” at the hour when our system suddenly fails.
Agree that it is much easier and more convenient to let the computer recover itself than to manually install and configure everything you need for work. Therefore, I think that your immediate goal after the next reinstallation of the system will be to create its image. Is not it? ;)
P.S. Permission granted to freely copy and quote. this article provided that an open active link to the source is indicated and the authorship of Ruslan Tertyshny is preserved.
I would divide the system recovery methods into the following:
1 Using Last Known Known Configuration
2 Using the "System Restore" mechanism normally
3 Using the system recovery mechanism not normally (via safe mode or original installation disk Windows 7)
4 Using a previously created system backup.
1) Let's say you encounter a problem in Windows work 7 and wanted to restore the system, the simplest thing you can do is boot into Safe Mode and load the last known successful configuration, to do this, press the key when loading the operating system "F8" and select "Last Known Good Configuration", press "Enter".
Last Known Known Configuration is a recovery option designed to boot your computer using the last known working system settings. Booting in Last Known Known Configuration mode restores the system registry information and driver settings that were used the last time the system successfully booted. Use Last Known Good Configuration mode when booting Windows 7 into normal mode impossible as a result of incorrect changes.
2) If the first method is not suitable or did not help, you can restore Windows system 7 using the mechanism " System Restore» The operating principle of this recovery method is quite simple; recovery occurs thanks to created points recovery. A restore point captures the state of the system at a specific point in time. Restore points are created automatically by the system, but they can also be created manually (this is the subject of this article). There are several ways to run System Restore - The first method is to click "Start" and write in the search bar "System Restore", a menu will appear at the top "System Restore" click on it with the mouse.
 The second way is to go along the path "Start-Control Panel- Recovery - Startup system recovery". A window will open "System Restore", press "Further", you will see all possible restore points to which you can return/“roll back” if you click on the button "Search for affected programs", you can see which programs will be affected by system recovery (I recommend choosing recovery two or three days before the system problem). Having selected the date, click "Further".
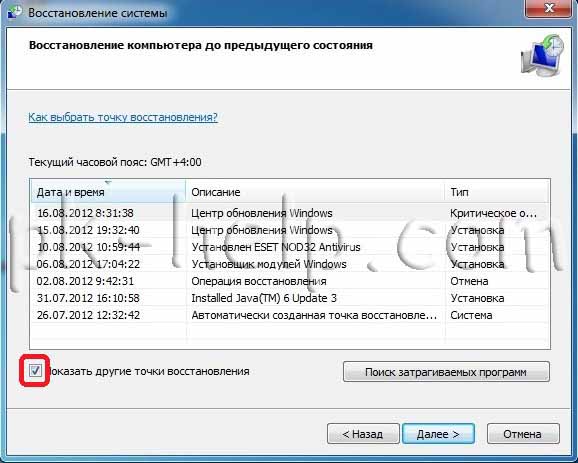 Confirm the restore point by clicking "Ready"
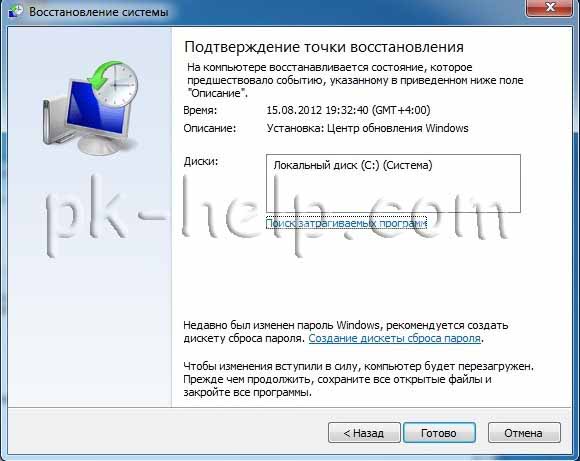 Then a message will appear stating that System Restore cannot be interrupted, click "Yes", after which the process of restoring and rebooting the system will begin.
 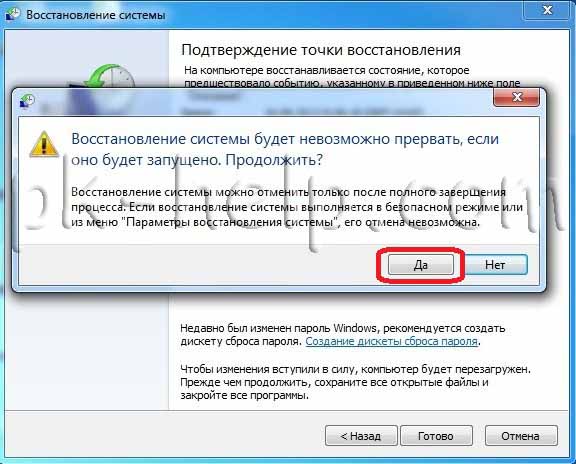 After the reboot, if the recovery is successful, a window will appear.
  3)
If you have suffered from a virus and you do not have the opportunity to start system recovery using the above method, then you can “roll back” the system using Safe Mode or using a disk with the operating system:
3)
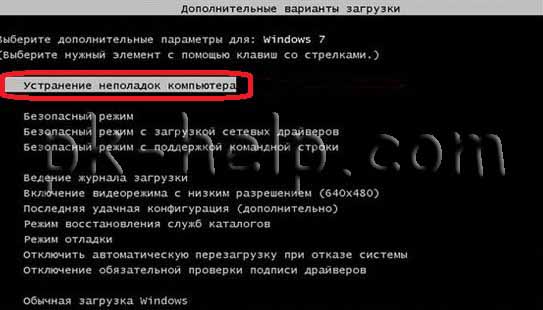
If you have suffered from a virus and you do not have the opportunity to start system recovery using the above method, then you can “roll back” the system using Safe Mode or using a disk with the operating system: We go into safe mode (by pressing "F8" at the very beginning of system boot) and select "Troubleshooting your computer", a window will open
 - We insert the original installation disk with the operating system (it must match yours), boot from this disk (to do this, in the BIOS we change boot from the hard drive to boot from CD/DWD). Select the language, then in the window « Windows installation»
, choose "Recoverysystems".
- We insert the original installation disk with the operating system (it must match yours), boot from this disk (to do this, in the BIOS we change boot from the hard drive to boot from CD/DWD). Select the language, then in the window « Windows installation»
, choose "Recoverysystems".
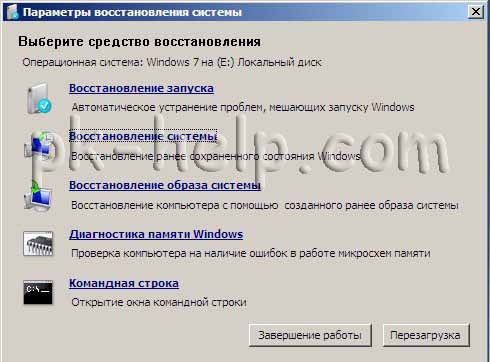
 After this a window will open "Windows 7 System Recovery Options."
So, no matter which method you used, the result is the same - you have a window in front of you "Windows 7 System Recovery Options",
 I propose to analyze a little the capabilities of this window.
Startup recovery- analysis of faults that interfere with normal booting Windows 7 and their further correction for normal loading and functioning of the operating system.
System Restore- this is why this article was written, with the help of this function we can use a restore point to return the system to an earlier period of time when there were no problems.
Restoring a system image- this tool allows you to restore the system from a backup. This method is described in more detail in recovery method 4.
Windows Memory Diagnostics- checks system memory for errors.
Command line- allows you to download command line and with its help you can delete files that interfere with loading Windows 7.
Click on "System Restore", after which a window appears stating that "rollback" system can fix problems... click « Further", select the required restore point.
After this, we agree with everything proposed, including rebooting, and as a result of all these actions, when loading Windows 7, we see a window
4)
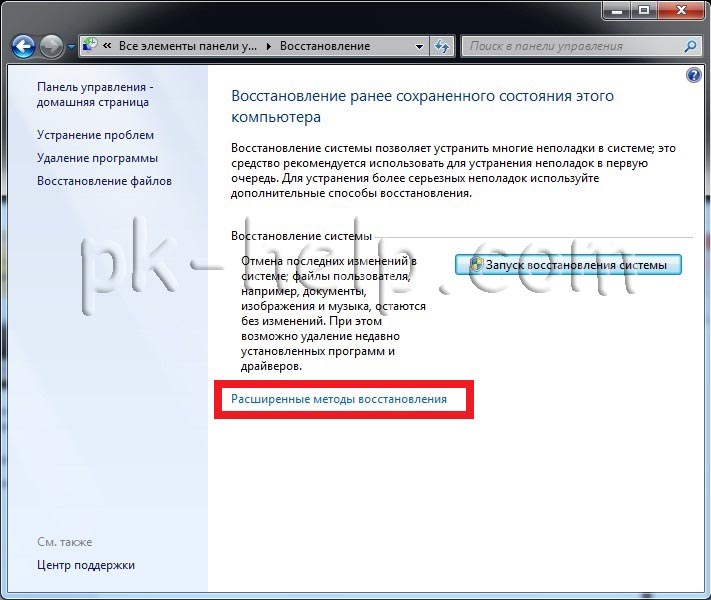
Restore using a previously made backup; creating a backup is described in more detail in the article. Connect USB device backup storage, click "Start" - "Control Panel" - "Recovery". If the system does not start and there is no way to boot the system, you must follow the third point of the article, just select Restoring the system image.

In the window that opens, select " Advanced recovery methods".


Then a window will appear asking you to reboot the system, click " Restart".

After restarting, you must specify system recovery settings. I recommend leaving everything as default and just clicking " Further".

In the next step, the system itself will find the system archive.
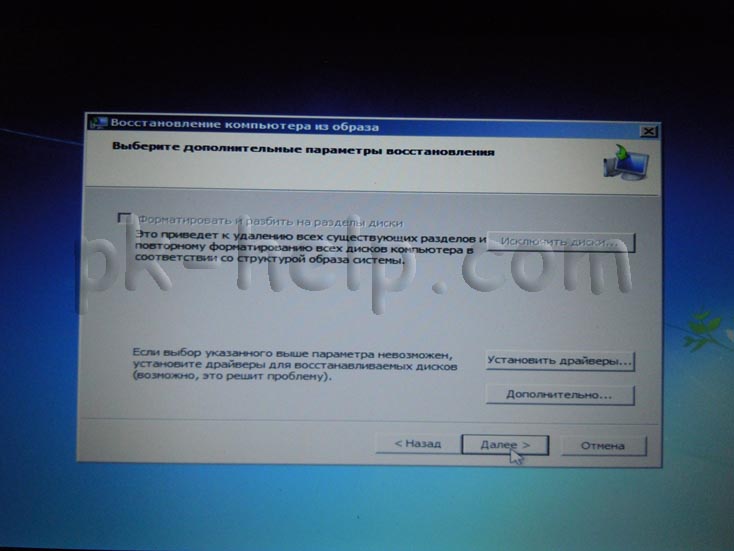
 Next, you can specify additional parameters.
 After that, confirm your choice and press " Ready".
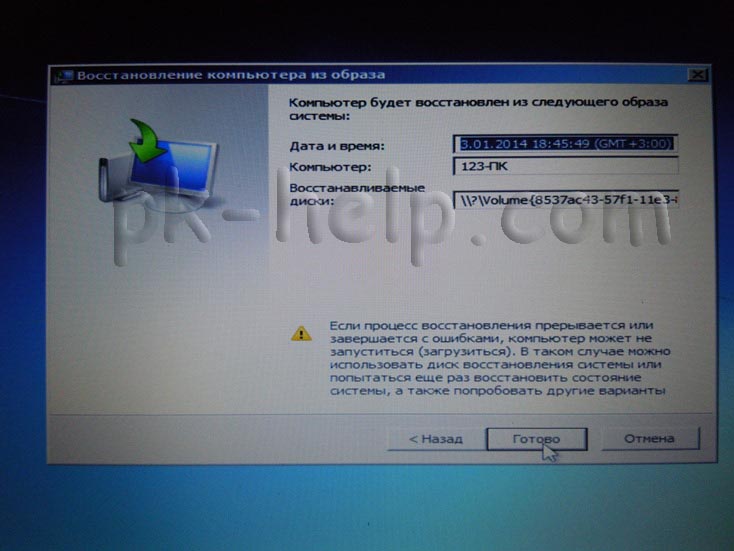
Confirm system recovery by clicking " Yes".

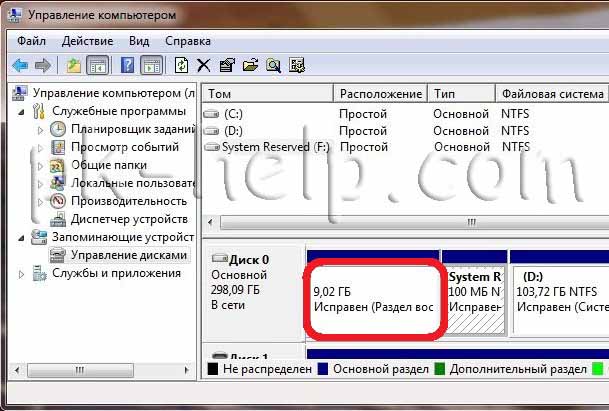
If all of the above methods did not help you, then all that remains is to return the Windows system to factory settings, i.e. lose all your data and programs. I’ll say right away that this method This will work if you have a hidden recovery volume on your hard drive, it should be provided from the factory. You can see it if you right-click on the shortcut "Computer" and choose « Management- Management disks"
 Below are the hotkeys for restoring laptops to factory settings:
- Acer- press the key combination Alt+F10
- Samsung- F4;
- Dell inspiron- when the dell.com splash screen appears, you need to type the key combination Ctrl+F11;
- HP Pavilion- when turning on, hold F11;
- Packard Bell - F10;
- Rover- when starting the laptop, hold down Alt;
- ASUS- when the ASUS logo appears, press F9;
- Sony vaio - at startup press F10;
- MSI- press F3 when starting;
- Fujitsu Siemens- after turning it on, press F8;
- LG- F11;
- Lenovo ThinkPad - F11;
- Toshiba- F8.
I hope this article has relieved you of your question. How to restore Windows 7 system and helped me get yours back operating system to the point of stable operation.