Very often, when reinstalling the operating system or during other manipulations with it, the error “The disk has a GPT partition style” may appear, so a completely logical question arises related to how to change the GPT partition style on a laptop.
The above error usually looks like this.
It is in this very style that the solution to the problem lies. But before you understand changing styles, you should understand why such an error occurs in the first place and what the concept of “GPT partition style” means.
Reason for the error
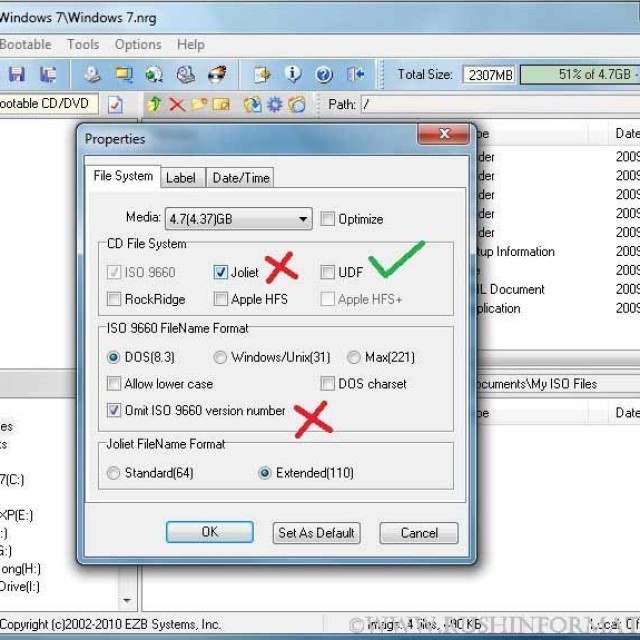
In general, the concept of “partition style” refers to how all the information is distributed on a computer’s hard drive. So, there are two types of these same styles - GPT and MBR. Modern operating systems use the GPT partition style.
It became part of UEFI, that is, a new type of interface connecting hardware and the operating system itself. You may be more familiar with the concept of BIOS.
So, UEFI has replaced BIOS. Both UEFI and BIOS are responsible for ensuring that all components of the computer can work correctly and the equipment can accept the commands that are given to it.
But the problem is that in some cases you still need to return to the old MBR style. In particular, such cases arise when it is necessary to install an old operating system.
This is also true for laptops, especially those that are not very powerful. For powerful gaming laptops, changing the partition style makes no sense.
And the solution to the “The disk has a GPT partition style” error is to install a newer operating system. And now, in fact, let's move on to changing the style of GPT partitions on the laptop. There are several ways to do this.
Using standard Windows tools
Let's say right away that the solution to the problem of changing the partition style is to change the GPT to the MBR. This can be done very simply.
Important: When using this method, all data from hard drive will be completely erased!
To change the section style to standard using Windows, you need to do the following:
- On your keyboard, press the Shift and F10 buttons simultaneously. This will bring up the command line. On some laptop models you also need to press the Fn key.
This should be done if the error that is shown in Figure 1 or at any other stage of working with the operating system occurs.
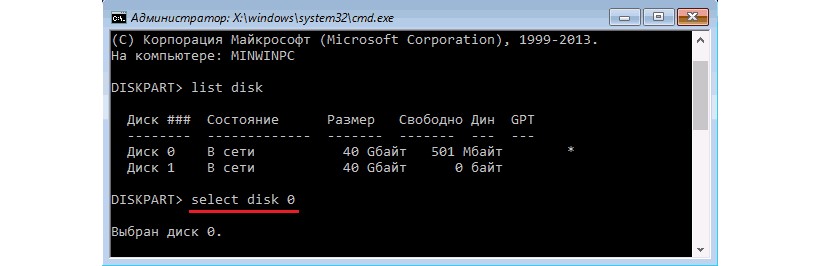
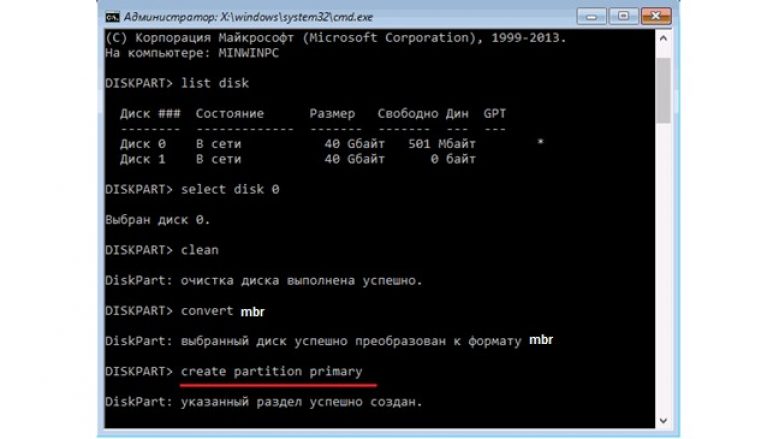
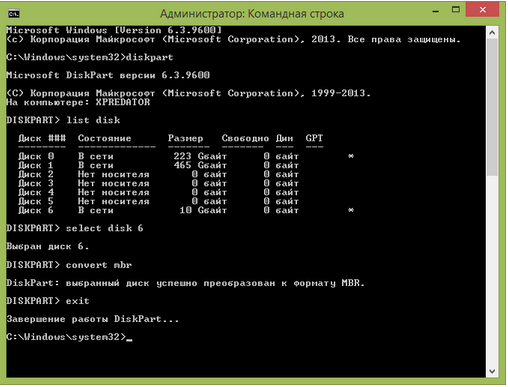
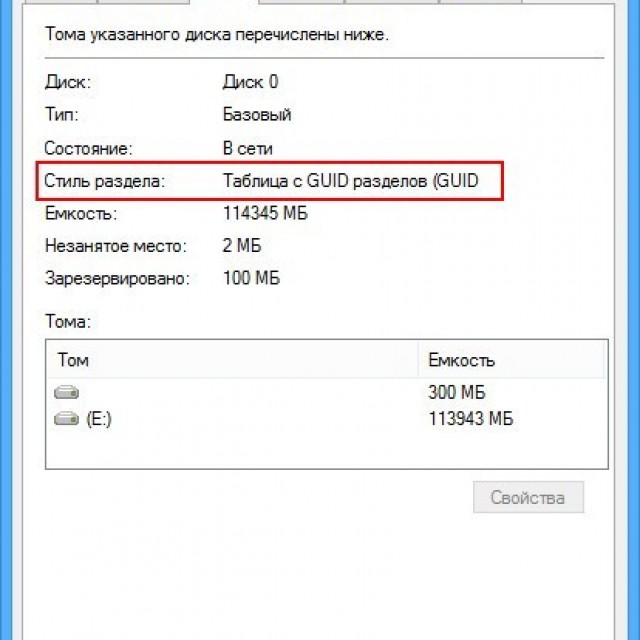
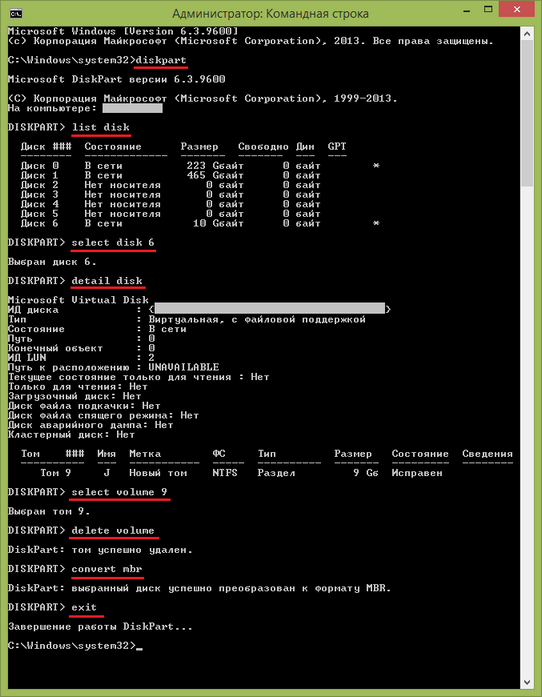
If, at the stage where you are when the error occurs, the command line does not start after pressing the key combination Shift +F10 or Fn +Shift +F10, you should return to one stage. But in most cases it should run. - At the command line, enter the command “list disk”. All this looks as shown in Figure 2. The command we need is underlined there with a red line.

- As you can see, after this a table of all the disks that are on the computer appears. Here we need to remember the disk numbers, which are circled in green circles in Figure 2.
By the way, there will be an asterisk next to those disks that have the GPT style. In the example above, disk number 0 has just such an asterisk. By the way, you can use it to find out which disk should be converted. - Next you need to enter the command “select disk a”, where “a” is the disk number (it is circled green in Figure No. 2). In Figure 3 this command is shown with a red line. After entering this, the message “Disk a selected” will appear, as shown below.
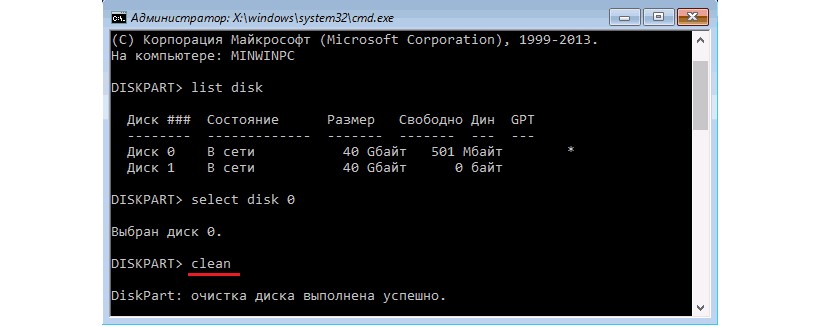
- Now the selected disk needs to be cleaned. To do this, enter a command with a quite logical name - “clean”. This is shown in Figure 4.
- Now another command is entered with the same logical name - “convert mbr”. Actually, it is responsible for converting the partition style to MBR.

- Now we need to make a new partition on the same disk. Otherwise, there will simply be no partitions on the disk, and the data will not fit anywhere. Then HDD it will simply become lifeless.
To create a new partition, use the “create partition primary” command.
- Next, you should link the created partition to the entire system. This is also an important step, because, otherwise, the partition will exist on the disk, but the system simply will not see it. For the link, there is a command also with a logical name - “assign”.
After this, you can exit the command line using the “exit” command.
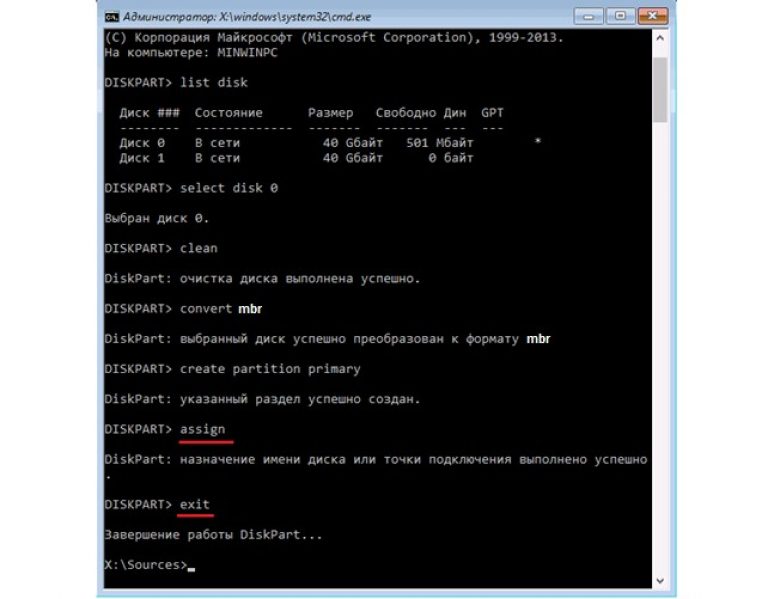
That's all. Now the disk has been converted to MBR and you can try to install an operating system on it or perform other manipulations.
Through the installation window
There is a much simpler way than described above. It consists of selecting “Disk Settings” right in the installation window.
First, you need to close the window that says “The disk has a GPT partition style” and return to the window for selecting a disk for installation. This method is suitable for cases where the hard drive capacity does not exceed 2.2 TB.
Interestingly, this is precisely the limitation of the MBR style. Finding this inscription is very simple; its location is also shown in Figure No. 8. Of course, before clicking on it you need to select required disk or the desired section, to do this you just need to click on it in the list.

After clicking on this inscription, a window will appear with all partitions of the selected disk. They should simply be deleted and then created again, only with the MBR style. This is also done very simply, and specifically, using the following sequence of actions:
- After clicking on “Disk Setup”, a set of commands will appear, which are shown in Figure 9. Among them, select the “Delete” command.
- In the window where the list of disks and partitions was previously located, the so-called Unallocated space on the disk will be present. It will be called that (an example of this is shown in Figure No. 10).
We need to select it and click the “Next” button (located in the lower right corner). After this, the installed system itself automatic mode will choose which style it needs and convert the system to that style.
Still, the first method is more reliable than this and there are several reasons for this, namely:
- The installed system may not convert the partition style correctly;
- In the first method, the user has the ability to control the entire conversion process;
- The command line can be called anywhere in the system installation or at any stage of other manipulations.
For these and other reasons, it is better to call command line and convert partitions standard means systems. The command line may look scary, but there is nothing criminal in it.
If time and opportunities allow, you can completely interrupt all operations, go to a regular desktop and convert the style of partitions on the disk using one of special programs designed for this purpose.
Hello! During the installation of the Windows 7 or Windows 8 operating system on your personal computer, a situation often occurs when, at one of the installation stages, an annoying message appears on the monitor screen, which says that installationwindows on this disk impossiblegpt, since its partition style is in GPT format.
In our today's episode, we will briefly go over concepts such as UEFI, GPT, MBR and BIOS, and also consider a detailed algorithm of actions that will allow you to safely complete the installation you have started when this message does not allow you to move forward.
Windows cannot be installed on this disk gpt
To solve this problem, several methods will be considered. The first of which implies full installation operating system to a disk with GPT partitions.
The second method involves changing the “GPT” disk partition format to the “MBR” format, which will give you the opportunity to complete the installation without much effort and unnecessary errors. Let's first look at the pros and cons of the two methods given above, and also talk about which one is preferable to use depending on the specific situation.
So, first, let’s figure out what “BIOS” and “UEFI” are, as well as the “MBR” and “GPT” disk formats.
BIOS is special software that, when you turn on the computer, diagnoses and analyzes its entire system, after which it boots the operating system, focusing on the boot record of the MBR hard drive. In one of my previous articles, I once devoted a separate lesson, in which I explained in more detail what BIOS is and its purpose. I recommend that you definitely read this article:
Most of the newest computer models use an alternative system called UEFI instead of the outdated BIOS system. Such a system is considered more reliable, fast and functional. It implements secure boot mode well, and also provides decent support for drivers and encrypted hard drives. But you can also read about this in more detail in one of my previous articles:
In addition, it perfectly reads the GPT partition format, which allows you to use drives with a large number of partitions. It is also worth saying that the developers of the UEFI system made it compatible with BIOS and MBR.
The trend is that hard drive capacities are constantly increasing. Many modern devices have hard disks, the capacity of which exceeds 4000GB. In this regard, we can say with confidence that the future lies with “UEFI” and “GPT”.
So, I suggest you move on to consider our question today - “Installing windows on this gpt disk is impossible.” At the end of today’s article there will be a video on how to install Windows on such a disk with a GPT partition.
Method No. 1. Installing the operating system on a disk with the “GPT” format
It is worth saying that the problem with the “GPT” format usually occurs among those who try to install the seventh or eighth version of Windows. So, in order to realize our plans, we should perform one of two actions - start installing the “64-bit version”, or boot the system in “UEFI” mode. One of these actions will fail and, most likely, it will be the second. In this case, we will need to perform only one or two manipulations - change several settings in the BIOS system, or change the same settings, plus prepare the UEFI boot drive for operation.
First of all, you need to check the settings in the BIOS system of your computer. In order to log in, at the very beginning of its loading, you must press a special key. Depending on the laptop model, this key may be “F2” or “F9”. On desktop computers, the “De”l key is most often used for these purposes. Moreover, on the monitors of most devices, when loading, a corresponding prompt is displayed, indicating the key that must be pressed to enter the “BIOS”.
It is also worth saying that the latter Windows version 8 allows users to enter the BIOS settings system when the system is already fully booted. For these purposes, you need to use the special Charms service panel, which is usually located on the right side of the screen. By clicking on it, from the drop-down list you need to select the “Change settings” tab, then click “Update and Recovery”, after which you should continue by selecting “Recovery”, then “Boot options”, then press the “Reboot the system” button.
Next, you need to go to the “Diagnostics” item. There are available additional parameters you should select the UEFI Firmware option. So you should find yourself in BIOS settings, from where you will need to activate some functions. First of all, you need to change the boot priority to “UEFI” instead of “CSM”. This can be done by going to the “BIOS Features” tab (in some systems this may be the “BIOS Setup” tab). Next, go to the “Peripherals” tab, where you also change the SATA operating mode. To do this, install "AHCI" instead of "IDE".
Additionally, it is recommended to install Safe Boot mode. To do this, set " Secure Boot" It is worth saying that there are many interfaces for the same BIOS version. Sometimes it can take you by surprise. However, it is worth understanding that the main points and interface elements are usually the same. The only difference is in the way they are placed on the screen. Knowing this, you should not have any serious difficulties regarding search and navigation. I have shown my version in the image below.

After making these changes, you can safely begin installing the operating system on a disk with the “GPT” format. Depending on what media you use for downloading, you may encounter the same error again. This often happens when using a bootable USB flash drive if it does not support UEFI boot. The problem can be solved quite simply - to do this, you need to format it and record it again, taking into account the appropriate settings. There are several ways to change these settings, but it's best to use the command line. In general, I will only note that when using boot disk everything should go smoothly.
Using a boot disk or flash drive that supports UEFI boot, all that remains is to install the system by setting the boot to BIOS.
Method No. 2. Installing the system by converting the disk partition format "GPT" to "MBR".
This method is perfect for those who do not want to understand complex BIOS settings, but just want to install the usual seven. In this case, all manipulations will have to be performed during the installation of the operating system. It is worth saying that the steps below assume complete erasure of data from the system disk.
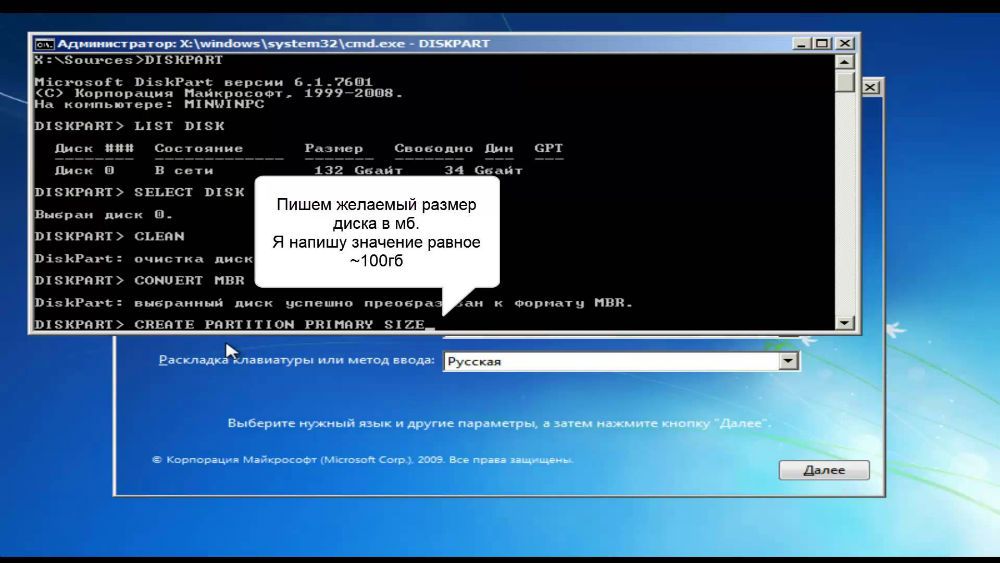
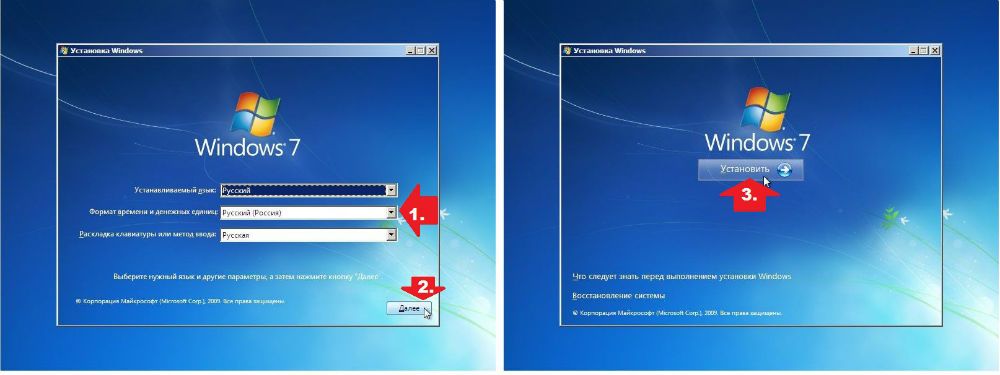
So, in order to change the GPT format to MBR, start the Windows installation from the installation disk. Then, launch the command prompt. To do this, hold down the key combination “Shift + F10”. Next you need to run a command called “diskpart”. To do this, simply enter this word and press “Enter”. Then enter the directive called “list disk” and then also press the “Enter” key.
After executing this command, you will be asked to select the disk number whose partitions need to be converted from the “GPT” to “MBR” format. Select the disk number using the “select disk Z” command, where the fictitious letter Z is the number of the disk to be formatted. This drive needs to be completely formatted. To do this, enter the “clean” directive and press the “Enter” key.
Next, we proceed directly to the conversion process. To do this, run the “convert mbr” command. At this stage, the process of converting the disk to the MBR format can be considered complete. All that remains is to exit - just enter keyword"exit" and press "Enter".
At the end of today’s article, I would like to note that each of the above methods is quite good, since it allows you to competently solve the problem associated with the incompatibility of the “GPT” format, however, the choice in favor of one or the second method is recommended depending on the specific situation. The first method is ideal for the newest and most modern computer models when installing a 64-bit version of the OS on them. Such computers usually run on UEFI. This BIOS is quite easy to distinguish - it has an interesting GUI, unlike the old one, where a regular blue background was used, with white symbols placed on it.
For a more complete understanding of today’s material, I suggest you watch the video below:
Accordingly, the second method is suitable when installing a 32-bit version of the OS on older device models with a “blue” BIOS. In this case, the method that involves converting the disk partition to another format is probably the only option in the case of the BIOS. Using this method, it is also important to know that “MBR” disks do not allow the creation of more than four partitions and cannot have more than 4000GB of memory. This concludes this review, see you all in the next article.
The progress in creating personal computers and server systems achieved over the past 20 years is obvious. However, the rudiments of dead platforms still determine many technological aspects of rapidly developing computing technology.
One of these rudiments is the BIOS - a microprogram in assembly language, executed in a special processor operating mode, recorded on a microcircuit that is part of the motherboard.
Time passes and the rudiments die off. So the BIOS is being replaced, long-awaitedly, by UEFI technology, which is replacing the Master Boot Record (MBR - Master Boot Record) with GPT.
What is GPT
GPT (an abbreviation for GUID Partition Table) is a format for storing records of hard disk partitions.
Unlike MBR, GPT does not contain executable code and does not transfer control of the computer to the operating system boot loader.
These functions are performed by UEFI. GPT contains the following information:
- hard drive block number, which is the beginning of the partition;
- section length in blocks;
- partition type.
GPT has a number of significant advantages over MBR.
Among them:
For compatibility reasons, if the selected disk has a GPT partition style, block zero contains an MBR with a special partition type value set. This is necessary for the hard drive to work on computers with BIOS.
It is clear that such a hard drive cannot be bootable, however, if the installed operating system supports disks with the GPT layout style, then information from them can be read.
Video: installing OS on GPT
Installing Windows on a GPT disk
To install Windows on a computer with GPT style hard marking disk, the following conditions must be met:
- a 64-bit version of the operating system must be installed;
- on motherboard The computer must be installed with UEFI, not BIOS.
The first condition is dictated by politics Microsoft: only 64-bit operating versions Windows systems Allows you to use UEFI and GPT.
Photo: Operating system Microsoft Windows 8 64-bit
The second condition follows from the fact that GPT is one of the UEFI standards and is not supported by regular BIOS.
To install the operating system you need installation disk or flash drive. Create bootable USB flash drive can be done in several ways:
- manually using the operating system command line;
- using specialized programs.
As specialized programs you can use:
Important! A UEFI-compatible flash drive must be formatted with the FAT32 file system, therefore, the maximum amount of data placed on it cannot exceed 4 GB.
If the operating system distribution is larger than 4 GB, it is recommended to format the flash drive in file system NTFS.
Setting up UEFI BIOS
To configure the UEFI BIOS, you need to do the following:
- enter UEFI by pressing the appropriate key when the computer boots;
- if you use a flash drive formatted in NTFS, you will have to disable the Secure Boot option;

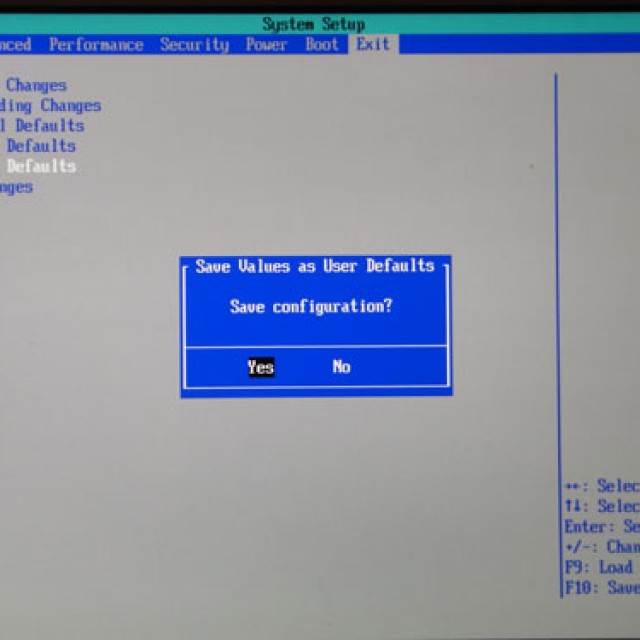
Figure 2. Saving changes and rebooting
Option Secure Boot allows execution only by those boot programs, which are signed with digital keys known to UEFI. This option is usually located in the Security menu; to disable it, you need to set it to Disabled.
In some cases, to disable the Secure Boot option, you will need to put the UEFI in BIOS compatibility mode. This operation may be called CSM, Legasy BIOS. For getting detailed information documentation must be consulted detailed description UEFI options. Possible view The UEFI menu for performing this operation is shown in the figure:

Photo: transferring UEFI to BIOS compatibility mode
To determine the loading order, press the button "Boot Menu" and in the dialog box that opens, select a flash drive or DVD drive.
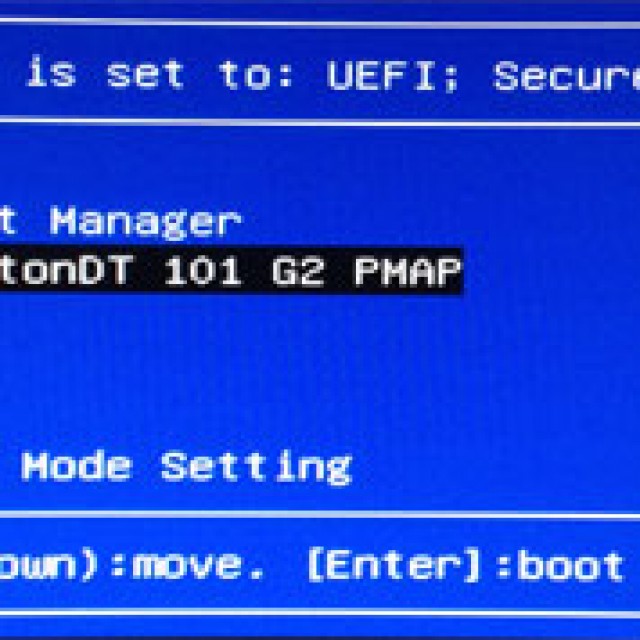
Attention! If BIOS compatibility mode has not been enabled, the DVD drive must operate in UEFI compatibility mode!
In some cases, saving changes is not required; the operating system installation process will begin immediately after the boot order is determined.
Please note: the Windows 7 operating system does not recognize a flash drive operating according to the USB 3.0 standard as a boot disk. The flash drive must be installed in a USB 1.0 or USB 2.0 connector. These connectors are usually black in color, unlike USB connectors 3.0, having a blue color.
Installation process
The process of installing an operating system on a disk with a GPT layout style is no different for Windows 7 and Windows 8 systems and includes the following sequence of user actions:
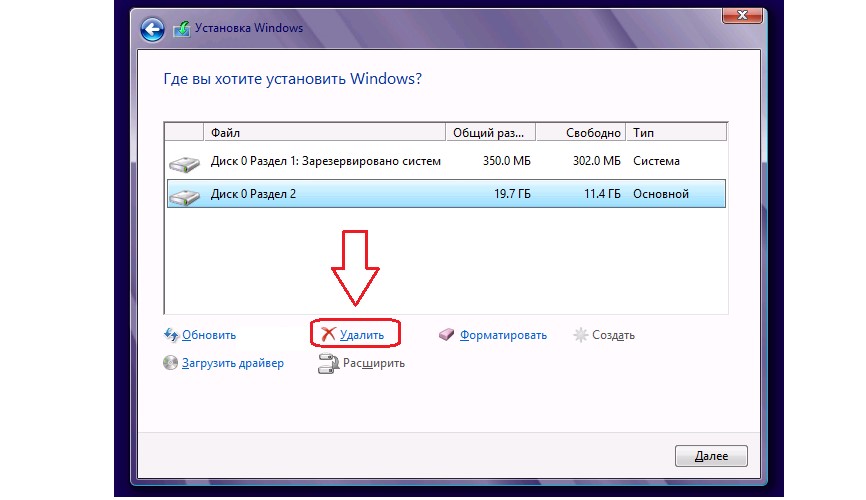
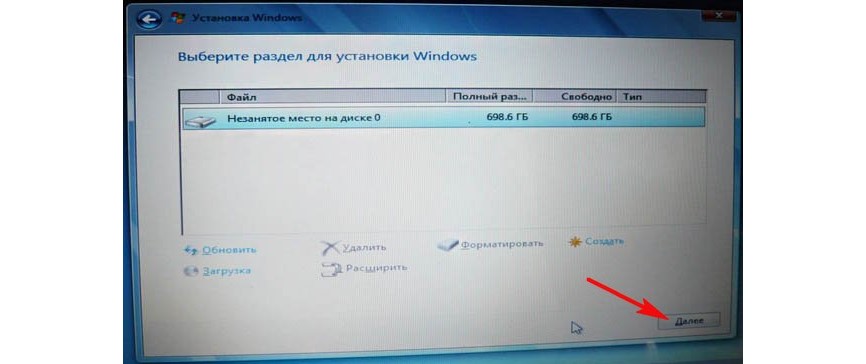
- when the operating system installer reaches the disk selection stage, it is necessary to delete all pre-existing partitions, resulting in a completely unpartitioned disk;
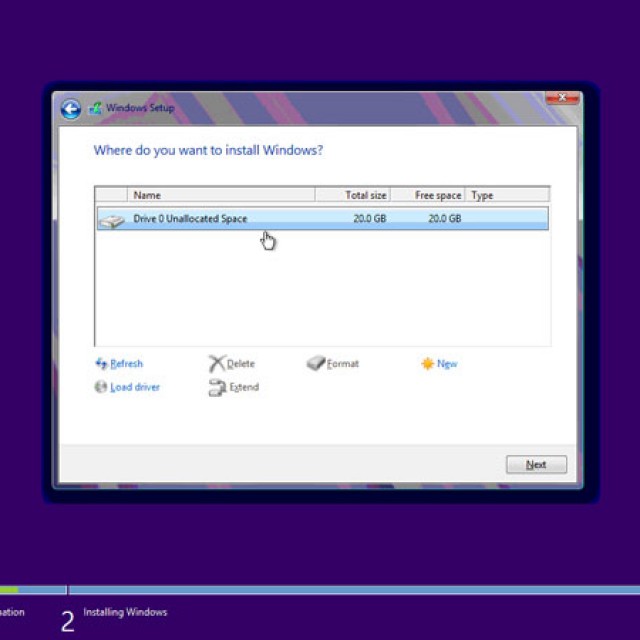
Photo: installing Windows on an unpartitioned disk
Please note: deleting pre-existing partitions cannot occur without data loss, so all information on the deleted partitions will be destroyed! Before deleting hard drive partitions, create backups important information.
What should I do if installing Windows on this disk is not possible with gpt partition style?
If the operating system installation program gives the error " Windows installation on this disc is not possible."
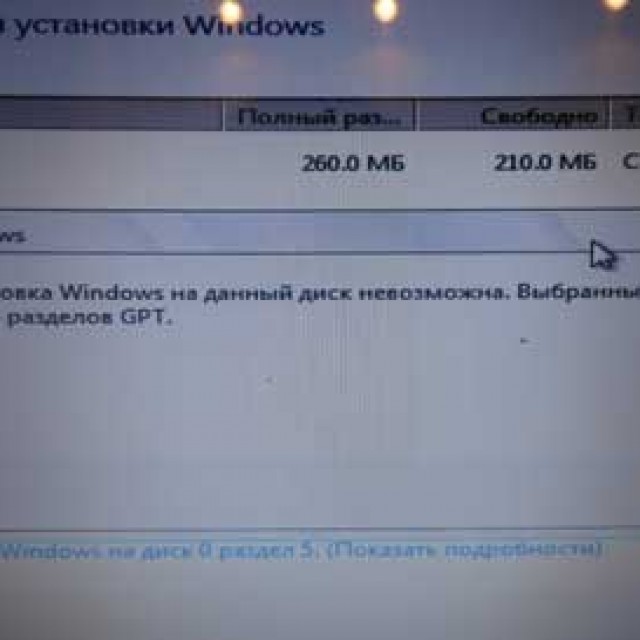
Photo: Selected disk has GPT partition style
The selected disk has a GPT partition style", there are two possible reasons:
- there is no UEFI on the computer;
- in UEFI, the Legasy BIOS (traditional BIOS) setting was activated, in which loading and working with disks marked in GPT style, is impossible. In this case, you need to disable BIOS compatibility mode.
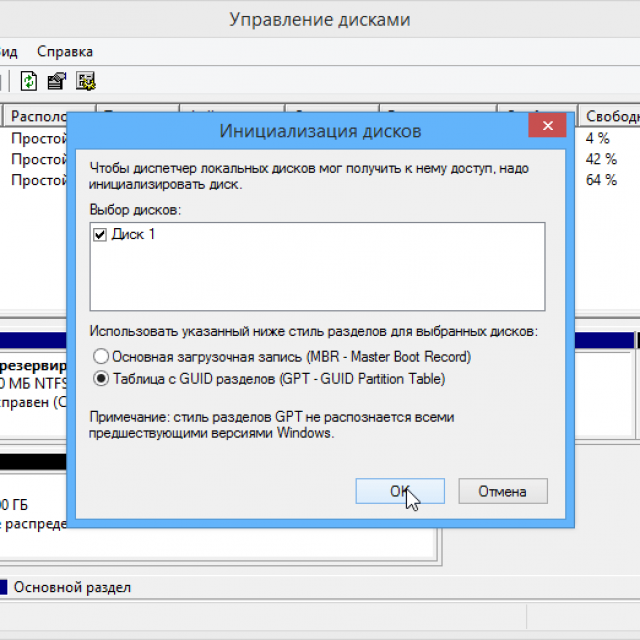
If the computer does not have UEFI, then you need to repartition the hard drive in MBR style. The simplest way is to use console command diskpart.
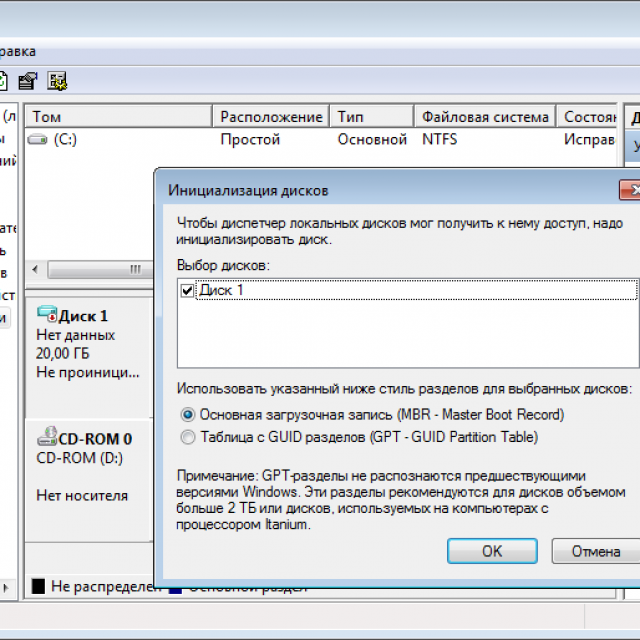
Photo: MBR style hard drive initialization
Please note that changing the disk partition style may destroy all data on it, so you should make backup copies of the information before changing the disk partition style.
Although GPT is relatively new technology, its developers have made every effort to ensure that the process of installing the operating system is not too complicated.
When installing Windows on a disk with a GPT partition style, you need to pay attention to the following:
- the computer must be running UEFI;
- in UEFI you need to disable the “Secure boot” option;
- When booting from a DVD drive, you must set it to UEFI compatibility mode.
Sometimes when installing Windows, including version 10, an error message is displayed on the screen. The text of the message is: “Windows cannot be installed on this disk.” In this case, the hard drive is displayed in the BIOS. It is also visible at the stage of installation of the operating system, where it could be divided into sections.
This problem occurs for two reasons:
- the controller is disabled in the BIOS (AHCI mode);
- The hard drive has a GPT volume.
Problem with AHCI mode
In addition to an error message informing that it is impossible to install Windows 7 or 10 on this disk, if there are difficulties with AHCI mode The computer cannot boot from the selected disk. The reason is that the controller may be disabled in the BIOS.
The problem is solved as follows:
Problem with GPT format
Another reason for the impossibility of installing Windows 7 or 10 versions with the display of a similar message may be the GPT format hard section disk.
Until recently, all hard drives were the same type. The only partition style was MBR. Over the past few years, manufacturers have been gradually switching to producing hard drives with the GPT format. And here boot files with the OS are not modified for new formats, and as a result, the error described above appears during installation.
MBR (main boot record) - This program code and data required to pre-start the computer. They are located in the initial marked sector of the hard drive. The MBR starts after the initial BIOS analysis of the performance of all devices. Its main function is to determine the location of the files that are needed to boot the OS.
GPT is a new standard for the volume table layout format. It was also developed standard interface built-in software for computers, replacing BIOS. It is called UEFI (Unified Extensible Firmware Interface).
The problem occurs because the OS installer cannot install Windows on the specified partition due to the fact that the partition table does not suit it.
There are 2 methods to solve the problem:
- installing the system on a similar disk;
- Converting a partition to MBR.
The choice of method should be determined by the following rules:
- if your computer supports the UEFI interface and you need to install a 64-bit OS (for example, Windows 10), then it is recommended to use the first option. Checking the presence of a UEFI interface is very simple. Graphics mode with mouse control indicates the presence of UEFI;
- if the computer was released several years ago, has a BIOS and you need to install a 32-bit operating system from MicroSoft, then you should GPT conversion in MBR.
Using MBR limits some features, such as:
- their volume cannot exceed 4 TB;
- The maximum number of volumes on the HDD is limited to 4.
Installation of Windows 7, 8 and 10 on GPT

Problems when installing an OS on a GPT volume usually arise for those who want to install Windows 7, 8 and 10.
To install the OS on a GPT volume, you must meet 2 conditions:
- install a 64-bit system (for example, Windows 10);
- boot in EFI mode.
If the first condition is not met, what should be prepared bootable UEFI storage device.
But in most cases, only the second condition is not met. Therefore, it is better to immediately go into the BIOS and check the settings.
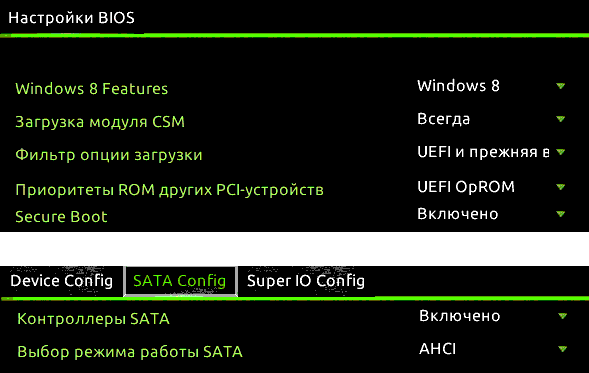
There are two parameters to set in the BIOS:
- enable UEFI boot;
- switch the operating mode from SATA to AHCI.
After saving the settings, you can install the OS on your computer. The mistake will not happen again.
Converting GPT volumes to MBR
There are several options for converting volume style. Let's look at them in more detail.
Converting to MBR when installing Windows via the command line
This method is optimal for use in situations where installing an OS such as Windows 7, 8, 10 is not feasible due to the GPT volume type. It can also be useful not only when installing the OS, but also during the normal operation of the OS for converting non-system partitions.
It should be remembered that when converting partitions, all information from them will be lost. Therefore, it is recommended to save everything important on an external storage device in advance.
To change the style of volumes from GPT to MBR via the command line:
- run the command line in Windows as a user with administrator rights;
- to display a list of hard drives connected to the computer, enter the commands “diskpart” and “list disk” in sequence;
- select the disk to change the style with the command “select disk D”, where D is the disk number;
Then two scenarios are possible.- perform a complete disk cleanup using the “clean” command. In this case, all HDD volumes will be deleted;
- You can delete HDD volumes one at a time using the commands “detail disk”, “select volume” and “delete volume”;
- start converting the disk to MBR with the “convert mbr” command;
- exit Diskpart by selecting “Exit”. Close the command prompt. After this, it is recommended to continue installing the operating system. This error message will no longer appear.
You can create volumes on the HDD by selecting “ Set up disk».
The volume style change is complete.
Changing partition style from GPT to MBR using Windows Disk Management
The alternative volume conversion method requires a properly functioning Windows 7, 8 or 10 operating system on personal computer. You can only convert a disk volume that is not a system one.
The sequence of steps to convert a HDD volume is as follows:
Utilities for changing partition style
In addition to the standard methods for converting HDD volumes provided by Microsoft developers, you can use third party utilities hard drive volume management, such as

Video on the topic
Or it starts to malfunction and it becomes necessary to install a new one. However, this may come with some difficulties. Due to incorrect parameters that may be set through no fault of the user, errors appear that interfere with the normal installation of the operating system. Microsoft systems Windows. Unfortunately, such troubles arise quite often. What to do in such a situation? In this article, we will look in detail at how to solve the error “Windows cannot be installed on this disk...”, as well as why such a malfunction occurs and what to do about it. Let's figure it out. Go!
If you get the error “The selected disk has a GPT partition style,” then you should pay attention to some parameters. For new UEFI computers that support 64-bit OS, it is better to install on GPT disk(even if a regular BIOS instead of UEFI is not scary, it is important that there is support for 64-bit systems). For older PCs with a regular BIOS that only support 23-bit OS, it is better to install it on an MBR disk (this is done by conversion).
Installing Windows on GPT
The most common problem encountered is Windows users 7, however, this does not exclude the possibility of this problem appearing in newer versions of the system. To install on a GPT disk, be sure to select the 64-bit version of the OS. It should be loaded in EFI mode. Most likely, the error appears precisely because the last condition is not met.
First of all, open the BIOS. This is done by pressing a certain key on the keyboard, depending on the computer model, at the time the PC starts. Usually these are the Del or F2 keys. Once you are in the BIOS, change the CSM to UEFI boot. You will find this item in the “BIOS Features” or “BIOS Setup” section. The next step is to select “AHCI” in the “Select SATA operating mode” item. In a regular BIOS, go to the “Advanced” tab, in the “AHCI Mode Control” section set “Manual”, and in the “Native AHCI Mode” item that appears below set “Disabled”. Those who have Windows 7 and older need to turn off Secure Boot mode.

Exist various options interfaces, so the names of some items may differ slightly, so do not be alarmed if they coincide with those indicated in the article. Don't forget to save your changes before exiting. After this, if you installed the OS from a disk, the error should no longer appear.
Those users who install Windows from a USB drive will most likely have to create a bootable USB flash drive again, only now with UEFI support, for the error to disappear. To support UEFI, after you have created a bootable USB flash drive, you need to transfer it to it ISO image with the system. You need to do it like this:
- Mount the image;
- Select all files and folders of the image;
- Right-click and from the list that appears, select “Send” and then “Removable disk”.
After this, installation problems should disappear.
Convert GPT to MBR
Before we move on to analyzing this process, I would like to draw your attention to the fact that it is better to move all data from the HDD, as they may be lost. If you are not worried about lost files, feel free to proceed to the steps below.
To convert a GPT partition table to an MBR partition table, use the key combination Shift+F10 when you are in the Windows Setup Wizard to launch the command line. Next, you need to repeat the following steps exactly. Display a list of all disks on your PC, enter “diskpart” and then “listdisk”. To select the disk with which you are going to work further, write “select disk M”. In place of “M”, indicate the number corresponding to the desired disk. The previous command “list disk” just displayed the numbers on the screen.
Next, clean the disk by typing “clean”. When the cleanup is complete, enter "convert mbr" to convert GPT to MBR. Please note that with this approach all data will be lost. At the end, write the “exit” command. You can now close the Command Prompt or continue working with it to create partitions.
There is an alternative option that will save all data. This method consists of using special utilities. One of these is MiniTool Partition Wizard Bootable. “Bootable” means that this version can be written to a USB drive (the flash drive must be bootable) and run even if Windows is not working. After downloading, you will see a menu in which you need to select the item corresponding to the name of the utility. Once in the MiniTool Partition Wizard Bootable window, select the desired disk and click on the “Convert GPT Disk to MBR Disk” item, which is located on the left. Then click the "Apply" button.
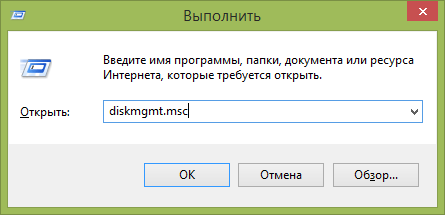
If the system installed on your computer is working properly, then you can download other programs that have similar functionality, for example, Acronis Disk Director or Aomei Partition Assistant. You can also use the built-in Windows tools. To immediately go to the desired utility, use the Win + R “diskmgmt.msc” combination. Going to the Disk Management window, select the disk you want to convert and click Delete Volume. After that, click on it again and click on the “Convert to MBR disk” item. Ready.

After reading the material presented, you will know what to do if during the installation of Windows OS an error warning appears that Windows installation on this disc is not possible. All the methods discussed above will help you solve the problem. Write in the comments whether the article was useful to you and ask if anything was unclear.