When working in Windows 7 OS, serious errors can occur, after which the operating system simply stops starting in Windows 7. normal mode. However, this is not a reason to get a Windows boot disk out of a dusty corner to reinstall it. Win 7 has in its arsenal the Recovery Environment - a powerful tool that will help restore the previous state of the operating system, avoiding the loss of data on your PC or laptop. In addition, other tools for resuscitation of Win 7 are available to users.
Windows 7 System Recovery Methods
You can revive Win 7:
- using a restore point;
- using safe mode;
- through command line;
- through the Recovery Environment;
- using a disk with the image of Win 7;
- using the Win recovery disk.
Rollback to a restore point from under Windows
If the OS boots normally, but you need to restore it to previous state using a restore point, to do this, do the following:
Rolling back the operating system to a restore point will allow you to remove the software that caused the PC to malfunction, undo unwanted changes, and return back to the state operating system when everything worked correctly and loaded properly. And last but not least: no data loss will occur, and all your recent documents will remain in place. Some files may remain duplicated by slightly changing their name. You can delete unnecessary copies of these files yourself.
Note: This process is completely reversible. If necessary, you can cancel it and restore the Windows 7 system using another point.
Rolling back the operating system in safe mode
This Windows 7 system recovery method is almost identical to the previous one. It is used in situations where Win does not start in normal mode:

Starting Win 7 Recovery from Command Prompt
In some cases, when Win 7 does not start in any mode other than safe, the following method helps: restore the Windows 7 system using the command line. You can execute it like this:

Rolling back the OS state through the Recovery Environment
The Windows 7 Recovery Environment includes 5 tools that offer the PC user various ways troubleshooting problems related to the health of a computer running Win 7. It is created in a hidden partition automatically. This happens when you install Win 7, be it "Maximum" or any other version.
To restore Windows 7 with this method, do the following:

Note: The first step is to start the OS with Last Known Good Configuration.
The operating system automatically remembers the parameters of the last successful start of the PC in normal mode and applies them when this option is selected. As a result, you can quickly regain access to the system without the slightest loss of data. If this method helps the PC user solve the problem, the question "How to roll back the Windows 7 system?" immediately stop worrying you.
Restoring Win 7 using an image disk
This Windows resuscitation method will allow you to return the lost functionality to the operating system, even if it categorically refuses to start in safe mode. You will need a bootable DVD with the version of Win 7 you have installed. If there is no OS image on the PC, create it yourself. To do this, go to the control panel and select the "Archive computer data" item. Then select the item indicated in the screenshot below and follow the instructions. 

Restoring Win 7 using a recovery disk
If, by pressing the F8 button, you did not find the line "Troubleshooting your computer" in the list, restoring Windows 7 using the system recovery disk will help. This happens if the user accidentally deletes the recovery environment partition, which is located in the Recovery directory of the system local drive. Do you think it remains only to remove Win 7 and install it again? This is not necessary - changes can be undone without having to reinstall the OS.
How to restore the Windows 7 system on a laptop, when loading, a black screen comes out, the recovery environment does not work, I deleted the hidden partitions, there is no original disk. I spent a lot of time, tell me what to do now or at least how to insure myself against such situations in the future, preferably without using paid programs Reserve copy data. Ilya.
How to restore the Windows 7 system
Unfortunately, there are enough reasons for this trouble, ranging from incorrectly written drivers, the harmful effects of a virus, errors file system and ending with our erroneous actions when working with a computer, there is no need to be afraid of such problems, you need to learn how to deal with them effectively.
Let's think how to restore windows 7 system, as well as insure ourselves for the future from possible troubles with the help of backup and recovery tools built into the operating system. We will learn how to restore Windows 7 without using third party programs for backup even when System Recovery Options does not load and the F-8 button is useless.
- Friends, if our article does not help you, then check out others on this topic, for example:, in it you will learn how to restore an unbootable system using various command line utilities, the first is Bootrec.exe with the /FixMbr and /FixBoot commands or the utility bootsect /NT60 SYS, as well as Bootrec.exe with the /RebuildBcd parameter, these utilities can be run from the recovery environment or from the Windows 7 recovery disk. The article will show you how to restore the operating system when system restore is disabled and much more.
- If Windows 7 freezes at boot or suddenly restarts, or suddenly may show blue screen with an error, then perhaps all these problems are due to numerous file system errors. How to fix the situation, even when the operating system does not boot due to these errors, is written in this article.
- Well, eight articles from the section will give you a detailed idea of \u200b\u200ball the built-in recovery tools in Windows 7: restore points, previous versions files, creating a system image and a recovery disk, and so on. So, let's begin.
Windows 7 has in its arsenal a fairly powerful and good tool-> recovery environment, which is created automatically when installing Windows 7 in a hidden partition and contains five other tools that solve numerous malfunctions and problems.
- Note: If you learn how to use Windows 7 recovery tools correctly, and this is not difficult, then you can do without additional and paid data backup programs.
You can start the recovery tool by pressing the F-8 button on the keyboard immediately after starting the computer. After that, a menu of Additional boot options will open in front of you: Troubleshoot your computer, then Safe mode, Safe mode with boot network drivers etc.

First thing to do is apply Launch Recovery(Automatically fix problems that prevent Windows from starting)

Required digression: After pressing the F-8 button when the computer boots up, you may not have a > item, but only Safe Mode and so on, the question arises why.
When installing Windows 7, a recovery environment partition is created automatically and is located at the root of the drive (C:) in the Recovery folder. You can also see in the Disk Management window - separate, hidden section hard drive, its volume is only 100 MB, it is used for storage boot files boot configuration (BCD) and system boot loader (bootmgr file).
You can see it Computer-> Management-> Disk Management. In no case should you delete this partition (many people delete it out of ignorance), otherwise you will not start the recovery environment, that is, the item Troubleshooting your computer you will not, and in more severe cases, you simply will not boot the system.

On the bottom screenshot, you can see another hidden partition, with a capacity of 9.02 GB, this is a hidden recovery partition with the factory settings of my laptop, you can have it more or less. It is also better not to delete it, if necessary, you can always restore Windows 7 from it.

What to do if you do not have a partition with the recovery environment and when you press the F-8 button, in the Advanced boot options menu, the Troubleshoot your computer item does not appear? How then to restore the Windows 7 system?
can save here installation disk with the Windows 7 operating system. You can start the recovery tool by booting from the original Windows 7 installation disk by selecting the item at the very beginning System Restore. If you do not have an installation disk with you, then you can use (you can make one in any running Windows 7) in five minutes, then you can also boot from it and do the same.


So, we still got into the System Recovery Options, either using the F-8 button and the Troubleshooting item, or the Windows 7 installation disc or the Windows 7 Recovery Disc.
In the System Restore Options menu, select the first one:
Launch Recovery-> there will be an analysis of faults that interfere with the normal loading of Windows 7 and their further correction for the normal loading and operation of the operating system. In the process, we may be warned that problems have been found in the boot options, click Fix and restart.


System Restore-> with the help of this function, if we have it enabled, we can roll back to the time when our Windows 7 worked fine and loaded, everything is simple here.


-> this is the tool I personally use, with skillful use it can be replaced paid programs on data backup, if interested, read on.

Why is he good? It will help when you don't have the original Windows 7 installation disc and you have deleted the hidden partition with the factory settings of your laptop, but that's not all.
Sometimes there are situations when, for various reasons or due to the actions of a virus, you will not be able to load the operating system at all, or many people ask How to restore Windows 7 system, even if the menu Additional options downloads will also be unavailable. Reinstall the operating system again?
Therefore, immediately after Windows installation 7 to your laptop or computer, create using this function-> Restoring a system image, archive image of our Windows 7 on the hard drive, save it. Be sure to create a Windows 7 Recovery Disc (read below), it will help you use the System Image if the Advanced Boot Options menu does not load.
Go to Start -> Control Panel->Archiving computer data.

Choose Creating a system image

then select Local disk, on which we will store the system archive. In my case, the Local Disk (E :), if you have system unit some hard drives, then of course it is better to place the backup on the hard drive where the operating system is not installed.


Note: You may notice that I have two operating systems installed on my laptop, so the backup program selected two Local drives.

Click Archive and the process of creating an archive with our Windows 7 will begin.
Created, it will look like this.

Now, you can deploy the archive with Windows 7 to your computer, if necessary, in 20-30 minutes. It would be better if you copy the archive with the system additionally to a portable HDD, this way you will protect yourself doubly.
Let's pretend that we can't start Windows 7 and deploy the backup we created, let's do it together.
We launch Windows 7 Recovery Tool by pressing the F-8 button on the keyboard immediately after starting the computer. The Advanced Boot Options menu opens, select Troubleshoot your computer.

Restoring a system image


Use the latest available system image


Of course, all our data on local disk, where the operating system is currently being restored, will be deleted, so you can pre-boot from any Live CD and copy what you need.
How else can you restore your Windows 7 system? Of course, using the Windows 7 Recovery Disk. Let's create Recovery disk, which can be used to boot the computer, it will contain recovery tools with which you can repair problems Windows boot 7, as well as restore the operating system from the backup copy that we created in advance.
Important: For a recovery disk, the bitness of the system is important, you can use a 32-bit recovery disk for any 32-bit Windows 7, and a 64-bit recovery disk for any 64-bit Windows 7.
Let's go again Archiving computer data
Create System Recovery Disc, insert the DVD into the drive, press
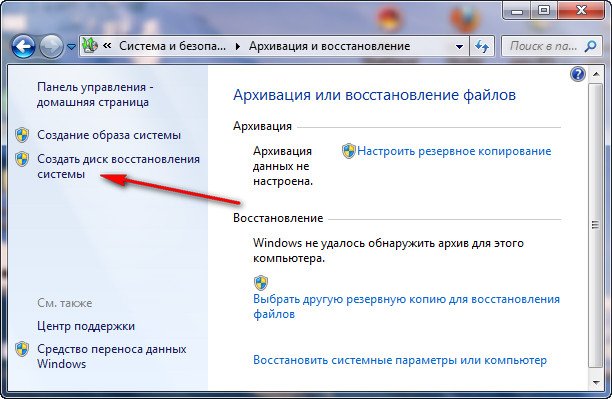
Create disc


When the Windows 7 Recovery Disk is ready, put it in a safe place.
In order to restore Windows 7 from the Recovery Disk, in principle, no operating system is needed at all. You will only need to change the boot priority to the drive in the BIOS of your computer, insert the recovery disk into it and restore your Windows 7 using the archive. Many here can draw an analogy with data backup programs, and rightly so, they work on the same principle, only Here is the functionality they have of course more comfortable.
- If you do not know how to change the boot priority in the BIOS, read our articles and
Restoring Windows 7 from the Recovery Disk. I show you how to do it. Suppose we are in trouble, we cannot start Windows 7, when we press F-8 on the keyboard, nothing happens immediately after starting the computer. We cannot get into the menu with Additional boot options and an error message is displayed. In this case, the system archive on the hard disk is not available to us. It was precisely such a nuisance that happened to our reader Ilya, who wrote us a letter asking for help.
In this scenario, many reinstall Windows 7 from scratch, but not you and me, because we have System recovery disc.
We insert it into the drive and reboot, put it in BIOS boot from the drive, as I said the disk is bootable, the System Recovery Options program is launched.
Press Enter until the offer to boot from disk is gone.
Greetings, dear readers.
Computers often fail for a variety of reasons. If this problem is related directly to the operating system, best solution there will be a reinstall. But what if there are important files left on the main disk or desktop? After all, when you flash everything will be deleted. The solution is a tool such as windows 7 system recovery from disk. This function allows you to restore the operating system when the latter refuses to boot.
In addition to a malfunctioning computer, we will also need a bootable windows disk. And it can be both a plastic medium and a flash drive. Moreover, it is desirable that this be the same image from which the current shell was installed. Indeed, otherwise, due to a version mismatch, the process may not go.
If the element from which the current system was installed is lost, try to find it on the Internet on another computer. Download the disk and save it to your hard drive.
After the system image is on one of the partitions, it must be correctly written to portable device. To do this, use one of the many programs. For example, I like Rufus. The application allows you to quickly cope with the task. It has an intuitive interface, so anyone can create a disc.
Procedure (to content)
There are many reasons why Win 7 can crash so much that it stops loading. To solve the problem, you need to use a tool that allows you to return everything to its place. It starts via BIOS:

It is worth noting that some laptop manufacturers even create special software that allows you to quickly restore the device to working capacity. So, for example, HP offers "Recovery manager", Samsung - Solution. In general, any large company provides similar functions.

I hope you can figure out how to use the tool built into the system without any problems. Believe me, with it you can correct a variety of errors.
windwix.com
The BIOS is a global configuration tool for the operating system. Practice shows that restoring the OS windows is better just through the BIOS, especially in cases where no other tricks help in any way.
Of course, there are situations when recovery is no longer possible, and often this happens for the reason that the system itself has critical damage that can be repaired complete removal and OS installation.
How to restore the system through BIOS - the necessary tools
To restore the system, you need an installation (or boot) disk with windows. You can also use a flash drive, because people don't always install disk drives these days. If the OS image is written to the media, you should check the hash sum, for this it is advisable to install the HashTab addon. The hash sum is recognized in the information for the image, and then it is checked in the properties of the image (already recorded on the media).

How to restore the system through BIOS
- Immediately after entering the BIOS, we need to select the storage medium that will automatically boot when the PC is turned on. To do this, press the F12 key and select BootDevicePriority from the Boot menu. For example, if we have a bootable DVD, then you need to select the appropriate device (with a DVD prefix). For a flash drive or external drive USB HDD is selected.
- You need to restart the computer by pressing the Reboot button in the BIOS menu. The system will ask you to press one or another key to start the media. IN fresh versions BIOS starts automatically.
- As a result, when the installation disk or other media is loaded, several options for operations related to the system will appear, among which there will be “System Restore”. You should click "Next" to start this process. There will be a definition current version system, after which it will become clear whether it is really possible to restore (if the OS version does not match, or even the edition of the current system, it will not be possible to restore using standard means). After the recovery process is completed, you need to click the "Yes, done" button, after which the PC will reboot, and the system will already be restored. Before rebooting the system, you should remove the disk or USB flash drive from the computer, otherwise these media will autoload.

- It is important to understand that with a full system restore, programs and games on personal computer will be deleted, but at the same time, files such as images, music, archives, and so on should remain.

SovetClub.ru
How to start System Restore on your computer
windows is a popular user operating system that runs millions of computers, laptops and mobile devices.
Wednesday is different high performance and stability, but it sometimes fails.
By knowing how to run System Restore, you will protect yourself from the problems associated with such failures.
A restore point is a copy of the system state at a specific point in time. windows is programmed to create restore points on its own when changes are made to the configuration as a result of installing drivers, network components, programs, etc. (see What programs do you need for your computer).
Checkpoints are also created every week if no major configuration changes have been made in the previous 7 days.
If desired, the user can manually create a new restore point. This is done without the need to use third-party software products, through the menu standard means titled "System Restore".
To get to your destination, open the Control Panel
Click the System and Security tab.
In this menu, select the System category, from there go to Advanced system settings. Here, select the System Protection tab.
alternative path - “This PC” → “Computer” → “System Properties”
The procedure is preserved for all current OS editions. In windows 8.1 and following, you can additionally activate / deactivate protection here.
To create a restore point, click the button of the same name and enter the desired name. It is also entered here Extra options: space allocated for storing restore points, etc.
The list of copies is available on the "System Restore" tab. If windows starts behaving suspiciously, go to the indicated dialog and “roll back” to the last working state.
Restoring the system through the BIOS using the recovery disk
If the computer does not boot, perform a BIOS recovery. To do this, you will need a special recovery disk or with installation way windows.
Follow the procedure below:
- insert the disk/flash drive and reboot the device. As soon as the branded splash screen of the laptop / motherboard manufacturer appears, click the Del key several times (a popular option for entering the BIOS). If Del doesn't work, try Esc or F2. If that doesn't work either, specify the button to enter the BIOS in the instructions for motherboard(see How to find out the characteristics of your computer);
- in BIOS, go to the 1st Boot Device tab (the name may = differ, but the essence remains the same). In the menu that opens, set the disk / flash drive as the first boot device. Click the F10 button or manually select the option to exit the BIOS with saving the changes made. After turning on the computer, you will be prompted to press any key to boot from a USB flash drive or disk (see below). DVD drive does not read discs). Do this and wait for the first dialog box to appear;
- the bootloader will offer to install windows or restore it by fixing the existing problems. Select the appropriate option and follow the installer's further instructions.
After waiting for the first dialog menu to appear, click the R button on your computer / laptop keyboard.
A window will open with a list of installed operating systems. If there is only one, you will only be shown the C: WINDOWS folder (the disk index may differ depending on which partition the OS was originally installed on). Click Enter.
A command prompt will open. You need to enter fixboot. Next, click Enter. After that, confirm your intentions by pressing the Y button. The system will start the process of repairing the boot sector. After waiting for a message about the successful creation of the boot sector, enter fixmbr into the command line.
Confirm your actions again by pressing Y. The program will create a new boot record. After waiting for the notification about the completion of this process, enter Exit at the command line. If everything went well, the device will reboot and start working normally.
After completing the above steps, open BIOS, find the 1st Boot Device menu there and configure the computer to boot from the hard drive. If you do not do this, the computer will continue to try to boot from the flash drive / disk in the future, which will not have the best effect on the speed of its inclusion (see How to increase the speed of your computer).
Features of windows 10 system recovery
Updated to current windows version 10, many users were unpleasantly surprised that the restore function is disabled by default here. If you encounter a similar phenomenon, first of all, activate the recovery function.
To do this, open the "Control Panel", go to the "System" section. On the left side of the dialog box, select the System Protection link.
Going to "Protection Options" (you will find it by opening Protection and in the Properties subcategory), select the system drive and click "Configure". On the “Recovery Options” tab that opens, in the “Protection” menu, activate the function by setting the switch to the appropriate position.
If a notification appears with text warning about the possible deletion of some old points, confirm your intentions by clicking Yes / OK.
Otherwise, the procedure for restoring windows 10 is no different from resuscitation early versions OS.
Use any of the appropriate instructions previously discussed.
Possible errors during system restore
The described recovery methods in the vast majority of situations allow you to bring windows back to life. Along with this, various failures and errors are not ruled out.
In the case of using a special disk or flash drive, such problems do not arise: either windows is restored and you continue to use your computer normally, or simply forgetting about the failures that have occurred, reinstall the OS (see How to install windows on Lenovo).
Errors (they are indicated by a specific index consisting of the letter “x”, zeros and additional letters / numbers or a text description) the user has to deal with mainly in cases where Windows boots and attempts to restore the system are made through the corresponding section of the Control Panel.
Under such circumstances, before resorting to drastic measures (reinstalling the OS), you can normalize work through Safe Mode.
Do the following:
- press the power button of the computer, and then several times click on the F8 key - until the menu appears additional ways downloads. If before that the computer prompts you to select a device for booting, select the hard drive and then click F8 until the mentioned menu opens;
- highlight the line "Troubleshoot your computer" and press Enter;
- wait until the recovery program starts;
- in the menu that opens, click Next;
- in the section that opens after this, enter the name of the computer administrator and click OK. By default, administrator rights are Account, created during the installation of windows and the first boot of the system;
- in the section for choosing the appropriate method, double-click on Restore OS image;
- wait until the console opens, then press 1;
- wait until the system prompts you to press Y as confirmation of consent to clear and return initial state disk storage. Confirm your choice. If nothing happens, change the keyboard layout to English (see Language bar disappeared);
- wait for the process to complete, reboot the device and try turning it on in standard mode.
If it doesn’t help, use the previously discussed method of recovering from a disk / flash drive.
Now you know how to normalize windows. The information received will help you not only to correctly orient yourself in case of failures in the operation of the OS, but also save on the service of third-party computer tuners (see Laptop does not turn on).
Roll back Windows 7 without a disc or with a recovery disc
1. How to restore Windows 7 without a disc
2. How to restore Windows 7 via BIOS
3. Important!!!
Division hard drive and creating recovery discs - Windows 7 is already installed.
In order to avoid calling a specialist in the event of a system failure,
, if not done, the hard disk on sections C and D, in section D we will save personal files. We also create a recovery disk or system image.
Windows recovery 7
If you do not have a recovery disk or system image for Windows 7, then consider the following recovery options:
- The PC does not boot - OS startup and recovery of the startup sector through the recovery console;
- PC boots up - system restore function without disk to roll back the system - System Restore.
- How to create a recovery disk (flash drive) Windows 7
- How to Create a System Image in Windows 7
- Restoring Windows 7 via BIOS using a USB flash drive or disk
- Restoring Windows 7 with system image(system image)
- How to Partition a Hard Drive After Installing Windows 7
1. Starting a Windows 7 Computer and Repairing the Startup Sector
If the PC no longer boots then boot it up in safe mode safe mode.
Before loading the Windows 7 operating system, immediately after pressing the computer's power button, press and release periodically or hold down the key F8 until a list of modes appears (Repair Your Computer, Safe Mode, etc.).
Select with the arrows on the keyboard up or down safe mode(safe mode) and press Enter. In the window that opens, click on the picture with the name of the administrator, if necessary, then enter the password - a window appears: Desktop with a record "Windows is running in safe mode, press OK
Further- recovery of the boot sector through the recovery console.
If the PC does not boot, then we repeat the launch until the modes appear (see again), but then we already select with the arrows on the keyboard and Enter, a new window opens System Recovery Options where we click

and then several times Next.
We are waiting for the end of the troubleshooting process and restart the computer. Again we repeat the start of the PC by pressing the key F8, choose again Repair Your Computer And Enter, but now we click not Startup Repair (troubleshooting the startup sector), A System Restore And Next, then performing the recovery according to the instructions (for details, see point 2).
Nothing works - PC won't boot- then you here
2. System Restore Windows 7 (System Restore)
PC booted up- we return Windows 7 to a state by date when everything worked well.
Click Start (Start) - All Programs (All programs) - Accessories (Standard) - System Tools (Utilities) - System Restore (System Restore) - Next (Next), check the box opposite Show other restore points and a restore point by date (when everything was fine), as shown in the example:

press again Next - Finish.
The computer restarts Windows 7 and if a window appears: Restoration Complete (Restoration completed). The system has recovered - it is necessary to produce computer cleaning. If nothing works, then reinstall Windows 7 .
3. How to create a Windows 7 recovery disk (flash drive)???
- Computer won't boot:
where to download the file and how to create recovery media - get started - Computer boots up:
create - disc recovery (recovery disc)- CD/DVD must be inserted.
Press ,
(on the left side of the window) Create a system repair disc - Create disc.
This disk will help restore the system in case of a system failure, when the system is no longer bootable (but not all files and programs, we will restore them later using a system image or Backup file (must be available)).
4. How to create a system image in Windows 7???
- We create - system image (system image)
Click Start - Control Panel - Back up your computer,
(on the left side of the window) Create a system image, choose a place,
where to save the system image ( On a hard disc, On one or more DVD DVD discs), On a network location). - If your disk is divided into partitions (C and D), then select the first one, on the hard disk, partition D,
otherwise on CD / DVD, then click Next (Next) - Start backup (Archive).
The system image can be restored system drivers required for stable Windows work 7 when a system failure occurs, as well as files and programs when the function System Restore unable to help.
5. Restore Windows 7 via BIOS

6. Restore Windows 7 using system image(system image)
computer boots up
and you can get to the control panel,
press Start - Control Panel - Back up your computer,
then select the previously created system image (archive) - do it according to the instructions.
All files and programs will be restored at the time the system image was created.- System recovery scheme using a system image,
computer won't boot:
turn on the PC using the power button, immediately press F8, opens Advanced Boot Options,
where choose Repair your computer and press Enter.
Next, select the keyboard, Next, name and password, OK,
on the menu System Recovery Options click System Image Recovery and further according to the instructions.
7. How to Partition a Hard Drive After Installing Windows 7
- We copy personal data in case of failure.
- To increase free memory, be sure to defragment the hard disk.
- Next, we divide the disk - click Start (Start) - Control Panel (Control Panel) - System and Security (System and Security) - Administrative Tools (Administration) - twice Computer Management (Computer Management) - Disk Management (Disk Management), on the right side windows, mark the drive (C :), then press the right mouse button, we see a menu where we select Shrink Volume. After a while, a window appears where we indicate the amount of memory (no more than specified) for the new partition (you can read more by clicking Shrink a Basic Volume base volume) ) and press Shrink.

If recovery failed, computer won't boot to Windows, then before reinstalling the system, you can try the last thing - creating a special boot disk if you haven't tried it, begin otherwise, only reinstallation or repair of electronics.
| Copying prohibited 2008 - PC Master All rights reserved |
| How to create a system recovery disk in windows 7 |
| Restoring Windows 7 |
| How to restore windows 7 |
| system rollback |


