I’ll show you how to save a backup copy of your iPhone in iCloud, that is, on the Internet on an Apple server, so that if you lose your iPhone or if something happens on your computer, you always have a backup copy of your iPhone “in the cloud.” Also, this method is definitely necessary for those who do not have a computer, but only an iPhone.
Here's an excerpt from Apple's website and information about what's saved in iCloud backup.
When you sign up for iCloud, you get 5 GB of free storage space. iCloud storage is used for iCloud Backup, iCloud Drive, iCloud Photo Library beta, app and document data stored in iCloud, and iCloud Mail messages (your @icloud.com account).
If the storage is full, you can purchase additional space. You can also manage your storage by reducing the size of your iCloud backup, deleting photos, videos, or other files stored in iCloud.What is saved when you back up to iCloud
iCloud automatically backs up your devices (iPhone, iPad, and iPod touch) daily over Wi-Fi when they're turned on, locked, and connected to a power source. With your data backed up to iCloud, you can quickly set up a new device and easily restore information on any of your old devices.When you create an iCloud backup, the following information is saved:
History of your purchases (music, movies, TV shows, apps and books).iCloud backup contains information about purchases, but not the purchases themselves. Restoring data from an iCloud backup automatically downloads purchased content from the iTunes Store, App Store, or iBooks Store. Some types of content may not be available for automatic download in all countries, and previous purchases that are no longer in the store or that have been refunded may not be available.
Photo and video on iOS devices unless iCloud Photo Library beta is enabled on your iOS 8.1 device. If you're in iCloud Photo Library beta, your photos and videos are already backed up in iCloud, so they're not included in iCloud Backup.
- Device Settings
- Application data
- Home screen view and application order
- iMessages, SMS and MMS messages
- Ringtones
- Visual Voicemail Messages
1. Enable iCloud backup
Go to Settings > iCloud.
Having entered iCloud settings, scroll down and look for a backup copy.

Click on Backup.

When this iPhone is plugged in, locked, and connected to Wi-Fi, it automatically backs up data such as your photo library, accounts, documents, Health data, HomeKit configuration, and settings.
Turn on iCloud Backup.

Start copying to iCloud. Your iPhone will no longer be automatically backed up to your computer when syncing with iTunes.
Click OK.

iCloud backup is enabled.

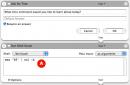
2. Create a backup in iCloud
Now we can create a backup that will be stored on the Apple server. Click Create backup.

The remaining time to create a copy in iCloud begins to count.

And the iPhone backup begins to be created in iCloud. This will take from 10 to 30 minutes, depending on the speed of your Wi-Fi and the load on the Apple server.

After the iCloud backup is created, the time of the last created copy will be indicated here.

3. Choose what to include in the iCloud backup
In Settings > iCloud, turn on the sliders for those items that you want to include in the iPhone backup that will be stored in iCloud. For example, you can enable mail, contacts, notes, then your contacts and numbers will be saved in the iCloud backup. And if you lose your iPhone, you can restore all your contacts from iCloud backup.

You can also enable keychain.

So that the keychain is stored in an iCloud backup. iCloud Keychain stores the passwords and credit card information you've saved to date on your verified devices. The information is stored in encrypted video and cannot be read by Apple.

4. Select what will be stored in the iCloud backup
To see which applications save data in iCloud backup, go to Settings > iCloud > Storage.

This displays how much space you have available to store your backup and how much is left. To see what is stored in your iPhone backup in iCloud, click on Storage.

Storage shows your devices (if you have more than one) and how much space their iCloud backups take up. Click on your iPhone to see which apps are taking up how much space.

Settings > iCloud > Storage > Storage > This iPhone displays how much apps are using in your iCloud backup.

You can disable those applications whose data you do not want to be stored in your iCloud backup. You can also delete your iCloud backup here.

5. Buy space on iCloud
If 5 GB is not enough for you. to store your backup, this space can be increased up to 1 TeraByte. Go to Settings > iCloud > Storage. To increase the space in iCloud for your iPhone backups, go to Settings > iCloud > Storage and click Buy more space.

By default, Apple gives you 5 GB. free to store your backups in iCloud.

But you can increase space and expand storage in iCloud (money will be debited from your App Store account):
- 20 GB., but it will cost 39 rubles per month
- 200 GB., but it will cost 149 rubles per month
- 500 GB., but it will cost 379 rubles per month
- 1 TB. (this is 1000 GB), but it will cost 749 rubles per month

You can also cancel your plan or reduce your storage capacity. This can be done on the device at any time. Contact Apple within 15 days of switching to a new plan for a refund. Partial refunds are possible in accordance with the legal procedure.
This is if you change your mind about using a paid plan and decide to get a refund.

Let's say you want to increase your iCloud storage to 20 GB. We choose 20 GB. and click Buy.

You now need to sign in to the iTunes Store to make a purchase. (money will be debited from your App Store account).
Enter your Apple iD password and click OK.

iCloud storage space is being purchased.

The purchase is completed. Now you have 20 GB available. iCloud storage. Click OK.

iCloud storage size has been increased.
Surely, every more or less knowledgeable iOS user, understanding how difficult the process of restoring personal data (contacts, accounts, calendars) can sometimes be, first of all takes care of their reliable backup.
What is all this for?
In your hands is a modern mobile device with a huge variety of functions. This device, be it an iPhone or an iPad, is designed to make your life easier. Throughout the day, you often access it: make calls, add new contacts, take important notes, use calendar reminders, save bookmarks in the browser, or simply play games. This is not all that your iOS device is capable of.
Over time, your iPhone or iPad becomes a repository of the most important information that you have accumulated over many months or years. Hundreds of contacts, notes, customized calendars, bookmarks and game saves... Isn't it true that this information is very dear to you?
Unfortunately, there are also unpleasant surprises in our lives, due to which we are often forced to part with our devices.
So, the bitterness of losing a gadget will be even stronger if, along with it, you lose all the personal data located in the device, collected bit by bit over many months or years. Buying a new device is sometimes much easier than recovering precious personal data.
To prevent this from happening, and for you to be as calm as possible about parting with your favorite device, you need to periodically resort to backing up your personal data.
As we noted above, there is preservation of personal data by creating backup copies. We talked about that in one of our articles about saving data on a jailbroken device using the utility iLex Backup You can find out . Also, a third-party application that has truly enormous capabilities can also be very useful.
How to Backup to iCloud on iPhone, iPad or iPod Touch
iCloud is a standard cloud service available on all Apple devices running iOS 5 and higher. By using iCloud You can set up automatic saving of data for almost any application installed on your iOS device.
1.
Register an Apple ID. You can sign up for an Apple ID directly on your device or in iTunes. .
2.
Open the default application Settings on your iOS device and go to the section iCloud.

3.
Enter your account information (Apple ID) registered in point 1.
4.
Select an item Backup copy.
 5.
Activate the ““ item.
5.
Activate the ““ item.
 The backup will be automatically created if the iOS device is connected to a power source and connected to a Wi-Fi network. Pressing a button Create a backup will result in an immediate backup.
You can view the created backup copy along the way Settings -> iCloud -> Storage -> Manage.

You can read how to select applications whose data is saved in iCloud backup.
How can I transfer photos and other data from iCloud to my computer to free up space on cloud storage? Using a web interface and a client on Windows to manage information on iCloud.
Saving photos to iCloud
To transfer photos, you first need to configure their saving to iCloud:
- Open settings.
- Click on your iCloud account.
- Go to the "iCloud" section.
- Open the Photos submenu and turn on iCloud Photo Library.
When this option is activated, the phone will transfer photos and videos to the storage; you cannot split the Media Library. As an alternative, you can use the “My Photo Stream” option - only photos will be sent to iCloud, but they are stored for only 30 days, and you cannot upload more than 1000 photos per month.
In iCloud settings, you can also enable synchronization of contacts, notes, reminders, calendar, etc. If there is not enough space and you cannot transfer data to your computer, you will have to increase the storage capacity:
- Open the "iCloud" section.
- Click on the "Storage" button.
- Select "Buy a seat"
- Specify the required volume and pay for capacity expansion And.

If you don't want to pay, periodically clear your storage of large files. Transferring photos to your computer is a great way to free up space on iCloud.
Using the web interface
The easiest way to transfer photos to your computer is to download them from the iCloud website:

The main inconvenience in the web interface is the absence of a “Select all” button. If you want to download all the photos, select the first file with the mouse, then go down to the last photo, hold down the Shift key and click on it. This will select all the files on the page.

If you want to figure out how to transfer contacts, then there is nothing complicated here either. The iCloud website has a “Contacts” section, which displays records synchronized with the iPhone.

You can download them all or individually as vCard files and then open them in Windows Contacts.
iCloud Drive
Another convenient way to upload photos to cloud storage and download them to your computer is to use the iCloud Drive application. Its advantage is that you can upload pictures separately. This is also a disadvantage: mass uploading of files is not provided.
- On your iPhone, open the photo you want to save to the cloud.
- Click on the arrow button in the bottom corner.
- Select Add to iCloud Drive.

You will have to repeat the operation for each photo you want to send to iCloud. Next, you can use the instructions on how to transfer data from iCloud to your computer via the web interface, or install the iCloud program for Windows on your PC. Mac owners do not need to install additional software - the iCloud management program is built into the system.
iCloud cloud storage is one of Apple's outstanding developments. However, access to iCloud backup is limited for users. But did you know that it is still possible to open and view data in iCloud on your PC or Mac? In general, there are several ways to view storage data; in this article we will look at two of them. Using our instructions, you can view your backup data in iCloud, even if it was made for the latest version of iOS 12.
3 Ways to Open iCloud Backup
View iCloud backup via restoring it on an iOS device
The first method involves restoring an iCloud backup to an iOS device, including iPhone, iPad, and iPod touch. This method is official - it is offered by Apple itself. However, all current data on your iPhone will be replaced by the restored backup copy. If you still decide to use this method, follow the instructions below.
Step 1. Go to Settings -> General -> Reset. Select the "Erase content and settings" option.
Step 2: The Programs and Data window will open. Click on "Recover from iCloud backup". Sign in to your account.
Step 3. Go to the “Select copy” function and mark the backup you want to view.
Step 4. Wait until the data from the iCloud backup is downloaded, after which you can view the files in this copy.
Is it possible to view iCloud backup data without restoring it? How to view iCloud backup without losing data? A third-party application for viewing iCloud backup will help with this - more on this later in our article.
Method 2: Open and view up to 25 types of data in iCloud backup
The program allows you to go in and view up to 25 different types of files saved in your iCloud backup. You can view and export data from iCloud or iTunes backups, as well as current data from your iOS device. The application works with both Windows and Mac and is highly efficient and responsive.
Step 1.Download the program, install and run it on your PC.
Step 2. Select the recovery mode "Recover files from iCloud". Sign in to your iCloud account. Here you can choose either of two login options: 1) sign in with your Apple ID; 2) if your PC is already logged into the cloud storage, go to the “Programmatic access” option and the login will be performed automatically.


Step 3. After logging into your account, a list of available backups will appear on the screen. Here you can check the details (name, date, version, size) of any backup file. Select the backup that contains the data you need and click “Forward.”
Step 4. In the window that opens, select the type of files to download and scan. To speed up the process, you can upload only the types of files that you need. Click "Forward" to start downloading the selected objects from the cloud.
Step 5. Once the download is complete, the program will automatically start scanning the data and provide you with the details of the objects for preview. In the left panel you can select the required file category. The scan results contain both information existing on your device and information deleted from the backup copy. At the bottom of the window you can enable the “Show only deleted” function.

Step 6. Mark the items you want to restore and click "Recover". You can restore files selectively or all at once. In addition, the program allows you to select the desired format for saving files. Media content (photos, videos) will be saved in their original formats. There are two recovery options for contacts, messages and notes: “Recover to device” and “Recover to computer”. When choosing the first option, make sure that your iPhone, iPad or iPod is connected to your PC using a USB cable.

You can also restore via UltData
Method 3. Life hack: How to check saved data in iCloud Online
If you have not created a backup in iCloud, but save your data in cloud storage using the following path: Settings -> (Name) -> iCloud -> Applications using iCloud; then you can easily get a backup via iCloud.com.
Step 2: The available data types will be displayed on the screen. Click on a data type to see its contents.

This method is quite effective for viewing data in iCloud, but its disadvantage is limited access to content. For example, MMS, text messages, iMessages, third-party applications and some other types of data are inaccessible.
To ensure efficient viewing of iCloud backup data without any data loss, you can use various third-party applications designed specifically for the convenience of users, such as the Tenorshare UltData application. With its efficient operation, user-friendly interface and ease of use, the program has gained popularity among users of Apple products. Its main feature is the efficiency of operation and the safety of all your data - you will undoubtedly like it too!
Hi all! Recently I received a call from a friend whose contacts had disappeared from her iPhone 6, and she did not understand how this happened and why. As a result of questioning, it turned out that she gave her old iPhone 5 to her mother... Has anyone already guessed what could have happened to her address book? If not, then I’ll explain - she simply gave her phone to her mother without deleting her iCloud account from the device, and my mother, as a lover of cleanliness and order, decided to delete all unnecessary contacts from her “new” iPhone, thereby deleting contacts from iCloud, and from all devices linked to your account! Let me now tell you in more detail about iCloud contacts, and how to avoid such troubles!
iCloud backup
How is an iCloud backup created?
If I understand everything correctly, then if the copy was created at night, for example at 1:00, and at lunch you decided to delete a couple of contacts, and then realized it, then you can freely reset the settings and restore the data from the last and only (!! !) copies. “Why the only one?” - you may ask, because copies may also be on iTunes. But now we are talking about one of the most common methods (which I use myself) - creating a copy only in iCloud.
The most sad thing in the situation described above is the following: what if you deleted your contacts in the morning, at 8:00, and then came to work and connected your iPhone to the charger again, the iPhone had already found and made friends with your work WiFi network and you left it for a couple hours, and only after lunch decided that remote contacts might still be useful to you? There is no point in restoring from a copy, since your last and only (!!!) copy dates back 8+N hours (when you put your iPhone on charge at work) and no longer there deleted contacts! As they say, hit or miss... Moreover, what we described with contacts also happens with calendars, notes, etc.
What if there is data left on the iPad?
Only 2 things can save you from the father of Russian democracy - if, suddenly, somehow there was a copy of the necessary data on another device - a computer or iPad, or there was a local copy of contacts on the computer. Again, if the iPad has this data and is connected to the Internet, then it has already disappeared there (via iCloud synchronization occurs within a few seconds or minutes). Although, if the Internet suddenly disappeared at home, the iPad was discharged before the data was deleted, or it was turned off altogether, then getting the data out will not be difficult, the main thing is to be careful - The device must not connect to the Internet! If you turn on the device, turn off your home WiFi router and remove the SIM card so that the device cannot access the Internet and synchronize, thereby deleting the necessary data!
I keep thinking - is it difficult to implement an analogue of Time Machine for iCloud? (Hurray, it turns out that there is such a function, and you can look. True, not everything I dreamed of is implemented there, but more on that a little later...) Do not create copies and copies of everything there, but only what is most important - contacts, notes, Safari bookmarks, keychain, etc.
What I mean? Time Machine has the latest copy, as well as a weekly copy, monthly copy, etc. What prevents you from making several copies of lightweight data in iCloud, such as contacts/notes, and also allowing you to manually select the necessary data? The most interesting thing is that it would take up very little space - a copy of contacts, notes, Safari pages takes up a maximum of 100 MB. Yes, mail may take up a little more space, but there is a separate basket there, in case of an error :)
How to save contacts from iCloud?
Save Contacts on Mac
I’ll start with the Mac :) First, you need to make sure that the iCloud service is connected to the Mac and contact synchronization is enabled there. If not, then go to System Preferences -> iCloud and enter your Apple ID and password for iCloud there, or go to the next point (if the Mac is not yours, or you just don’t want to create an account on it). If you have created an iCloud account on your Mac, then calmly go to the Address Book program (Mac OS 10.7, 10.8) or Contacts (Mac OS 10.9, 10.10, 10.11). If you see all your contacts in the program, then everything is going as it should, otherwise, go to the iCloud settings on the Mac and check that your contacts are included in synchronization.

So, the Contacts program is open (I show it using OS X 10.10 as an example), and to save you need to select all contacts, and you can do this by holding the CMD+A key combination on your keyboard. Or you can select one or more contacts by clicking on them while holding down the CMD key. After selecting contacts, you need to go to the File - Export menu and there select “Export vCard...” or “Contacts Archive...” In the new window, select a location to save and click Save. That's it, your contacts are saved on your computer in a separate file, and no matter what, you can always restore your address book. Personally, at the moment of saving, I turn on the paranoid mode and make a copy both in the vCard and in the Address Book Archive - believe me, it’s better to be safe! 🙂 By the way, the paranoid mode is not unfounded - if you suddenly need to transfer contacts to Gmail or iCloud, then you can download the vCard file through the sites, and not the Address Book Archive.

Save the generated files in mail, the cloud and many other places, so that if necessary, they are always at hand!
Save contacts via iCloud website
If you have a Mac or computer with Windows or Linux at hand, you can simply go to the site through a browser and save all your contacts from there. First you need to go to the same iCloud website, enter your Apple ID and password for iCloud. After you have entered your name and password, a window will appear with a set of services - mail, contacts, calendars, etc. We need contacts:

After entering contacts, you can also select one, several or all contacts, as in the previous paragraph. You can select all contacts by pressing CMD+A or clicking on the gear in the lower left corner and selecting Select all. Once the necessary contacts are selected, you can begin saving them to your computer. To do this, click on the gear icon and select Export vCard:

If for some reason the download does not start, try another browser (in Google Chrome, I don’t save contacts from iCloud the first time)... Through Safari, contacts are saved almost instantly. Maybe this is a problem in my Mac, I don’t know, the main thing is to know a backup option :)
Save contacts in Windows
Everything is very simple here - either you need to install iCloud for Windows and tinker with something there (forgive me, friends, but I don’t know what is there and how to do it - I don’t like Windows), or just go to the site through a browser and there you are do as in the previous paragraph! I hope that you will forgive me for this arbitrariness and be able to save contacts through the browser :) The problem with Windows is that in different versions of Outlook, Contacts (Windows) everything is done differently, and I have no desire to sort through +100500 options. Besides, most of my readers work with OS X and iOS :)
If you have a backup copy of your contacts, you can restore them from the archive at any time by opening them on the desired device, or by uploading them to Google or iCloud services... For example, an address book in vCard format can be uploaded to Google Contacts, after which they will appear on all linked devices. You can also upload the same vCard file to iCloud or synchronize with Nokia, for example...
And a little advice from my personal experience - back up your contacts to your computer whenever you want to make changes to your address book. Sometimes I review my address book to make sure the data is up to date, sort contacts into groups, and every time before I start the process, I create a copy on my computer, as well as a copy after all the changes! It’s like the old joke - it’s better to shoot, reload and shoot again than to shine a flashlight and ask “who’s there?” 🙂