(released December 2014) ship with Pip. This is the best feature of any Python release. It makes the community's wealth of libraries accessible to everyone. Newbies are no longer excluded from using community libraries by the prohibitive difficulty of setup. In shipping with a package manager, Python joins Ruby , Node.js , Haskell , Perl , --almost every other contemporary language with a majority open-source community.
If you do find that pip is not available when using Python 3.4+ or Python 2.7.9+, simply execute e.g.:
Py -3 -m ensurepip
Of course, that doesn't mean Python packaging is problem solved. The experience remains frustrating. I discuss this .
And, alas for everyone using Python 2.7.8 or earlier (a sizable portion of the community). There's no plan to ship Pip to you. Manual instructions follow.
Python 2 ≤ 2.7.8 and Python 3 ≤ 3.3
Download get-pip.py , being careful to save it as a .py file rather than .txt . Then, run it from the command prompt:
Python get-pip.py
You may need an administrator command prompt to do this. Follow Start a Command Prompt as an Administrator(Microsoft TechNet).
This installs the pip package, which (in Windows) contains ...\Scripts\pip.exe that path must be in PATH environment variable to use pip from the command line (see the second part of "Alternative Instructions" for adding it to your PATH,
alternative instructions
The official documentation tells users to install Pip and each of its dependencies from source. That's tedious for the experienced and prohibitively difficult for newbies.
For our sake, Christoph Gohlke prepares Windows installers (.msi) for popular Python packages. He builds installers for all Python versions, both 32 and 64 bit. You need to:
For me, this installed Pip at C:\Python27\Scripts\pip.exe . Find pip.exe on your computer, then add its folder (for example, C:\Python27\Scripts) to your path (Start / Edit environment variables). Now you should be able to run pip from the command line. Try installing a package:
pip install http
There you go (hopefully)! Solutions for common problems are given below:
Proxy problems
If you work in an office, you might be behind an HTTP proxy. If so, set the environment variables http_proxy and https_proxy . Most Python applications (and other free software) respect these. Example syntax:
http://proxy_url:port http://username: [email protected] _url:port
If you"re really unlucky, your proxy might be a Microsoft
In this section, we will learn how to install Python and the package manager on Windows 10 from scratch. The best way install python on windows is download the official installer from python.org. To do this, open a browser and go to https://python.org/ . Once the installer has finished downloading, open Downloads. The site will detect that you have visited it with Windows and offer to download the latest version Python 3 or Python 2. If you don't know which version to use, then I recommend Python 3. If you need to work with legacy Python 2 code, then you need Python 2. Under the tabs Downloads → Download for Windows click the “Python 3.X.X” (or “Python 2.X.X”) button to download the setup file.
64-bit Python vs 32-bit
If you're wondering if it's 64-bit or 32-bit, you'll most likely need 32-bit. Sometimes hard enough to find 64-bit binaries, which means that some third-party modules may not install properly on 64-bit Python. My opinion is to use the version that is specifically recommended on the official website. If you click the Python 3 or Python 2 button under “ Download for Windows”, you will get exactly the version you have chosen. Remember if you end up doing incorrect choice and want to switch to a different version of Python, you can simply remove existing version and reinstall it by downloading another installer from the official site.
Run the Python Installer
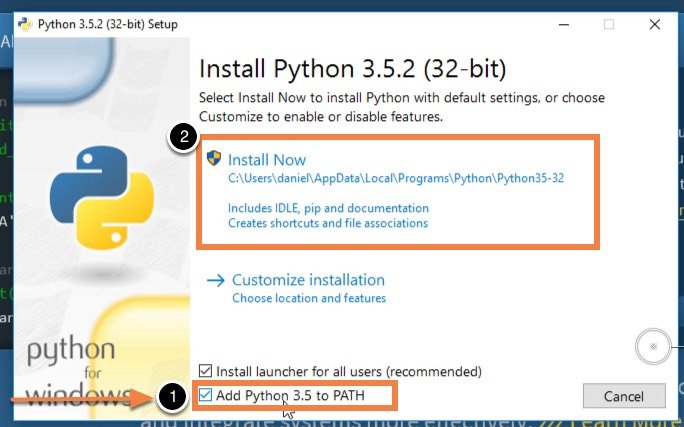
Once the installer has finished downloading, double-click it to start . Be sure to check the box for " Add Python X.Y to PATH» in the setup wizard. Make sure the checkbox " Add Python X.Y to PATH” is set in the installer, otherwise you will have trouble getting the Python installer to access the command line. Click " Install» to start installation. Installation should be quick and Python should be ready to run on your system. For the next step, you need to make sure that everything was done properly.
Confirm that Python has been installed correctly
At the end of the installation, Python should be installed on your computer. Let's make sure everything was done correctly by testing to see if Python has access to command line (cmd)Windows:
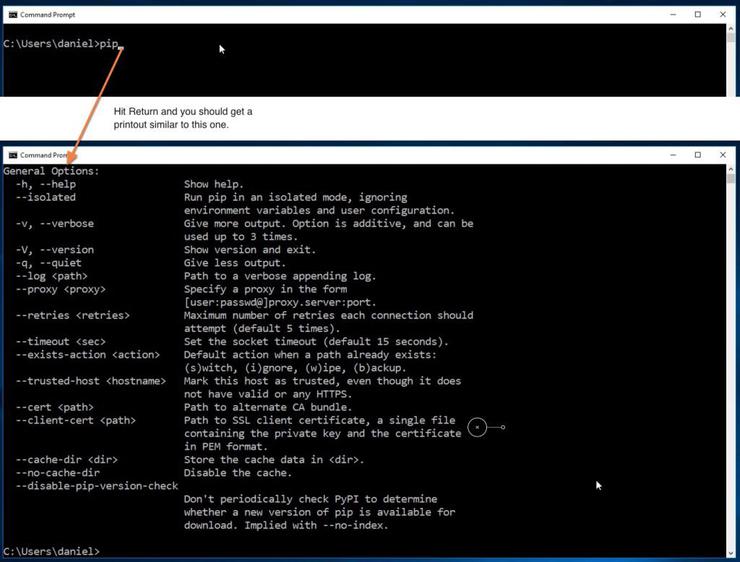
- Open command Windows line by running cmd.exe
- Enter pip and press "Enter"
- You will see the help text of the Python package manager called “ ”. If you receive an error message, repeat the Python installation steps and make sure you have working version of Python. Most of the problems you may encounter will have to do with one way or another. incorrect setting PATH. Reinstall and confirm that the option “ Add Python to PATH” has been activated should fix this problem.
Now what?
Once you've made sure everything's done right, and you've made sure your command line is working properly, you can safely claim that you've installed Python on your system.
During the software development process onPythonoften there is a need to use a package that in this moment is missing from your computer. You will learn about where to get the package you need from and how to install it in this lesson.
Where can I get the missing package?
The need to install an additional package will arise very quickly if you decide to work on a task beyond the basic functionality that providesPython. For example: working withweb, image processing, cryptography, etc. In this case, you need to find out which package contains the functionality you need, find it, download it, place it in the right directory and start using it. All these actions can be done manually, but this process lends itself to automation. In addition, downloading packages from unknown sites can be quite dangerous.
Luckily for us, withinPython,all these issues have been resolved. There is a so-calledPython Package Index (PyPI)is a repository open to allPythondevelopers, in it you can find packages to solve almost any problem. There is also an opportunity to upload your packages. Used to download and install special utility, which is calledpip.
package manager in Python– pip
pipis a console utility (without GUI). After you download and install it, it will be registered inPATHand will be available for use.
This utility can be run independently:
>pip<аргументы>and through the interpreterPython:
> python -m pip<аргументы>Key -mmeans we want to run the module (in this casepip). More details on how to usepip, you can read below.
Installation pip
When deploying a modern versionPython(beginning with Python 2.7.9 and Python 3.4),
pipis set automatically. But if, for some reason,pipis not installed on your PC, you can do it manually. There are several ways.
Universal way
We will assume thatPythonyou have already installed, now you need to installpip. To do this, download the scriptget-pip.py
> curl https://bootstrap.pypa.io/get-pip.py -o get-pip.pyand execute it.
> python get-pip.pyAt the same time, together withpipwill be installedsetuptools And wheels. setuptoolsis a set of tools for building packagesPython. Wheelsis the distribution format for the packagePython. Discussion of these components is beyond the scope of the lesson, so we will not dwell on them.
Method for linux
If you are usinglinux, then to installpipYou can use the package manager provided with your distribution. Below are the commands for the serieslinuxsystems that start the installationpip(We will only considerPython 3, because Python2 is already obsolete, and its support and development will be discontinued after 2020).
Fedora
Fedora 21 :
> sudo yum install python3 python3-wheelFedora 22 :
> sudo dnf install python3 python3-wheelopenSUSE
> sudo zypper install python3-pip python3-setuptools python3-wheelDebian/Ubuntu
> sudo apt install python3-venv python3-pipArch Linux
> sudo pacman -S python-pipUpdate pip
If you are working withlinux, then to updatepiprun the following command.
> pip install -U pipFor Windowsthe command would be:
> python -m pip install -U pipUsage pip
Package installation
pipallows you to install the latest version of a package, a specific version, or use boolean expression, through which you can determine that, for example, you need a version not lower than the specified one. There is also support for installing packages from the repository. Let's see how to use these options.
Installation latest version package
>pip install ProjectNameInstalling a Specific Version
> pip install ProjectName==3.2Installing a package with version 3.1 or higher
>pip install ProjectName>=3.1Installation Pythonpackage from git repository
> pip install -e git+https://gitrepo.com/ProjectName.gitInstalling from an alternate index
> pip install --index-url http://pypackage.com/ProjectNameInstalling a package from a local directory
> pip install ./dist/ProjectName.tar.gzRemoving a package
To remove a package, use the command
>pip uninstall ProjectNamePIP Camera (pip camera) is a portable photo editor suitable for making adjustments to photos before uploading them to Instagram. The package contains the most versatile photo frames, collages, and other overlays. You can upload pictures to the application directly from the smartphone’s memory, or through the camera. In separate modes for editing the dimensions of the picture, the background of the picture is blurred along with the shades of the photo. There are more than two hundred collages available. The maximum possible number of shots in one collage is ten, which is a lot when compared with other products of this direction.
More than two dozen different filters will be available in the program, as well as a special editor. You can attach a sticker, a message, increase the sharpness value, and crop the edges to the picture. You can retouch color brightness, saturation, and other options yourself. The resulting photos can be saved to a flash drive or uploaded to a social network that you use on a regular basis. Management in PIP Camera is not particularly difficult, the only drawback of the program can be considered the lack of a Russian version. This minus is in some way solved by icons, by which you can find out what this or that section in the menu will do. A set of superimposed frames, interesting special effects and other tricks are constantly updated by the creators of the project. The project is interesting in that such opportunities that are available here were presented for the first time.
In the options for the application, it will be possible to choose the path where exactly the photo will be dumped. Basically, at this stage functionality settings are completed. It can be concluded that the pip camera is an incredibly easy-to-use product that provides non-standard options for editing and beautifying user photos, while a person does not need to have special knowledge in the field of management. All that is required is just to find the material of interest, and at the output to see the final result. For now, this application With Google Play has been downloaded over ten million times. Turn on your imagination, go to the PIP camera program, and then a huge number of likes on the social network will be provided to you.
Main Features of PIP Camera:
- Frames of the most different orientation and design;
- Ability to upload to the photo editor, as from a gallery mobile device, and with the help of a camera;
- Over two dozen ready-to-use frames;
- The largest set of stickers and stickers;
- The ability to combine and experiment with the available filters;
- The coolest features to choose from;
- The ability to change the font format, text and other parameters for editing collages;
- Regular updating of the library settings directory;
- Over twenty filters for image retouching;
- Fast uploading of finished material to social networks.
In this tutorial, we are going to show you how to install Pip on an Ubuntu 16.04 installation. operating system. Pip is a package management system and is used to install and manage software packages written in Python, which can be found in the Python Package Index (PyPI).
First of all, and make sure all your system software is in up to date. Run the following command to update the package list and update your system to the latest version available:
sudo apt-get update && sudo apt-get -y upgrade
Once the update is complete, you can move on and install Pip on your . Installing Pip is very easy. The only thing you need to do is run the following command:
sudo apt-get install python-pip
The Apt package manager will install Pip and all dependencies needed software for optimum performance. Once the installation is complete, you can verify that it was successful with the following command:
You should see something similar to the following:
# pip -V pip 8.1.1 from /usr/lib/python2.7/dist-packages (python 2.7)
This means that Pip has been successfully installed on your server and is ready to be used.
To search for a package, you can use the following command:
Pip search package_name
To install a package, you can use the following command:
Pip install package_name
In case you want to remove a package, you can use the following command:
Pip uninstall package_name
For getting additional features Pip and usage examples you can use the --help flag:
# pip --help Usage: pip
PS. If you liked this post, please share it with your friends on in social networks using the buttons at the bottom of the post or just leave a comment below. Thank you.


