Checking and repairing disks or partitions using Disk Utility does not check and repair the physical condition of the disk, it only fixes software errors on the disk. The utility itself is located in the "Programs-> Utilities" folder or via Finder Cmd + Shift + U
Recovery of a backup disk: (connected via USB)
Turn off Time Machine (in TM settings). Launch Disk Utility and select the desired disk.
Then select "First Aid" and "Check Disk". In case of errors as a result of the check, click the "fix disk" button
If the restore procedure ends successfully, a message will be received "Volume<имя тома>seems to be fine"
If the required drive is not listed in Disk Utility's list of available drives, then you need to make sure that it is connected directly to your computer and not through a network or Time Capsule.
Disk Utility in normal mode cannot restore boot disk with OS X. This also requires running the disk utility from the installation procedure.
If the restore fails.
If Disk Utility was unable to repair the disk, carefully read the messages that were nearby (before the message about the failure to repair). If some of the data on the disk has been fixed, but not all of it, you need to repeat the disk recovery procedure (again and again) until there is a complete recovery or a complete failure to restore
If Disk Utility is unable to repair the internal drive, you can try third-party low-level repair utilities, such as Disk Warrior(http://www.alsoft.com). This utility is quite expensive (about $100), but it is a very reliable recovery tool. If you decide to take such actions, make sure that the version of the utility is compatible with the version of your OS X (how to check the version of OS X)
Using Disk Utility with Terminal
Some of the actions that are not available to the "Disk Utility" program can be done with the diskutil command in the Terminal
Many people know about the existence of "Disk Utility" in OS X. Today we will talk about how to use it effectively, because it is necessary.
Regular system reinstallation is not an option for the user OS X. Let's leave this procedure to the owners of computers under Windows control. However, any mechanism needs to be prevented, the same applies to the operating system of our Mac computer. Today, we're going to start that process by doing preventative maintenance on your drive.
To do this, we do not need an expensive third-party software. No, everything you need can be done in " Disk Utility", which is part of standard programs OS X since time immemorial. It has a simple and understandable GUI and targeted at the average user. You can not understand partition tables and types of file systems, but at the same time keep your computer's drive in decent condition.
So, for starters, let's launch the "Disk Utility" using Launchpad. If you cannot find it there, then from the right upper corner and enter the name of the program you are looking for. The result will be the following:
![]()
Okay, now let's talk about what we will do and, most importantly, why. Prevention of the system drive in a Mac computer is performed for a number of reasons, here are the most obvious ones:
- Increases system performance.
- Checks drive status and errors.
- Corrected access rights.
Let's start with the last point. Within OS X access rights play a significant role. Putting them in order, although not the solution to all problems, but it can save you from certain problems with operating system right now or in the future. The procedure is recommended to be performed regularly.
To do this, select the main HDD or SSD on the left side of the window. There we choose system partition- it will be located a little lower. Below the button "Check access rights" will be available - click it.

After waiting for the result of the check, after a while, boldly click "Fix access rights" and wait again until the procedure is completed.

The first stage of prevention is completed.

Now check the drive for errors. To do this, click the "Check disk" button. The check takes a certain time: in the case of an SSD - less, with a conventional HDD - longer.
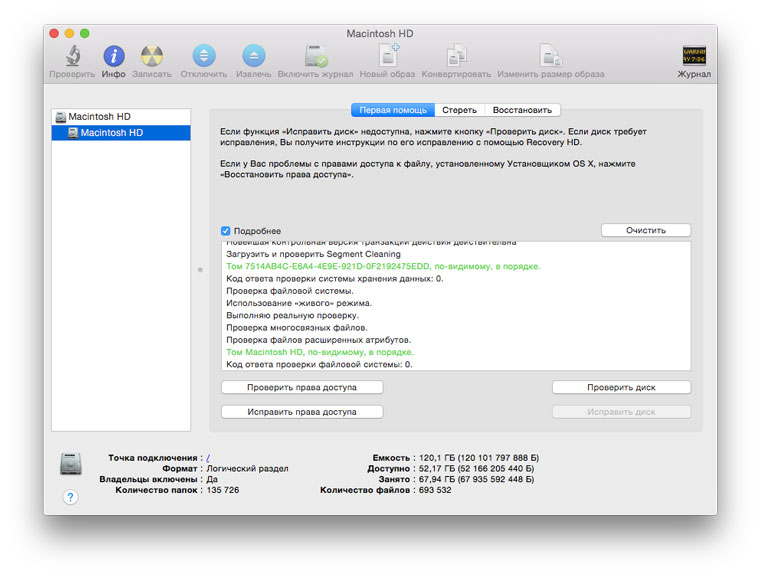
Further, two options are possible. The check may not find errors - that's good. If errors are found, then, without hesitation, click "Fix Disk" and wait for the result. In my case, as you can see in the screenshot, there were no problems.
It remains to remember the promised increase in productivity. In fact, you may not notice it when using a solid state drive. Although if the system is two or three years old and you are running this procedure for the first time, then the result should still be. Concerning hard drive, then regular preventive maintenance is simply necessary here: this directly affects both the performance of the drive itself and the entire system. If the drive can no longer be helped, and this sometimes happens, then the only way out will be in advance.
This is the end of system storage prevention. Similar procedures can be arranged for other drives that you have: external hard drives, solid state drives or flash drives. It definitely won't get any worse. Now let's look at a few other useful features of Disk Utility.
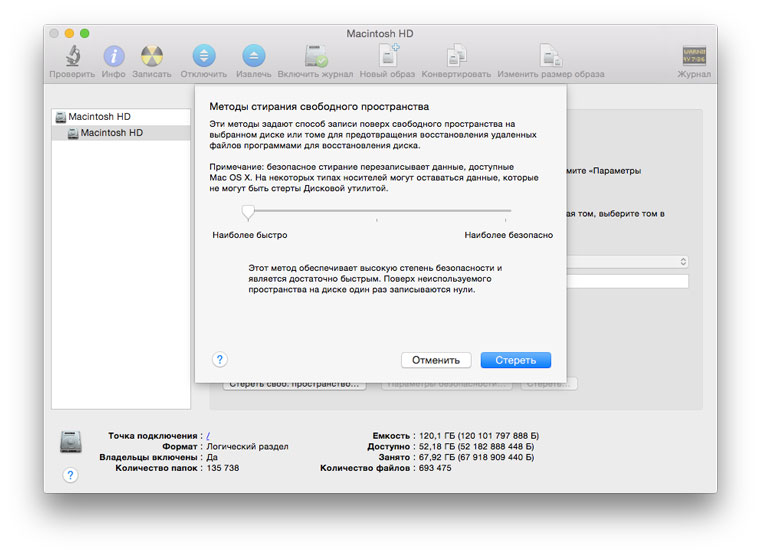
In the "Erase" section for the selected drive, you can not only completely format it, if it is not a system drive, but also " Erase free space". This procedure can be useful if you have deleted some files and really don't want them to be restored. In the settings, you can choose the level of care for deleting data.
You can burn discs and create images using Disk Utility. It will show detailed information about any connected drive or image. This program even create a RAID array or delete an unnecessary Windows partition. The usefulness of Disk Utility within OS X cannot be overestimated, and we encourage you to simply run it as often as possible to keep your Mac's drive in order.
Don't hesitate to buy an imac from Seaplase.
Fresh hot apples:
"Rifat, I bought new disk and I need to make it work on both Mac and Windows.” “Hi, I have a disc, but I can’t write anything to it on a mac, what should I do?”. “Listen, how to format a Mac disk, what would it be?”.
About the same questions my friends and clients ask me, once a week, if not more often! So now, I'll show you how to format a disk in disk utility, for different cases!
First, a little introduction to the main file systems (FS). If you do not want to bother with the theoretical aspects, you can scroll down below, directly to the formatting procedure.
To format a disk, you need to go to Disk Utility, which is located in the Programs - Utilities (Utilities) folder or find it through Spotlight. In the window that appears, on the left side, you need to select the disk to format - it is the disk itself, and not the name of the volume. In my case it is 160.04 GB Seagate TOSH… not Extended HD. Next, we need to click on the Disk Partition button, at the top in the middle, and here we can see all the options for formatting the disk for different needs! So, now I will describe all the sections and what they give us:

1) Partition scheme - by clicking on "Current", we can select the number of partitions on the disk. Someone may need to create a disk with 2 or more partitions for storage different files or for use on different computers.

2) Partition information - here you need to select the name of the disk and FS. For use on Mac and Win, select FAT or ExFAT. To use the disk for Time Machine, choose Mac OS Extended (Journaled).

3) Options - by clicking on this button we select the type of bootloader - this is a very important parameter, because. it depends on it whether the disk on the computer will be detected or not!

— GUID partition scheme- no matter which FS you choose, the disk will only be detected on a Mac with Intel processor(all modern poppies). Together with the HFS + file system (Mac OS Extended), the disk will be available for creation backups via Time Machine! No other combination of "Partition Scheme" and FS options will allow you to use the disk for copies!
— Apple partition scheme- Designed for use in older Mac computers with a PPC processor. We won't need it.
— Main boot record - when you select this item, the disk will be visible on computers with Win. But besides this, it is necessary that the format be FAT or ExFAT.
ATTENTION! FORMATTING A DISK WILL ERASE ALL DATA FROM IT!!! BEFORE FORMATTING A DISK, MAKE SURE THERE ARE NO IMPORTANT FILES ON IT OR SAVE THEM ON ANOTHER STORAGE MEDIUM!!!
After selecting all the parameters, you can click on the "Apply" button in the lower right corner and this will appear:

The system will warn you that all data will be deleted from the disk, and if you agree, then click on the "Disk Partition" button. Formatting is quite fast - from 3 to 20 seconds, depending on the size of the disk.
If you have chosen the path to Creation Time machine, then immediately after formatting, a window may appear with the choice of this disk for backups.
Once again, I will clarify which items you need to choose for:
— Time Machine and disk work only from Mac- file Mac system OS Extended and GUID Partition Scheme;
— Disk for Mac and Win- ExFAT file system and Master Boot Record.
So we figured out how to format a disk in Mac, and what options you need to choose for different cases! This method suitable for disks, flash drives, regardless of the connection interface - USB, FireWare or Thunderbolt. If you have any question or difficulty in the process of formatting a Mac disk, write about it in the comment 🙂
By the way, if you were interested in this article, then feel free to add to my groups in
The Repair Permissions feature has been a standard feature in OS X for a long time. Despite its ambiguity, Apple allowed you to launch Disk Utility if necessary and check and repair the permissions caused by software failures. A new version OS X El Capitan brought changes to this well-established process.
“I was shocked when I found out how much Disk Utility has changed. I can't believe there's no way to check and restore permissions or drive. It's not a utility anymore,” says SelectGroup indignantly.
In this case, we are talking about disk utility number 15, which is part of OS X El Capitan. Previously, she performed many important functions. For example, scanning system disk for damaged objects. Another important function was hard drive management: formatting, partitioning, error correction. From now on, this functionality is not available to Mac owners out of the box.
But chances are, most OS X users won't notice the change. If you believe the statistics, only a small part of the "macovods" used the function of restoring access rights.
If you are one of those who preferred to fix errors manually, we hasten to please. OS X El Capitan has a built-in auto-scan feature file system. It regularly checks the drive and fixes any software failures. At least in theory.
This is what Disk Utility looked like in OS X Yosemite:

And this is how she looks now:

A much more visual and therefore convenient demonstration of the distribution of data on a disk. In reality, Disk Utility was of dubious value for working with files. According to Apple, it was almost a panacea for all problems. But in fact, it turned out that most of the corrupted data remained undetected. Any specialized software App Store offers much more possibilities.
OS X El Capitan September 30th. All are compatible with the operating system Mac computers, released in 2009 or later, and some models released in 2007 and 2008.
In this article, we will show you how to erase partitions and format a hard drive on a Mac using Disk Utility.
In contact with
Attention! Before you carry out the actions described below, take care of the safety of important data. Implement backup or use the utility.
What you need to know about Disk Utility?
It's free apple app shipped with macOS. It is distinguished by its simplicity and sufficient functionality for the philistine needs of users. She works with hard drives, SSDs, and disk images. Disk Utility can erase, format, repair disks, as well as partition and even provide first aid.
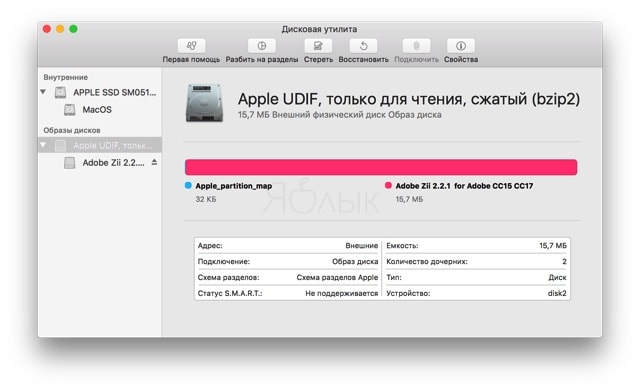
The program works with disks and partitions. A disk is a physical drive and a partition is a formatted section of a disk. Any disk contains at least one partition.
It is very important to know and understand the process of interaction between the disk and the partition(s). You can erase an individual partition without affecting the entire disk, but if you erase a disk, you will also destroy all the information on each partition.
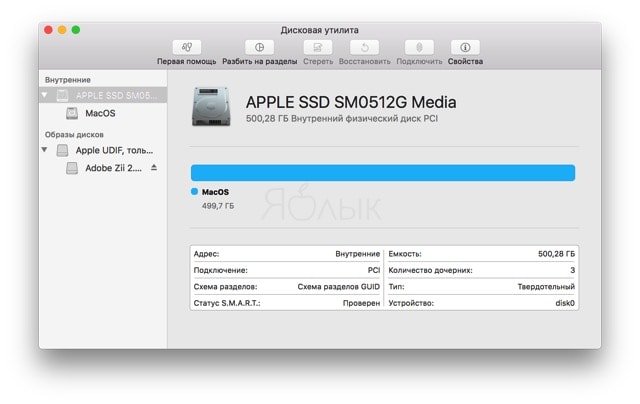
Interface Disk Utility consists of three main elements:
- toolbar (top part of the program, header);
- left side menu containing disks and partitions;
- Workspace.
How to Erase a Disk or Partition Using Disk Utility
Erasing a disk or partition is one of the most simple ways freeing up space. There is no fundamental difference between cleaning a disk or partitions.
1 . In the left side menu, select the disk or partition you are interested in (the disk icon has priority in the tree. Clicking on the triangle next to the disk will open a list of the partitions it contains).
2 . On the toolbar, click the " Erase».
3 . Enter a name for the new disk and select a format.

4 . Click the button Erase».
How to Safely Erase a Drive or Partition Using Disk Utility
If necessary, you can perform a secure erase. To do this, repeat steps 1-3 and click the " Security Options...". There are three types of secure erase. The higher the security level, the longer the erasing process will take. " Security Options' include the following options, which will vary depending on the location of the slider:
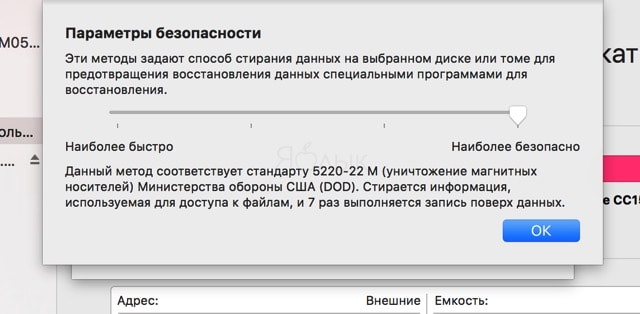
1) Safe deletion of files, without overwriting information with zeros. There is a high probability that the data can be recovered. Erasing provides low level security.
2) Erasing files with an acceptable level of security, achieved by writing random data with a single-pass write of zeros over the entire disk.
3) Erase according to US Department of Energy standards (random data is written twice and zeros are written three times over the disk).
4) The most serious safety standard. This is how magnetic media is erased in the US Department of Defense. In addition to writing random data, it is overwritten seven times with zeros.
Then click the " OK" And " Erase».
We talked about how to install macOS on a formatted disk.


