Microsoft strongly recommends that you use the Recovery Console only when booting into Windows XP. safe mode and similar methods fail. To work with the System Recovery Console, you must have administrator rights and know the basic commands designed to detect problematic files and drivers. 
Installing the Recovery Console
If you have problems starting your computer, you can start the system using the installed recovery console by selecting the desired item from the suggested boot options. Having an installed console is a necessity on important servers, as well as on the workstations of specialists working with information technology. To install the Recovery Console, you must be logged on to your computer with administrator rights. The console can be launched directly from boot disk Windows XP, but it is more practical to configure and use it by selecting the option in boot menu. To install the System Recovery Console you need to follow these steps:
- Insert the Windows XP boot disk into the drive;
- Click the button Start→ Execute;

- In line Open enter the command:
J:i386winnt32.exe/cmdcons
J- letter designation drive, if it doesn’t match, put your letter. 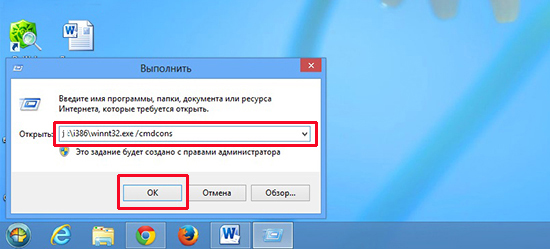
- In the installation dialog box that appears, Windows programs containing short description recovery console, press the button Yes to confirm installation.

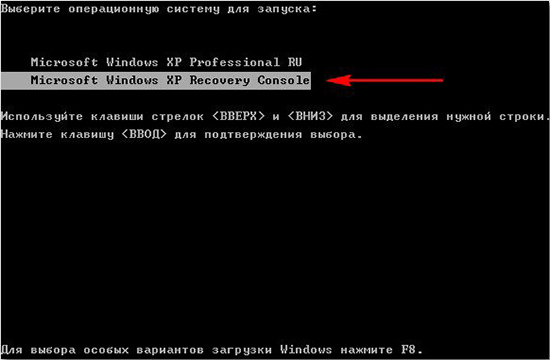
- Restart your computer. The next time you start the system, the boot menu will display Console.
You can also install from a network folder (shared), to do this you need to specify the path to it in Universal Naming Convention (UNC) format.
Note: If the Recovery Console is installed on a Windows XP system with SP2, a message may pop up stating that the installation cannot be completed because an earlier version is on the disk. Windows version than installed on the computer. In this case, installation is not possible without Windows updates XP with updates 2 (SP3) to 3 (SP3).
Installing System Recovery Console in silent mode
The Recovery Console can also be installed during system installation in automatic mode. To do this you need to use: file unattend.txt → section
Command1="pathwinnt32 /cmdcons /unattend"
For more information about using the Unattend.txt file, see the Deployment Planning guide included with Windows package- 2000 Server Resource Kit.
Using the System Recovery Console
Using the recovery console, you can format disks, disable and enable services, read and write necessary data to local disk with any file system, perform various administration tasks. The main purpose of the recovery console is to perform work recovery operating system by copying a specific system file to a local disk from a boot disk or USB flash drive or make the necessary changes to service parameters that prevent the PC from starting.
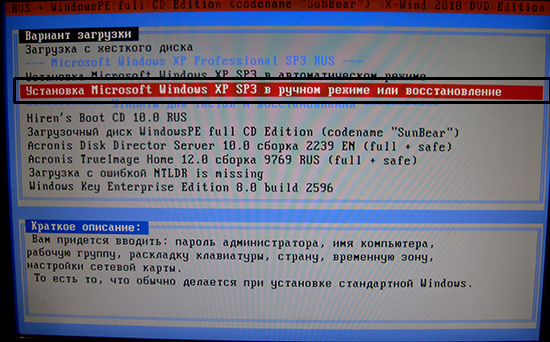
If loading the operating system fails, you must launch the recovery console using disks, installation floppy disks, or a USB flash drive with Windows XP. After restoring your computer, you can also launch the Recovery Console using disks, installation floppy disks, or a USB flash drive with Windows XP.
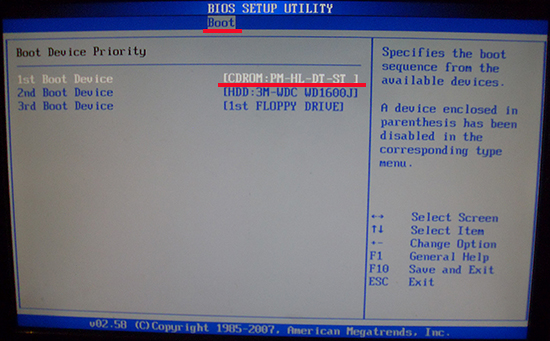
Note: To restore a faulty system using disks, installation floppy disks or a USB flash drive, you need to set the boot priority from the appropriate storage medium in the BIOS program.
To launch the Recovery Console in this case, you need to do the following steps:
Using the Command Prompt in the System Recovery Console
The console command prompt is different from the Windows command prompt. The System Recovery Console has its own command interpreter. To log in, you must enter the correct administrator password.
If you need to install a special third-party RAID or SCSI driver to access the desired hard drive, then while starting the recovery console, you can click F6 and install it. Driver installation is similar to the Windows system installation process.

The recovery console takes a few seconds to launch. Next, a list of Windows operating systems installed on the computer appears. Typically, the list contains entries like: C:Windows. Select the desired entry and press Enter. In case of pressing the button Enter without selecting an operating system, the computer will restart and the process will start over.
You can run System Restore console commands when the %SystemRoot% C:Windows prompt appears on your display.
Windows XP System Recovery Console Commands

List of commands for the recovery console:
- Attrib— change the attributes of a subdirectory or file.
- Batch- execute the commands prescribed text file(Inputfile). The file for outputting the results of completing the assigned tasks is specified by the Outputfile parameter. If the specified parameter is omitted, the output will be produced on the display.
- Bootcfg— change the Boot.ini file to configure and restore boot.
- CD (Chdir)
- Chkdsk— using the /p parameter allows you to run the Chkdsk program even when there is no sign of damage on the hard drive. To search for bad sectors, use the /r parameter, and to further restore some data that can be read, use the /p parameter. The Chkdsk program requires the Autochk program, which (the Autochk.exe file) it automatically searches in the startup folder, if it is not there, it then searches on the Windows XP disk. If the Autochk.exe file Chkdsk program is not found, you will be prompted to specify the location of this file yourself.
- Cls— clear the screen.
- Copy— copy the file and then send it to the desired folder. By default, you cannot copy to removable media, and you cannot use wildcards. When copying from Windows disk XP file compressed by the program is unpacked automatically.
- Del (Delete)- delete a file. Acts exclusively within the system directories of the last installed instance of Windows, the root directory of local installation folders or partition hard drive, removable media. By default, stage characters cannot be used.
- Dir— display a list of any files, including system and hidden ones.
- Disable- disable Windows driver or system service. Service_or_driver– name of the driver or service to be disabled.
- Diskpart— management of hard disk partitions. The /delete option deletes existing section, /add creates a new one. Device – the name of the new partition (for example, deviceharddisk0). Drive – letter assigned to the partition to be deleted (for example, E). Partition is the name of the partition to be deleted (example: deviceharddisk0partition1); Partition can be used instead of drive. Size is the size of the new partition in megabytes.
- Enable— enable Windows driver or system service. Service_or_driver is the name of the driver or service to be enabled, start_type is the startup type of the service to be enabled. The startup type has one of the following values:
— SERVICE_DEMAND_START
— SERVICE_BOOT_START
— SERVICE_AUTO_START
— SERVICE_SYSTEM_START
- Exit— close the console and restart the computer.
- Expand- unpack the compressed file special program. Source – name of the compressed file. Default stage signs cannot be used. Destination – folder for the unpacked file. This folder cannot be on removable media or have the Read Only attribute by default. To remove the Read-Only attribute, there is the attrib command. If the compressed source has multiple files, the /f:filespec option is used (wildcards are allowed). The /y option suppresses the confirmation prompt for files to be deleted. The /d option is used for files that cannot be extracted; the contents of the recipient folder are displayed.
- Fixboot— write the new boot sector to the system partition.
- Fixmbr— restore the master boot record in the partition of the same name. Device – name of the device on which the main new one is created boot record. Device is not used when the target is a boot device.
- Format- format disk. The /fs option specifies file system, the /q option performs a quick format.
- Help- help. The help command without specifying the command displays everything possible commands, available in the recovery console.
- Listsvc— display all drivers and services of the computer.
- Logon— display all available instances of Windows XP with a request for an administrator password for each. This command is needed to move from one Windows system to another or subdirectory.
- Map- show current device associations. To use a path in ARC (Advanced RISC Computing) format, specify the arc parameter.
- MD (Mkdir) - operates exclusively within the system directories of the last installed instance of Windows, the root directory of local installation folders, or hard section disk, removable media.
- More/Type— display information of the specified text file.
- Rd (Rmdir)- operates exclusively within the system directories of the last installed copy of Windows, the root directory of local installation folders or a hard drive partition, removable media.
- Ren (Rename) - operates exclusively within the system directories of the last installed copy of Windows, the root directory of local installation folders or a hard drive partition, removable media. You cannot specify a new path or drive as the destination.
- Set– Used to set and display recovery console variables.
- Systemroot— change the current directory to %SystemRoot%.
Recovery Console Rules
 There are several environment rules running in the System Recovery Console. To display the current one, enter the set command. The following default rules apply in the console:
- NoCopyPrompt = FALSE— show a request — confirmation to overwrite an existing file;
- AllowRemovableMedia = FALSE— prohibition on placing copied files on removable devices.
- AllowWildCards = FALSE– prohibition on the use of wildcards; AllowAllPaths = FALSE— prohibiting access to partitions that are not related to the operating system that was selected in the recovery console upon login.
Uninstalling the Recovery Console
To remove the System Recovery Console, you need to do the following steps:
- To restart a computer
- Start → My Computer → HDD with the recovery console installed on it;
- Tools → Folder Options → View → Show hidden folders and files → OK;
- Delete the Cmldr file and the Cmdcons folder in the root folder of the disk;
- Right-click the Boot.ini file in the root folder → Properties → Uncheck “Read Only” → OK
- Open the Boot.ini file using Notepad and delete the entry belonging to the recovery console, which looks something like this: C:cmdconsbootsect.dat=”Microsoft Windows Recovery Console" /cmdcons
- Close and save the file.
Many years have passed since the Mircosoft corporation successfully launched in the computer market and several generations have known practically nothing about the command line. The main features of older versions of Windows, which were called MS DOS, were single-tasking and an exclusively text-based interface. Several decades later, most actions are performed using the mouse, but in the past, in order to perform the simplest operations, you needed to know and understand a huge number of console commands. From those times, UNIX systems such as Ulbuntu, Fedora, ArchLinux and others have come to our time, where text commands are still used.
Despite the twenty-first century, modern operating systems have retained the console and commands. This function is not popular among regular users, so to launch command line(cmd.exe) you have to understand a couple of simple tricks.
Opening the console via the "Run" button.
All Windows operating systems, old and new, have a Run feature that gives you instant access to hidden possibilities computer. To start it this program, you should open the Start menu, go to the Standard tab and select the Run button from the list that opens below. You can also launch the Run program using the key combination WIN + R, after which a small window will open in front of you with only input fields, where we type the following command cmd.exe and click OK. By the way, this method Works only in Windows 7,8,10.

Using the Start menu.
You can also follow the steps above to launch the console, but instead of Run, select Command Prompt. In addition, you can use the search in the Start menu. But owners of Windows 8 OS will have to work a little to open the console, since the interface in this version of the operating system has undergone enormous changes.

First, let's enter METRO, in other words, into new version Start menu. Right-click on an empty area, after which a panel with additional features. Next, select the icon that says All applications, located in the lower right corner.

Here you will see a list with hidden applications, where the command line shortcut will also be located, right-click on it and select Run as administrator in the bottom panel.

IN latest version Windows 10 OS, to open the console, you can use a simple search; to do this, use the hot keys WIN + S, and then enter the name of the program, Command Prompt.

System disk.
As shown above, the command line is opened using the cmd.exe executable file, as a result of which we can conclude that this file can also be found in one of the folders and run. All this is true, this executable file is located in Windows folder, in the System32 subdirectory.

Closed menu in Windows 8.10.
In the Windows 8 and Windows 10 operating systems, using the WIN+X hotkeys, you can open a menu hidden from users, which contains almost all system programs, like the command line.

Using context menu in Windows 10 Explorer
The latest version of Microsoft's operating system has an unusual way to open the console. Having opened any folder, hold down the Shift key and right-click on a free area, after which a context menu with advanced options will pop up.

As shown above, the command line in Windows OS can be called using various ways. Many users will feel that a lot of attention has been paid to such a simple program as the console. Only experienced people will understand that cmd.exe is a powerful tool, thanks to which you can produce any result in a matter of seconds. The developers of the latest operating systems not only did not abandon this function, but rather expanded its capabilities, which indicates the importance of this program.
Probably, many PC users found themselves in a situation where the operating system did not start. For example, the computer constantly rebooted, or a window appeared that displayed an error. This often pushes users to reinstall the OS. Everyone knows that this is a troublesome task, since in this case some of the files are lost and the drivers need to be reinstalled. Meanwhile, it is much easier to use the recovery console.
You will need
- - computer;
- - disk with Windows OS distribution kit (XP, Windows 7).
Instructions
You will need a disk with the distribution of your operating system. Before starting the operation, insert this disc into the computer drive. Turn on your PC. Now you need to enter the Boot menu. Most often, you can use the F5 or F8 keys to do this. Press it immediately after turning on the computer. If using them you were unable to enter the Boot menu, do it by brute force, alternately pressing the F keys until you find the one you need.
When you enter the Boot menu, select as the system startup source optical drive. Wait until the disk spins up and press any key. If you have an operating room Windows system HR, do it this way. Wait for the first dialog box to appear. In this window, you can either begin installing the operating system or start the recovery process.


