Installing an operating system is something that every user has to resort to from time to time. Updates, hardware failures, equipment changes - there are many reasons. The most ordinary way Windows installations– using a standard installation DVD. However, some have lost it, others are not going to purchase a licensed version and have downloaded everything they need from the network. Further registration required Windows image 7 per flash drive. This article provides a guide on how to create a bootable USB flash drive, or as it is also called - live usb, using the UltraISO utility.
Multiboot USB Flash Drive: Promised Understatement
This does not mean that this blow was completely destroyed. To restore it to the correct size, you must use a partitioning program such as. Then follow the instructions below. Press the select button. We mark the section as an active "active" command.
Fast means fast formatting, which in this case is sufficient and should reduce the time required to complete this task. Creating and formatting a partition is not a matter of assigning a letter to it. We assign this command to "assign".
More information about bootable USB flash drive
When not installation disk, to install the system you need to burn a bootable USB flash drive. How is it different from the usual one? It's all about special files that the BIOS can recognize and with which it can work. It has its own boot sector, like hard drive and operating system, some live usbs have their own systems installed from which you can boot and work with files. Such devices are called multiboot devices.
Firstly, a tiny pendulum, measuring a few centimeters in size and weighing several grams, is much more convenient than a plate, which is not very convenient to carry in your pocket. The third issue is important for netbook users. However, this procedure will work equally well for large laptops and PCs.
Free program to create a boot disk
We don't close the application window - we now move to the right side of the procedure. We'll show you how to do it quickly, correctly and without hassle. Moving the system to new disk. Typically, replacing a hard drive also makes it possible to update the entire operating system, that is, reinstall it.
In technical terms, it is no different from the usual usb media. It's all about the data. It turns out that to make a bootable USB flash drive, you just need to write the correct files there and create a boot sector. Previously, this was done manually using the command line. In fact, some still work this way - the flexibility of settings in this case is very high.
Recording with UltraISO
So we have to prepare this environment - we suggest using flash memory because it's easier. It does not require installation and the main window will appear after a while. A message to format the flash memory appears. Within about a dozen seconds, the program should prepare the memory, which it tells by successfully saying "Run boot disk."
After purchasing a new drive, we recommend that you install the system from scratch. Firstly, reinstallation allows you to update your system, get rid of unwanted applications, long unused files, unnecessary registry entries. In many cases, cloning a system is most appropriate.
However, today there are a huge number of programs with which even a person far from computers can create a bootable flash drive. For example, in Ultraiso you can do this in just a couple of clicks. Programs differ in functionality and complexity: some are applicable in a wide range of applications, while other utilities are only suitable for producing live USB for a specific operating system.
Launching and working with the program
This situation is becoming more common, especially in the case of ultraportable ultrabooks or laptops, as manufacturers choose to remove optical drive to ensure the thickness and weight of the final product. The operations are simple and are performed in one utility window as follows.
The operations you need to perform are simple. As an alternative to these utilities you can use command line. However, this method is cumbersome and involves a lot of keyboard commands that produce the same result, but on a much larger time frame.
UltraISO - Utility for working with ISO images
UltraISO is a paid utility, but is completely free to download. During installation, the user activates the trial demo mode, after which the program is blocked and requires the purchase of a license with unlimited access to all functions. 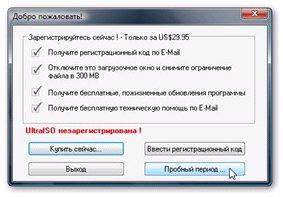
What method do you prefer when you want to make a loading stick? This seems like a relatively simple thing for us to say, but when is it for you new system, things look a little more complicated, especially in the first place. This format is the best option to accept both operating systems, both writable and readable, being the most versatile format on the market. Unfortunately, this format has a big disadvantage, it is a very old format and has technical limitations.
Perfect for what we need, but the following should be mentioned. Open disk utility. Of course, this formatting process meant deleting all existing files on this section, so before you start make sure you save everything that was important.
Using this utility, you can edit directly in ISO format and write it to a ready-made blank or bootable USB flash drive. The program will create everything itself necessary files, will register the boot sectors and place the operating system image in the required directory. 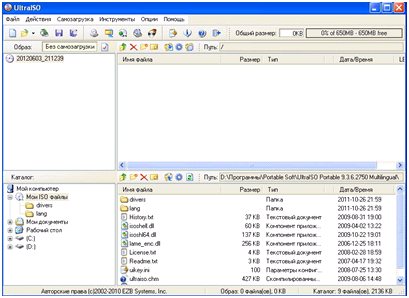
Go to your computer. Select "Format" from the menu window that appears. In the next window, you can select the format you want to select to format the drive. The selection box size should be the default. For more quick formatting you can check the Quick Format field.
Using the built-in disk utility
If the boot device does not find the boot code on the first boot device, the computer will look for a boot sequence on the next device in the list, and so on. For example, in the following image, the computer first looks for booting from disk optical disk, if it doesn't find anything there, it will rely on external devices, then on HDD and finally try network card. Typically, a computer boots from the floppy drive, the hard drive, and then the optical drive.
To get started, you need to install it. To do this, follow the instructions:
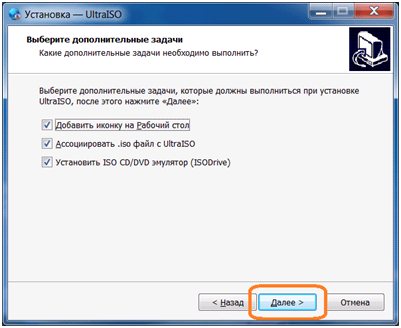
Now that the UltraISO utility is installed, you can begin.
Hello, friends! Today we’ll talk again about creating bootable flash drive.
Tools for creating a boot sticker Files Any software is somehow part of the file. The commands required for the boot sequence are no exception. As it is very likely that we do not have such a floppy disk or even a floppy drive needs to receive these files.
To run the mission we need a little extra software that needs to write what is called the boot sector of the disk. Instructions for use: - First select the drive that we want to make it bootable. Then you should do the following.
How to create a bootable USB device? For what purposes should I use it and what program should I use to record it?
A brief overview of the five most popular and free programs to create a bootable USB flash drive.
Modern developments do not stand still, and yesterday's technologies are slowly but surely losing their relevance. So the once popular CDs and DVDs no longer seem like such a clear solution for storing, transferring and working with information. High data reading speed, versatility and the possibility of reusable use are only a small part of all the advantages of a flash drive as a bootable media in front of the disks. Today almost everything personal computers and laptops, if they are less than ten years old, support the ability to boot from USB devices. And in some cases (for example, a netbook), a flash drive may be the only boot device from an external drive.
If the download is completed correctly, the window shown will be shown in the image below. Once the operation is complete, the hard drive can be reused or recycled safely without the risk of recovering the data stored on it. All the tools described above are very intuitive. The answer to all these questions can be found above. Our comment block! Flash drives are the most important drives on which you can store files. Flash drives are portable and small in size, so you can carry it with you and you can use it anywhere.
By the way, the new Windows 10 operating system will be the first axis, the distribution of which will be officially distributed on a USB drive.
By using additional software A flash drive can be used not only as a boot device for installing, reinstalling and restoring the operating system, but also to create an emergency device (Multiboot). This is a kind of resuscitator, a tool from which you can boot at any time and cure your computer of viruses, restore system files or save important data. I described how to create such a flash drive resuscitator in the article “Creating a bootable Live CD/DVD/USB device and its use.” You can read this article.
Flash memory has many capabilities that allow you to store data files. However, data files may be lost if this drive is formatted or damaged. To save important files from damaged files, you need to stop using flash drives because they can be overwritten. Also, look for a data recovery tool that will safely recover your data.
Factors that can cause flash drive damage
Damaged flash drives are a racket. Flash memory is damaged and is the most common reason for this.
Viruses and malware
Exist Various types viruses that often attack our computers with flash drives and hard drives. They often get into our devices using the Internet or damaged files. When they hit them, they will flash their discs when physical damage your data, but this will damage the contents of your flash drive.Despite all the obvious advantages and the growing popularity of a flash drive as a bootable device, there are not so many programs for creating it. Nevertheless, they exist, and today I will introduce you to them in more detail, but first a few words about the preparatory stage.
Preparing a flash drive
We will need the flash drive itself, plus knowledge of some important aspects. First, you need to make sure that your computer supports booting from USB devices. There is a misconception that if in the bios (boot section) there is no option to select boot from usb (there are only floppi, hdd and dvd-rom options), then boot from usb is not supported. This is wrong!
At using hard drive, make sure you eject it correctly. When you connect it to your computer and want to transfer data to your practice, safely remove it from your computer. When you remove the flash drive and the data transfer ends up damaging the files, it means the flash drive will be damaged. Do not expose flash memory to environmental factors such as heat and cold. It's not just temperature, but also other factors such as water. When these environmental factors hit the flash drive, they damage the cells and hence lose data.
More precisely, this is not always the case. The only correct solution is to refer to the manual (user manual) of your motherboard or using specialized software(as an option - AIDA64) get a detailed report on the hardware used.
The second point is the size of the flash drive. Here everything will depend on what we write on it. For example, to create a Live-USB, installation Linux disk or Windows 7, a 4 GB flash drive is enough. To create a boot device with latest versions For Windows, it is advisable to have a flash drive of at least 8 GB on hand.
There's one thing you'll never know with flash memory. When you use it for a long time, it undergoes wear and tear. This long-term use will allow your file to get lost, setting the retention level. This means it won't be enough and you will lose data. The use of this flash memory is updated frequently and also contributes to this.
How you handle the drives can also damage the flash memory. Some people carry flash drives in their pockets. You can also leave the flash drive and physically break down. If this doesn't remove part of its body, weaken it to damage the flash. If you are carrying a flash drive, make sure it is capped and keep it in good condition. Always be careful how you handle flash memory. Handling as a delicate object because it has its own values.
The third point is transferring files from a flash drive. Typically, the process of creating a boot device involves full formatting. If there are important files on the flash drive, transfer them to another device in advance. To create a bootable USB flash drive and then work with it as a boot device, use the USB-2.0 port (Windows 7 does not support USB 3.0).
You may be lucky that the flash drive is damaged, but it can still recognize the computer and you want to restore it. This should bring a smile on your face because you can use mind-blowing software as you can use this software regardless of the operating system you are using. It allows you to recover various files such as videos, audios, pictures and pictures from flash drive, computers and even memory cards.
The beauty of this device is the way it is designed with four playback modes to shake up all your lost data. Lost data recovery mode, this mode allows you to recover files or delete or damage files.
How to create a bootable USB flash drive
Let's consider five in various ways using the example of five free programs for Windows.
A small but quite functional utility with the self-explanatory name WinSetupFromUSB. Equally well suited for recording a bootable and/or multiboot flash drive (up to 10 operating systems) and creating Live devices. Official site .
This is always the last option to use disk mode, and getting lost in file recovery mode is frustrating. Partition recovery mode, this mode will search for all lost data due to partitions, size and even deleted files. Having said that, we have told us how to use this software. Download and run it on your computer. Then connect the damaged flash drive to your computer.
Step 1 Set data recovery options
When you open a program, four programs appear in playback mode. Start shopping with your lost file in recovery mode.
Step 2 Start scanning
Before you start telling you the drive and select the file types to recover. Click the All Files icon. You can get deep scan files by clicking "Enable Deep Scan".Among the shortcomings is the lack of support for the Russian language. Among the advantages, as I already said, is its versatility. The utility can work not only with Windows distribution, but also suitable for burning an installation disk with Linux.
The usual option for creating a bootable flash drive, for example, with a Windows distribution, involves selecting the flash drive itself, the option to automatically format the media, and the ISO image of the operating system in the appropriate boxes. The recording process starts after pressing the “Go” button. You can read more about how this program works.
Step 3 Save recovered files
From there, go to the top left and click on scan. When you finish scanning, you will see what has been recovered. This is suitable for files and photos. The quality of the file is also displayed. Then select all necessary files and click to play. Select to save files to external storage.
How to identify an unrecognized flash drive
In some cases, the flash memory may fail on your computer. You will have to fix it the first time. Go for first aid and disk repair. If you use windows disk management to format the disk. You will see Disk Storage Management.
To create a multiboot flash drive (several OS), you need to specify the path to the ISO images of the operating systems. Paragraph Windows selection 10 at the time of writing this article is not available by default, but in reality everything is written and works, you just need to select the appropriate column with the available versions - Vista, 7, 8.
2. Rufus
Perhaps the simplest solution for creating bootable USB drives. Everything is simple and intuitive. Suitable for working on systems that do not have an installed OS. Official site rufus.akeo.ie.
The main advantages are speed, simple interface, Russian language. An excellent solution if you need to create a bootable Windows flash drive 10 with UEFI support. By the way, I wrote in detail about how to do this in.
Distributed in the format of a regular installer and a portable version. To create a bootable USB flash drive, in the utility window you need to specify the path to the ISO image to be written and click the “Start” button.
On new systems that use UEFI instead of BIOS, set the Partition Scheme and System Interface Type menu to GPT for computers with UEFI.
In other cases, the default settings will be sufficient. The option to format a flash drive is assigned by default.
3. Windows 7 USB/DVD Download Tool
This utility is the official application from Microsoft. The interface is minimalistic, simple and clear, it is easy to work with. Download from the official website wudt.codeplex.com.
Perhaps the name of the utility (Windows 7 USB) will mislead many that with its help you can removable media You can only record the Windows 7 distribution. However, this is not the case. In addition to the seventh version, Windows 8.1 and 10 distributions can be stored on a flash drive.
The downside is that the utility is not Russified, but the simple and intuitive interface is designed to offset this drawback.
All that is required from the user is to insert a USB drive in advance, select an ISO image with the operating system and specify the path to the media (flash drive) to which this image should be deployed.
If there are several USB devices connected to the computer, then assign the one you need in the drop-down list and click the “Begin copying” button. The boot device creation process has started.
The operating principle of this program is based on standard operating room tools Windows systems- this is “diskpart”, “bootsect /nt60”, extracting ISO onto a flash drive. The program acts only as a graphical interface.
UltraISO is one of the best and most functional programs for working with disk images. A universal “harvester” that supports work with almost any known formats. Can work in tandem with Nero Burning Rom and integrates with virtual emulators. It will help if the image boot disk not in ISO format.
The program can convert other image formats into ISO files - NRG, MDF, MDS, IMG, CCD, etc. using UltraISO you can edit ISO files without extracting them. The UltraISO interface has been translated into many languages, including Russian. For downloading, you are offered several editions of UltraISO, adapted for individual Windows versions, as well as a portable version of the program. Download link www.ezbsystems.com.
By and large, the program does not care what boot devices will be created with its help, with what operating system, what software and from what manufacturer. The ISO image to be burned must be opened in the program window either using the Open command in the File menu or using the browse button on the toolbar. This can also be done using the Ctrl + O key combination.
Then in the window that appears, if the program automatically selects the desired flash drive, you should click the “Burn” button.
Daemon Tools Ultra is a professional tool for working with images. The program itself is familiar to many users free version Lite, which allows you to mount virtual drives for reading disk images. Its more functional version - Daemon Tools Ultra - offers, among other features, the creation of boot devices.
Among the disadvantages, it is worth noting that it is paid, but to create a bootable flash drive, you can download a free 20-day trial version on the program’s official website. Official website of the program.
Go to the official website and download the program. During installation, you must select a trial license type.
The program works with a huge number of disk image formats and can be used both to create a boot device with subsequent installation of the operating system, and to restore it (Live disk).
To create a bootable flash drive, in the main window of Daemon Tools Ultra, select the “Tools” menu item, and among its commands is “Burn boot image to USB". Or the hotkey combination Ctrl+B.
In the recording parameters window, specify the path to the image, enable the MBR rewrite option and click “Start”.
When the flash drive is ready, all that remains is to boot from it. The easiest way is to use the boot menu keys. The table below shows a clear example of such keys.
Of course, this is not the entire list of programs designed to create bootable devices, but for the vast majority of users, the capabilities and functionality of the listed software will be sufficient.
Eg, Rufus program can be used as the simplest and fastest tool for creating a bootable USB drive with one Windows distribution or for BIOS firmware from under DOS.
If you need to create a multiboot flash drive (with several operating systems and/or LiveCD) with the ability to select boot options, then WinSetupFromUSB can handle this.


