Typically, error 0x8007045d occurs during system installation Windows various versions and generations, usually with the error " Windows failed to install necessary files. Make sure you have all the files required for installation and restart the installation. Error code: 0x8007045d" Sometimes a similar problem can also occur during everyday use of the OS. If you encounter a similar problem, you should definitely read this article. In it we will describe why error 0x8007045d may occur and give a complete step by step instructions to help eliminate it.
Reasons for error 0x8007045d
First of all, error code 0x8007045d indicates a malfunction of the device on which files are written or the source from which the files are read. Since most often this problem occurs during installation operating system Windows, this may indicate a malfunction hard drive or problems with the media used for installation. If you can check the media quite simply by installing it in any other computer, then for hard testing disk and troubleshooting, you will need to perform a number of actions, which we will describe below.
How to resolve error 0x8007045d
- Insert into PC installation disk or a flash drive with OS Windows.
- Restart your PC and select the external media as bootable media to begin the installation process.
- In the installer window that opens, do not click the Install button, but find the “System Restore” item. Activate it.
- In the menu that opens, select “Command Line”.
- In the window command line Windows press Enter and type the following command:
list volume - The recovery system will check everything sections of hard disk and will give you detailed information.
- Locate the disk marked as bootable and type the following command:
chkdsk X: /F /R
where X is the drive letter that corresponds to the boot drive. - Press Enter.
After this procedure, testing of the specified partition will be started and if errors are detected that interfered with the installation of the OS, the system will be able to fix them and return them HDD into working condition. After testing is completed, restart your computer and repeat the procedure Windows installations.
- when installing Windows - the solution is described in this article.
- when copying / moving / cutting / pasting files to a Flash disk - the solution is given in .
Description of error code 0x80070570 when installing Windows:
Sometimes when installing Windows, error 0x80070057 is displayed. Usually (but not always), there are three main problems due to which it appears:
- Module failure random access memory.
- Failure of the motherboard (rarely) or hard drive (common). This item also includes malfunctions of interface cables (loops).
- ISO image checksum mismatch - recorded DVD image the disk or flash card is “broken” or not recorded correctly.
1. Checking RAM.
This error very often appears when the RAM modules are faulty. Check that they are installed correctly and fully inserted. If you do not find any problems with their correct installation, remove all modules except one. Check the remaining program MemTest, and so each module separately and determine the faulty one.
2. Problems with the hard drive.
2.1 Check the interface cables (loops).
Try connecting the SATA cable to a different connector on motherboard, or better yet, replace the SATA cable with a known good one (new). In most cases, cheap SATA-cables, at first flexible and elastic. Over time, due to temperature changes and dust, the cable loses these properties, becomes fragile, brittle, and becomes unusable. Another problem with cheap SATA-cables, this is an extension of the walls of the L-shaped connector.
2.2 Check the hard disk file system.
Check your hard drive for errors. To do this, open a command prompt and enter the following command:
chkdsk c: /r
This can be done in the recovery console. How to access the console is described in detail in the article.
2.3 Check the surface of the hard drive for bad sectors.
Check the surface of the hard drive for bad sectors. You can check using LiveCD such programs as Victoria and MHDD. Read the manuals for these programs.
3. Incorrect recording of the image to the media.
If you're using a disc that you've previously installed Windows from, check it for scratches and dirt. If you are installing an operating system from this disk for the first time, it may not have been written correctly, or the image may be damaged.
3.1. Verifying the checksum of a disk image.
If you downloaded an image from the Internet, you need to check its checksum. To do this, use the program by downloading it from Neoshibka.Ru. It will add a new tab to the file properties window, on which the checksums of files are calculated, including images, which need to be compared with those indicated on the site from where you downloaded the image or those located in the archive with the image.
If the image checksums do not match, download the image again. Then check again. It is best to download images using programs such as uTorrent. It itself calculates the checksums of downloaded files, and downloads the part that was downloaded with an error.
3.2. Recording an image to a CD-DVD, flash card.
3.2.1 Burning an image to a CD-DVD using the UltraISO program.
So, the image has been downloaded, the checksums have been verified. There is a recording to be done on the media. If you want to burn an image to a CD-DVD disc, you can use any of the programs convenient for you: Nero, UltraISO, Alcohol120%, etc.
It is not advisable to use the built-in tool Windows entries, because it does not allow you to customize the burning process, but configures it at your discretion.
So, for example, you decide to use the program Ultra ISO. Insert a blank disc into the drive (it is advisable to use high-quality Verbatim, TDK discs).
Let's go to the menu “File” => “Open...”.
Select the image we downloaded. Then click on the icon "Record".
A window for selecting recording parameters will open in front of you. Here, you can select the drive to which the recording will be made, and select its speed:
- 4x- very slow, but gives the best results.
- 8x- short and high quality.
- 16x- the disc may not be readable even immediately after recording.
Then press the button <Записать> .

After all the steps described above, we get a high-quality recorded disc.
3.2.2 Write an image to a USB Flash card using the UltraISO program.
If you decide to make a bootable flash card with Windows 7, 8, the same UltraISO will help you, and the process will be very similar to burning a disc.
Let's go to the menu “File” => “Open...”.
Select the image we downloaded.
and select the item “Burn Hard Disk Image...”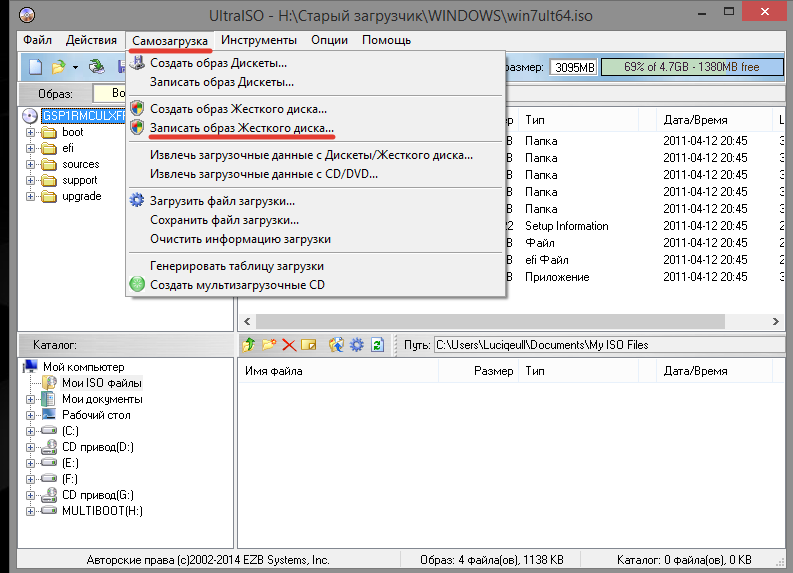 In the window that opens, select the desired flash card and recording method from the drop-down list USB-HDD+, if necessary, format the device right here and press the button <Записать>
. In some cases it is better to use the recording method USB-HDD.
In the window that opens, select the desired flash card and recording method from the drop-down list USB-HDD+, if necessary, format the device right here and press the button <Записать>
. In some cases it is better to use the recording method USB-HDD.

At the output we get bootable USB flash drive with Windows.
Most likely, one of the methods will be useful for you, or at least help you identify the cause of error 0x80070570 when installing Windows.
Remember that all work involving the replacement of PC parts must be carried out with the power turned off. Improper handling of PC components + your inexperience or negligence = PC failure.
If you know any other ways to deal with error 0x80070570 or a more accurate description of it, we would be grateful if you let us know.
According to the latest statistics, the percentage of computer systems running Microsoft Windows software is about 91%. In light of this, one should not be surprised at the abundance of questions from users that are in one way or another related to the operation of this particular operating system. One of the most common ones is precisely related to the peculiarities of the work of the accompanying software. So, sometimes an attempt to install an application results in the error “Windows cannot install the necessary files 0x80070017”. Such failures can be related directly to the operating room itself Windows system, as well as with third-party applications.
"Problematic" media
Although many computer owners have practically abandoned the use of CDs, giving preference to media based on solid-state flash memory, the former are still found. One of their disadvantages is the impossibility of error-free reading of recorded data if they are not stored carefully and the mirror surface is scratched. Thus, if, when working with CDs, when trying to install an application, a system window appears informing you that Windows is unable to install the necessary files, then you need to make sure that there is no damage on the media. Sometimes, to restore functionality, it is enough to wipe the disk, removing dirt, fingerprints, etc.
Incorrect entry
To ensure that the drive can read data from the disk normally, it is recommended to write at a low speed, down to the minimum speed.  In addition, the recording program must be configured correctly, so various functions“overburning” must be disabled. And finally, it should be remembered that rewritable ones are inferior in quality to their simpler R standard counterparts (both + and -). The best “treatment” option is to use a flash drive. You can also try switching the hard drive operating mode from AHCI to IDE in the system BIOS.
Security lock
Both of the above points relate primarily to errors that occur when installing the operating system itself on a computer. No less often, users receive a message that Windows was unable to install necessary files when working with applications. To understand the reason for what is happening, let’s take a general look at the process of installing programs. When you click on an executable file, the data in it is extracted in the background into an intermediate folder, from which, like bricks, a complete set of program files is created in the target directory. If anti-virus protection is installed on the computer and it detects a danger in one of the unpacked files, then access to it is blocked. And since the user is often not even informed about this, the result is system error"Windows was unable to install required files." Thus, if this occurs, you can try disabling anti-virus protection while installing the application.  If reinstallation passes without errors, then the reason is in the antivirus or, indeed, in the presence of a threat in one of the files. Obviously, such a check is potentially dangerous due to the risk of infecting the system, so it is recommended to try installing the same application obtained from another source.
Internal damage
If the user is informed that Windows was unable to install required files, one of the reasons may be incorrect work installer. Previously, we described the application installation process. It occurs “under the control” of the executable module, which indicates to the system which files should be transferred where from the temporary folder, and unpacks the compressed data. Consequently, any malfunction in its functioning leads to the message “Windows was unable to install the necessary files.” Although, we repeat, this is just one of possible options. The solution is to test functionality with a similar application from another source.
Storage device
Since the installation is carried out on some kind of disk (hard drive, flash drive, etc.), if the free space on it is exhausted, the installation cannot be completed without errors. Additionally, file copying failures may be caused by errors file system on the media itself. In these cases, you need to make sure that there is enough free space and also check the disk for errors.
Everything you need to do when a message appears "Windows Setup was unable to configure Windows to work with this computer's hardware" or "The installation process could not be completed. To install Windows, restart Setup" So this is not to press the “OK” button, but to press a key combination A black window with a command line will appear. In it you need to write the path to the executive file and run it by pressing the “ENTER” key. The file is called msoobe.exe and the full path to it will look like: C:\Windows\System32\oobe\msoobe.exe A window should appear asking you to enter an account name.
Some ideas that might help:
- Keyboard layout does not switch
- Try different keyboard shortcuts: “CTRL+SHIFT”, “ALT+SHIFT”, “Windows+spacebar”
- On some laptops/keyboards, the F (function) keys are activated by the “Fn” button. On such devices you need to press
- 1. Right-click on the command line window and select “Mark”.
2. Click on the letter “O” in the word “Microsoft” in the left top corner window. The letter will be highlighted with a white square.
3. Press the “Enter” button on the keyboard.
4. Right-click on the command line window and select “Paste.” We perform this operation twice to get it "C:\Windows\System32>oo".
5. Press the “TAB” button on the keyboard until you get "C:\Windows\System32>oobe."
6. Add the slash “\”. It turns out "C:\Windows\System32>oobe\".
7. Press the “TAB” button on the keyboard until you get "C:\Windows\System32>oobe\msoobe.exe" and press the “ENTER” button
- What to do if the path does not change from “>” to “\»
- This is not important. We're just writing C:\Windows\System32>oobe\msoobe.exe The result is the same.