From time to time, users need to work with flash drives or other devices. But when it comes to hard drive, many questions immediately arise. That is why today we will touch on this sensitive topic, how to format the Windows 7 C drive through the BIOS, and also how to do it using installation disk Windows 7. This problem is faced by many users who have begun to study the computer on their own, so I will tell you as much as possible.
Attention! Windows 7 is taken as an example! If another system is installed on your computer or laptop, then there is nothing to worry about, since the program does not care which version is installed on a particular device.
The main reason to format the C drive is to reinstall Windows. Personally, I pen Windows installation I always format drive C. Of course, before formatting, you must transfer all the necessary data to another drive, such as D: \ or to another medium where there is free space for this data.
The second reason may lie in malware who are not treated. For example, many files on your C drive have become infected with viruses, what should you do then? After all, after treating these files, they can and will open, but most likely when you open them, you will see one or more errors on the screen that are associated with file damage.
Naturally, such viruses are dangerous, but novice users forget about simple precautions: antivirus, opening links from friends (fake), etc. Therefore, it is better to use the Internet with an active antivirus so that this does not happen to you. But if it did happen, then formatting will help. local disk followed by a Windows installation.
Note: if you found a lot of viruses on your computer and your Windows freezes after treatment, then it is possible that this happened due to viruses that you removed. In this case, it is better to reinstall Windows to get rid of annoying system glitches:
About the cases that I mentioned above, it was a kind of introduction from which you can understand why you might need this procedure.
Formatting the C: / drive using the Windows 7 installation disk
There are many programs through which you can do this procedure, but in fact, you only need to know 2-3 ways, as situations are different, and only you can find a way out.
I must say right away that it will not work to format it directly from the system (meaning right-clicking on the disk and selecting "Format"). To format the disk, you need to boot from the installation disk, and use it to format the C: / drive or any other drive.
Now I will describe how to format the C drive in Windows 7, or to be more precise, we will do the formatting using the distribution. This principle is the same for all system versions! When you started the installation and got to the step where you need to select HDD where you would like to install Windows, select the C drive to format. We click once on the C: / drive with the left mouse button, thereby highlighting it. Then click on the item: "Disk Setup" - "Format". All information will be deleted, including viruses, if they were there, of course.
Formatting drive C:/ with Acronis Disk Director
Now we will figure out how to format a disk using a third-party software. There are many special programs designed for this, but I prefer Acronis Disk Director because it is intuitive and convenient in every sense. It is with this utility that I will give an example of how you can format a hard drive or its partition.
To make it work, you need to download AcronisdiskDirector BootISO- this is how you enter it into search engines to download this program. After that, you need to burn this image to a CD or DVD.
There may be other Acronis products on your drive, but there is nothing wrong with that, as they may be useful to you in the near future. After you set the priorities in the BIOS, when booting from disk, select AcronisdiskDirector and wait for the program menu to appear on your screen.
The screenshot was taken in old version Acronis Disk Director, and the screenshots that will be below, were already made in the new 12th version of the program.
Before I start writing instructions on how to format drive C through BIOS, I want to say right away that this program has a very detailed help on using this software, which opens: "Help", then select "Help Topics".
Now it remains to right-click on the disk we need and select "Format". You can also select the disk with the left mouse button and select "Format" in the menu that appears on the left.
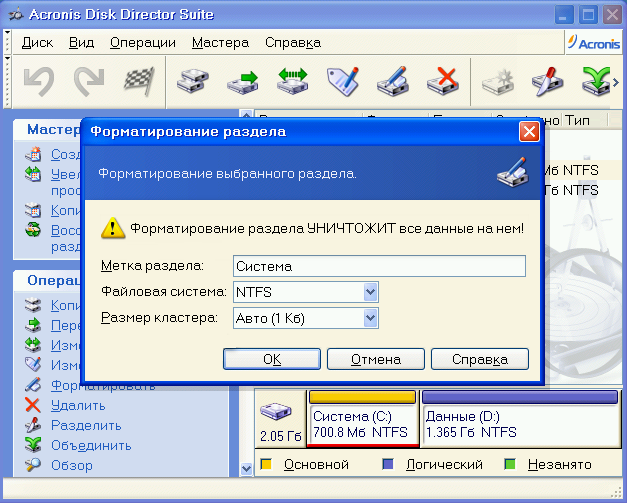
In the window that appears before formatting, you can leave everything as it is, with the exception of the “File system” item. Make sure that the NTFS option is set there, as that is what is needed for working in Windows.
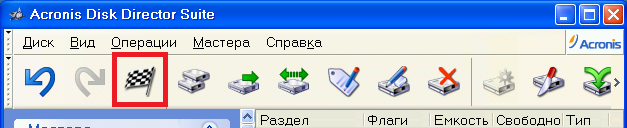
We confirm the actions in the upper part of the program, where the menu is located, click on the checkbox - we start to perform our actions.
In the next pop-up window, click "Continue" and wait for the completion of this procedure.
After that, the system will reboot and, if you have selected the drive where Windows is installed, then after the procedure is completed, the computer will not be able to boot the system, since it simply does not exist on your hard drive. If you chose another drive, for example, D: /, then Windows will be able to boot successfully.
This program can not only format disks, it has other features that may be useful to you. Therefore, I recommend using it.
Formatting without software
If you do not have an installation disk or some software products at hand, then you can do the formatting operation without software. You can disconnect the drive from your computer and connect it to another computer that has a different Windows system.
You must boot not under your system (the disk that was just installed in the computer), but from the disk that was installed before. When Windows boots up, it will detect your hard drive with all partitions, then you can perform all the necessary steps that I mentioned above. Right click on it and select Format.
I also want to note that there are situations when it is not possible to format the C: / drive for a number of reasons. But this is a topic for a separate article.
At complete installation Windows 7 operating system, it is recommended to format the hard drive first. Unlike regular deletion, formatting completely deletes all files from the disk, their paths and completely clears the headers. In addition, during the formatting process, you can select the type of file system, which will significantly affect the operation of the computer. During the installation of Windows 7, before how to format, you need to familiarize yourself with the basic concepts a little: file system, volume label, formatting method, and partition types.
Filesystem types
OS file system Windows families can be of several types FAT16, FAT 32 and NTFS.
FAT 16 is one of the simplest and oldest systems, which is practically not used now due to the very small maximum file size by modern standards - 2 gigabytes.
FAT 32 - Maximum file size - 4 gigabytes, currently used on flash drives
NTFS is a type of file system that is used as a standard in operating systems of the Windows family, with a maximum file size for writing - 16 terabytes.
A volume label is a kind of name that can be given to a hard drive or partition when formatting. This parameter is optional, but greatly simplifies the work with hard drives having more than 2 sections;
Formatting methods
When installing Windows 7, it is desirable to format the disk, but it is divided into 2 types:
- fast - clears only the paths to the files, after which the computer does not see them, and all new data is written over the old ones;
- full - the hard disk or its partition is completely cleared, all new data is written to new cells. (it is recommended to use this type).
Partition types for Windows 7 also come in two main types: basic and logical. One hard disk can have only one primary and several logical, as well as hidden section, about 100 megabytes for system Windows files 7.
How can I format a hard drive when installing the Windows 7 operating system?
There are many formatting methods, which can be conditionally divided into two types: formatting during the installation process and using third-party programs.
Formatting during installation
The installation program at a certain step prompts you to select the partition where the operating system will be installed. At the same step, you can perform a number of the most basic work with the hard drive: create and delete partitions, as well as resize them.
Step-by-step instruction
1. After selecting the type of installation, a window appears prompting you to select a disk for installing Windows 7: 
2. Here you need to select the required disk and click the link "disk settings" and it will appear additional set functions, where you need to select the "format" item: 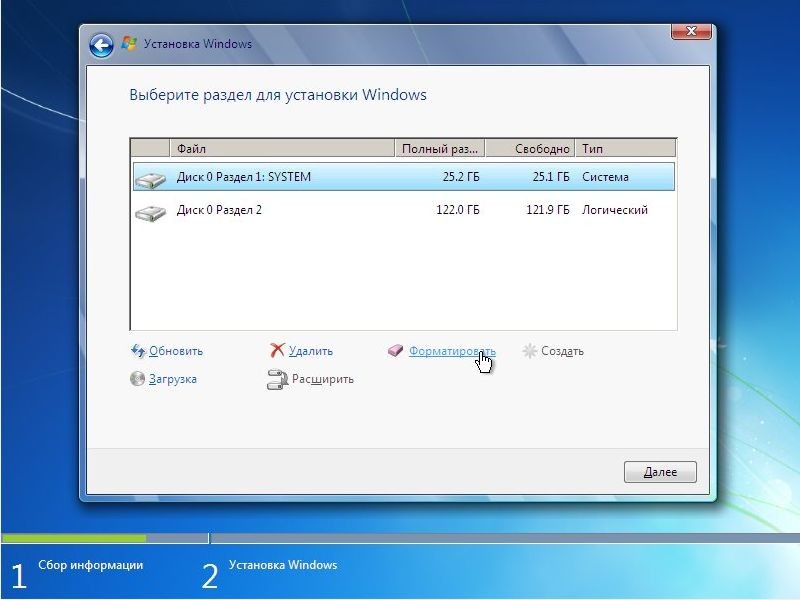
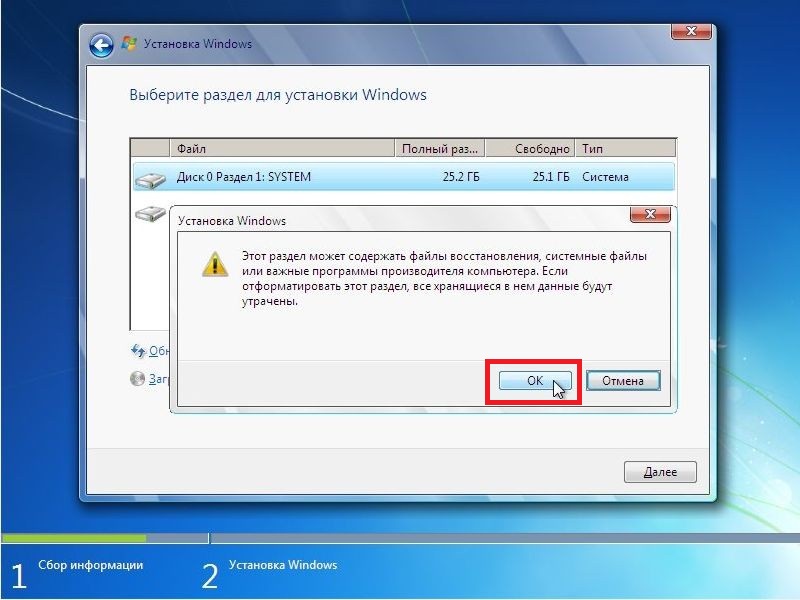
3. In the pop-up warning window, you need to confirm the action: 4. We are waiting for the process to complete and proceed to install Windows 7: 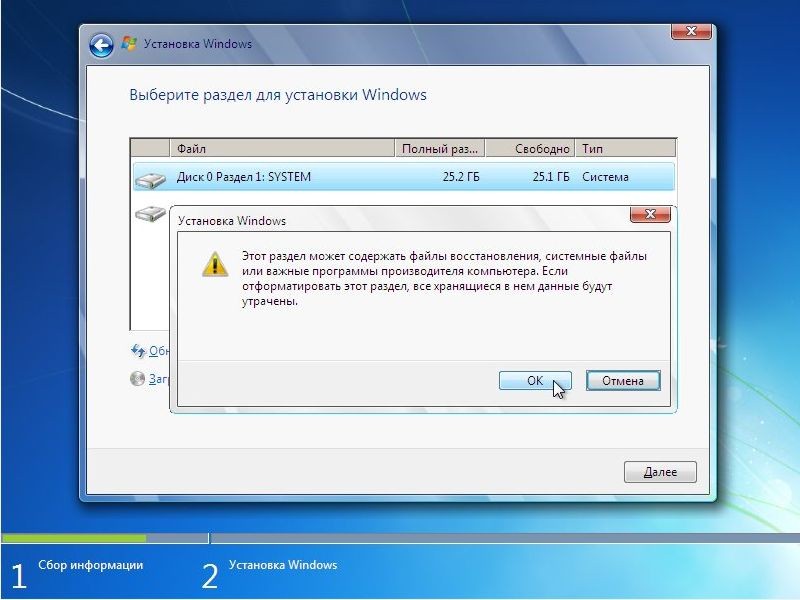
The disk utility when installing Windows 7 uses fast way formatting and does not have additional functionality, so you can use additional utilities to work with disks that can work even without an operating system on your PC.
The easiest to learn and easy-to-use program is Suite (the program is paid, but you can find pirated versions or use the demo version of the licensed program).
How to format a hard drive using Acronis Disk Director Suite?
Consider the method in which the Live CD with the program will be used.
1. Insert the disk into the drive and make sure that the main boot device in the BIOS is the CD / DVD drive.
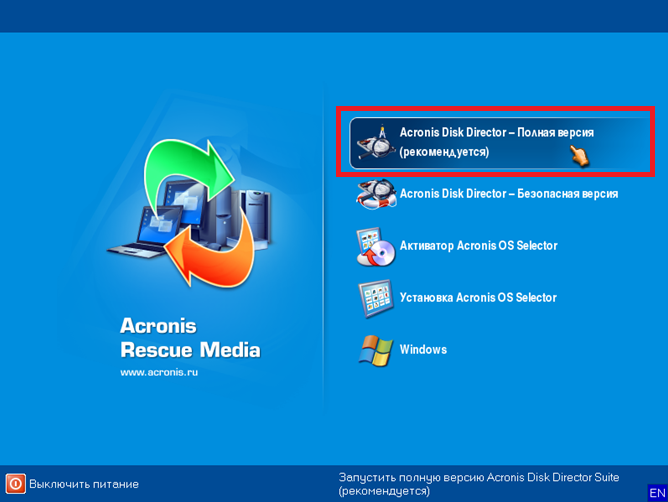
2. Select the item "Acronis Disk Director (full version): 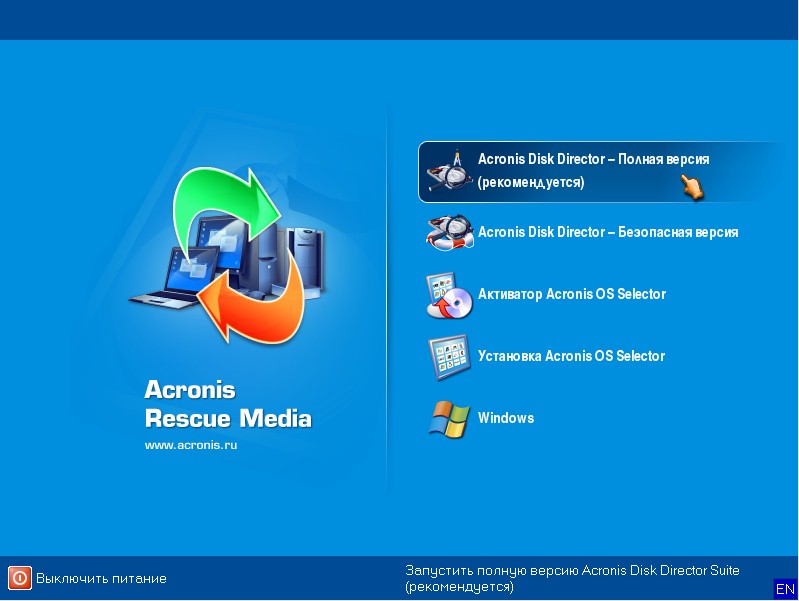
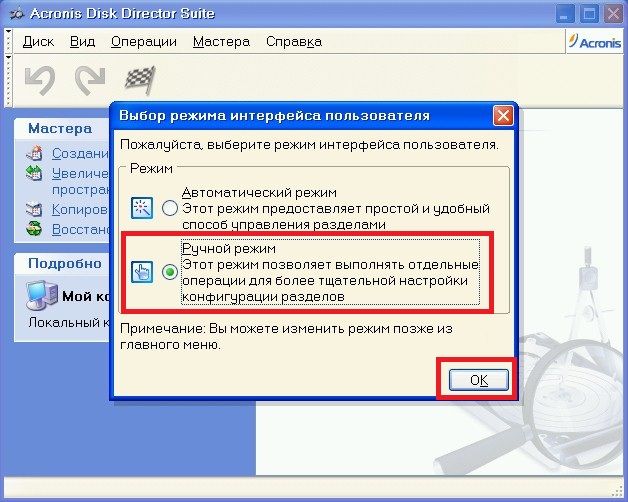
3. A pop-up window will prompt you to select a mode, select the "manual" mode: 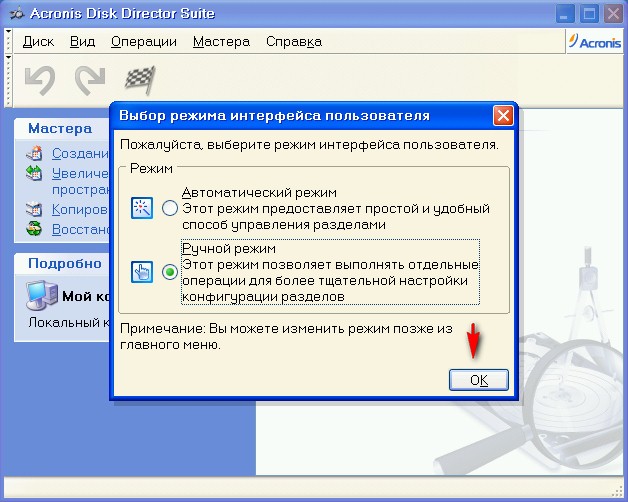
4. In the next step, select the section with which we will work with the mouse and select the "Format" item in the menu on the left:
5. In the next window, you will need to select the type of file system, cluster size and create a volume label. We set everything except the label according to the picture and press the “OK” button:
6. After clicking “OK”, we again enter the disk selection window, this is done in order to make a number of changes to the current or other partitions, but since we only need to format the disk on which Windows 7 will be installed, click on the checkered checkbox:
Formatting a hard drive is an important step in the Windows 7 installation process. fresh version operating system will not work for long and will cause a number of problems during operation. The computer will get confused in the remnants of files, trying to associate them with freshly recorded ones. And every time you spend a certain amount of time to reinstall all the software and drivers in the system, it simply may not be.
Surely, many are faced with the installation of any operating system. This process, as you know, requires at a certain moment split hard drive into volumes and then format them. Affairs with Windows are exactly the same.
In this article, we will look at the main ways disk formatting and give examples of solving this problem.
Format a blank disk or resize partitions from Windows
Just off the assembly line Winchester usually contains all one logical volume, and may not have one at all. In any case, if you do not want to use the entire size of the hard disk in its original form, and specifically - with just one partition, you will need to create on it additional volumes smaller size. You can do this in many ways, but all of them (methods) are divided into two categories - formatting from the inside running system or externally using boot programs. Let's start simple.
Let's say you have purchased a hard drive and would like to create partitions on it. After connecting it to a computer with Windows system 7, do the following:
To create additional partitions in the unallocated area, use the same instructions. After that, you can proceed directly to the installation of Windows.
Formatting from Windows Installer
An installer here refers to a program that runs directly when you install Windows. With its help, you can also redistribute the sizes of hard disk partitions, create them or format existing ones.
So, before the direct operation of installing the OS, at a certain moment a window appears in which you need to select a partition to install Windows on it.
It looks like this:
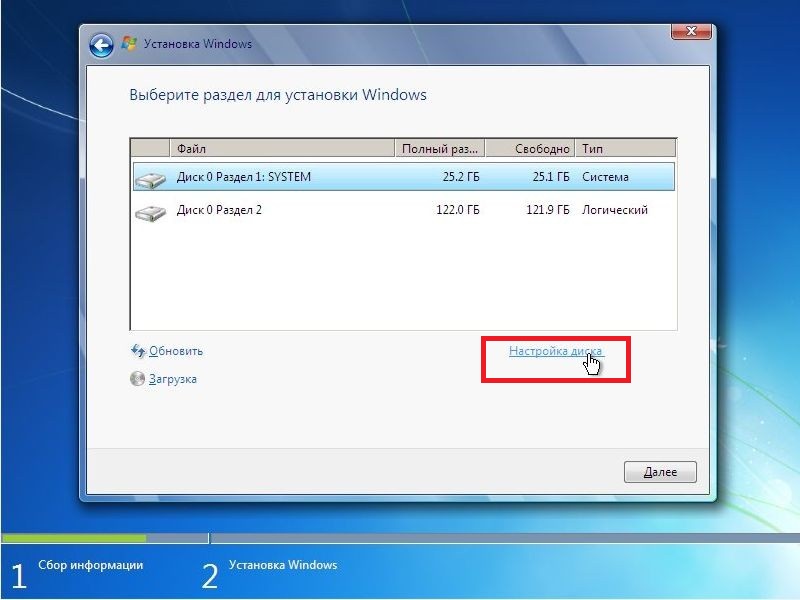 Select the section that you would like to format from the list (in our case, it is “ Section 1» labeled « SYSTEM”), and then click the item “ Disk setup". Additional action buttons will appear at the bottom of the window. Choose " Format". A window pops up with a warning about deleting all information - click OK and wait for the formatting to finish.
That's all, now you can safely reinstall Windows to the partition that we just formatted.
Using Third Party Boot Programs
There are situations when formatting the hard drive is not possible with the above methods, but it needs to be done. In such cases, you can use one of the dozens boot programs that can work outside the system. One of these - Acronis Disk Manager.
We will not consider creating boot disks or flash drives with this program, since this is not about that. If this question is of interest to you, you can refer to an article on this topic:. Let's consider the operation of the application, and specifically, how it can be used to format a disk.
After launch Acronis prompts you to select an upcoming task. We select the first item, as in the picture:
Then a window will open in which we select " Manual mode"and click OK.
After that, the main window of the program will display the available on the hard drive sections. We need to choose the one we want format, and then in the menu " Operations» in the left part of the window, click on the item « Format».

In order for the program to start formatting the partition we have selected, click on the icon in the form of a finish flag at the top of the window:
Related videos
Have you recently bought a computer and are still not good at it? Switched to Windows 7 from another system and still don’t really understand what’s what? Are you wondering how format the hard drive toWindows 7? If so, then you are at the right place.
The procedure for formatting disks, flash drives, or something else in Windows 7 is not much different.
I want to warn you, after formatting the disk, everything data will be deleted. So be careful when choosing a disk to format.
Incidentally, the disc operating system, usually drive (C:), cannot be formatted. This can only be done when reinstalling the system.
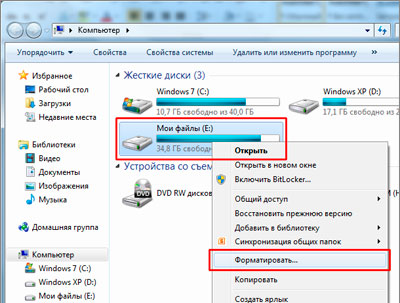
So let's start the process hard formatting disk in Windows 7. We go to My Computer by clicking on the icon on the desktop or through "Start" by clicking on the item "Computer".
Now right-click on the disk you want to format and select the item from the list that appears. "Format".
In the window that opens, we need to set some settings for formatting. Line "Capacity", it indicates the total volume that we will have after formatting. In line "File system" select NTFS. This is a modern file system and it is best to choose it. "Cluster size" we leave by default, "Volume label" is the name of the disk, we write there whatever our heart desires. And the last "Formatting Methods", check the box next to "Quick (clearing the table of contents)" remove. Now we press the button "Start".
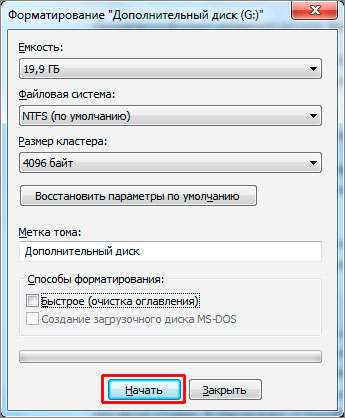
We confirm that we are aware of the deletion of all data from this disk by clicking "OK".


