VirtualBox- a program that allows you to create, run and import one or more virtual machines simultaneously on your computers. That is, the user can install and work with any OS without installing it on his computer - all operating systems run in an isolated environment.
Using VirtualBox, any user can test a wide variety of operating systems, work with them, record videos and perform other actions. It’s not difficult to use this program; let’s look at the first launch of VirtualBox and .
Concepts and definitions used
After many reboots, you'll arrive at your fresh, clean desktop that you can start using right away. This place includes guest additions. On this moment you have a well-oiled virtual machine, but let's be able to easily transfer files between your host and guests.
Want to see what systems you can install and save installation time while you're at it? 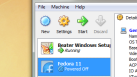
You are an experienced user virtual machine with suggestions on how to make the process smoother for beginners? Just start and clarify something? To get started, you'll need a few things.
Step 1. Download operating system
First you need to download operating system image, which you plan to install in VirtualBox. Naturally, you don’t need to create any bootable flashes; you need the image itself, for example, . However, if you already have a ready-made bootable USB flash drive, you can install the OS from it.
Otherwise, you will face a lot of problems later when everything works as it should. Once you have these things, you are ready to get started. If you're using a 64-bit build, feel free to use as many as you like.
In the next step, you can choose how much storage space you want to put on the virtual machine, even if it changes dynamically and you won't be able to bypass the size you define here. Choose any size that best suits your system.
Creating and managing virtual machines
Just like that, your new virtual machine is ready to use. On the Disk Utility screen, select New. Create a primary disk and allow it to use all of the virtual disk space hard drive, which you selected earlier. This should be selected by default.
Step 2. Download and install VirtualBox
Download VirtualBox from the official website of the program using this link. Download the program for your operating system (in most cases it is Windows).

After the .exe file has been downloaded, you can proceed with the installation. This process is worth considering in more detail, as some users may have certain questions.
Press Enter in the Boot option to make the partition bootable, then select Burn. Press Enter. You will need to type "yes" and press "Enter" on the next screen to ensure that you want to write the partition table to the disk. When you're done, highlight the Exit option and press Enter.
Highlight Yes and tap Enter on the next screen to confirm. Otherwise it will just download straight into the installer! So yes, just log in and finish setting up. Below are the basic terms you should know before going any further.
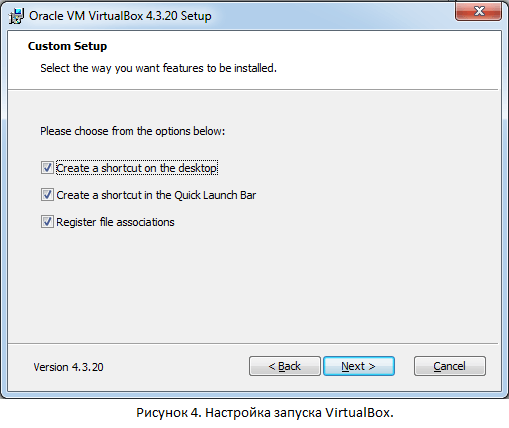
Once the installation starts, a window will open Custom Setup. It asks you to select the location where VirtualBox will be installed, as well as the choice of volume. If you are not sure whether you need additional features, then we recommend skipping this step and leaving the program in full.
Creating a virtual machine
This will launch the Create a New Virtual Machine wizard. The New Virtual Disk wizard is created. Now we need to choose whether the disk should be “Dynamically Expanding Disk” or “Fixed Size Storage”. Remember that for a guest machine, it sees the file located on the host machine as "Hard Drive". Whenever guest machine writes to disk, it is written to a file that is located on the host machine.
Virtual machine settings in Virtualbox
If we select "Dynamic storage", then. Enter the maximum size you want to allocate to the guest machine. Now a new "virtual machine" is created and it will be in a "shutdown" state. Select the newly created virtual machine.
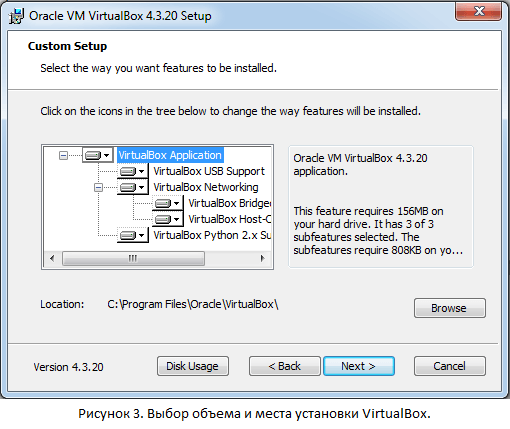
In the next window, the program will offer: 1) create a shortcut on the desktop; 2) create a shortcut in the panel quick launch; 3) register VirtualBox file extensions in the OS. Check the boxes next to the options you need.
Install the VirtualBox Extension Pack
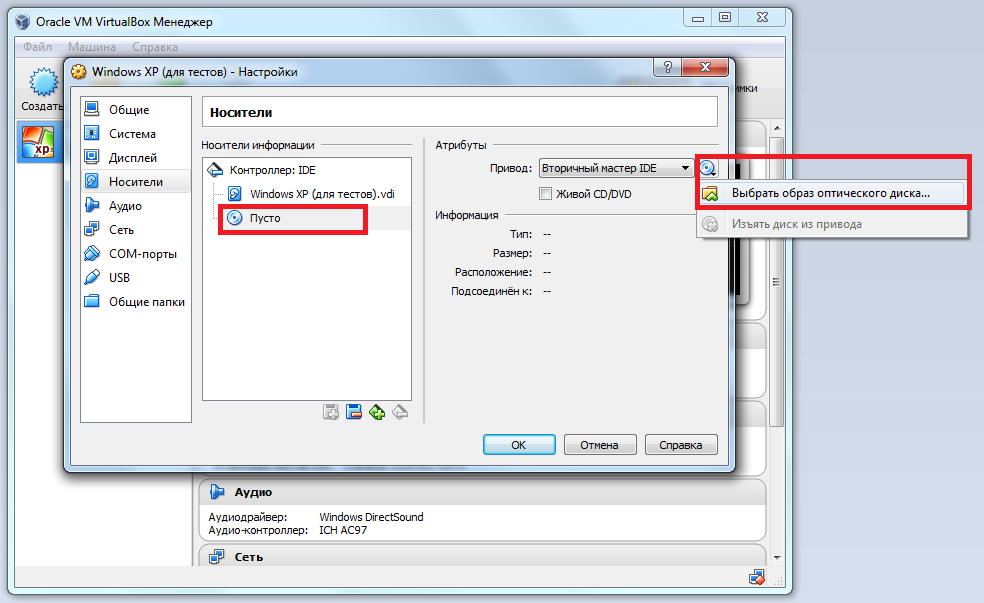
Now a new window will open which will show a group of settings in the left pane and the actual setting with right side as shown below. In the right pane, make sure the boot order is correct. In the Settings section, go to the Storage section, the following screen will appear.
My job depends almost entirely on my ability to do work in the virtual machine lab. No matter what happens, if you can turn on your computer, you can work in your virtual machine lab. Turn on the network. Make sure this checkbox is checked.
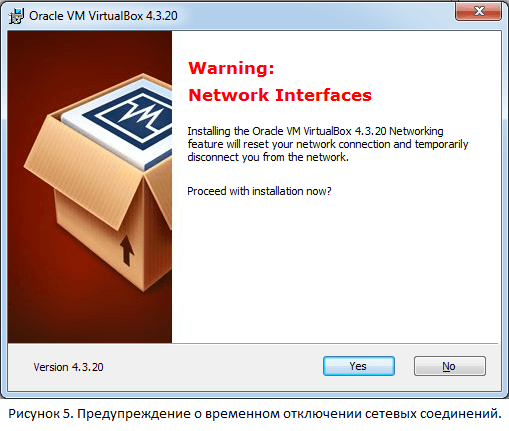
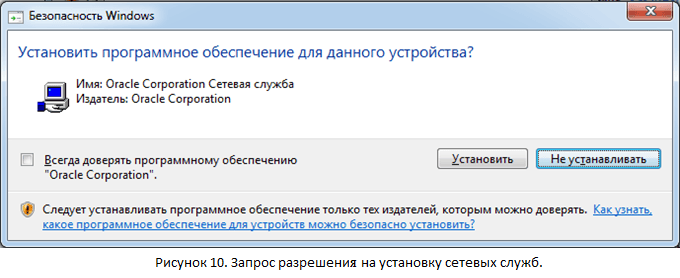
Next, another window will appear in which you will see a warning: “ Warning: Network Interfaces" This means that after you click " Yes", the installation will continue and the Internet connection will be lost for a few seconds. Therefore, before agreeing, it is recommended to shut down all applications that are actively using network connection(, downloading files from the network, etc.), and then proceed to continue the installation.
There will also be a button for port forwarding. We'll come back to this later after creating our first virtual machine. The network is configured and we are ready to create our first virtual machine! The first option will be the name of your virtual machine. If you only see 32-bit versions, learn how to enable 64-bit options.
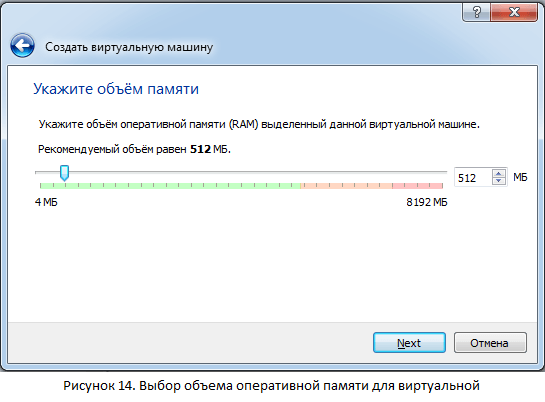
The next option is to set the amount of memory your virtual machine will use. Don't forget that the amount of virtual memory you set will be used on your local computer whenever the virtual machine is turned on.
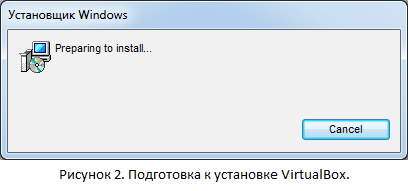
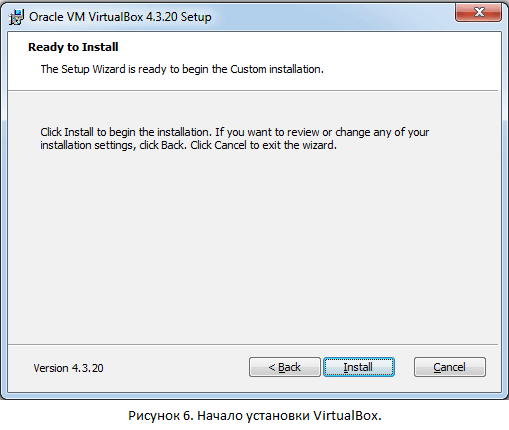
A window will then appear informing you that the preparatory processes have been completed and the installation of VirtualBox itself will now begin. Click on the button “ Install».
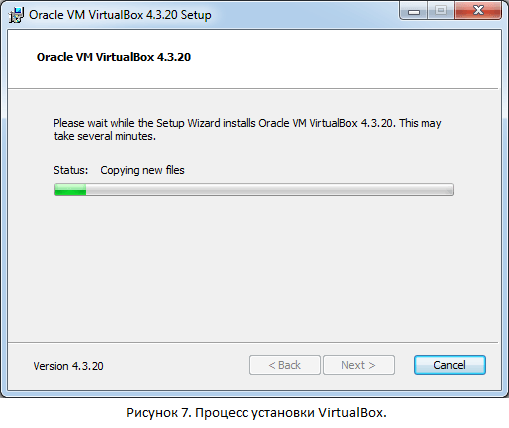
As this window informs you, the installation process has started and the user needs to wait a few minutes.
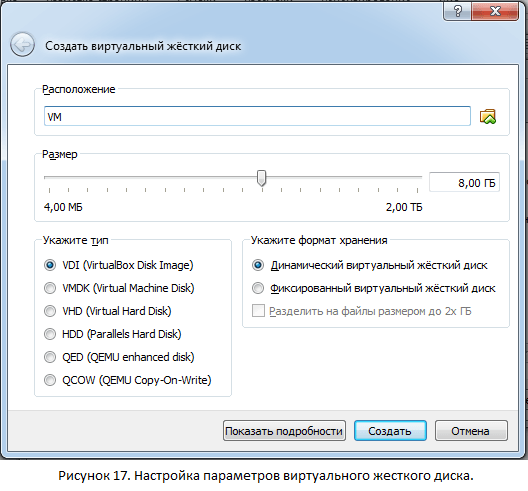
The next step will give you the opportunity to create a virtual HDD for your virtual machine. The next option will allow you to select the hard drive type. The next option will allow you to choose whether you want to virtual hard the disk was dynamically allocated or fixed size.
Dynamically allocated means that the file on your computer representing the virtual hard disk will start small in size, but will grow as needed until it fits the cap indicated by the disk size. The advantage of this is that you first save space before actually using the hard drive space in the virtual machine.
During the installation process, several more windows will appear that will prompt you to install software. VirtualBox will ask for confirmation to install: USB controller, network adapters, network services. It is recommended to install the requested software for correct operation programs.
The file can also be easily fragmented and distributed on disk physical disk. Fixed size is what it sounds like. The growth potential is that you don't have to worry about losing track of how much your virtual machine files can grow. However, you can use what you are comfortable with to your advantage.
The next option allows you to set the size of the virtual hard disk. Now we are ready to launch the virtual machine! This will allow you to troubleshoot and be prepared for problems you may encounter on the client system. Once the installation is complete, we will have to use the virtual virtual terminal until the connection is established. We can start by creating networks. Let's enable the controller by editing it configuration file. You will want the file to contain the following.


After a short time, the installation of the program will be completed; all you have to do is click the Finish button, after which VirtualBox will start.
Quick access and comfortable work
At this stage the machine can perform its basic functions. Here you will want to do some finishing touches in a virtual machine and create your first snapshot. Before taking my first snapshot, I typically follow these steps.
Let's close it and take a photo. Right now the only thing you should see is the current state. This will allow you to create a snapshot of your virtual machine. You'll want to know what the status of the snapshot is without downloading it.

Step 3: Create your first virtual machine
In order to create your first virtual machine, click on the blue button “ Create" In the window that opens, set a name for virtual system, and then select its type and version. After that, click “ Next».
Creating a virtual machine in VirtualBox
We're going to set this up now. You need to configure a rule to forward a port on your local machine to a port on your virtual machine. Be sure to turn your virtual machine back on before attempting this! Having 1 virtual machine is nice, but it won't be enough. How often do you see single server solutions? Make sure your first virtual machine is turned off, and then follow these steps. This will bring up the Clone Virtual Machine window.
Minimum System Requirements
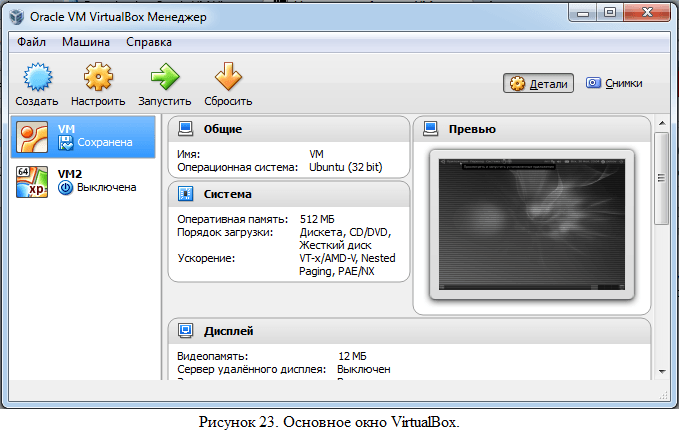
The following options will either create a full clone or a linked clone. A linked clone is like a snapshot. The next option will ask if you want to clone the machine only in its current state or all of it, including existing snapshots. Once this is done, you will see that you have 2 virtual machines at your disposal. However, there will be problems with the second virtual machine that we will need to fix.


In a new window, the program asks you to specify the amount of memory. The size you specify is what VirtualBox will use. Most often, the size specified by default is enough, but if desired and if the computer is available, you can install more - this way, “heavy” and resource-intensive applications can be easily launched on the virtual machine.
This is done, reboot your virtual machine. The output is the following, which shows what the content looks like on my second virtual machine after it is rebooted. At this point you are good to go. Shut down your second virtual machine. You can enable both virtual machines and they should be able to talk to each other without any additional configuration.
VirtualBox virtual machine
This virtual machine setup is as small as you'd like, although it's effective and will remain available to you as long as you can turn on your machine. Oh, and everything written in this tutorial was tested using virtual machines.
Next, you need to select the hard drive with which the virtual machine will work. When you first start VirtualBox, the created virtual hard drives no, so you need to select the " Create a new virtual hard disk" and click on " Create».
Installing dependency packages
However, this is not necessary. In most cases, installing this module is simple. Also, make sure that all system updates are installed. This is also called starting a virtual machine.
What is a virtualization application
Different operating systems have different processes for interacting with the hardware.Why do we want to run a virtual machine?
Virtual machines give us the freedom of choice no matter what operating system sits on top of our hardware. There is also the added bonus of sharing responsibilities.
Is there a disadvantage to virtualization
Virtual machines can help us solve many problems, but there are some disadvantages.
After that, select the file type that will be used when creating virtual disk. It is recommended to leave the default selection unless the created disk will be used with other software virtualization products.

Creating and Configuring Shared Folders in VirtualBox
One of the main disadvantages is virtualization itself. The minimal installation is what it appears to be minimal. It does not come with a window manager or any development tools. This easy installation bones, which allows us to customize the environment according to our exact needs.
The next prompt will ask you to add a virtual hard disk. Go ahead and select “Create Virtual Hard Disk” which should be the default. The next prompt will ask you whether you want dynamic storage or fixed storage.
Next, a window with advanced hard drive settings will open. Select the virtual disk type based on whether it will be used in other virtualization programs. Select the size that the program will use. It is worth noting that the allocated size will be occupied by VirtualBox on the physical hard drive, so first make sure that the allocated resources are available. Click " Create"and wait.
Guest Axis Additions
Go ahead and click the “Create” button to complete this part of the process. You will be asked to point the manager to the previously downloaded one. The installation process will begin by asking you to select your preferred language. After you make the following prompt, select your installation destination.
You will now notice that the Set Destination section no longer contains the warning that was previously there. The installation will begin, but there are still two steps left. Go ahead and make the user an administrator. We are interested in the network icon. A dialog box will open showing the current network adapter configuration.
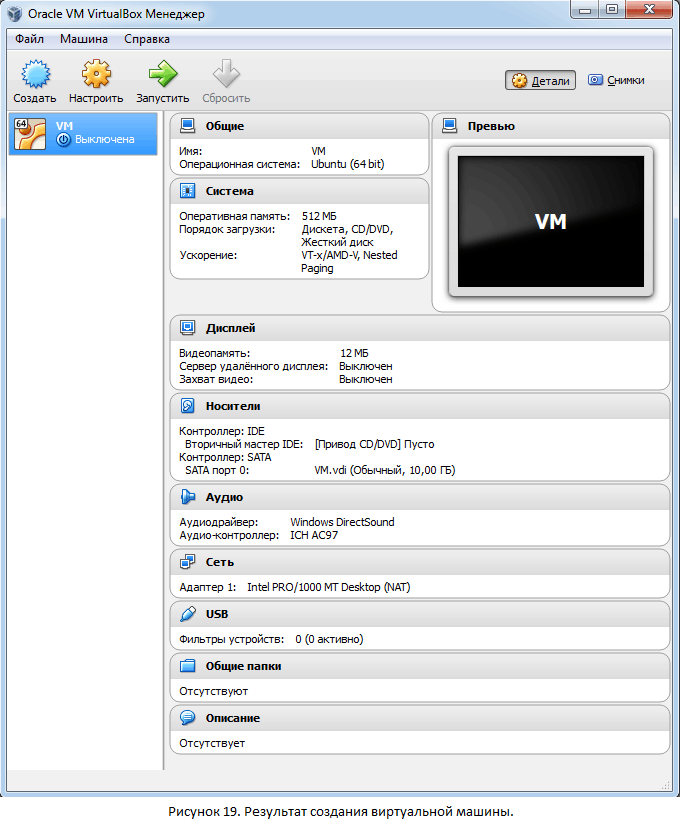
If all actions were completed correctly, a new virtual machine will appear on which you can install the guest OS.
Step 4: Install Guest OS
After the first launch of the virtual machine, the OS installation will be automatic. To start the machine, you need to press the corresponding button (green arrow to the right, " Launch") and indicate the path to boot disk or image.
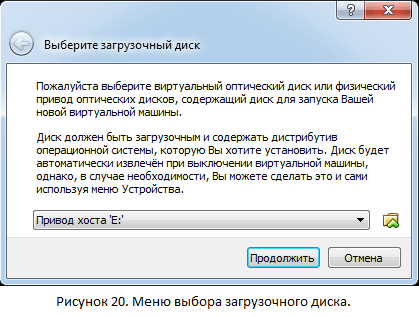


Once the disk or image has been selected, auto-installation of the OS will begin. The installation process itself is no different from the actual installation on a computer. After installation, you can start working with the operating system.
Other useful information
Adding, starting and shutting down a virtual machine
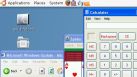
You can start virtual machines by selecting them with the mouse (the list is on the left side of the program) and on the toolbar by clicking on the button " Launch».
If the machine you need is not in the list, click “ Car" and select " Add».
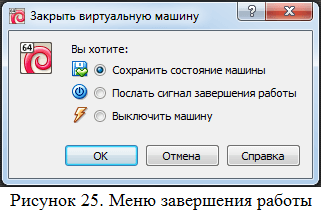
There are several ways to shut down a virtual machine:
Pausing the virtual machine
The guest OS can be paused if you need to be away at some point, but it is very important not to miss any activity that is happening in it right now. To freeze the virtual machine, you need to click " Car" and select " Suspend" To resume work, you must perform this action again.
This option has a higher priority than shutting down work while saving the state, if only because exiting the pause is instantaneous, and restarting takes much longer.
Connecting removable devices to the virtual machine
You can connect USB devices to the virtual machine. To do this, in the toolbar follow this path: Devices > UUSB devices and in the list window that opens, select the required device. Working with a removable device will be the same as with a real machine.
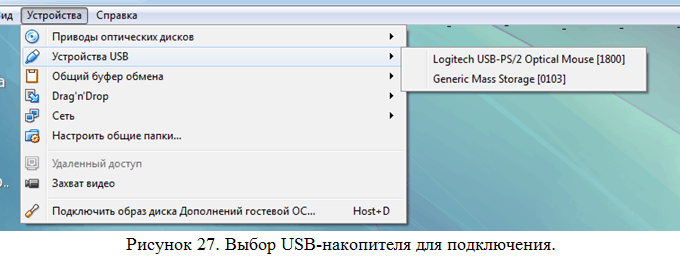
It is important to note that when a device is connected to a virtual machine, it is “disconnected” and becomes unavailable to the real machine, resulting in the loss of unsaved data. Therefore, first make sure that you do not make any important actions with the host OS (for example, copying).
Switching between host and guest OS
When you work in a virtual machine, the mouse and keyboard are captured. That is, all actions performed by these devices are relevant only for the virtual machine. When you need to switch to the real operating system (host), press the " Right Control».
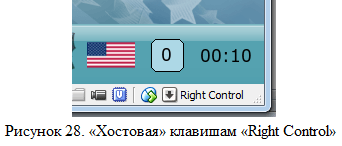
You can resume working with the virtual machine by clicking on any location in the VirtualBox window.
In this article we will figure out how to install virtualbox and how to add new virtual machines. First, I’ll tell you for those who don’t know what these virtual machines actually are.
Imagine this situation - at work you have to work in a program that only works under the operating system Windows system XP, and you have Windows 7 (or Windows 8/8.1) installed. How do you get out of this situation? Someone will humble himself and set himself on windows computer xp (for which security updates are no longer issued), and someone more intelligent will install a virtual machine on their computer and install Windows XP in it with the ability to work in the desired program.
That is, to put it briefly, a virtual machine is a full-fledged computer (with a processor, RAM, hard drive and even BIOS), which runs inside your computer using an emulator program.
Virtualization technologies, which were very expensive and resource-intensive just a few years ago, have already entered homes today ordinary users and take up space in most ordinary home computers. Here is a sample list of what they are used for virtual machines:
- Application testing
- Testing network programs in closed virtual networks
- Testing applications with various PC configuration parameters
- Lack of funds for additional computers
- Consolidating servers on one physical computer
- Training on various operating systems
and much more…
My experience with virtual machines began with virtualbox, but after working with virtualization giants such as VMware and the mega giant Hyper-V, I felt how much cooler they are. But for this coolness they ask a lot of money.
So if you are just interested in tinkering with other operating systems without reinstalling yours, or you need, for example, to run windows applications on a Linux computer, then Virtualbox should satisfy you completely.
If you are going to run serious network infrastructure projects that must work 24/7/365, then you are better off looking towards Hyper-V, which comes with Windows Server 2008/2012. Believe me, it's really worth the money.
This was a little background, and now about Virtualbox itself.
Download and install virtualbox
You can download Virtualbox from the official website https://www.virtualbox.org, the most latest version at the time of writing - 4.3.14, we will install it. 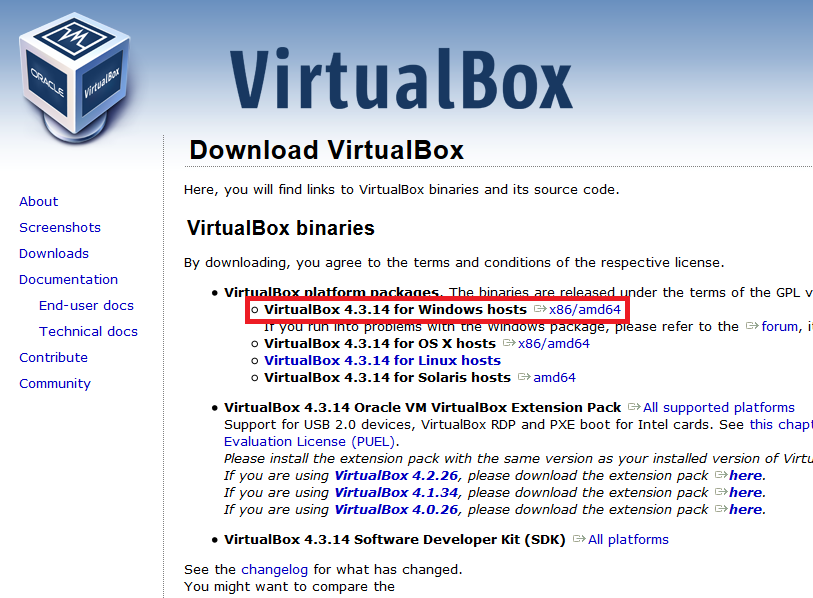
Run the downloaded installer and click “Next”  In the next window, leave everything as default and click “Next”
 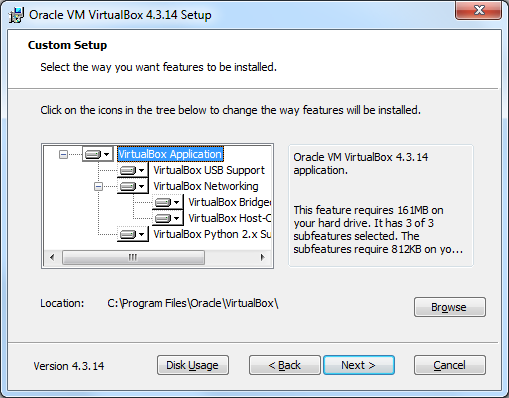 In the options window, leave all the checkboxes as default
 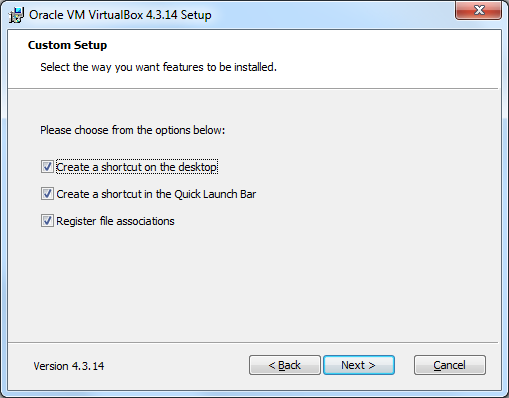 In the next window, the installer will warn you that during installation a new network connection will be created, which will lead to a temporary disconnection of your active network connection. Click “Yes”, and in the next window “Install”
 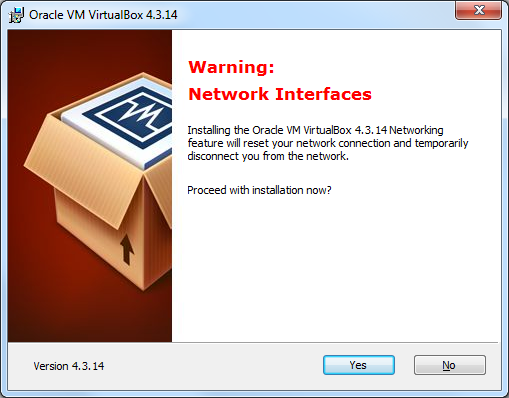 We wait a few minutes for the program to install. After a message appears indicating that the installation was successful, click “Finish”
 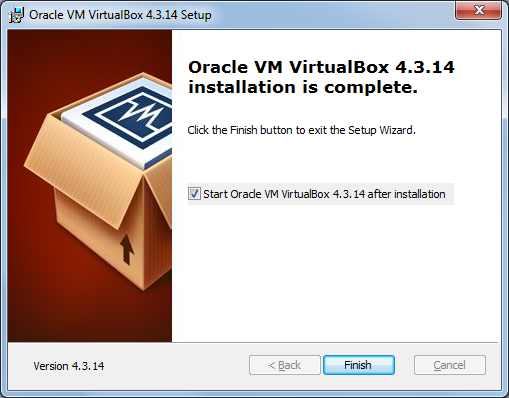 If everything went well, the program “ VirtualBox Manager“
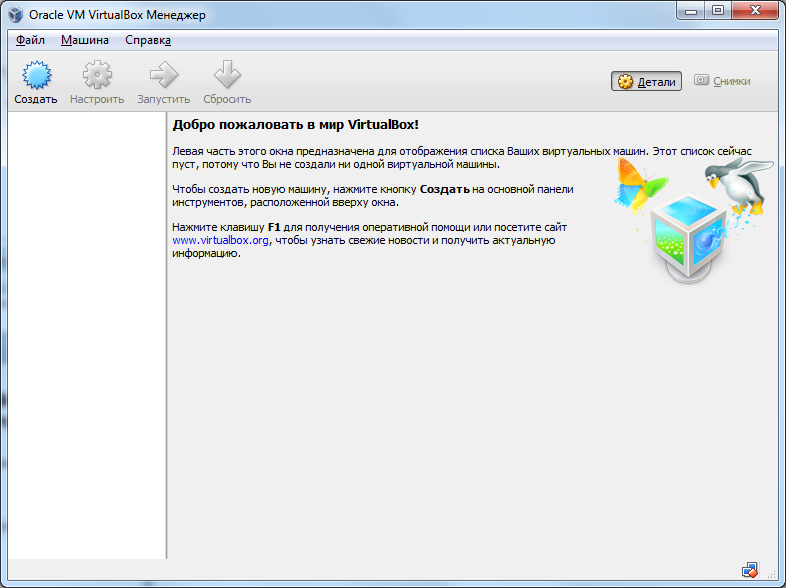 The “Manager” itself is just a shell with the help of which work will be carried out between the virtual machine and the physical computer.
The program settings are quite sparse, you don’t even have to pay attention to them, since everything is configured there by default, which should satisfy the vast majority of users.
Adding a virtual machine
To add a new virtual machine, click the “ Create“, enter the name of the virtual machine, select the type of operating system and its version.  In the next window, select the quantity random access memory for a virtual machine. I would like to draw your attention to the fact that you cannot select more RAM than is installed on your physical computer.
 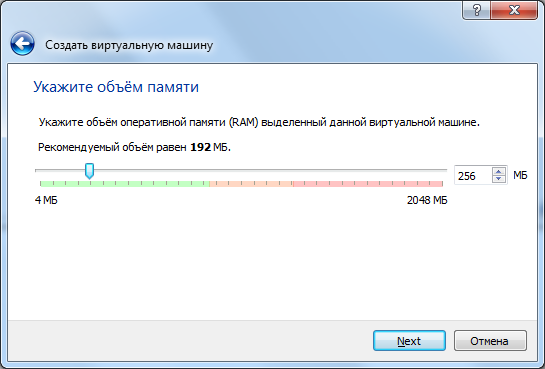 In the next window you are asked to select a virtual hard disk or create a new one. Since we are launching the program for the first time, we will create new hard selecting “Create a new virtual hard disk”
  In the window for selecting the type of hard drive, I advise you to leave the type VDI, by choosing this type your virtual hard disk will be 100% compatible with virtualbox and its operating speed will be equal to the speed of a real hard disk
  In the next window you should select the type of virtual hard disk:
- Dynamic virtual disk– the size of the virtual disk will grow as it is filled with data. It is created faster, works slower.
- Fixed virtual disk– the size of the virtual disk will be the size that will be specified when creating it. It takes longer to create, it works faster.
I think you can decide for yourself which type suits you best, I will choose Dynamic type disk. 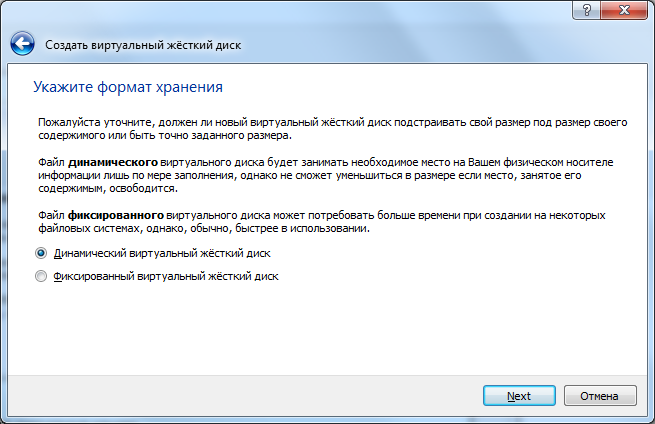 In the next window you will be asked to select the name of the disk, its size, as well as the location where the disk itself will be stored
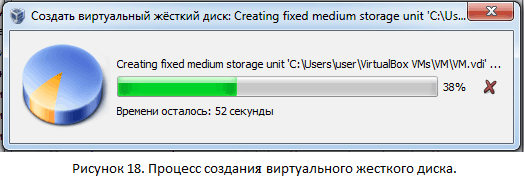
  After selecting this data, click “Create”. At this point, the preparatory work can be considered complete.
Now a program with an added virtual machine has opened in front of you  In this case, a virtual machine is a “bare” computer, without an operating system. If you need to have a disk with the operating system or bootable USB flash drive, then you can use disk images to install the operating system in virtualbox (as in other virtual machines). It is very convenient and practical.
Setting up a virtual machine
Let's move on to the settings of the virtual machine we added. Click the “Configure” button and examine the virtual machine settings window.
After setting up the virtual machine, click “OK” and click “Launch”. If you did everything correctly, then when you start the machine you should start booting from the disk image  Then everything is the same as in a regular computer!
As you can see, there is nothing complicated and you now also know how to work with virtual machines! If you have any questions or suggestions, I’m ready to discuss them in the comments.
Did you like the review? Click like and subscribe to our website updates!


