It's no secret that the use of DVDs and CDs in Lately is declining because there are more convenient analogues: various flash cards, removable hard drives and other wonders of technology. However, a technology developed relatively long ago remains unaddressed - the creation of virtual drives and disks.
What is a virtual drive?
It is necessary to distinguish virtual drives from virtual disks.
Virtual drive- a device that has the same functions as a physically real drive: disc writing, reading, and so on.
A virtual disk is analogous to a disk that can be read or written using a virtual drive. Most often, the object of recording on a virtual disk is a so-called disk image, which is an iso file.
However, the virtual drive and disk cannot be moved, scratched, or folded into an envelope. These devices are virtual, that is, they do not physically exist. We emulate their presence in our computer.
What is a virtual drive used for?
There are a number of reasons why using virtual drives and disks is justified:
- The ability to quickly transfer a disc to a computer without spending money on buying a DVD disc.
- Maximum security. The actual disk or drive can be scratched, hit, or broken. Virtual devices do not have this threat.
- The ability to create as many virtual drives as you like, and even more so disks.
- Convenience of transmitting information over the Internet.
Thus, we get a flexible mechanism for writing, reading and transmitting information, without spending any money on purchasing additional drives and a bunch of disks; this approach is becoming outdated every day. You don’t have to bother with packaging disks, you don’t have to learn how to install and configure the drive in your computer. You just need to have Windows 7 or higher operating system installed on your computer.
How to create a virtual drive?
Having figured out what using virtual drives gives us, we move on to the most interesting stage - creating them on your computer.
Today there are a lot of programs that allow you to implement this. The most time-tested and easy to use are Alcohol 120 and UltraISO. We will analyze the use of both programs, after which everyone can decide for themselves which program is more convenient.
Virtual drive for Windows 7 using UltraISO
Download this program from an official or any other source. It is advisable to use latest version 9.6.5, although using older versions is not critical.
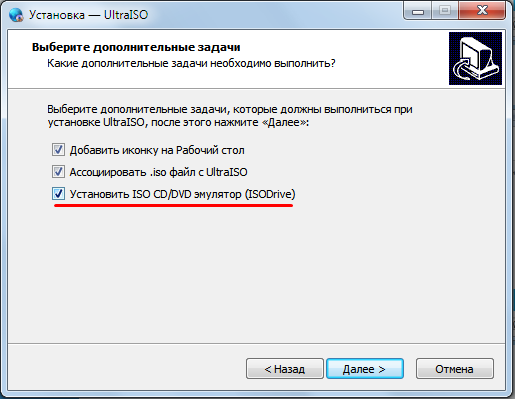
During installation, at the selection stage additional tasks, you need to check the box “Install ISO CD/DVD emulator”
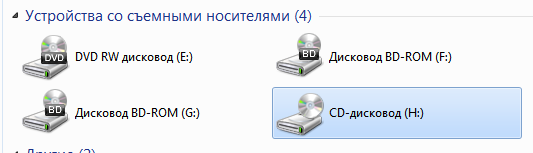
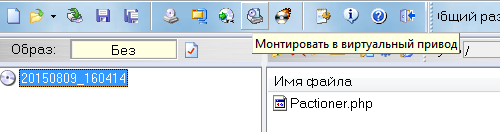
Ready. After installation, go to My Computer and see that the virtual drive has already been created:
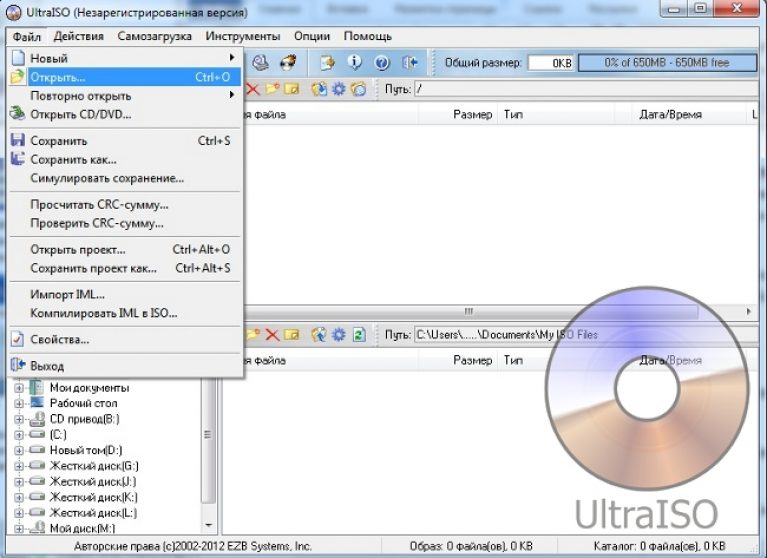
Let's launch the program. In the left top corner We see the disk image, which was also created automatically. To the right of it is shown its contents, which are still empty. Below is the directory of files on our computer, this is where we can choose necessary files and send them to our virtual disk:
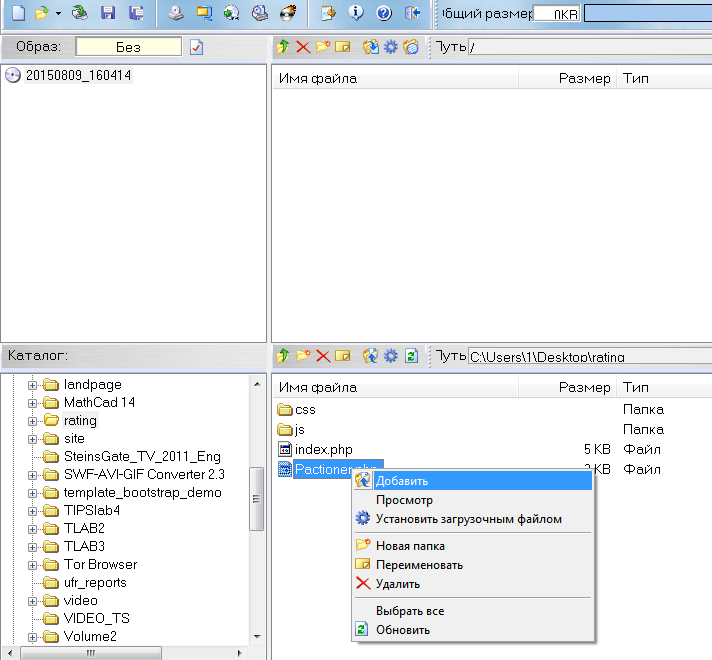
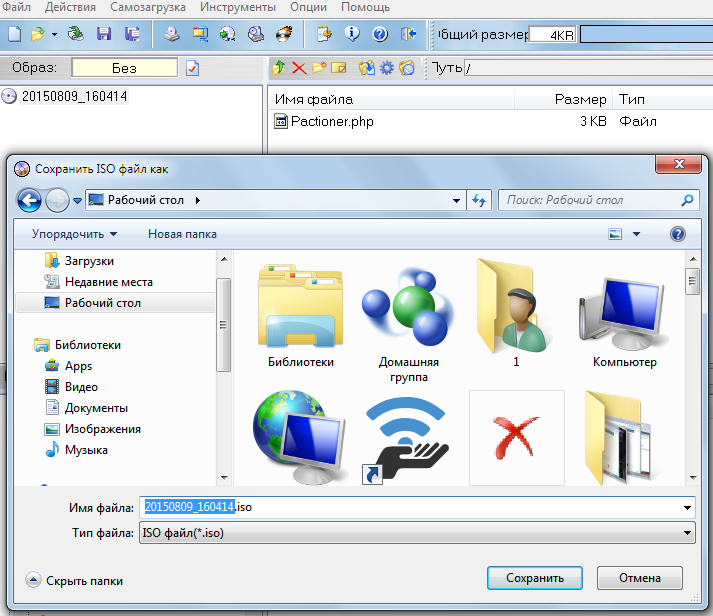
We see that the data has been added to the virtual disk directory. Go to File -> Save As:
Click on the “Mount to virtual drive” icon:
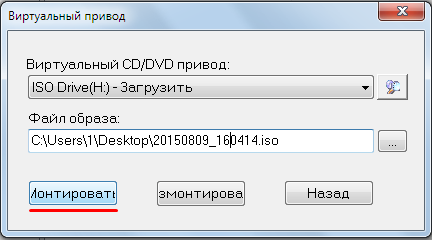
Make sure that the path to the file is set correctly and click “Mount”:
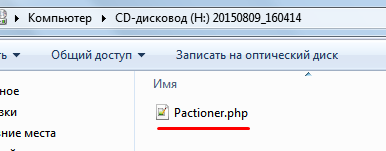
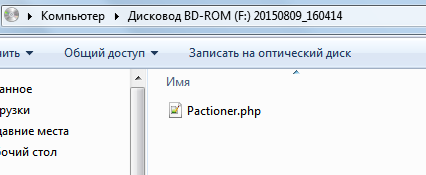
We go to My Computer, open the contents of the virtual disk and see that the file Pactioner.php is written to it:
Thus, in just a minute we created a virtual drive and mounted the disk image on it. The example uses a regular file; instead of it there could be, for example, some game that you need to emulate from disk, so as not to take out the disk every time and load it into a real drive. Recording such things looks the same way: select the game disk files in the directory, transfer them to a virtual disk, emulate it, and you're done. You no longer need a real disk.
Virtual drive for Windows 7 using Alcohol 120
Download and install the program. After installing the program, we see that Alcohol 120 separates physical drives from virtual ones:
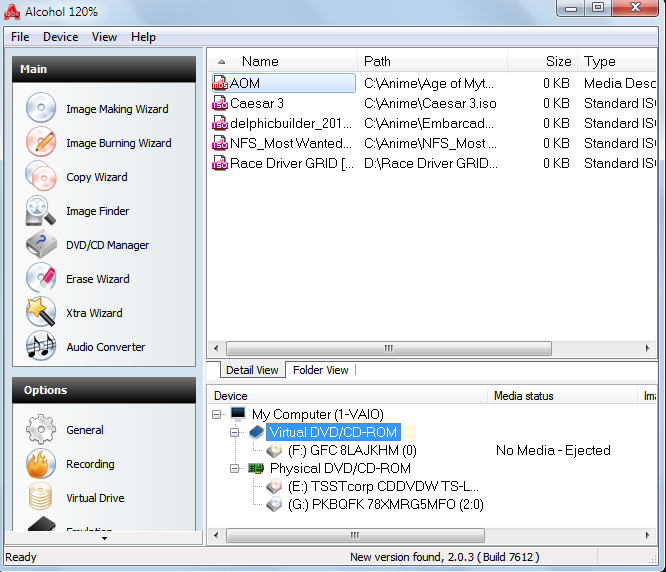
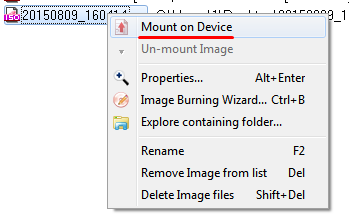
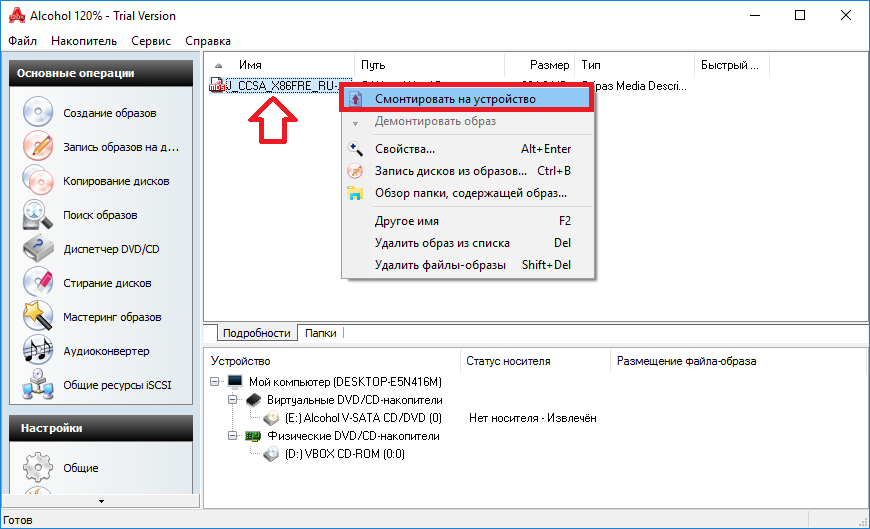
The virtual drive F is ready for use; all you need to do is transfer the necessary ISO files in the field above and select the desired function. To burn the image to a real disk, select Image Burning Wizard. In this case, we want to emulate our image on a virtual drive, so we’ll add the same image that we created in UltraISO, right-click and select Mount on Device:
Ready. It will be revealed to us new disk with the recorded file Pactioner.php:
Results
We looked at the theoretical basis of virtual drives and disks, dealt with programs that allow you to use this technology. Undoubtedly, using these things will save your time and nerves, which is very important in the age of information technology.
Read about how to create and work with disk images, as well as what programs you use in our article today.
Disk image. Areas of application
A disk image is a file containing full copy content and structure of data located on the drive. In this case, a disk should be understood as any hard disk (HDD), floppy disk (FDD) or optical disk (CD/DVD) or Flash drive.
Advice! The main advantage of a virtual image is the fact that the disk image contains absolutely all the information to duplicate the structure, content and location of data on the storage medium, repeating its set of sectors and ignoring file system.
Virtual disks are used for the following purposes:
- Reserve copy.
Unlike regular programs Reserve copy, which copy only those files to which there is access; if an image is created, in addition to the data itself, the bootloader and files that could be blocked by the OS will also be copied. - Distributions software. For distribution (including via the Internet) operating systems(OS) and software (software) having a large size (for example, BSD, Linux OS distributions).
- Create virtual hard disks in virtual machines. Before you start working with a virtual machine, you must create virtual hard disk on which the operating system will subsequently be installed.
- Replication of similar systems.
If it is necessary to install the operating system and software on computers that have the same hardware configuration.
A more rational step would be to install and configure the OS and software on one computer, after which an image is created along with all system settings and installed on other computers.
The .ISO format is the most popular disk image format, but has the disadvantage of lacking support for multi-session data.
Other popular formats are the .DMG and .IMG formats, as well as the proprietary .MDS/.MDF (Alcohol, Daemon Tools), NRG (Nero Burning ROM), .VCD (VirtualCD) and others. Next, we will look at several of the most popular programs for creating a disk image.
Overview of programs for creating a disk image
Alcohol 52%
The program settings allow you to:
check the accuracy of data reading from physical devices;
improve scan quality bad sectors;
simultaneous operation with 6 virtual drives;
work with formats: BIN, BWA, BWI, BWS, BWT, CCD, CDI, CUE, ISO, ISZ, NRG, MDS;
DAEMON Tools
As can be seen from the table, the functionality of the free version is sufficient for the tasks of the average user, which allows you to create and mount all existing types of images and emulate up to 4 drives. The program has a clear Russified menu.
Ultra ISO
Useful features of the program include:
optimization of the disk image structure, allowing more efficient use of hard disk space;
creating boot disks containing boot sectors of the most popular operating systems (DOS, Windows, Linux);
extracting boot sectors from hard disks (HDD) and floppy disks (FDD);
adding, deleting, editing files and folders directly inside the disk image.
The program interface is available in more than 40 languages, including support for English, Ukrainian and Russian. The program license costs $30, and there is also a trial version.
How to create a game image using DAEMON Tools
3 best programs to create a disk image
Users personal computers often encounter image files optical disks format ISO or MDF. These files contain various file information, multimedia content or installation “image” with Windows OS, as well as many other data.
Therefore, the PC user faces a task, the solution of which is to open these files, view them, or process information on these images. The most popular programs that can create a virtual DVD-ROM for reading ISO images, as well as writing them to optical drives, are Alcohol 120 And Ultra ISO. In this material, we will describe with examples how to create a virtual DVD-ROM, and also describe the process of creating ISO images using these utilities.
We create and mount images on a virtual DVD drive using Alcohol 120
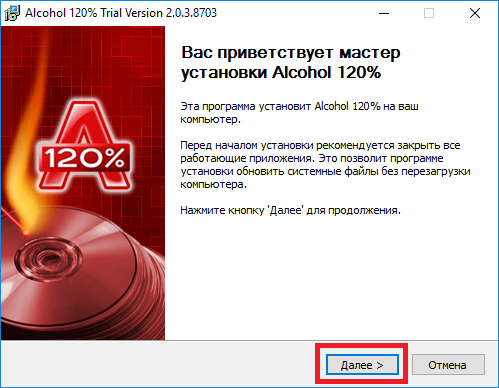
Alcohol 120 appeared back in 2002. Since then, it has become very popular among Russian-speaking users. It gained popularity due to the ability to create virtual DVD drives and mount an image on them. The program can also write images to physical optical drives. You can download the program on its official website www.alcohol-soft.com. After downloading the installer, you can begin installing the program. On startup installation file, we will be taken to its start window.
In this window, click Next, and continue downloading and installing the utility to go to the next window. In this window, we will make a decision regarding the license agreement, after which the main utility installer will begin downloading to the computer. After downloading, the main installer window will launch.
Let's move on to the next step, where we will also resolve the issue of accepting the license agreement, and then click the Next> button. After completing these steps, the installer will ask you to restart a computer, with which we must agree.

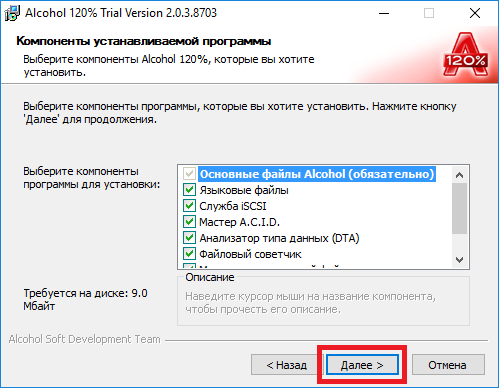
After reboot the same wizard will start, in which you need to take again license agreement. Next we will move on to selection of installed components. Leaving all components unchanged, click the Next> button.
In the next window, select the installation location for the utility and click the Next> button. After these steps installation will begin. After installing the program, launch it from a shortcut on the Desktop, which will allow us to go to the main program window.
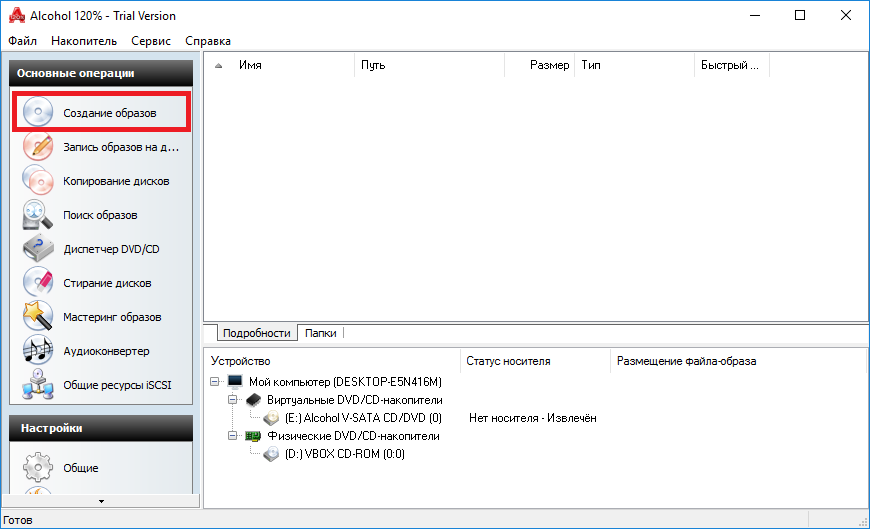
At the bottom of the program you can see that we have two optical drives on our computer, one virtual, which I made Alcohol 120 and one physical. Now let's start creating an image file. To do this, insert a licensed disk with Windows 10 into our PC. Going to the program window, press the button “ Creating images" This action will open the Image Creation Wizard.
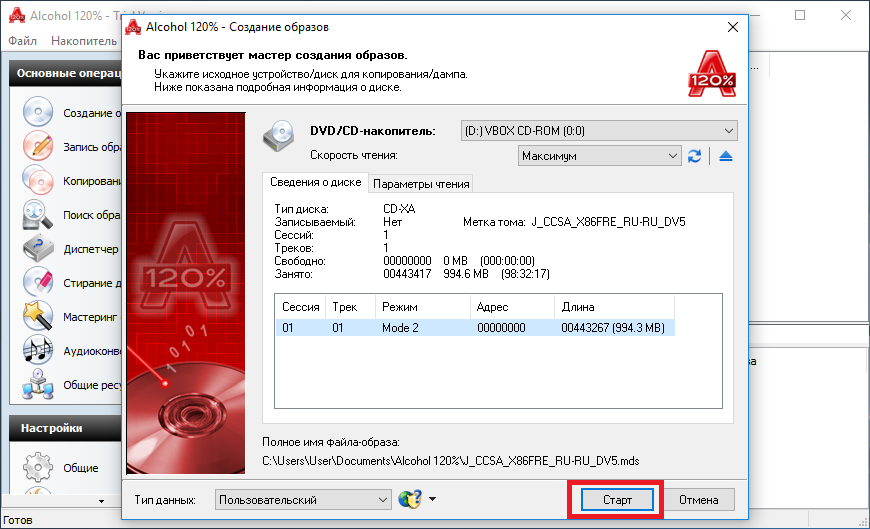
From this window you can see that the utility I myself chose the physical drive from which I need to make an image file, and also displayed all the information about the located disk in DVD drive e. To create an image file, the last step left is to click the Start button.
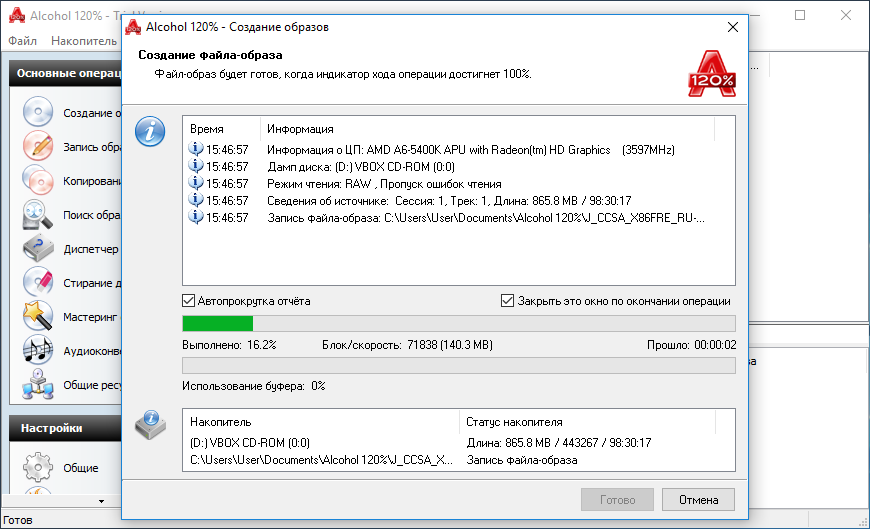
The recorded ISO image will appear in the main window of the utility. By right-clicking on it, you can mount it to the utility’s virtual disk.
The example shows that creating an ISO image and mounting it on a virtual DVD-ROM is not at all difficult. Also, if necessary, the created image file can be written to a new optical disk directly from the utility menu in the “ Burning images to discs" With this action we will make another copy of the Windows 10 license disk.
Create and mount images on Virtual DVD-ROM using UltraISO
Program Ultra ISO as well as Alcohol 120 can burn images, create Virtual DVD drives and mount images on them. In addition, the utility can edit dozens of image formats, which is a big plus. You can download the utility from its official website https://ezbsystems.com/ultraiso. Even a novice user can figure out how to install the utility, as it is very simple. Therefore, there is no point in describing the installation process of the utility. After installing the utility, launch it from a shortcut on the Desktop. This action will move us to the main program window.
![]()
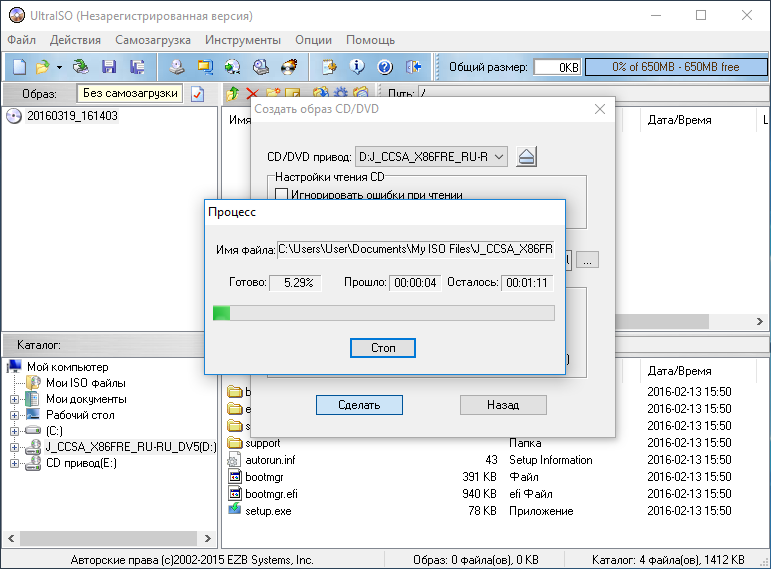
Before creating an image in Ultra ISO, insert the licensed disc with Windows 10 into the DVD drive. Now in the program window press the F8 key to call the image creation wizard. In the wizard, select the image type " ISO"and the DVD drive where our Windows disk 10. After installing the selected options, click the Make button, which will directly launch the creation process itself.
To mount our created image file, we need to press the F6 button, after which a wizard will appear in which we can choose the location of our image, mounting it on the virtual drive created during installation of the utility.

In the same way, we can unmount an image file from a virtual DVD drive.
As can be seen from the example, the utility is as easy to use as Alcohol 120.
Let's sum it up
The utilities discussed are quite easy to use and perform their task 100 percent. Therefore utilities Alcohol 120 And Ultra ISO have become so popular among millions of users around the world. In addition to the programs discussed, there are also such popular utilities that you can familiarize yourself with:
- Gizmo Drive;
- WinCDEmu;
- DAEMON Tools.
These programs have similar functionality as in the utilities under consideration. I would also like to note that these programs and the ones in question support both old and new Windows operating systems, so users, for example, with Windows XP will not have any problems running them.
We hope that our material introduced you better to Alcohol 120 And Ultra ISO, so you can create your own disk images and mount them on virtual drives.
VirtualDVD Media Emulator - simple but sufficient handy tool, which will help you create a virtual drive on your computer to run CD/DVD/Blu-Ray disc images...
3.69 MB | Free |
PowerISO allows you to create, convert, decompress, compress, edit and encrypt CD/DVD images...
3.02 MB | Shareware |
DAEMON Tools Ultra is a powerful multifunctional application that combines all the main functions of the popular emulator optical drives DAEMON Tools, excellent and user-friendly interface, as well as a number of other additional features...
25.95 MB | Shareware |
QEMU is an open source program source code for emulation on PC most of existing platforms. Contains two emulation modes: full and custom...
36.33 MB | Free |
DAEMON Tools Pro - popular instrument for emulating optical disks and virtualizing drives with additional features mounting images...
30.73 MB | Shareware |
Alcohol 120% Free - free version popular drive emulator. The program can burn discs from images, create virtual drives and disc images, copy discs, etc. Unlike the full version, it has functional limitations...
7.6 MB | Free |
Alcohol 52% Free Edition is a free version of the popular CD/DVD drive emulator. Allows you to create up to 6 virtual drives with images. Supports all versions of modern CD/DVD formats. Sami optical discs you won't need anymore...
6.98 MB | Free |
Alcohol 120% is a popular CD/DVD emulator that creates a disk image with data, audio or video information on the hard drive of the user's PC, and then provides access to them as if the disk were in the drive. You can create up to 31 drives...
7.62 MB | Shareware |
Daemon Tools is a small, free, but very functional application for creating ISO/MDS/MDF/MDX images from CD/DVD/Blu-ray discs. The program can bypass many copy protection systems, such as SafeDisc, CDCOPS, Protect CD...
24.03 MB | Free (with ads) |
Virtual CloneDrive - a program for working with virtual disks created from images using CloneCD and CloneDVD. It is possible to simultaneously create up to eight virtual disks. The program has virtually no settings...
1.63 MB | Free |
DAEMON Tools Net - network version popular program DAEMON Tools, which, in addition to working with disk images, allows the user to organize CD, DVD, Blu-ray disk storage on the server, and control access to it...
There is no way to do without a program for mounting disk images if the computer has content presented in the format of a virtual clone of a CD/DVD disk. Below we will look at five ways to mount a disk image in Windows so that its contents are available in a virtual drive.
1. Mounting images using standard Windows tools
First, let's look at the standard functionality for mounting CD/DVD images in the version Windows systems 8.1.
Time of creation Windows versions 8, from which the standard functionality for working with disk images migrated to all successor versions - Windows 8.1 and 10 - was due to the mass phenomenon of computer device manufacturers refusing to include their drives. CD/DVD disks were becoming obsolete, and the lack of a drive reduced the final cost of individual laptop models and PC assemblies. Microsoft, in fact, had no choice but to implement the standard ability to connect disk images, at least only in the popular ISO format, so as not to take bread away from developers third party software. So, if in the Windows 7 version mounting disk images is only possible using third party programs, then users will be able to view the contents of the disk image in ISO format using the system.
So how do you mount an ISO disk image in Windows 8.x and Windows 10? In Explorer, select the ISO file, call the context menu and select the “Connect” command.

That’s it – the image is mounted and visible in the virtual drive. You can start viewing its contents in System Explorer.
![]()
2. Mounting images in Deamon Tools
Deamon Tools is the market leader in drive virtualization software. The first version of the program appeared in 2000, and, despite the fact that its analogues were released onto the software market earlier, Deamon Tools immediately rapidly gained popularity due to its friendly user interface and the free Lite edition, which was more than enough for home non-professional use . Daemon Tools works with almost all disk image formats. The program's operation is invisible even for low-power devices, since it uses a minimum of system resources. The free Lite version contains limitations - in particular, it is the ability to simultaneously mount only 4 virtual drives. Whereas in the paid version Pro Advanced, 32 drives can be mounted on the computer.
Relatively recently, Daemon Tools has radically transformed, and the classic interface has been replaced by dullness and wretchedness, but with an extremely clear description of functions and clear internal organization sections. The functionality of the program has been expanded, but not everything is available in the Lite version. Naked demonstration of individual functions without the possibility of using them is a marketing ploy to encourage users to purchase the paid version.
Daemon Tools Lite 10 is available for free download on the developer's website.

An important point when installing the program is choosing the free license option.

Among the innovations in the Daemon Tools version is the option to scan your computer to detect disk images and display them in the program’s internal library. Well, let's take advantage of this opportunity.

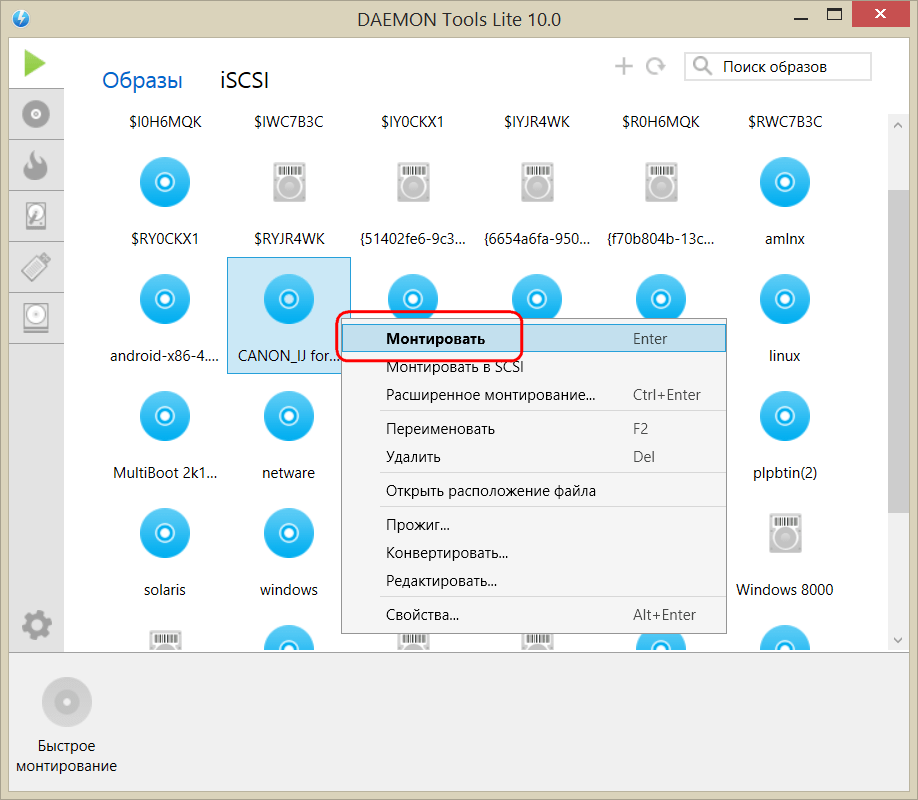
After scanning, all possible virtual CD/DVD and hard drives will be visible in the program window. Select the desired image, open the context menu and execute the “Mount” command.
That’s it – the image is mounted into a virtual drive.

As before, disk images can be added to the Daemon Tools interface one at a time using the quick mount button.

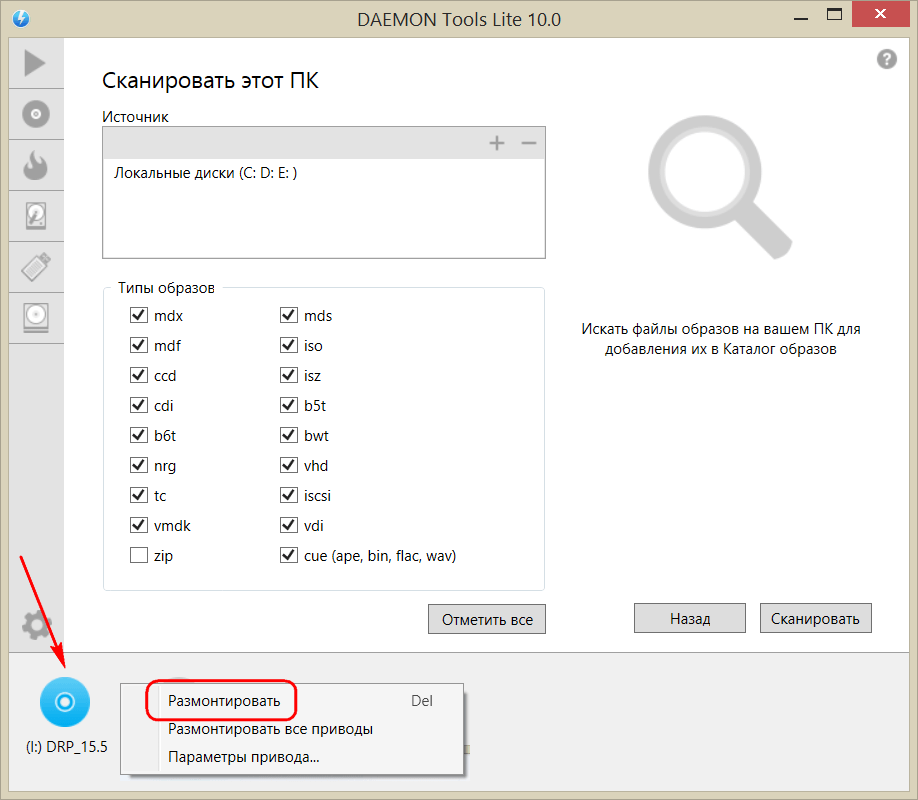
To unmount a virtual drive, call the context menu on its connection icon at the bottom of the program window and select the appropriate command.
3. Mounting images in UltraISO
UltraISO is a mega-program for working with disk images, designed for professional use. Among its capabilities are the following: creating images of CD/DVD disks, burning them to discs, editing images without unpacking, optimizing their structure in order to save space, converting images from one format to another, etc. This program is also a reliable and proven tool for creating bootable flash drives, but one of its features is mounting images into virtual drives.
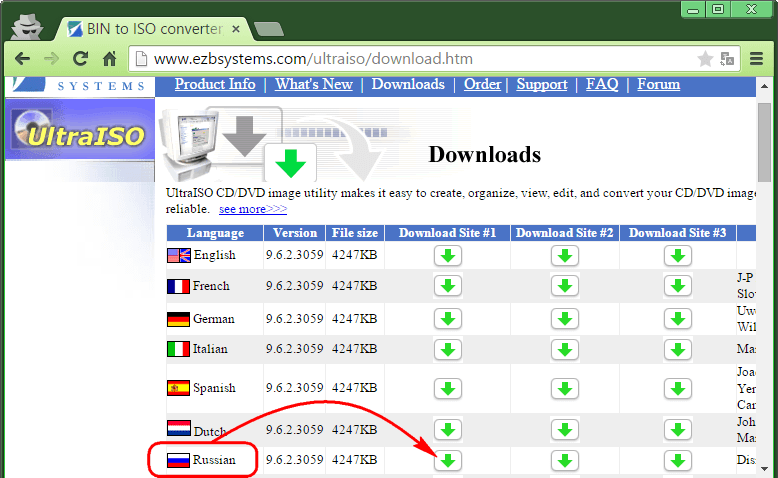
UltraISO is a paid software product. The free trial version is of little use if we are talking about making full use of most of the features. Thus, the trial version has limitations due to which it will not be possible to create or burn a disk image whose weight is more than 300 MB. In our case, when we are talking purely about mounting a disk image into a virtual drive, this limitation does not apply. Therefore, you can safely download the trial version with a Russian-language interface from the UltraISO developer website.
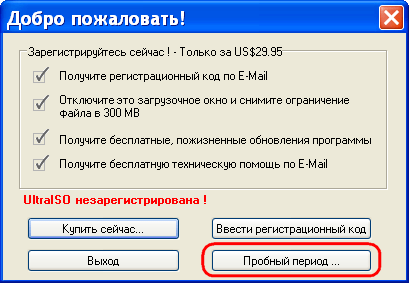
After launching UltraISO, you will see a small window telling us about the limitations of the trial version and encouraging us to purchase the paid version. Click the “Trial period” button.
In the program window, open the “File” menu and click the “Open” button.
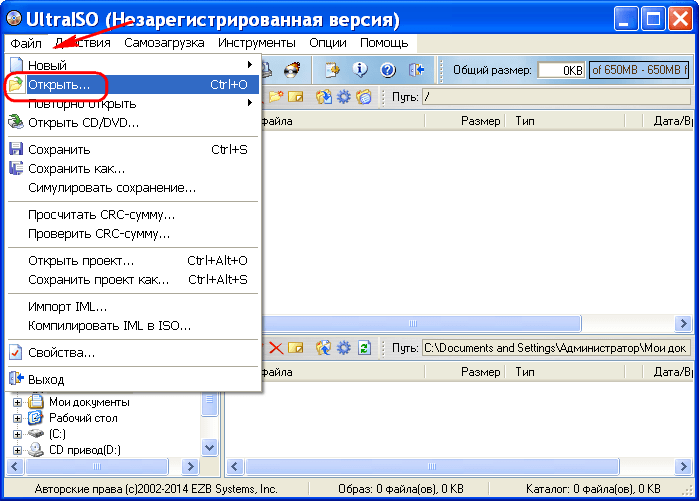
Add a disk image file.

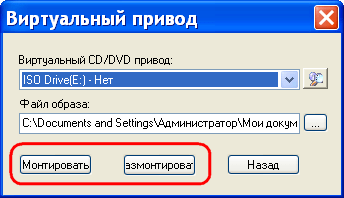
Expand the “Tools” menu and select “Mount to virtual drive” among the available commands.

A small window will appear where you need to select the mount button. The button next to it - “Unmount” - must be used, respectively, to extract the CD/DVD disk image from the virtual drive.
4. Mounting images in Alcohol 52%
Alcohol 52% Free Edition is a free, stripped-down version of the well-known CD/DVD emulation program Alcohol 120%. Unlike the latter, the paid Alcohol 52% allows you to mount a limited number of virtual drives at the same time - up to 6 pieces. In the free version of Alcohol 52% Free Edition, this number is completely reduced to a minimum - only 2 parallel virtual drives. Also, the free version does not provide for recording discs to discs.
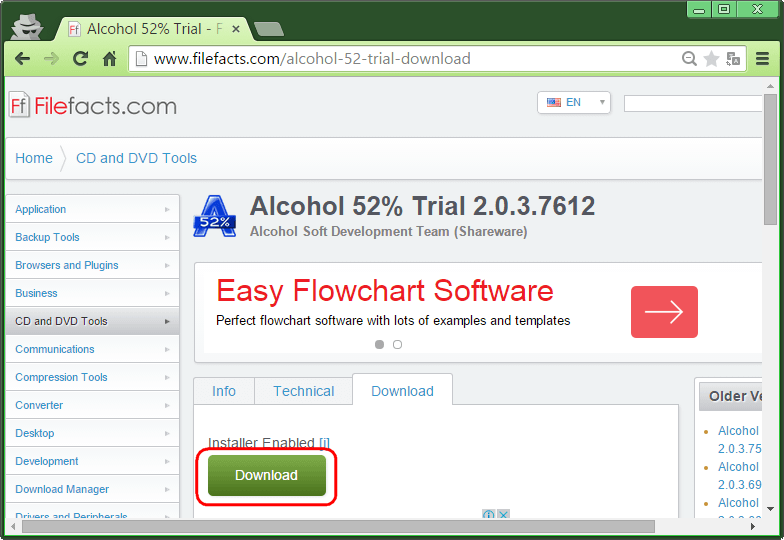
The free trial version of the program can be downloaded from the link from the official website of the developer.
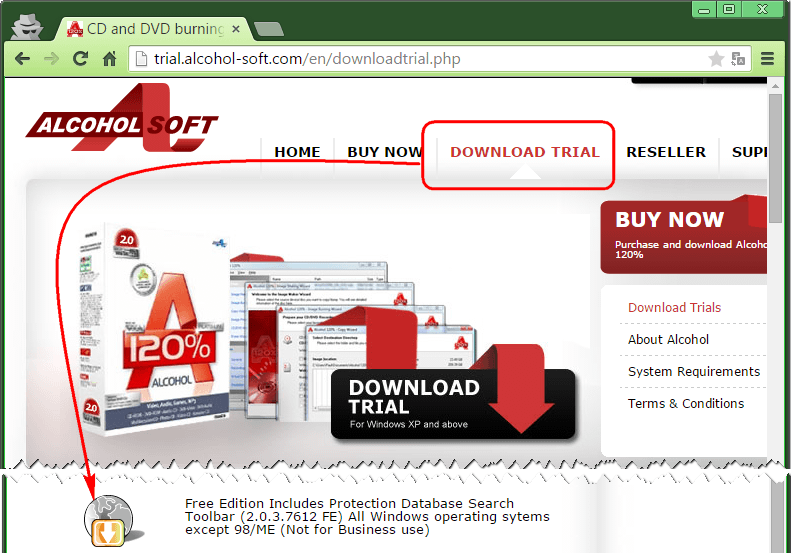
At the time of writing this article, it was not possible to download the program installer using the browser downloader, but the problem was successfully resolved using the Download Master download manager.
There are no limits to the tricks of developers who want paid versions of software products to be purchased from them. In the case of the trial version of Alcohol 52%, we will not just look at the demo window with an offer to buy full version program, but you will even have to wait a few seconds until the “OK” program launch button becomes active.

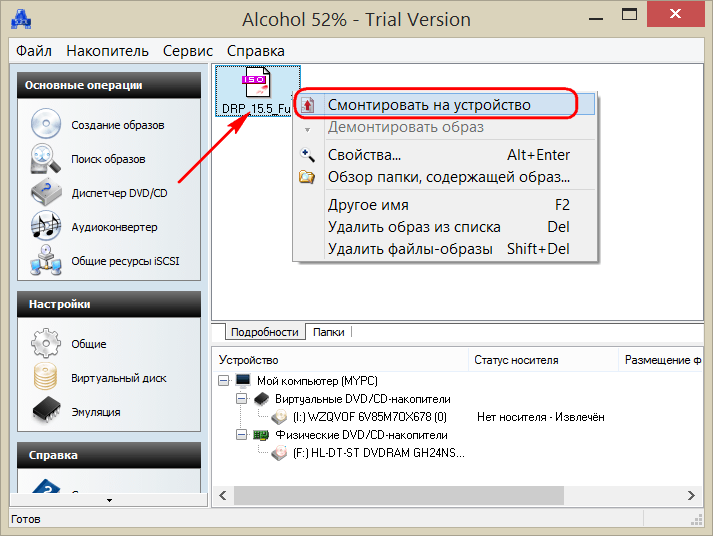
To mount a disk image into a virtual drive, in the Alcohol 52% program window, expand the “File” menu and select “Open”.

Add the image file to the program window, open the context menu on it and select the “Mount to device” command.
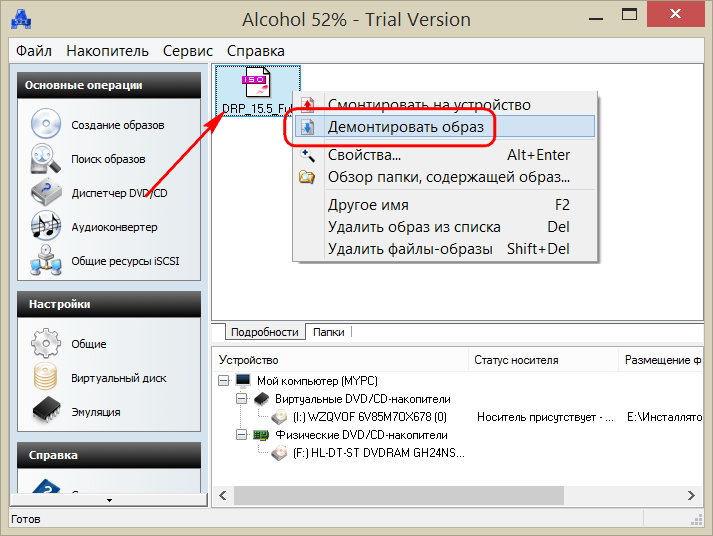
To extract the image from the virtual drive, open the context menu again and select the “Dismount image” command accordingly.
5. The fastest way to mount and unmount a virtual drive
The methods for working with virtual drives within programs are discussed above. But there is also a more convenient one, more quick way mount and unmount the virtual drive. If Daemon Tools Lite is installed during installation with a program that opens disk image files by default, you can mount the drive by opening the image as a regular file by double-clicking the mouse from the system explorer. In case of UltraISO program The disk image will be instantly added to the program window for further actions. But Alcohol 52% will simply open, as with a normal launch, however, it is also convenient.
If the default program was not assigned during installation, this can be done manually at any time. To designate a program that opens a particular type of image file by default, find any of them in Windows Explorer and select “Properties” from the context menu.
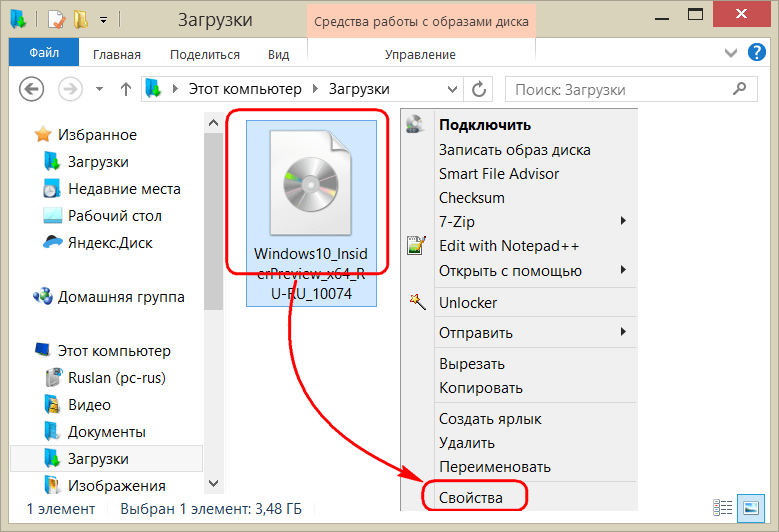
Click the change application button.

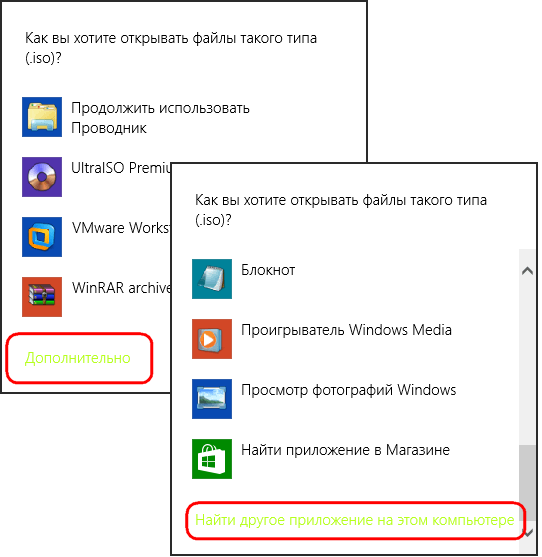
If the desired program not in the list, select "Advanced", scroll down to the end of the list and click the option to search for another application.
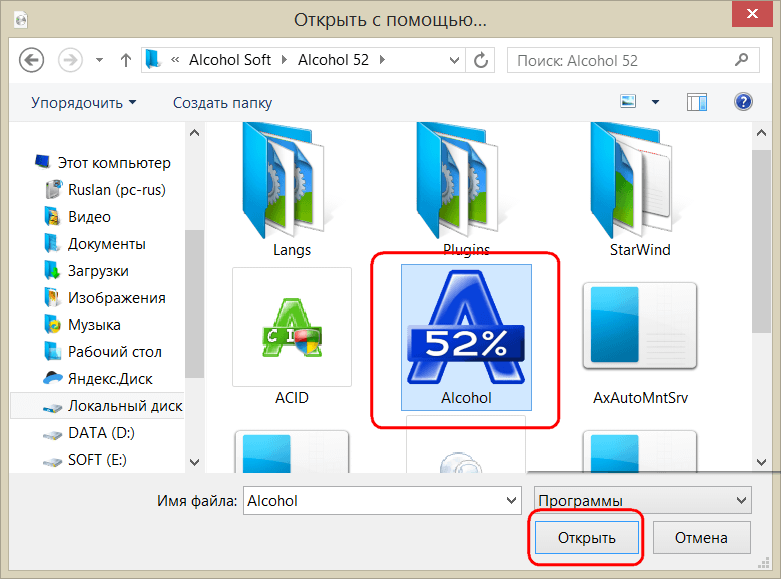
Specify the program launch file in the installation folder.
Apply the changes.

Now in the system explorer the CD/DVD image file will be displayed as the default program icon. And when launched, the image will open in this program.

The easiest way to unmount a virtual drive is in System Explorer. Among the teams context menu, called on the mounted drive, has a disk eject function.
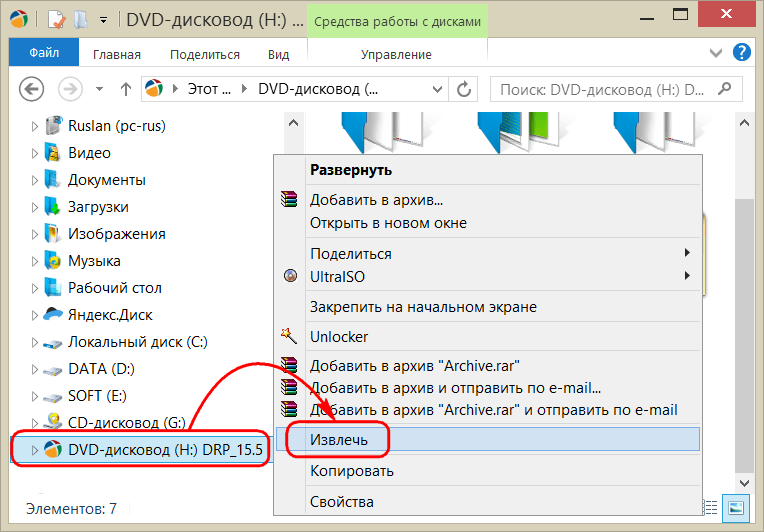
After this, the virtual drive will disappear.