In a situation of malfunction operating system When some programs stop functioning or errors appear, restoring the system and returning to an earlier state when such problems did not exist will help.
The System Restore component is available in the following Windows operating systems: Windows ME, Windows XP, Windows Vista, Windows 7 and Windows 8. In these operating systems, when the service is enabled, backups(checkpoints) of many files: system files, copies of the registry, most drivers. Rolling back to an earlier state of the computer does not affect personal data and files (photos, video and audio files, documents). Some programs that were installed after the checkpoint may not work or may be uninstalled, but there are exceptions. System Restore has limitations: it has a limited amount of memory allocated to it. hard drive, so when the reserved space is exhausted, old restore points are deleted. Sometimes this component is completely disabled so as not to affect computer performance and not take up disk space.
- By clicking the “Start” button, select the “All Programs” column, then “Accessories” and in the “System Tools” folder click on “System Restore”.
- Go to the Help and Support folder through the Start menu and select Undo changes using System Restore.
- In Windows 8, press the Windows + R key combination and enter rstrui in the line that appears.
- In Control Panel, open the “System and Security” section, select “Restore your computer to a previous state.”


System recovery is not a complicated process, but it is often a very effective process. However, such failures occur when system recovery does not give the desired result, then the right solution would be to reinstall the operating system.
To begin recovery Windows systems 7, first you need to figure out what errors occur and whether the operating system boots at all. If it boots, you can try to restore it from Windows.
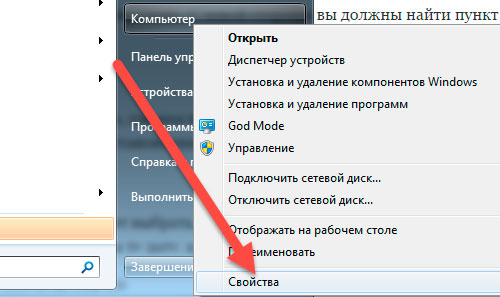
Go to the desktop, find the shortcut or icon Computer (My Computer), right-click on it and go to Properties.
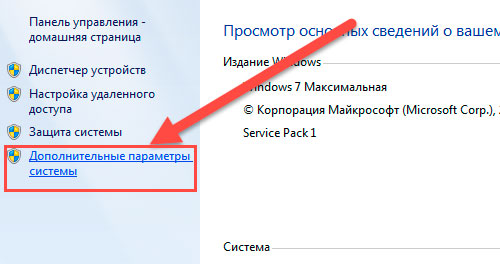
In the window for viewing basic information about your computer, go to the System Protection tab.
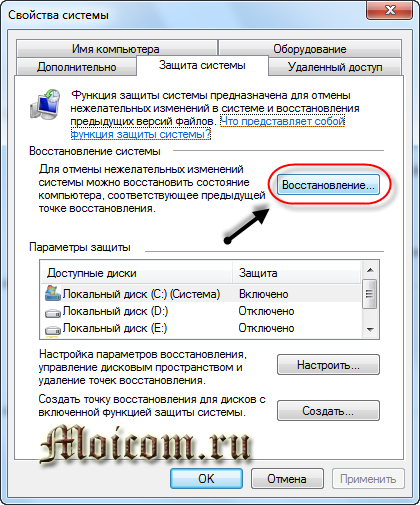
In System Properties, find the System Protection tab and click Recovery.
Getting into Recovery system files and parameters, click Next.
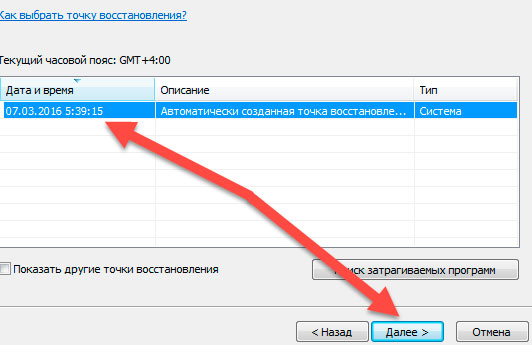
In the next window you need to select a restore point. If they are not there and the recovery function is disabled, then you need to enable it and create a recovery checkpoint.
Select the desired date with a recovery checkpoint. You can click the Show other recovery points checkbox if the one you need is not among the points presented. Click Next.
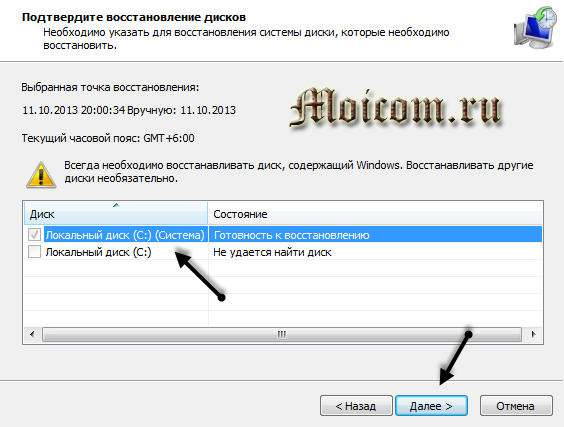
We confirm the restoration, indicate system drives, which we want to restore and again Next.
We confirm the restore point, look again at its description and if everything is correct, click Finish. There is also the option of creating a password reset floppy disk. You can save this information to either a floppy disk or a USB flash memory device.
You may need it if you forget or lose your computer password. If you still forgot it, then here you go How to crack a password on a computer .
System Restore will not be able to be interrupted once it is running. Continue? Click Yes.
After this, the system prepares for its recovery, all open source software and applications, the computer goes into reboot. Next time Windows startup 7, if everything went well, then the following window appears: System recovery completed successfully.
This is how system recovery 7 is done, using standard means Windows.
But let’s say that your Windows 7 operating system does not turn on and does not boot, how then can you perform a recovery? To do this, we will use the second method of restoring the Windows 7 system.
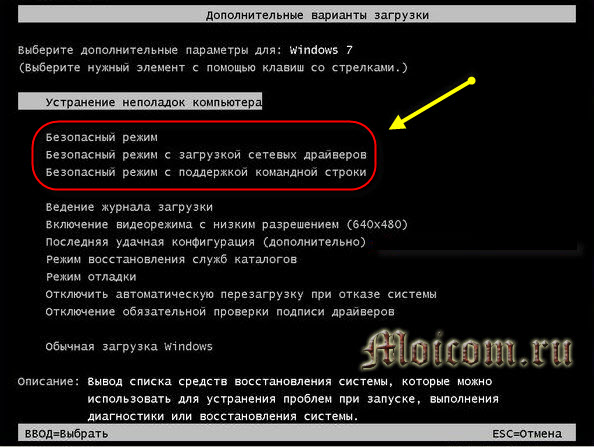
System Restore via Safe Mode
A window appears additional options downloads, choose any safe mode and press Enter (Enter = Select).
Right-click on My Computer and go to Properties. The screen should be black, as shown in the screenshot.
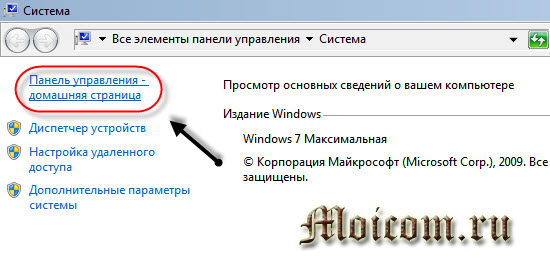
Then go to Control Panel - Home Page.
Find and go to the Recovery tab (Restore the system to an earlier state).
To restore the previously saved state of this computer, click on the Start system recovery button. You can also select Advanced recovery methods.
After this, the Restore files and settings window appears.
Selecting a checkpoint >>> Confirming disk recovery >>> Confirming a recovery point >>>
If the second method of system recovery did not help you, then the third option remains - we restore the computer from installation disk Windows 7.
Recovering using a Windows 7 disc
Let's look at how to do it Windows recovery 7 using the installation disk.
To do this you need to go to bios computer and set the first priority to boot from the CD/DVD drive. Then paste boot disk Windows 7 into the disk drive (drive) and restart the computer.
The first window that appears is Press any key to boot from CD or DVD. . . (please press any button to boot from CD or DVD disc), you must press any key within 5 seconds. There may not be such a window; if you haven’t had one, then don’t be alarmed and read on.
Windows is loading files... (Windows is loading files) you need to wait a little.
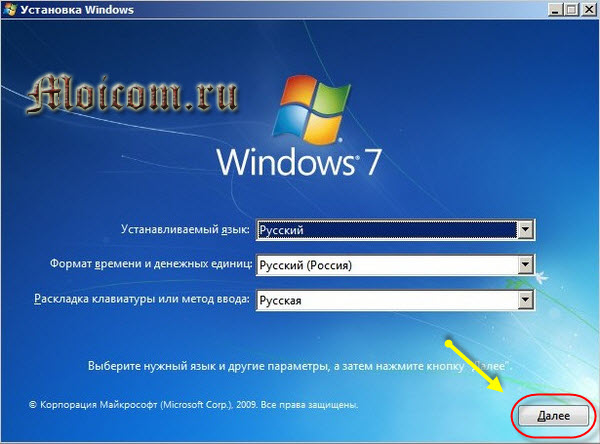
Choose desired language, time format and keyboard layout, then click Next.
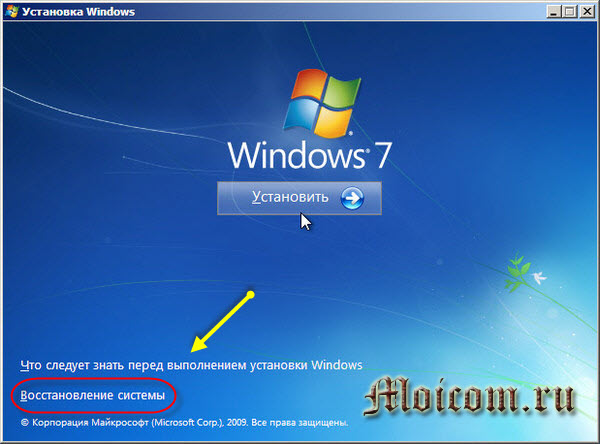
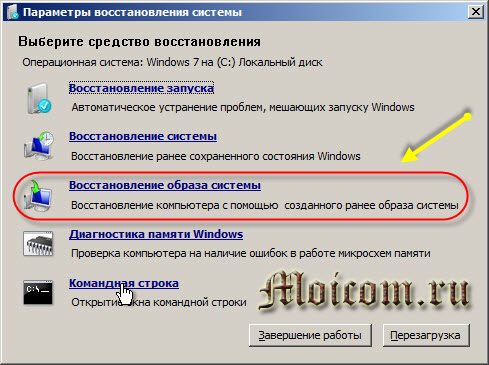
The Windows 7 welcome window appears - Install, click on System Restore.
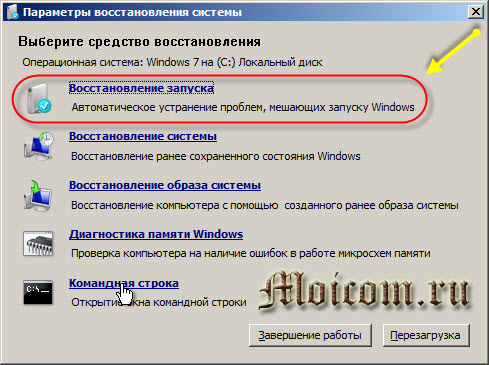
Next, the System Recovery Options window appears. We select the desired one from five options and try to revive the computer. First of all, I recommend Startup Repair - Automatically fixes problems that prevent Windows from starting.
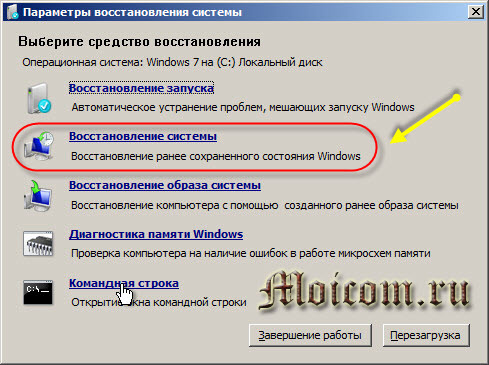
If it doesn’t help, then click System Restore - Restore an earlier saved state of Windows).
After this, we perform all the same operations as in the first two methods for restoring the system 7. Restoring system files and parameters >>> Selecting a checkpoint >>> Confirming disk recovery >>> Confirming a recovery point >>> Starting the recovery procedure.
If the system still does not start after this, you can try System Image Restore. This method can be used if you have previously made an image of your system.
If your PC still won’t start, I recommend run CHKDSK program , you can use it to check HDD for errors and bad sectors.
As a last resort, you can do it again.
If nothing helps you, then do it computer diagnostics , look for information on the Internet, call a computer technician at home, contact service center for computer repair or ask your question in the comments to this article.
Let's sum it up
Today we learned a lot useful information how to perform a Windows 7 system recovery in three ways: recovery from using Windows, restored via safe mode and used the installation Windows disk 7.
Now let's watch a video tutorial on how to run System Restore.
How to do a system restore on Windows 7 | Moicom.ru


“If only I could take it all back!” - how often do we think about it. Alas, in real life this is impossible - time inexorably flows forward and only forward. But in virtual reality everything is possible. And if you accidentally did something wrong on your computer, you can always go back. To do this, you only need to know how to restore the system on your computer. And then the magical doors of a time traveler will open before you.
What is System Restore
System Restore is a special feature that allows you to go back to a time when everything was still working correctly. In the latest Windows operating systems, the recovery system creates checkpoints independently. This occurs when installing new programs and hardware.
Another advantage of such a system is that user files are not deleted. Only deleted installed programs and drivers that could damage the system.
What are control points
In Windows XP and newer operating systems, checkpoints are created automatically.
The first checkpoint appears immediately after installing the OS on your computer.
The computer will also automatically create a restore point if you try to install a driver that is not WHQL certified. This laboratory certifies all applications that can safely run on the Windows operating system.
How to create checkpoints yourself
Let's say you installed a number of programs, after which the computer began to work poorly. How to determine which of them damaged the process? To do this, you need to go back to before you installed all the programs. And then install one at a time, creating preliminary control points and checking the work.
In order to create a checkpoint, you need to go into the recovery system. In Windows XP it is located in the Start menu.
- Select the “All Programs” menu.
- There we find the “Standard” folder.
- And in it, in the “System” folder – “System Restore”.
- Here we select the item “Create a restore point” and click “Next”.
- If desired, you can add a description of the system to this moment. That's all!
In Windows 7 things are a little different. We enter the recovery menu like this:
- Go to the Start menu.
- There on the right, in the blue area of the panel, we find the “Control Panel” section.
- Here we need to find the “System and Security” item. If it is not immediately visible, perhaps you were automatically transferred to “All Controls”, then we simply skip this item and move on to the next one.
- Find the “System” section.
- In it on the left we look for the item “System protection”.
In the window that opens, click “create”.
We are again asked to describe the recovery point. Come up with a capacious and concise name to make it easier to recognize later. Click “Create” and you’re done. When the computer tells you that the restore point was created successfully, you can close the window.
How to restore Windows XP system
To do this, you need to go all the same way to restore the system. And there select the item “Restore the computer to an earlier state.”
A calendar will appear in front of you where you can select any date. Days on which control points were created are highlighted in bold. You can select a date and see what happened on that day.
Now click the “Restore” button and wait for the computer to do the rest.
How to restore Windows 7 system
Here we go to the recovery menu through the control panel.
- Open the Start menu again.
- On the right side of the blue part of the window we look for “Control Panel”.
- Go to “All Controls”. In order to do this, on the right top corner, where it says “View” there should be “Large Icons”.
- Click on the “Recovery” item.
- Next, click on the “Start System Restore” button.
- We read what the system writes to us and click “Next”.
- Here the control points are shown to us in the form of a list in retrospect. That is, in reverse order, from the last to the very first. Select the moment when everything was still working correctly and click “Next” again.
- Again we read what the system writes to us and click “Finish”. The recovery program will start. You will need to wait a while, and then the computer will automatically reboot. Don't be alarmed, this is how it should be. When you turn it on, you will already have the version you chose.
Many people wonder how to restore the system on a laptop. But it all depends, again, on what operating system is on your laptop. The remaining steps are the same as we described above.
Now you know how to restore a Windows system, which means you have taken another step towards understanding your computer and increasing its security!
Now at any time you can go back and restore the system. If this does not help, try reinstalling the operating system.
Read about how to do this in the next article on our website!
How to do a system restore on Windows 7 different methods and why is this needed at all?
Hello, dear subscribers, guests and blog readers! It's time to talk about a great feature that is available on every operating system, namely recovery. Windows systems.
In this article we will discuss why it is necessary to do this at all. Is this operation harmful to our system?
In the future, we will definitely talk about various problems and solutions with the operating system, so I recommend subscribing to blog updates. So as not to miss this material.
Let's start from the very beginning and answer the questions. And why should we do this?
As practice shows, a lot of people use this function. Most of them don't know much.
At any slightest failure, for example, or a program crash, these people, as a rule, immediately turn to system recovery. Is it possible to do this and is it correct? Write in the comments what do you think about this? Do you recognize yourself?
While you are thinking whether it is right or wrong. We will begin the topic of today’s article, namely, we will begin the process of restoring the system on Windows 7.
How to do a system restore on Windows 7
This is very, very easy to do. We will need a few mouse clicks and a little precious time.
To do this, go to the “Start” menu, there we find “Computer”. Right-click on the shortcut and select “Properties”.
The main window will open. On the left side you should find the item " Extra options systems" click on the link.
A window pops up where you need to select the “Computer Protection” tab. And using the large button that says “Recovery”, start the procedure.

You will need to select what date you are making the restoration for and click next. After this, the computer will be restored to the date you specified.
Be careful! Data that was recorded after the date on which you restore is subject to complete destruction!
Before performing a system restore, be sure to make backup copies!
How to do a system restore using the command line.
You can simplify and reduce the number of steps when restoring the system. To do this, go to the “Start” menu, find the “Run” item and enter this line - rstrui.exe.
Screen
Why do you need Windows System Restore?
For me, restoring the operating system is a very, very cool tool. It helps to roll back the system to a working state. For example, if you broke something in your files, you can fix it without any problems.
You can also correct your mistakes, for example in accidentally deleted data. Of course you can use special programs or knowledge on this issue. By the way, I already wrote an article on the topic.
One way or another, this is a very useful tool. Unfortunately, there are also disadvantages, for example, when the recovery service is enabled, more is required random access memory. But it seems to me that this is nonsense compared to the benefits it gives us.
I myself admit, I practically do not restore the Windows system. I constantly make backup copies, and I also have a cast of the whole, working system, which I restore in 20 minutes.
That is, I get the same system that was photographed after reinstallation, installation of drivers and programs. I wrote how to do this in the article -.

Why do you need to do a Windows system restore?
Well, as I already said, this will allow you to return deleted files or folders. Plus, you can return to any date (restore point), where, for example, you saved some document that you mistakenly deleted, say, yesterday. You can return this document without any problems. Even this is quite enough for you to know how to perform a system restore on Windows 7.
At the same time, you must not forget to carry out regularly.
Now let's talk in the comments about how you use this tool and why you need it. I think that each of us will find something new for ourselves. So don’t be lazy, let’s share a little experience.
This is where I will end the article; I think that restoring the Windows system is not so difficult and a very necessary operation.
Thank you for your attention, if you have anything to add, be sure to write in the comments.
That's all! Be healthy!
See you soon!
P. S. There will be a competition in the next article, don't miss it!


