One of the main elements of any computer device, as you know, is the hard drive on which information is stored. In relation to hard drives of any type, the term AHCI is used. But many users not only know how to enable AHCI, but have no idea what it is. Let's consider the meaning of the main term and the actions required to activate this mode on Windows systems.
What is AHCI?
Modern hard drives connected to the motherboard through operation can use two modes: IDE (compatibility with legacy equipment) and AHCI - the latest standard, designated as Advanced Host Controller Interface, which allows you to significantly increase the performance of the device itself and the installed operating system due to faster reading data.
Almost all modern SSD drives show an increase in performance when accessing them precisely when the AHCI mode is set. But this is not the most important thing.
What is AHCI mode for?
Let's leave for now the question of how to enable AHCI mode in Windows, and let's look at the benefits that a user of a modern computer can derive from activating this mode.
First of all, when AHCI mode is activated, you can change or install additional hard drives, as they say, “on the fly” (even without turning off the computer or reinstalling the operating system). This is undoubtedly a huge plus for servers.

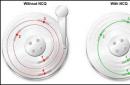
The second aspect is related to the fact that when this mode is installed, a special NCQ technology comes into effect, which allows you to reduce the number of movements of the read heads, while speeding up the simultaneous use of access to the hard drive by different applications, programs and services. Finally, activating AHCI is believed to have a beneficial effect on overall system performance. Of course, as evidenced by reviews from experts and users, at home there will not be a significant increase in performance, however, if you install an SSD hard drive, it is still better to enable this mode.
What not to do and what to pay attention to initially
But the most important misconception of most users is that they try to use exclusively the settings of the primary BIOS system for activation (at least, this can be read in most reviews of emerging problems). It is strictly forbidden to do this without performing preliminary actions in the operating system.
You can activate the mode in the BIOS only if you install the OS on a “clean” hard drive. If you perform this procedure with an existing OS on board, Windows will generate an error at startup and go into constant reboot mode. Then the complaints begin, saying that the user enabled AHCI mode in Windows, but nothing good came of it. What to say? Basic rules may have been violated, since different modifications of the system require different actions.
How to check if AHCI mode is active?
But first you should check if the mode is enabled. Perhaps its additional activation will not be needed.
In the simplest case, when starting a computer terminal or laptop, you need to go to the BIOS settings and access the SATA Mode section.

In the operating system itself, you can use the “Device Manager”, called from the “Control Panel”, administration or the “Run” console with the command devmgmt.msc and go to the IDE ATA/ATAPI controllers section. When this mode is enabled, the AHCI controller will be displayed in standard devices. If it is not on the list, you will have to decide how to enable AHCI in the system. Again, the decision depends on which version of Windows is installed on the computer.
How to enable AHCI mode in Windows 7
So, first, let's look at the "seven". For the seventh and tenth versions, the actions look somewhat similar, but for Windows 8 they are quite different.

- The first step is to call the registry editor (regedit in the Run console).
- Expand the HKLM thread.
- Through the SYSTEM, CurrentControlSet directories and the final Services directory, reach the msahci folder.
- On the right, call up the menu for editing the Start parameter and set its value to zero.
- Now in the Services directory you need to find the IastorV directory, in which, for the Start parameter, actions similar to those described above are performed.
- Only after completing these procedures, the question of how to enable AHCI in the BIOS without catastrophic consequences for the system will cease to be a problem.
Actions in Windows 8/8.1
For Windows 8, the above method will not work, since there is a simpler solution. In this case, you first need to set the system to minimum boot mode in safe mode. How to enable AHCI? Simple enough.

- To do this, first call the command line (necessarily as an administrator), and enter the combination bcdedit /set (current) safeboot minimal.
- After this, you need to reboot, at the very beginning of the restart, enter the BOIS settings and then switch the mode from IDE to AHCI.
- After saving the settings, a reboot follows again, the command console is called, and the line bcdedit /deletevalue (current) safeboot is written in it, after which another restart of the computer follows.
In principle, the question of how to enable AHCI in the G8 can be resolved by using a special utility from Intel (of course, if you have a processor from this particular manufacturer).
- First, you need to download the driver in the form of the f6flpy file and the SetupRST.exe customizer from the official resource.
- After this, the desired hard drive is selected in the “Device Manager”, the driver update procedure is applied, and the downloaded f6flpy file is manually specified as the driver itself.
- This is followed by a reboot, and after the system starts with the AHCI mode already activated, the SetupRST executable configuration file is launched to complete the computer setup.
How to enable AHCI on Windows 10?
As already mentioned, for the tenth version of the system the actions are somewhat similar to those performed in Windows 7. The only difference is the selection of folders and parameters.

- In the system registry we find the Services directory. Here, the storahci directory is used for the Start parameter.
- Next, zero values are set for parameter 0 in the storahci/StartOverride and iaStorV/StartOverride directories.
- After this, you can begin to activate the primary value in the BIOS primary input/output system settings.
By the way, in the eighth version of the system, editing similar parameters can also be done. But why, if there is a simpler rational solution to the problem?
Activating AHCI in BIOS
To enter settings on desktop computers, the Del key is most often used, and for laptops - F2, F12, combinations with the Esc and Fn keys, or special buttons on the panel like ASSIST in Sony VAIO.

Here you need to find the AHCI mode section or settings. How to enable the required parameter in the BIOS? Just use the enter key on the SATA mode setting line, and select a parameter using the arrows with confirmation in the form of another press of Enter. When exiting, don’t forget to save the changes (F10 + Y) and reboot the system. When you restart, the system will automatically install the necessary drivers.
Possible problems
Unfortunately, sometimes unexpected errors may occur when switching to AHCI mode. Perhaps the hard drive itself does not support this mode of operation. In this case, there is no point in trying to activate AHCI.
On the other hand, if the system boots, but some errors are displayed or crashes occur precisely after switching from IDE to AHCI, you can try to troubleshoot using a specially developed utility from Microsoft called Fix It.
If neither one nor the other helps, you will have to call up the BIOS settings again and change the operating mode of the hard drive. Please note: if AHCI was activated without performing the preliminary steps in the system registry described above, these methods may not work. The solution is either a system restore using removable media or a complete reinstallation of Windows. So be careful. However, I would like to hope that it will not come to this (of course, provided that the entire sequence was completed exactly in the order that was given in the description).
When repeating or clearing, you can initially enable this mode in the BIOS, so that later you don’t have to rush around looking for a solution to activate it or troubleshoot problems and malfunctions in your computer or laptop.
Instead of a total
In conclusion, it remains to add that inexperienced users who are not familiar with the intricacies of setting up the primary BIOS system and Windows operating systems should not activate this mode unless absolutely necessary. All the same, on modern computers with powerful processors and large amounts of RAM, the performance increase will not be particularly noticeable. On old terminals or laptops there is no point in using this mode at all. Basically, as already mentioned, such settings are more suitable for servers when the hard drive is accessed by several dozen child terminals on the local network.
Greetings everyone, today we’ll look at how you can enable Windows 10 boot using the protocol AHCI without reinstalling the operating system. How to enable AHCI mode in Windows 10 after installing the system, if for some reason reinstallation with AHCI mode previously enabled in the BIOS or UEFI is not possible, and the system was installed in IDE mode. I note that for almost all modern computers with a pre-installed OS, this mode is already enabled, and the change itself is especially relevant for SSD drives and laptops, since the AHCI mode allows you to increase SSD performance and, at the same time (albeit slightly) reduce power consumption.
On my PC, like many users, the Windows 10 operating system is installed on an SSD, and all files are stored on an HDD hard drive. When installing from a flash drive cut from the official image of Windows 10 with the Creators Update, for some reason it was not possible to install immediately in AHCI mode and had to be installed using the standard IDE. As a result, the speed of the SSD in the test is 100 units lower than stated, the HDD with files buzzes annoyingly.
Immediately after switching, the benefits are noticeable:
- HDD is noticeably quieter;
- The SSD gives full speed, if with IDE it gave 425 and 445, then with AHCI it gives full speed 514 and 548.
Now a little what it is...
(AHCI)
Advanced Host Controller Interface (AHCI) - a mechanism used to connect storage devices using the Serial ATA protocol, allowing for advanced features such as built-in command queuing (NCQ) and hot swapping.
Designed to replace the outdated classic ATA controller, which maintains top-down compatibility with the original IBM PC/AT, and supports direct memory access only as an addition. The main real problems of this controller are the lack of hot swap support (despite the fact that eSATA hardware supports it) and command queues on one channel (in the case of SATA, each device has one channel) - only one command can be executed at a time. Thus, using the ATA NCQ feature, even if it is supported by the disk itself, is impossible on a classic ATA controller.
When switching, with Windows OS already installed, the ATA controller included in the south bridge to the “AHCI” mode, this will mean, for the installed operating system, the use of incompatible operating logic of the hard drive controller - this action is equivalent to installing an ATA controller into the board system that is different from the existing one, and physically switching the boot disk to this board.
And one more detail: in theory, the described actions can also lead to undesirable consequences, such as the inability to start the OS; in this case, Windows will not find the boot disk upon boot and will crash with a BSOD STOP 0x0000007B, INACCESSIBLE_BOOT_DEVICE.. Therefore, take them on only if you know why you are doing it, know how to get into the BIOS or UEFI and are ready, if anything happens, to correct unforeseen consequences (for example, by reinstalling Windows 10 from the very beginning in AHCI mode).
You can find out whether AHCI mode is currently enabled by looking at the UEFI or BIOS settings (in the SATA device parameters) or directly in the OS.

Well, now let's get down to business...
Enable AHCI using Windows 10 Registry Editor
It seems to me that this is the simplest, and most importantly trouble-free method.
To launch the registry, press the Win+R keys on your keyboard and enter regedit.
1. Go to the registry key HKEY_LOCAL_MACHINE\ SYSTEM\ CurrentControlSet\ Services\ iaStorV, double click on the parameter Start and set its value to 0 (zero).

2. In the next registry section HKEY_LOCAL_MACHINE\ SYSTEM\ CurrentControlSet\ Services\ iaStorAV\ StartOverride for a parameter named 0 set the value to zero.

3. In the section HKEY_LOCAL_MACHINE\ SYSTEM\ CurrentControlSet\ Services\ storahci for parameter Start set the value to 0 (zero).

4. In subsection HKEY_LOCAL_MACHINE\ SYSTEM\ CurrentControlSet\ Services\ storahci\ StartOverride for a parameter named 0 set the value to zero.
 5. Close Registry Editor.
In my case, the values needed to be changed only in steps 2 and 4.
Restart your computer and enter UEFI or BIOS. In UEFI or BIOS, find the choice of drive operating mode in the SATA parameters. Set it to AHCI, then save the settings and restart your computer.

Immediately after the reboot, the OS will begin installing SATA drivers, and upon completion you will be prompted to restart your computer. Do this: AHCI mode in Windows 10 is enabled. But I would like to immediately note that for many boards the driver is already in the OS and the system will not load it or install it in the usual way; after a reboot, the desired AHCI is immediately turned on.
In 95% of cases everything goes smoothly and without a hitch, but it’s still better to play it safe. To do this, do the following:
At the same time, it is better to start Windows 10 for the first time after a reboot in safe mode, and therefore I recommend enabling safe mode in advance using Win + R -
If you have UEFI, in this case I recommend doing this through “Settings” (Win + I) - “Update and Security” - “Recovery” - “Special boot options”. Then go to “Troubleshooting” - “Advanced options” - “UEFI Software Settings”. For systems with BIOS - use the F2 key (usually on laptops) or Delete (on a PC) to enter the BIOS settings.
Introduction
SSD drives are generally faster than magnetic hard drives. Of course, some flash memory drives have very mediocre write speeds, but in general it is solid-state drives that now set the pace, leaving the evolution of traditional hard drives in the shadows.
True, SSD drives are not only faster, but also much more expensive than conventional HDDs. Each gigabyte of SSD storage is not cheap. And if there is an option to free up a few gigabytes by disabling unnecessary Windows services and components, then this cannot be neglected.
It is also worth noting that on computer enthusiast forums there are many individuals who claim that a few simple Windows optimizations will help achieve increased performance. But is this really true?
In this article, we decided to take a closer look at the most popular SSD tweaks and use a test to determine how they affect system performance. Essentially, we have to answer only two simple questions - is it possible, using certain system tweaks, to free up space on the system disk and increase computer performance?
In addition, we plan to test two different SSDs to see if the effect depends on the specific SSD model, or if these tweaks will work for any drive. It is possible that these tweaks are completely useless and there is no way to make the SSD work faster.

We will test nine of the most popular SSD tweaks for the Windows 7 operating system:
- Disabling System Restore.
- Disable data indexing.
- Disabling the paging file.
- Disable hibernation.
- Disable prefetching (read ahead).
- Disable clearing the Windows entry cache.
- Disable SuperFetch and Windows Search.
- Disable ClearPageFileAtShutdown and LargeSystemCache.
- Setting up a power plan.
AHCI Mode and TRIM Command
Before you start making subtle system tweaks, you need to make sure that the SATA controller is set to AHCI mode and the TRIM command is supported by Windows 7. Both of these settings, strictly speaking, cannot be classified as optimizations for SSDs - rather, they are a requirement for the computer configuration , which uses a solid state drive.
AHCI mode (Advanced Host Controller Interface) is a specific SATA controller mode that allows you to use hot-swappable SATA drives and NCQ (Native Command Queuing) technology. Using NCQ provides higher performance of the disk subsystem.
This is especially true for flash memory drives that use a multi-channel controller: an SSD drive is much better suited to executing several commands simultaneously. That is why solid-state drives provide maximum performance precisely at large queue depths, and the benefits from using NCQ can be quite noticeable.
Don't forget about another important argument in favor of AHCI: only in this mode of controller operation can you take advantage of the TRIM command support provided by the Windows 7 operating system. TRIM support is necessary for SSD drives, as it helps maintain high drive performance in over a long period of time.
According to Wikipedia, TRIM- a command that allows the operating system to notify the solid-state drive which blocks of data are no longer in use and can be cleaned by the drive itself. Using TRIM allows the SSD device to reduce the impact "garbage collection"(garbage collection), which otherwise will further result in a decrease in the write speed to the affected sectors. TRIM support ensures more stable write speeds and also reduces wear on free memory cells.
How to check that the SATA controller is working in AHCI mode
The AHCI mode of the SATA controller can be set in the BIOS or UEFI settings of your motherboard. In most modern motherboards it is installed by default, but you should make sure that the BIOS is configured correctly before installing Windows, and not after. If Windows is already installed, you need to check if AHCI mode is enabled:
- From the Start menu, select Control Panel.
- On the "View" tab, select the "Small Icons" display mode.
- Select "Device Manager".
- In the "Device Manager" we find the branch "IDE ATA/ATAPI controllers", expand it and look for AHCI controllers.
- If the AHCI controller is in the list, then the system operates in AHCI mode.
- If AHCI controllers are not in the list, then the system is running without AHCI support.

- If Legacy IDE mode is used instead of AHCI, it is recommended to switch to ACHI mode. However, with the OS installed, this will be a little more difficult. This is described in more detail in technical support article on the Microsoft website .
How to check that the TRIM command is enabled
If TRIM support is enabled in Windows 7, the operating system sends appropriate commands to the SSD drive. Checking if TRIM is working is also quite simple:
- In the Start menu, enter cmd in the search field.
- Right-click on the cmd.exe executable file and select “Run as administrator.”
- At the command line, enter “fsutil behavior query DisableDeleteNotify” (without quotes).
- If the computer reports DisableDeleteNotify = 0, TRIM support is enabled.
- If the message DisableDeleteNotify = 1 is displayed, TRIM support is disabled.

Disabling System Restore
Let's move on to a description of more subtle system optimizations. The first of these is to disable System Restore, the system's built-in rollback (restoration) system that uses the "checkpoint" principle.
Disabling System Restore solves two problems. First, you reduce the number of writes to the SSD, which improves its longevity. Today, there are different opinions on whether you should worry about excessive writes to an SSD. The number of rewrite cycles is the main parameter that tells us about the durability of the memory cells on which solid-state drives are created. Some users believe that there is no need to worry: you are unlikely to see the day when the memory cells of your SSD drive stop storing data. Other users, on the contrary, do everything to minimize the number of rewrite cycles. There is no clear answer yet as to which of them is right. But if you don’t rely on chance and are one of those who don’t want to take risks, then disabling System Restore is a good option to reduce the load on memory cells. Let's add that System Restore "checkpoints" are not available to the TRIM command and regular use of this Windows function can potentially lead to a decrease in drive performance over time.
The second reason to refuse system recovery is to save free space on the system disk. Checkpoints created by System Restore are stored on the system disk itself and “eat up” expensive disk space on the SSD. However, they do not always provide a full system rollback. As a rule, it is safer to have a full-fledged system image created using a specialized utility (Norton Ghost, Acronis True Image). You can “deploy” such an image to disk in a matter of minutes and you will be confident that you will be able to return to a working system. In addition, there is no need to store such an image on the system disk itself - for these purposes you can use a regular hard drive or an external drive.
How to disable System Restore
- Right-click on the "Computer" icon in the "Start" menu and select "Properties".
- Select the "System Protection" tab.
- Click on the “Configure” button.
- Check the box next to "Disable system protection".

|
|||
|
| |||
What is AHCI mode and why should it be enabled? AHCI is a mechanism for working with information storage devices. For example, with hard drives or SSD drives. This mode replaces the more outdated IDE mode. The dawn of this “protocol” came, perhaps, in 2011. At that time, prices for SSD drives became more or less affordable for home use.
We will not disclose all the technical details about how the AHCI mode works. It will be enough for an ordinary user to know that with AHCI enabled, the speed of working with the disk and its service life increase. But to experience all the beauty of its work, an SSD drive with a SATA 6Gbit interface must be installed in your computer.
This is where we will finish the story about the details of the operation of the AHCI mode and move on to considering the issue of enabling it in the system.
It’s worth mentioning right away that the connection mode for AHCI drives must be supported by your motherboard. Fortunately today, we can confidently say that almost any motherboard released from 2008 onwards has this capability.
Increase PC speed using AHCI mode
What is the difficulty when switching to AHCI mode? If you are just going to install the operating system, then no problems will arise. You just need to enable this mode in the BIOS of your computer and only then install Windows. Usually enable AHCI it is possible through the BIOS in the section on working with storage devices Storage Configuration.
On different models of motherboards, this section may have a different but similar name. For example, SATA Configuration, SATA Mode, etc. The guideline for your search will be the ability to select from a list of the following modes: IDE, AHCI, RAID.

Switching to AHCI without reinstalling the operating system
So, we figured out installing a clean OS, everything is simple! Now let's look at the situation of turning on AHCI for already working Windows. The fact is that when you change modes in the BIOS, the operating system will stop loading with various types of errors.

These errors are caused by the absence of the required hard disk controller driver when loading the OS. That is why, before changing the BIOS settings, we will need to prepare the operating system.
To do this, open the Registry Editor through the menu Start > Run > Regedit and we will find the following subsections in it:
- HKEY_LOCAL_MACHINE\System\CurrentControlSet\Services\Msahci
- HKEY_LOCAL_MACHINE\System\CurrentControlSet\Services\IastorV
In each section you will need to open the parameter Start and replace its value with - 0 .

After making changes, you need to restart the computer, go into the BIOS, enable AHCI mode and save the changes. When the operating system first starts, it will install the new driver and be ready for further work.
As a rule, this method works and is suitable for all versions of Windows from version 7 and higher. If you were unable to figure it out with the first method, then you can try to enable AHCI mode a little differently or contact our team for help.