And in this one, we’ll look at a clean installation of Windows 10 with all the nuances.
1. Is it worth installing Windows 10
Windows 10 has absorbed all the best from previous versions of Windows 7 and Windows 8.1. It is quite beautiful, convenient and fast. But it wasn't without its drawbacks. The most significant of them are errors that many people experience in the operation of the system, programs, games, and the operating system’s own removal of applications that it considers unlicensed, even some free ones.
However, if you have enough modern computer or laptop, then over time, most likely you will still have to switch to Windows 10, since older versions of operating systems are gradually losing support from both the developers of the system itself and software developers.
Should owners of PCs that are rather mediocre by today's standards rush to update the system? Probably not... Since you will have more problems than benefits from the update - selection of drivers, glitches in the operation of the system and programs, etc. And you are unlikely to gain in productivity.
But for owners of licensed versions of Windows 7 and 8.1, it is important not to miss the moment and make free update to Windows 10, which is available until July 29, 2016. After this date, you will not be able to get the update for free.
If you love games and your video card supports DirectX 12, which is only available in Windows 10, then you will have to switch to it anyway, as it is designed to give an additional performance boost. Although games on DirectX 12 are unlikely to appear before mid-2016, or even closer to its end.
But if you have a modern computer or laptop with not very successful Windows 8.1 and you want to plunge into the world of a more modern operating system, then why not? Do it and move forward to new technologies! As a last resort, you can easily and quickly restore the previous system.
2. How to download Windows 10
Using the "Media Creation Tool" utility you can not only download the original Windows image 10, but also create boot disk or flash drive. You can download the utility at the end of the article in the “” section.
The utility allows you to download the version of Windows 10 you need from latest updates. It works on Windows 7, 8, 8.1, 10 of any bitness. You won't be able to run the program on Windows XP and Vista.
After launching the utility and accepting license agreement you will be asked what you want to do.
The “Update this computer now” item is designed to update your existing operating system. Windows systems 7 or Windows 8.1. But it is always better to do a clean installation from a disk or flash drive. To do this, select “Create installation media for another computer."
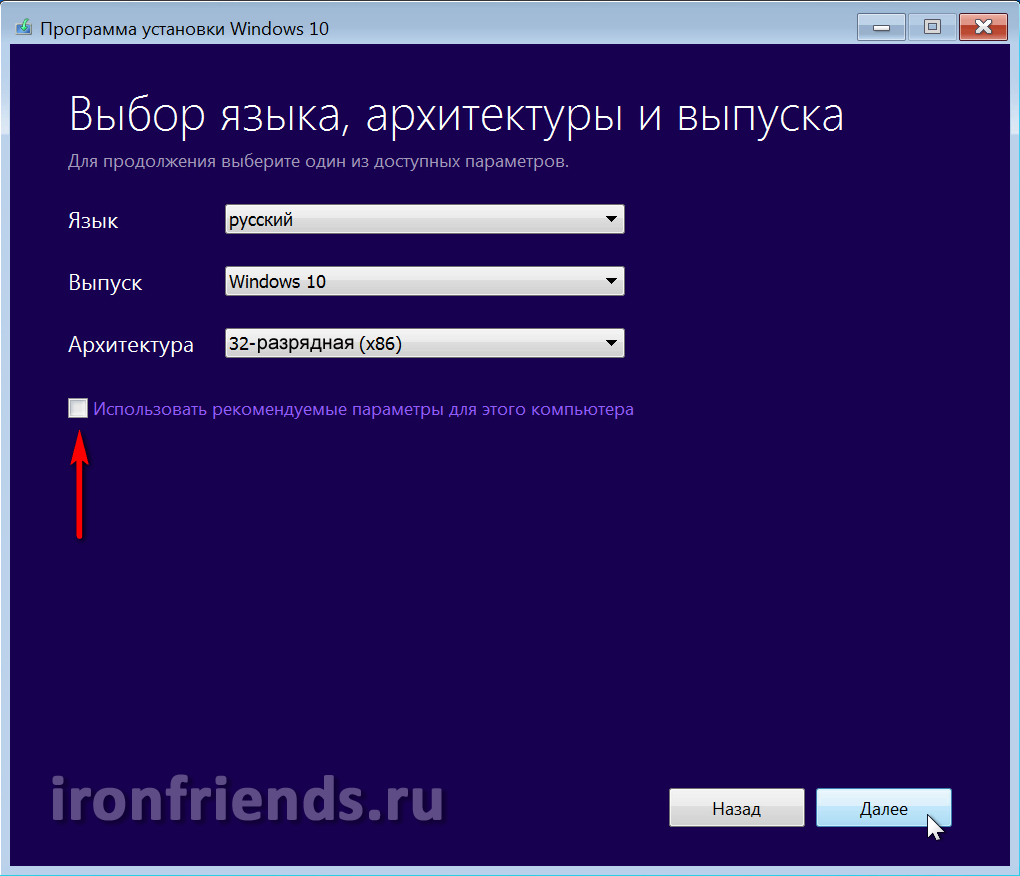
To download an image from which you can install both the “Windows 10 Home” and “Windows 10 Professional” versions, just leave Windows 10.
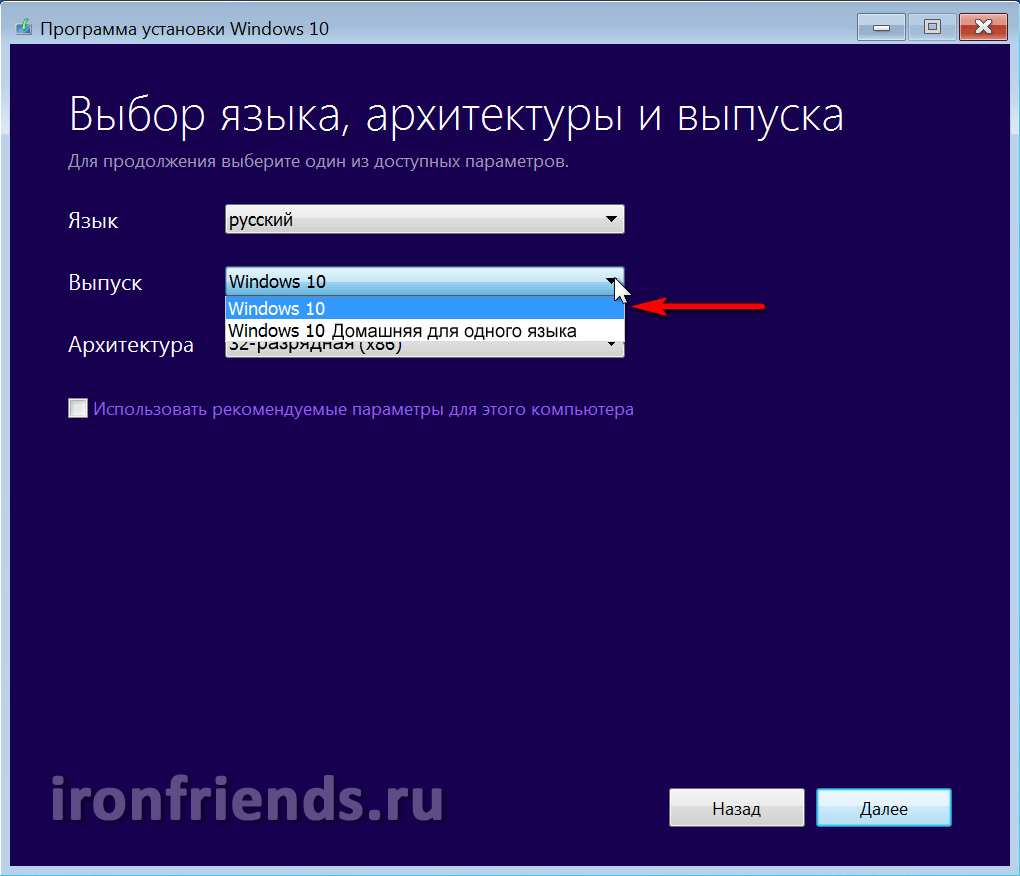
If a licensed “Windows 10 Home for one language” was installed on your computer or laptop and you just want to reinstall it without losing the license, then choose this option.
In the "Architecture" field, select the bitness of the operating system.
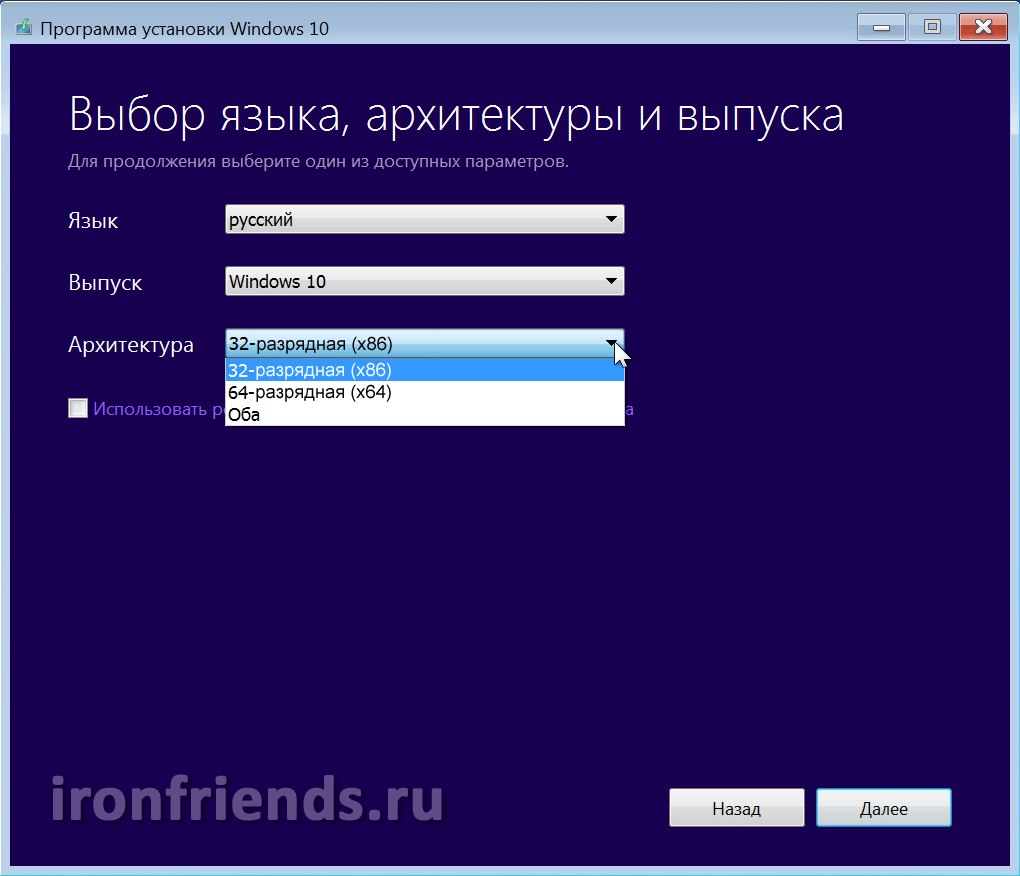
General recommendations are as follows. If you have 3 GB random access memory or less, then choose the 32-bit version. If the RAM is 4 GB or more, then it is 64-bit. If you select the “Both” option, a universal image will be downloaded from which you can install both 32-bit and 64-bit versions of Windows. But the image size will be more than 5 GB, so to record it you will need a double-layer DVD or a flash drive of at least 8 GB.
The next window asks you to select media for Windows 10.

If you install Windows from a flash drive, you can leave the “USB flash memory device”; this option will be the simplest and most reliable. Insert a flash drive with a capacity of at least 4 GB and click “Next”. Once the image is downloaded, a bootable USB flash drive will be created automatically.
Please note that all files on the flash drive will be destroyed, so copy them to a safe place in advance (for example, to drive “D”).
If you select “ISO file”, it will be downloaded to the folder you specify and you can make a bootable disk or flash drive from it at any time. Installing Windows from a boot disk is easier and more reliable than from a flash drive. So if you have a DVD drive and it works well, this option is preferable.
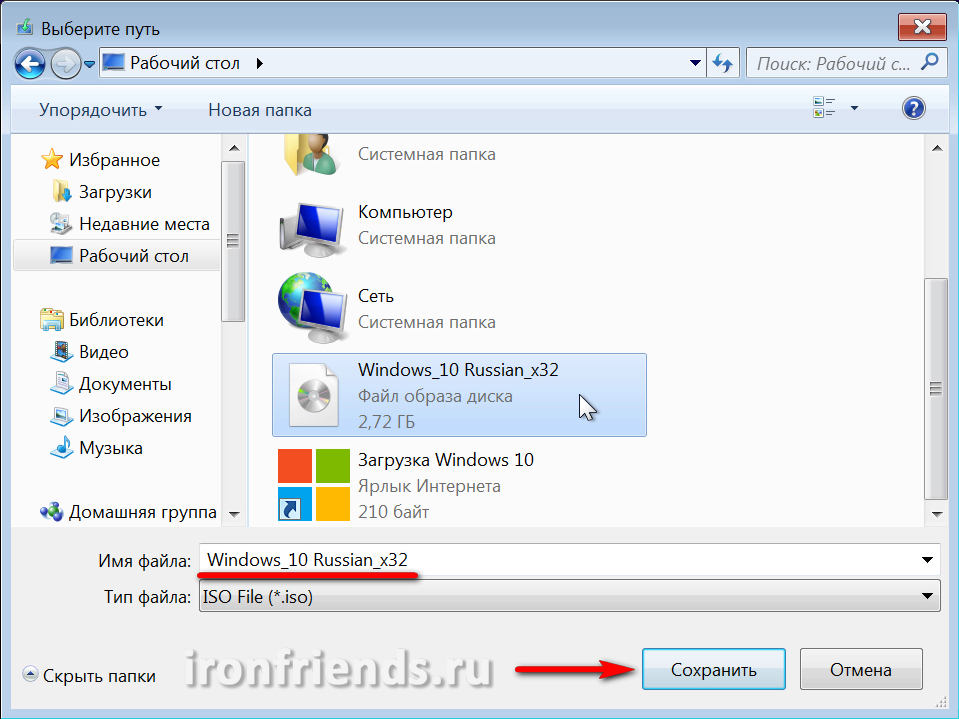
Once the download is complete, you will be prompted to burn the image to a DVD. If you plan to install Windows from a DVD, then insert a blank disc and click on the appropriate link.

Thus, using the “Media Creation Tool” utility, you will download the desired version of Windows 10 and prepare a disk or flash drive from which you can install the system.
3. Create bootable media
For Windows installations 10 from the downloaded operating system image you need to make a boot disk or flash drive.
3.1. Creating a Windows 10 installation disc
The easiest way to create installation disk Windows 10 using the “Astroburn” program, which you can download at the end of the article in the “” section.
Launch the program, go to the “Image” tab and click on the icon next to the “Path to image file” field.


Be sure to check the “Check” box and click the “Start Recording” button.
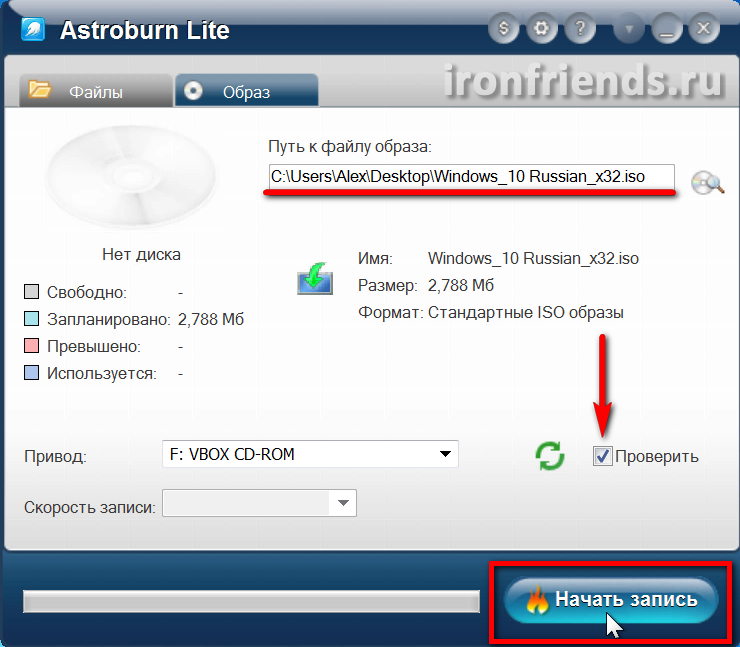
As a result, you will receive an installation DVD Windows disk 10.
3.2. Creating a bootable USB flash drive for Windows 10
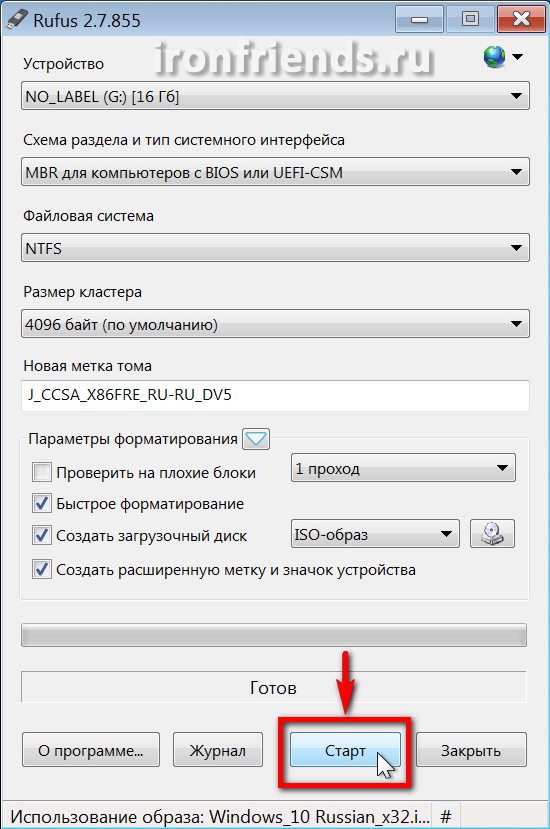
Do bootable USB flash drive Windows 10 can be done using one of the best programs“Rufus”, which you can download at the end of the article in the “” section.
Connect a flash drive with a capacity of at least 4 GB to your computer.
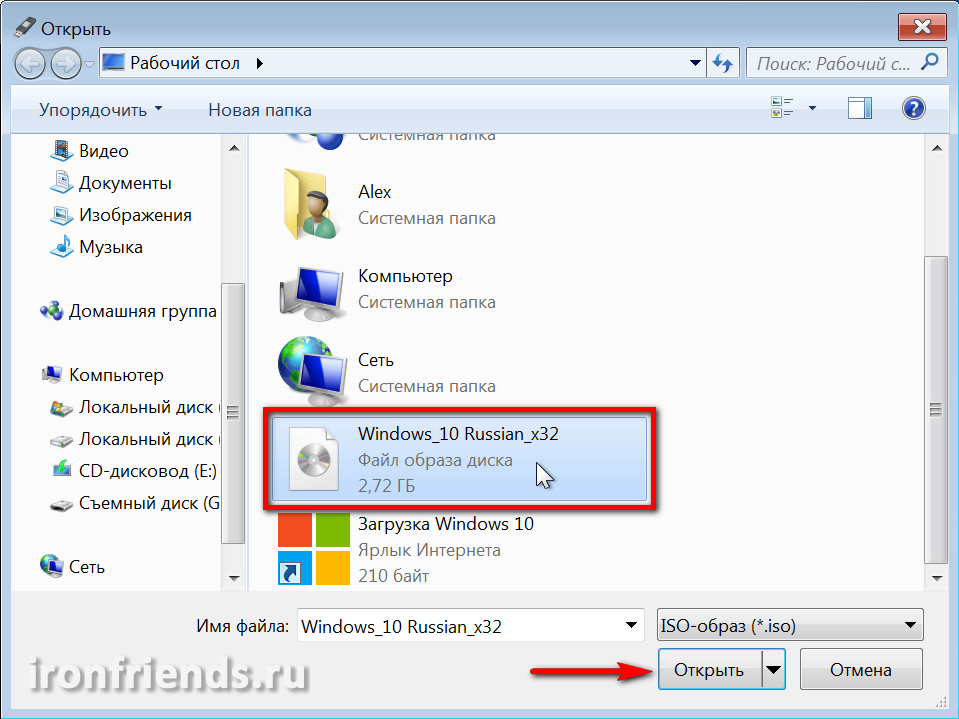
Launch the Rufus program and click on the DVD drive icon.
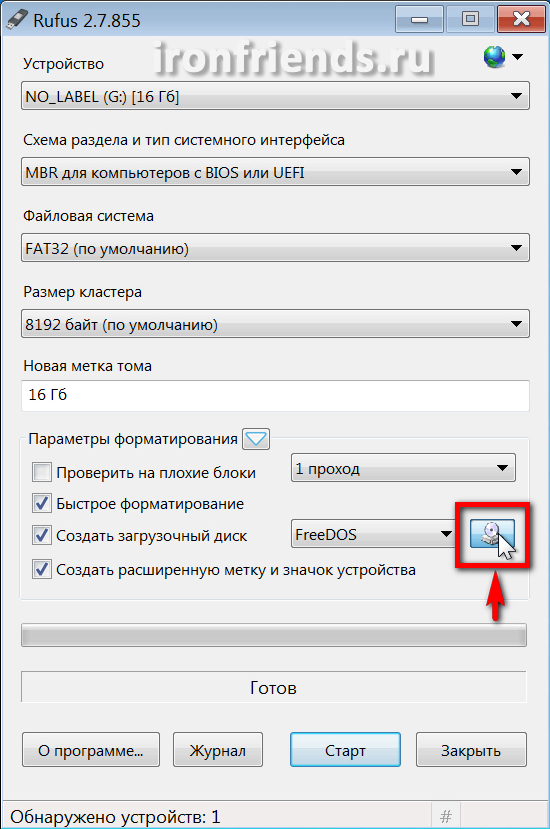
Select the Windows 10 image and click Open.
Now just click the “Start” button and the creation of a bootable flash drive will begin.
If you have valuable files on your flash drive, copy them to a safe place in advance.
As a result, you will receive a bootable USB flash drive from which you can install Windows 10.
4. Boot from installation disk or flash drive
To begin installing Windows 10, insert a bootable disk or flash drive and turn on or restart your computer.
It is better to insert the flash drive into the rear USB connector on motherboard without using a USB extension cable.
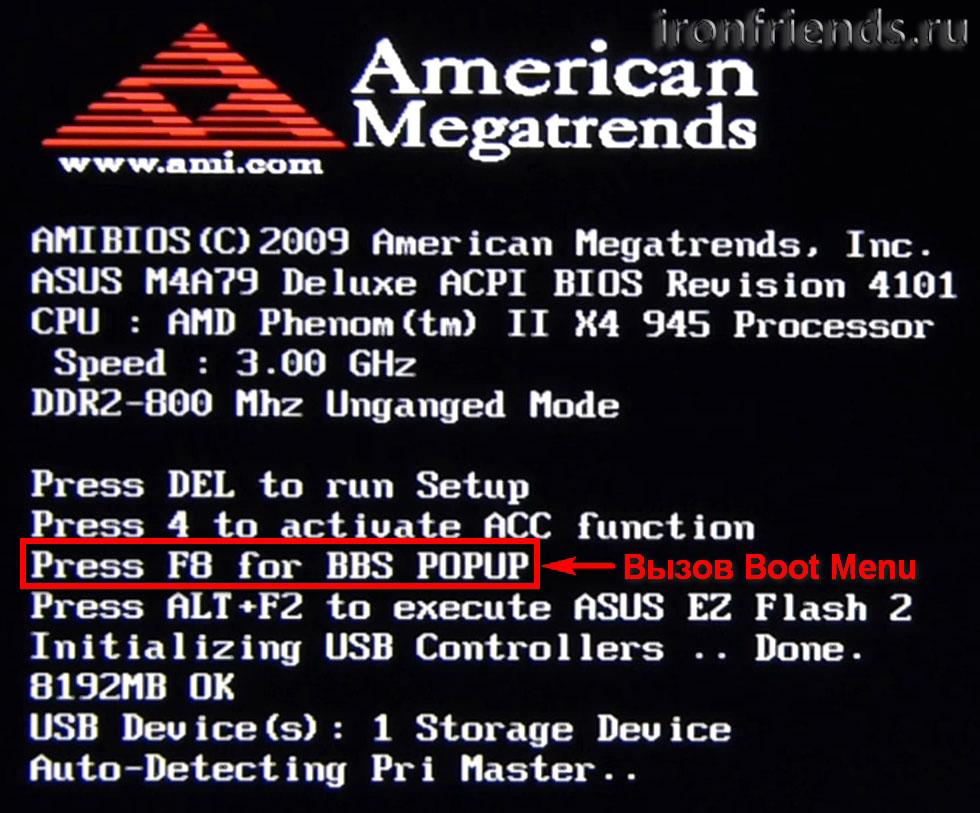
Immediately after turning on the computer, press and hold the “Boot Menu” key. It is usually listed in the prompts on the initial boot screen of your computer. On different computers and on laptops this can be the key from “F8” to “F12”.
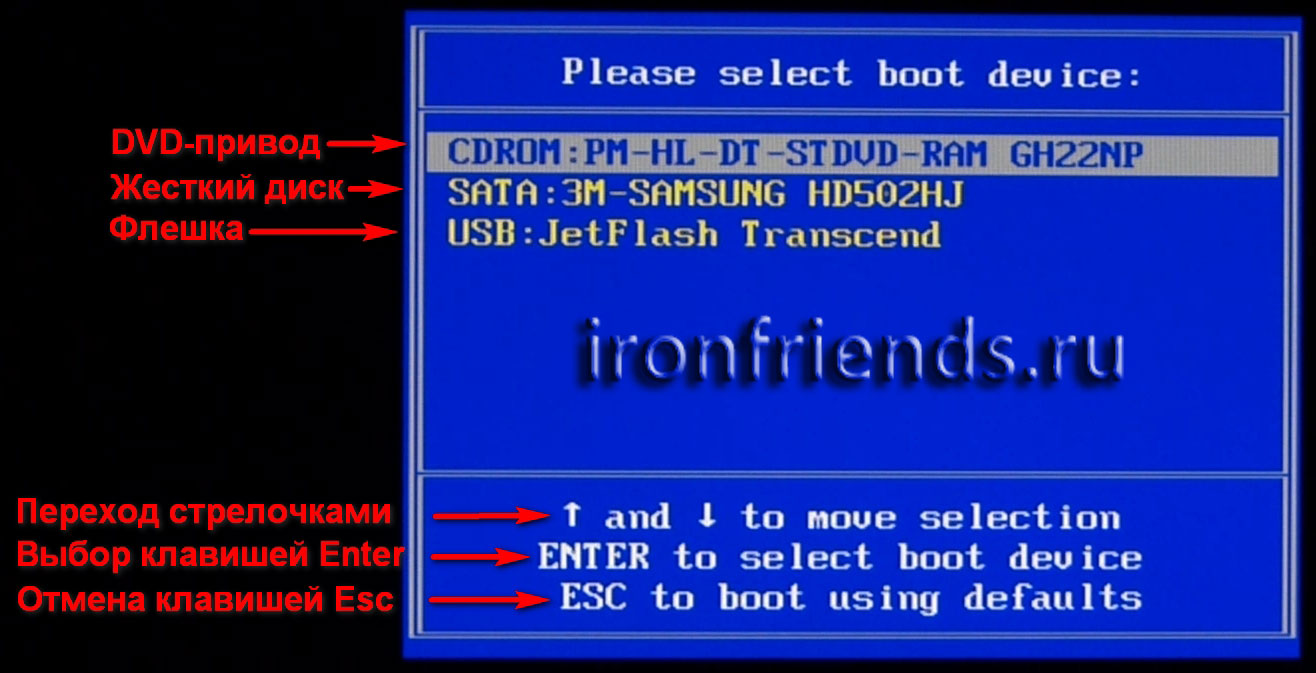
After the “Boot Menu” appears, use the down and up arrows to navigate to the DVD drive or flash drive and press Enter.
If your computer does not even try to start booting from a disk or flash drive, then read our article. If the computer sees the flash drive and tries to boot from it, but freezes or displays an error message, then read and make a bootable flash drive in a different mode.
5. Start of installation and choice of bit depth
Immediately after booting from the installation disk or flash drive, you should see a prompt to press any key to begin installing Windows.

This must be done within a few seconds, otherwise the installation will not start and the computer will need to be restarted again. I usually press Spacebar.
During installation Windows computer will reboot several times, but you no longer need to press a key on the keyboard, otherwise the installation will start all over again.
If you downloaded an image that allows you to install both 32-bit and 64-bit versions of Windows 10, a screen will appear asking you to select the bit depth.

Select the desired version using the down and up arrows and press Enter.
Wait for the blue “Install Windows” window to appear.
6. Configure language settings
At this stage you are asked to select languages.
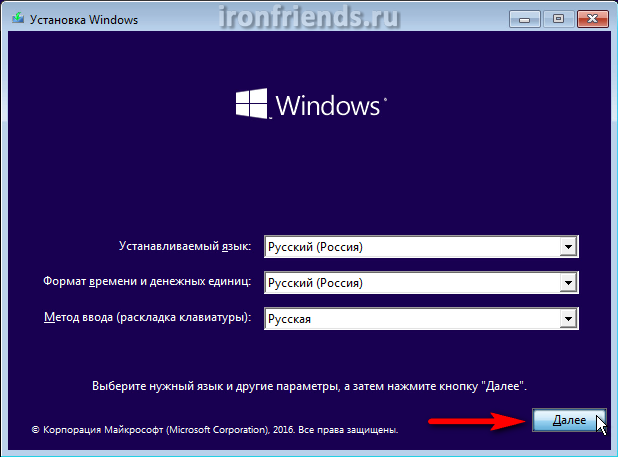
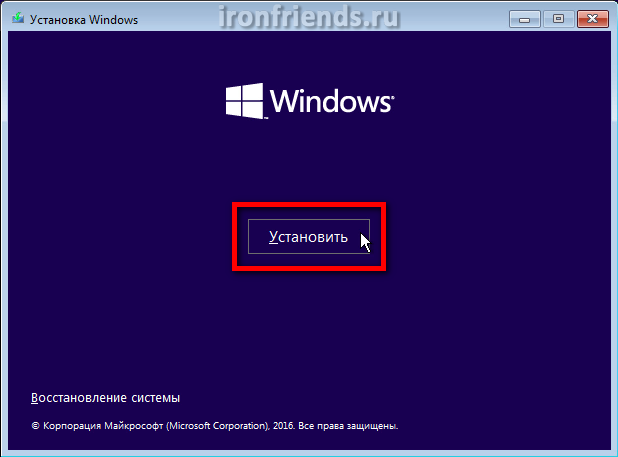
In the next window, click the “Install” button under the “Windows” logo.
7. Entering the key and selecting the version of Windows 10
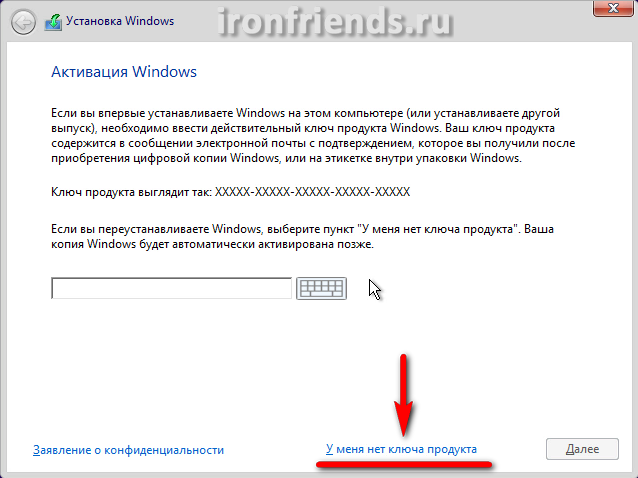
If this computer or Windows laptop 10 is being installed for the first time and you have an unused key or a Windows 7, 8 or 10 key used on this PC, then enter it and click the “Next” button.
If on this computer or the laptop has already installed Windows 10 (for example, by Windows updates 7 or 8.1) or you do not have a license key, then do not enter anything and click on the link “I do not have a product key”.
Windows 10 does not have a license key tied to the operating system bit depth, as was the case in previous versions Windows. You can, for example, upgrade 32-bit Windows 7 or 8.1 to 32-bit Windows 10, and then perform a clean installation of 64-bit Windows 10 and the license will remain. But Windows 7 or 8.1 Home cannot be upgraded to Windows 10 Professional.
In the next window, you need to select the operating system version - “Windows 10 Professional” or “Windows 10 Home”.
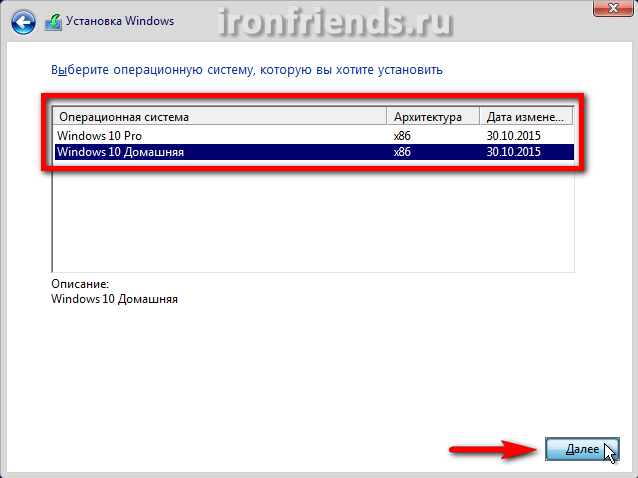
If you don’t know why you need the “Professional” version, then choose the “Home” version, as it contains fewer unnecessary components and will work faster. Comparison table You can download “Professional”, “Home” and other versions of Windows 10 at the end of the article in the “” section.
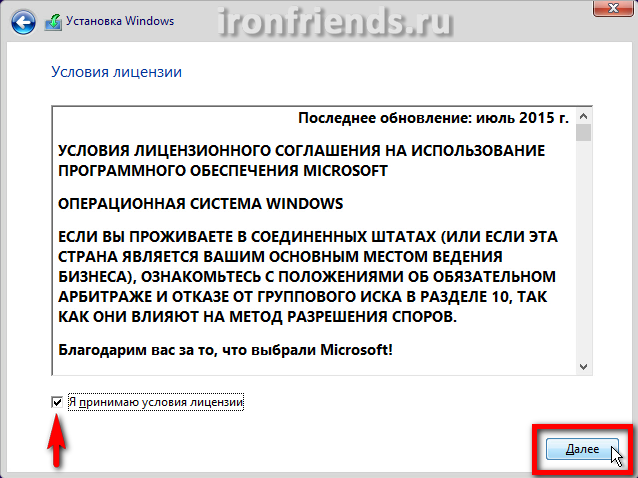
In the next window, check the box “I accept the license terms” and click “Next”.
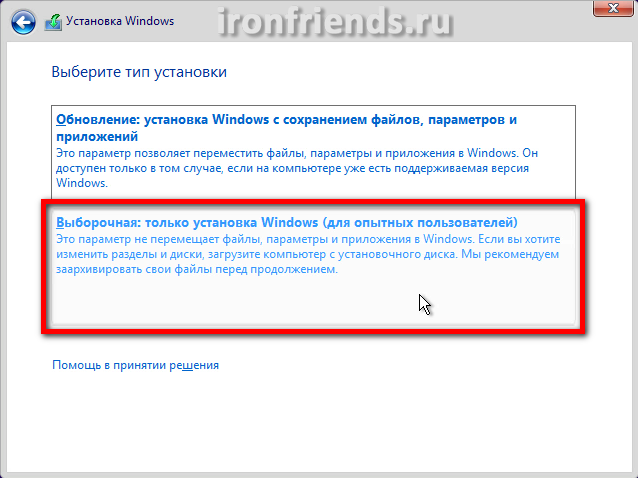
We are offered two types of Windows 10 installation.

“Update” – selecting this type of installation will display a message about the impossibility of updating when booting from media (disk or flash drive).

Upgrade Windows 7 or 8.1 to Windows 10, keeping files and installed programs(or without saving) can only be done by running the installation program from Windows. We will not consider this option now.
“Custom” - installing clean Windows 10 on a new or existing partition hard drive. We will consider this type of installation in this article.
9. Disk setup
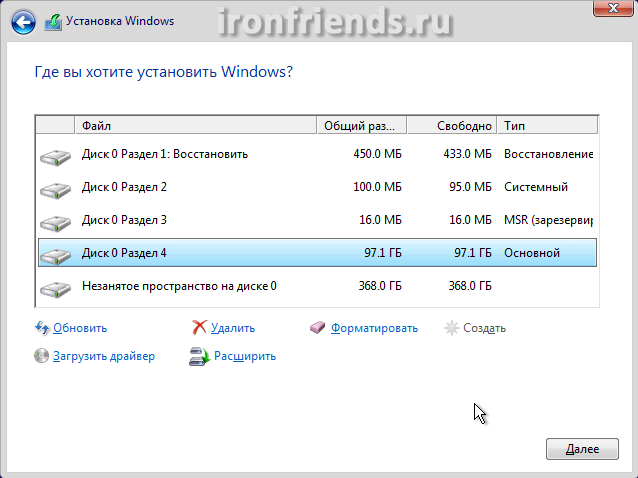
After selecting the installation type, the disk settings window will appear. If you already had some version of Windows installed, then the disk will have partitions with the old system.

Delete all partitions except the largest one, which contains your personal files (drive “D”).
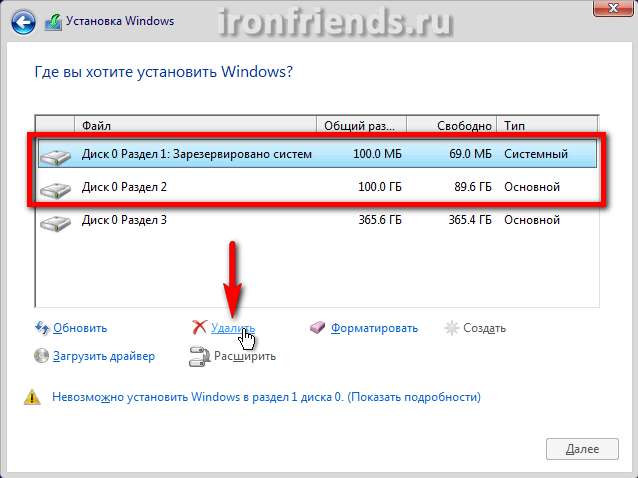
Take care in advance of the safety of your files that were on the desktop and in the user’s “My Documents” folders, as they will be deleted along with the old system.
Then select “Unallocated space...” to install and click the “Next” button.
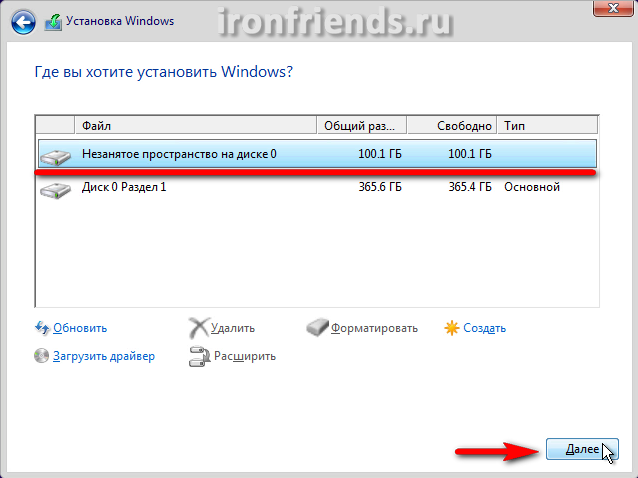
If the disk of your computer or laptop is clean and there are no partitions on it, then create a partition for the system with a capacity of about 100 GB (102,400 MB) using the “Create” button.
SSD drive It’s better not to divide it into several partitions, but to give it entirely to the “C” drive for installing Windows, programs and games. Then you will get unrivaled computer speed!
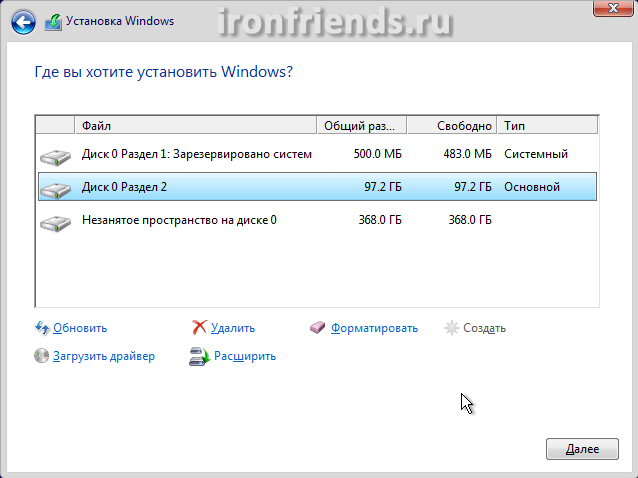
If your disk's partition table is in MBR format, a 500 MB service partition will be automatically created before the partition for installing Windows 10.
If the partition table of your disk is in GPT format, then before the partition for installing Windows 10, 3 service partitions with a capacity of 450, 100 and 16 MB will be created.
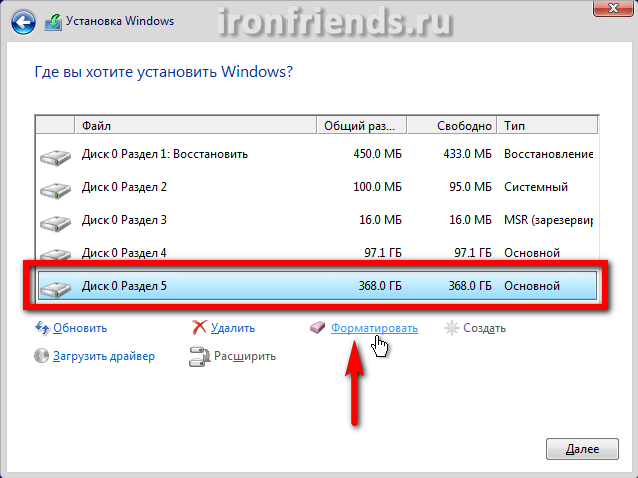
There will still be “Unallocated space...” at the bottom. Create another partition on it for user files for all the remaining space, select it and click the “Format” button.
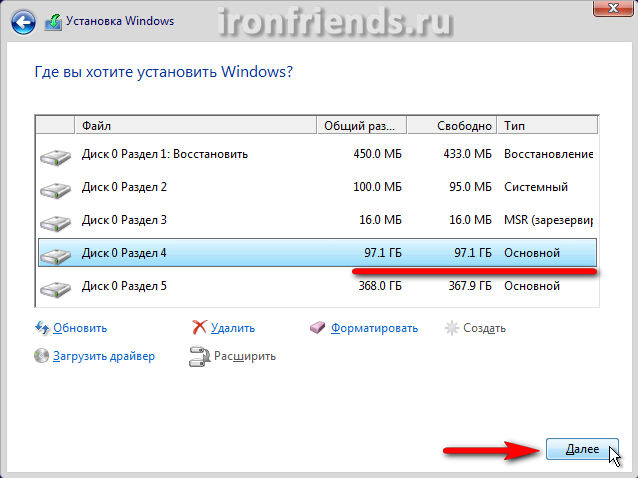
Select to install Windows partition 2 or 4, which has a volume slightly less than the 100 GB we specified, and click “Next”.
Creating and deleting partitions is quite simple, but if you have any doubts, refer to our article on installing Windows 8.1, it is described in great detail. If Windows 10 will not install to the disk and reports an error, then try.
At this stage, files from the installation disk or flash drive are copied to HDD computer and further installation will take place from the hard drive.
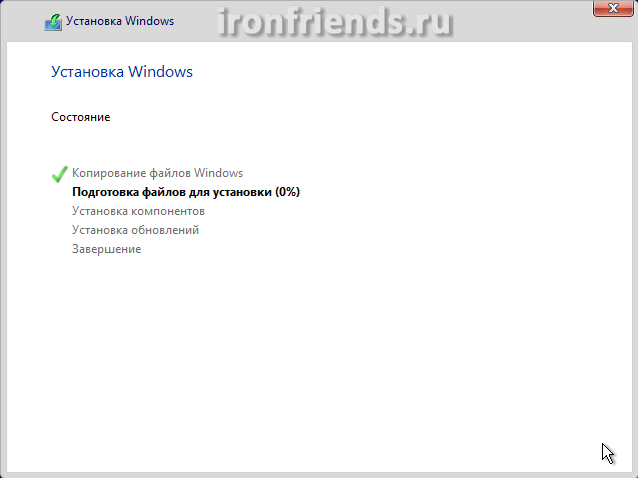
Sometimes this process may stop at 0% or any other place for a while, and then quickly end. Please be patient and do not touch your computer. If after 30 minutes of waiting nothing happens, then most likely the computer has frozen or the installation disk is hard to read. You'll have to start all over again and if it freezes again, perhaps replace the installation disk.
After copying the files, the computer will reboot several times and the installation process will continue, requiring user interaction. During the reboot process, each time you may be prompted to press any key, but you no longer need to press anything, otherwise the installation will start all over again.
If you did not click anything, but the installation still starts from the very beginning, then remove the installation disk or flash drive, restart the computer and the installation will continue from the hard drive.
11. Setting parameters
At this stage you can configure some Windows settings 10, relating mainly to user tracking.

If you don’t want to bother, then click the “Use standard settings” button, nothing bad will happen. To view and change settings, click on the “Settings” link.
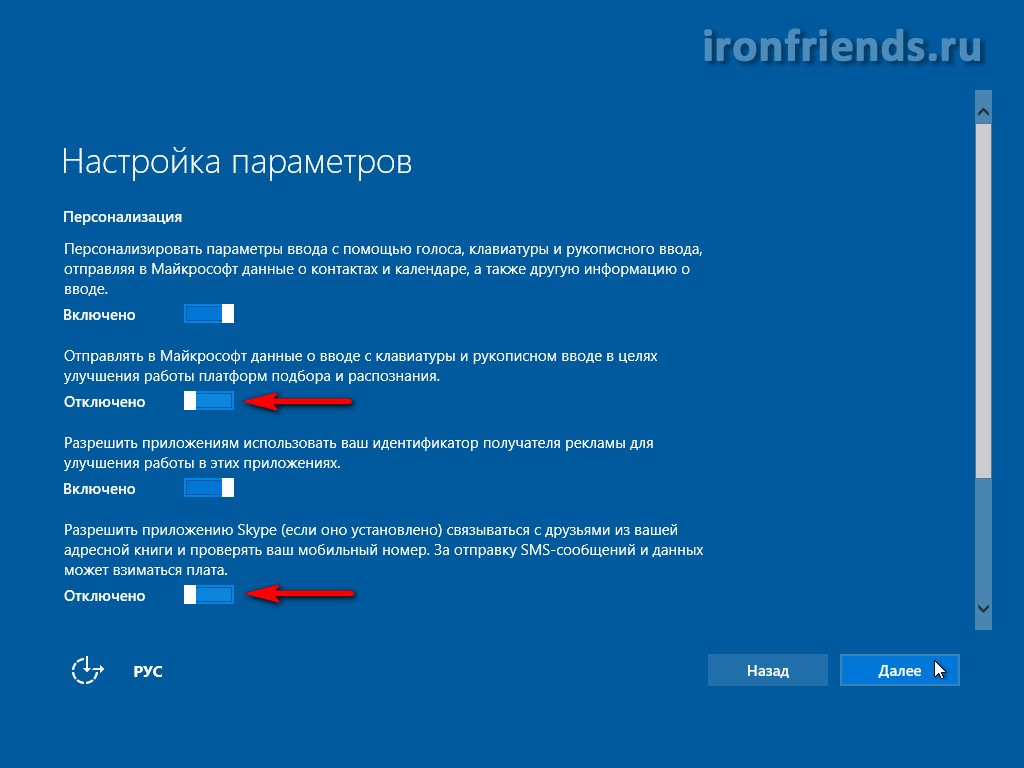
It is advisable to disable all options for connecting to unknown Wi-Fi networks and sending error reports, this will improve security.

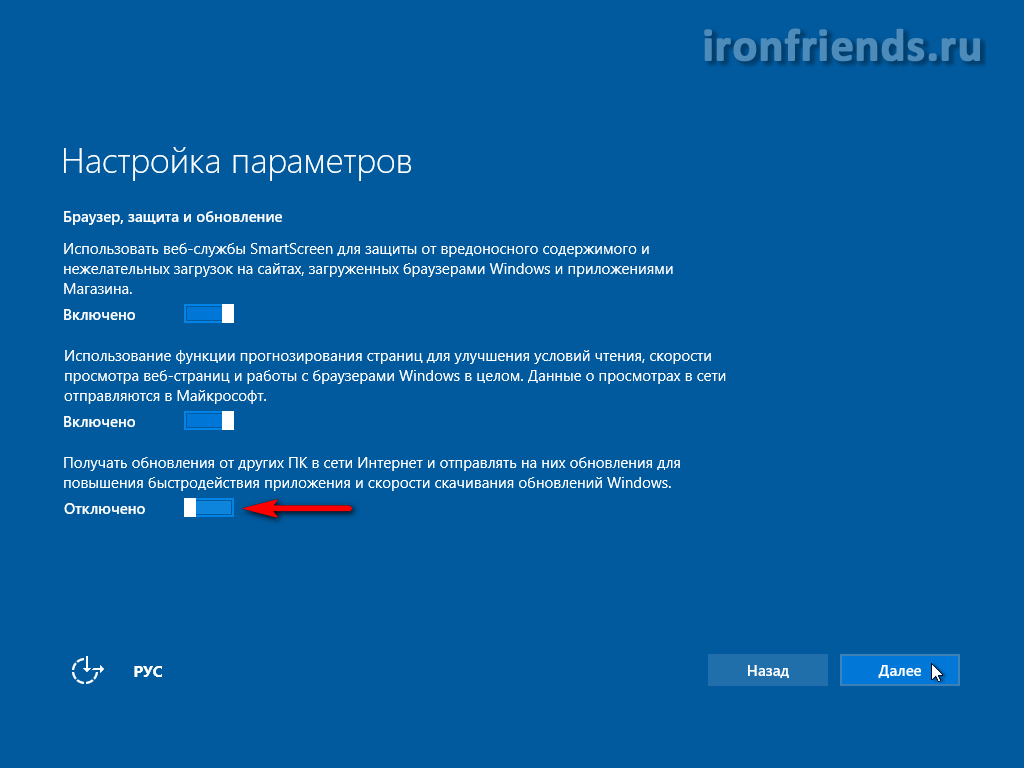
It is better to leave browser protection and speed up its work. But use your computer to download system files It is better to disable other users so as not to load the disk and the Internet.
After this, the computer will restart and the installation will continue.
12. Login or create an account
The next window asks you to enter your login and password. account Microsoft.
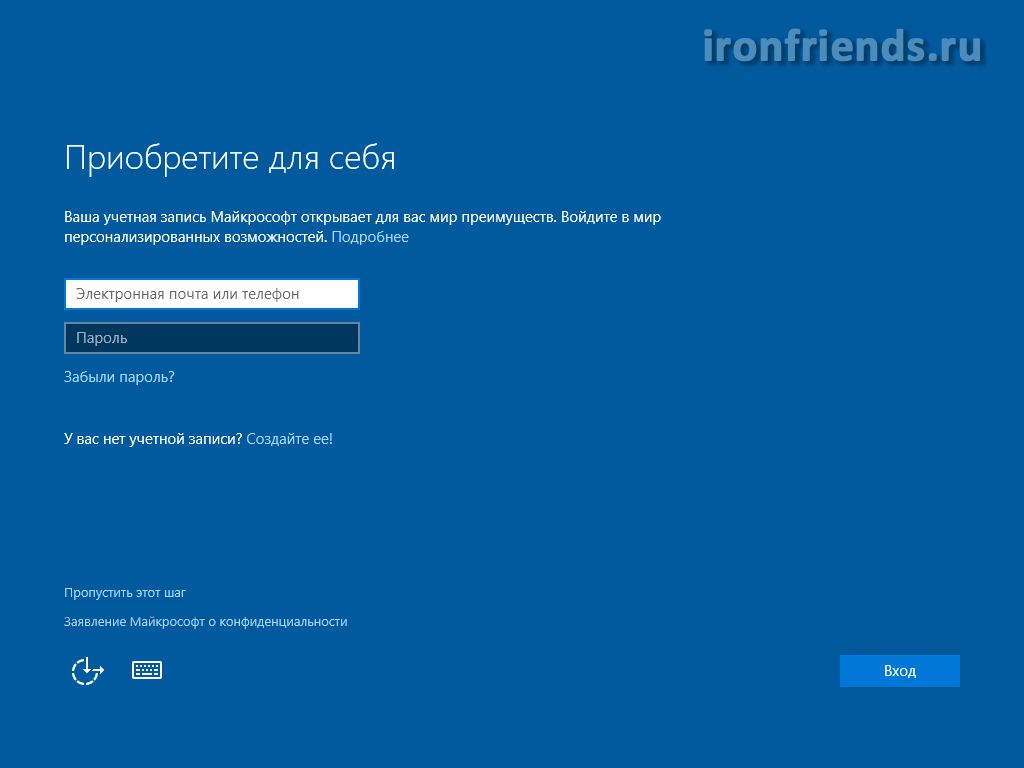
If you do not have such an account, you are encouraged to use the “Create one!” link. This account is tied to the Microsoft server and is needed primarily to synchronize system settings between several computers.
Personally, I don't like to link my account to the Internet, as sometimes it causes various problems and slows down my computer. To create a local account as in previous versions Windows, click on the “Skip this step” link.

Now just enter your name, preferably in English, and click “Next”.
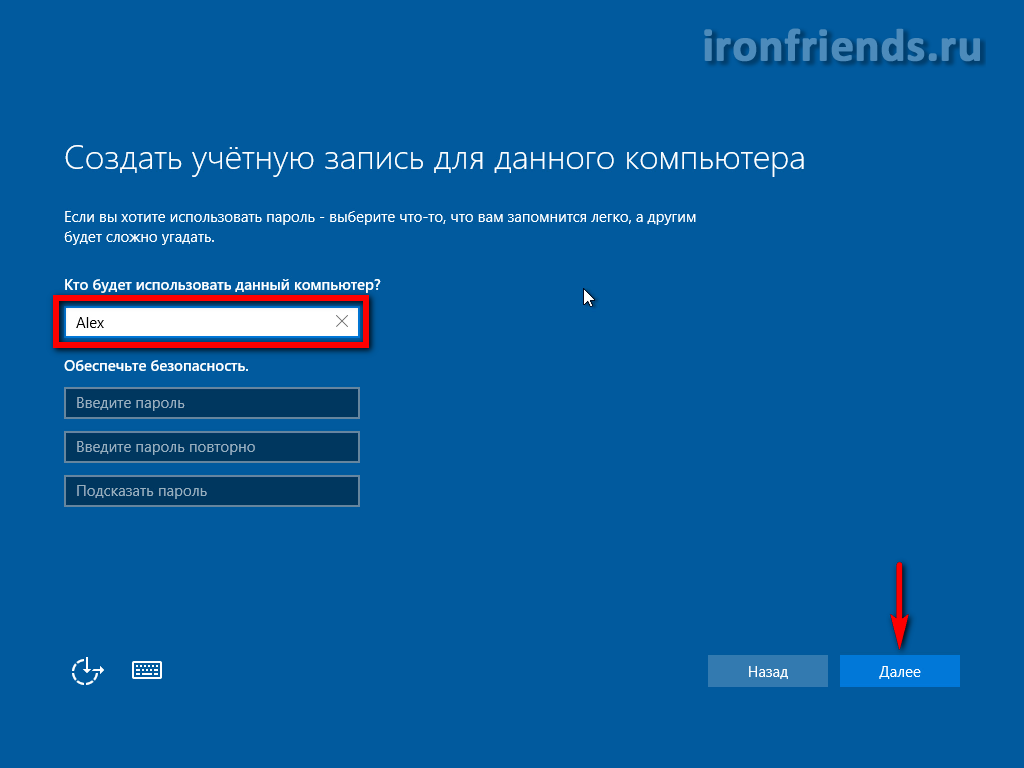
It is better not to enter the password at this stage, but if necessary, set it later in Windows, after full customization computer.
13. Completing the installation and logging into Windows
At the last stage installation program finishes system setup and displays various messages on a background that changes brightness.

This may take from 5 to 30 minutes. Be patient and do not touch the computer.
When you first log into your desktop, you may be prompted to allow access to your computer from the local network.
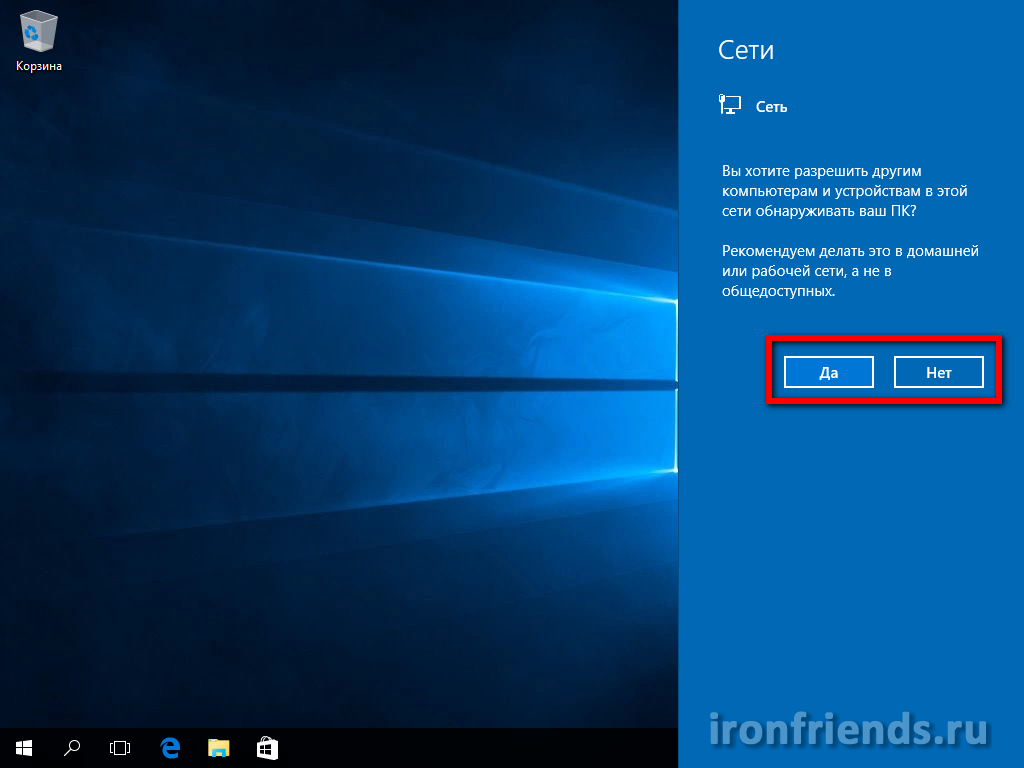
If you have another computer or laptop and you want to exchange files between them, then allow access. If you do not have other computers, then it is better to deny access, this will increase security.
14. Activation and subsequent actions
If during the installation process you entered the correct license key or Windows 10 has already been activated once on your PC, the system is activated automatically the first time you access the Internet.
To check the activation status, enter or change the product key, click on Windows icon in the lower left corner and go to Settings - Update and Security - Activation.
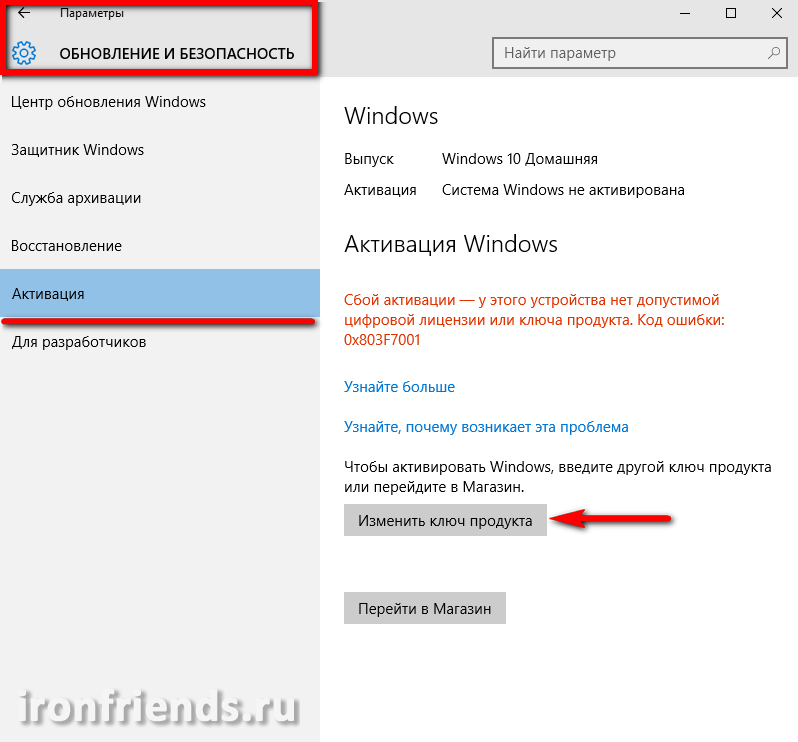
There is also a “Go to the Store” button to purchase a license and legalize Windows 10 on your computer.
If you don't produce Windows activation 10, then a reminder about the need to activate will appear on the desktop; you cannot change color settings, and the desktop wallpaper can only be set using the Photos application.
15. Links
Below you can download everything necessary files to download and install Windows 10 which I mentioned in this article.
A lot of users personal computers on the Windows platform, people often ask questions - what are virtual disks and how to create virtual disk . To increase the awareness of our readers on these issues, in this article we will try to fully cover the topic using specific examples.
Also in our article we will look at what is virtual hard disks and where they are used. After familiarizing yourself with the material, our readers will be able to easily create virtual hard drives and image disks in ISO format, as well as mount them onto a virtual device and burn them to DVD without any problems.
Virtual optical drive and its applications
The main purpose virtual drive- This mounting images optical disks. To understand in detail why it is needed, we will look at an example where an image of a disk in ISO format will be mounted on a virtual DVD-ROM. For this example, we will use the Windows 10 operating system.
A nice thing for owners of computers with the Windows 10 operating system is that it already has a virtual DVD-ROM installed. Therefore, Windows 10 owners will not have to use third party programs for mounting images.
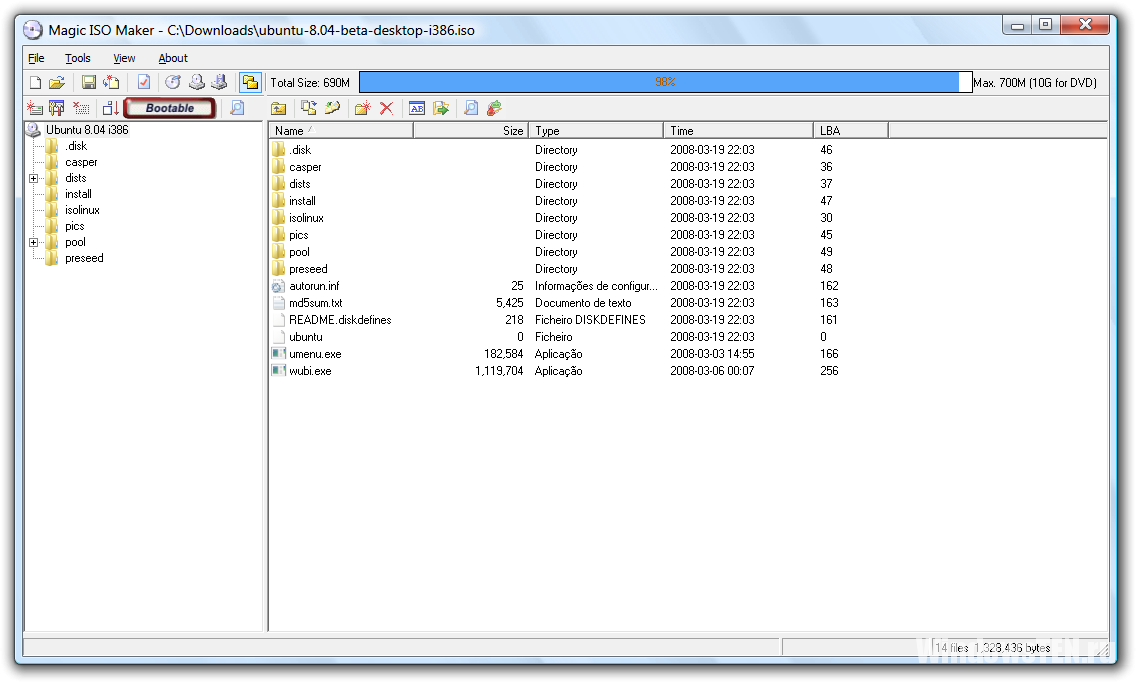
To mount the image optical disk into a virtual DVD-ROM, we need the image itself. For example, we will use image with operating Linux system Ubuntu. You can download the image of this operating system on its official website http://www.ubuntu.com. In our example we will use the image 64-bit Ubuntu versions 15.10 , which has a size of 1.1 GB.
Having downloaded the image, you can begin to mount it directly. To do this, right-click on the image file to open the context menu.
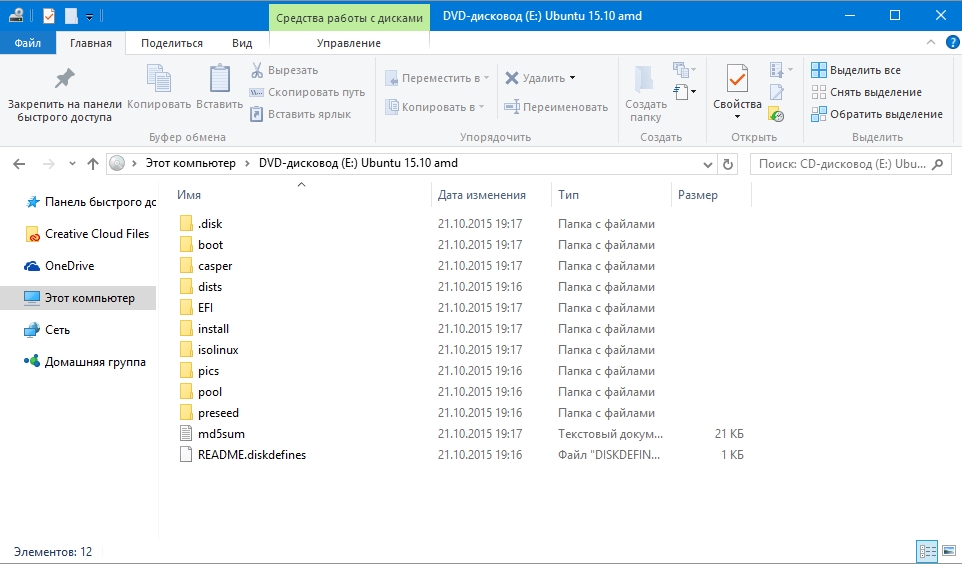
The mounted “virtual disk” can be opened and all its contents copied.
As you can see from the example, we mounted an image from the Ubuntu OS on a virtual DVD drive. Essentially, we were able to do almost what we do with a regular and optical disc when we insert it into a DVD drive and open it, only in our version all the components are virtual.
Creating a laserdisc image
In the previous example, we looked at how to open an image disk in a virtual DVD drive. Now let's deal with the situation when you need to create an image of an optical disk. To create an image, we will need the DAEMON Tools Lite program, which must be downloaded and installed. It is also worth noting that in addition to creating different image formats, DAEMON Tools Lite can also mount a huge number of formats into its own virtual DVD drive. After installing the program DAEMON Tools Lite In Explorer you will notice a new drive named ""

This “” is precisely the drive of the program in question DAEMON Tools Lite. In this example, we will create an image of the original installation DVD with the Windows 10 operating system. To make an image from the installation DVD with ten, insert it into the DVD drive. Now let’s run the utility and go to the “ New look».

In the utility window we find the button “ Create an image from disk" and press it. These actions will take us to the image creation window.

In this window, you can select the DVD drive from which the ISO image will be created, and also select the location to save it.
We will also select the image ISO format and confirm the creation by clicking the Start button, which will start creating a DVD image with Windows 10.
After creation, we will receive an ISO image file named “J_CCSA_X86FRE_RU-RU_DV5.iso”, which can be mounted or written to a regular disc and installed a new Windows using it.
The example shows how easy it is to burn an image for a virtual DVD-ROM using DAEMON Tools Lite. In the same way, you can record images for all licensed Windows drives, be it XP or Vista. In addition, you can record images of games or software that will not run without a disc. In addition to the program DAEMON Tools Lite I would like to recommend other popular utilities that can create and allow you to open images of optical disks:
- Alcohol 120%;
- Gizmo Drive;
- WinCDEmu.
It is especially important to use these utilities on an OS that does not have built-in virtual DVD drives, for example, in OS Windows XP. In addition to XP support, each of these programs, including DAEMON Tools Lite, will be able to burn ISO images to DVD disk. In addition to supporting the ISO format, these utilities can mount other formats, including their own, which can be written to regular discs.
Virtual hard disk
A virtual hard disk is quite often used by IT specialists, as it allows them to solve many problems with backup, virtual machines and testing of various operating systems. Virtual hard disk is a container file that simulates file structure hard drive.
Since such a disk is a file, it is therefore usually stored on a physical HDD or SSD. Starting with Windows 7, users now have the ability to create and mount a hard disk directly in the operating system.
Let's look at an example of creating a virtual hard disk using Windows 10. First, let's go to the " Execute"using the key combination Win + R and type the following command in it: diskmgmt.msc
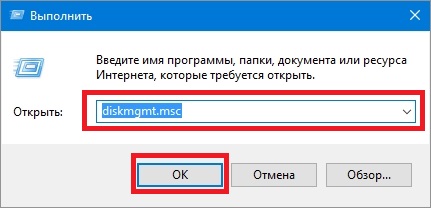
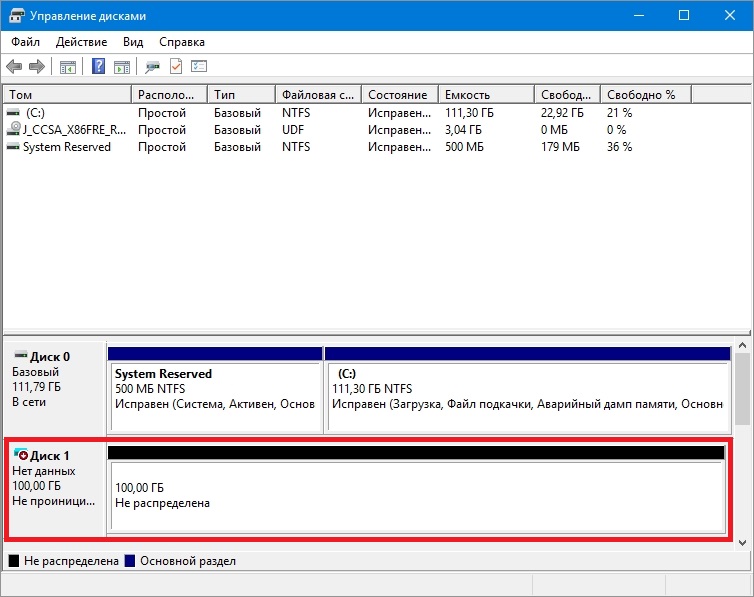
This command will take us to the Disk Control Panel.

To create a new virtual HDD, you need to go to the " Action / Create virtual hard disk", which will open a window to create such a disk.

Starting with Windows 10, it became possible to create a disk with the format " VHDX" Unlike the "VHD" format, the " VHDX» can create containers up to 64 terabytes. Let's make our 100 GB virtual hard disk in the new format " VHDX", and also set the switch to dynamic creation mode, in which our disk will grow as it fills.
After setting the parameters of our hard drive, press the OK button, which will allow you to write it to the specified folder on the screw. Once created, the output will be a virtual hard disk named “virtual disk.vhdx”. From the image below you can see that our disk was automatically mounted, but it is still not visible in the system.
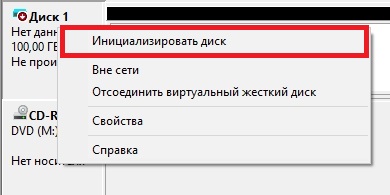
For the system to see our VHDX disk, it must be initialized. This can be done by right-clicking on the VHDX disk and selecting context menu point " Initialize disk».
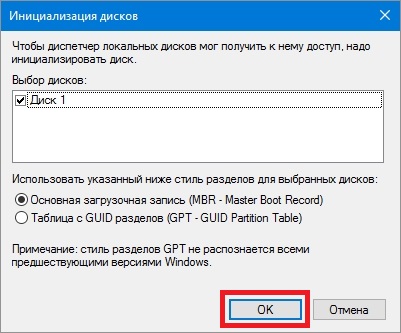
In the window that appears, do not change anything and click OK.
Now the simplest thing left is to choose for our disk file system and a letter. To do this, go to it and select the item “ Create a simple volume».

After this, a wizard will launch in which you need to assign a drive letter and select a file system. After completing the wizard, the virtual hard disk will appear in Explorer.
From the example it is clear that creating a virtual HDD using OS tools is very simple, so we hope that you will no longer have the question of how to create a virtual hard disk. I would also like to note that with the created VHDX disk you can do the following operations:
- Encrypt it using BitLocker;
- Install an additional OS on it;
- Move and open it on another computer;
- Connect it to a virtual machine.
Computers based on the Windows XP operating system, which is still quite popular, do not support VHD drives. But don’t be upset, because in the utility we reviewed earlier DAEMON Tools Lite there is support for VHD disks and it Fully compatible with Windows XP.
Using a VHD disk in a virtual machine
Let's create it using the program VirtualBox virtual machine based on the Windows XP operating system. At the stage of creating a virtual machine for XP, you will be asked to create or attach a virtual hard disk, which will be used to install Windows XP on it.
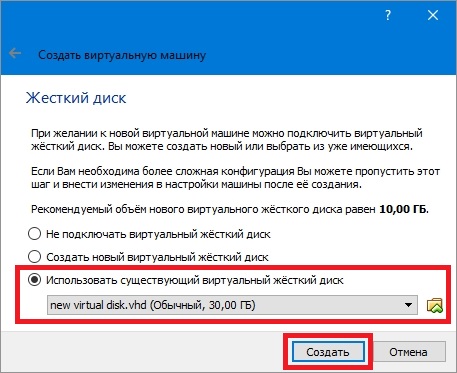
At this point we can attach the VHD disk that we will create with using Windows 10. Therefore, we will try to attach our 30 GB VHD container, which we made in the top ten. After creating the virtual machine, you can view the attached VHD disk in its settings.

If there is little space in the virtual machine on XP, you can always attach new VHD virtual HDD. Besides, you can connect containers with various file data to the virtual machine for XP. In the same way, you can use virtual machine from other software products. For example, VHD containers can be installed on VMware Workstation products.
Bottom line
From the material reviewed it is clear that the use virtual drives And hard drives It helps solve many problems much better, especially since even a novice PC user can figure out how to create them. We hope that our material will help our readers better understand the question of how to create a virtual disk and how to use it for work.
Video on the topic
Often when working with files you may encounter unknown formats, for example .mdf and .mds. Not everyone knows how to open them in Windows 10, since the standard set of OS programs does not work with such an extension. For this you will need third-party software.
What it is?
The .mdf file contains a CD image or DVD disc. It is opened by the same program that was used to create it. If the file came to you already in a “ready” form, then you can open it with the programs listed below.
If you have data in .mds format and are wondering how to open it, then there is no need to do this.
Important! This file does not work separately. It contains only the header of the image, while .mdf contains the image itself.
Programs for opening
If you have a .mdf file, you will need to download it before opening it special utility. The three programs described below are the most popular.
is a free, powerful utility. In addition to solving the problem of how to open .mdf and .mds files, it also works with other disk images. The main functions are:
- Generates up to 4 virtual drives, i.e. if you have several .mdf and .mds, then there will be no problems opening them all at once.
- Creates disk images.
- Squeezes them.
- Protects against access with a password (customizable function). Those. no one will know how to run .mdf and .mds file without password.
- Builds collection catalogs.
- Works in the background.
Supports Russian language. It is the most popular tool that is chosen when deciding which program to open the .mdf and .mds file.

When faced with the .mdf format and deciding what to open, users choose . This is a popular utility that is distributed for a fee. But during the trial period of 15 days, all functions are available to the user. It has functionality similar to the previous software. With it you can:
- Mount image.
- Burn to disk.
- Open.
Intuitive interface - you can easily understand how to open .mdf, .mds files. Works on 32 and 64 bit OS.
Advice! If you need information from .mdf and .mds files and you don’t know how to open it on Windows 8, Windows 7, this utility will be an excellent solution, as it works on more earlier versions OS.
Another one demon paid program. Functional, but less popular than the previous two. Distributed free of charge. Mounts and opens disk images of most formats. Creates 4 virtual drives.
Important! MagicDisc Virtual CD/DVD-ROM does not support Windows 10. Works with Windows versions 2000, ME, XP, 7, 8.
Conversion software
Sometimes, when encountering the .mdf extension, the user is more accustomed to working with another format virtual image. In this case, it is converted to a standard ISO image. But this will require additional software.
Important! The conversion will be successful only if you have both files – .mdf and .mds.

— a powerful and multifunctional utility for working with images. Performs the following functions:
- Mounting the image (with format selection).
- Opening the image.
- Generation of virtual drives.
- Virtual drive management.
- Format conversion.
- Burning an image to disk, etc.
You can also use the program. The program is paid. No demo or trial period.
 - paid program. It has wide functionality and fast operating speed. Mounts and opens images. Writes to disk. Capable of converting. The functionality is no wider than that of some free converters. Additional functions are required only by professionals.
Power ISO
![]()
Power ISO - helps to convert the format in question, extract content from it, and resave. Mounts images, writes mdf and mds format to disk, good decision in the question of what to open, etc.
Have a question about working with the program? Ask it in, describe in detail what the difficulty was, so that we can help.