Free software to create virtual disks and working with them. DAEMON Tools Lite also supports image files created by other programs (Alcohol 120%, Nero, etc.).
How good it is that in our modern life there is a place for such a useful invention as CDs. They are inexpensive, easy to transport and relatively durable. However, this durability is only possible if a number of conditions are met. We often neglect them and, as a result, end up with a non-working disk, which can then only be used to decorate a room :-)
It also happens that we cannot play our favorite game or use the desired program without disk. No matter how hard we try to preserve it, over time it will become unusable. To get rid of this problem once and for all, you need to use special disk drive emulator programs.
One of the most common and, most importantly, free emulator is the program Daemon Tools . It exists in three versions, but only free Daemon Tools Lite. This is what we will talk about.
Installing a Daemon Tools Lite virtual disk
So, you have downloaded the installation distribution of the program. Launch installation. You will be offered select language programs (choose Russian;-)). Then the standard one will start "Installation Wizard". Here you will read and accept license agreement , and you will also be asked integrate panel Daemon Tools into the browser, and make the Daemon Tools page the starting page. I would recommend that you give up all these additional settings(it’s unpleasant to turn off the Daemon Tools page every time you want to access the Internet - it’s annoying!).
Installed! Will appear on the desktop and in the tray label programs.
Launching Daemon Tools Lite
You will manage the program from the tray, so the shortcut from the desktop can be removed if desired.
You will have another one in the “My Computer” folder. DVD drive.
This is why we installed the program. You can create up to such drives with Daemon Tools Lite 4 pieces. The program supports many image file formats: *.b5t, *.b6t, *.bwt, *.ccd, *.cdi, *.cue, *.nrg, *.pdi, *.isz, and can also create them herself in the following formats: *.mdf/mds(native program format) and *.iso(standard image file). This means that with Daemon Tools you can open images created earlier using programs such as Alcohol 120, Blind Write, Nero, etc.
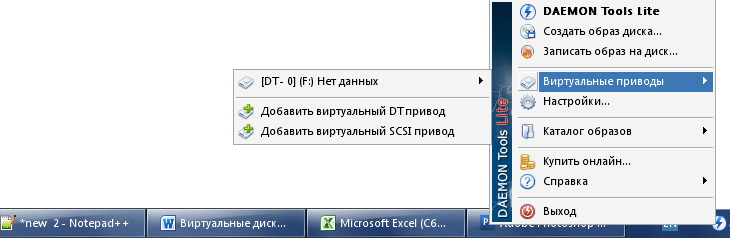
You can manage the program by right-clicking on the tray icon. The following will open menu:
The program has Daemon Tools panel, making it easier to access many features. But more about her a little later.
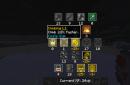
Let's see the tab Virtual CD/DVD-ROM. Here you can set the number of drives (from 1 to 4), and also mount the image on the virtual disk. To do this you need to go to the first option ( Drive 0: No data) and press "Mount image". A window will open Windows Explorer, in which you will choose required file image, and then press "Open". All!!! Virtual disk ready for work. Now you can open it, copy it or run applications installed on it. You can do the same with three more possible disks: add support for another disk drive and mount the image on it.
Daemon Tools Lite Settings
Now let's look at the tab "Settings".
IN "General" You can configure those parameters related to launching the program. "Autostart" allows you to download Daemon Tools along with the system. « Automatic connection» – this is something like autoloading a disk image for user convenience. If you have the option to check for updates enabled, the program itself will notify you about the availability new version. The disk image may be locked by one of the locking systems. In this case, it will not start. You can check this in advance by checking the option "Image lock check". Now if the image is locked, the program should display a message indicating the encryption algorithm. Knowing it, you can bypass the protection. You can also configure here language programs.
IN "Panel Options" You can:
- enable or disable the Daemon Tools panel;
- place it on top;
- show the panel on top of all windows;
- configure its integration with the desktop;
- configure the display of the panel after double-clicking on the program shortcut in the tray.
IN "Settings" on the tab "Hotkeys" You can configure buttons for quick access to the Daemon Tools panel and mounting/unmounting virtual disks. On the tab "Integration" You can check the boxes for those disk image formats that will be automatically opened using Daemon Tools. On the tab "Compound" You can set up an Internet connection to access the manufacturer’s website through a proxy server. And finally, the most fun thing about the tab "Additional". Here you can configure the encryption algorithms that Daemon Tools will bypass when creating images of protected disks. The list is small, but the fact that it exists at all is already pleasing!!!
Now let's get back to what I promised to talk about earlier. This Daemon Tools panel.
Having it can make life much easier for any user. As they say, from right to left :-). The first thing we see is the search bar Daemon Search. With its help, you can search the Internet using it as a search engine.
On the next section of the panel there are two buttons: "Mount"n"Drive" And "Image Creation". The first allows you to quickly mount an image on a virtual drive. You just need to press it and in the window that opens, click on the icon "Add file". Once the image is added to the list, you can quickly download it by double-clicking. "Image Creation" allows you to make an image of any of your disks yourself. To do this, press the button and select the drive in which you have the disk. After that, select the disk reading speed and the final saving path on the computer (by default: C:\Documents and Settings\All Users\Documents\DAEMON Tools Images\NewImage.mds). Can also be customized Name And format disk image (*.mds or *.iso). To do this, click the button located next to the line with the saving path and below, under the Explorer window, enter a name in the first window, and select the file type in the second.
The next section of the panel allows you to enter settings, which we have already talked about.
The last window displays Availability in virtual drives disks. If you left-click on this window, an explorer window will open where you can select the desired image file. Also on this panel there is up arrow button. By clicking on this button, you will see a small window in which there will be an option unmount all drives. After clicking this button, all virtual disks are automatically unmounted. This is useful, for example, if you need to quickly increase the performance of your system, since each virtual disk requires the allocation of RAM.
This is such a good program we have. Of course, this is not such a “monster” as, for example, Alcohol, which is preferred by many users, but for everyday work you don’t need much. This is an excellent option for owners of systems that do not have disk drives (old computers, netbooks, etc.), as well as those who save every megabyte of RAM and physical memory on their computer!
P.S. This article is intended for free distribution. You are welcome to copy it while preserving the authorship. Ruslan Tertyshny and everyone P.S. and P.P.S.
Hello everyone, this is the author of the blog site, today we will talk about creating virtual drives and disks, their purpose and consider several useful programs. Many new laptops no longer contain an optical drive, so they cannot play CDs or DVDs to watch movies, install a game or software. If there is a need to have an optical drive in your computer purely for show, then you can use the services of programs that allow you to create virtual disk drives.
Before touching on the topic of virtual drives and virtual disks, I will say a couple of lines of text about virtual ISO images; it is also important to read the article, which discusses additional software tools. The same article discusses additional programs on the topic of this article.
What is a virtual disk and why does it have different extensions?
CD/DVD images are a file that contains a copy of all files of a given optical drive while preserving a number of other parameters (boot sectors, startup, type file systems and so on). Most often they have an ISO extension, but this is not the rule. May have extensions NRG, BIN and others. It all depends on the burning program in which the impression was created. Yes, ISO files are typically created using .
It is important to note that virtual disk images are often created as a transition link when copying primary data, or completely purposefully. Because they can be used to create identical copies of the original drive, you can use them as backup copy followed by storage on a hard drive. One of the advantages of using impressions, compared to physical drives, is that they do not become unusable with frequent use. As you may have guessed, having created a virtual Windows disk drive on your computer, you can then mount an image on it, which will be perceived by the system as physical media.
Origin of virtual drives and disks
Virtual drives arose at a time when CDs and DVDs were still widely used. There were many reasons, the main one being computer games. Those, over time, began to spread on several media, and the player had to constantly alternate them.
There was, therefore, nothing more complicated than creating a virtual image of the media, saving it as a file with an ISO or some other extension (depending on the program used) and mounting it into the Windows virtual optical drive. This approach saved the player from a lot of inconvenience, although in most cases, the problem was that the player did not have the original disc, or he needed to return the original.
Game manufacturers and software began to prevent this problem and tried to develop various degrees of protection against copying original discs. The virtual drive for discs kept pace with them, and several specialized programs were created that were intended only for photocopying the game and were able to emulate various protective mechanisms of the original discs.
Today the situation is a little different, and optical drives fade into the background, and there are changes in the playing space. And although the development of programs for creating virtual disk images is not so rapid, they themselves are very convenient and are used everywhere.
Specialized programs for mounting virtual media into virtual drives work in such a way that one or even several disk drives appear in the system with impressions in them, which are perceived as real optical media.
What is and why do we need a virtual disk image?
Many computer users had to deal with installation operating system from a CD or DVD drive. We will not touch on such things now, but simply take it as a fact - there is a CD, when loaded from which a console window appears with instructions for installing WindowsXP. We used such a disk once, twice, three times, ... tenth time, and ... we realized that it is not eternal and we could create a copy of it and save it on the computer. Next, write all the copied files onto a brand new CD, which will be kept in reserve.
But now, the day of PI comes, the old CD with the XP installation has become unusable, and we decided to use our reserve. However, to our surprise, the system stubbornly refuses to boot from the brand new installation CD. The reason for this inappropriate situation is that the computer is stupid. The user understands that on this disk, in its root, there is a file like setup.exe, launching which should start Windows installation XP. However, the computer aside, whatever it is called, it focuses on the boot sectors of the disk, and if there is nothing there to perform, then it will simply ignore the contents of the drive. This is where the concept of a virtual disk image comes into play.
Simply copying files cannot preserve the correct placement of data in the right sectors. For this purpose they serve special programs, which allow you to make an impression of the desired optical drive and save it in one file, making virtual file image the desired disk. It is so accepted that in most cases, a virtual disk is saved in a file with the ISO extension, hence the more popular expressions like iSO file/image. There are several formats that provide storage of a disk impression at once ISO, CUE, MDF, CDI, BIN and so on, but the ISO format is the most commonly used and most supported by various programs.
If there are flash drives, then why create virtual disks?
Logical, but everything is not as simple as it seems. So, some games could not be launched without having them in the drive installation disk, and here virtual disk images came to the rescue, which were then mounted on virtual drives, perceived by the system as physical devices. Among other things, it is convenient to store various (rescue disks) in virtual disks, which can then be easily added to a multiboot flash drive - we use a virtual disk image with Windows 7, 10, LINUX in addition, and several RESCUE DISKs, and create our own multiboot flash drive in case of critical situations.
Among other things, you can create your own virtual ISO disk image, which will contain files and folders from hard drive. So, if you have a large collection (several gigabytes) of documents and books devoted to one topic, then you can put them all in one ISO file. Remember that the process of copying one file is faster than copying several. And unlike an archive like RAR/ZIP, access to packed files will be much faster; you just need to mount virtual disk images on virtual drives and that’s it, you can work.
How to create and open a virtual disk
Oddly enough, creating or opening virtual ISO images of disks or files is also vague. Let's note a number of factors associated with virtual ISO disk images:
- Possibility of grouping several files into one with ISO, CUE, MDF, CDI or BIN extension.
- Opening a previously created image for editing without the need to bind to a virtual drive.
- Creating a virtual drive/drives with the ability to mount virtual images of any disk format (ISO,CUE, MDF, CDI, BIN, and so on).
- Availability additional functions to create snapshots of copy-protected drives.
As you can see, there are quite a lot of aspects. The programs discussed in this article can handle most of them (if not all of them), and the famous NERO can do a lot of things.
DAEMON Tools line for working with virtual images and drives
I couldn't help but ignore such a popular product as DAEMON Tools. On the official website, users are offered several program options, from the free DAEMON Tools Lite to the super functional and paid DAEMON Ultra. I’ll say right away that for working with virtual drives and virtual disks, it’s quite enough for you free version DAEMON Tools Lite. If you plan to create entire virtual hard disks, and are well versed in computer hardware, then DAEMON Tools Ultra will help you.
How to create a virtual disk with DAEMON Tools Lite
DAEMON Tools Lite- this is one of the most famous and popular software products for emulating virtual drives optical disks. This allows you to save the original media, which, in the case of intensive use, simply becomes less durable. The program will also be useful to owners of computers that do not have a CD/ DVD drive ov, for example, popular in Lately laptops.
The application automatically installs a special driver for virtual drives. In the system, such a device is visible like any other equipment of this type, for example, a DVD drive. IN physical device We place the disk on the tray and close the drive; in DAEMON Tools Lite, the role of the disk completely replaces the image file on the hard drive. We mount the image on the drive, that is, we indicate in the program which file to read the data from. The mounted image behaves like a normal disk, for example, launching the main menu of the game. The only trouble is that when reading from such a virtual device, there is no automatic generation of sound from the mechanical components of the drive. In addition, several such virtual devices can be created simultaneously.
This solution is very convenient, however, it requires the creation of an appropriate virtual disk image (its exact copy), which will be located on the computer. DAEMON Tools Lite also comes to the rescue here - the program can create virtual image files of any disk and save it in one of the popular formats, for example, ISO. The program itself supports, however, much more formats, more than 10, in particular, MDS, CUE/BIN, NRG, CCD, CDI, and, of course, ISO. In addition, if, for example, the original disc is lost and we still have a virtual copy of it, we can burn the corresponding media using the additional Astroburn Lite application recommended by DAEMON Tools Lite.
Main features of the package:
- Creating virtual DT and SCSI drives - without going into technical aspects, some programs for CD/DVD copy protection take into account the drive connection interface. DT – suitable for emulating simple snapshots without copy protection; a virtual SCSI drive will be needed if you need to mount an image of a virtual protected disk.
- Creating a virtual disk from media in mdx, mds or ISO format.
- Ability to mount virtual disks of various formats on virtual drives.
DAEMON Tools Pro – program for virtual disks and drives
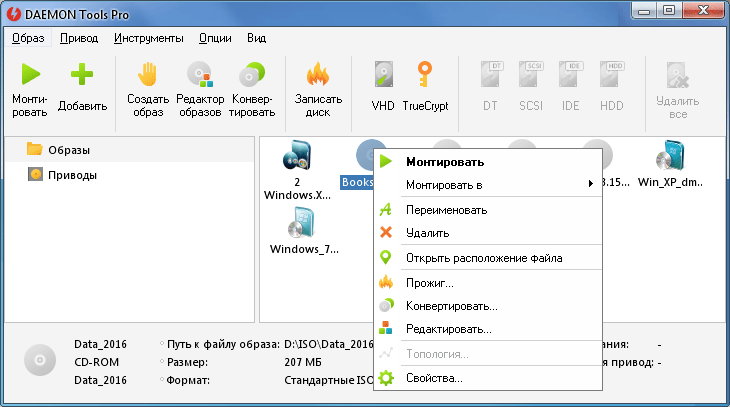
DAEMON Tools Pro Advanced is the largest release of the DAEMON Tools package. This is very popular instrument for emulating virtual optical drives, recording and media management. The application is appreciated among users from all over the world for several reasons. First of all, it is distinguished by its simplicity and precise action. It also offers all the functions necessary for everyday use. The package can be divided into several main modules:

Management and maintenance of virtual drives
The application allows you to create virtual devices that will be visible from Windows Explorer and standard elements. What is very important, the tool copes well with the most popular technologies that protect media from copying. Also important is the large number of supported virtual disk image formats (MDX, MDS/MDF, ISO, B5T, BWT, CCD, CDI, BIN/CUE, APE/CUE, FLAC/CUE, NRG, ISZ). The built-in manager allows you to change settings for DT, SCSI and IDE controllers. We can change the visibility of drives, drive letters assigned to them, mount point, manufacturer/model name, DVD region or search.

Disk Image Editor
The application was equipped with a module for managing the contents of CD/DVD/DVD DL virtual disk images, which is served by dragging and dropping elements. Information about your current disk space usage will also be helpful. DAEMON Tools Pro Advanced allows you to convert pictures to MDF/MDS, MDX or ISO formats. The data can be additionally password protected, compressed or split into fragments.
Data recording
The tool offers basic functions related to disc burning. The user can delete the contents of the rewritable disc and record a normal/protected snapshot.
Other features:
- maintenance of ISO9960, ISO9960 + Joliet and UDF systems,
- built-in search system disk images,
- viewing information about the media and drive (manufacturer, recording speed, model, revision, supported recording modes, free/used space, type and name of the project),
- the ability to disable some confirmations and messages,
- catalog and history of recently used images,
- creating boot disks/images,
- mounting images to local NTFS folders,
- agent running in the system tray (next to the clock).
It is possible to use the program using command line, which will be especially useful for system administrators. The program integrates with Explorer. The installer also allows you to copy a Windows gadget that offers access to the application's most frequently used features.

Main features of the package:
- In addition to DT and SCSI virtual drives, you can also add virtual IDE and HDD drives to the system. Simply put, the program allows you to add not only a virtual drive to the system, but also virtual hard a disk of a given size and file system.
- More advanced capabilities for creating virtual disks or data. Plus, there are tools for recording information on media.
Creating a virtual disk with DAEMON Tools Ultra
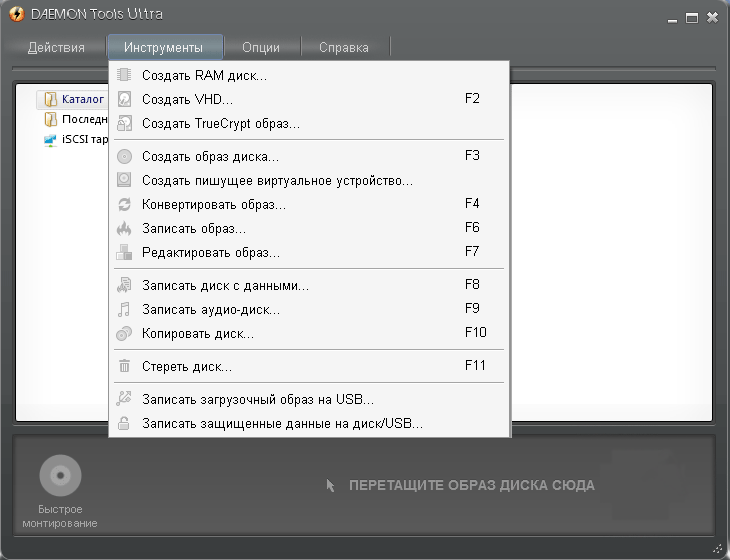
According to the information on the manufacturer's website, this version of the DAEMON Tools package offers the most features. In fact, everything that was said above can be attributed to this version. The following qualities are distinctive:
- Creating bootable flash drives.
- Support for RAM disks.
- Simulation of virtual writing drives.
- Ability to set a password on a flash drive.

Personally, I didn’t particularly like this version, because the program interface and the menu in the taskbar were too cut off.
Working with virtual disks and drives in the MagicDisc program

MagicDisc is a free and very simple program for working with virtual drives and disks. Since I am not a demanding PC user and there is no need for me to create complex virtual systems to deceive the defense, then having become acquainted with MagicDisc, I decided to use these tools instead of Daemon Tools. The program can be downloaded from the official website magiciso.com. On the same site there are several add-ons to the program that allow you to create virtual disks and edit them.
setup_magicdisc.exe- page address magiciso.com/tutorials/miso-magicdisc-overview.htm. After launching the program, the MagicDisc icon will appear in the taskbar near the clock. If you right-click on the icon, a menu will appear in which you can specify the number of virtual drives, as well as select a virtual file disk to mount. You can immediately proceed to creating a virtual image from a given disk, saving it in ISO, NRG, UIF or BIN/CUE format. If desired, you can add password protection.
Setup_MagicISO.exe– page address magiciso.com/download.htm. This is a full-fledged program for creating and editing virtual images with extensive capabilities. To use the tool without restrictions, you need to register.
Thank you for your attention. Blog author
| alt=" Brief description of the program" src="/images/kratko.png"> !} |
| < | > > |
|---|
Daemon Tools Lite is a tool for emulating CD/DVD/Blu-ray drives, free program for reading and creating virtual images of laser optical discs. With Daemon Tools Lite you can create up to 4 virtual CD/DVD/Blu-ray drives and you can use them like regular optical drives, with the only difference that you need to insert electronic impressions, images of optical storage media into them. The Daemon Tools Lite utility is an excellent solution for a computer that does not have a laser drive. Install Daemon Tools Lite and you will be able to create *.iso, *.mdx and *.mds disk images, as well as mount images of *.iso, *.nrg, *.cue, *.vhd, *.ccd, formats into a virtual drive. *.bwt, *.b5t, *.b6t, *.cdi, *.isz, *.dmg.
Reading images
Using a virtual disk image allows you to store information more reliably, because the disk image file cannot be scratched, and the reading speed from a virtual drive is several times higher than the reading speed of a conventional drive, and when accessing a virtual drive there is no noise at all when rotating laser disk. Storing information in the form of image files on disk is also convenient, because it does not take up space on shelves. Mounting disks is possible directly from the Explorer window; the program is built into it context menu during installation. Daemon Tools Lite implements algorithms to bypass copy protection Laserlock, CDCOPS, Protect CD, SafeDisc, Securom, StarForce and others, thanks to this, you can emulate both regular and protected disks.
Screenshots of Daemon Tools Lite
|
|

Instructions
Download a program for working with disk images. This may be paid or free utility. Among the free ones, the recognized leader is Daemon Tools Lite. From paid analogues I can recommend Alcohol 120%, in addition to reading disk images, it can create them and also write them to disks. To download, use trusted sources or the official website of the developer.
Double-click the installation file and answer the installation wizard’s questions by clicking the “Next” and “Finish” buttons. You will be required to reboot during the installation process, so save and close all important data and documents. Open the main module of the downloaded program by double-clicking the icon on the desktop. Or you can click the “Start” button -> “All Programs” -> Daemon Tools. The result will be the same.
A window with the title Mount`n`Drive Manager will appear. At the bottom of it, right-click on the free space and select the line “Add virtual SCSI drive”. Another way is to right-click on the program icon in the system area near the clock. The actions are no different, just select the line with the command written above.
A message appears indicating that the virtual drive has been created. Wait until it disappears.
Open My Computer and check the list of drives. A new item should appear on this list. For example, if earlier you had the letters “C:, D:, E:”, then after that it should be, for example, like this: “C:, D:, E:, F:”.
Now you have computer there is a virtual disk drive. It works with almost all types of disk images and integrates into the operating system. All you have to do is double-click on the file to automatically download and mount. In some cases, two or more virtual drives at the same time may be useful. If this is your case, repeat the steps starting from step 3. You can create about 20 disk drives using this program.
How complicated is life after all, if necessary in this moment a program or game does not start if there is no disk drive installation disk. Only a disk copied as accurately as possible can become a replacement for such a disk. At the same time, it is not at all necessary to spoil clean disks for these purposes. With the help of programs that allow you to create virtual disk drives and virtual media (disk images) on your computer, you can forget about such problems. One such program is Alcohol 120%.
You will need
- Computer running operating system, Alcohol 120% program
Users personal computers often encounter optical disc image files of the format ISO or MDF. These files contain various file information, multimedia content or installation “image” with Windows OS, as well as many other data.
Therefore, the PC user faces a task, the solution of which is to open these files, view them, or process information on these images. Most popular programs which can create a virtual DVD-ROM to read ISO images as well as write them to optical drives are Alcohol 120 And Ultra ISO. In this material, we will describe with examples how to create a virtual DVD-ROM, and also describe the process of creating ISO images using these utilities.
We create and mount images on a virtual DVD drive using Alcohol 120
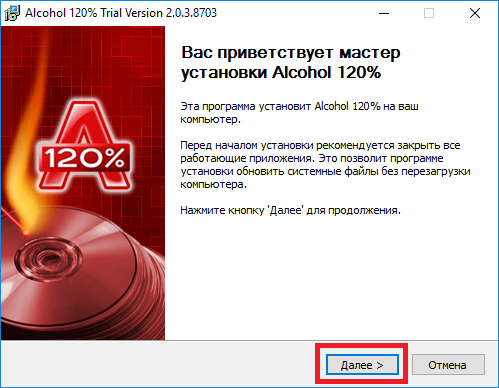
Alcohol 120 appeared back in 2002. Since then, it has become very popular among Russian-speaking users. It gained popularity due to the ability to create virtual DVD drives and mount an image on them. The program can also write images to physical optical drives. You can download the program on its official website www.alcohol-soft.com. After downloading the installer, you can begin installing the program. On startup installation file, we will be taken to its start window.
In this window, click Next, and continue downloading and installing the utility to go to the next window. In this window, we will make a decision regarding the license agreement, after which the main utility installer will begin downloading to the computer. After downloading, the main installer window will launch.
Let's move on to the next step, where we will also resolve the issue of accepting the license agreement, and then click the Next> button. After completing these steps, the installer will ask you to restart a computer, with which we must agree.

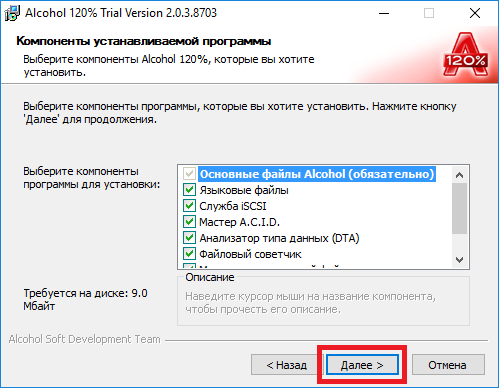
After reboot the same wizard will start, in which you must again accept the license agreement. Next we will move on to selection of installed components. Leaving all components unchanged, click the Next> button.
In the next window, select the installation location for the utility and click the Next> button. After these steps installation will begin. After installing the program, launch it from a shortcut on the Desktop, which will allow us to go to the main program window.
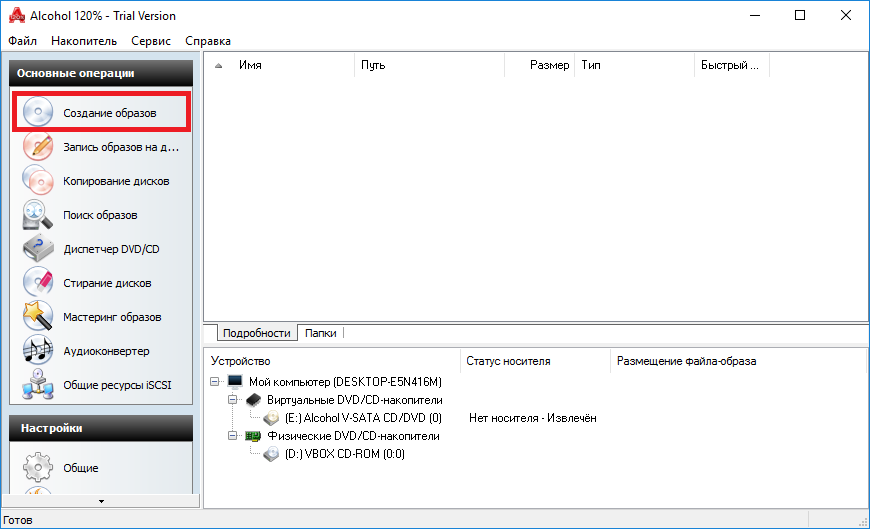
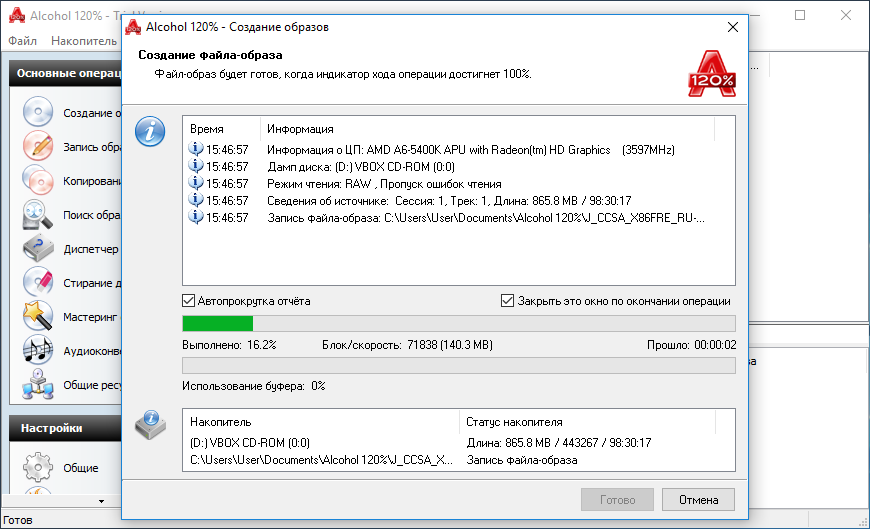
At the bottom of the program you can see that we have two optical drive, one virtual one that made Alcohol 120 and one physical. Now let's start creating an image file. To do this, insert a licensed disk with Windows 10 into our PC. Going to the program window, press the button “ Creating images" This action will open the Image Creation Wizard.
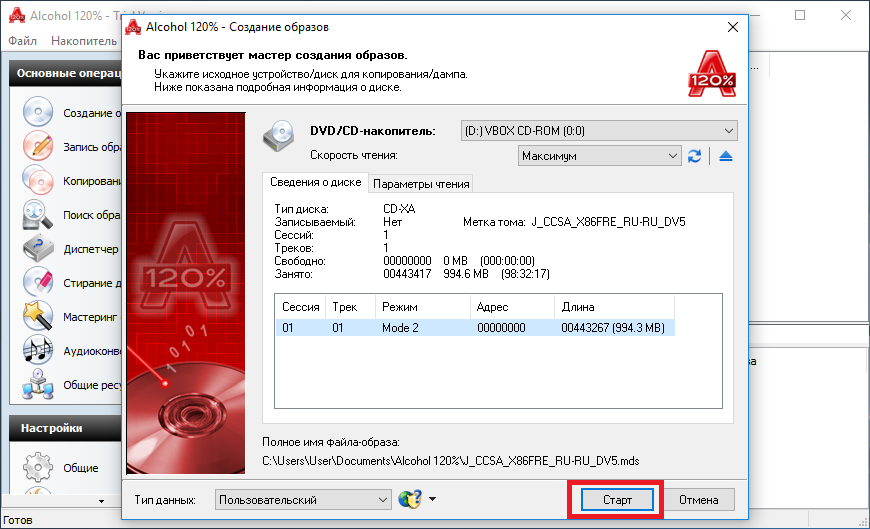
From this window you can see that the utility I myself chose the physical drive from which I need to make an image file, and also displayed all the information about the disc in the DVD drive. To create an image file, the last step left is to click the Start button.
The recorded ISO image will appear in the main window of the utility. By right-clicking on it, you can mount it to the utility’s virtual disk.
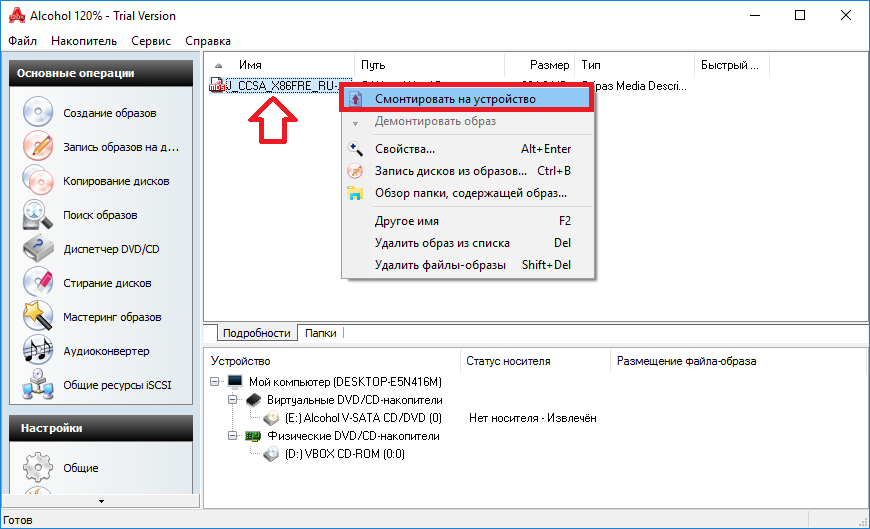
The example shows that creating an ISO image and mounting it on a virtual DVD-ROM is not at all difficult. Also, if necessary, the created image file can be written to a new optical disk directly from the utility menu in the " Burning images to discs" With this action we will make another copy of the Windows 10 license disk.
Create and mount images on Virtual DVD-ROM using UltraISO
Program Ultra ISO as well as Alcohol 120 can burn images, create Virtual DVD drives and mount images on them. In addition, the utility can edit dozens of image formats, which is a big plus. You can download the utility from its official website https://ezbsystems.com/ultraiso. Even a novice user can figure out how to install the utility, as it is very simple. Therefore, there is no point in describing the installation process of the utility. After installing the utility, launch it from a shortcut on the Desktop. This action will move us to the main program window.
![]()
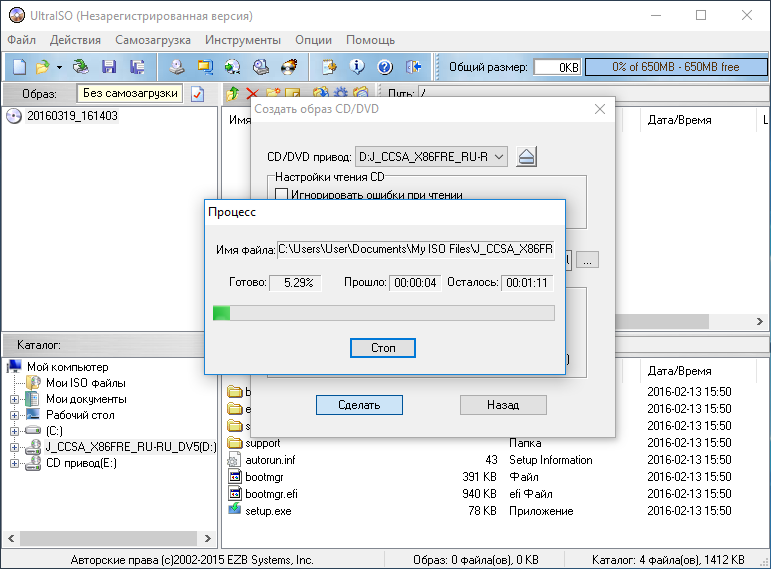
Before creating an image in Ultra ISO, insert the licensed disc with Windows 10 into the DVD drive. Now in the program window press the F8 key to call the image creation wizard. In the wizard, select the image type " ISO"and the DVD drive where our Windows disk 10. After installing the selected options, click the Make button, which will directly launch the creation process itself.
To mount our created image file, we need to press the F6 button, after which a wizard will appear in which we can choose the location of our image, mounting it on the virtual drive created during installation of the utility.

In the same way, we can unmount an image file from a virtual DVD drive.
As can be seen from the example, the utility is as easy to use as Alcohol 120.
Let's sum it up
The utilities discussed are quite easy to use and perform their task 100 percent. Therefore utilities Alcohol 120 And Ultra ISO have become so popular among millions of users around the world. In addition to the programs discussed, there are also such popular utilities that you can familiarize yourself with:
- Gizmo Drive;
- WinCDEmu;
- DAEMON Tools.
These programs have similar functionality as in the utilities under consideration. I would also like to note that these programs and the ones in question support both old and new Windows operating systems, so users, for example, with Windows XP will not have any problems running them.
We hope that our material introduced you better to Alcohol 120 And Ultra ISO, so you can create your own disk images and mount them on virtual drives.