A rollback point, or restore point, is a saved state of the system for a specific date. Rollback points can be created manually by the user and automatically by the system on a weekly basis or before a configuration change, such as installing a driver or program. In this case, only the state of system files is recorded. User created documents ( text files, photos, videos, music) are not saved.
How to create a rollback point
This feature must be enabled in order for restore points to be created. Right-click on the “My Computer” icon, select “Properties” and go to the “System Restore” tab. Uncheck the box next to “Turn off System Restore.”
If you have Windows XP installed on your computer, manual creation recovery point, press the Win key and in the “Programs” group go to the “Accessories” section, then “System Tools” and select the “System Restore” program. Check “Create a restore point” and follow the instructions.
In Windows 7, click Win, right-click Computer and check Properties. On the left side of the window, click "System Protection", go to the "System Protection" tab and click "Create". Next, follow the instructions.
How to restore the system
To restore the system in any version of Windows, you will need administrator rights. On a computer under Windows control XP, press Win, in the “Programs” section, select “Accessories”, then “System Tools” and “System Restore”. Check “System Restore”, click “Next” and mark the desired date in the calendar that the recovery program will offer you. Choose the date closest to the fatal event from which recovery was required.
In critical cases when the system does not boot, restart the computer and press F8 after the initial hardware scan. In the boot options menu, check “Load last known known configuration”, then in the provided calendar, indicate the date when the computer was working correctly.
To run System Restore in Windows 7, go to the Control Panel and follow the “Security” link. In the new window, select “Backup and Restore”, then “Restore” system parameters or computer." Click “Run System Restore” and follow the instructions of the recovery wizard. You can also use System Restore under Programs or Last Known Good Configuration as described for Windows XP.
You can cancel System Restore if you are not satisfied with the result. Click “Start”, in the “Programs” section select “Accessories”, then “System Tools” and “System Restore”. Click “Cancel System Restore” and follow the wizard’s instructions.
Fortunately, Windows 10 still supports the Windows 10 System Restore feature, and if necessary, you can use it to protect any and all data on your computer, not just user files and settings. To return your computer to a point in time where it was stable and performing better than when it crashed, follow the instructions below.
1. Right-click on the Start button and select context menu System command. In the window that appears on the screen, go to the System Protection section (in the left panel). Finally, in the System Properties dialog box, click the Repair button. The System Restore dialog box will appear on the screen.

2. Click the Next button in the System Restore window. The next page of the window will present a list of available restore points.
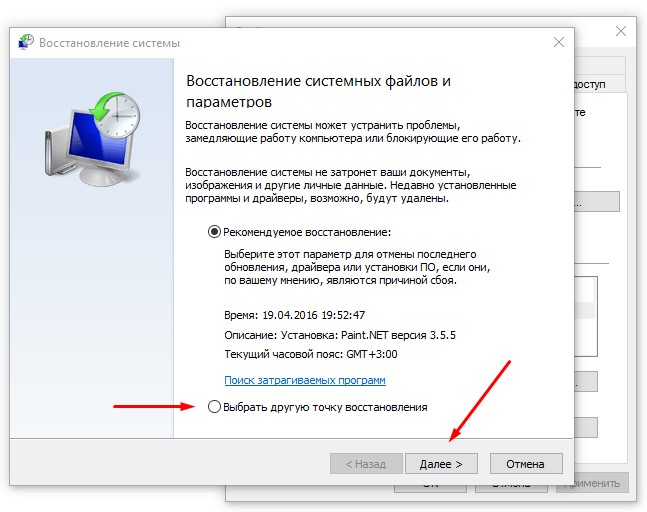
3. Click one of the restore points provided. To display more recovery points, check the Show other recovery points option at the bottom of the window.

4. Click the "Search for Affected Programs" button to see how restoring the system to a specified point will affect installed programs. By carefully reviewing the information presented in the window, you will determine the programs that will need to be reinstalled after restoring the system.
5. To confirm the restore point, click the Next button. In the next window, click the Finish button.
After a moment's thought, the computer will return to previous state, in which he (I would like to believe) maintained normal performance. If your computer is already working normally, then you can manually create an additional restore point, as described earlier. Give the recovery point a name that most accurately describes the state of the computer in it, for example, Before the neighbor arrived. Naming recovery points is a good practice to keep the data stored on your computer safe from any trouble.
Sometimes it happens that the Windows system begins to crash and function unstably. In fact, there could be many reasons for this. A sign that not everything is in order is when various kinds of errors are issued or startup ceases to be possible at all. As a rule, this happens as a result of changing some settings, installing new programs and becoming infected with a virus. And here the question of reinstallation becomes acute, but before embarking on this radical measure, you can still try to restore the system’s functionality.
Restoring Windows using standard system tools
If the case is not too advanced, then you can try to resuscitate the operating system using a standard utility Windows recovery. This utility makes it possible to ensure the working state of the operating system. The action occurs due to the fact that important system files and other equally important parameters are restored from a previously created archive. This is called a recovery checkpoint.
In this case, documents, video and audio files, mail and Internet bookmarks will not be affected and will remain intact. At the same time, the settings of some programs may return to the date when the restore point was created, from which the system will be resuscitated.
For a more precise understanding, you can consider an example. So, if the current date is January 25, and the creation of a restore point occurred on the 5th, then updates antivirus database, uploaded after January 5th may disappear. The settings of the operating system and programs, their updates, as well as registry settings will be rolled back to the same date.
Typically, Windows automatically creates restore checkpoints. This happens when the user installs or uninstalls a program, sets up new devices and drivers for them, and also changes important settings. In addition, a system restore point can be created manually, at the most convenient time for the user. So, based on the above, a restore point is a display of settings and parameters of the system and programs for a specific date. At the root of the disk there is hidden folder System Volume Information, in which under specific number and a “snapshot” of the system is stored. It is impossible to view the contents and change it, since access to this folder is provided only by Windows.
How to create such a restore point and use it to save the system
First you need to make sure that you can create restore points for system disk was turned on. This is a prerequisite for using the standard utility. If you are in doubt whether this option is active, on the Desktop you need to right-click on the My Computer icon and select “Properties” in the context menu.
Next, you need to go to the “System Restore” tab and make sure that in the utility settings, the “Disable system restore on all disks” option is not checked. The “Available drives” table provides information about which drives can create recovery points. The “Monitoring” state is interpreted as the system monitoring the selected disk and, if necessary, will automatically create a recovery point for it.
In order to save recovery points, a specific amount of disk space is allocated on the disk. By clicking on the “Options” button, you can get information about how much space is allocated for storing control points. In order to reduce or increase the amount of disk space allocated for storage, you need to move the slider to the left or right, respectively. Naturally, the larger the amount of space, the greater the number of recovery checkpoints that can be stored on the computer. But since there is no point in getting a six-month-old system after restoration, storing the last five control points will be more than enough. Depends on what operating system is on the computer, this may require from 1 to 5 gigabytes.
How to create a system restore point manually
Windows XP
In order to manually create a system restore point for Windows XP, you need to go through the following path: “Start” - “Programs” - “Accessories” - “System Tools” - “System Restore”. After this, you will need to check the “Create a restore point” option and click “Next”. The user will then be prompted to enter a description of the recovery point and click Create. As a result of this procedure, a message will appear about the creation of a restore point, its date and description. Then click on the “Close” button.
Windows Vista
In order to provide system recovery for Windows Vista, you must select “Start” - “Control Panel” - “System”. On the left side of the menu, click on “System Protection”. After the window opens, make sure that there is a checkmark next to the system disk, which means that the selected disk is under the control of the system recovery program, which, in the event of significant changes, Windows settings will automatically create a recovery point. To create it manually, you need to click on the “Create” button and enter the characteristics of the control point.
So, if the System Restore program is active, then Windows has a chance to regain its working state. In order to restore the system, you need to open the program window and select “Restore the computer to an earlier state”, then click “Next”. It is recommended to select a date when the computer was functioning well. During the period of such stable operation, more than one control point could be created. You need to select the one you need and continue the procedure.
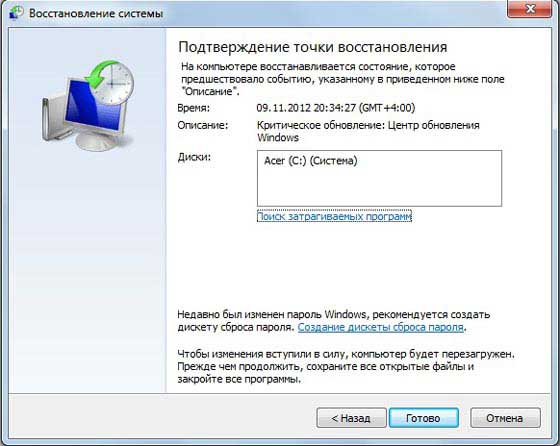
After this, Windows will prompt you to confirm your choice and provide all the information about restoring the system from the checkpoint that was selected by the user. In order to start the process, click “Next”. Afterwards, the computer will automatically restart. At subsequent booting Windows The state of the system for a specific date will be obtained. Once the successful restore is completed, Windows will warn you about the result.
In most cases, using recovery, it is possible to return the operating system to its proper state. But there are cases when, at the end of this procedure, there are even more errors and freezes, then the last recovery needs to be canceled. It is important to do this before the computer restarts. In order to cancel the restoration, you need to check the box “Cancel the last restoration” and click “Next”. After this, you will need to confirm the selected solution by pressing the “Next” button again. After this, the computer will reboot again and a message about system recovery will be displayed.
Safe mode
There are cases when Windows does not even boot. For this option, you can try to restore the system using Safe Mode. To do this, when loading personal computer you need to press and hold the “F8” button.
When a menu appears with suggested boot options, select “Safe Mode” or “Safe Mode with Boot” network drivers» press “Enter”. Windows will then be able to boot into safe mode. Next, you can try to restore the system from a checkpoint, when the system was functioning stably. This is done in exactly the same way as when simply loading the operating system.
There are severely neglected situations when Windows cannot boot into any Normal mode, nor in Safe. In this case, when booting the computer, you also need to hold down the “F8” key, but at the same time select “Load the last known good configuration (with working parameters)” and press Enter.
Next, you should select the operating system to launch. It is worth taking into account that it will be possible to restore the last known good configuration only if the checkpoint option is enabled. If you are the owner of a laptop, then you can use the Recovery Disk. Such a disk is usually issued when purchasing the computer itself. Next you need to Laptop BIOS Set to boot from CD, insert the Recovery Disk into the drive and press the reboot button. The next time you start it, it will be loaded from this disk, and you just need to use the system recovery functions available on it.
In cases where standard program System recovery did not solve the problems, and there is no special recovery disk, it’s worth trying to update the system. To do this, you will need installation disk with Windows system. You need to boot the operating system in Safe or Normal mode, insert the disc into the drive and follow the instructions.
But this does not always work, and therefore sometimes the problem can be solved only by completely reinstalling Windows. In this regard, it is strongly recommended to create backups most important information. Acronis True Image can help with this.
System recovery using Acronis True Image
Acronis True Image is great program, to create backup copies of data as well as image system partition. In that difficult case, when the system does not want to start, it can be easily and quickly restored using this image. Such a program must be installed on a clearly functioning operating system. The most ideal option is to install it immediately after installation and Windows settings, other important programs, devices and drivers. Thus, even in the event of a complete system crash and the impossibility of loading, it can still be returned to its original state without viruses and freezes. The described program will allow you to create both separate archives and backup copies of audio and video files, photos and documents. In addition, they can be periodically supplemented with the necessary information.
It is best to save the image made using Acronis True Image in a separate partition hard drive in the Acronis safe zone, which is inaccessible and invisible to users, as well as to Windows and other programs, including dangerous and malicious ones.
In order to be able to resuscitate the system when the operating system is completely inoperable, you need to make sure in advance that the “Startup Recovery” option is activated in the program settings.
To create an Acronis Secure Zone, you need to select the required item in the Acronis True Image window that opens or in the Tools program menu. In the next window, click “Next”.
You must select a partition on your hard drive that will be designated for the Acronis Secure Zone. You need to tick it and click “Next”. After this, you will be asked to specify the size of the Acronis Safe Zone.
It is necessary to take into account that the allotted space should be enough for the operating system image, as well as all previously installed programs computer. Based on this, the minimum volume should be at least 3.5 gigabytes. Of course, ideally, about 40 gigabytes should be allocated for the Security Zone. This amount of memory is due to the fact that here it will be possible to save not only the system image itself, but also archives with documents and other important files created using Acronis True Image. In this case, when Windows crash nothing will be lost. It is worth noting that Acronis Secure Zone is hidden section, and therefore in Windows Explorer she won't be visible. Once the size is determined, click the “Next” button.
Be sure to check the “Activate Startup Recovery” checkbox. Using this option, if the system cannot be booted, you can still restore Windows. To continue, click “Next”.
After this, Acronis True Image will offer the user a list of intended operations. To continue, click “Proceed.” Within a few minutes you will observe the functioning of the program. After this, we can assume that the Security Zone for storing the system image has been created, the “Startup Recovery” option has been activated, all that remains is to work on creating the system partition. To do this, in the Acronis True Image window, click on the “Create archive” task.
Since you will need to create a system image for copying, check “The entire hard drive or individual partitions on it” and click “Next”. In the proposed list of partitions, select the system one on which Windows is located, and click “Next” to continue. Then you need to select a location to store the backup image - Acronis Secure Zone, mark it in the list and continue by clicking “Next”.
For the first Reserve copy section, you need to select “Create a full archive”. In subsequent cases, it will be possible to add changed folders and files to it, creating incremental archives. But at the same time, you need to remember that errors, glitches, and viruses inevitably appear on your computer during operation. In this regard, restoring a system containing viruses and errors makes no sense. But there is still a way out in this situation: it is recommended to create an archive immediately after Windows installations and setting all the necessary parameters. Then, the state of the operating system will be almost ideal.
While working at a computer, you can create other images and periodically update them with incremental archives. As a result, the user will always have two types of system partition - a state close to ideal and a current state. When you have decided on the archiving mode, click “Next” again. Then select “Use default settings.” If necessary, you can enter a comment. This is not a mandatory procedure, but it is thanks to this that in the future the user will be able to distinguish one image from another without any problems. Afterwards, click “Next”.
This completes the preparatory procedures for creating the archive. To start the backup process, you need to click the “Proceed” button.
If a system image is created in advance in the Acronis Secure Zone, then restoring an incorrectly functioning Windows will not be difficult. Let's say that the operating system has stopped loading. Then, when you try to boot, the message “Press F11 for Acronis Startup Recovery Manager...” will be displayed; when you see it, you can press F11 without hesitation. This button will launch the Acronis True Image bootloader and begin recovery. When presented with download options, you will need to select "Acronis True Image ( full version)", then wait a couple of seconds for the program to load. In the window that appears, select “Recover data”. After launching the Data Recovery Wizard, click “Next”.
Afterwards, select the archive to restore. You will need an image of the system partition that was previously saved in the Acronis Secure Zone, click “Next”. After this, you need to note what exactly you want to restore: and “Next” again. After that, select the partition to be restored and “Next”. Then select the partition to which the system image will be restored. It will be necessary to replace partition C: with a non-working Windows system with partition C: with a working system taken from the Acronis archive. To do this, mark “NTFS(C:)” and click “Next”. After, select the partition type and select “Active” for the system partition. Then you will need to set the size for the partition to be restored. At this point, you can skip making changes and click “Next”. After that, assign a partition letter. For system, select “C:”. You can also configure Acronis True Image to scan recovered files and archives. If you are currently restoring one partition, then when the program asks about restoring others, select the answer “No, I don’t want” and finally click “Next”. Then it is recommended to carefully check the recovery options and click on “Proceed”. Over the next few minutes, you will watch the progress of this operation.
After the system partition recovery process is completed, a message will appear indicating that the data was successfully recovered. Next, click the cross in the upper right corner to close the Acronis True Image window. As you can understand, this program is quite easy to work with, and its advantages are quite significant. After all, if there is an archival Windows image there will be no need to reinstall the system.
In order to avoid data loss, just follow a few simple rules:
- At certain intervals, make backup copies of important information or create images of system partitions.
- Use reliable protection against viruses and hacker attacks. Regularly update your antivirus and correctly configured firewall. It is also strongly recommended to do a full scan of your computer for viruses.
- Install updates that can fix critical problems in programs.
- Even Windows work stable, you still need to create recovery checkpoints.
- To experiment with different programs, it is recommended to use virtual computer. It can be created in programs such as Virtual Box or VMware Workstation.
Do you know what? In Windows, you cannot create a folder called "Con". There are a lot of hidden system folders, which appeared back in the days creating Windows, Con is a command for one of the services, so you cannot name the folder that way. There is also a beautiful legend that Bill Gates banned this file name because he had such a nickname at school - con (something like “cramming, nerd”). Do you know what? On the European Internet, and mainly in the UK, there are general rules ethics of behavior on the site. An English proverb says: good habits are better good principles, and good manners are better than good habits. When a person goes to any site there, he receives from it necessary information, then as a sign of respect he leaves his opinion in the comments. In Russia, the ethics of behavior on the Internet defy description. If there are cultured people, then they are a minority, and mostly they are lovers of freebies, and even those who will not even say thank you for downloaded programs for free. A person’s behavior in society is a kind of calling card, by which you can find out not only how he was raised and where he grew up, but also how he treats people and how comfortable his life is. Rules of good manners regulate our communication literally everywhere: at a party, on a trip, at work and even on the Internet! Did you know that: 1. Champagne was invented by the British, and not by the French, as is commonly believed. 2. The bikini swimsuit, invented in 1946, was named after the tiny island of Bikini, where the Americans conducted nuclear tests after World War II. 3. In 1998, miracle tights were invented - with three legs - the third leg was supposed to be used if one of those the girl was wearing broke. 4. Great Britain is the only country in the world that does not print its name on postage stamps, because it was in Great Britain that these same stamps were first issued. 5. The roller coasters known to us are called Russian all over the world, because the attraction originates from sledding on ice slides, which was invented in Russia. 6. The first puzzles, which appeared at the end of the 18th century, were not intended for play at all, but were used as teaching aids- they were used to study the borders of countries. 7. The “@” sign was not invented at all for the Internet, but was used back in the Renaissance - then it denoted a measure of weight equal to 12-13 kg. 8. The first indoor swimming pool appeared in London - it opened on May 28, 1742. 9. Henry Ford did not invent the conveyor belt at all and was not even the first to use it in the automotive industry. 10. Customers at the Harrods store in London who dared to ride the world's first escalator installed in the store were treated to brandy - so that it would not be so scary. Did you know that the now popular 3D format has quite a long history. The Guinness Book of Records recorded the very first showing of a 3D film in history - this happened back in 1915 in New York. Produced by Edwin Porter and William Waddell, the film consisted of various pieces depicting, among other things, dancing girls and Niagara Falls. To create a 3D effect, spectators were given glasses with red and green (not blue, as now) lenses. Did you know that the Great Red Spot on the planet Jupiter is a giant anticyclone that has lasted for at least 350 years (counted since it could be seen from Earth), but perhaps it has existed much longer. It can reach up to 40,000 km in length and 14,000 km in width. This vortex rotates counterclockwise at a speed of 300-500 km/h (in different parts). Did you know that people have been finding bones of dinosaurs and other prehistoric animals for centuries, but began to understand their true origins only recently - in the early to mid-19th century? Thus, in China, dinosaur bones have always been considered the remains of ancient dragons (and even the term in modern Chinese used to refer to dinosaurs actually translates as “terrible dragon”). In Europe, there were different theories about the origin of huge fossils - some scientists talked about the bones of giants or giants who died in the Flood, while others talked about the remains of heroes of the Trojan War. Did you know that the “neon lights” so beloved by all visitors to Las Vegas (and with them writers, directors and other people trying to convey the atmosphere of this most interesting city) are actually not all that we used to call them. Neon, an inert gas, is used only to produce a red glow. For lamps of other colors, different substances are used - for example: for yellow color- sodium, and for blue - mercury. Did you know that the South Pole is colder than the North Pole? Thus, according to recent information, the average temperature at the South Pole was approximately -48′C, while at the North Pole it was only -29′C. Moreover, due to faster melting of snow and underwater currents, the average temperature at the North Pole is rising faster than at the South Pole (and the average summer temperature at the North Pole is generally about 0′C). The explanation for this fact is quite simple: Antarctica is a continent covered with ice, while the Arctic is an ocean covered with ice. In this case, water acts as a “reservoir” of heat, in contrast to a solid ice continent, which, on the contrary, retains cold. The much larger masses of ice in Antarctica are also important. In addition, the South Pole itself is at a higher elevation (about 2800 m) than the North Pole, which is at sea level, and higher elevation almost always means a colder climate. Friends! Don't forget to leave your comments and ratings for articles, and also subscribe to our news!
System Restore is one of those computer functions that I think everyone should know. After all, sometimes, even an experienced technician cannot always determine for what reason a particular computer failure occurred. However, the developers windows systems foresaw this and it was for such cases that they came up with such a function as, system rollback until she was fine.
In what cases is it necessary to perform a Windows system restore?
I won’t go far and give an example from my own situation.
One day it happened that I had a “fly” Microsoft program Office Word, some kind of glitch occurred in it, and it stopped starting! This was really a problem for me, because I work in this program very often and my husband, I had a licensed program. That is, I lost not only the program, but also the money I paid for it. At first, I started to panic, but one computer geek I know tells me: “ Why don't you do a system restore?", I speak - " Will she help get the program back?", He - " Certainly!" I thought, trying is not torture, in extreme cases, I have nothing to lose. In the end, I completed Windows 7 system recovery, and lo and behold, the program worked!
So you can do a system rollback not only when you installed something wrong (until now I only used it in such cases), but also when some serious program crashes.
On what principle does system rollback work in Windows 7 and Windows XP?
The principle of system recovery is quite simple. Your Windows OS makes system restore points. What are these dots?
Points are a conditional name, because in fact, a recovery point is a saved copy of the system at the moment when your system is working normally and without errors. That is, the OS itself remembers its normal operating state and makes a note to itself that if some kind of failure occurs, or if we install something wrong on our computer, it should return to such and such a point . I hope the answer is clear. By the way, this answer may lead to another question for you - where does it store a copy of the system? And really, where, who knows, there are several such copies, where do they all fit? Let's figure it out.
To do this, let's go back a little to the time when you just... Most often, during installation, the disk space is divided into two partitions (if you have one partition, be sure to split it, I told you how to do this in the article) one system and the other for everything else (games, movies, your videos, photos and etc.). But, if you have ever noticed, several gigabytes disappear somewhere after installation. Those. for example, when I bought a computer, it was stated that HDD has a capacity of 720 gigabytes. Now look at the picture below.
One disk has a capacity of 98 gigabytes, the other has 600, for a total of 698, that is, 22 gigabytes have disappeared somewhere. It is these 22 gigabytes that are the very memory in which all my system restore points are stored. By the way, this is not the limit, on many computers much more disk space is allocated for this matter, for example, on my laptop, which I bought not so long ago, as much as 40 gigabytes are allocated for the “Windows 7 System Restore” function!
Well, now, let me tell you how to roll back a Windows 7 and xp system. By the way, if you noticed, I say either rollback or recovery, don’t be alarmed, they’re the same thing. So let's get started.
How to perform a system restore on Windows 7 and Vista?
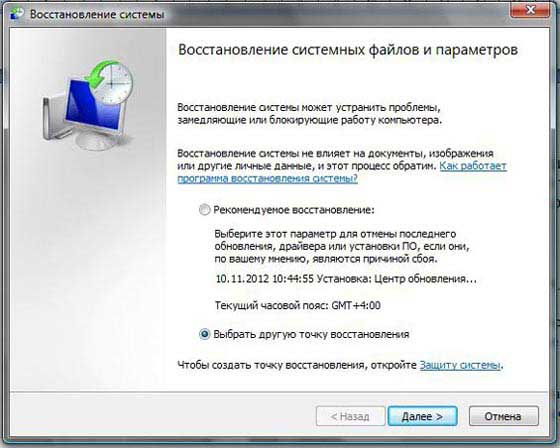
Since these two OS System Restore happens the same way, then I will show everything on example windows 7.

A small digression. If you see in the screenshot above, under the heading Description, the reason why a restore point was made is written, this reason is “Center Windows updates" Those. if after the update some strange errors began to appear, or the OS began to take longer to load, then you can do Windows 7 system rollback before it worked without this update. But the reason for the appearance of the point can be not only the update, also, in this line you can see the inscription “Planned recovery point” or something like “Install SUCH PROGRAM”, “Remove SUCH PROGRAM”. Of course, in place of SUCH PROGRAM there is the name of some serious program, like Microsoft Office Word.
We're distracted, let's continue
After which, the process itself will begin. Do not restart your computer until everything is finished. At the end, the computer will reboot and you should see a window indicating the successful completion of this special operation.
In Windows Vista everything is almost the same. Only the first window that opens is very different.
How to restore windows xp system?
To begin with, I would like to warn owners of computers that have old windows versions xp, they may not have such a function as System Restore.
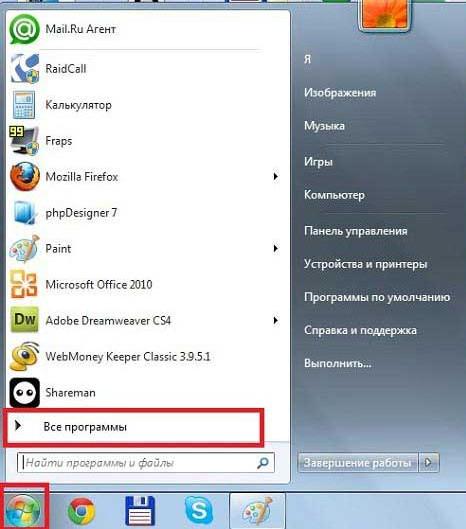
Unfortunately, I can’t show you with screenshots how to perform the same operation in Windows XP. But I know for sure that it is done in the same way, i.e.: Start -> All Programs -> Accessories -> System Tools -> System Restore. As you can see, everything is simple, then you just need to choose for what number you want to do it Windows xp system rollback, and then the process itself will go on.
Let me take my leave with this.
P.S. For clarity, I recorded a video lesson; it lasts only five minutes, so watch it to reinforce the material.


