Now there are many Windows users 10 are concerned about the safety of their confidential data. After all, it has already been mentioned in many sources as a system that sends all collected information to Microsoft and other partners of the corporation, not to mention the many cloud functions that the user may not even be aware of.
Those who do not agree with this corporate policy can disable the data collection feature on their system using the instructions in this article.
Note! This article will discuss only the standard options for disabling the sending of user data provided in Windows system 10. Methods for removing related services will not be discussed here. This is due to the fact that such actions can disrupt the stable operation of your system.
Also, we hasten to warn you not to use third-party software that allows you to increase the privacy of Windows 10. Many scammers quickly realized that they can take advantage of users’ concern for their data and now, under the guise of programs for setting up the system, they distribute various viruses.
Confidentiality
From the Start menu, open System Settings and go to the Privacy section. Here you can manage various settings related to private data on your computer. You can disable geolocation, turn off the camera, and block access to the microphone. Here you can turn off sending contact information, turn off calendar synchronization and message tracking, and much more. Dig through all the tabs and turn off everything unnecessary. For example, you can turn off the following options:
- Open the Speech, Handwriting, and Text tab and deactivate sending information to voice assistant Cortana;
- Open the Feedback and Diagnostics tab and set the appropriate level for sending your statistics to Microsoft. Here you can choose from complete data to only the most basic. Unfortunately, standard means disable this function impossible. There is only the option to disable telemetry through the AllowTelemetry policy, but this is only available for enterprise versions of Windows 10.
Synchronization
Synchronization works due to integrated into the system OneDrive service, which works with the Microsoft cloud. This service allows you to store various files and documents in the cloud, as well as settings for account. By logging into your account on any computer or device, you'll be able to access your documents, settings, browser settings, and more. Those who do not want to store their documents and personal data in the cloud can disable this feature.
Go to the account settings and open the settings synchronization tab, then, next to the “Synchronization Settings” item, move the switch to the “off” position. 
This is a standard antivirus program that is built into the system. The main purpose of which is protection against various malicious software. If you install any other third-party antivirus, the standard defender will simply turn off, allowing its “colleague” to do all the work.
Attention! By disabling Windows Defender and not installing additional antivirus program, you can seriously reduce the security of your system.
Here you can turn off the “Cloud Protection” function, as well as “Sending detected malware for study.” In addition, it is possible to add files to exceptions that will not be scanned by Defender. 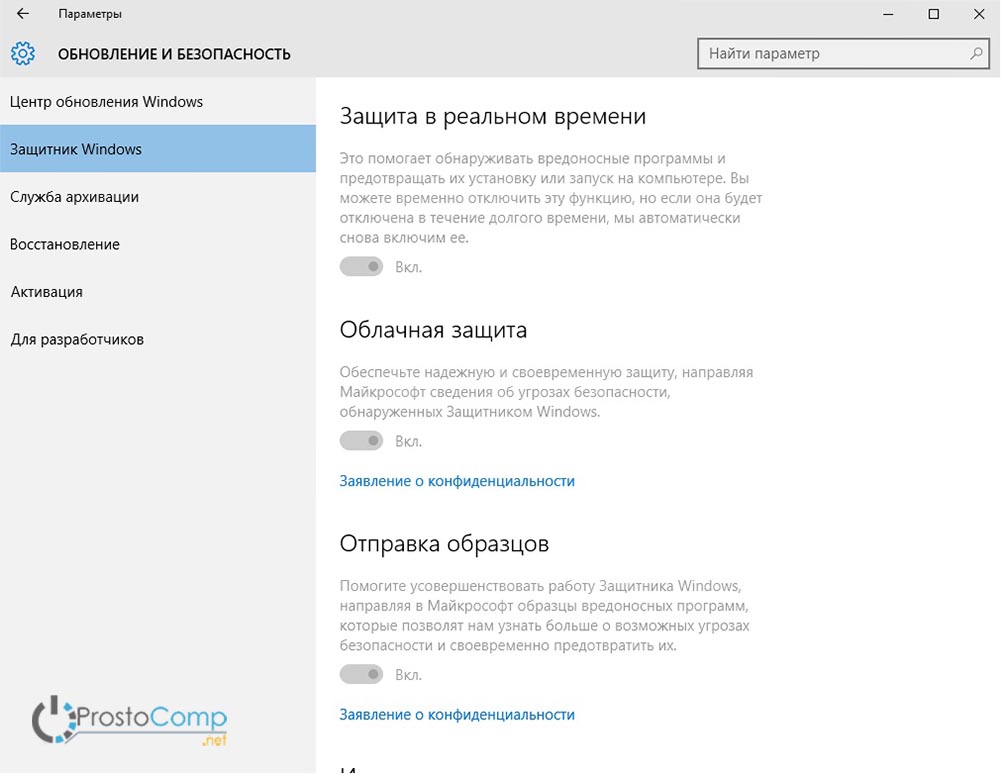
SmartScreen
For more information on how you can change the settings for this service and even disable it completely, read this article: 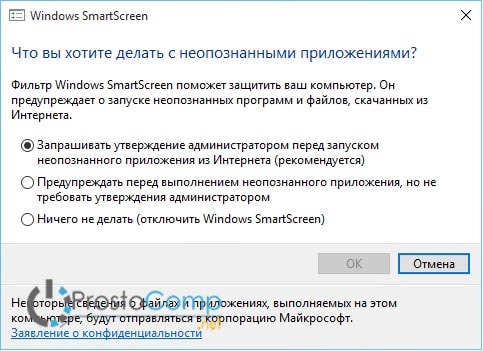
This operating system introduced new opportunity receiving updates via P2P technology. For example, having received an update on your computer, you can distribute it to all devices that are in the same local network or those located on the Internet.
Some people may not like this method of receiving updates. If you think that this is far from the best The best decision for the security of your computer, you can change the settings to receive updates.
To do this, open System Settings through the Start menu. In the next window, click on “Update and Security” and then go to “Center” Windows updates" In the update center, select " Extra options" and in it open the section "Choose how and when to receive updates. 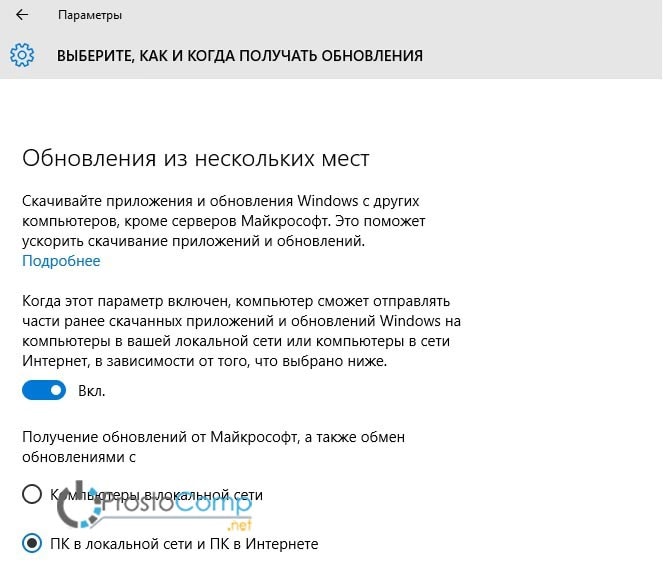
13.07.2009 19:01
Pop-up lists in the Start menu - new Windows feature 7. Some users find it convenient, others are confused by the fact that the pop-up lists store the history of files opened on the computer and the history of visits to web pages.
If you belong to the second category of users, then you can easily disable the storage and display of opened elements:
1. Right-click on the taskbar.
2. In the appeared context menu select Properties.
3. Go to the tab Start Menu.
4. Uncheck the box Store and display a list of recently opened items in the Start menu and taskbar.
5. Click OK.
After performing these operations, the history of opened items will not be saved. If you want complete privacy, then enable clearing of your browsing history in all Internet browsers you use.
Disabling history in the Opera browser
1. Open Tools -> Settings -> Advanced -> History and check the box Clear on exit. On the same page in the drop-down list Addresses select 0 and press Clear.
2. Open Tools -> Settings -> Advanced -> Cookies, and check the box Delete new Cookies when exiting Opera.
3. Click OK.
Please note that after closing Opera, some information about the sites you visited will still remain. Therefore, if you need to completely clear the history, then before closing Opera, press Tools -> Remove personal data.
In Firefox browser
A) IN Firefox versions 3.0.x and previous:
1. Open Tools -> Settings -> Privacy.
2. Uncheck items Remember your browsing history for at least 0 days, Remember download history, Remember search history and form data.
3. Check the box Clear history when closing Firefox, and opposite this item click the button Options..., and check all the boxes in the window that appears.
B) In Firefox versions 3.5.x and later:
1. Open Tools -> Settings -> Privacy.
2. From the drop-down list, select Firefox won't remember history.
3. Click OK.
In Internet Explorer browser
1. Open Tools -> Internet Options.
2. On the tab Are common tick the box Delete browsing history on exit.
3. On the tab Additionally check the box Delete all files from the Temporary Internet Files folder when closing the browser.
4. On the tab Confidentiality set the slider to level Moderately high.
5. Save changes by clicking the button OK.
In addition to all of the above, periodically you need to do a complete cleaning hard drives from excess garbage. To do this, open the folder Computer and right-click on the logical drive. Select Properties and press the button Disk Cleanup. In the window that appears, check all the boxes and agree to the operation of deleting files.
We also recommend that you use CCleaner program, which not only cleans your computer’s disks of unnecessary logs, temporary program files, and unnecessary system restore points, but also corrects registry errors that often arise, for example, when uninstalling applications.
Security and privacy
Windows 10 runs on more than 400 million devices, but it still has all the privacy concerns - including mandatory diagnostic and data usage reports from Microsoft - and copious amounts of advertising permeate the platform.
Not all Windows problems 10 can be fixed, but there are some things you can do to restore your privacy. Here are five privacy-related settings you can change for a more secure Windows 10 experience.
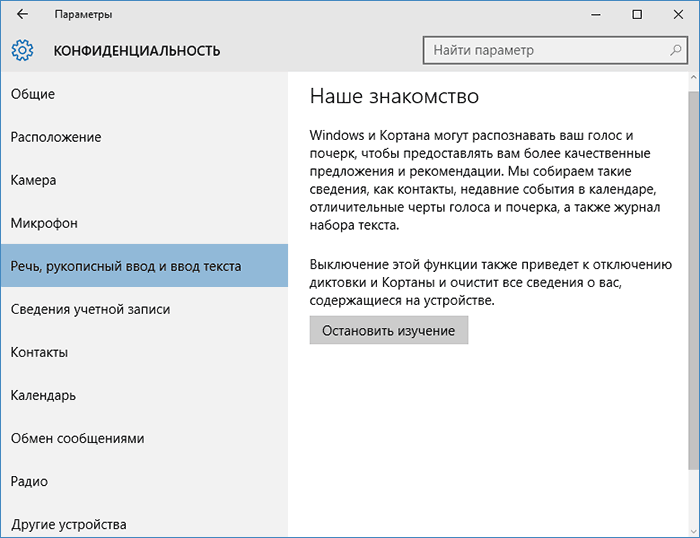
Stop Cortana from learning about you.
To make Cortana the best virtual personal assistant, it will ask you early on if it can "learn you" about how you interact with the device, namely your speech, handwriting and typing patterns. The "learn about you" feature also allows Windows 10 to collect other information about you, including your calendar, contacts, location, and web browsing history, according to Microsoft's privacy statement.You can stop Cortana from learning about you. If you do this, you will not be able to use voice communication with Cortana, and all personal information that Cortana has collected about you will be cleared.
To turn this off, open the options menu, click the Privacy tab, and go to the Speech, Handwriting, and Text section. Under the heading "Getting to Know You", click the "Stop Study" button. This will turn off dictation and delete all collected information from the device.
Turn off your location.
If you are using mobile device, such as a tablet or laptop, there are times when you have allowed Windows 10 and third party applications access your location. But that doesn't mean you have to leave your location turned on all the time. When your location is turned on, Windows 10 stores your devices' location history for 24 hours and allows location-enabled apps to access that data.If you turn off your location, apps that use this data (such as the Maps app) will not be able to find you. However, you can manually set a default location that apps can use as an alternative.
To turn off your location, open Settings > Privacy and go to the Location section. You can either turn off location for all users (under "Location of this device > Change"), or you can turn off location services for your account (Location Services). From this menu, you can also clear your location history and allow certain apps to see (or not see) your exact location. Apps in the list will receive location information if they use historical data.
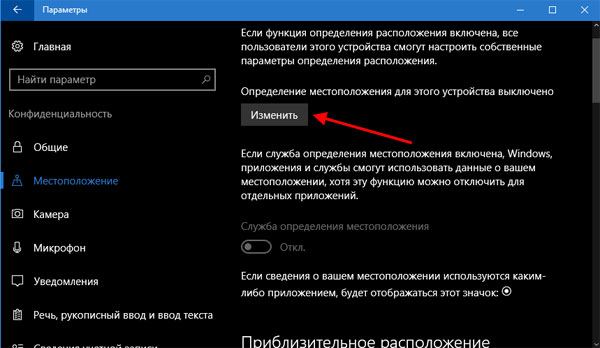
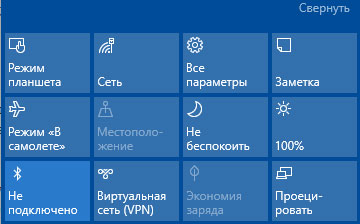
For fast switching location services, open the notification center; There is a "Location" switch in quick settings(next to Do Not Disturb).
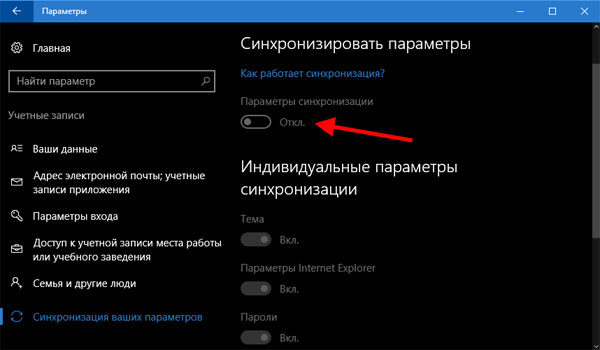
Stop synchronization.
There's a lot that syncs in Windows 10. If you sign in with a Microsoft account, your settings, including passwords, can be synced across other devices that you sign in to with the same account. Your notifications can also be synced across all devices.If you turn off sync, your settings and passwords won't sync across other devices when you sign in with a Microsoft account (so you'll need to do things like enter passwords manually).
To turn off syncs, open the Settings menu and navigate to Accounts > Sync your settings. You can either turn off all sync settings at once, or toggle individual sync options.
To turn off sync notifications, open Cortana (Cortana does not work in Russia, so residents of the Russian Federation do not need to do the following) and go to Settings > Send notifications between devices. You can turn off this setting to turn off all sync notifications, and you can also click the "Change sync settings" button to manage your various devices.
Disable information on the lock screen.
The lock screen is the first thing a user will see when they turn on their device, and this screen can display a lot of information that you don't want to show to strangers.Here are three things you need to do to lock your lock and login screens.
Make sure your notifications don't appear on your lock screen. Open the Settings menu and select System > Notifications & Actions and turn off Show notifications on lock screen. The downside to turning this feature off is that you won't see any notifications until you unlock your device.
![]()
Disable Cortana on the lock screen (residents of the Russian Federation do not need this), open Cortana and go to Settings> Use Cortana even if my device is locked. The downside to turning this feature off is that you won't be able to use Cortana while your device is locked.
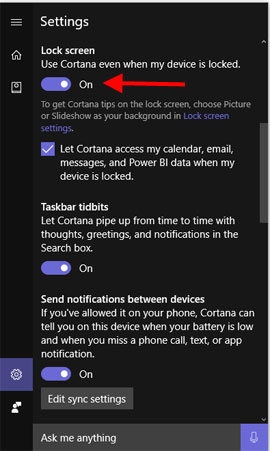
You can also limit its presence on the lock screen (rather than disabling it completely) by unchecking the box next to "Allow Cortana to access my calendar, email, messages, and Power BI when my device is locked." This way, you'll still be able to ask Cortana questions that don't reveal any personal information while the device is locked.
To hide your address Email On the login screen, open the Settings menu and go to Accounts > Sign-in Options > Privacy. Turn off the toggle under "Show account information (such as email address) on sign-in screen." There's almost no hidden point in turning this feature off if you really like seeing your email address on the screen.
Disable advertising identifier.
Each account Microsoft entry has a unique advertising identifier that allows Microsoft to collect information about you and deliver personalized advertising to different platforms. When you sign in to Windows 10 with a Microsoft account, these personalized ads will follow you to your computer, you'll see them in apps and possibly in the operating system itself (for example, in the Start menu).To remove these ads in Windows 10, open the Settings menu and go to "Privacy > General > Allow apps to use my Ad Recipient ID (disabling this setting will reset the ID)" and disable this feature. You will still see ads, but they will not be personalized to your tastes and preferences.

Disabling this feature will stop personalized ads from popping up in Windows 10, but it won't necessarily stop personalized ads from popping up for you when you use your Microsoft account on other platforms. To get rid of ads on other platforms, such as browsers, go to Microsoft's personalized advertising page and turn off the "Personalized ads in this browser" toggle.
Since release new version OS from Microsoft, a lot of information has appeared on the Internet about Windows 10 surveillance and that the OS spies on its users, inexplicably uses their personal data and more. The concern is understandable: people think that Windows 10 is collecting their personalized personal data, which is not entirely true. Just like your favorite browsers, websites, and even the previous version of Windows, Microsoft collects anonymous data to improve the OS, search, other system functions... Well, and to show you advertising.
You can configure settings for transferring and storing personal data in Windows 10 already in the installed system, as well as during its installation. Below we will first look at the settings in the installation program, and then in the system already running on the computer. Additionally, it is possible to disable tracking using free programs, the most popular of which are presented at the end of the article. Attention: one of the side effects of disabling Windows 10 spying is the appearance of the inscription in the settings.
Setting up personal data security when installing Windows 10
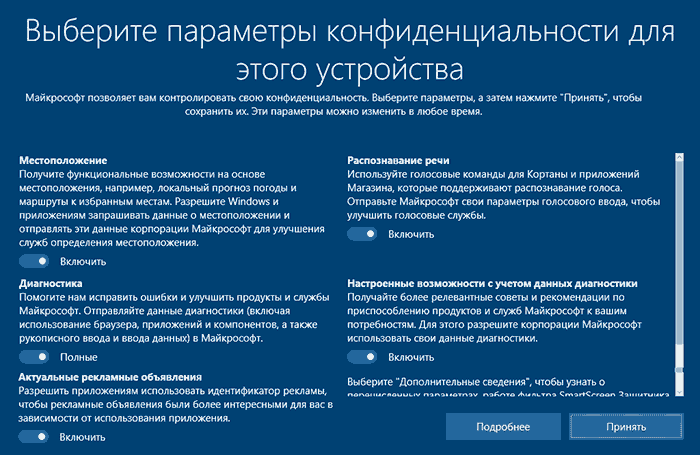
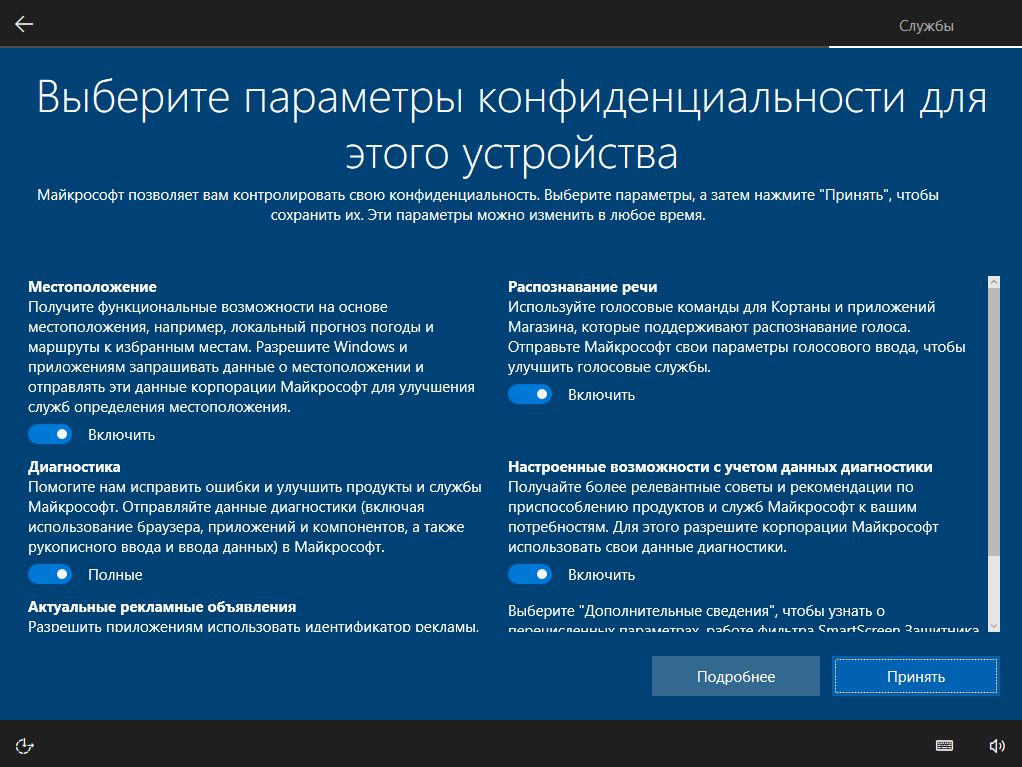
One of the steps in installing Windows 10 is setting up some privacy and data usage settings. Starting with version 1703 Creators Update, these parameters look like the screenshot below. To disable, the following options are available to you: location determination, sending diagnostic data, selection of personalized advertising, speech recognition, collection of diagnostic data. If you wish, you can disable any of these settings.
During installation of Windows 10 versions before the Creators Update, after copying files, rebooting for the first time, and entering or skipping your product key (and possibly connecting to the Internet), you will see the Boost your speed screen. If you click “Use standard settings”, then the sending of many personal data will be enabled, but if you click “Customize settings” at the bottom left, then we can change some privacy settings.
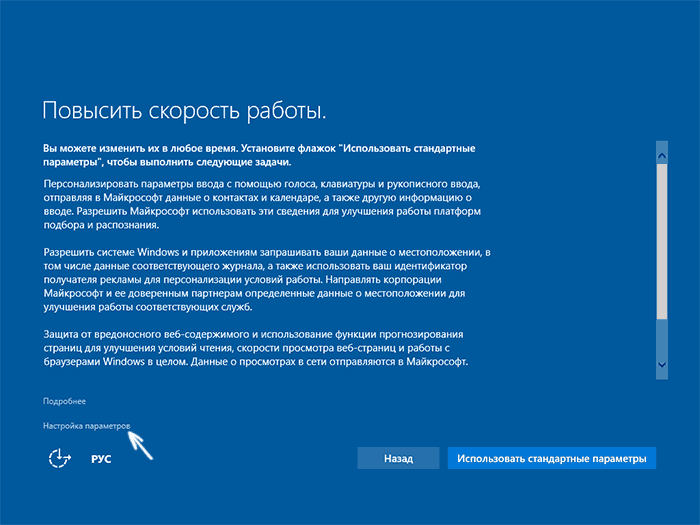
Configuring settings spans two screens, the first of which includes options to turn off personalization, sending keyboard and voice input data to Microsoft, and location tracking. If you need to disable Windows 10 spy features entirely, you can disable all items on this screen.
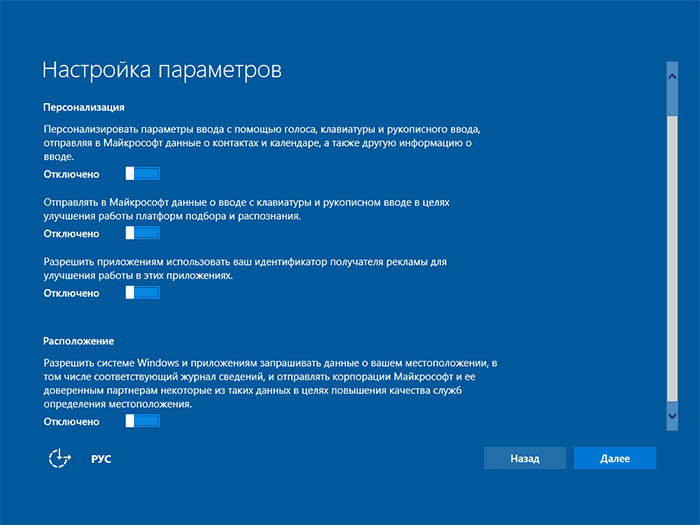
On the second screen, in order to avoid sending any personal data, I recommend disabling all functions (page load prediction, automatic connection to networks, sending error information to Microsoft), except for “SmartScreen”.

This is everything related to privacy that can be configured when Windows installation 10. Additionally, you can not connect a Microsoft account (since many of its parameters are synchronized with their server), but use a local account.
Disable Windows 10 tracking after installation
In Windows 10 settings, there is an entire “Privacy” section for configuring relevant settings and disabling some functions related to “spying”. Press the Win+I keys on your keyboard (or click on the notification icon, and then “All settings”), and then select the desired item.
The privacy settings have a whole set of items, each of which we will consider in order.
Are common
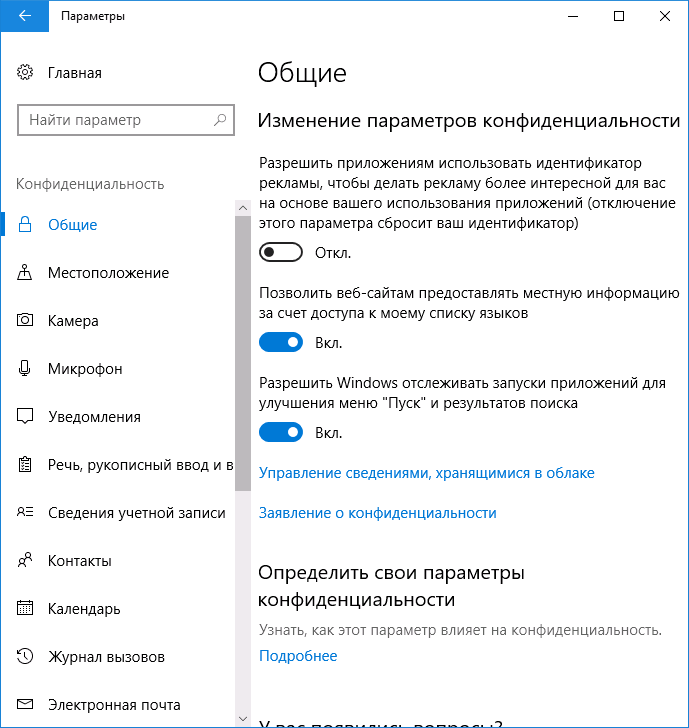
- Allow apps to use my ad recipient ID - turn off.
- Enable SmartScreen filter - enable (the item is not included in the Creators Update).
- Send my writing information to Microsoft - turn off (the option is not available in the Creators Update).
- Allow websites to provide local information by accessing my language list - turn off.
Location
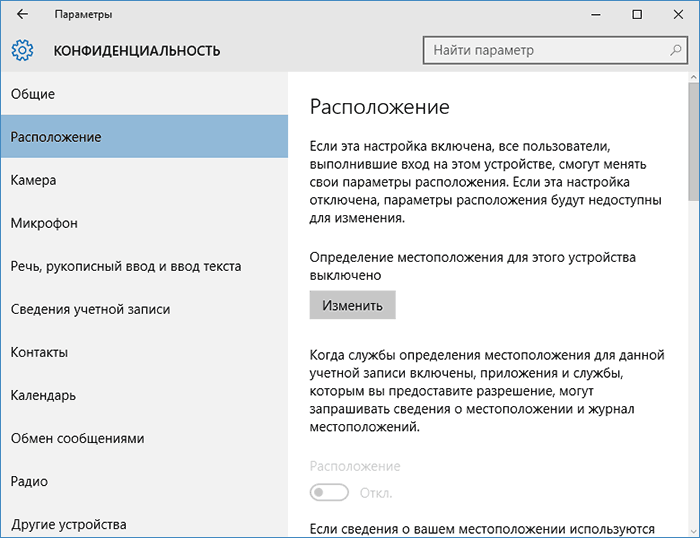
In the “Location” section, you can disable location detection for your computer as a whole (it is also disabled for all applications), as well as for each application that can use such data separately (below in this section).
Speech, handwriting, and text input
In this section, you can disable tracking of your typed characters, speech and handwriting input. If you see a “Meet Me” button in the “Meet Me” section, this means that these functions have already been disabled.
If you see a “Stop learning” button, click it to disable the storage of this personal information.
Camera, microphone, account information, contacts, calendar, radio, messaging and more
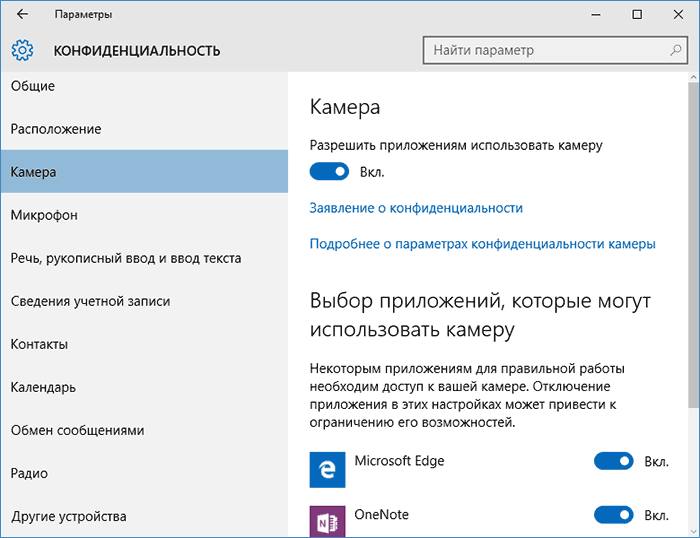
All of these sections allow you to turn off the use of relevant hardware and data on your system by applications (the safest option). They can also allow their use for certain applications and prohibit them for others.
Reviews and diagnostics
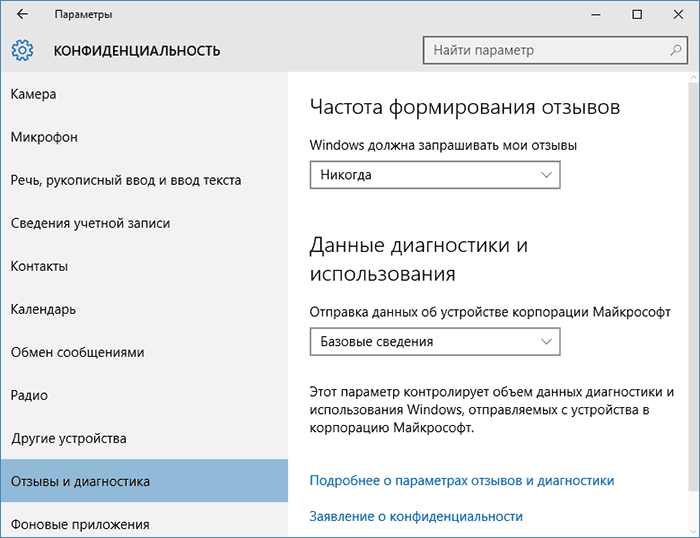
Set “Never” to “Windows should ask for my feedback” and “Basic information” (“Basic” amount of data in the Creators Update) to the paragraph about sending data to Microsoft if you do not want to share information with it.
Background applications
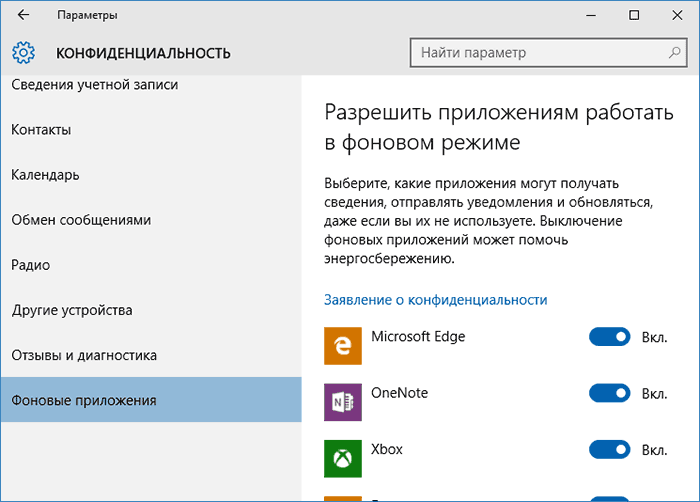
Additional options that may make sense to disable in the privacy settings (for Windows 10 Creators Update):
- Applications' use of your account information (under Account Information).
- Allow applications to access contacts.
- Allow applications to access email.
- Allow applications to use diagnostic data (in the Application Diagnostics section).
- Allow applications to access devices.
An additional way to give Microsoft less information about yourself is .
Additional privacy and security settings
For greater security, you should also perform a few more steps. Return to the All Settings window and go to the Network & Internet section and open the Wi-Fi section.
Disable the options “Search for paid plans for nearby recommended open hotspots” and “Connect to suggested open hotspots” and Hotspot 2.0 Networks.

Go back to the Settings window, then go to “Update & Security”, then in the “Windows Update” section, click “Advanced options”, and then click “Choose how and when to receive updates” (link at the bottom of the page).
Disable receiving updates from multiple locations. This will also prevent other computers on the network from receiving updates from your computer.

And, as a final point, you can disable (or manually start) the Windows Diagnostic Tracking Service, since it also sends data to Microsoft in background, and disabling it should not affect the performance of the system.
Additionally, if you are using a browser Microsoft Edge, look into additional settings and disable the forecasting and data saving functions there. Cm. .
Programs to disable surveillance Windows 10
Since the release of Windows 10, many free utilities have appeared to disable spyware. Windows functions 10, the most popular of which are presented below.
DWS (Destroy Windows 10 Spying)
DWS is the most popular program to disable Windows 10 tracking. The utility is in Russian, is constantly updated, and also offers additional options (, removing built-in applications).
![]()
O&O ShutUp10
The free program for disabling Windows 10 surveillance O&O ShutUp10 is probably one of the simplest for a novice user, in Russian and offers a set of recommended settings for safely disabling all tracking functions in 10.
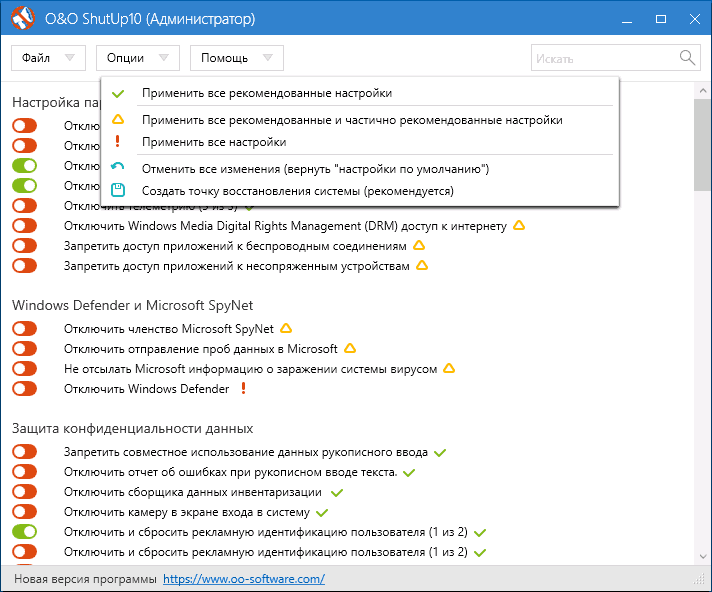
One of the useful differences between this utility and others is detailed explanations for each disabling option (called by clicking on the name of the parameter being enabled or disabled).
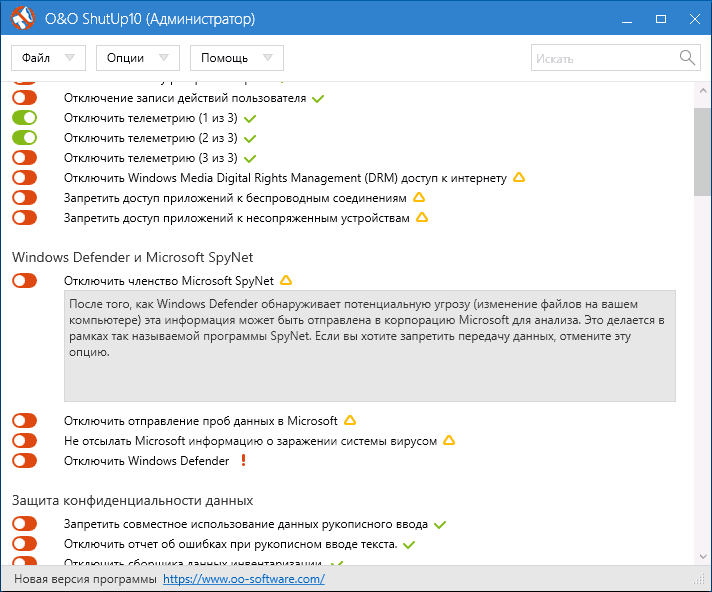
You can download O&O ShutUp10 from the official website of the program https://www.oo-software.com/en/shutup10
Ashampoo AntiSpy for Windows 10
In the original version of this article, I wrote that many free programs have appeared to disable spyware. Windows features 10 and did not recommend using them (little-known developers, quick release of programs, and therefore their possible imperfection). Now one of the fairly well-known companies, Ashampoo, has released its AntiSpy utility for Windows 10, which, it seems to me, you can trust without fear of ruining anything.
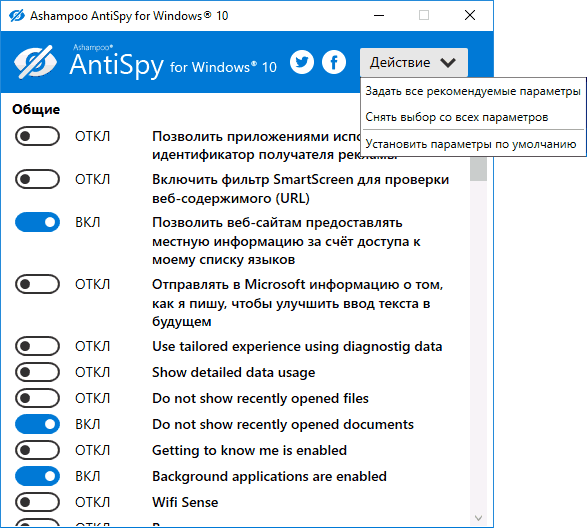
The program does not require installation, and immediately after launching you will have access to enable or disable all available user tracking features in Windows 10. Unfortunately for our user, the program English language. But even in this case, you can easily use it: just select the Use recommended settings item in the Action section to immediately apply the recommended personal data security settings.
You can download Ashampoo AntiSpy for Windows 10 from the official website www.ashampoo.com.
W.P.D.
WPD - another quality free utility to disable tracking and some other functions of Windows 10. One of the possible disadvantages is the presence of only Russian interface language. One of the advantages is that this is one of the few utilities that supports Windows version 10 Enterprise LTSB.
The main functions of disabling “spying” are concentrated on the program tab with the image of an “eye”. Here you can disable policies, services, and tasks in the Task Scheduler that are somehow related to the transfer and collection of personal data to Microsoft.
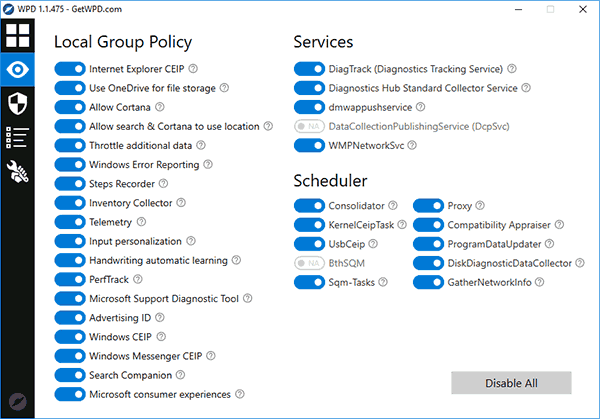
Two other tabs may also be interesting. The first is Firewall Rules, which allows you to configure rules in one click Windows Firewall 10 in such a way that Windows 10 telemetry servers and Internet access are blocked third party programs or disable updates.
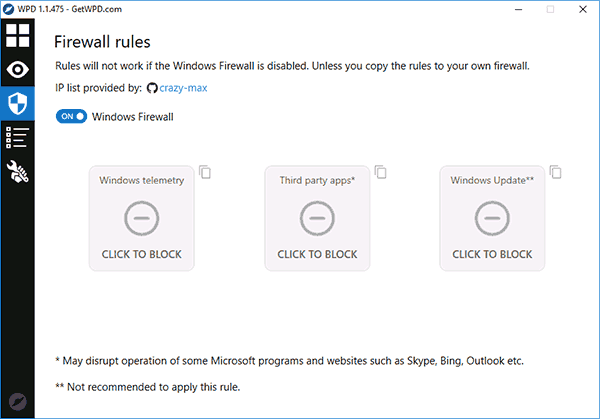
The second is convenient removal of built-in Windows applications 10.

You can download WPD from the official website of the developer https://getwpd.com/
Additional Information
Possible problems caused by Windows 10 anti-spying software (create restore points so you can easily roll back changes if necessary):
- Disabling updates while using default settings is not the safest or healthiest practice.
- Adding multiple Microsoft domains to hosts file and firewall rules (blocking access to these domains), subsequent possible problems with the operation of some programs that require access to them (for example, problems with Skype).
- Potential problems with the operation of the Windows 10 Store and some sometimes necessary services.
- If there are no restore points, it is difficult to manually return the settings to the initial state, especially for a novice user.
And in conclusion, the author’s opinion: in my opinion, the paranoia about Windows 10 spying is overblown, and much more often we have to deal with the harm of disabling surveillance, especially for novice users using free programs for these purposes. Among the functions that really interfere with life, I can only mention “recommended applications” in the Start menu (), and among the dangerous ones - automatic connection to open Wi-Fi networks.
What seems especially surprising to me is the fact that no one blames their Android phone or browser so much for spying ( Google Chrome, Yandex), social network or a messenger that sees, hears, knows everything, transfers it where it should and should not, and actively uses personal, not impersonal data.
11 April Microsoft company opened the Windows 10 Creators Update to more than 400 million Windows users - after all, the largest ever this moment update.
Our impressions so far: While Microsoft has done a good job and many users have been able to update their systems without any problems, the devil is again in the details. We will tell you how not to fray your nerves when installing this update and then work with it safely.
Preparing for the Creators Update
This essential advice applies to all major Windows 10 updates: don't rush headlong into the undertaking, but do your preparatory work first.
In theory, even a child can handle installing the Creators Update (we talked about the most interesting innovations in this update in the article “”), but if problems suddenly arise during it, you may find yourself with a permanently damaged system. Thus, be patient for some more time and improve your existing Windows first.
1 Check the existing Windows
You should start migrating to the Creators Update only if your installed system doesn’t cause any particular problems - you wouldn’t run a marathon while lying in bed with the flu. When " blue screen"and other problems with Windows, there is only one rule: first solve the main problems and only then take on the Creators Update. To do this, you can simply run a scan, which will tell you about the state of your system in a minute.
Open the Run window using the Win+R keys. In it, enter the command “perfmon /report”, Windows will handle the rest on its own. As a result, you will find out what the actual problems are operating system. Review the report and update your drivers through Device Manager. In Software Administrator, view all installed programs.
2 Making room for the Creators Update
The Creators Update download file weighs from 3.1 to 4.1 GB, depending on the version. However, we are not yet talking about the space that will require updating. Launching Creators Update is carried out as a system installation. The installer first moves the existing system, then installs the upgrade, and only then returns the previously archived data.
Thus, the disk space will be occupied in the same amount as when installing a fresh Windows 10. For the 32-bit version you will need 16 GB of disk space, for the 64-bit Microsoft requires at least 20 GB. To clear up such space, you will likely need to use Windows Disk Cleanup or an additional utility such as CCleaner.
If deleting temporary files does not help, you will have to get rid of the data in another way. Forgotten files prefer to accumulate in the “Downloads” folder, as well as in collections of music, photos and videos.
3 Making backups
Once your Windows is in order and you've freed up enough disk space for the Creators Update, it's time to make your backups. Yes, you read that right, it is recommended to create several copies. First, record a complete image of the entire system, allowing you to restore it in case of problems.
They will cope with this task perfectly special programs, including free Macrium Reflect Free. The paid version of this utility can also archive files, but you can turn to free software, for example, Personal Backup. The meaning of actions: first backup copy saves your system, the second - important information user.
4 Preparing drivers
Most problems installing major Windows updates are caused by faulty drivers. They can cause minor difficulties, such as problems with sound settings, or they can crash the entire system in the case of corrupted drivers network card or incompatibility of video card drivers.
What are the minimum measures that should be taken? Keep a second computer ready, through which you can download drivers and utilities in an emergency.
5 Remove antiviruses and system utilities
 When updating Windows, conflicts with system utilities often arise. This can happen with third-party antiviruses, tuning programs, encryption tools, and anything that penetrates deep into Windows.
Is it really necessary to get rid of all these programs? Yes, if you want to be sure. In any case, the mandatory program includes removing hard drive encryption tools. But also with other special options, such as systems with double loading Windows with Linux, you should assume that the Creators Update will not cope with the configuration.
Exotic situations include transferred user folders. Before updating, they should be returned to the “C:” drive.
Privacy in Creators Update
Microsoft has backed down and strengthened your privacy with the Creators Update. There is still a long way to go to ideal, but progress compared to previous versions on the face.
> During installation You will no longer see the familiar Express settings. Instead, Windows will display the main points along with their explanations. Disable these features as much as possible.
> Already configured parameters The Creators Update adopts privacy settings and does not revert them to default values. But be careful: new Windows settings 10, as before, is activated by default.
> To control parameters privacy settings in “Settings”, go to the “Privacy” category.
> O&O ShutUp10 – free program, which will give you a shortcut to your privacy settings. Apply the suggested setting with a mouse click and restart Windows 10.
Troubleshooting Creators Update issues
Now you are ready for the Creators Update. But in case any problems arise, we have solutions to the most common problems ready.
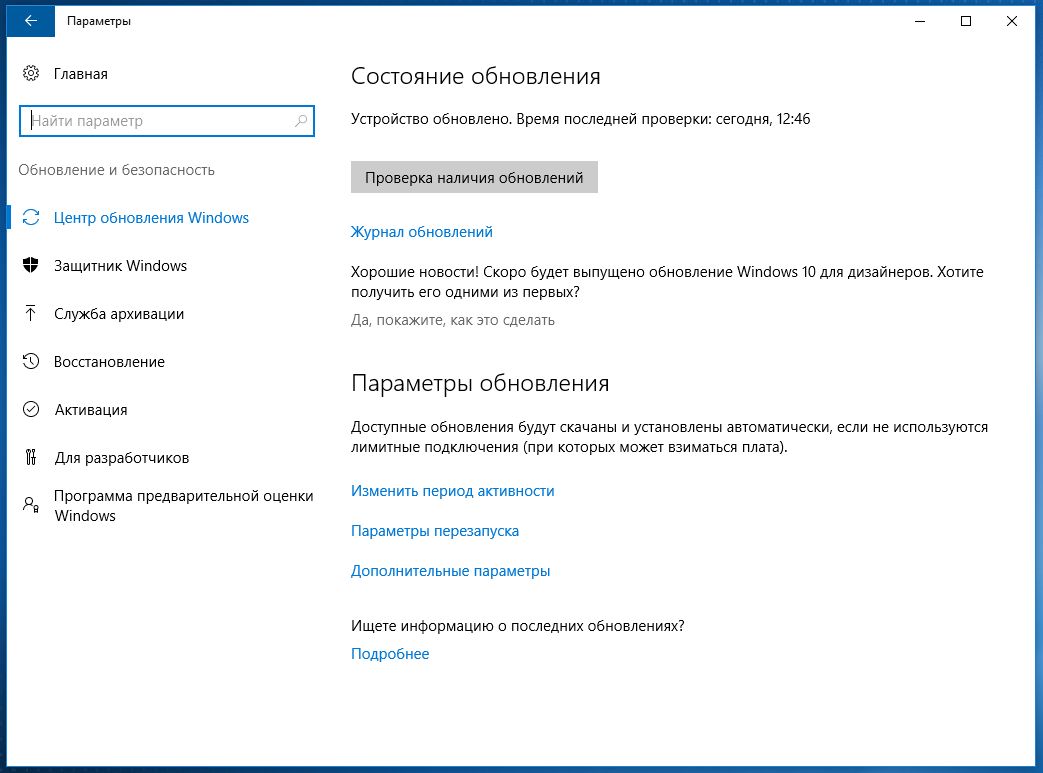
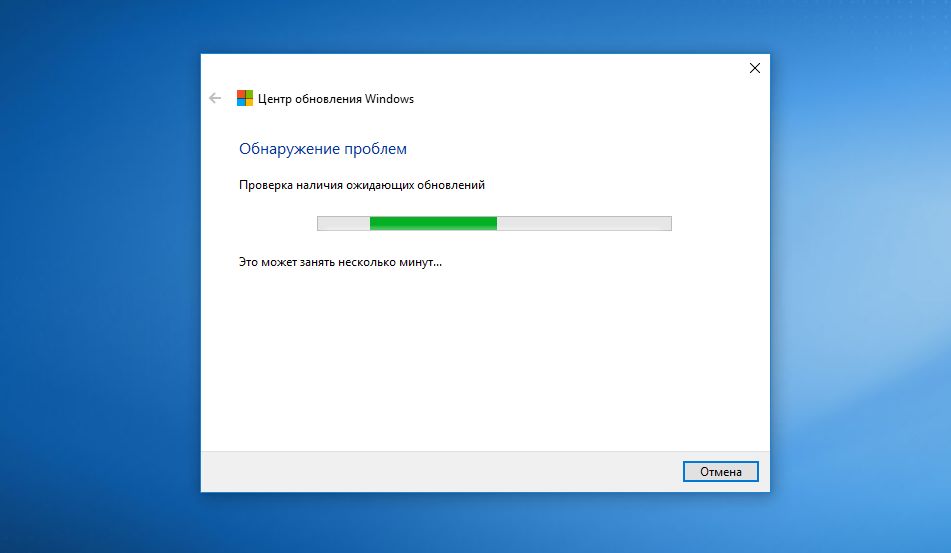
1 Windows Update doesn't work
There are many ways to get the Windows 10 Creators Update, but the easiest is through the built-in Windows Update. However, this often causes the most annoying problem of all updates - the Creators Update does not appear in it. According to Microsoft, there are currently more than 400 million devices that are eligible for the Creators Update.
But, even with the giant server capacities of the corporation, the process cannot be completed in one day. Therefore, Microsoft is rolling out the Creators Update gradually. It is quite possible that you have not been lucky yet and your turn has not yet arrived. For those who don't want to wait, Windows 10 Update Wizards are available.
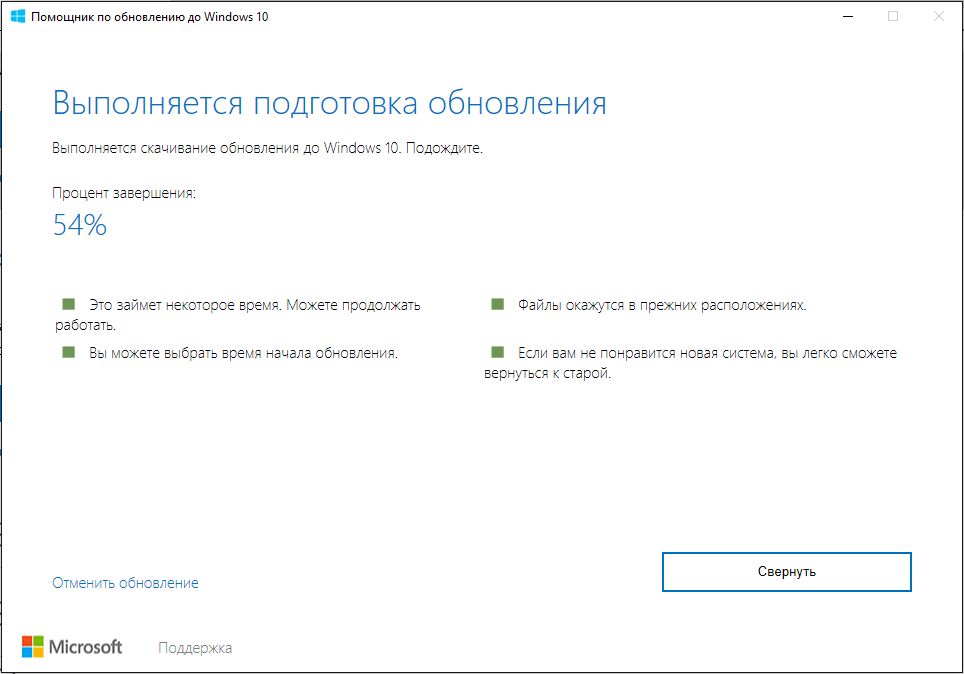
You can download them directly from site or in Windows Update, click on the nondescript line “Yes, show me how to do this” (Fig. 1a). The wizard will check the version installed Windows, will analyze the hardware, and then download the Creators Update in the background (Figure 1b). After additional verification of the download, you can proceed with the installation.
2 Windows Update shows an error message
 If Update spits out an error message, you can download problem solver, which will automatically try to fix problems. After using this utility, you will need to restart your computer. Open Update Center again and let it find Creators Update.
3 Decoding error codes
Installing Windows looks pretty simple, but under the hood it's much more complicated. The difficulty begins when Windows interrupts the process, displaying cryptic error codes such as 0x80070070 – 0x50011. Of course, you can Google these codes and find out that our example means there is not enough free space to update.
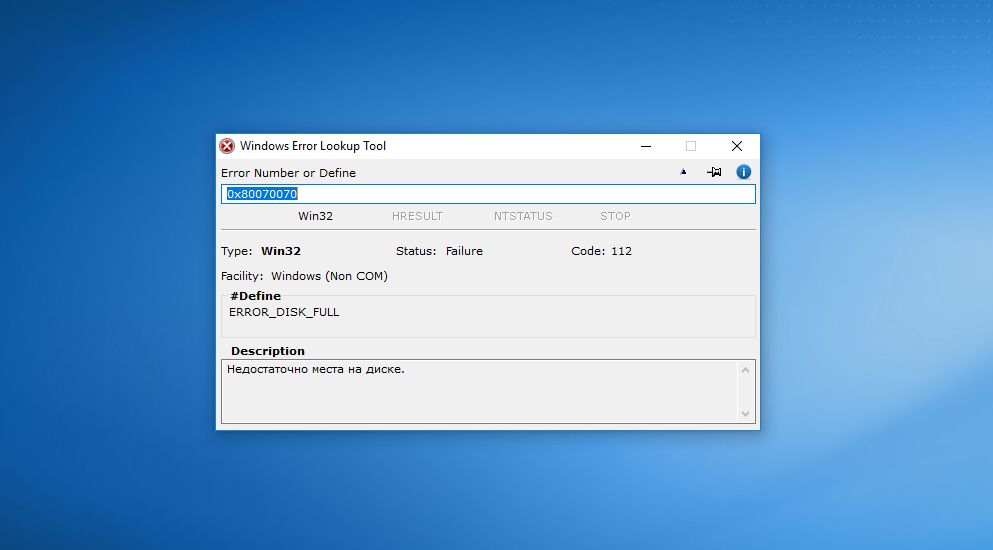 But it's a free utility Windows Error Lookup will make this task easier. Enter the error code and the program will translate it into a clear reason. However, since the utility is already quite old, it may not be able to handle some codes.
4 Removing external media
Difficulties can gradually increase, even driver problems can interrupt the installation of the Creators Update. They will also be indicated by encrypted error messages, including code 0xC1900101 - 0x20004. In this case, it is a good idea to disconnect any connected devices that are not needed for the update, such as a printer or external drive.
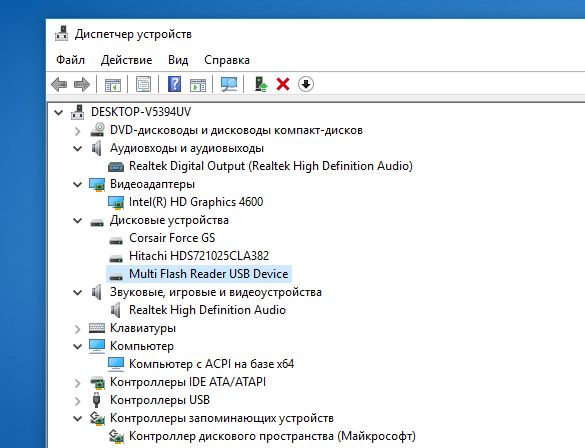 Additionally, in the Task Manager, look for any problems with drivers or any strange devices. Also, check the status of your system data by running “sfc /scannow” in the command prompt.
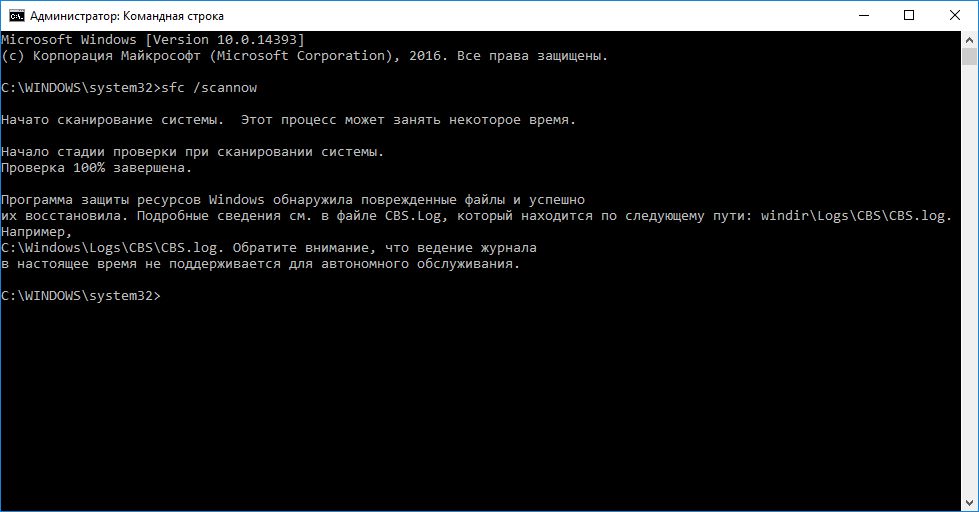
5 Uninstalling antivirus
Antivirus protection for Windows 10 is necessary, but when installing the Creators Update, it causes errors under certain circumstances. In this case, the system may issue error code 0x800F0923. It indicates an incompatible driver or problematic system program.
Our advice: If you have a third-party antivirus, uninstall it before updating. Install Creators Update and then install protection again. Since antivirus often penetrates deeply into the system, you need to check with your supplier to see if you need a special utility that removes their product without leaving a trace.
6 Windows 10 is not activated
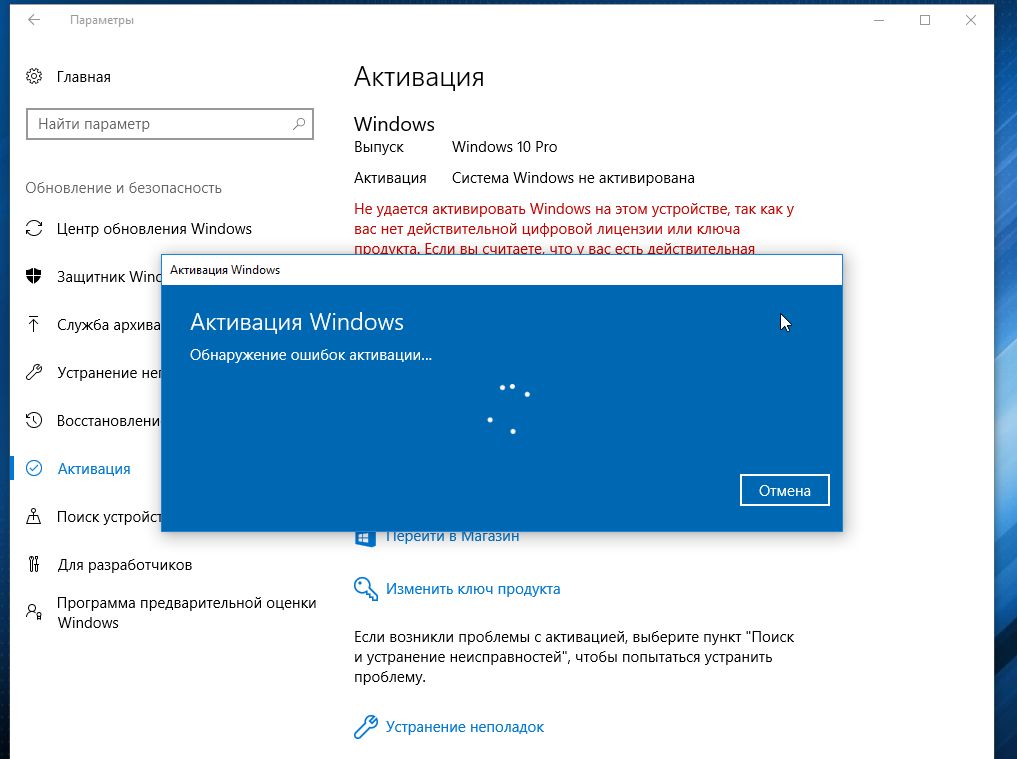 Windows 10 worked well and, of course, was activated. Then the Creators Update arrived and suddenly Windows decided you needed to register it again.
The easiest way to resolve this issue is to use the built-in troubleshooter. To do this, in “Settings”, click on “Update and Security” and go to “Activation”. Here at the bottom, select Troubleshoot. Now Windows should take care of activation itself.
7 Reinstallation instead of updating
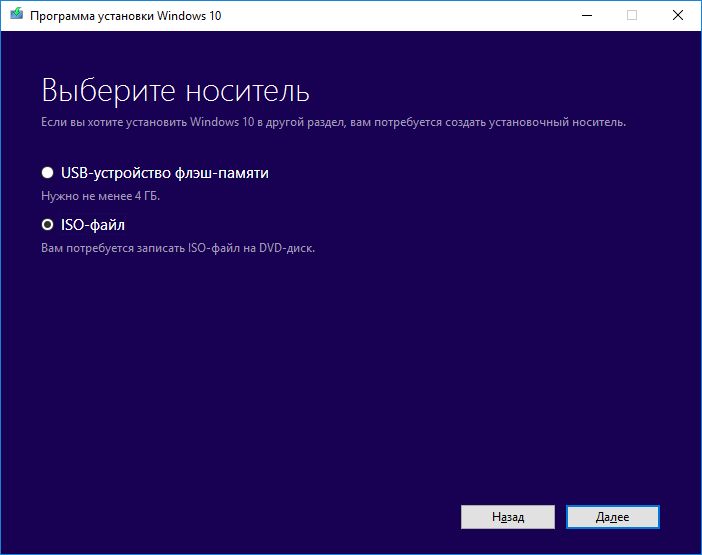 If the Windows Update Wizard did not do its job, you can try using another utility from Microsoft. Download Media Creation Tool from the official Microsoft website. It offers a whole range of options for working with the Creators Update.
With its help you will launch the update, download the full ISO file, create a bootable USB drive to reinstall the system and even an installation DVD. If you have problems with the update, the first solution may be a bootable USB drive.
8 Devices stopped working
After installing the Creators Update, missing or damaged drivers can fray your nerves. DVB-T2 tuners, webcams, Wi-Fi adapters and other devices may stop working.
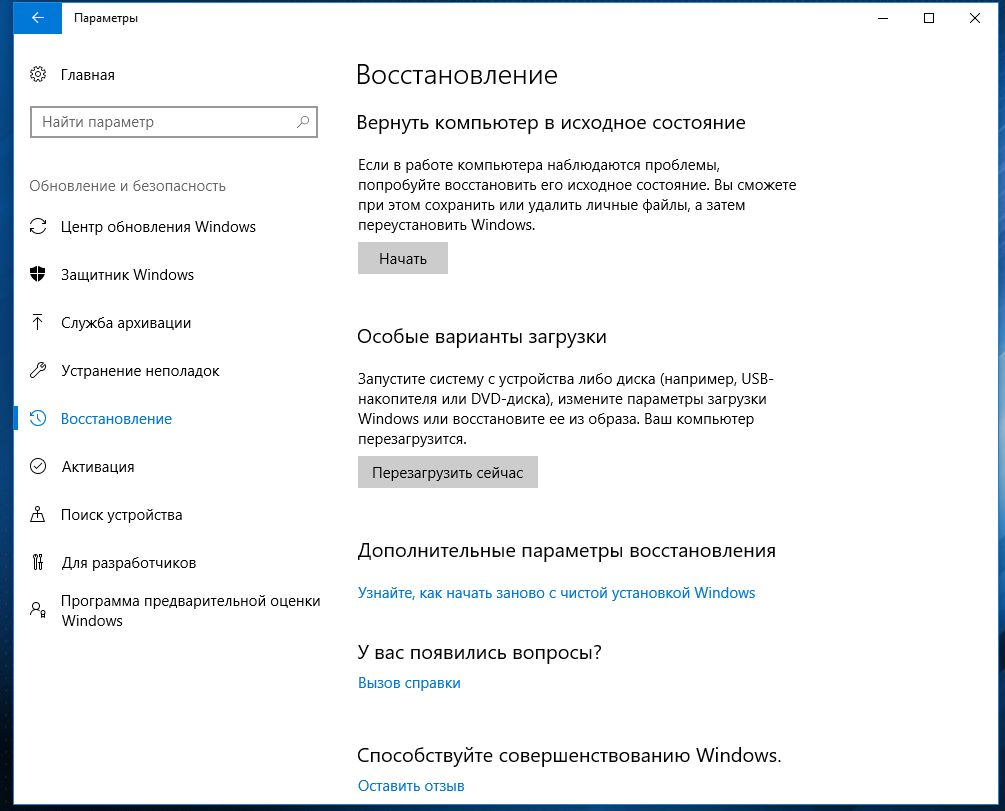
9 Last resort: backup or reset
Due to the huge number of different configurations, it may happen that Creators Update simply won’t work for you. In this case, you can always return to previous version. A backup copy created in advance is available to you at any time.
This can also be done through “Options | Update and security." Go to the "Restore" item and under the "Rollback to an earlier build" option, click on the "Start" button. Thus, even your own ones allow you to roll back the Creators Update. Windows tools. Please note, however, that the built-in reset feature is only available for 10 days after the update.
Creators Update: first steps
After the final installation of the Creators Update, it is necessary to carry out the following priority actions:
> System check: Using the Win+R keys, open the Run window and enter the command “perfmon /report”. Windows 10 will generate a system status report with an overview of errors.
>Checking drivers: Check the status of your drivers in Device Manager. Ideally, there should be no unfamiliar devices there.
> Installing antivirus:
If, when installing the update, you uninstalled your antivirus and other system utilities, they must be returned.
 10 days for rollback: if the Creators Update provoked serious
 problems, roll back to more early version
Photo: manufacturing companies


