Updated Windows 7 or 8 to new Windows 10? Windows.old folder appeared on the computer, and it takes up a lot of space? You can delete it, but not in the same way as you delete regular folders.
The Windows.old folder is not new to Windows 10. But before Windows 10, you could see this folder if you bought a new one. Windows versions and install it by the update method previous version.
What is the Windows.old folder?
This folder appears when you upgrade from one version of Windows to a newer version starting with Windows Vista. The Windows.old folder contains all files and data from the previous version of Windows that was installed before the upgrade. It can be used to revert (rollback) to a previous version of Windows, in case a new version won't fit. To recover data after pen Windows installation.
If you need to find a particular file that was not copied correctly during a Windows update, you can also rummage through the Windows.old folder and find it.
Essentially, the Windows.old folder contains old version Windows. Starting from the system Windows files before installed programs, from user account settings to simple files, all here. The new version of Windows keeps this information in case you want to go back to the old version of Windows or if you need to find a file.
But, don't delay too long. Windows will automatically delete the Windows.old folder to free up disk space after one month.
How to return the previous version of Windows?
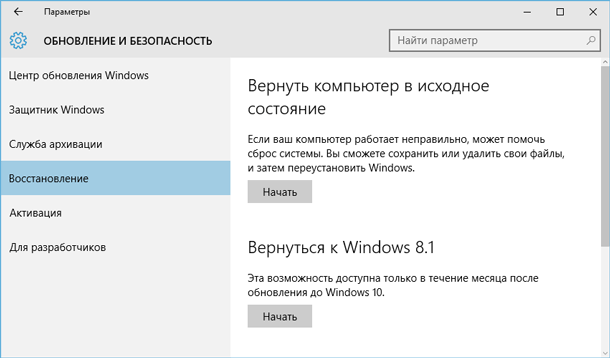
From Windows 10 to Windows 7 or 8.1, it's very easy to return. After installing Windows 10, you can simply open the Settings app, select Update & Security, and click Recovery. In this section, we will see the item Revert to Windows 7 or 8.1, depending on which version of Windows you upgraded from.
After we click the "Start" button, Windows will restore the previous version of the operating system using the Windows.old folder as the source.
Prior to Windows 10, this could also be done. For example, here is an instruction from the official Microsoft website on how to restore Windows 7 to a previous version of Windows using the Windows.old folder. With Windows 10, everything is much easier.
But again, as noted in Windows settings, this feature is only available for a month after upgrading to Windows 10. After a month, Windows will automatically delete the Windows.old folder in order to free up disk space. So you have a month to decide whether you want to continue using the new version of the system or not and evaluate whether all the files you need have been copied correctly.
How to recover individual files from the Windows.old folder
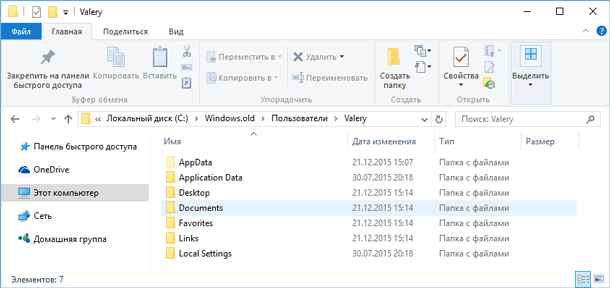
If you need to restore individual files from an old Windows installation, you can restore them from the Windows.old folder. To do this, simply open the Windows.old folder in File Explorer: C:\Windows.old. Your personal files will be located in the C:\Windows.old\Users\USER_NAME folder.
But keep in mind that even on the official Microsoft website it is indicated that, if desired, all files or (Attention!) Some of them can be restored from the Windows.old folder. To prevent data loss, Microsoft strongly recommends that you back up your files and settings to external drive before restoration, return to the initial state, updating or reinstalling Windows.
That is, there is a risk of data loss when updating Windows and / or returning from Windows 10 to a previous version. Moreover, the recovery of data lost in this way by standard Windows tools, not provided by Microsoft.
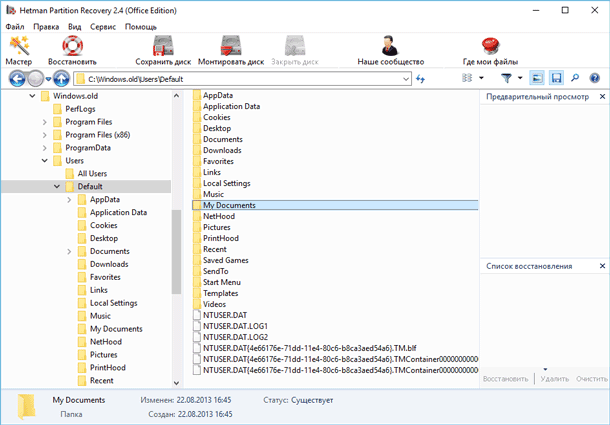
In such a case, the only option for data recovery may be third-party software. If any data or files are lost during Windows update or restore, regardless of their type or extension, scan the C: drive using Hetman Partition Recovery from Hetman Software, and restore them to a convenient location or storage media.
How to delete the Windows.old folder to free up disk space
The Windows.old folder can take up quite a lot of disk space. At best, it will be 12 GB. But its volume can reach 20 GB or even more. It all depends on the size of your previous version of Windows.
Try deleting the Windows.old folder the same way you delete any other folder and you will get an error message. You can work around the error message by changing the permissions of the Windows.old folder. But this is not the correct way to delete this folder.
To remove the Windows.old folder, you can use windows tool Disk Cleanup or another manufacturer's program. In Windows 10, open the Start menu, search for "Disk Cleanup" and launch the application. Also this application can be opened by right-clicking on the This PC folder on the C drive and selecting Properties from the pop-up menu, then clicking the Disk Cleanup button.

Click the "Clear" button system files". "Previous versions of Windows" will also appear in the list of files to be deleted, and "Disk Cleanup" will show how much space these files take up. Select this option and click Clean Disk, the old version of Windows will be removed. This function can also be used to clear system disk and from other unnecessary files.
By deleting the Windows.old folder, you risk nothing. If you are satisfied with the new version of Windows and have no desire to return to the old version of the operating system, and are also sure that all the files you need are copied from the Windows.old folder, you can safely delete it.
Windows will still automatically delete the Windows.old folder one month after the update. All computers that have upgraded to Windows 10 will still be able to use the space occupied by the Windows.old folder, even if their users are unaware of such a folder and are unaware of its existence, as well as the possibility of using the Disk Cleanup feature.
Reverting to a previous version of Skype with a single click is of course not possible, but there are several ways in which the problem can be solved.
Method 1 – System Restore
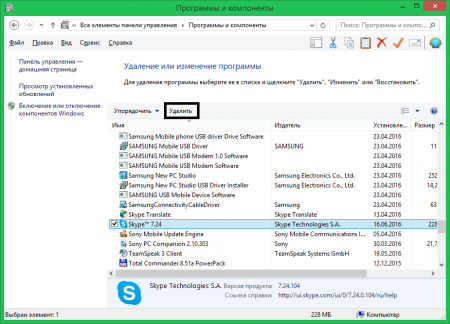
First of all, you need to delete the current Skype version from your PC. To do this, click the "Start" button, go to "Control Panel" and open "Programs and Features".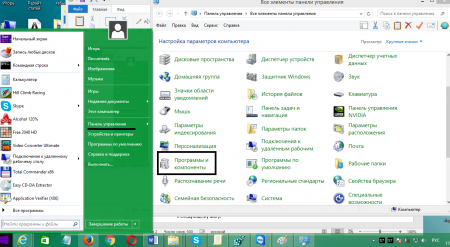
Find Skype in the list, select it and click the "Delete" button.
Another way to uninstall the program is through the same Start menu, but in this case, you need to open All Programs, and then find and select the folder named Skype. Run the uninstaller program and follow its instructions.
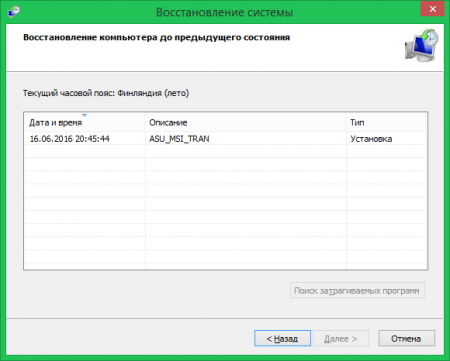
After that, you can try to restore the system to the moment the program was installed and thus return the old version of Skype.
Note: If you have System Restore disabled on your computer, proceed to the next step.
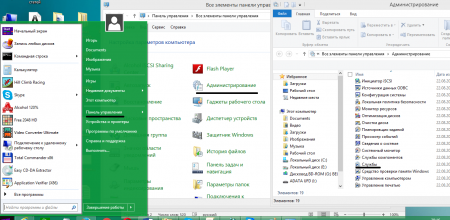
To do this, click the "Start" button, go to the "All Programs" section

and find the folder "Standard" - "Utilities". In it you will find the "System Restore" component.

Note: in Windows 8 and higher, when you click on the shortcut, a window will open where you will need to select "Start System Restore".
Run it and select a restore point with a date that matches Skype update(possibly earlier). Click next and wait for the recovery process to complete.
Once the process is complete, open Skype and sign in to the client using your login credentials. If this method did not help or you do not have a restore point, you can try downloading a previous version of Skype from the Internet.
Method 2 - Downloading a Previous Version from the Internet
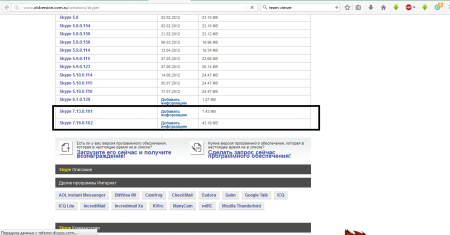
To download the previous version of the client, go tohttp://www.oldversion.com.ru/windows/skype/
And scroll down the list. penultimate and latest version you can safely download and install.
Note: you can also use search engine and enter the query "How to return the previous version of Skype." The first links are usually from the Skype community. By clicking on them, you can also find older versions of the application, but there will be no guarantee that the version you downloaded will be the previous one, and not an earlier one.

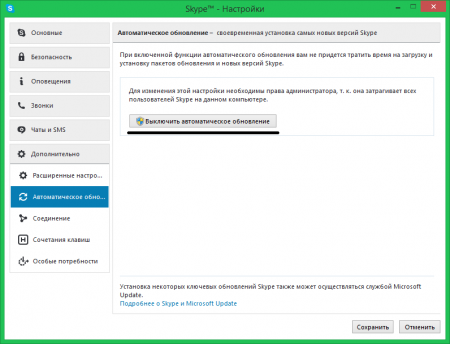
If you no longer want to receive updates, you can simply turn them off. You can do this in several ways:
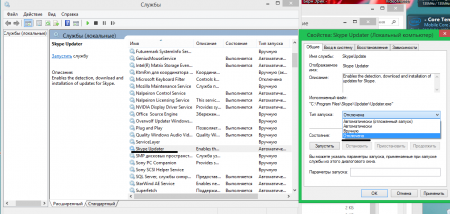
Second way:

If the client prompts you to install an update every time you start it, do the following:
- Go to C:\Users*\AppData\Local\Temp (need to enable display hidden files).
- Delete the SkypeSetup.exe file.
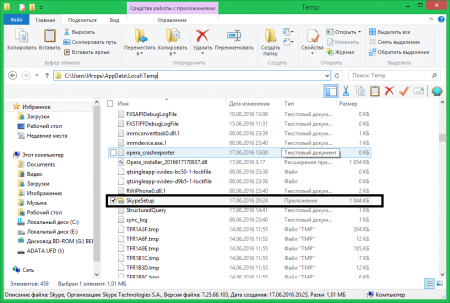
This is because Skype automatically downloads the new update and places it in a temporary folder before confirming the update request. As a result, it will issue an appropriate notification every time it is launched.
Many had to deal with situations when, due to inexperience or negligence, files were deleted, in electronic Excel tables they removed entire sheets with important data, or simply “put things in order” in the My Documents folder, which led to the loss of the necessary documents. You don’t need to immediately panic, everything can be fixed, and if you follow the recommendations, then in the future you will avoid such unpleasant situations.
File recovery in Windows 7 can be done thanks to the standard features of the operating system itself. Previous File Versions", provided that on the local disk on which the files we need are located, "System Protection" is enabled and checkpoints are created.
A little theory:
If "System Protection" is enabled on the Local Disk, the function of creating Previous versions of files will be activated. If you disable System Protection, then automatically creating backup information on the specified drive will stop. Previous versions of files have an inherent relationship with restore points.
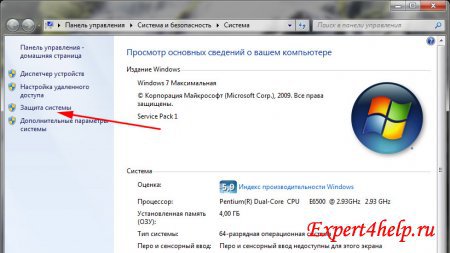
To enable System Protection, you need to right-click on the My Computer icon and click Properties, then System Protection. It is described in more detail in the article " points Windows recovery 7 ”.

By default, System Protection is enabled, only for the drive where the installed Windows 7. If you need to use the tool to restore previous versions of files on some other local drive, then activate protection for this drive.

Attention: this method relevant in 2 cases: by accident remote file or an incorrectly edited document. Although in the second example it is much more preferable to use the "Data Archiving" function, since the document will be restored to the date the checkpoint was created, and all changes made after that will be lost.
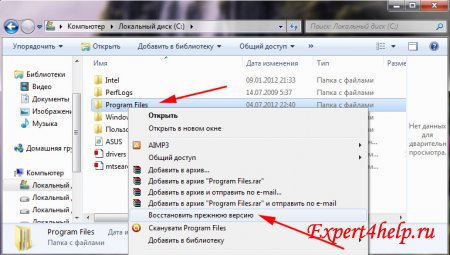
Now let's move from theory to practice and apply the function Previous File Versions In action. Let's go to the "Program Files" folder and delete an arbitrary file or an entire directory and restore from "Previous versions of files".

Let's look at the example of the "uTorrent" folder from the Program Files directory. To recover a deleted folder, you need to go up one level from it, in our case to Program Files. We click on our folder and right-click to call the context menu "Restore old version».
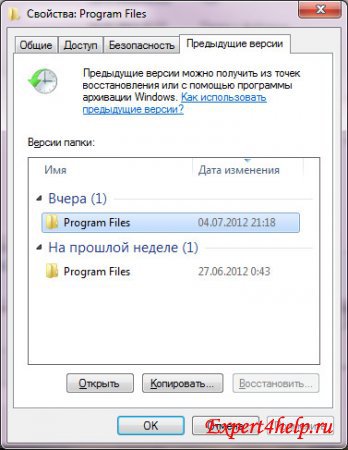
We will see the properties of the Program Files folder, go to the "Previous versions of files" tab, where the saved version of the Program Files folder is located.

We select the latest folder by date and double-click on it, find the remote uTorrent folder we need, copy it and paste it into the original Program Files folder.
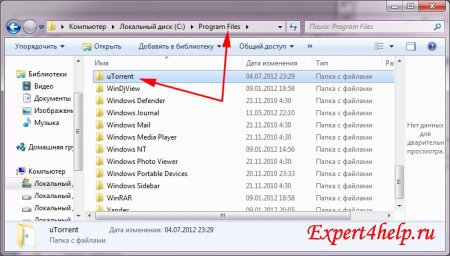
We recovered a deleted folder, as you can see, the recovery process is no different from recovering files.
A few words of postscript:
If a document was deleted by mistake, then you can only restore the version of this file on the date the restore point was created. All data entered after this date cannot be restored using " Previous File Versions».
Previous versions of files are not permanently stored. Older versions are replaced by newer ones, and their number depends on the size of the allocated disk space specified in the System Protection Settings.
Previous versions of files are usually created once a day.
Previous versions of files created on the day we want will not be deleted if you back up the files on the same day using the Data Archiving function.
If you disable system protection, previous versions of files will not be created, and you will not be able to repair corrupted system files using the System Restore utility.
Why are previous versions of files missing?
1. Previous versions of files are not created on the computer if System Protection is disabled.
2. Previous versions of files cannot be created on local drives formatted in FAT32.
3. For system files containing information about the system and users (passwords, etc.), creating backups is not performed.
4. If no changes have been made to files or folders, they will not be backed up by previous versions of files
5. If your computer has two operating systems Windows systems XP and Windows 7, then Windows startup XP, all restore points will be automatically erased. So, it will not be possible to use the function of restoring previous versions of files.
6. Programs for setting up and cleaning the system (for example, Ccleaner) are removed from hard drive restore points. To avoid this situation, you need to add the System Volume Information folder to the exceptions.
7. While working on a laptop with the power off, restore points are not created.
In other words, in addition to quickly restoring the system in the event of a failure, you can now also restore individual files if they were accidentally deleted, damaged, or if you just need to quickly undo all the changes made to the file.
Although restoring previous versions of files is a wonderful windows function 7, oddly enough, few people know about it and few people use it. In this article, I will talk about this technology in more detail and explain how it works.
Briefly about previous versions
Although I advertise previous versions of the files as new feature, Actually this is not true. This technology has its roots in Windows XP and Windows Server 2003, where it was implemented as . When you install the Shadow Copies of Shared Folders client on a Windows XP computer connected to the server under Windows control Server 2003, restoring previous versions of files was also possible in Windows XP. The main new feature in Windows 7 is that this feature is now fully available within a single operating system and does not require a connection to a server.
I also mentioned that legacy files are supported to some extent in Vista as well. To be more precise - in Vista Business, Enterprise and Ultimate. This function is not available in Home Basic, Home Premium and Starter editions. In Windows 7, it is present in all editions.
How it works
As you know, in order to create restore points, the operating system constantly monitors any significant changes, which include the installation of new applications, hardware, drivers, system updates or security patches through the Center windows updates. When such changes are detected, the system automatically creates a restore point, which is essentially a snapshot of the state of the system that includes important system files, including certain parts of the registry. At the same time, snapshots of all data files stored on the hard disk are also taken.
However, major changes to operating system is not the only reason to create a restore point. By default, Windows 7 automatically creates a restore point once a day, and in addition, you can create such a snapshot yourself at any time.
In addition, when creating backups using the Backup and Restore tool ( Backup and Restore) Windows 7 automatically tracks them and allows you to restore previous versions of files not only from restore points, but also from backups.
To use the restore previous versions feature, right-click on the file and select context menu option "Restore Previous Versions" (Restore Previous Versions, Fig. A).
Figure A The Restore Previous Version option is available from the context menu of any file in Windows 7.
The file properties window opens with the Previous Versions tab (Figure B). As you can see, in my example, the file is included in both the restore point and the backup, so I can choose either option to restore it to a previous version, depending on which date I'm interested in.
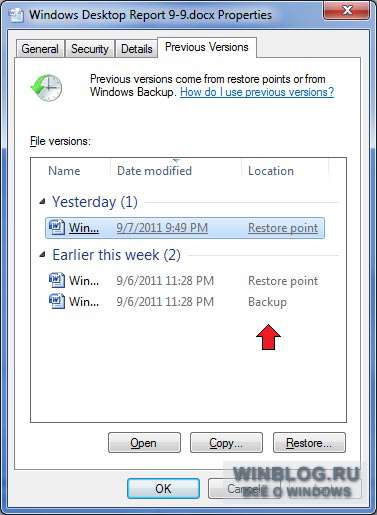
Figure B When you use the Backup and Restore tool, you can restore previous versions of files not only from restore points, but also from backups.
As you can see, there are three buttons on the Previous Versions tab: Open, Copy, and Restore. To check if this is the version of the file that you need, you can select it in the list and click "Open". In this case, the file will be opened for viewing in the appropriate application - in my case it is Word.
The Copy button invokes the standard copy dialog box, like the Copy To command, and allows you to restore the file to a different folder. Please note that the "Open" and "Copy" commands are available only for files saved to a restore point and do not work for files from backups. The Restore button allows you to restore a file to the exact state it was in when the restore point or backup was created.
What to Consider
It is worth bearing in mind that previous versions of a file from restore points will only be available if changes have been made to the file since the last restore point was created. If the file has not been modified since then, the Previous Versions tab will display the message: "There are no previous versions available" (Figure C).
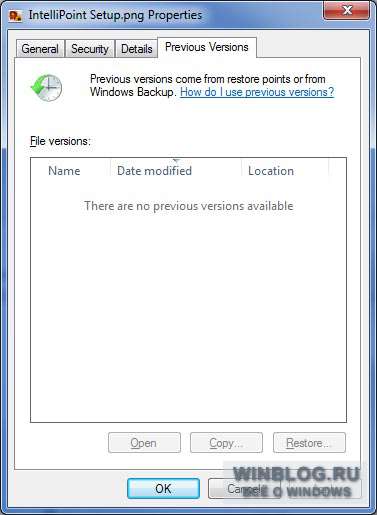
Figure C If the file has not changed since the last restore point, the following message will appear.
However, this does not mean that the previous version of the file was not saved to the restore point. If you simply open and save the current file, its previous version will immediately appear on the Previous Versions tab.
If a file hasn't changed in several months, new versions won't be saved every time a restore point is created.
File recovery
Now that you have an idea of how the Restore Previous Versions feature works, let's see how to use it. Let's say I accidentally permanently deleted word document(Fig. D), and then realized his mistake. Since the file no longer exists, there is nothing to right-click on. Instead, you need to open the Previous Versions tab for the folder where the deleted file was stored (Figure E).
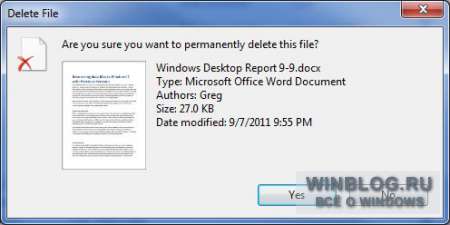
Figure D I accidentally deleted a Word document.
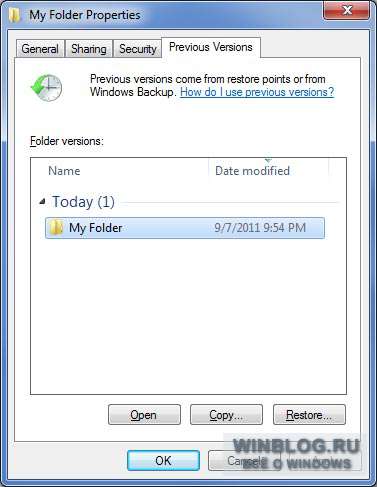
Figure E To recover a permanently deleted file, you need to open the Previous Versions tab for the folder where it was stored.
To make sure that this folder is saved desired file, I click the "Open" button. A folder opens, and in it - the desired file. Now I can open it in Word and see the content. After confirming that this is the file I need, I close Word, close the folder, and return to the Previous Versions tab. I click the "Restore" button. The dialog box shown in Fig. F. If I click the "Restore" button in it, the file will be restored to the original folder.

Figure F. Before restoring a file, the system prompts you to confirm the operation.
Although the warning in the dialog box is worded as if restoring will replace the entire contents of the folder, in fact, only the deleted file will be restored. There were several other files in my folder, for example, and they remained intact after the restore.
What do you think?
Did you know about the existence of the function of restoring previous versions of files in Windows 7? If not, will you use this feature now? And if you have already, what are your impressions? Share your opinion in the comments!
| materials |


