The world does not stand still. Once upon a time, the height of popularity was to store information on a disk or floppy disk. Now preference is given to more convenient and capacious flash drives.
To boot into BIOS via a flash drive, you need to take into account several features:
- It is recommended to connect the removable disk to the connector located with reverse side system unit. It is he who is located on the motherboard;
- Connect the storage device before turning on or restarting the computer.
Regardless of the BIOS manufacturer, to boot Windows from a flash drive, you must take the following steps:
This process can even be used if you want to dual boot with a different operating system. To do this you will have to first. Be careful if you change the settings here to prevent the computer from booting. Here you will need to change the boot order.
This is the default on my laptop. Use the 4 arrow keys on your keyboard, go to the Download tab and change the settings. It may be a little different on your laptop. First update for the first time, activate it and then “Clean installation”. The following screen will appear.
- Open BIOS. To do this you need to click Delete or Esc. Service call keys may differ depending on different versions programs. They are usually written at the bottom of the screen immediately before the operating system boots.
- Next you need to enable the USB controller.
- After this, the flash drive must be moved to the first place in the list of devices from which to boot.
- Save your changes.
Running from a flash drive in Award Bios
This version of the program is called by the button DEL or keyboard shortcut Ctrl+Alt+Esc(in older versions).
Setting boot from flash drive in BIOS
You will be provided with license terms. You will be asked what type of installation you want. Since we want to use a fresh or clean installation, select "Custom Installation". You will then be asked to select the partition you want to install to. If you haven't created a partition before, this setup wizard also allows you to create one now.
Booting from a flash drive in BIOS
He will copy setup files, installs features, installs updates if there are any, and finally cleans up residual installation files. When you restart, you will see the following screen. If you are dual booting, you will be greeted with the following screen.
Go to the tab "Integrated Peripherals" to enable the USB controller. Near the inscription "USB Controller" And "USB Controller 2.0" set value "Enable". To do this, use the button Enter. Go back one step by clicking Esc.
Now we need to directly configure booting from a flash drive in bios. To do this, go to the tab "Advanced BIOS Features". Choose a section "Hard Disk Boot Priority". Here the first line should indicate the name of the memory card. By default this position is occupied HDD. Using the key «+» , move the required line to the first place. Return to the previous menu.
Luckily, there are tools around that can help you accomplish this with minimal effort and without putting you through a huge multi-step process full of manual commands. Some products may not be available in your country or region. Continue to step 9 below. . This article contains advanced troubleshooting instructions.
Surface 3
- When Surface is turned off, press and hold the volume button.
- While holding the volume button, release and release the button on the surface.
Pay attention to the line "First Boot Device". Next to this inscription there should be "USB-HDD", which means booting from a flash drive or external hard disk. Sometimes the installation process may not proceed. In this case, you should select the external floppy drive indicator - "USB FDD".
Hard Disk should be indicated next to Second Boot Device.
Then restart your computer. Hard disks computers are automatically connected and installed network connection. We recommend that you confirm the launch automatic updates when prompted. Basic functions can be accessed from this user interface. Use the arrow keys and the Enter key to highlight the Scan option.
- The system will restart.
- Once the system boots, a simple user interface is displayed.
- Specify whether to scan the entire drive or just a specified directory.
- Check your scan settings.
- Confirm the start of scanning.
After making changes, you can exit the BIOS while saving the changes. Press Esc to exit to the main menu. Then click "Save & Exit Setup".
Installing boot from flash drive in AMI Bios
Exit to “AMI BIOS” is carried out by pressing keys DEL or F2.

No action is performed automatically. After scanning, a results menu is displayed. Here you can view reports and choose actions for detected files. If you select Rename All or Delete All, all recognized files will be renamed or deleted from your computer. Please note that your computer may not function properly if you remove important system files. If you select Individual, you can select an action for each individual file. You can then use the Select option to perform actions on selected groups of files. They can be found in the menu in the "Utilities" section.
USB controller settings are located in the tab "Advanced", In chapter "USB Configuration". Index "Enable" should be near "USB Function" And "USB 2.0 Controller".
Return to the previous menu (Esc) and go to the tab "Boot", chapter "Hard Disk Drives". The name of the flash drive should come first. Click "Enter" on the first line and in the new window, select the desired item.
Setting up AMI on a laptop
There is no password set for the superuser. Depending on what you choose installation media you must enable the appropriate boot devices if they are not already activated. The main difference is how the disk partitions are stored on the disk. On a single hard drive, only one of the two drives can be used for practical reasons, so all systems must use the same partition type in a multi-boot setup. This means that both systems require different bootloaders.
In the previous menu, go to "Boot Device Priority". There should be a flash card at the top.
After this, you can return to the main menu and exit the BIOS, saving the settings.
Set boot from flash drive in Phoenix-Award Bios
Clicking F1 or F2 you can open the BIOS version “Phoenix-Award” .

Hardware issues to watch out for
This usually works, but can be a problem in multi-boot environments. Instead, something similar to partial suspension to disk is performed to reduce boot time. First of all, there are several elements that are intuitively called the First Boot Device, in which you need to record which media should be used to search for the boot sector in exactly the same order. But nothing is as simple as it may seem at first glance, although the configuration of the second and third boot device is standard, although it will not be taken into account until you set another boot device to enable.
The USB controller section can be found in the tab "Peripherals". Index "USB-HDD" must be placed in line "First Boot Device", tab "Advanced". Don't forget to save your settings.
Configure booting from a flash drive in Bios UEFI
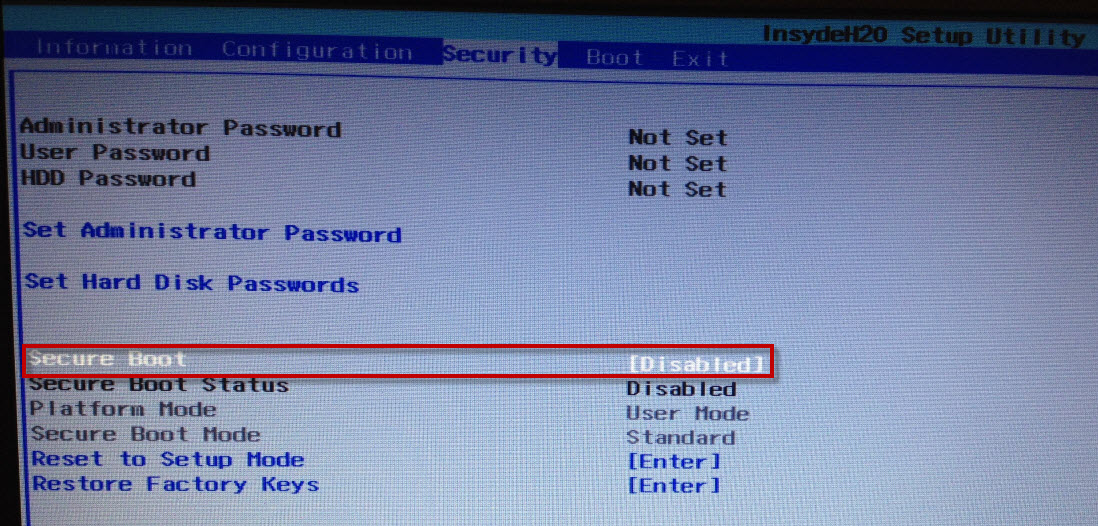
New laptops released no earlier than 2013 have a special BIOS version. One of its features is the presence of protection against installing operating systems from any media other than a licensed disk. To install boot from a flash drive in this bios version, you must first disable this protection and set compatibility mode with other operating systems.
In the following dialog you will be able to navigate with different buttons with priority separate disks, which will usually be shown by their respective names in the list shown. On the other hand, to decrease the priority, you need to press the Down or - button.
As a rule, the keys are always listed at the bottom of the list. For the sake of completeness, it is still worth noting that this form of control is nowhere to be seen. For other elders, you may find controls that seem to fall out of your eye. List of mechanics below to prioritize each one - again, you'll need to use the English equivalents. A priority boot hard disk or First One Comes First, boot loader first.
After entering the BIOS, go to the tab "Security", chapter « Secure Boot» and set the value there "Disabled".
Little by little the discs are becoming obsolete. Increasingly, the question arises about loading the operating system from a flash drive. Or such a need arises due to technical reasons. For example, the disk drive in a laptop PC has failed. In this case, booting the laptop from a flash drive will help. This way you can also work with netbooks that simply do not have a disk drive. However, it’s not enough to just put information on a flash drive; first you need to format it and turn it into a bootable one. Let's deal with everything in order.
Note. A small disadvantage of this method is that it is not possible, for example, to only target a specific floppy drive - all available drives in the list will always be executed. Funny statement, but due to the fact that today's computers often don't have a floppy drive, let alone two, there will probably be something there. There is no clear answer to this thorny question.
The reason for this is very simple - to speed up the startup of the correct operating system. The first setup method will cause unnecessary wastage of time and this will be twofold. Some motherboards are strictly necessary. The first line is the configuration line bootable media, which simply turns this option on or off. An interesting menu with even more interesting elements is the Storage menu.
What is loading
Quite simply, downloading is sending programs or any data at all to a computer from a device connected to it. Why do we talk about loading the operating system every time the PC turns on? But because in this context the hard drive (from which the OS is sent for direct work already in random access memory) acts as a connected device. Both the disk drive and the flash drive are perceived as the same connected device.
For PCs from these manufacturers, you will also often notice removable media recording options to enable or disable possible recording on removable media. Thanks to this technique, the manufacturer can, among other things, easily find out whether the messages that occur should not lead to a non-replaceable hard drive. During production, all drives in use are tested using this technology, and code containing the test results is permanently recorded at the end of the test. The same thing happens in the future when the computer user runs this program stored in the hard drive firmware.
Therefore, in essence, it makes absolutely no difference to a computer or laptop where the necessary information comes from. Will it be loading from a flash drive or directly from a hard drive. It's all about the BIOS settings.
How to boot from a flash drive
BIOS is an abbreviation English words, which are translated as the basic input-output system. And she has a strict procedure for completing assigned tasks. By default, your computer will first try to boot from a floppy disk (historically, this has been the case). Then it will access the disk drive. Then comes the turn of the hard drive. But loading from a flash drive in the BIOS is either in the last place (which you cannot get to without going through the hard drive), or is not provided for at all. To correct this situation, it is necessary to change the priority of the system. This is not difficult to do.
The element is only present in Computer Setup if any of the installed drives support this technology. The test time is very variable and depends greatly on the manufacturer and size of the hard drive. The advantage of the test is the fact that it is independent of the installed operating system.
In the world of computers, there are many ways to enter much-needed information. Otherwise, configuration items are often not needed. Do you want to keep your apps with you and always ready to use? Functionally, the tools are almost identical.
You can enter the BIOS only when you start the computer before booting begins. Almost every manufacturer has individual login buttons. Ideally, it would be correct to look at the documentation at motherboard. But, based on the fact that ideal situations in our lives develop extremely rarely, just try asking Google (or Yandex - whichever is more familiar to you) which key will allow your particular computer model into the BIOS. And as a last resort, you can use the “scientific poking” method. That is, sequentially try all possible combinations. There are not so many of them - these are the Esc, Del, F2, F8, F9, F10, F11, F12 keys.
Something for those who like fast paces
For example, we can mention the possibility of multiple kickbacks in the modifications made, or the simple but very effective addition of defragmenting the registers themselves, with which the system can work a little faster. The psychiatry checker includes the ability to enable the so-called quick start. When using the faster testing option, not all components are installed, this check is not performed at great depth. On the other hand, it is worth thinking about whether there are some points at the beginning that are associated with the risk of disclosing an error.
 For example, let's take Asus laptop. Booting from a flash drive should be a priority for it. When starting your computer, continuously press the F2 key (if that doesn't work, try Del). This will take you to the BIOS. You can only use the keyboard to navigate here. The arrows and the Enter key will help you.
However, this almost incomprehensible task was much more important considering that at the time, with the exception of today's types of 80-track mechanics, they also had their "little 40-foot" brothers. Due to the fact that all floppy drives today are 80 feet, you can forgive this control with a clear conscience.
For these reasons, assigning you a value other than 0 would be a completely unnecessary delay. You will appreciate this item if you have an exotic, prehistoric or partially damaged hard drive. In such cases, fewer experiments can help speed up backup important data.
Go to the tab labeled Boot (this means “download”). There you are interested in the line Boot Device Priority (“boot device priority”). After confirming the selection of this line by pressing the Enter key, you will see a numbered list. In the first row in the second column in square brackets it will say Floppy Drive (“floppy drive”). The second position is Hard Drive, and the third position is Disabled.
When you select any line, a window appears next to it with a list of possible assignments. In addition to those described above, you can install a CDROM (“disk drive”) or USB Device (“device connected via a USB port”). This is exactly what is required to enable booting from a flash drive in the BIOS. After you set the new command priority, press the F10 key and confirm your choice by clicking on “Ok” in the window that appears. After these changes in the BIOS, booting from the flash drive will be carried out automatically.

Preparing a USB drive
However, if you just throw it at the program, nothing will happen. In order for the computer to boot from a flash drive correctly, the flash drive must be bootable. This can be achieved either by using special programs, or by registering the necessary tasks on the command line. First, let's look at two popular programs. We won’t dwell on the fact that first you need to install the program on your computer. Let's move on to working directly with her.
A few words about the ISO format
Don't try to just copy files. Be sure to find it in ISO format. The fact is that program creators often use copy protection in some files. This will be enough to prevent the entire program from working. And the peculiarity of a disk image in an ISO is that every byte is copied there sequentially. Conventionally, this can be illustrated by the difference between a painting painted by an artist and digital photography. They may represent the same object, but the photograph will still be more accurate. So, for loading from a flash drive to be successful, you need exactly a “photo” - an ISO disk image.
How to use UltraISO
- The program must be opened using administrator rights, otherwise nothing will work. To do this, right-click on the icon. In the menu that opens, select “Run as administrator.”
- After that, expand the “File” menu (the top line is the first position) and give the command “Open...”. Or, if you prefer to use the keyboard, press Ctrl + O.
- To this moment operating system in ISO format should already be in the computer's memory. Select it by clicking the left mouse button.
- Now go to the Bootstrap menu. This is the third position on the top line.
- Give the command “Burn image” Hard drive..." (next to the desired line there is a four-color shield icon).
- Carefully check the information that appears in the pop-up window. Pay special attention to the “Recording Method”. It should say: USB-HDD+.
- Click on the “Record” button (bottom row).
- Do not be alarmed by the warning that all information will be erased. Confirm that you wish to continue.
- After this, the recording process will begin, during which the window will indicate what stage the recording is at. You will need to wait a few minutes.
- Soon the program will please you with the message “Recording complete!”
Don't be intimidated by such a lengthy description. In practice, everything happens easier than it looks. It’s just that this detailed explanation will save you time (and possibly nerves) when you first get acquainted with the program.
Windows7 USB/DVD Download Tool
Once you install the Windows7 USB/DVD Download Tool on your computer, you only need to follow three simple steps. Remember that the program must be opened with administrator rights.
- Step one: in the window that opens, the program will ask for the source file. Click the Browse and Next buttons.
- Step two: Choose media type. The choice is yours USB device(flash drive) and DVD (disc). Choose the first type.
- Step three: specify the path to the flash drive and click Begin copying (“start copying”).
The program will do the rest on its own. All you have to do is wait for the copying process to complete.
Although, at first glance, this program seems easier to use, it is useful to know that there have been cases when loading Windows 7 from a flash drive recorded by the above program simply did not start. This doesn't always happen. But if you encounter a similar problem, just use UltraISO. Booting Windows from a flash drive recorded by this program always works correctly.

Using your own resources
However, it is possible, without resorting to any additional programs. It will be enough to ask required parameters on the command line.
Left-click on the “Start” button (the Windows logo icon in the lower left corner of the desktop). In the search bar, type the word “run”. In the list that opens, select the “Run” program. In most cases it will be first on the list. In the field that appears, enter You called command line. And now we will describe how to act with the help of it.
Working with the command line
We will work to ensure that our laptop can boot from a flash drive. Acer Aspire will serve as a prototype. If you did everything correctly, the following line should appear: C:\Users\ACER>. In this line enter (call a utility that manages partitions on the hard drive). The computer will provide the requested information. In the case of Acer Aspire it looks like this:
- Microsoft DiskPart version 6.1.7601.
- Microsoft Corporation, 1999-2008.
- On computer: Acer-V5_PC.
- DISKPART>.
Enter the following command: list disk (request a list of available disk drives). A table will appear with a list of disks, the numbering of which starts from zero. Look at what number is assigned to the removable media you have chosen (the column indicating the size will help you determine this). In our example this will be “Disk 1”. Type in the line: select disk 1 (“select disk 1”). Remember that the number may differ depending on what position your computer has defined for the flash drive. A confirmation should appear:
- Disk 1 is selected.
- DISKPART>.
- create partition primary (“create primary partition”);
- select partition 1 (“select partition 1”);
- active("make active");
- format fs=NTFS (“format to NTFS system”).
Wait until the process score reaches 100%. At this stage, if desired, you can assign an individual volume letter to the flash drive. Although this is not necessary. But if you decide to name it, enter: assign letter=T (“assign the letter T”). You can choose a letter arbitrarily. And the final touch is the Exit command.
What else needs to be done before installation
After all the preparatory work has been done, you can proceed directly to installing the operating system. Let's try to avoid all the pitfalls in this process.
So, to begin with, let's remember that Windows download from the flash drive will be transferred to the C:\ drive. And therefore it is necessary important information From there, save it either to another disk or to removable media. All information from this disk will be lost.
The same goes for everything software. However, it is better not to simply move the programs to a neighboring drive, but to reinstall them again. This will prevent you from clogging up the system registry again.
Pay special attention to drivers. In some cases, they are included with your computer or laptop, but sometimes they need to be installed or updated. Be sure to save the drivers from the C:\ drive to any other drive. Otherwise, after loading from the flash drive has already completed, you may be sad to discover that, for example, the Internet connection is not supported due to the lack of the required driver. Therefore, after installing the operating system, the first thing to do is re-equip your computer or laptop with all the drivers.
Booting Windows 7 from a USB flash drive

Installing an operating system is not such a scary and complicated action as it might seem at first glance. Especially with this detailed step by step instructions you have nothing to fear at all. Just be careful and do not confirm an action if you do not understand why it is needed.
If you have already prioritized booting from a flash drive, simply restart your computer (the flash drive must be connected, of course). It should appear with the text at the bottom: Windows is loading files... (“Windows is loading files”). This means that the process of copying data from the media has begun.
Soon the message Starting Windows will appear (“ Launching Windows"), after which you will see the installation window on the usual colored background. The first thing you'll be asked to choose is your preferred language, time format, and keyboard layout. Everything can be selected without problems from the pop-up lists. Click the “Next” button. On the next window, you are only interested in the “Install” button (it is located in the middle of the screen). Press. Next, accept the terms license agreement(check the box and click “Next”).
The next item is choosing the installation type. You need full installation(second option). The computer will now offer you disks on which you can install the system. It is preferable to choose one that allows you to reserve at least 50 GB of space for Windows. Select it by clicking the left mouse button. Below you will see a list of actions that can be performed with this disk. Click "Create". IN this moment we are making a partition on which the operating system will be stored. You will see the size data (don't be alarmed by the huge number - these are megabytes). Click "Apply".
 The system will warn you that, in addition to this section, it will create additional ones. This is fine. Agree (button “Ok”) - and click “Next”. Now the installation process will really begin. It is quite long, it can take about half an hour. During installation, the system will reboot itself several times. However, no action on your part is required.
Once the installation is complete, there are only a couple of finishing touches left. You will be prompted to enter your user and computer name, set a password (you can skip this step) and enter an activation key (you can skip this too, but you will still have to activate the program within 30 days). The last step is to set the time and date.
You can congratulate yourself - loading from Windows flash drives was successful!