Installed a new Windows system 10, and the search in it does not work? Nothing surprising, in the next product from Microsoft full of imperfections. But do not sin on it: firstly, any software at the first stages it gives a lot of errors due to its running in, and secondly, such a problem is easy to fix. Moreover, the search is new feature. You do not even need to have special programming skills, just go through a few simple steps.
The search has already managed to fall in love Windows users 10. This is a great feature that helps you find the right item in a short time. This applies to how Windows settings 10, and any files on the computer. Also already working voice search, which does not force you to type words on the keyboard. Everything would be fine, but every update sometimes promises another problem. It's all about the software incompatibility of some components of Windows 10. If the search fails, let's start treating it.
Solution
To solve a similar problem, when the search does not work, you need to edit Windows registry 10. There is nothing terrible in the name of the registry - it is just a certain data storage. By editing registry values, you can correct Windows work 10. Naturally, for comfortable work, you need to fine-tune the operating system to your needs. And the registry allows it. So let's get started with the implementation:
- Open the registry using the Win + R key combination.
- This combination opens a special window.
- In this window, go to: HKEY_LOCAL_MACHINE\SOFTWARE\Microsoft\Windows Search.
- You need to find the name SetupCompletedSuccesfuly.

- You can change the values in the registry, so you should replace the right-click parameter 0 with 1.
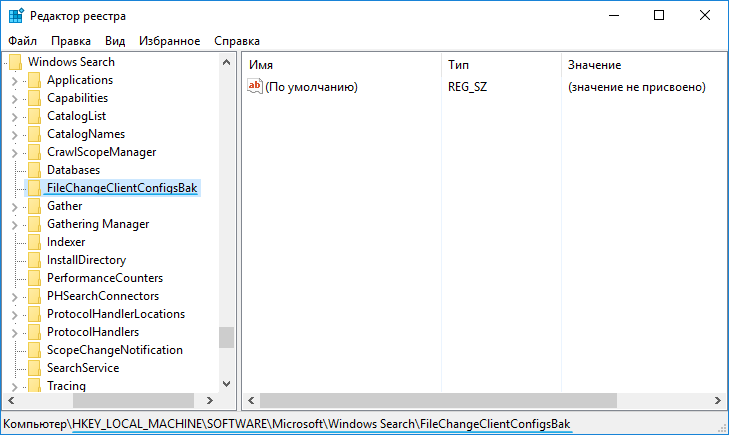
- Then we go to the branch: HKEY_LOCAL_MACHINE \SOFTWARE\ Microsoft \Windows Search\FileChangeClientConfigs.
- Therefore, we find the line FileChangeClientConfigs at the address and rename it FileChangeClientConfigsBak.
After completing all the steps, you need to restart Windows 10. Such a simple trick, after which the search works again.
Is it safe
It should be remembered that any changes to the computer should be done with care. Unfortunately, the incompleteness of Windows 10 forces the user to quickly adjust their system to the changes. Nothing can be done, it will take a long time before the developers are completely finished adapting their applications to the new axis.
Therefore, every time a problem occurs, something needs to be corrected. Should I worry too much about changes in system files? In fact, the register with values can be corrected back. Worst case, reinstalling will help. This procedure will clean up the malicious software, and possibly give a new build, more successful than it was previously installed on the machine.
Whether something works or doesn't work - in any case, you should never panic, as any changes can be turned back. Even an unprepared person can use the resources on the network, which publishes a lot of information on setting up operating systems. Our project is not an exception from the list of sites to help. It is enough to read articles on topics of interest to begin to understand how a computer works. And no search will oppose users.
After installing "dozens", especially when author's assemblies are used for this, its intelligent search engine may not work. And the reason Windows 10 search doesn't work is because it's been improved when developers release updates. But any of them can cause problems with the search engine. And here no one should be blamed, because any program has errors, shortcomings and shortcomings, and the problem is easily fixed and does not require special knowledge.
If Search does not work in Windows 10, the user will not be able to take advantage of it to execute many system commands, launch programs, launch applets, and quickly access OS settings. As you can see, a newbie search engine in the "top ten" will not be easy.
The problem is solved by editing the registry keys that are responsible for search options in Windows 10.
1. We call a program that allows you to directly change most of the registry entries.
This is done by executing the "regedit" command in the same search line or command interpreter window (called by the Win + R keys).

The structure of the registry is presented in visual form, reminiscent of a tree-like visualization of the contents of a disk in file manager.
2 By the principle of working with the file manager, open the branch (section) "HKLM".
3. Go along the path SOFTWARE\Microsoft\Windows Search.
4. We find the key (parameter) called SetupCompletedSuccesfuly.
5. By double clicking or context menu element we call the window for its editing.
6. In the line with the value, replace zero with one and click "OK".

7. In the same HKLM section, go to SOFTWARE\Microsoft\Windows Search.
8. In the FileChangeClientConfigs branch, find a branch (similar to a directory in Explorer or a file manager) with the same name and rename it to FileChangeClientConfigsBak.
9. Reboot and check if the search has started to function.
If Windows 10 search doesn't work again, skip to the next section.
The search soon stopped working again
"Ten" is kind to the defense system files which sometimes negatively affects its functioning. For example, a renamed registry key may reappear. In this case, we do the following.
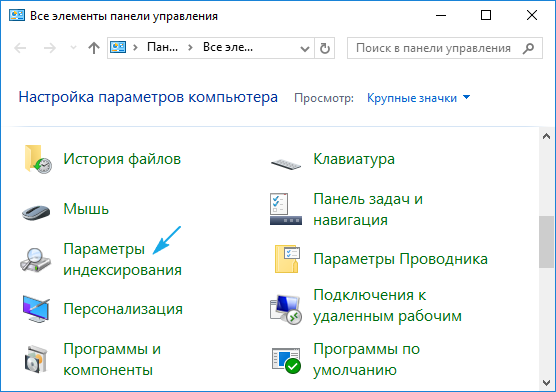
1. We call the Control Panel.
2. We find an applet called "Indexing Options" and launch its configuration window.
3. Click on the "Change" button.

4 Select the places where you want to perform an instant search and save the new settings.

5. We call Extra options and click on the "Rebuild Index" icon.

After that, we call the "Task Manager" and restart the explorer.exe process or Explorer.
Also, these operations will speed up the search.
Another solution to the problem
Responsible for the operation of the search engine in Windows windows service search. If it is disabled, of course, the search will not function. Check if it's enabled automatic start this service.
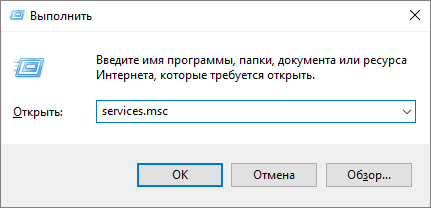
1. We call the "Run" window, designed to run system commands.
It is called using Win + R.
2. Enter services.msc and execute the command.
3. In the list of services we find "Windows Search" and check its status.
The Startup Type should be Automatic and the Status field should be set to Running.
4. If this is not the case (most likely it is), we call the properties of the service.
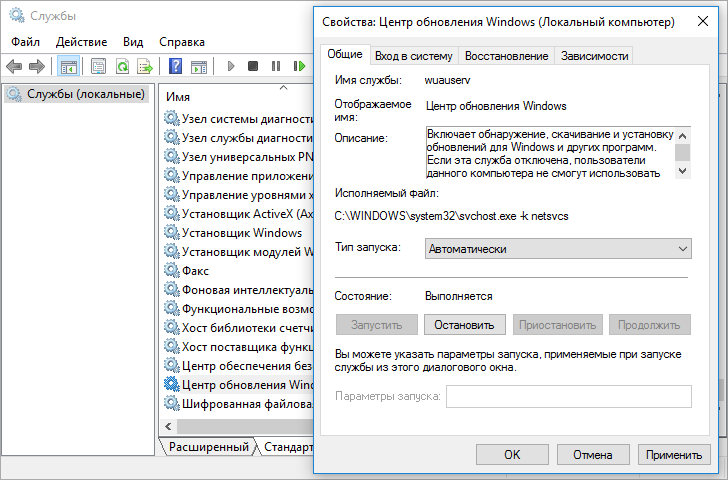
5. We set the automatic way to start it and run it so that the search will work in the current session of restarting the computer.
After upgrading to Windows 10, some users have encountered such a problem that they do not open some windows, such as: All Settings, Start Menu, Windows Search, Notifications, and possibly some other windows. This situation can be corrected.
First of all, try restart the explorer.exe process.
To do this, simultaneously hold down the keys Ctrl + Shift + Esc. Or right-click on an empty space on the taskbar and select Task Manager.
In the window Task Manager click on the button More and among processes find Conductor ( windows explorer) . Right-click on the found process and select the item Restart.

If the method above did not help, then we will act through the utility PowerShell.
In general, this utility, as a rule, opens through Start or using the search, but if these tools do not work for you, then you can open this utility by going to This computer, and then along the way: C:\Windows\System32\WindowsPowerShell\v1.0, in this folder, right-click on the element with the name powershell.exe and choose the item Run as administrator.

In the utility itself, i.e. in the blue window that opens, enter the command:
Get-AppXPackage -AllUsers | Foreach (Add-AppxPackage -DisableDevelopmentMode -Register “$($_.InstallLocation)\AppXManifest.xml”)
And press the key Enter. When the process is complete, try opening the menu Start Now.
If the two methods described above did not help, then you can create a new user, and if everything opens normally with the help of a new user, then transfer everything desired applications there, and simply delete the old account. (To get into Control Panel, to create a new user, hold down the keys Win+R and in the window that opens, enter control, it remains to press OK).
If Start, Search and other windows do not open in the newly created user, we recommend that you roll back the system to the previous OS, and then perform the update process again by restarting the computer.
When Windows 10 search is not working, the most obvious solution is to restart the explorer process. It overloads the start menu, panel quick launch and updates the entire management interface. This is the case when it comes to the fact that the search tool called by the combination Win + S has stopped working. It displays a variety of applications, snap-ins that are present on the PC. The Start menu has failed several times throughout the evolution of the dozen, but reports of such cases are becoming increasingly rare.
There are also other kinds of problems. User invokes explorer via Win+E and finds he can't weed required files by entering their names. This case rather indicates a system failure. And the only thing that Microsoft experts can advise is to create a new account(via netplwiz) and try the same steps from there. First of all, right-click on the Taskbar, and make sure that Search is present, enabled by the corresponding checkbox in the settings, and then move on ...
Restarting Explorer
The Start menu will be redrawn, it is possible that the search will also work.
Keyboard shortcuts

To quickly enter the search on the top ten, use Win + S (in previous versions– Win+F).
Searching for files via command line
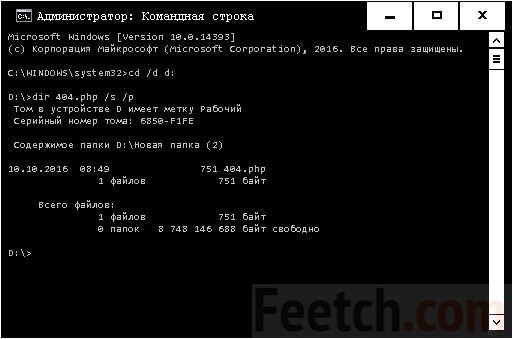
If only part of the name is known, replace the other letters with questions. An asterisk immediately fills all the free space. In the example on the screen, 0 is replaced by a question mark.

You will see that this tool is faster than the regular File Explorer.
Searching for files via Run
For this purpose, the search-ms command is used (msdn.microsoft.com/en-us/library/ff684385.aspx):
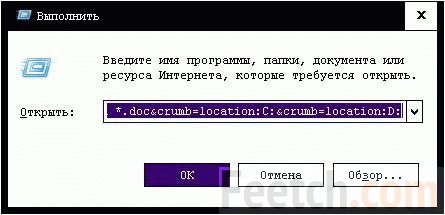
This technique is suitable in cases where the Search does not work, the button is pressed, and the result is not entered in the field. The list that opens in Explorer will contain all the files you are looking for.
Through the system menu
As noted above, not once have users seen that the Start menu does not want to open. Why does not work, and how to turn it on, no one knows. Try opening with keyboard shortcuts?
It has long been noticed that the system menu, called through Win + X, always works. There is a Find line that will help many solve their problem. This is the same as pressing Win + S.
Mastering the search tools in File Explorer is perhaps the most important thing you need to know. And the biggest performance boost comes when you realize that you can save files in one folder and quickly find them there, instead of having to tediously nest folders.
Each search in the file explorer consists of three parts:
Search area. This is where you search. It can be a folder (with or without subfolders), a library, or some other place to look for.
Filters. To limit the search results, you can use specific filters - by date, file type, tags and other details, usually selected from a list or control.
Search terms. This is the text you enter in the search box. Windows finds matching files and folders by file name or file content.
You can, of course, search for files using the search field on the taskbar. Enter in search desired term, then click on one of the small icons at the top of the results list to see the documents, folders, images that match that term, music files or video.
However, this is more than just a search, the search box in the file explorer is a logical starting point.
Create a search using the ribbon
Over the years, the tools for creating searches in Windows have evolved a lot. On Windows 10, you can create searches using collections of point-and-click lists. In the right upper corner file explorer window, click in the search field, the search toolbar will open.
These search tools only appear after the cursor is positioned in the search field. For more complex searches, you can combine multiple criteria.
The search tools you select are applied in the context you specify. For example, in the figure above, the navigation bar is selected OneDrive storage, and the location on the ribbon is the All Subfolders group (default). By clicking on the "Modified by date" criterion and selecting "Today" from the drop-down list, you will see two files that were added or changed in the OneDrive folder today.
If you are looking for notes you created after a meeting and remember that the meeting was in this month, you can, in the edit by date section, click on the "Last month" option. If the number of results is too large, apply additional filters or click in the search field and enter a word or phrase known to you in the file name or its content.
The top three filters in the Refine group, on the search tools tab, are:
Change by date. This property defines new date saved file or folder that was created or last modified. For a downloaded program file, it shows the date you saved the file locally, not the date it was created by the developer.
sign. This field shows predefined groups of file attributes, including some items not stored in Explorer. The most common choice is a document that includes text files, any office and PDF files. If you're looking for digital media, try the word music or pictures.
Size. This value suggests a range of sizes. If you want to clear your system disk, select "Large" (from 16 to 128 MB) or "Giant" (more than 128 MB) size. It's a great way to find large files, which you can safely delete or archive to an external drive.
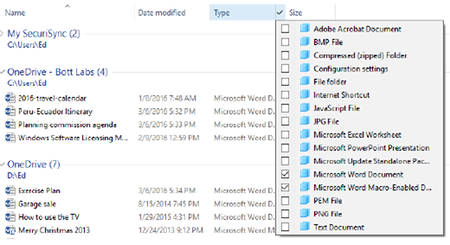
Click the "More Properties" option on the search tools tab and view four additional filters with which you can refine your search results:
Type. This property uses the file type attribute. You can enter the file extension (such as pdf, xls, or docx) or any part of the description (such as Excel, Word, image, text, or folder).
Name. Here you can enter a text string. The list of results will show any files or folders containing this string in their name.
The path to the folder. Enter a text string here. The list of results will show all files and folders containing this string in full path. For example, enter doc; the results will include all files and folders in the My Documents folder and any of its subfolders (since Documents is part of the path for those subfolders), as well as the contents of any other folders that have those three letters in their name.
tags. Almost all data files contain this field, which is stored as metadata in the file itself. You can add one or more tags to any file in the details panel or in the properties dialog box of the details tab.
Using tags for precise searches
Entering tags requires extra effort, but it's worth it, especially in large projects. The advantage of tagging a group of files, such as "Project X" or "2016 Finance" is that you can count on finding those files even if there is no tag text in the file name or content. Because tags are stored as metadata, they can be used to identify files as part of a project group.
You can create a search by combining values from different fields. For example, in the list of changes by date, you can enter - this week, and in the features area - document. The result filters out all items older than the start of the current week and any files that don't match the attribute, such as MP3 files and photos.
However, in the drop-down list, more than one value for a particular field cannot be selected. For example, if you specify the value - last week, it will replace any previously specified value.
Using filters to find groups of files
Using the tabs on the ribbon for a periodic one-time fine search - the search tools are often faster and more flexible than switching to the detail view in the file explorer and using its built-in filtering options. The figure below shows an example of filtering files in a library by type. Unlike the corresponding Explorer options, on the search tools tab, you can specify multiple file types by checking the boxes in the type drop-down list.
In detail view, click on the right edge of any column heading and open the drop-down list built from the contents of this folder, then check the boxes to view the corresponding files.
It should be noted that this method only filters what is currently displayed in the content pane, usually the content of a folder or library. Subfolders are not searched.
Combined search and filters
To expand the filters in the detail view so that they include all subfolders, click in the search field and enter the wildcard character *. Now the list will display all files and folders of the current folder and all its subfolders. After that, to refine the results, you can switch to the detailed view and use the filter drop-down list on any column heading.
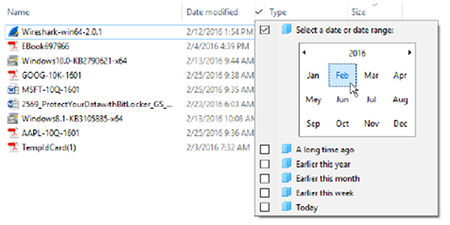
Noteworthy is the change date filter. As shown in the following figure, the calendar of the current month is displayed here, and just below, some predefined options.
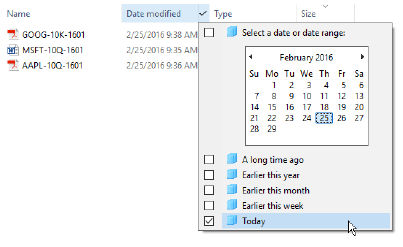
Calendar management looks simple, but has more options than it looks.
The options list at the bottom is dynamic, showing only alternatives that return valid search results. This is the main difference from the fixed search tools tab menu.
Calendar management is much more versatile than it seems. By default, the current month is displayed. Click on the heading of a month, which will change the display to all 12 months of the current year:
In this view, you can use the Shift key and click or click and drag to select multiple consecutive months in the same year. (Unfortunately, you can't Ctrl+click and select non-contiguous months.)
Click on the year heading and view all 10 years of the current decade:
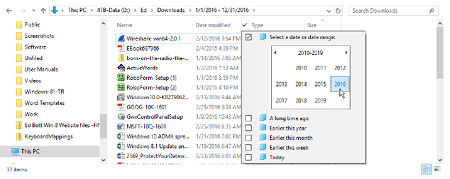
In addition, to view files of two or more consecutive years, you can use click and drag. This is useful if you are viewing a long-term archive of files and folders.
If you like the calendar management feature, you can add it to your search terms main search box. To do this, click in the search box and type datemodified:(don't forget the colon). If there is already a /datemodified filter in the search box, click on it (note that in the list below the calendar, you can select several options):

This calendar control works exactly like the headings option in the detail view's change by date filter. However, the fixed menu options are slightly different.
Creating complex searches
Search capabilities in Windows 10 are a direct descendant of the "Date" function. These original search tools ran on the so-called Advanced Query Syntax (AQS), which still works today, but usually in documentless form.
Some remnants of AQS, you can see when creating a search using the search tools tab. Each entry you make on the feed adds a matching query to the search box.
The search operator is easily distinguished from the search string and is displayed in blue followed by a colon. If you use an equal sign (=) and enclose the search string in quotation marks, you force an exact match.
If you are in the mood to mess around with bits, you can try manual creation search. For example, if you only want to see folders whose names start with the letters A through E, in the search box type type:="File folder" name:(>A AND
Also, you can use a colon between a couple of dates. Thus, the parameter datemodified:12/1/2015..1/31/2016 displays files created between December 2015 and January 2016, which cannot be done in the calendar management function. More on this in Windows 10 Inside Out (Microsoft Press, 2015).
Saving a search
Saving search settings is a very handy option. You can save your search and reuse it. While maintaining the conditions Windows Search writes its parameters to an XML file, which is stored in the "Searchs" folder of the user's profile. This search save format uses the search ms file extension. The beauty of saved searches is that relative dates, such as this week and last month, are revisited every time you run a saved search, so the results are always as expected.
For example, you might want to quickly see all the OneDrive synced files that were added or changed in the last week or two. How to create a saved search:
- Open your OneDrive folder by clicking its entry in the navigation bar.
- Click in the search field and enter datemodified:this week/this week or datemodified:last week/the last week.
- On the Search ribbon tab, click the Save Search button.
That's all you need to do. Windows will automatically store the current search context and your date filters in the folder's XML file %UserProfile%\Searchs. Open this folder and double-click on any saved search, which will automatically restart it.
The figure shows a collection of saved searches. To make it easier to understand what each search does, saved file searches can be renamed. (Right click on a saved search, select "Rename" and change the name to something more descriptive).
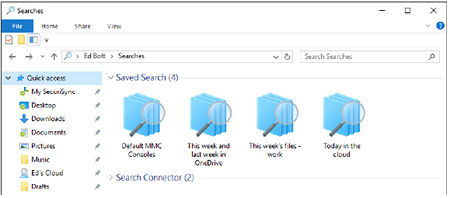
The search folder in your user profile contains all saved searches. In this example, the default names have been changed to be more descriptive.
Using a saved search as a starting point
If you open a saved search, its results can be used as the start of a new search. Any terms you enter into the search field will be returned as the corresponding files and folders from the saved search results. For example, if you have a saved search that shows all the files saved to OneDrive this year, you can open it and then enter more specific information, "birthday" or mp3 in the search field. As a result, files containing the search word in the file name or the file itself will be found, but only if they are in OneDrive and have been changed this year.
Once you've created a collection of saved searches, there are two things you can do to make it easier to access:
Pin a shortcut to the search folder in quick access. So, you can quickly view all your saved searches and double-click to start any re-search.
In the "Search" folder, right-click on any saved search, then select the "Pin to Start Screen" option from the context menu.