In this article I will tell you how to configure the BIOS on your laptop yourself Acer - Packard Bell ENTE11 to boot from a flash drive.
Create bootable USB flash drive, for installation Windows 7, 8, XP , you can do it yourself, using THIS instructions.
This may be necessary for reinstallation operating system, or to treat viruses by booting from a flash drive and running the antivirus.
Our first step will be to get into the BIOS.
To do this, turn on the laptop and immediately press the F2 key.
Having entered the BIOS, we find ourselves in a tab with brief information about the laptop.
Then go to the "Boot" tab and in the first item "Boot mode" select the "Legacy BIOS" mode.
Now go to the “Exit” tab and select the first item - exit with saving changes “Exit Saving Changes”.
If there is no flash drive or CD, booting will be done from the hard drive.
For greater clarity, you can watch a video on setting up the BIOS.
Video instruction By BIOS setup laptop Acer-Packard Bell ENTE11 to boot from the installation flash drive.
Settings Laptop BIOS Packard Bell P5WS5
Let's look at this example to see how easy it is to configure the BIOS to boot from a flash drive or drive. And at the same time, we will also enable the boot selection option.
But everything is in order. This model of the Packard Bell P5WS5 laptop has a simple BIOS, without any UEFI and other bells and whistles.
Well, let's begin.
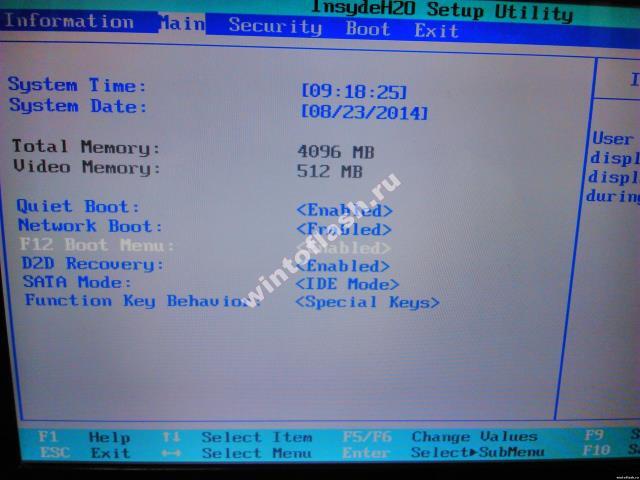
First we need to enter the BIOS. As always, enter using the "F2" key.
And here we see brief description laptop. Such as core frequency, connected devices (hard drive and drive), BIOS version.
But we are not interested in this.
And having admired the characteristics of the Packard Bell P5WS5 laptop, we go to the “Main” tab.
Here we enable the "F12 Boot Menu" option and don't touch anything else!
P.S.: Do not switch “Sata mode”; if you switch, your OS simply will not start. There will be an eternal reboot with code 7B.
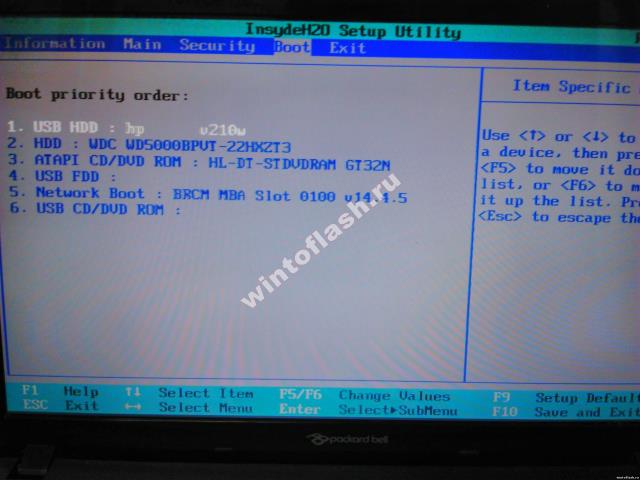
Did you do as written above? Let's move on to the next tab "Boot".
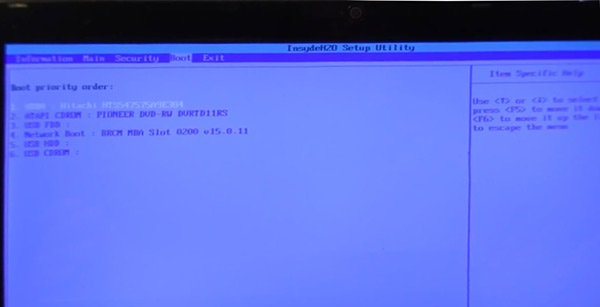
This is where we see the connected devices. In this example, I set the priority for launching from a flash drive, but if the flash drive is not inserted, it will boot from the hard drive, etc.
The priority is set using the "F5" (lower) and "F6" (increase) keys.
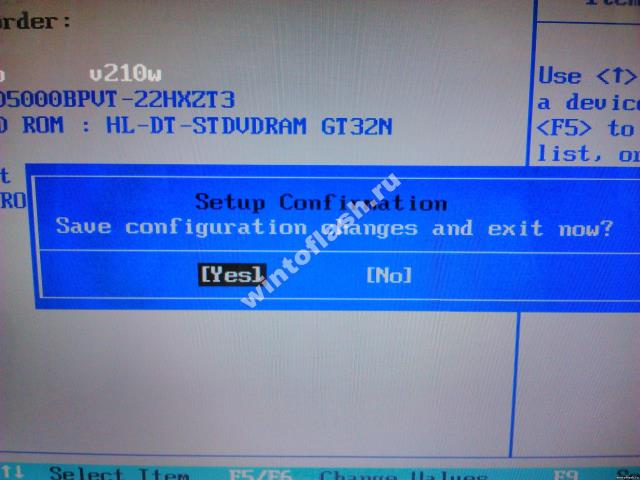
Have you chosen what we will launch from? Then Press the "F10" key and a window will appear in front of us with the question: "Are you sure you want to save the settings?"
Naturally yes, select “Yes” and press “Enter”.
At this stage, we saved the settings of the given boot priorities and enabled the “Boot menu” option - in Russian words “Boot menu”.
To go into boot menu, you need to press the "F12" key when turning it on (when the logo appears, in no case after, since it will load).
The boot menu looks like this.
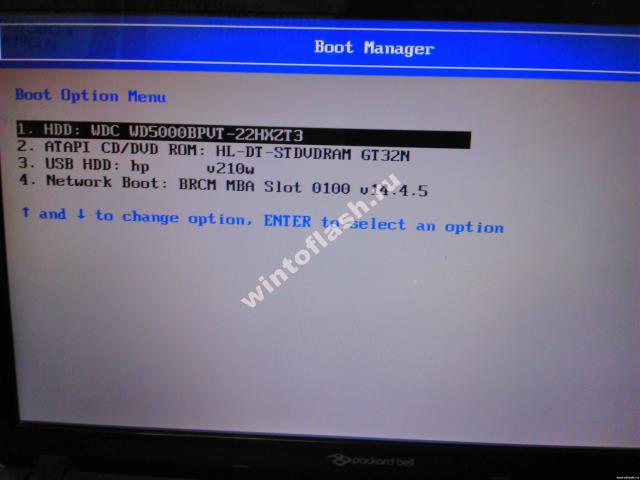
In the boot menu, simply use the arrows to select what you want to boot from and press "Enter".
That's all BIOS setup Packard Bell P5WS5 laptop to boot from a flash drive or drive and enable the boot menu.
So, you need to boot from a flash drive or other device, for example, to install an operating system or scan the system for viruses. To resolve this issue, there are two options. For the first method, you first need to enter the BIOS, then go to the boot menu, and there set the device from which you want to boot the computer. The second method does not require entering the BIOS, you just need to call the boot menu directly, this is done by pressing keys when starting the computer.
Keys to enter BIOS and Boot Menu
Typically, the keys for entering the BIOS and Boot Menu (POST keys) are indicated at the initial stage of booting the computer; in the screenshot, these keys are indicated at the bottom of the screen.
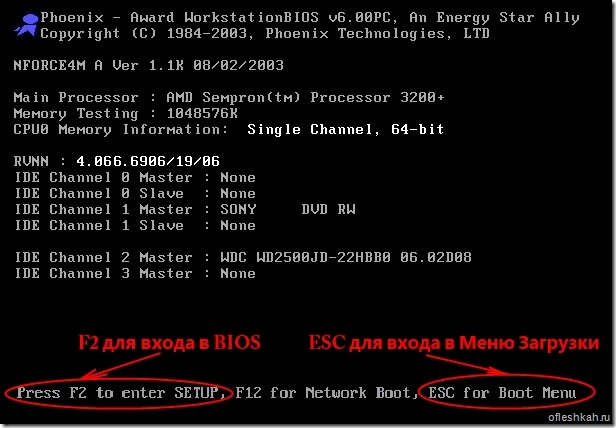
In our case, to get to the boot menu you need to press the key, and to get to the BIOS you need to press the key.
BIOS entry keys for laptops and PCs
Manufacturer - BIOS - Hotkey.
Acer (Altos 600 Server) - ++ or
Acer (Aspire, Power, Veriton, Extensa, Ferrari, TravelMate, Altos) - or
Acer (Older PC) - or ++
AMI (American Megatrends AMIBIOS, AMI BIOS) -
AMI (American Megatrends AMIBIOS, AMI BIOS) - Old Version - or
Award BIOS (AwardBIOS) -
Award BIOS (AwardBIOS) - Old Version - ++
Compaq (Older Computers) - , , , or
Compaq (Presario, Prolinea, Deskpro, Systempro, Portable) - - at the moment the logo is displayed.
Compaq (Presario, Prolinea, Deskpro, Systempro, Portable) - - cursor in the upper right corner.
Dell (Older 486 Models) - ++
Dell (Older Laptop Models) - + or +
Dell (Some Models) - Reset - press the button twice
Dell (XPS, Dimension, Inspiron, Latitude. OptiPlex, Precision, Vostro) -
Dell Dimension L566cx System -
eMachine (Some Older Computers) —
eMachines (eMonster, eTower, eOne, S-Series, T-Series) - or
Gateway (Some Older PCs) -
Gateway Using Phoenix BIOS (DX, FX, One, GM, GT, GX, Profile, Astro)
Hewlett-Parkard (HP Alternative) - or
Hewlett-Parkard (HP Pavilion, TouchSmart, Vectra, OmniBook, Tablet) -
Hewlett-Parkard (HP) Tablet PC - or
IBM (Older Computers or Notebooks) —
IBM (PC, XT, AT) -
IBM ThinkPad using IBM BIOS (Early Models) - ++ - when the cursor is in the upper right corner.
IBM ThinkPad using IBM BIOS (Later Models) - - press and hold
IBM ThinkPad using Phoenix BIOS - ++ - from command line DOS
Lenovo (Older Products) - ++, ++ or +
Lenovo (ThinkPad, IdeaPad, 3000 Series, ThinkCentre, ThinkStation) - or
NEC (PowerMate, Versa, W-Series) -
NEC Versa Notebook - - press and hold.
Packard Bell (8900 Series, 9000 Series, Pulsar, Platinum, EasyNote, imedia, iextreme) - , or
Packard Bell (Early 386 and 486 Dodels) - ++[S] - sequentially.
Phoenix BIOS (Phoenix-Award BIOS) -
Phoenix BIOS (Phoenix-Award BIOS) - Old Version - ++[S], ++, ++ or +[S]
Sharp (Notebook Laptops, Actius UltraLite) -
Sharp (Old PCs) - Requires diagnostic disk to enter BIOS.
Sony (VAIO, PCG-Series, VGN-Series) - , or
Sony Vaio 320 Series -
Tandon - ++
Tandon 386 — ++
Toshiba (Portege, Satellite, Tecra with Phoenix BIOS) -
Toshiba (Portege, Satellite, Tecra) -
After pressing the keys, the BIOS system menu will open. Appearance BIOS systems may vary depending on the manufacturer motherboard and BIOS version.

But every version of Bios has a Boot menu, and this is exactly the parameter we need to find – Boot if we need to set it to boot from a flash drive, for example. Next, let's look at entering the boot menu without visiting BIOS.
Keys for calling up the boot menu on laptops and personal computers
At the beginning of the computer boot, you can see a key combination or key (POST hotkeys) by pressing which you will be taken to the boot menu directly bypassing visiting the BIOS. On some computers, Boot Menu hotkeys may be disabled by default in the BIOS. To be able to use hotkeys, you need to enable it in the BIOS settings. Opposite the F12 Boot Menu column you need to set the Enabled parameter.
Good afternoon.
Many problems on a laptop can be solved if you reset the BIOS settings to factory settings (sometimes they are also called optimal or safe).
In general, this is done quite easily, it will be more difficult if you set a password on the BIOS and when you turn on the laptop it will ask for this same password. There is no way around this without disassembling the laptop...
In this article I wanted to look at both options.
1. Reset laptop BIOS settings to factory settings
To enter the BIOS settings, the keys are usually used F2 or Delete(sometimes F10 key). It depends on the model of your laptop.
Finding out which button to press is quite easy: reboot the laptop (or turn it on) and look at the first welcome window (it always indicates a button to enter the Bios settings). You can also use the documentation that came with the laptop upon purchase.
And so, we will assume that you have entered the Bios settings. Next we are interested in Exit tab. By the way, in laptops of different brands (ASUS, ACER, HP, SAMSUNG, LENOVO) the names of the Bios sections are almost the same, so there is no point in taking screenshots for each model...
![]()
Setting up BIOS on an ACER Packard Bell laptop.
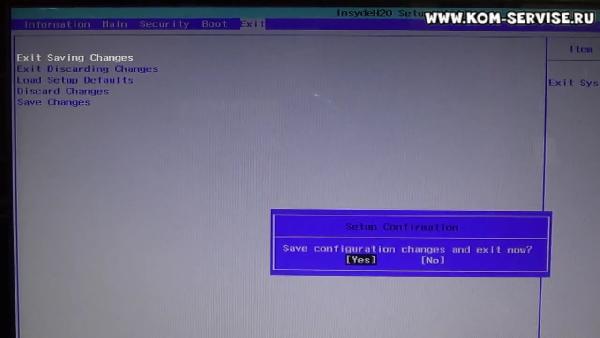
Next, in the Exit section, select a line like " Load Setup Defaults" (i.e. loading default settings (or default settings)). Then, in a pop-up window, you will need to confirm that you want to reset the settings.
And all that remains is to exit the BIOS while saving the settings made: select Exit Saving Changes(first line, see screenshot below).
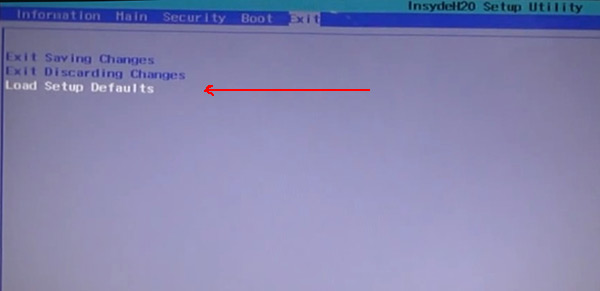
Load Setup Defaults - loading default settings. ACER Packard Bell.
By the way, in 99% of cases with the settings reset, the laptop will boot normally. But sometimes a small error occurs and the laptop cannot find where to boot from (i.e. from what device: flash drive, HDD, etc.).
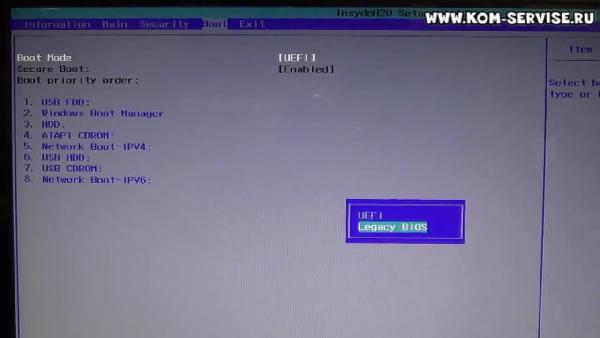
To fix it, go to Bios again and go to the section Boot .
Here you need to change the tab Boot Mode :UEFI change to Legacy, then exit the Bios saving the settings. After rebooting, the laptop should boot normally from hard drive.
![]()
Changing the Boot Mode function.
2. How to reset BIOS settings if it requires a password?
Now let's imagine a more serious situation: it happened that you set a password for the Bios, and now you have forgotten it (or your sister, brother, friend has set a password and is calling you for help...).
Turn on your laptop (in the example, an ACER laptop) and see the following.

ACER. The BIOS asks you to enter a password to use the laptop.
To all brute force attempts, the laptop responds with an error and after several incorrect passwords are entered, it simply turns off...
In this case, you cannot do without removing back cover laptop.
You only need to do three things:
- disconnect the laptop from all devices and generally remove all cords that are connected to it (headphones, power cord, mouse, etc.);
- remove the battery;
- remove the cover protecting RAM And HDD laptop (the design of all laptops is different, sometimes you may need to completely remove the back cover).
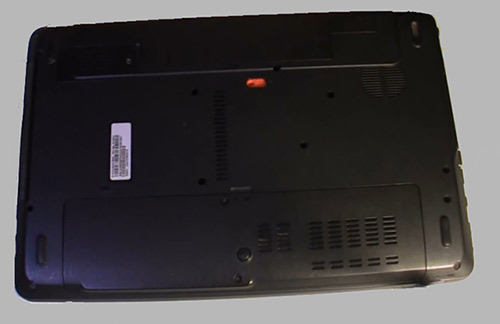
Overturned laptop on the table. You need to remove: the battery, the HDD and RAM cover.

Laptop without battery, hard drive and RAM.
There are two contacts under the RAM strips (they are also signed JCMOS) - these are what we need. Now do the following:
- close these contacts with a screwdriver (and do not open them until you turn off the laptop. This requires patience and accuracy);
- connect the power cord to the laptop;
- turn on the laptop and wait about a second. 20-30;
- turn off the laptop.
Now you can connect the RAM, hard drive and battery.
![]()
Contacts that need to be closed to reset the BIOS settings. Usually these contacts are labeled with the word CMOS.
ACER laptop bios has been reset.
We need to say a few words about the “pitfalls”:
- not all laptops will have two contacts, some will have three, and to reset you need to move the jumper from one position to another and wait a few minutes;
- instead of jumpers there may be a zero button: just press it with a pencil or pen and wait a few seconds;
- You can also reset the Bios if you remove the battery from the laptop motherboard for a while (the battery looks like a small tablet).
That's all for today. Don't forget your passwords!
Social buttons.
Typically, the average user does not particularly need to delve into the technical nuances of the portable device entrusted to his hands. electronic device. Nevertheless, knowing the answer to the question about what is in the laptop contributes to some process of liberation... After all, reinstalling the system, improving the modification, as well as competent problem situations of conflicting computer hardware devices is the prerogative of specialists. As is known, maintenance and software repair cost money. Therefore, it makes sense to understand some computer intricacies, because knowledge is a kind of freedom!
What kind of beast is this BIOS?
The short acronym BIOS stands for Basic Input/Output System. In other words, it is the built-in firmware that controls the laptop hardware and interacts with system components.
Depending on the type of chip used, on which the microcode is located, the BIOS can be updated (overwritten). Why is it so important to know the answer to the question of how to enter the BIOS on a laptop? Firstly, it’s interesting, and secondly, it’s incredibly useful! Moreover, the final argument became the reason for this information review.
"Brotherhood" BIOS(a)
There are several types of Bios microprograms, the name of which is a certain element of involvement with the manufacturer.
- AMI - American Megatrends.
- Award Software.
- Phoenix Technologies.
- UEFI - Unified Extensible Firmware Interface.
True, despite the striking interface and distinctive scale functionality of each individual input/output system, one can still discern a certain standard of purpose, so to speak, the unity of vocation of Bios-chips.
Key to all doors

To reward the reader practical advice On how to enter the BIOS on a laptop, you only need to clarify a small detail. Universal method There is simply no integrated firmware to open it. It all depends on the modification of the laptop and the BIOS settings entry scheme used in it. It is worth noting that most manufacturers of portable computer equipment implement the traditional way of accessing the base system, namely by periodically pressing the “Delete” or “F2” key with a short time interval (literally a fraction of a second).
Execution procedure, or How to enter BIOS in a laptop of any model
- Turn on or restart the computer.
- During the initialization of installed equipment, on the laptop screen, usually in the lower part, you can see an information line with a brief background information about the method of entering the BIOS settings. It is at this moment that you need to make several short presses of the displayed key.
However, not always this method effective, since in some modifications of laptops the above process occurs almost instantly or is not visualized at all. Please note: during boot testing of devices, you can try activating the “Pause/Break” button. This will allow you to more carefully familiarize yourself with the initialization results and the provided option for entering BSVV.
Logo hint
Let's say you have an HP laptop. It is unlikely that you will be able to enter the BIOS using traditional keys, since this brand has a slightly different access scheme to the base system.

The answer to the question of what to do in such a situation will be the list presented below, which, by the way, is easy to remember, since there are not so many variations of keys designed to enter the basic system of laptops, and the value of such information is sometimes simply disproportionate.
- F1 - will help you enter the BIOS Lenovo laptop, Dell, as well as Packard-Bell and Gateway. By the way, some modifications use this key to open the holy of holies of their settings.
- ESC - almost all Toshiba. It is worth noting that the Japanese device is somewhat more demanding when it comes to entering the BIOS, and the user will need to confirm his intention by using the F1 button.
- F3 - Sony and some American Dell models.
- F10 - Compaq, most and again the Texan Dell.
The absolute champion of “basic” clicks: the F2 laptop formula

Indeed, most laptop computers use the “F2” key to enter BIOS settings. For example, if we take desktop PCs in this context, the “Delete” button has always been considered the leader. But to enter the BIOS Acer laptop, you need to press F2. However, the vast majority of modern modifications respond specifically to the above-mentioned key. So if you need to install the system, overclock (overlock) the processor, change settings or improve the modification of the computer, then first of all try to enter the BIOS using this button.
Finally
Laptop manufacturers sometimes surprise with their entrepreneurial ingenuity. Therefore, sometimes a somewhat unusual situation may arise, that is, all known BIOS keys will be out of use. Don't despair, try logging into the base system using one of the presented key combinations (shortcuts): Ctrl+ Alt + Enter, Ctrl + Alt + Esc, Ctrl+ Alt + Del or Ctrl + Alt + Ins. Perhaps Fn + F1 or Ctrl + Ins will help you enter the BSVV settings. In general, there is no need to be nervous, because the Internet can solve any problem...