As the letters I received after the publication of the article showed, the seed fell on fertile soil. People write that the article was useful to them, which I am very happy about.
But there are also many letters in which users ask to describe the recovery procedure for laptops from other manufacturers. To this I will only answer what I said earlier: I will definitely try to cover as many methods as possible from different manufacturers. It just takes time and the availability of appropriate laptops.
For this purpose, I use computers that come to me for testing and writing, so there is a good chance that I will soon post detailed instructions for restoration of laptops, produced by the most famous companies.
Today I will talk about how to restore Hewlett-Packard (aka HP) laptops to factory condition. This also includes Compaq laptops, since these companies merged in 2002. Such models are, in general, called HP Compaq, but the presence of a different logo may confuse an inexperienced consumer.
So keep in mind that Compaq is also HP, with similar recovery mechanisms.
However, I would like to draw your attention to the fact that in HP laptops, unlike most devices from other manufacturers, the recovery partition, as a rule, is not located in a hidden area, but on a separate logical drive.
I would also like to remind you that all important data from the hard drive must first be saved, since they will be destroyed during the recovery process. If your computer's operating system has crashed and won't boot, use the advice in this article.
It must be said that HP laptops provide the ability to save data before recovery, but I prefer to do such things using third-party tools, so this instruction will give the recovery scenario when all the necessary data is previously saved.
And finally, let me remind you that the recovery procedure must be carried out with a fully charged battery and it is strongly recommended that you connect the laptop to the power supply.
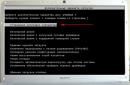
So, in order to begin restoring the system, after turning on the power, we need to start making short presses of the Esc key until the following menu appears on the display:
To launch the recovery utility, press the F11 button.
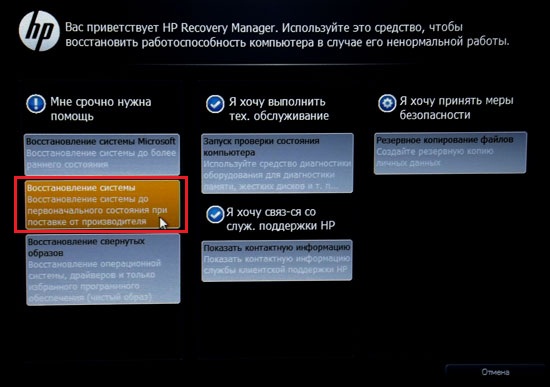
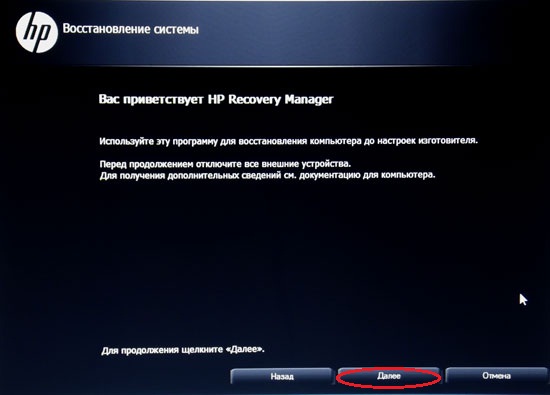
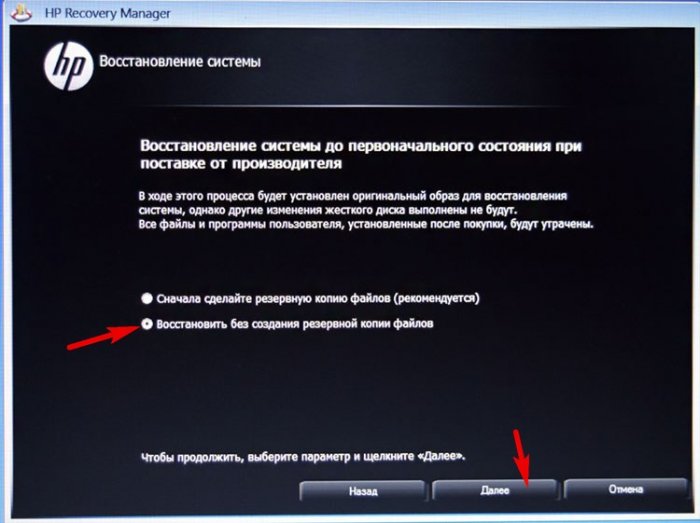
The utility interface will appear on the display. Select the option “Restore the system to its original state when shipped from the manufacturer.”
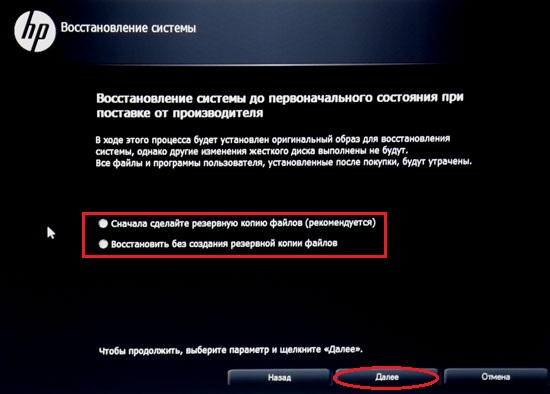
We will be offered a choice between saving data and restoring the system. Since we assume that you previously saved the data, select the “Recover without creating backup copy" and click "Next".
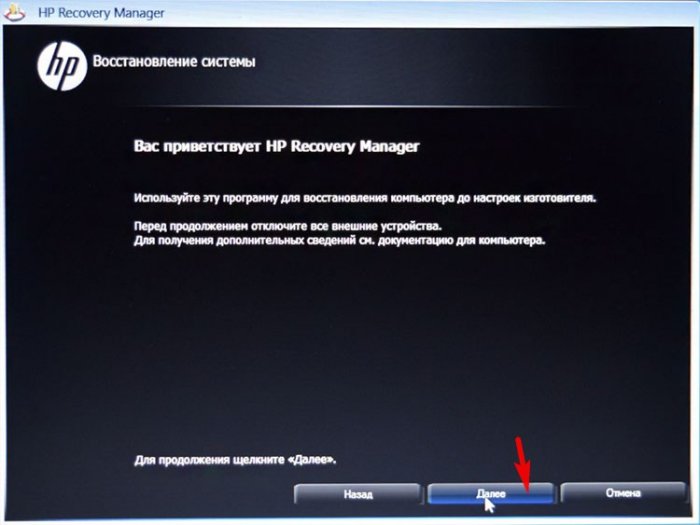
We will be warned to turn off all external devices. You need to disconnect everything that is connected to the laptop. Even a mouse.
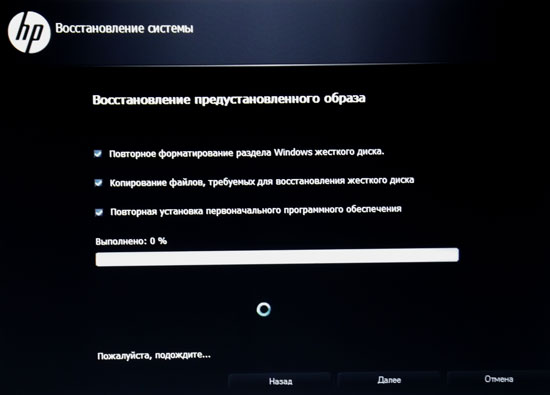
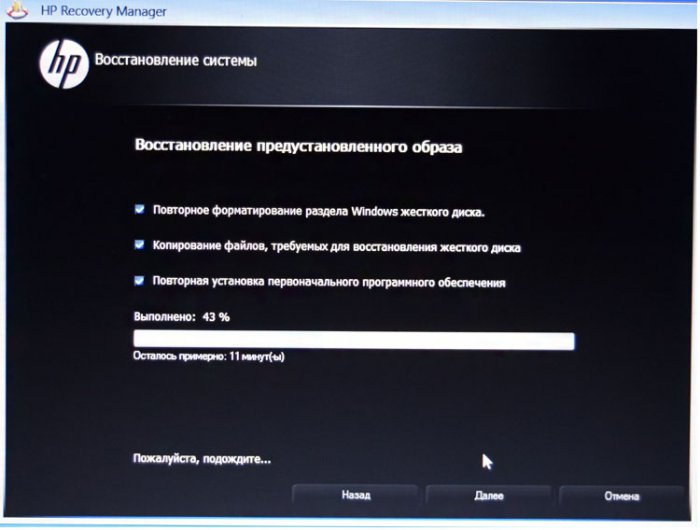
After this, the laptop recovery procedure will begin. The display will show information about the actions performed. This procedure will take a long time. You can do other things for now.
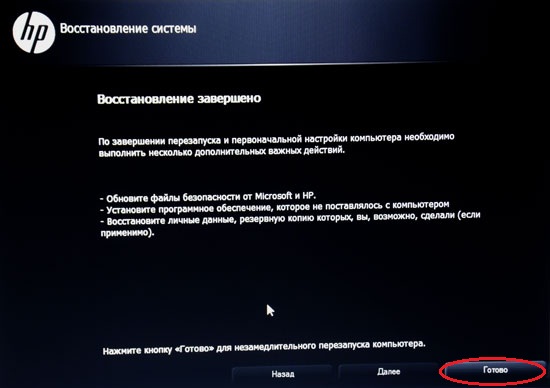
After the restoration is completed, a message indicating the successful completion of the procedure will appear on the display. Clicking the “Finish” button will reboot the computer, after which the operating system will start as if it was turned on for the first time.
So you have learned how to restore HP laptops to factory condition.
If my article was useful to you, please recommend it to your friends using the buttons social networks or simply by sharing the link.
You can send your questions for the section “ Free help"at the address: admin@site. Please write “Free Help” in the subject line of your email.
If Windows stops loading, then to restore correct operation you can use standard utilities.
One of the biggest nightmares for fans computer equipment- is to encounter a situation where you cannot turn on the device. operating system starts to load, but eventually displays a message like: “Failed to configure Windows updates, changes are being undone, do not turn off the computer." After which nothing new happens - the software cannot be restored, and downloading stubbornly does not help.
Viruses and all kinds spyware- the most common causes of PC problems. Let's figure out how to defend ourselves.
System recovery tools
Before the release of Windows 7, this situation turned into numerous dances with a tambourine, and often even complete reinstallation operating system. Now everything is different, and often the problem is solved with standard tools from Microsoft, which do not even need to be specially installed. The task comes down to being aware, in principle, that such a toolkit exists, as well as simply remembering it when something “irreparable” suddenly happens.
The trick is that when you boot your computer, before the icons appear Windows boot, have time to get into the advanced parameters of this very boot, where you will be able to run diagnostics and, if necessary, restore the system to the selected checkpoint. Windows 7 required you to press a function key when booting F8, and then select the “Troubleshoot” option (although in rare cases the “Last Known Known Configuration” option saved the day).
More Windows 7 download options
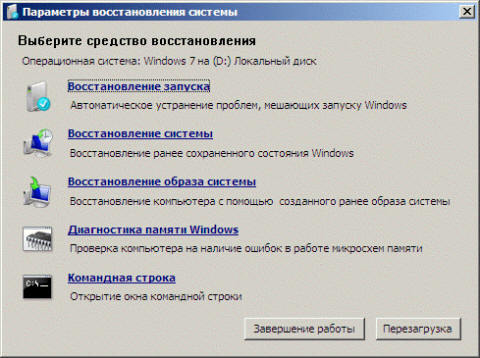
Once in the “System Recovery Options” menu, in most cases one of the first two options became a salvation. "Startup Recovery" could save the operating system automatic mode, A "System Restore" required you to manually select a checkpoint to which to rollback.
Recovery options Windows systems 7
In order to be able to restore it to its original state in the event of a malfunction of the operating system, it is necessary to make a recovery disk in advance. Microsoft would be betraying itself if, with the update of its brainchild, it left all the useful tools as before. Windows 10 system recovery is carried out by pressing hot keys Shift+F8, and, unlike “seven”, you need to press this combination very, very quickly, since the operating system itself began to load much faster.
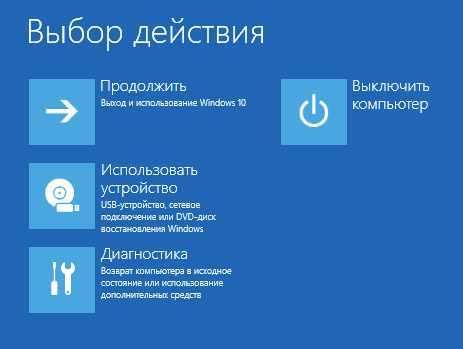
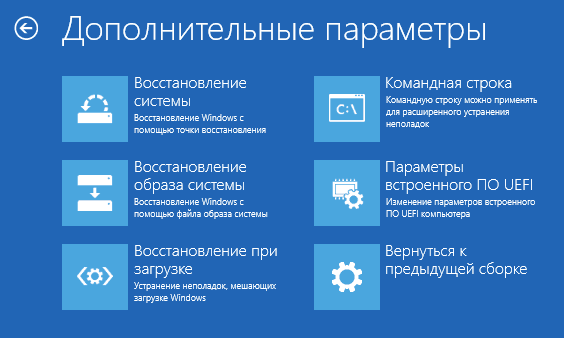
Has undergone changes and appearance saving menu. By selecting “Diagnostics”, in “ Additional options“There are the already familiar “System Restore” and “Startup Repair” (only in a different order). There is also an option “Return to the previous build” if you updated to “ten” from one of previous versions Windows.
If automatic recovery doesn't work
Restoring a Windows system to one of the previous checkpoints is not a difficult task. It is only important that these points themselves exist in the system, because sometimes users themselves manually disable their creation, at the same time deleting existing ones. It really makes sense to periodically clear old control points, since they take up a lot of space. But giving up recovery points altogether is a risky proposition.
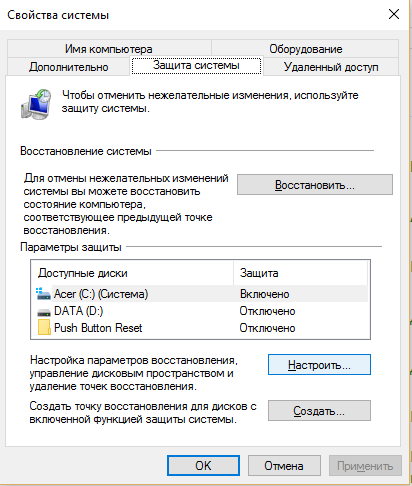
How to navigate the Internet without picking up viruses? Secure DNS servers will help. To make sure that restore points are automatically created for you or to make changes to the corresponding settings, you need to select the display of Large icons (or Small icons, but not Categories) in the “Options” window and select the “Recovery” option. There's already a choice "Setting up system recovery", check whether the protection is enabled and, if necessary, use the “Configure” button. Here you can manually create a point for subsequent recovery.

Recovery Windows computer 10
Windows 10 restore points
If we have recovery points, then using the method described earlier, that is, using the built-in Windows tools To restore the system, you can quickly roll back to an earlier state of the computer without losing important files.
Creating a Windows 10 recovery image
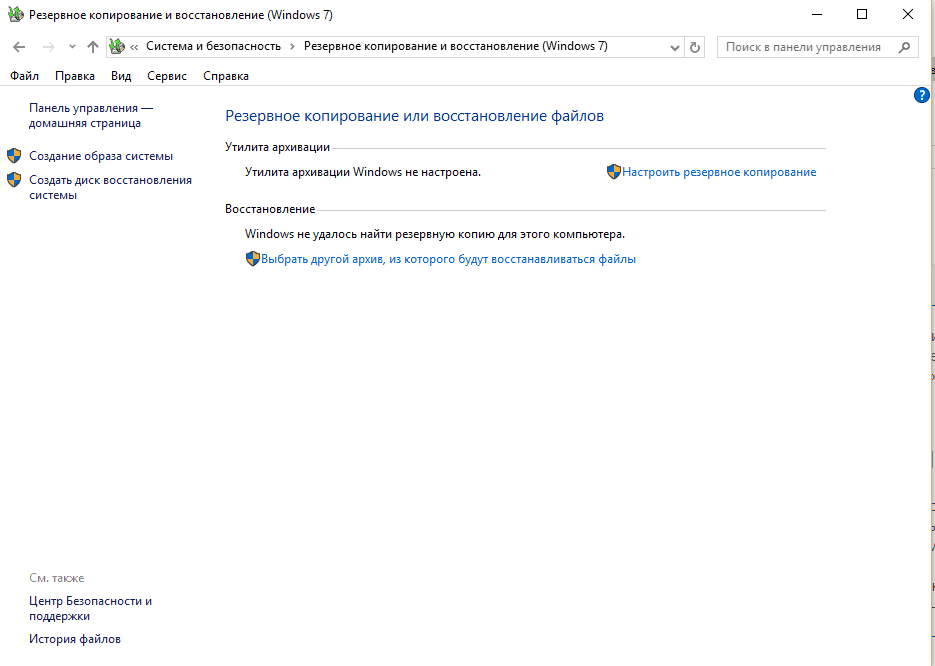
In extreme cases, you will have to restore the system to its original state or to a previously created system image. It is advisable to create a “System Image” and a “System Repair Disk” in a working state of the operating system, after you have installed all the applications you need. This is all done through the same “Control Panel” (aka “Settings”), when viewing by “Categories”, selecting “Backup and Restore (Windows 7)”. Here you can restore the operating system to a previously created image if the computer still boots, but has no longer worked as it should.
With every operating system release Microsoft company requests more and more information from users. But you can moderate her appetites.
Restoring a laptop to factory settings
If standard means do not help, and you do not have a disk or USB device with a recovery image, then laptop owners can use “hot keys” to launch the built-in recovery utility. Some models may even have a separate key for these purposes, for example, OneKey Recovery from Lenovo, but this is rather an exception. In other cases, it is important to know which one " hotkey» for your laptop, since it tends to differ among manufacturers.
Hotkeys for laptop manufacturers:
F3– MSI;
F4– Samsung;
F8– Fujitsu Siemens;
F8- Toshiba;
F9- ASUS;
F10- Sony VAIO;
F10- Packard Bell;
F11- HP Pavilion;
F11- LG;
F11- Lenovo ThinkPad;
Alt+F10- Acer (before this, select Disk-to-Disk (D2D) in the BIOS);
Ctrl+F11- Dell Inspiron;
Hold [ Alt] - Rover.
Factory Utility will restore the device to its original condition, as if it had just come from the store. This will delete all programs with settings, all files, including favorite photos, which it makes sense to store in just such cases. cloud services. However, the device will be able to work again, and in some cases this method will simply help prepare the laptop for subsequent resale or transfer to relatives.
Instructions
Almost every laptop that you can buy at a computer hardware store comes complete with an operating system. This has its advantages: you don’t have to spend money on buying an operating system, and there’s also no need to waste time installing the system. The presence of an operating system on the laptop’s hard drive indicates that HDD contains hidden section, which is used to restore factory settings. Some users deliberately overwrite this partition to increase disk space; some are not even aware of the existence of this partition.
If you did not know about the existence of this hidden drive and want to use it for its intended purpose, you can use special keyboard shortcuts. To properly use the system recovery function and application programs, you need to know these keyboard shortcuts. The so-called hot keys must be pressed while the computer is booting, i.e. at the moment when the operating system crashes and cannot boot on its own. When you press the hotkeys, you will be taken to the factory reset menu.
Each laptop manufacturer has developed its own system for restoring settings; accordingly, the hot keys will differ. Below is a list of hotkeys from major laptop manufacturers:
Samsung - press F4;
Fujitsu Siemens - press F8;
Toshiba - press F8;
Asus - press F9;
Sony VAIO - press F10;
Packard Bell - press F10;
HP Pavilion - press F11;
LG - press F11;
Lenovo ThinkPad - press F11;
Acer - in BIOS, activate Disk-to-Disk (D2D) mode, then press Alt+F10;
Dell (Inspiron) - press Ctrl+F11
Laptop manufacturers assure that you will be able to restore the system, but the integrity of files or folders that are important to you is unlikely. Therefore, do not forget to frequently make copies of your files on removable media: CD/DVD drives, flash media, etc.
ASUS laptops have long been equipped with a convenient utility for resetting settings. This utility will help you return to factory state in just two simple steps. You need to read carefully, and the utility will do the rest, as I already wrote, for you.
To return your Asus laptop to factory settings, you must follow the following steps in sequence:
IN ASUS laptops function is enabled by default quick launch- Boot Booster. She bothers us. To disable it, go to the BIOS. On company laptops ASUS bios launched by pressing the F2 button while turning on the device. The button must be pressed before the operating system starts loading. It would be wise to press it several times to let the laptop know what we want from it.
Once in the BIOS, go to the Boot tab. You can go to the tab using the arrows on the keyboard or using the mouse, if the BIOS supports it. In the Boot tab, you need to find the Boot Booster item, highlight it and press Enter. After pressing Enter, a window will open in which you need to select the Disabled item. In this way we will disable the quick start system, which will give us the opportunity to return to factory settings.
Now, use the arrow keys on your keyboard to go to last tab and select Savechangesandexit and wait for it to activate. This will save your work in the BIOS and restart your laptop.
The recovery program will prepare everything necessary files, will ask you again and begin system recovery. After this, system preparation for data recovery will begin. A message will appear on the screen indicating that all user settings will be deleted. You will need to confirm this action by clicking OK. Your further participation is not required. During the process, the laptop will reboot several times. Approximate waiting time is 30 minutes.
Hello admin, I want to restore the factory settings on my HP laptop, I launched the HP Recovery Manager program and it offers 8 recovery options! How do I choose the right one? There are two partitions on my hard drive: (C:) and (D:).
Us:) Windows 8.1 installed.
On (D:) There is a collection of films and music.
Tell me, when restoring from a laptop, will all files be deleted or only information from the disk (C:)?There is no way for me to lose those files that are on the disk (D:), and there is simply nowhere to copy them, portable hard drive No USB. If you have a detailed article for me, I would be grateful.

Friends, if the operating system installed on your laptop has become mischievous, then you don’t have to bother searching for various viruses, crooked programs, incorrect drivers and other reasons that led to unstable Windows work, take it and simply restore the factory settings on your laptop! You can do this on an HP (Hewlett-Packard) computer in 20 minutes. The operating system will be in perfect condition at the time of purchase, all that remains is to install software that's all. A rollback to the original state will only affect the drive (C:), information on other drives will remain untouched.
The program is responsible for recovery on HP laptops HP Recovery Manager, which can be launched even if the computer device does not boot. In my article I want to show you all the ways to restore an HP laptop to “store settings”.
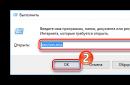
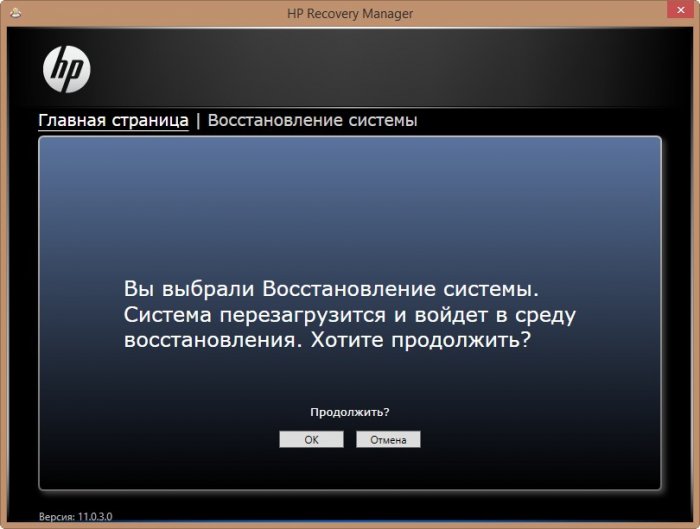
First way. Go to the Metro Windows 8.1 interface, find among the applications " HP Recovery Manager" and launch it. Click on the "Windows Recovery Environment" button. Restart your computer and enter the Windows Recovery Environment to update the image or restore the system to initial settings manufacturer."
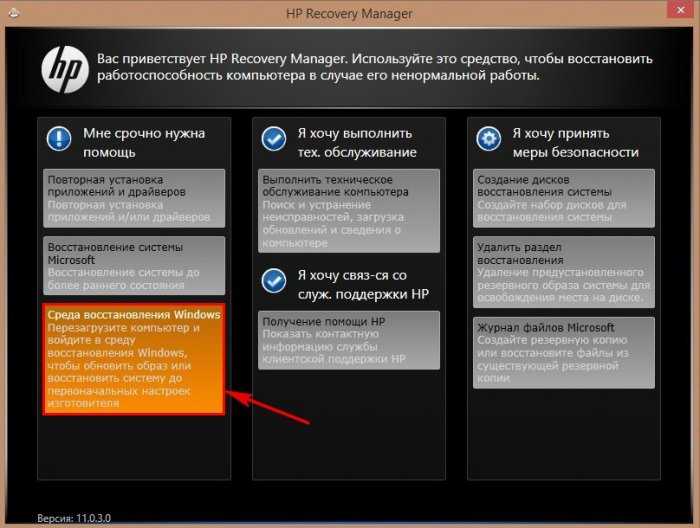
Click OK. Laptop reboots
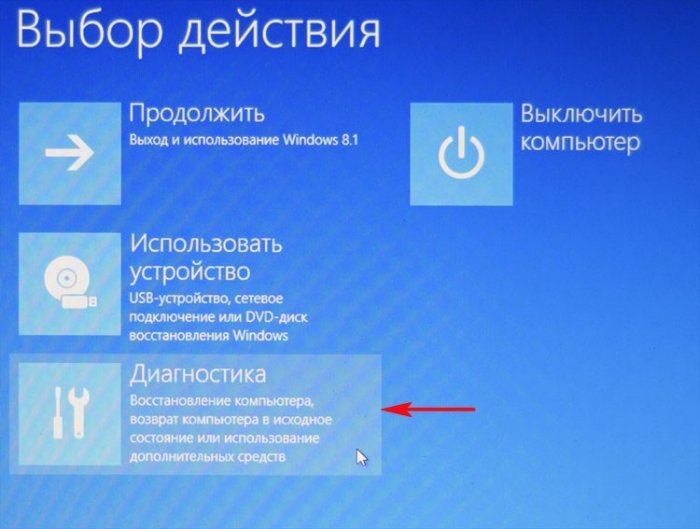
Click Diagnostics.
Recovery Manager
![]()
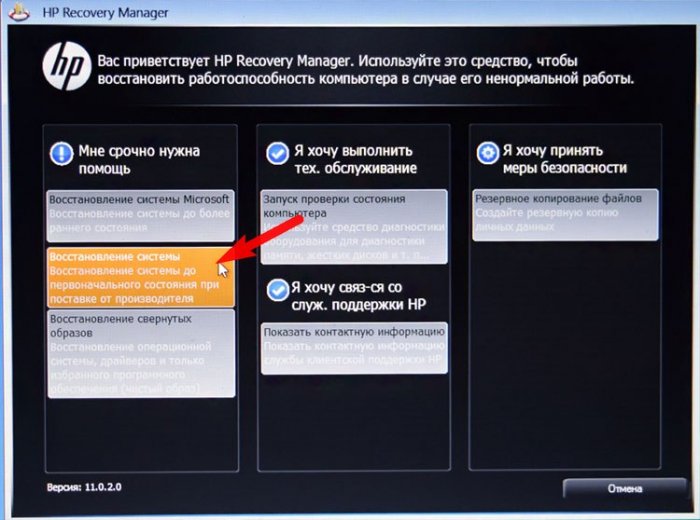
Click on the button Restoring the system to its original condition when shipped from the manufacturer.
Mark the item. Further.
The process of returning the laptop to its original settings begins.
Click Finish.


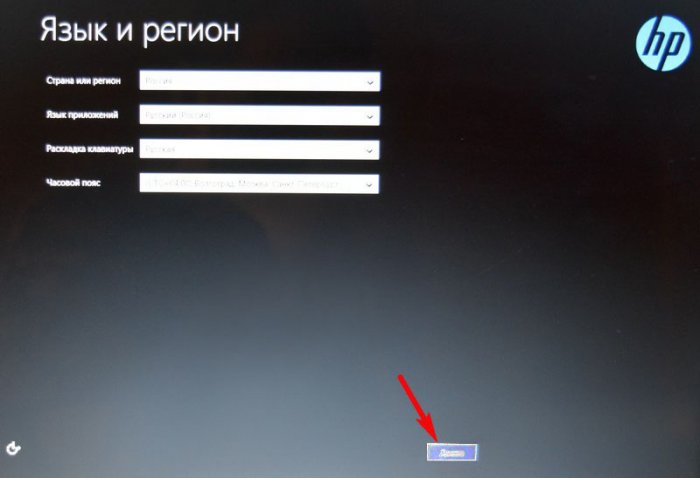
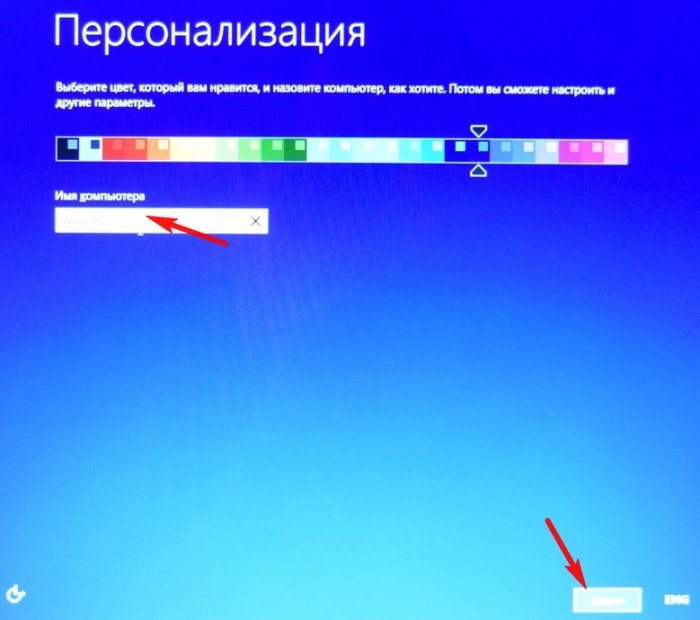
All we have to do is configure our personal settings and get started.
Regional settings are usually configured correctly. Further
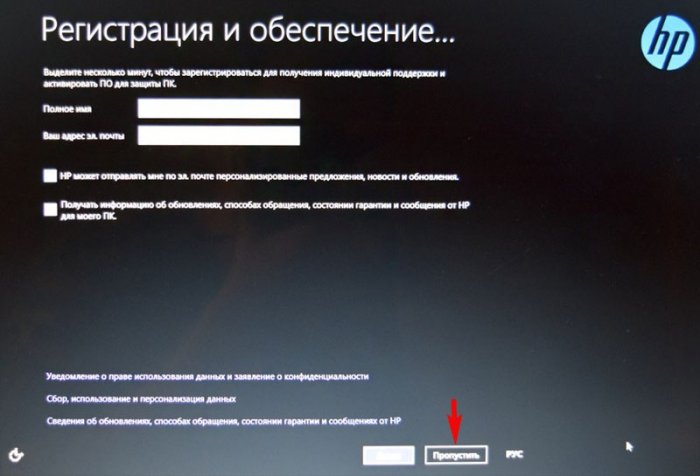
I accept

Skip
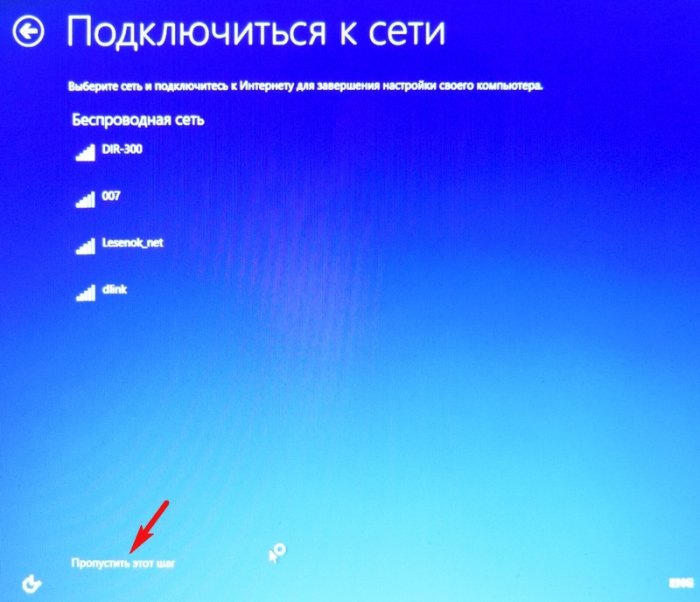
Skip this step
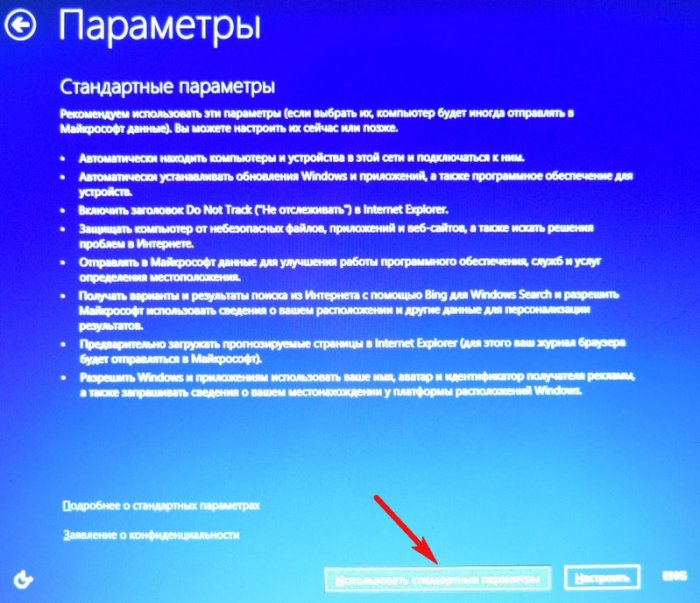
Use standard settings
Enter your username and click Finish.
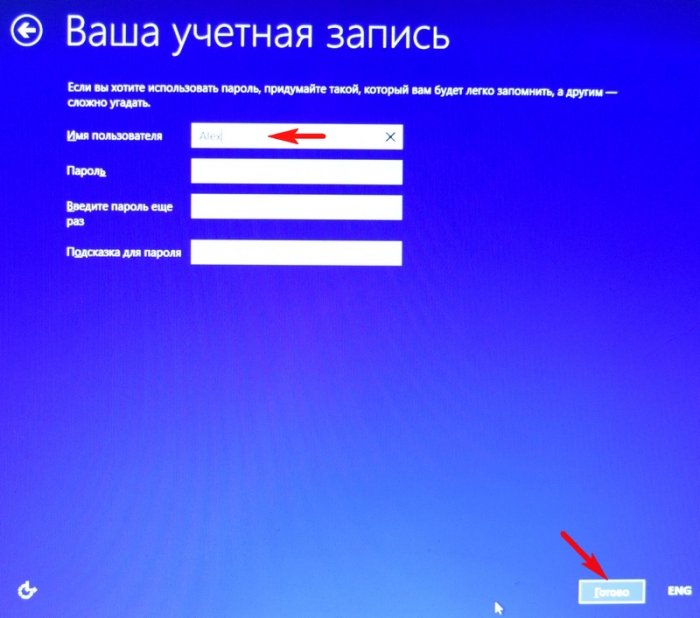
Loading clean Windows 8.1. The recovery affected only the drive (C:), all files on other drives remained intact.

How to restore to factory settings HP laptop if it won't boot
This can happen due to various system errors or destructive actions malware and in this case you will not be able to get to the Metro interface and launch HP Recovery Manager, but you can still start the rollback process.
Press the button when booting the laptop Esc and enter the settings menu. To enter recovery mode, press the key F11.
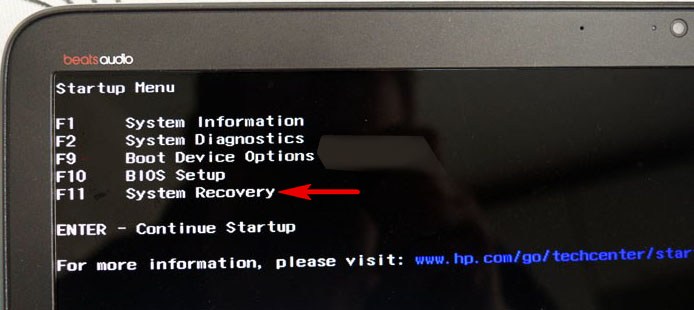
The already familiar “Select Action” menu.
Select the Diagnostics option.
Recovery Manager
![]()
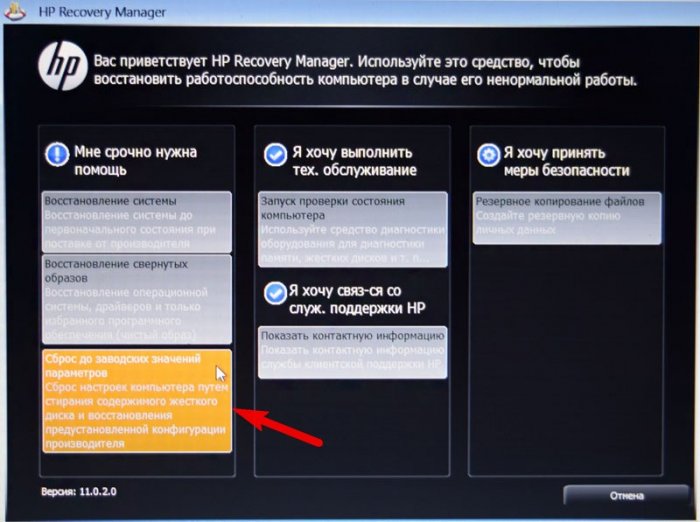
Click on Restore the system to its original condition as shipped from the manufacturer. Then you already know how to act.
How to restore to factory settingsHP laptop if it won't boot and hidden partitions with factory settings are deleted
If you reinstalled Windows 8.1 on Windows 7 on your laptop, then you probably deleted everything before installing the seven partitions on the hard drive, including a hidden partition with the factory image. In this case, you need to use . These discs need to be made in advance.
Insert the recovery disk into the laptop drive.

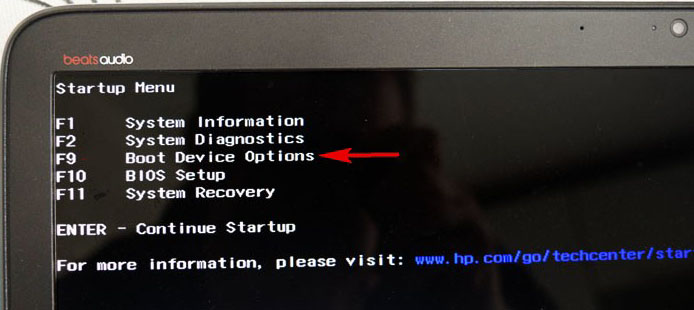
Press the button when booting the laptop Esc and enter the settings menu. To boot the laptop from the recovery disk, press the key F9.
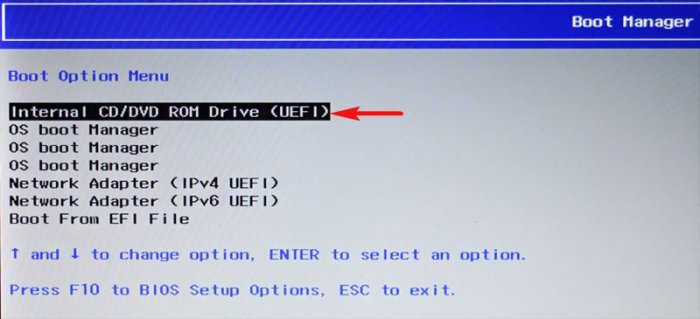
Select in boot menu drive and press Enter.
Mark the item Run the program from the media
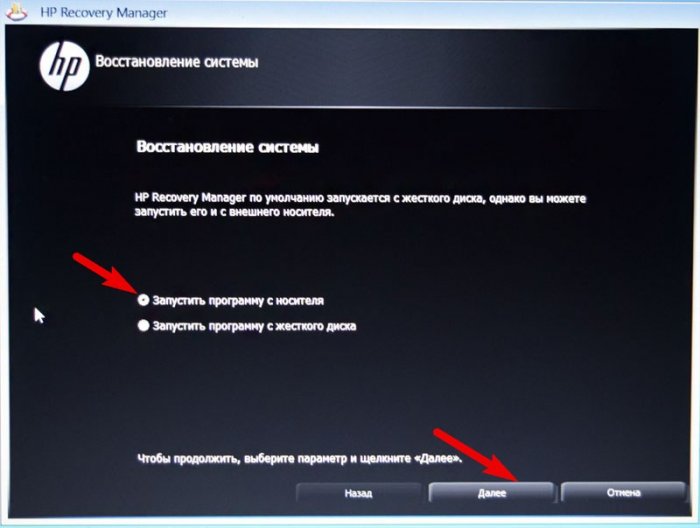
Factory reset
Mark the item Recover without backing up files. Further.
The process of returning the laptop to the initial state, which is sure to end successfully.

Articles on this topic: