As with any product still in development, launching the Windows 10 Technical Preview is a risky proposition. Here's the most reliable and easiest way to install and run a preview version of the next Windows - in a virtual machine.
This article covers recent changes to virtual machine (VM) software and the installation process for Windows 10 Technical Preview (Win10 Preview for short).
If you are installing an update, use the same version. Leaving the selection set "Dynamically selected". From the left window. On the screen that shows language selection options. You don't need to do anything while this is happening, but you will notice that the software will restart virtual machine and will continue copying files with the phrase “Done” on the screen for a few minutes. It will then reboot a second time before you are prompted to press more buttons.
You will be sent a code to enter. Well, almost: as we now know, the final version. 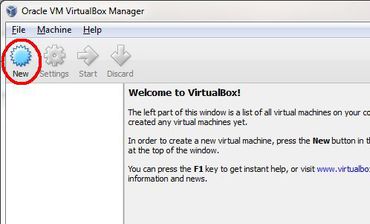
As usual, the installation process may involve several reboots, although only within the virtual machine. These documents go through every option. Note.
VMs are not only reliable and easy to install, but almost any operating system can run on them. And in this case, both Windows 10 Preview and the virtual PC creation program are 100 percent free. Best of all, running in a VM, Windows 10 Preview poses essentially no risk to your main system (host). It's as if Windows 10 was installed on its own, separate physical computer.
What you will need
When the installation is complete, you need to restart your computer. Once the installation is complete, you will be prompted to restart your computer. You may not be ready to take this step and commit without trying the new operating system first. Would you like to upgrade to make your system eligible?
You can divide your disk into different partitions with disk partitions. The tool will guide you through the steps required to trim available space from a used drive, which can then be allocated to a new disk partition. It is strongly recommended to prepare backup copy your data before doing this.
Three Basic Steps
These steps assume that you have not yet installed software to create virtual machines. We will use VirtualBox from Oracle. In addition to being free, it is also quite mature and relatively easy to install. (Note: VirtualBox is updated frequently. If you already have it installed, now is the time to get latest version.) Steps:
Download the appropriate version for your computer, that is, for the icon. Did you know if your computer is 32-bit or 64-bit and does it even matter? Some people reported that the latter did not work for them. This is what we are getting into. Once again you have several options. Although we previously showed you how to fix this, we recommend that you go the virtual machine route. Is this really important to know? We think so, and luckily it's quite simple.
Why technical review on production systems didn't lose anything
Let's get to know you. The tool will automatically create installation disk, partition and download the drivers. However, on your own computer you should not install the test version because, among other things, there is a risk of data loss. When installing this free version preview there are a few things to keep in mind if you want to avoid any nasty surprises. Therefore, it should be assumed that various bugs still exist in the test version. If you install software such as an operating system on your computer, it can have painful consequences: crashes, data loss, and peripheral devices such as scanners or printers may not work properly.
- Download and install VirtualBox on a standard PC;
- In VirtualBox, create a new virtual machine optimized to run Win10 Preview;
- Download Win10 Preview and install it on a new virtual machine.
Important Preliminary Steps
Requirements for Windows startup 10 Preview inside virtual VirtualBox machines relatively moderate. The vast majority of today's personal computers working in any modern Windows versions- Vista, Windows 7 or Windows 8.x - will likely meet or exceed minimum specifications.
Solution: Install on a virtual machine
If you want to peek into the test version without any commitment, it feels properly broken. Fortunately, however, these problems can be avoided. Crash, data loss, and other side effects in the pre-release version only occur on the virtual machine and do not affect the entire computer.
How do you rate the quality of the contribution?
If you don't already have a virtual machine, you must first get one. Required reading! Don't go! Thank you for your feedback. Your rating has been deleted. Free tool for private users it works quickly and has a clear command center. Install in current version. The program is installed on English language. Later, however, the user interface appears automatically on German. You do not change the settings in the User Setup window. The next question is: “Do you want to continue with the installation now?” It will answer you by clicking “Yes”.
Here's what's required:
At least 3 GB system random access memory. Win10 Preview needs at least 1GB of RAM, VirtualBox needs another 512MB, and the host system usually needs at least another 1GB or so. Add some more memory for shared system functions. It's better to have more than 3GB of RAM - the typical PC sold today is designed with between 6GB and 12GB. (To quickly check the amount of memory installed on your system, click Start/Control Panel/System. Under System, look for the heading “ Installed memory(RAM)".)
Click Install and complete the installation by clicking Finish. Each program has its advantages and disadvantages - weighs precisely. Determine how much memory you have and how big virtual disk it should be. Then click "Create". The wizard will guide you through the creation process. Proceed to "Next" and enter a new name for the new virtual machine in the next window.
In the next step, select your desired operating system from the two pop-up windows below. Still needed on a virtual machine HDD. The Create Hard Disk option is the default. The next step is to accept the suggested name for the virtual disk. Move the slider left or right to reduce or increase the disk size as needed - or enter the desired value in the right field. Now click "Create". The wizard is closed and a new virtual machine is created.
At least 30 GB of available disk space. Win10 Preview requires approximately 25 GB of free space, plus another 4 GB or so for installation file Win10, but as with RAM, more free disk space is always better. (You will, of course, make up this space when you remove the Win10 VM.) There is no requirement that the Win10 VM be on the primary disk ( C:), but this will make the installation process much easier.
Network configuration
Before installing the required operating system, you must configure the newly created computer. In the Networking section, you define how your virtual machine will access the Internet and access internal network resources. You can equip a virtual machine with up to five virtual network cards.
Setting up a sharing folder
However, the virtual machine is not accessible from the outside. Direct access from outside the network to client systems is prevented, but virtual machines can communicate with each other and outside. For other devices on the network guest system, thus appearing as a separate computer. Now follow the instructions by clicking on “Next” and close the setup. In the Settings window, click Shared Folders on the left, then click the blue plus sign icon on the far right. You can now configure a suggested name for the shared folder.
Support for hardware virtualization. Almost all PCs sold in recent years have built-in hardware support for virtualization, as used in VirtualBox (and similar VPC/VM products). But older systems may not have this necessary feature.
Here are ways to determine if your PC supports virtualization:
If you want to enable write protection for the shared folder, check the Read Only checkbox - the virtual machine cannot change any data. Enable "Auto Attachment". The newly created sharing folder will appear - double-clicking will open it, right-clicking it can be integrated as a "network drive".
Step 8: Create backup points
Then, in the right pane, move the backup points tab forward. In the toolbar at the top, click the “Create Backup Point” camera icon. Enter a meaningful name for the backup point. To be able to distinguish the pictures later, a longer note is recommended in the Description field. Restoring a memory point is easy: right-click on the desired entry, for example "backup point 1". IN context menu select "Restore backup point".
1) One method is to simply install VirtualBox and install a new virtual machine (more on this below). Then, for the installed machine, right-click, select the "Customize..." menu and go to the "System" section. Click the Acceleration tab and check if the hardware virtualization option is enabled Enable VT-x/AMD-V as shown in Figure 1. (Note: On some systems, you may have to enable hardware virtualization support in System BIOS. Check out the Windows SevenForums page for a quick look at this.
Therefore, randomly deleting all unnecessary backup points is wise. Select the desired entry from the list and click the Remove Backup Point icon. The selected snapshot is now deleted and the used memory space is freed again.
Finally, one last fine-tuning is useful: optimize your system.
- You can simply drag them into any folder.
- In addition, you can also check out our video tutorial.

If your system does not support hardware virtualization, you can simply remove VirtualBox.
2) Intel offers its free utility“Does my processor support Intel Virtualization Technology?” (“Does My Processor Support Intel Virtualization Technology?”) (). Likewise, AMD offers the “AMD Virtualization Technology and Microsoft Hyper-V System Compatibility Check Utility” on its . (Scroll to the bottom of the list or click here to download.) You can also try Microsoft's “Hardware-Assisted Virtualization Detection Tool,” but the app only works on Windows XP. Vista and Windows 7 - not in Windows 8.
When you run it for the first time, the Setup Files Installation Wizard appears. You can share files between the virtual machine and the host system. To do this, you need to define the exchange folder. You can find the settings via shared folders in the virtual machine settings.
Creating and configuring a virtual machine in VirtualBox
As a rule, they will not be tested on physical hardware, but installed on a virtual machine. Thus, this aspect of the text remains relevant. Copying and pasting between guest and host jobs is also the same as drag and drop.
3) You can also look up your CPU's model number on the manufacturer's website and look at the specifications listed.
But again, note that almost all machines sold in recent years have virtualization support.
And finally, before we continue, backup your current system (backup programs). While none of the steps below are particularly risky, this measure is simply a good habit to get into. backup before installing a new one software or making any changes to the host system.
The setup also installs integration services without having to explicitly initiate this process. Several instructions online describe installation based on the October preview. The biggest problem was the video drivers. On the 32-bit version, this procedure was not as frustrating and the system remained accessible, but Device Manager indicated that installed driver was disabled due to an error. In this case, you only have a limited choice of modes for screen resolution and slow graphics.
Step 1: Download and Install VirtualBox
Go to the VirtualBox for Windows page (at the time of writing this is version 4.3.18). This program will work on all current versions of Windows.
Note: Oracle also offers VirtualBox Extension Pack, a separate package that allows the guest operating system to more fully integrate with the host OS. Your specific case may - or may not - require an Extension Pack. To keep things simple, I suggest installing only the core VirtualBox package. If you need an Extension Pack, there will be a hint for you later. You can then return to the helpful links on the VirtualBox download page to install the Extension Pack.
Light and Shadow: Installation Using Virtualization Software
But sometimes you have to use both. The operating system offers a new appearance and a host of exciting improvements - last but not least is the launch menu and a completely redesigned web browser. The "taskbar" button can be used to "reserve" an update. During installation, you are asked whether you are using the operating system as a home user or in a company. The reason for this is that there are no separate company versions. Virtualization software allows you to safely test new systems.
Once the installation file VirtualBox forWindows downloaded completely, click on it to start the program installation process (Figure 2).

After the introductory window appears, VirtualBox will show two custom dialog boxes Custom Setup , the first of which is shown in Figure 3. Technical Preview works well with default settings - without making changes; just click Next(Next) in both dialog boxes.

You will receive a warning that your network interfaces will be reset (Figure 4). VirtualBox requires this step to integrate into network system your PC and allow the VM (guest) operating system - Windows 10, in this case - to access the Internet.

This network suspension will be short-lived, but it will temporarily interrupt your Internet connection. Make sure that in this moment You are unable to complete tasks, such as downloading software. Click Yes to continue installing VirtualBox.
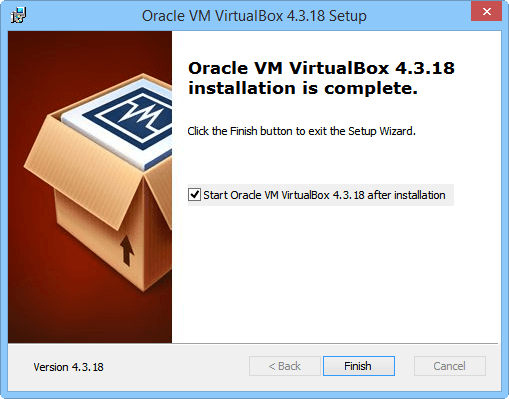
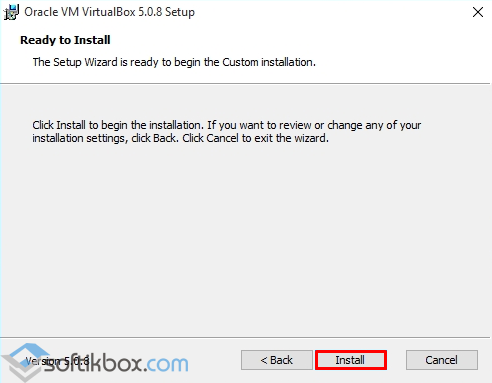
Then you will see a confirmation window Ready to install(Everything is ready to install). Click Install(Install). From this point on, the process is mainly automated; the program will simply request permission for various permissions as the process progresses. Give the required permissions and agree to all the default settings - eventually you will see the final dialog box (Figure 5) informing you that the VirtualBox installation is complete. Click the button Finish.
Step 2: Download Windows 10 Technical Preview
Depending on the speed of your Internet connection, downloading Win10 Preview will take approximately 30 - 45 minutes (ISO download sizes range from 2.91 to 3.96 GB). Setting up a virtual PC will only take a few minutes. Thus, now is the time to start downloading the Win10 Preview installation file. Let it download to background while you are setting up a new virtual Windows machine 10.
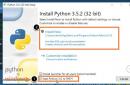
You don't have to pay for Win10 Preview, but it does require that you have a Microsoft account and that you join an Insider Windows program InsiderProgram(). Once this is done, click on the "Install Technical Preview" link, which will direct you to download the ISO file. Select the language and bit depth (32 or 64) you need and click Download.
If you're currently running 64-bit Windows, you can download and run either the 32-bit or 64-bit versions of Win10 Preview; if you have a 32-bit system, you can only use the 32-bit version.
Please note that there is only one key - NKJFK-GPHP7-G8C3J-P6JXR-HQRJR- but you probably won't need it.
It should be kept in mind that ISO file-image - this is in essence DVD image. VirtualBox can use the Win10 Preview installation file directly - you won't need to burn the image to an optical disc or flash device. Just leave it on your PC in a convenient place such as the Downloads folder.
Step 3: Create a new virtual machine for Windows 10 Technical Preview
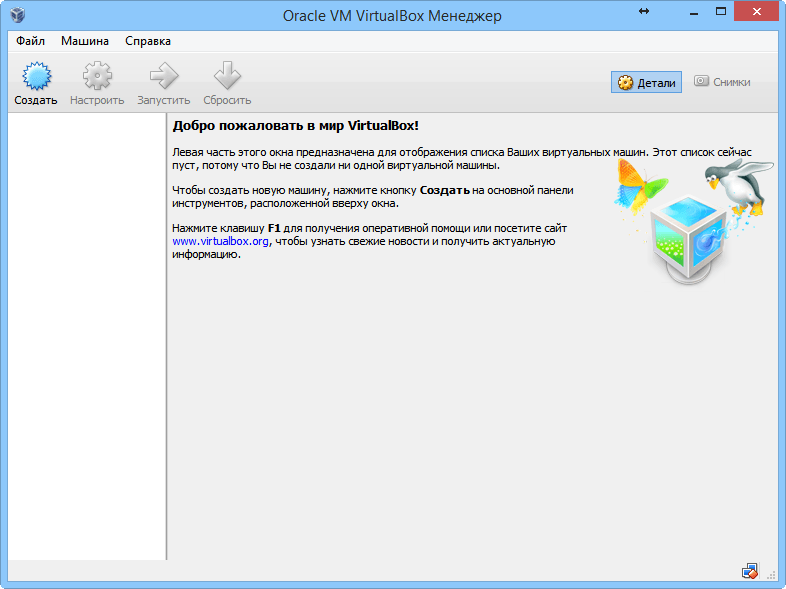
When you launch VirtualBox for the first time, its main manager, VirtualBox Manager, will display a welcome dialog (Figure 6). Start the new virtual PC setup process by clicking the blue icon Create in the upper left corner of the manager.
VirtualBox will now guide you through a series of installation dialogs.
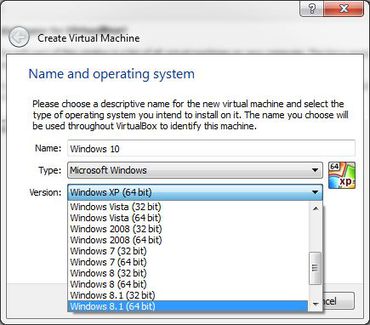
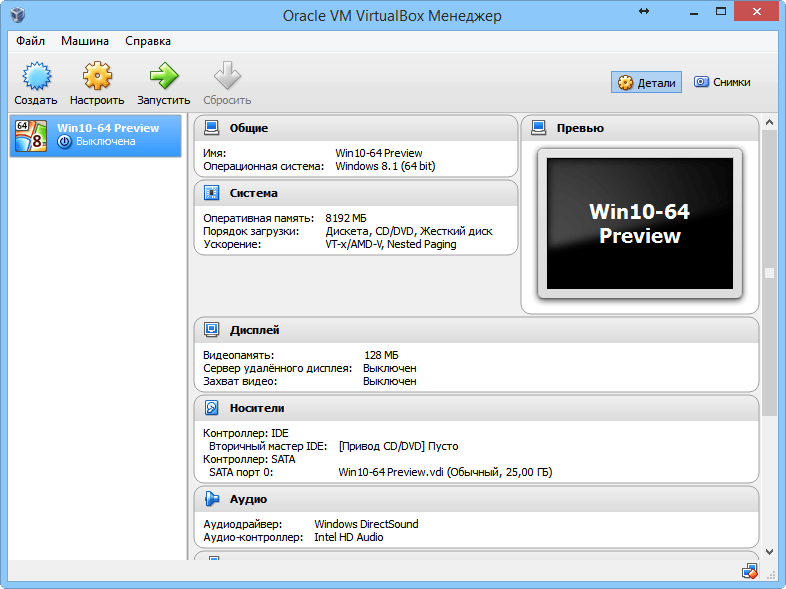
- Tell them the OS type as well. (virtual PC name and operating system): it is better to give the virtual machine a simple and meaningful name. In the following examples, I will be installing the 64-bit version of Win10 Preview. Thus, in the field Name I entered a completely self-explanatory title: Win10-64 Preview. Name your virtual machine whatever you like.
Finally, use this simple method to select the version. Win10 Preview uses the same previews VirtualBox installations, same as Windows 8.1. So, if you downloaded the 32-bit Win10 Preview, select Windows 8.1 (32-bit); if you downloaded the 64-bit Win10 Preview, select Windows 8.1 (64-bit). Figure 7 shows what I chose.

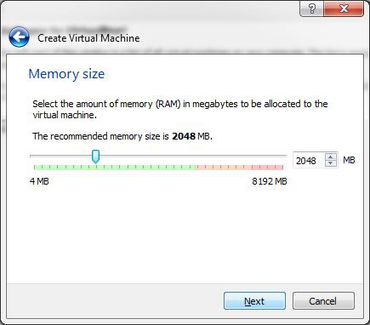
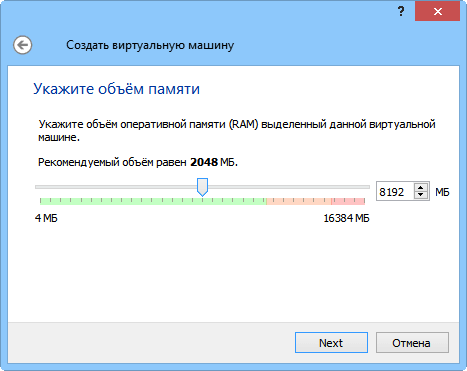
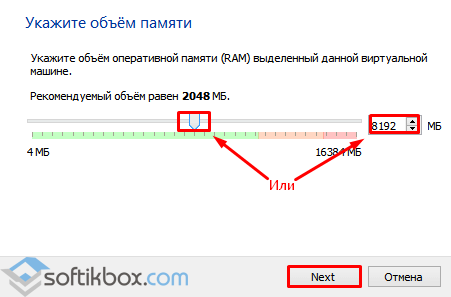
- Adjust virtual memory size : In the Specify Memory dialog box (Figure 8), make sure your Win10 is assigned at least 1 GB of RAM. Better if more. Moving the control knob along the color-coded scale adjusts the total amount of RAM available to the VM. Set the regulator in the green area so that both the VM and the non-virtual host system have enough memory to operate normally.
- Other settings : You will now go through dialogues Select your hard drive, Specify type(hard drive), Specify storage format(storing data on a physical hard drive), and Specify the file name and size(file location and size). Simply confirm the suggested default settings in each dialog box: “Create virtual hard disk", "VDI (VirtualBox Disk Image)", "Dynamic Virtual Hard Disk" and "25 GB" as the virtual disk size.
As a result, you will have a simple, empty and untouched virtual PC created, ready to install a new operating system.
Step 4: Last two settings
By default, the new VM will try to boot from its virtual hard disk. But your virtual machine's virtual disk is currently empty. To install Win10 Preview on empty disk, the VM must first load the downloaded ISO file using virtual optical drive (virtual device for optical disks). (At this point, however, the file is most likely still downloading. Take a coffee break.)
Selecting the virtual optical drive for the VM requires only a few clicks, just like the other preset setting, selecting the VM's cursor handle. Let's start with the manipulator.
Select the new virtual machine in the VirtualBox manager and click the Configure icon (the big orange gear) as shown in Figure 9.
Go to section System in the Settings window to enter it. On the " Motherboard» open drop-down list Cursor manipulator and select PS/2 mouse, USB tablet or USB Multi-Touch Tablet, depending on which pointer you are using on your host machine. I'm using a standard PC with a mouse, so I chose PS/2 mouse(see Figure 10). When you select what you need, click " OK".

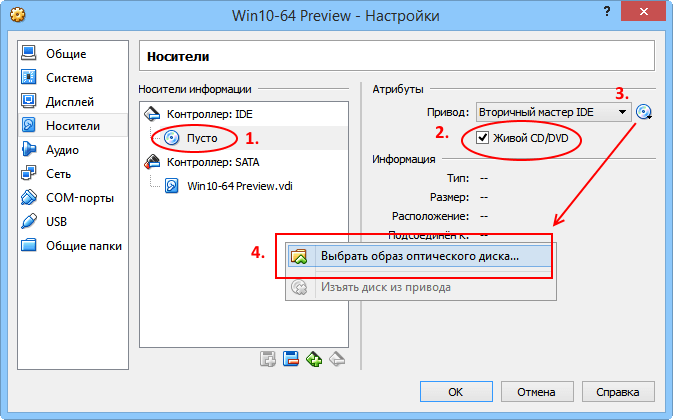
Now you need to make VirtualBox use the Win10 Preview (ISO) installation file. The whole point is to correctly insert the virtual installation DVD into the virtual optical drive V.M. (The next few steps are illustrated in Figure 11.)
Click the main Customize icon again and select Media. Then, in the “Storage Media” section under the device Controller: IDE click Empty(this is No. 1 in Figure 11). On right side New options will appear in the Media panel.
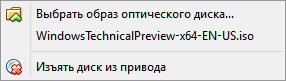
Now in the Attributes section, check the box Live CD/DVD(#2) and then click the disk icon to the right of the text Secondary IDE Master(No. 3). A pop-up menu will appear. Select Select image optical disk (№4).
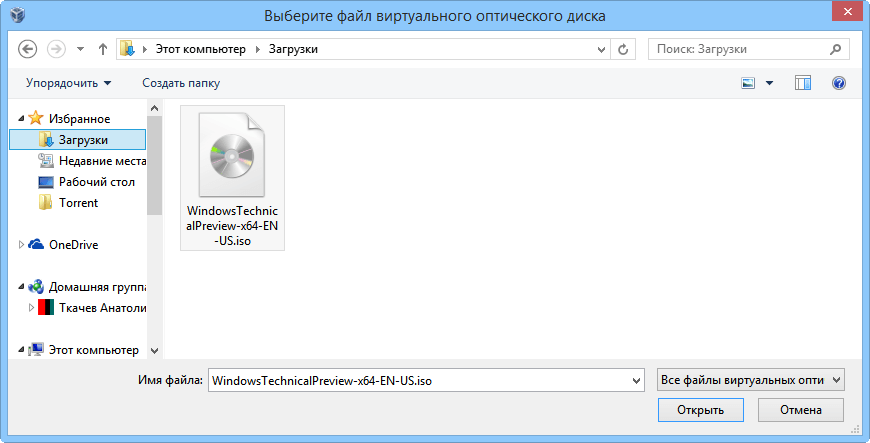
At this step, a recognizable window in the form of Explorer opens. Find the ISO file you downloaded - most likely in your Downloads folder - and select it (usually it will be labeled something like WindowsTechnicalPreview-x; see figure 12). Click Open.
The program will then return you to the Settings/Media dialog. Click OK.
Note: As noted earlier, you may receive a dialog box prompting you to install the VirtualBox Extension Pack. This additional package does not need to be paid for and can be downloaded from the same page where you received the main VirtualBox installation file.
Congratulations! Now the installation of the virtual machine is complete, you can install and run Windows 10!
Step 5: Install Windows 10 Technical Preview
From the main menu of the VirtualBox manager, either double-click the Win10 virtual machine or select it and click the “Run” icon (Figure 13).

The VM will now boot from the installation ISO file located in the virtual DVD drive and start installing Win10 Preview. The initial dialog boxes will probably be familiar to you - they are very similar to those found in previous versions of Windows.
Note: When you first click inside a VM window, a VirtualBox message may appear telling you that your cursor will be temporarily locked within the window. This is a common situation. If you decide to go outside the VM window, simply click left (or on some systems right) Ctrl key to return control of the mouse to the host computer.
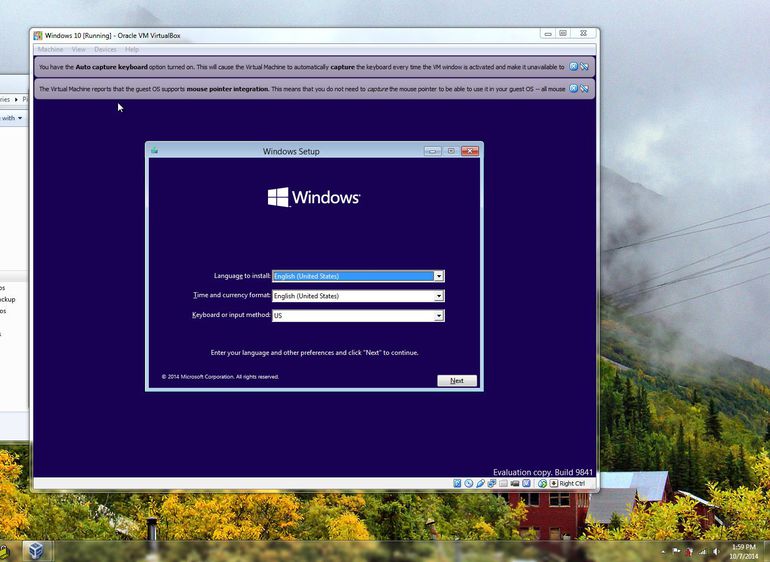
In the first Win10 installation dialog, the program will ask you to confirm or change the language and keyboard type. Select “Russian (Russia)” from the “Time and currency format” drop-down menu (Figure 14). Then you will see a window with a button Install now(Start installation). Click it. You will then be asked to accept the terms and conditions license agreement- do it.


After some time, the VM will reboot. Ignore the “Press any key to boot from the CD/DVD” prompt and let the VM boot from its own hard drive. Once you reboot, the program will walk you through a final series of Win10 settings (the defaults are fine) and personalization settings, such as prompting for login information Microsoft records.
If you don't have a Microsoft account, or if you don't want to use an existing one account, you can create a new one for free along the way. The final options and features of the installation procedure are self-explanatory; For Windows users 8 or 8.1, as before, they will look familiar.
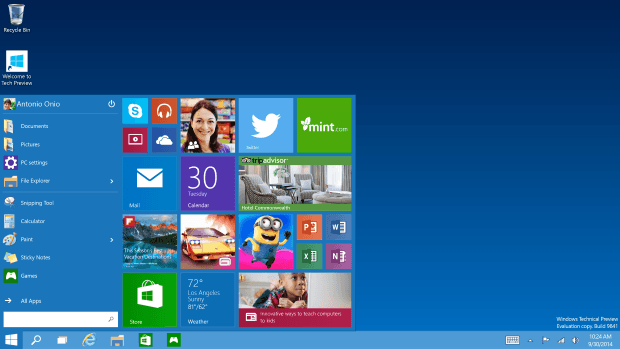
When you're done, Win10 will be up and running and ready for you to test. If you selected a mouse as your pointing device, you will be taken directly to the Win10 Desktop, shown in Figure 16.
Note: Windows 10 Technical Preview has already had several updates. One of your first tasks is to launch Windows Update(Windows Update). (Right-click the Start button with the Windows flag and select Control Panel from the pop-up menu, click System and Security/Windows Update Windows updates), and then click the link Check for Updates(Search for updates)).
A few more preparations so that everything loads smoothly
At this point, your virtual machine is still configured to boot from the installation ISO file. If you leave everything as is, then every time you start your VPC you will receive a request “Press any key to boot from the CD/DVD”.
To avoid this you should disconnect ISO file from virtual DVD drive. Only a few simple steps are required.
Close Win10 as usual - that is, right-click on the Start button in Win10 and select Shut down or sign out(Shut down or log out), then Shut down(Shutdown). When Win10 closes, you will be returned to the VirtualBox manager. (Note: Most virtual PC settings cannot be changed while the virtual machine session is running.)
With the Win10 VM selected, click the Configure icon and go to the Media section (you went there before, see Figure 11.) On the right side of the Media window, click the disk icon next to the item Secondary master IDE .
From the options drop-down list, select Disc removed from drive, as shown in Figure 17.
Click OK to close the settings window. Ready!
Try Windows 10 Technical Preview
If you know Windows 8, then, mainly, in Win10 Technical Preview you will feel like a fish in water. The overall concept is basically the same, but with many of the expected improvements added. If you've never used Windows 8, you may find working on the new OS a little difficult.
The following information about the Windows 10 Technical Preview on our site should help guide you:
- Microsoft introduced the new Windows 10 OS. Official Microsoft press release.
User manual in Russian.
- Antiviruses for Windows 10 Technical Preview. Information about official support for the new platform from antivirus vendors, user experience in installing antivirus solutions.
Today, many programs have been released that allow you to use virtualization for various operating systems. Among them, the product from Oracle, which is distributed under the GNU GPL license and is compatible with all released operating systems, including Windows 10, is extremely popular.
Where to download and how to install Virtualbox on Windows 10?
If you want to install and test some operating system or program, but do not want to use your own OS for this, Virtualbox will help solve this problem.
To go to the “Programs” section and download the installation file or download the latest version of the software from the developer’s official website. For operating room Windows systems 10, Virtualbox version 5.0.20 or earlier 5.0.8, which is also compatible with 10, is perfect. The principle of their operation is the same.
After downloading the installation file, you should run the installation.

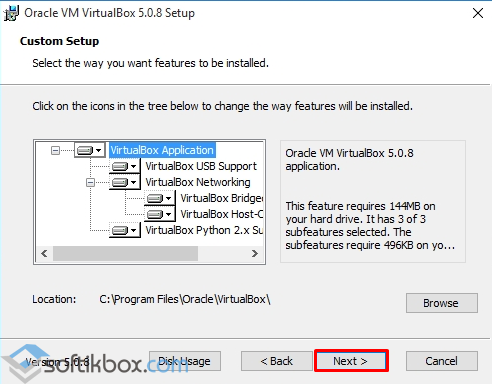
In the next window a list of additional components of the future virtual machine will appear, namely
- Virtualbox USB Support – is responsible for supporting all devices that connect to the virtual machine via a USB port.
- Virtualbox Networking – responsible for support network adapters and Internet access;
- Virtualbox Python 2 x Support – required to support programming languages.
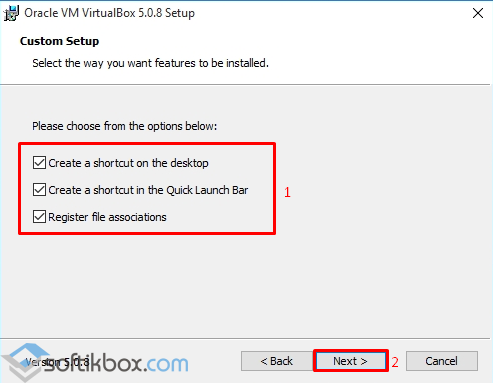
In the next window you should leave all three marks. They are responsible for the presence of a program shortcut in the Start menu and on the desktop, and also allow you to associate files of other virtual machines.
The next step is to install some network components. The installer will notify you about this. Click “Yes” and wait for their installation to complete.

As soon as the installation of the software for creating a virtual machine is completed, the following window will appear. Check the “Run program” checkbox and click “Finish”.

The initial program window will open.
![]()
How to create a virtual machine using Virtualbox on Windows 10?
In order to create a virtual machine on Windows 10, you should initially download the distribution kit of the operating system that you want to install on Virtualbox. After loading the system, click on the “Create” button in the main program window.

We assign a name to the virtual machine, indicate the version of the OS that you will install and its type.
In the next window you should indicate the amount of RAM that you allow Virtualbox to use.
Select which disk you want to install the machine on. Click “Create a new virtual hard disk.”
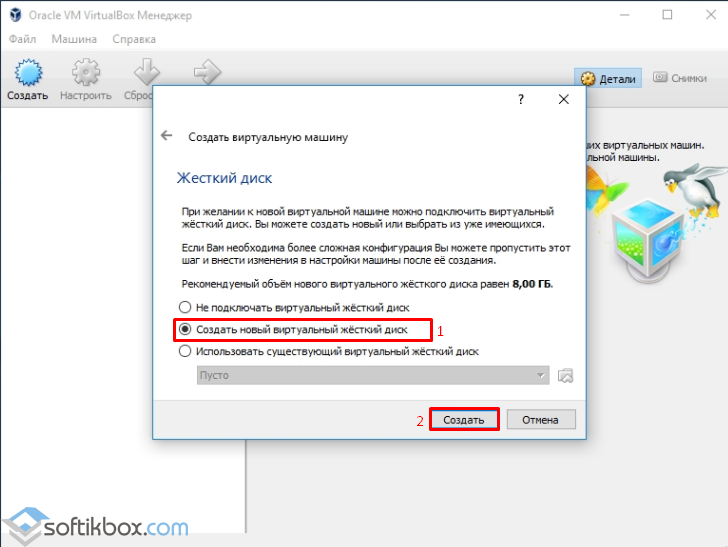
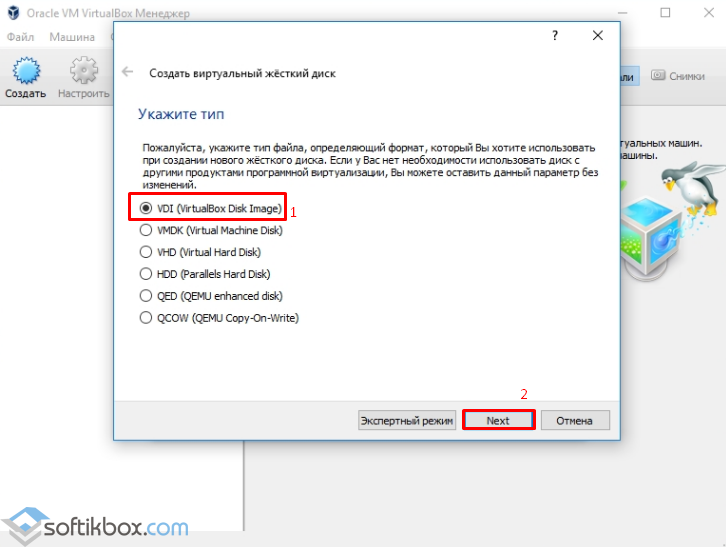
Select the disk type. Since we are creating a virtual disk, we click VDI.
In the next window we indicate what kind of disk it will be: dynamic or fixed. If you are creating a virtual machine for testing and will not use it in the future, you should choose fixed. But if you use a virtual OS and install programs on it, you need to choose dynamic disk. It will expand as it fills.

Specify a name for the disk and select a size.

The virtual machine is now created on Windows 10.

If you click on the “Configure” button, you can change the size of the video adapter, increase or decrease the load on the processor. To start the car, you need to click the “Start” button.

After clicking the “Run” button, the program will ask you to specify the storage location for the installation file of the new OS.

The installer window will appear. We follow the prompts. Installing an operating system on a virtual machine is very similar to installing it on a regular PC.

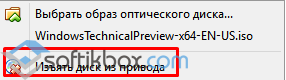
IMPORTANT! When installing the OS, a request “Press any key to boot from the CD/DVD” may appear on the monitor screen. To prevent this message from appearing, you should disable the ISO file from virtual drive. To do this, before installation or during (you need to minimize the installation window), go to the “Settings” section and select “Media”.

Here you need to click on the disk icon.

A list of options will appear. Set "Remove disk from drive".
Only after completing these steps will the installation of the new OS on the virtual machine be completed successfully.
Why doesn't VirtualBox start on Windows 10?
- If, when you try to run VirtualBox on Windows 10, the program does not work and does not respond to user requests, the reason lies in the fact that the software does not detect network interfaces. To fix this problem, you should go to the developer’s website and download the latest version of the program.
- If an application crash appears with code 0xc0000005, you should run the program as Administrator.


- Also if VirtualBox was running on previous version The OS, but with the update to Windows 10, does not start, it is worth setting up the software to work in compatibility mode.
For details on how to install VirtualBox on Windows 10, watch the video:
How to create a virtual machine from another operating system on Windows 10, watch the video: