Typically, most Windows builds have only two languages - Russian and English. Naturally, this will not be enough for everyone. It’s good that the developers have provided for the installation additional languages which is easy to do. In this article I will show you how to add a language to Windows XP. If you need to solve this issue on Windows 7, then read.
The only difficulty that may arise is the absence of any specific letters on the keyboard. For example, in Cyrillic Ukrainian or Latin German there are letters that are usually not written on the keyboard, although the main alphabet is composed of Cyrillic and Latin letters, which are found in Russian and English. However, these specific letters definitely exist, but you will have to select them at random if you do not know exactly where they are located. It is not difficult. But first you need to add a language to your computer.
Enabling an additional language
In order to add a language on Windows XP, you need to click “Start” and select “Control Panel”. Then you need to click on “Region and Language”. (This assumes that Classic View is enabled in Control Panel.)
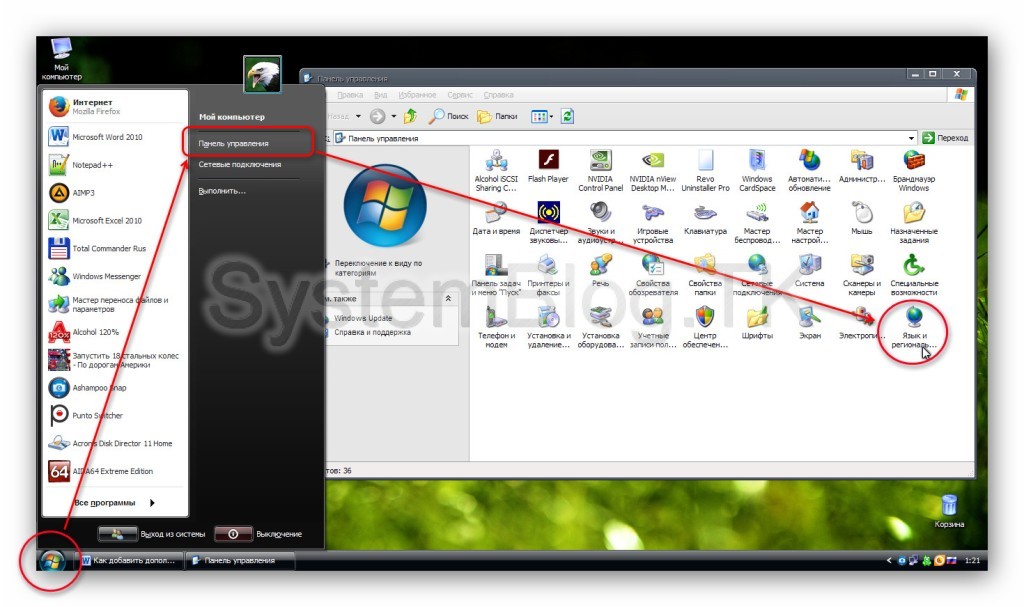
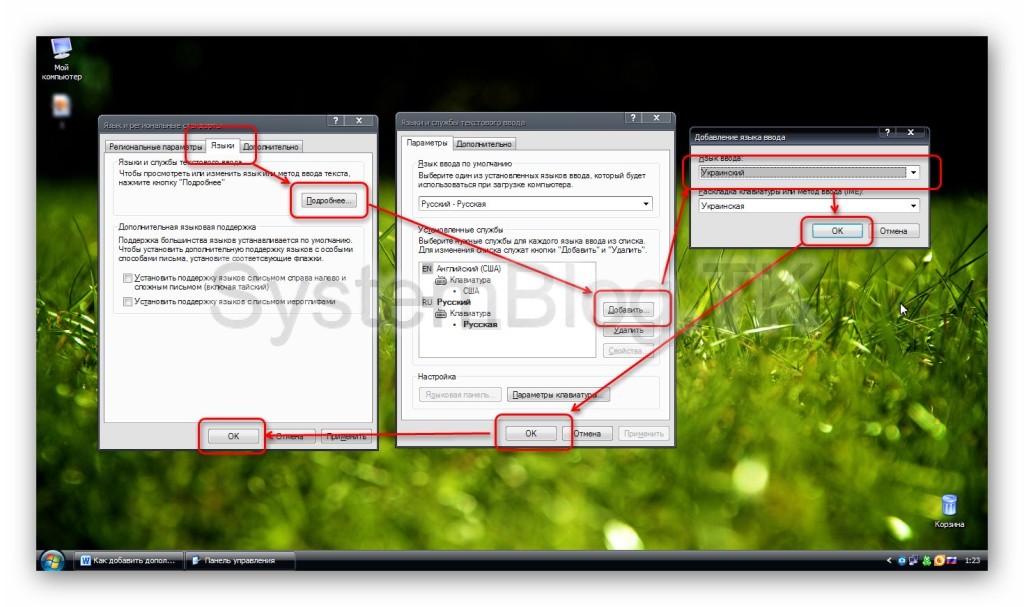
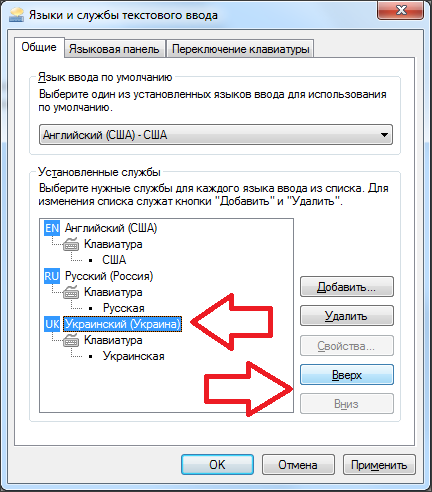
Select the “Languages” tab and click the “More details” button. The Languages and Text Input Services window opens. Here we see a list of already added languages in Windows XP. To add another one, you need to click on “Add”. In the “Input language” list, you need to select the required one and click on “Ok”. The selected language should appear in the list of installed ones. Then click “Ok” in all open windows, and then new language will appear in the language bar near the clock at the bottom. It will be possible to switch using the standard shift+alt key layout.
Adding an additional language
To add Latin or critical languages to Windows XP, there is no need to install additional components.
Additional features
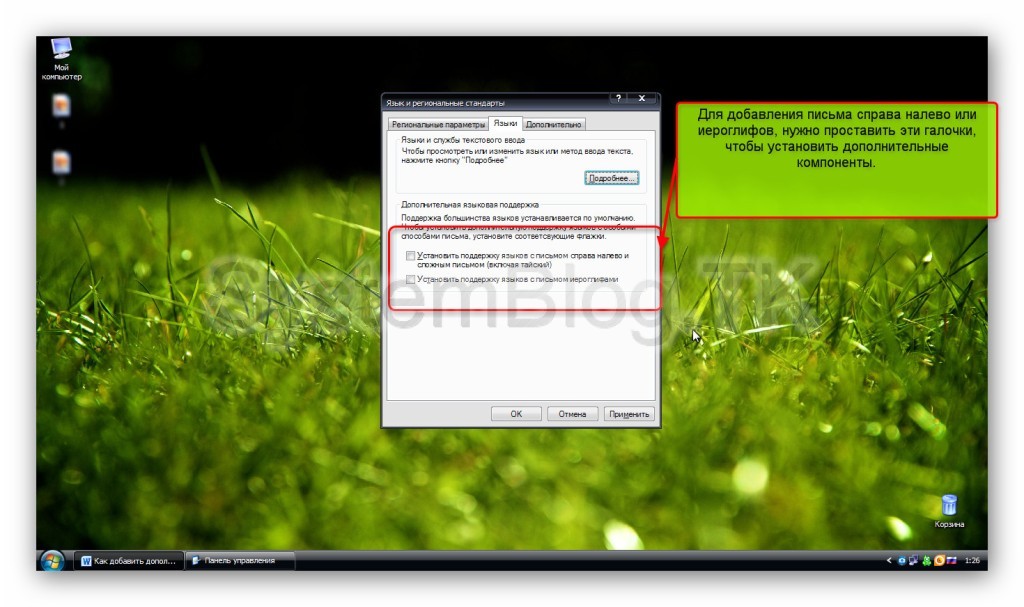
In Windows XP, you can add a language that consists of more than just Latin or Cyrillic letters. Those written from right to left and in hieroglyphs are also available. In order to enable them, you need to check the appropriate boxes in the “Regional and Language Options” window.
Adding additional language capabilities
To add right-to-left or hieroglyphic languages to Windows XP, additional components are required and must be installed from the operating system disc. To install these components, you need to insert the disk into the drive, check the required boxes (from left to right or hieroglyphs) and click “Ok”. The installation will begin and then the languages will be available.
Disabling unnecessary languages
By the way, in the “Languages and Text Input Services” window you can not only add a language to Windows XP, but also remove an extra one, if any. This can be done in the same list window installed languages, you just need to click “Delete”, highlighting the desired item first. After this, you need to click “Ok” in all open windows.
![]()
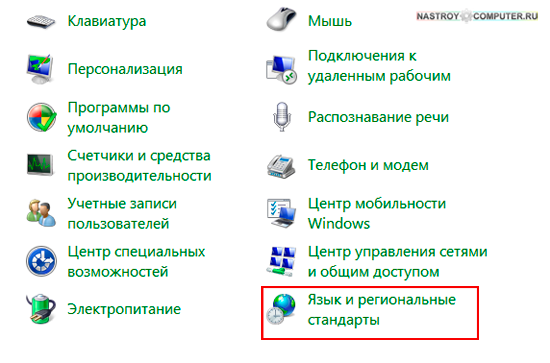
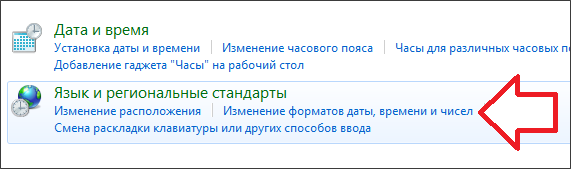
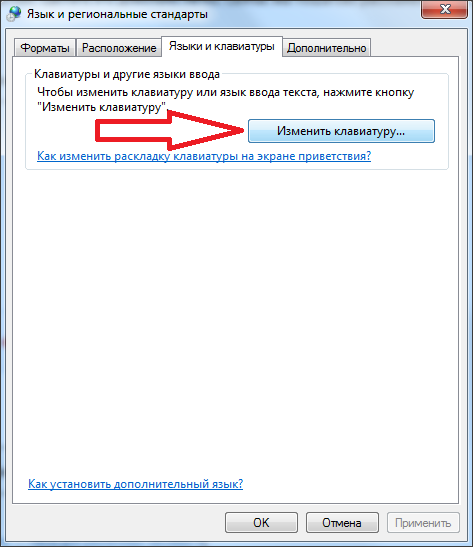
If you have installed version Microsoft Windows 7, then to add a language to language bar, you must click on "Start", then select the menu item "Control Panel". For greater convenience, we recommend viewing it in small icons mode. Next, click on the item "Language and regional standards", the icon of which will depict a globe and a clock.
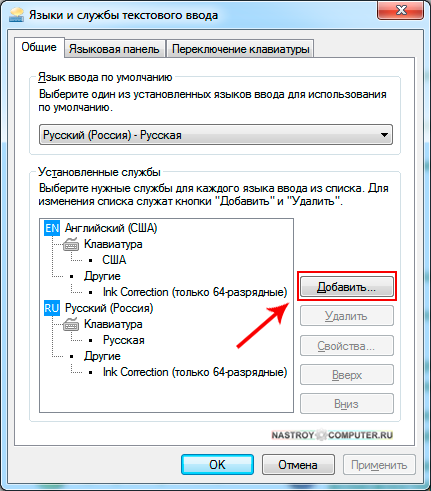
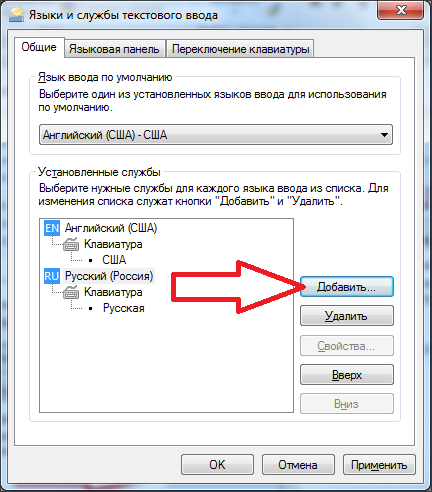
In the dialog box that opens, you need to select the “Languages and Keyboards” tab, in which there will be a button "Change keyboard". After you click on it, another dialog box will appear, where you should go to the tab "General". At the top of the window you will see which language is installed by default, just below the inscription "Installed services" a list of available languages that can already be used in the operating system is displayed. There will be several buttons to the left of this list, but we are interested in the one that says "Add...". Click on it. A small dialog box will appear called "Adding an input language".
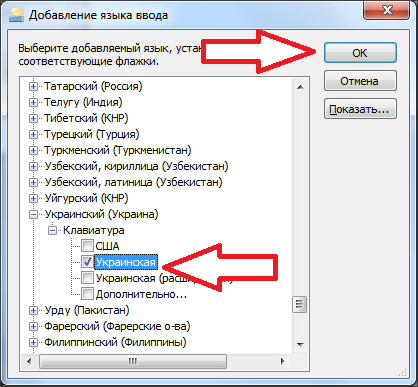
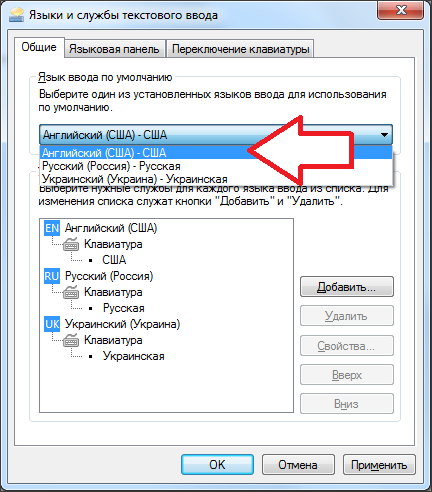
will appear in front of you quite a large list of languages, supported by the operating system, from which you need to select the one you need. After the language is selected and the parameters of the keyboard it uses are marked, click “OK”. Now we go back to the “General” tab of the previous dialog box, where we click “Apply” and then “OK”.
It is also worth noting that in this dialog box, which is called “Text Input Languages and Services”, there is a button "Delete", thanks to which you can remove one of them from the list of languages used, if necessary.
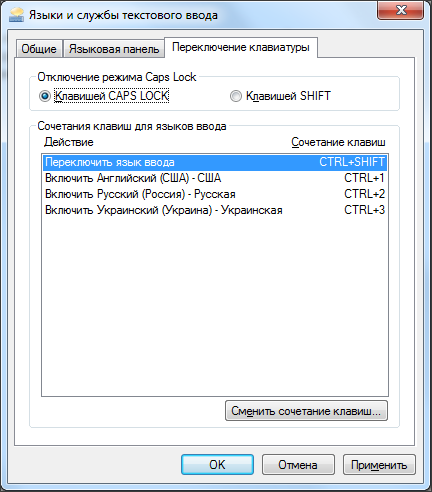
In addition, here you can not only add or remove a language, but also change the keyboard shortcut that switches languages. Typically, by default, the Windows operating system provides this key combination capability. "Alt + Shift", but experienced users believe that the combination "Ctrl + Shift" more convenient, since it is possible to press it with only one thumb.
There is also a second way. To add a language, you can simply right-click on the language bar icon, and then in the appeared context menu Click on the “Options...” item. The same window will open in front of you with a list of languages used on the “General” tab.
To check whether you succeeded in adding a language, left-click on the language selection icon on the taskbar. The new language you just added should appear in the list displayed.
The listed methods are relevant not only for the operating room. Windows systems 7, they will also work under Vista and XP. Modern versions of this system are equipped with support for a fairly large number of languages, including both the languages of Western Europe and the languages of Southeast Asia. Judging by online forums, most often people are interested in how to add German or Ukrainian.
As you have seen, adding a language to the language bar is quite simple, and this procedure does not require any additional knowledge or skills in using a computer. Moreover, this operation does not take much time.
By default, setting any operating system be it XP, Vista or Windows 7, you will have only two languages in the language bar. These are Russian (RU) and English (EN). But if you need to add another language, it won’t be that difficult.
Let's say that we need to add the Ukrainian language to the language panel. To do this, follow the following instructions in order.
Step 1 . Go to the Start menu and select Control Panel. In the window that opens, click on the linklanguage and regional standards.
Step 2 . In the new window, go to the tab. In the block Keyboards and other input languagesclick on the buttonChange keyboard...

Step 3. In a new window Text input languages and servicesgo to the tab General and in section Installed Services click the Add button.
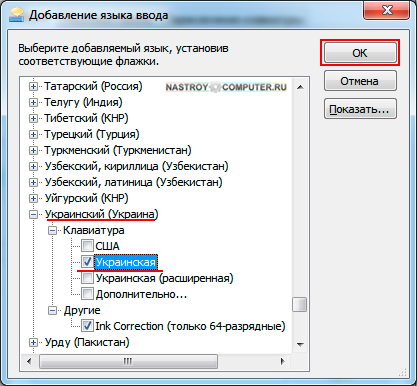
Step 4. In the window Adding an input languagedrag the slider to the Ukrainian language. Next to the wordUkrainian (Ukraine)Click on + and expand the list. In the parameter Keyboard check the box next to it Ukrainian . To continue click on the button OK .
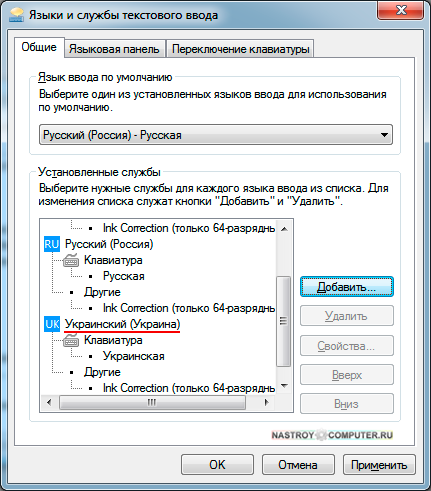
Step 5. In chapter Installed Services, the Ukrainian language appeared. To apply all the settings made, click on the button Apply and then Ok.
(If you want to delete a language, then to do this you will need to select it and press the button in the right menu Delete) .
Only two languages are available: Russian and English. For most users this is quite enough. But, if you need to enter text in another language (for example, Ukrainian), then you need to add this language to the language bar. Fortunately, this is quite easy to do. Now we will tell you step by step how to add a language to the language bar.
And go to the "Clock, Language and Region" section.
After this, the “Regional and Language Options” window will open in front of you. Here you need to go to the “Languages and Keyboards” tab and click on the “Change Keyboard” button.
After this, a small window will appear to add languages to the language bar. Here you need to mark the languages that you want to add and click on the “OK” button.

Other settings for the language bar and input languages
In addition to adding a language to the language bar, you can make other settings in the Languages and Text Input Services window. For example, you can change the default input language. To do this you need to select desired language in the drop-down list at the top of the window.
You can also change the order of languages in the language bar. To do this, you need to select one of the languages and change its position using the “up” and “down” buttons.
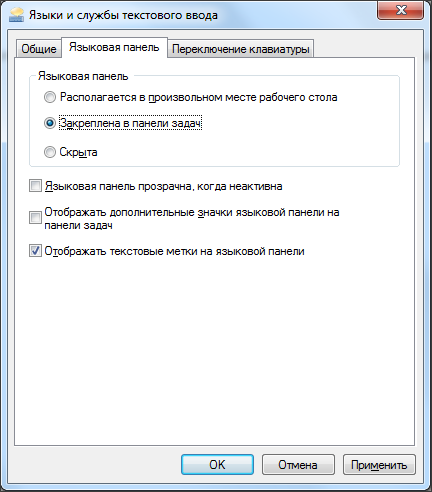
If you go to the “Language Bar” tab, you will see settings that relate directly to the language bar itself. Here you can hide the language bar, pin it to the taskbar, or allow it to be located anywhere on the screen. Here you can also turn on the transparency of the language bar and enable the display of additional icons.
On last tab, which is called “Keyboard switching”, you can change the logic of the mode Caps Lock, and also change the key combination responsible for switching input languages.
As you can see, the language bar has many different settings, which allows you to configure work with input languages in a way that is convenient for each specific user.


