To install a new virtual machine with Linux we need:
- The program itself for launching virtual machines.
Download VM VirtualBox - Installation image Ubuntu Linux.
Download the installation image from here. We take Ubuntu 13.10. Downloading one of the images- Ubuntu 13.10 Desktop (64-bit)
- Ubuntu 13.10 Desktop (32-bit)
Installing Virtual Box.
Part 2 - Selecting an operating system image


Now select the operating system image you want to install. 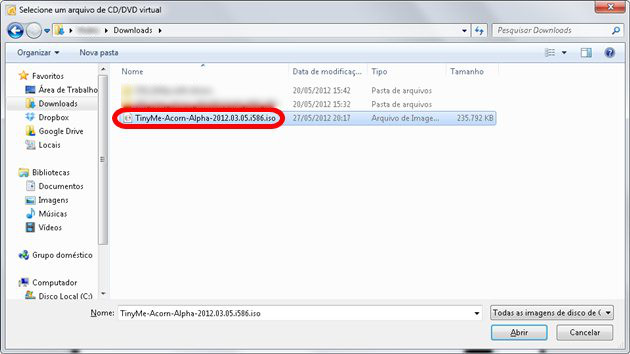
Now the final summary is shown with all the details of the file and gives some important information. 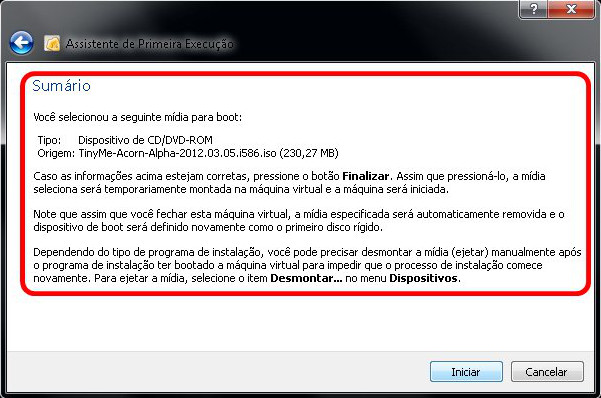
The virtual machine is ready to download and install. 
The big advantage of virtual machines is that you can create as many as you need, with different profiles, and even spin several at the same time. In the following lessons, we will show you how to find the ideal profile for each system and how to enable all available resources.
Click the “Create” button and then use the wizard to configure the new virtual machine. 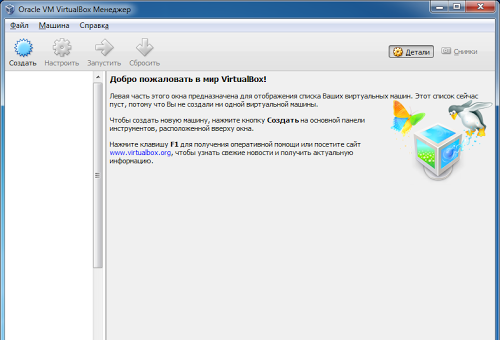
Enter the name of the virtual machine, the type “Linux”, and the version “Ubuntu (64 bit)” (or just “Ubuntu” if you install 32 bit). If you want to install the 64-bit version, but you do not have 64-bit configurations in the list of versions, then you may have a 32-bit processor. If the processor should still support it, then read the F.A.Q. on the VirtualBox forum.
When I installed an HP 630 on my laptop ( Core processor i3), I just encountered the fact that the program did not provide 64-bit configurations. As written in the F.A.Q. that in some BIOS virtualization support needs to be enabled, it turned out that by default it was disabled for me. 
Create the folder we are going to provide
Have you completed all the steps? Which virtual machine do you want to install? The mouse is not captured and will work increasingly better.
We are preparing a guest operating system
- We create a folder with the name we want in our personal folder.
- With the guest operating system turned off.
Next we set the size random access memory which will be available to the virtual machine 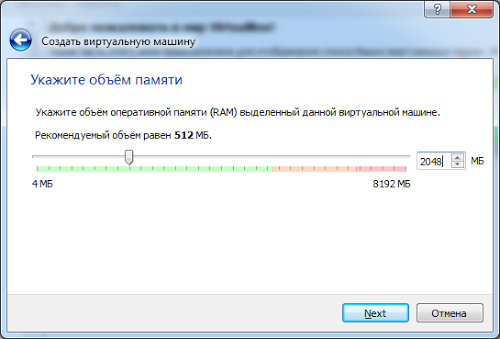
The virtual machine needs virtual hard disk, which will actually be a file on our hard drive. Creating a new virtual HDD, the wizard will ask for the type - select default and set the size limit hard drive.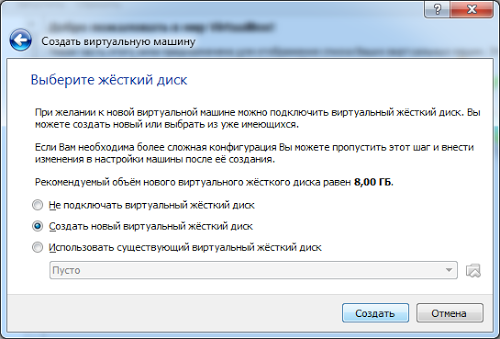

With virtualization you can. Virtualization software. Reduced costs: Less equipment is required to manage the network. Reduced energy consumption: by reducing the number of devices. Better use of physical space: With fewer machines, the space requirement is reduced.
Possibility to imitate computer networks with lower hardware requirements: it is possible to assemble the entire network in a virtual environment. Easy environment migration: Avoids reinstallation and reconfiguration of systems that need to be migrated. Application autonomy. When each application is inserted into its own virtual server, changes and application changes can be prevented from affecting the entire network and compromising the operating procedure.
The virtual machine is ready. 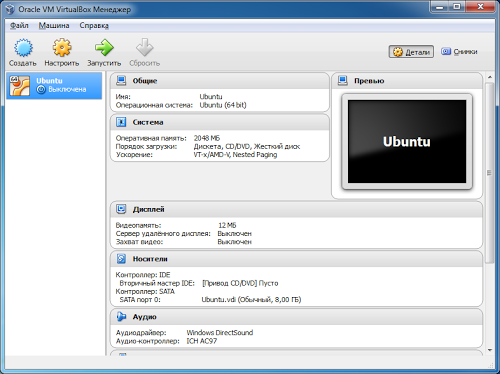
But it needs to be further configured in order to work more comfortably later. Click “Configure”. Go to the “System” section. I increase the number of available processor cores to two because GUI with one core it is very slow. 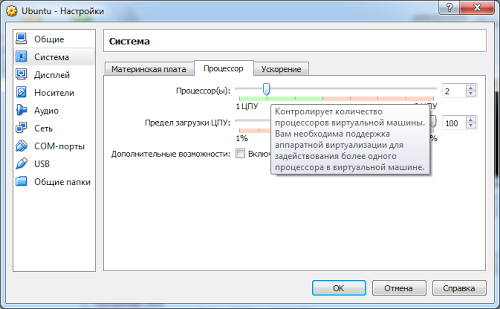
Perfect fit: Multiple operating system technologies can coexist on a single platform. Installing and configuring a virtual machine using a virtual box. If this is the first installation, we must select the Create option new hard disk. If you have previously created a virtual disk, you can use it by selecting the Use existing hard disk option. Click Next to continue and then Next to select your hard drive storage type.
The description of the difference in the options is very clear. Select the one that suits you and click Next. Click Next after setting these options and then click Finish to complete this first part. In the System option, configure the boot order.
Then go to the “Display” section, set the maximum video memory and check the box to enable “3-D acceleration” 
Installing Ubuntu Linux
Now close the settings and start the machine. We will install the operating system. The machine starts but there is no OS on its hard drive, so we see a black screen. You can install the OS directly from the image; for this you need to mount it as an optical disk. To do this, select “Devices” - “Drives” in the menu optical disks" - "Select an image optical disk"and indicate iso image downloaded ubuntu. 
Optionally, you can enable advanced feature settings to optimize performance over graphics cards. Now just click “Start” to connect the virtual machine. Explore these options and draw your own conclusions. All tools used are free.
We will use this software to create our testing laboratory. With this software we will not adhere to hardware, because they will be virtual. Soon, everything done inside a virtual machine will be restricted to the virtual machine.
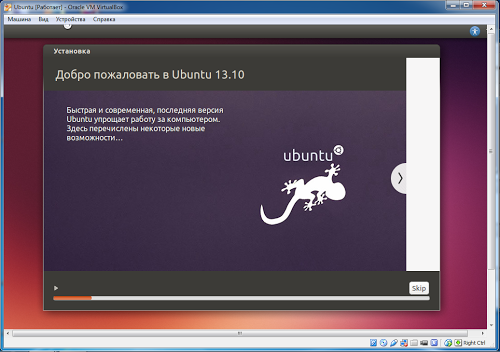
Then in the “Machine” menu we restart the machine. Booting from the disk begins. And after a while the installer welcome screen will appear. We immediately select the language. And click “Install Ubuntu”. The “Launch Ubuntu” button allows you to boot to the Ubuntu desktop without installation for evaluation purposes, but we don’t need this mode, we install it right away.
- Preservation of equipment.
- Energy saving.
On this screen we will simply click “Next”. For compatibility issues, we will leave all components checked for installation. The following screen will appear informing you that a shortcut will be created on your desktop and in the panel quick launch. Click Next to continue with the installation.
Now you need to set the installation conditions. We set the disk placement method. Ubuntu typically requires two partitions, one regular and one page file partition. You can also create three partitions in order to place the /home mount point on the third partition, which will store all user files. Analogy with Windows drives C: and D:.
But because This is a virtual machine, and the (virtual) hard disk is not large anyway. Let’s leave the default option, the installer will create the necessary partitions itself. 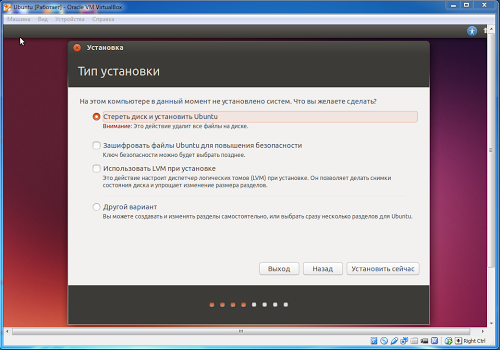
Wait for the installation to complete and click Finish. Click the icon located on your desktop. The following screen will appear with the following options. In the "Settings" option we can edit the parameters of the created virtual machine, for example: which network interface will be used and how it will be used, add a new virtual disk, configure memory consumption, CPU consumption and others.
- In the option: New, we will create a new virtual machine.
- In the options: View is enabled if you have a virtual machine installed.
Set the time zone 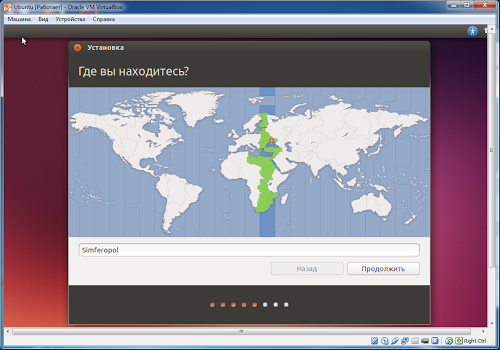
Choosing a second language after English 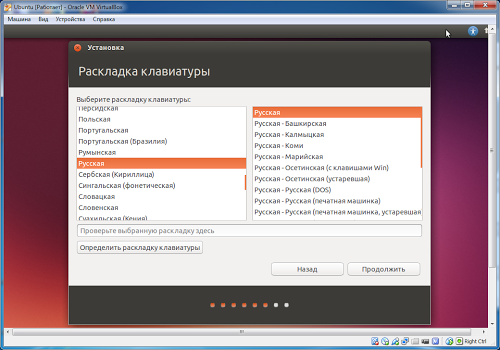
Enter the new user name and password. You need to enter a password, because... on Linux this is an important security point. 
The name of the virtual machine will be indicated. . In this step, we will configure the amount of memory used by the virtual machine. Note that it will tell you the total amount you own. The colors define the level of criticality of use, where we cannot use everything because this memory is shared with the real system.
Now we will create a virtual disk. When defining the type and size, a file will be created with the extension according to which we choose. In the image above, we cannot add a disk, create a disk, and use an existing one. When you select Create Disk and click Create, the following screen will be displayed.
Skip entering your Ubuntu One account - click Login later 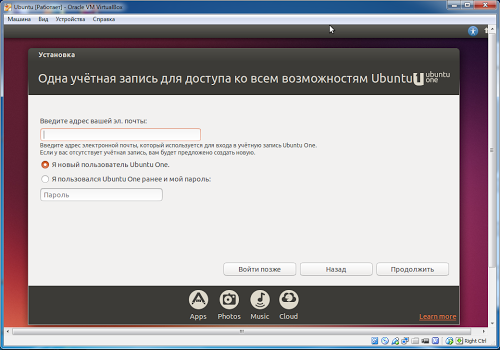
And wait until the OS is installed 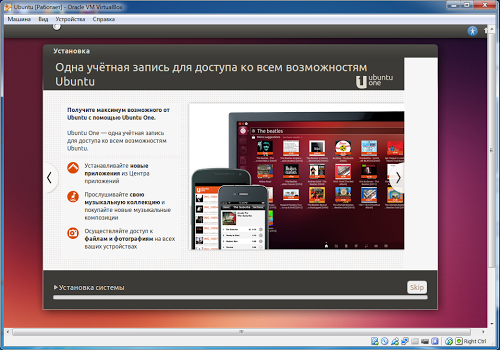
Therefore, in the next screen we need to determine whether the disk will be dynamically allocated or fixed size. This means that if you define a size of 10 GB, you can only use the space provided.
- Dynamically allocated - means that we will define a non-fixed size.
- Soon we can announce the size without worrying about space.
We can set it by entering a square next to or along the panel. You can set any name to the virtual disk. We've just determined the drive type and size, memory size, system used, and version, among other things. After this step, the following screen will be displayed.
At the end of the installation, the machine will ask you to reboot in graphical mode, and then in text mode you will need to press Enter. 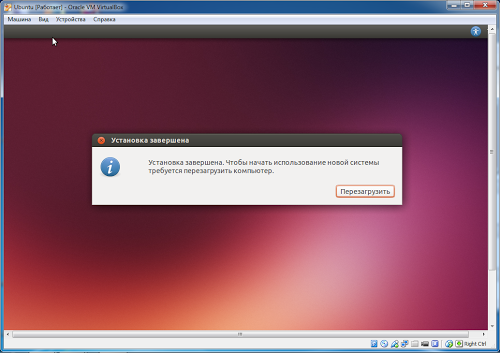
After the reboot, enter the user password and start using it. 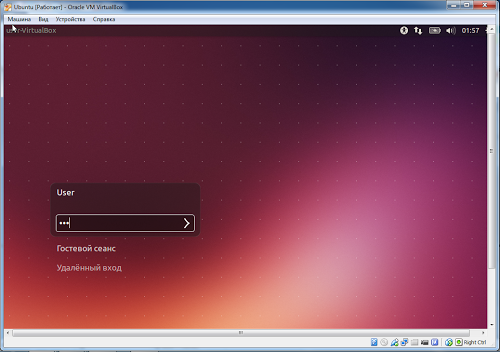
We will focus on the following options. All settings made from the very beginning can be changed without problems. System - configuration of memory, processor, etc. We can determine which network interface will be used and how it will work. Once we go through these steps, we are ready to start installing the operating system on the created virtual machine.
In image 18 it informs about the keyboard capture. If you have completed all the steps correctly, you will be presented with the following screen. If this happens, check the following points. By default, we will install the distribution using the first option. Select the first option with the arrows and enter or wait for the countdown.
Configuring installed Ubuntu Linux 13.10
In Ubuntu 13.10, the ability to switch layouts using the usual Ctrl+Shift is no longer available. Therefore, you need to configure the combination to switch. On the panel we find the language icon. (If it's not there, reboot Ubuntu)
Then click on it and select “Text input options”. In the window that appears, in the field with a key combination, you just need to click and press the combination that will be convenient to use. I set myself Ctrl+Space 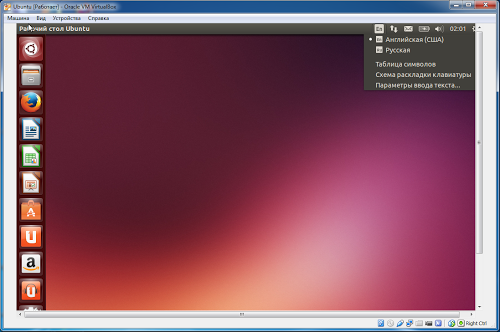
After checking the hardware, we will be faced with a text mode screen. Don't be afraid as it will not damage your computer. Now with the following screen the installation will be more clear. We will then configure the installation, where in the first step we will determine the language used in this distribution.
After selecting the language, click “Next” where on the next screen we will move to the location. At this step, click "Next". The next setting will be the keyboard layout. By default let it be automatically detected, if you want to install it manually please.
The next step for convenient use of the virtual machine is to install the guest system add-on. This special programs which are installed in the virtual machine and are available in the “Devices” menu - “Mount the Guest OS Additions disk image.” After connecting, the disk will autostart, you need to agree to run it. A terminal will be launched in which you will need to enter the user password. When entering a password into terminals, no characters will appear. Then you will need to press Enter. Wait for the installation to complete and reboot the virtual machine. 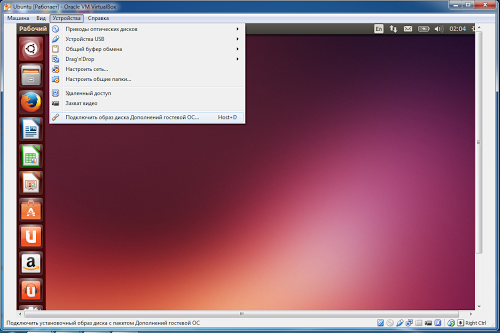
Now we will configure the disk. The first one will automatically exit, so we will not define the partitions, the system itself, which will do this in the main way. With calmness and patience, you will see that the second option is better and easier, but everything will happen in due time.
After selecting the option, click Next. On the next screen, simply click Install. When everything is completed, the following screen will be displayed. The system installation process will begin as shown in the image. Now just wait for the installation to complete.
Who is this article for?
If you have problems, try all the steps again. Remember that you can install on your real machine. Remembering that the username comes first. Well, I hope you liked the post and leave your comments.
Virtual machine environment
This is necessary so that our package manager will 100% recognize the new repository we just added.After installing these add-ons, the screen resolution in the virtual machine will be adjusted to the window size, you can enable the shared clipboard, see the “Devices” menu. And an equally important function is to create a shared folder between your operating system and Ubuntu on a virtual machine.
To create such a folder, go to “Devices” - “Setting up a shared folder”. Click add a shared folder, select a folder in the main OS, check the Auto-connect and Create permanent folder checkboxes. 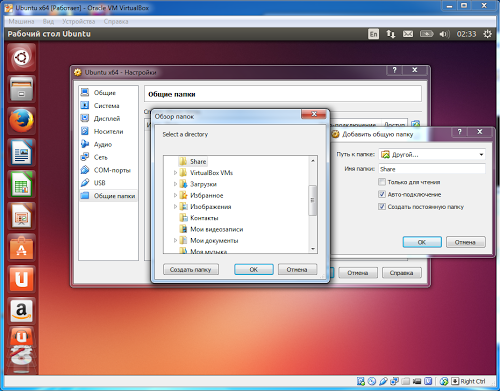
Because we need remote connections to the desktop to manage our virtual machines, we now need to install the appropriate extension package. Because it's easier to set up and much less intrusive, plus it's free and entirely in French.
For this we need some components. Follow the instructions on the screen. You come to such an interface. Then again and select create new virtual disk. You can choose a fixed or dynamically allocated size. Click Dynamically Selected.
Console
A console or terminal is an application with a text interface that provides no less, or even more, opportunities for controlling a computer than programs with a graphical interface. 
When you start the console, it contains the line %username%@%computer name%:~$
~ is the short name for your home folder
You then have the option to change some configuration options. Here it asks you to choose boot disk. Then press the Start button and release. Select French or any other language by navigating using the keys on your keyboard. If you don't talk about it, you probably don't understand it, right? Select "France" and then determine the location of the keyboard. Allow yourself to be guided by instructions. In the car name, put what you want, but keep the name aside. Select your full name, username and password.
There is no need to encrypt your personal file. When you get to the partitioning method, choose to use the entire disk. At the end the installation begins. For our use, you can install updates automatically. On the next screen, you can select the software to install.
To open the console, you can remember the key combination Ctrl-Alt-T or press the super key (the key with Windows icon on the keyboard) and enter terminal or terminal in the line and click on the icon.
Connecting the shared folder is half completed. We gave the folder to Virtual Box but did not configure this folder in Ubuntu. And in order to work with it, you need to mount it. There is a command for this
Mount -t vboxsf Share /home/user/share-folder
Here, for example, Share is the name of the folder that we configured in VirtualBox
/home/user/share-folder - folder in file system virtual machines, if your user has username
To create this folder you can navigate with the cd command and then run the command
Mkdir share-folder
But every time (after a reboot) mounting the folder will quickly get boring, I found a solution in the article and it consists of adding the command line to the /etc/rc.local file:
Mount -t vboxsf Share mount-point
The folder names are still the same for example. To get into the file you can run the command
Sudo nano /etc/rc.local
Here sudo is a flag that the command comes from the superuser, this is necessary because configuration file is systemic and requires appropriate rights. Calling commands with sudo will require you to enter a password.
nano is one of the console editors. You could use gedit instead - this is already a window editor.
Now you can install programs. And enjoy all the benefits of Ubuntu.
For example, you can install Git. You can enter the git command into the terminal and see a prompt that this program is not installed and you can install it with the command
Sudo apt-get install git
But before running this command you need to call
Sudo apt-get update
To have ubuntu update its repository lists.
After installation you can dial
Git --help
And if you see the help for the git program, make sure that it is now installed.
Introduction
VirtualBox is one of three common systems for creating virtual machines. Virtual machine systems are programs that emulate the hardware environment of a conventional computer, in such a way that another operating system can be installed in this virtual machine, and this OS installed inside the virtual machine will “believe” that it is running on a real computer. That is, the VM system allows you to emulate several virtual computers on one physical computer.
Such virtual machines are used for different purposes. For example, in order to use application programs that are incompatible with the main OS. Or in order to create some kind of safe environment that cannot harm the main operating system - the so-called sandbox. In particular, developers antivirus programs study the behavior of viruses, infecting with them the OS installed inside a virtual machine.
Why VirtualBox? Because, unlike competitors VMWare and Microsoft Virtual PC, VirtualBox is a free VM system distributed under the GNU GPL license. Another reason is that VirtualBox is a cross-platform system - it can be installed not only on GNU/Linux, but also on MS Windows. And “inside” the VirtualBox VM you can install both GNU/Linux and MS Windows.
VMWare is also cross-platform, but it is proprietary commercial software. Microsoft Virtual PC is generally an exclusively single-platform product - it can only be installed on Windows and only Windows can be installed “inside” a VM.
Terminology
Virtual machine management systems use special terminology and abbreviations:
VM is a virtual machine, one instance of a virtual computer.
Host OS (or host OS or simply Host) - operating system installed on a real computer, an OS in which the VM management program runs.
Guest OS (or simply Guest) is an operating system that is installed inside a VM.
Installation
In the Ubuntu 10.04 repository, VirtualBox version 3 is presented, while version 4.1.18 is already available. Therefore, it is better to download this latest version from the website virtualbox.org. The site has binary installation packages for all current versions of Ubuntu. In addition to the virtualbox-4.1_4.1.8-75467~Ubuntu~*.deb package, you immediately need to download the Oracle_VM_VirtualBox_Extension_Pack-4.1.8-75467.vbox-extpack package - it implements USB 2.0 support inside the virtual machine. And of course you need to download the user manual.
Before installing VirtualBox, you need to make sure that the package is installed on your copy of Ubuntu dkms. If such a package is not in the list of installed ones, then it needs to be installed.
To install, you just need to run the file virtualbox-4.1_4.1.8-75467~Ubuntu~*.deb. After installation is complete, go to the Applications menu - System utilities"The item "Oracle VM VirtualBox" will appear. When you launch it, the wizard will immediately offer to create a new virtual machine, but it is better to cancel this operation. After starting VirtualBox, you need to install the Extension_Pack extension, this is done through the VirtualBox settings. After installing the extension, you need to close VirtualBox and then add current Ubuntu user to the vboxusers group, this can be done either through the terminal or through the graphical applet "System - Administration - Users and Groups". If you plan to use VirtualBox by different users, each of them must be added to this group. After adding the user to the vboxusers group You need to log out of your Ubuntu session and log in again.
Creating a virtual machine
To create a VM, you need to launch VirtualBox and execute the “Create” command (using the button on the panel or through the menu) and then, step by step, in the wizard, specify the necessary VM parameters. At the first stage, you need to specify the type of guest OS, then other parameters - RAM size, disk size, etc.
After this, you need to install the guest OS into the created VM. To do this you will need an installation CD image or DVD disc as ISO file. Such a file can be created using many programs, for example Nero, InfraRecorder, ImgBurn, Ultra ISO, IsoBuster etc. If you use Linux, then the easiest way to make an image is with the command dd if=/dev/sr0 of=CD.iso bs=2048 conv=noerror,sync.
This image file is connected to the VM as a CD drive and when the VM starts, it boots from this CD, that is, the OS installer is launched. Installing the OS in a VM is the same as on regular computer, but most likely it will happen more slowly.
Important note!
If you are installing a proprietary OS, such as Microsoft Windows, on a VM, you must comply with the licensing requirements of the copyright holder in the same way as in the case of normal installation on computer.
After creating the VM, the main VirtualBox window will look something like this:
The virtual machine is started using the "Start" button. When you click this button, the media is loaded in the order specified in the VM settings, which are accessible through the "Properties" button.
The window of a running VM in which Windows XP is already installed looks like this (its size depends on what screen resolution you set in the guest OS settings):
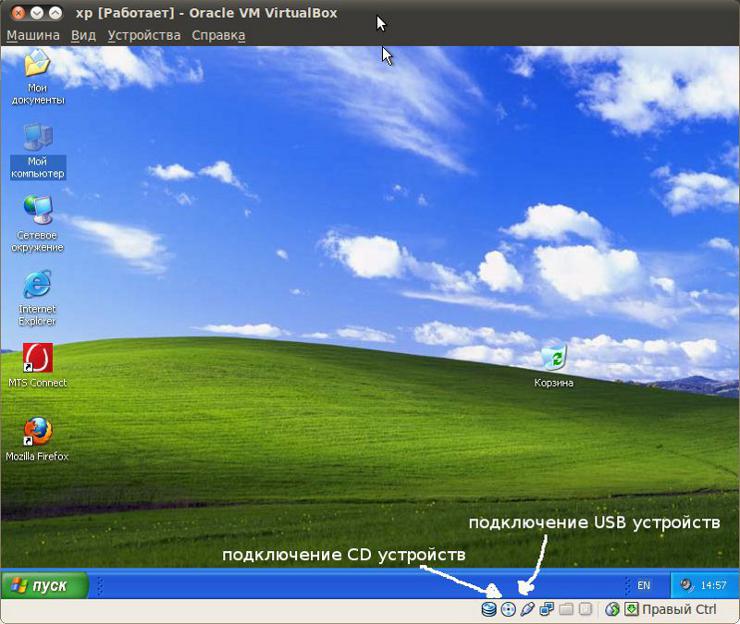
At the top of the window there is a VirtualBox menu, at the bottom of the window there is a toolbar - indicators and quick access to CD and USB devices. In order to connect or disconnect a CD or USB device, you need to right-click on the desired button and then select the device from the menu:
 |
 |
Important note!
Any physical device A CD or USB may only be available in one of the OSs, either the host or the guest. In order to make the device available in the guest OS, it must be connected to a running virtual machine using a button. In order to make a device available in the host OS, you need to click to disable this device in a running virtual machine.
After installing the OS, if necessary, you can install drivers on those devices that were not detected automatically. However, you need to remember that you cannot install drivers on a video card - there is no video card emulation in the VM. You can install various USB devices in the guest OS, such as a cellular USB modem.
VirtualBox - network setup
VirtualBox allows you to make a variety of network configuration options between the host and guest OS. You can connect the guest OS to the real local network. It is possible to create a VLAN between the host and the guest. You can connect several VMs via a virtual network. You can connect the Internet to and from there. In general, settings are possible to suit every taste and color.
Let's start with the Internet.
If the guest OS requires Internet access, this can be achieved in two ways. Connect an access device directly to the guest OS, or use the Internet from the host OS via virtual network.
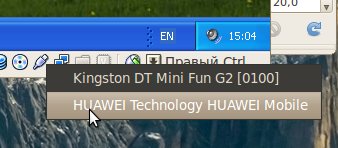
Direct connection to MTS USB modem
The modem needs to be plugged into USB and after it is detected in the host OS, it needs to be connected to a running VM. After this, the guest OS should “see” this modem.

Note: You may need to disconnect and reconnect (using a button in the VM window) the USB modem in order for it to appear in Explorer as a CD driver disk.
After this, the installation is performed exactly as described in the article 3G USB modems, installation, configuration for Windows. The only difference is that driver installation will most likely be slower than on a regular computer.
Note: After the driver installation is complete, you may need to disconnect and reconnect (using the button in the VM window) the USB modem in order for it to be correctly identified in the list of devices.
Using such a modem is similar to using it on a regular computer. The main thing to remember is that while the modem is used in the VM, it cannot be used in the host OS.
Connecting via virtual network
A virtual one is created for the VM LAN card and through this card the guest OS can be connected to the Internet or to a local network. Of course, this will only be possible if the OS host has a real connection to the Internet or local network. In this case, the host OS will act as a gateway for the guest OS.
First you need to set the virtual network adapter settings for the VM. This is done through the VM settings, with the VM turned off. The NAT connection type provides a gateway to the Internet for the guest OS, as well as limited access to the local network:

In the guest OS itself, in the network connection settings, you need to explicitly specify DNS addresses servers:
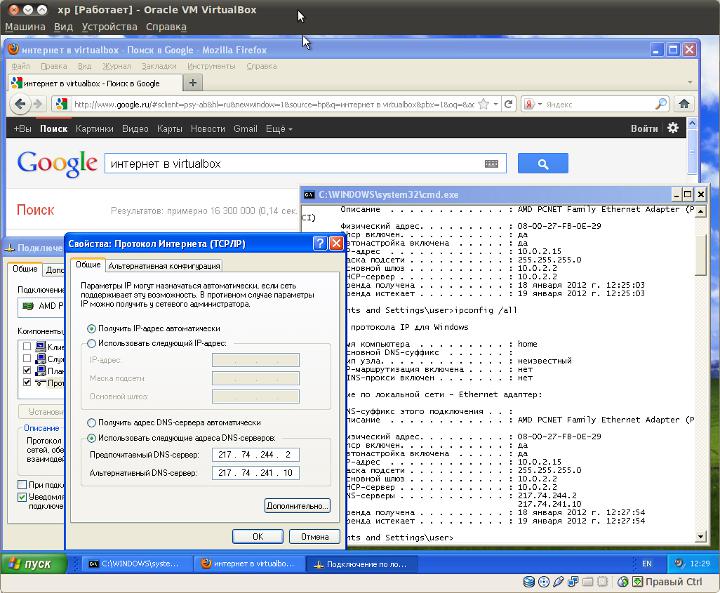
With this approach, the Internet will be in both the host system and the guest system. In addition to the Internet, the guest OS will have access to web and ftp resources of the local network.
VirtualBox - setting up a local network
If you need the guest OS to have access to a local network with shared network resources (files, printers), then the setup is done a little differently. In the VM settings you need to specify the bridge connection type for the virtual adapter:

If there is a DHCP server on the local network, then this will be enough - the guest OS will receive network settings automatically. But if there is no DHCP server, then you will need to enter the data manually in the guest OS:
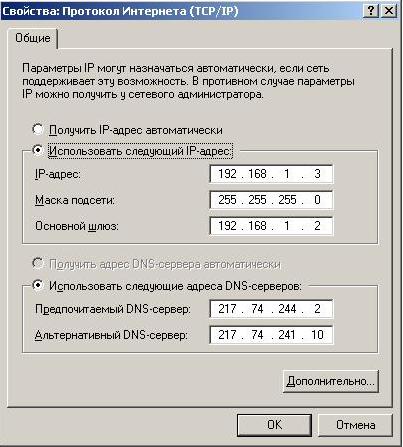
The subnet you enter manually must match the subnet specified for the associated VM network adapter in the host OS. That is, if you write the subnet address 192.168.1 in the guest OS, then the eth0 adapter to the host OS should have an address in the same subnet 192.168.1
In this way, you can connect the host and guest OS to each other even if there is no real local network. It is enough to define shared resources in one of them or both, and then network exchange between them will be possible.
VirtualBox - setting up a virtual local network
If the host computer is not connected to a real local network, you can nevertheless install network connection. But this needs to be done differently than described above.
At first, in VirtualBox settings, you need to add a virtual network. This is done through the menu "File - Properties" and then in the properties applet, the Network tab:

After this, you need to specify the connection type “Virtual Host Adapter” in the VM settings (the “Properties” button):
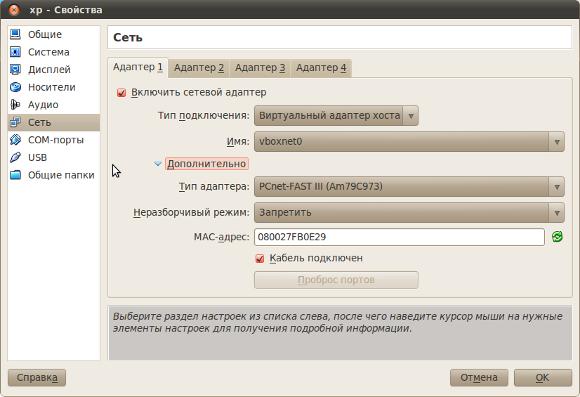
After this, you can start the VM and the guest OS will receive network settings via DHCP. Through this virtual network, network resources can be shared between the host and guest OS. But the Internet will not go to the guest OS through this virtual network.
If you need to “distribute” the Internet to the guest OS, you will have to do this by adding a second adapter to the VM and setting this adapter to NAT mode:
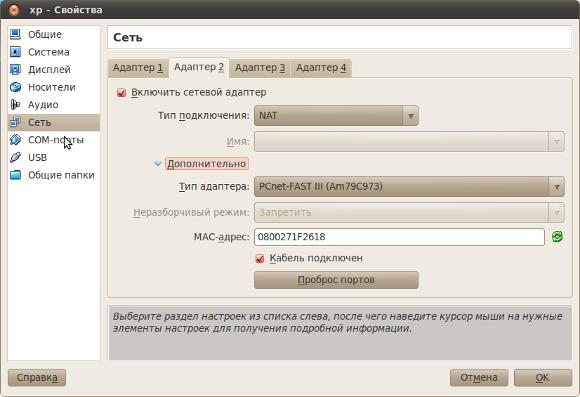
Thus, the guest OS will have two network adapters. After one it will work the local network, via another Internet.
Conclusion
You need to understand that a virtual machine is not complete analogue a real computer. For example, a video card cannot be emulated in a VM, which means that the guest OS cannot use 3D acceleration or any specific capabilities tied to a specific video card. And this applies not only to video cards - some devices may work with limited functionality or not work at all. In general, the hardware profile of the virtual machine is quite modest.
At the same time, one must also understand that hard resources Disk, RAM and CPU will be shared between the host OS and the guest OS. If you have 512 MB of RAM on your computer, then you will not be able to allocate more than 196 - 256 MB for the VM, and this may not be enough for the guest OS (unless it is something old like Windows 98). That is, when planning to use a VM system, you must first of all pay attention to the real hardware resources of your computer in combination with what guest OS you will use.
If your guest OS is something like MS-DOS, then you will need very few resources for the VM. And if the guest OS is planned to be Windows 7 or Linux distribution With graphical environment KDE, then your computer must have at least 2 GB of RAM alone. And besides this, at least 10 GB of free space on your hard drive.
There is an easy way for you to install VirtualBox .
If you found this article useful or simply liked it, then do not hesitate to financially support the author. This is easy to do by throwing money at Yandex Wallet No. 410011416229354. Or on the phone +7 918-16-26-331 .
Even a small amount can help write new articles :)


