Note: This article was written for KKT Shtrikh-M, corresponding to Federal Law-54 (Online cash register). If you have an old model CCP, then the connection occurs through the COM port (point 4).
1. Install the Shtrikh-M driver as an administrator. Follow the installer's recommendations
2. Connect the device via USB cable to your PC.
3. After installing the driver, run the “FR 4.x driver test” as an administrator. (right-click on the shortcut and select “run as administrator”):
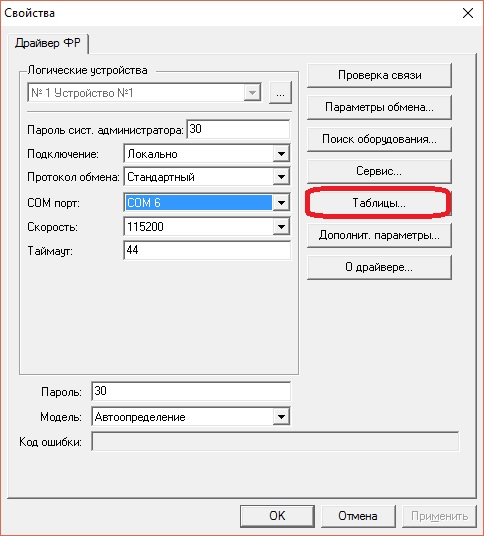
4. Click “Properties settings” and enter the settings as shown in the figure (Sometimes the Shtrikh-M KKT is not switched to operating mode via the RNDIS adapter, then first, by searching for equipment, you need to find out which COM port the device operates on, install it in settings, go to Tables -> Network Interfaces and set RNDIS to 1 and reboot the cash register:
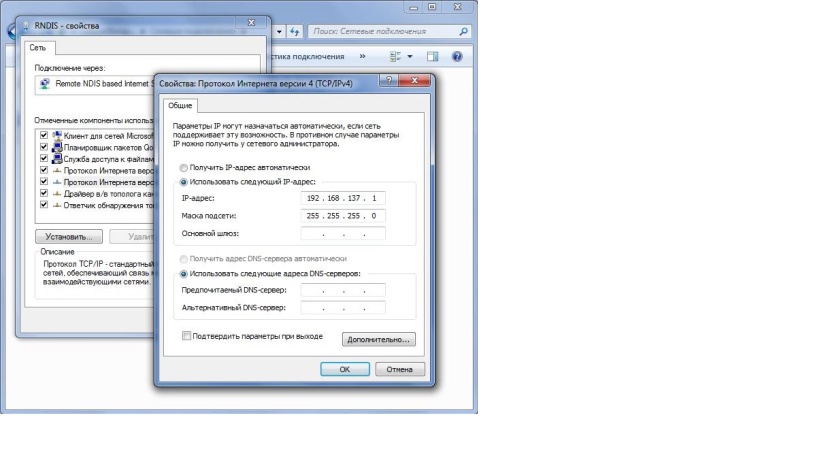
6. RNDIS adapter operating system need to be configured as shown in the figure.
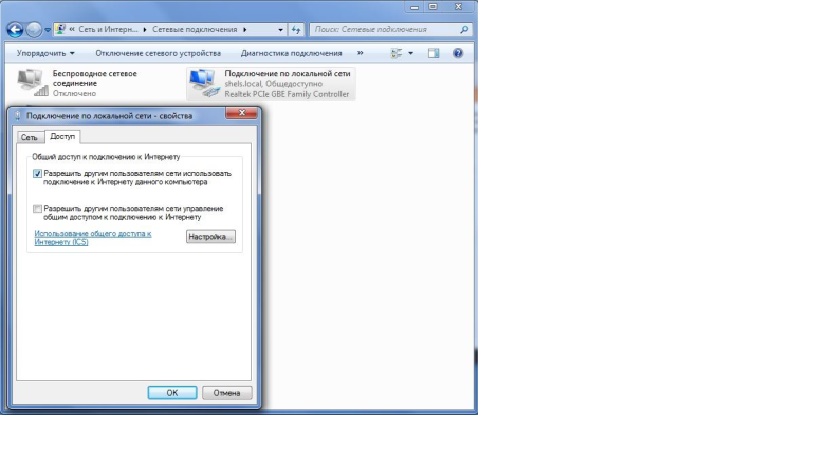
7. In order for the cash register to be able to transmit data to the OFD server through the main network connection You need to allow the main network adapter to transmit data from other subnets. To do this, you need to check the box as shown in the figure.
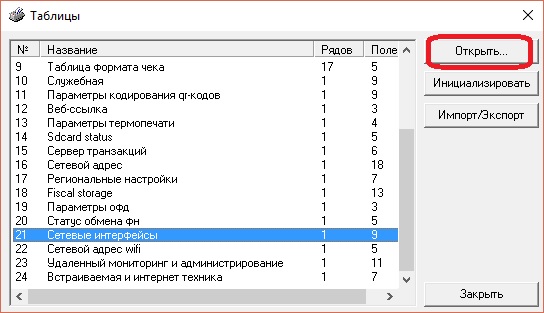
8. The name of the OFD and its TIN are indicated in Table 18.
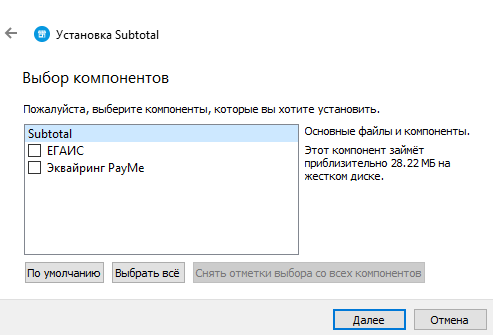
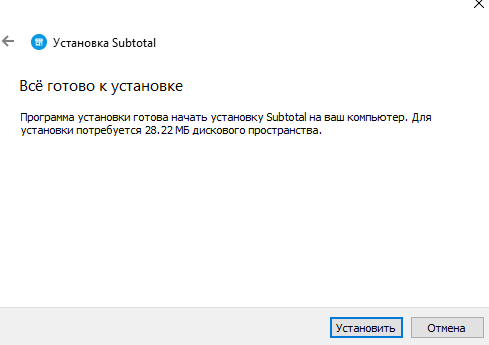
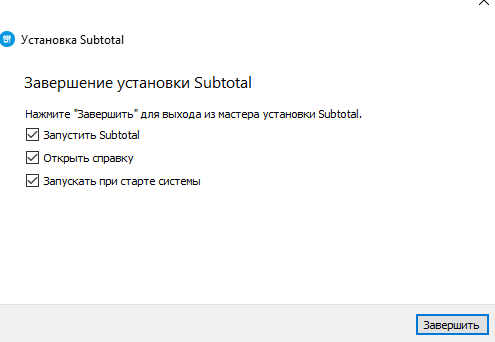
9. Now install the Subtotal application, following the installer’s instructions:
![]()

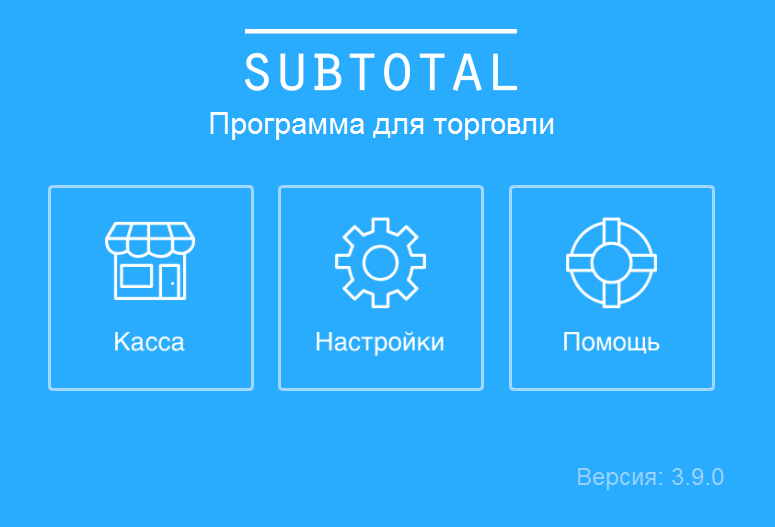
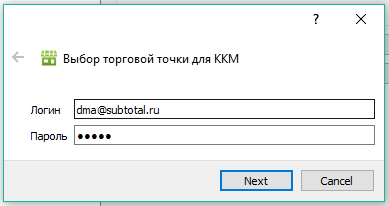
10. After launching the Subtotal application, open “Settings” and select the “KKM” section:
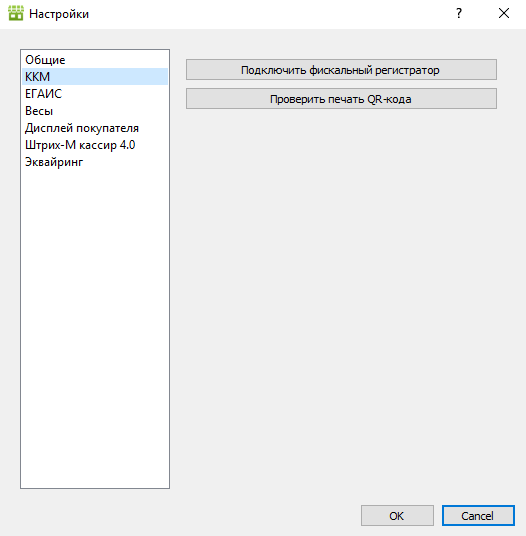
11. Select “connect fiscal registrar" and enter the main login and password from Subtotal, select the store and point of sale:
Why exactly do we connect to OFD-Y (Yarus)? The fact is that OFD-Ya, as I understand it, is the brainchild of the Shtrikh company. And it is RECOMMENDED to connect the Strokes only to OFD-Y. And other CCPs (not Shtrikh) are POSSIBLY not recommended to be connected to OFD-Y at all. That's why the initial state Shtrikh-On-Line with test FN and OFD-I with test page.
- We have:
- Barcode-On-Line
- test FN
- Windows 7-64
We connect Shtrikh-On-Line via the Com port cable (RS232 - RG12).
To control Shtrikh-On-Line we use Windows 7-64 with the Shtrikh-M test driver version 4.13.0.538. We insert the test FN (previously cleared on the Mercury-115F, it was just more convenient), turn on the cash register, establish a connection from the driver and check that the FN is readable and responds to something on the FN tab: FN software version: fn debug v 1.32, FN software type : 00h, Debug version.
The inconvenience of all Online cash registers is similar to the fact that you cannot punch checks, close a shift, etc. on an Unregistered cash register. Barcode-On-Line is no exception.
- For test mode:
- connect.ofd-ya.ru
We register the cash register through the Shtrikh 4.13 driver and wait for the reaction to appear on the OFD-Ya website, 10 minutes and an hour and two pass - nothing.
Did we forget to connect the USB so that the KKT could access the Internet? The fact is that the CCP is controlled via the COM port, and the CCP itself must somehow transmit data to the OFD. Since it does not have WiFi, Ethernet, or GSM, but does have USB, they came up with the so-called USB RNDIS driver.
To set up access to the OFD, it is more convenient to use FiscalMaster from Shtrikh.
We connect the USB cable - a new unidentified device appears. We find out that this is VCOM from NXP (the fact is that the ShTRIKh company is switching to an NXP (Phillips) processor in new models). Next, through the FiscalWizard program - setting up Communications with the OFD, we selected RNDIS, rebooted the cash register and VCOM turned into RNDIS (Remote NDIS based Internet Sharing Device), a new network adapter RNDIS appeared in the system). It needs to be configured (see below). Next, on my PC, of course, there is an Ethernet network adapter, through which I access the Internet (see configuration example below) - so you need to check the box for it " General access to the Internet." And now it turns out that the cash register will also have to have its own unique IP (see configuration example below)
192.168.1.1 is the address of the main PC in the office, through which the Internet is actually accessed.
- AAA0 (our LAN card Ethernet on PC)
- 192.168.1.19
- 255.255.255.0
- gateway 192.168.1.1 (this is our main Server in the office through which we access the Internet)
- DNS 8.8.8.8
- Important: "Access" tab "Internet Sharing" install. (The bookmark can appear only after connecting the cash register via USB)
- AAA1 (RNDIS - the adapter appears in the system when the cash register is connected via USB):
- 192.168.1.62 (can be any free one on your network here)
- 255.255.255.0
- Gateway 192.168.1.19
- DNS 192.168.1.1
- AAA2 (the cash register itself, it must also have a unique IP assigned to it in your network):
- 192.168.1.63 (here can be any of the ips that are unoccupied on your network)
- 255.255.255.0
- gateway 192.168.1.19
- DNS 192.168.1.1 (or 8.8.8.8 or 192.168.1.19)
- Notes:
- FiscalMaster 1.0.0.10 - RNDIS test - for some reason you can’t change DNS here (then through the Shtrikh 4.13 driver)
- Sometimes the RNDIS adapter turns off (in network devices is not visible), you need to do: System-Device Manager-RNDIS-Engage!
We punch the checks, close the shift to make sure that the checks go to the OFD. But you don’t - at the end of the shift there is no information about the number of transferred/non-transmitted checks, as in other normal cash registers. All that remains is to go into the driver and look at the FN - “Number of unconfirmed documents: 9” and my last one is also No. 9. And this despite the fact that the connection test with the OFD passes. Don’t be surprised - this is normal, you just need to wait maybe a day, maybe a week!
You must use both a COM cable and a USB cable at the same time
2017-04-06 carried out combat registration of Shtrikh-On-Line at 1-OFD (at the request of the client). We suffered from the non-habit for 1.5 hours. We checked the connection with the OFD. They opened an office at 1-OFD. Everything is OK, but the checks didn’t go away right away. But it normal.
Setting up a USB connection
1.We connect the “Retail-01F” or “Shtrikh-On-line” printer to the PC via USB, for this we connect USB cable to the interface connector of the cash register and to the USB port of the PC (the cable is supplied with the cash register).
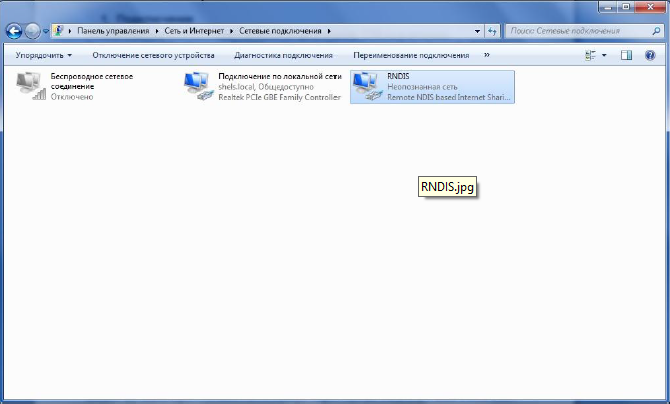
2. In the device manager in the category " Network adapters» the device “Remote NDIS based Internet Sharing Device” will appear.
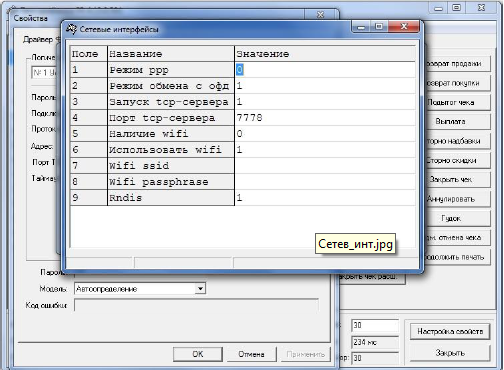
*If you do not have such a device in the device manager, but there is a "Serial device" USB interface(COM...)" under Ports (COM and LPT) as shown below
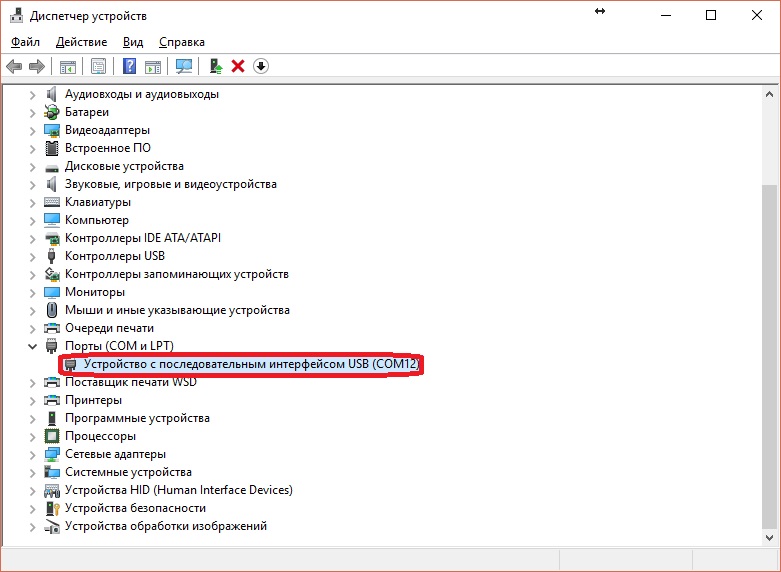
then you need to enable the RNDIS protocol in the printer driver, to do this:
- download the driver at the bottom of the article
- in the driver open "Tables"
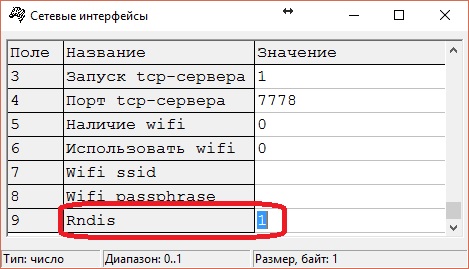
- select the table "Network interfaces"
- in the table that opens, set the value “1” opposite RNDIS and press the “Enter” button on the keyboard
After this, we check that the “Remote NDIS based Internet Sharing Device” device appears in the Device Manager in the “Network Adapters” category.
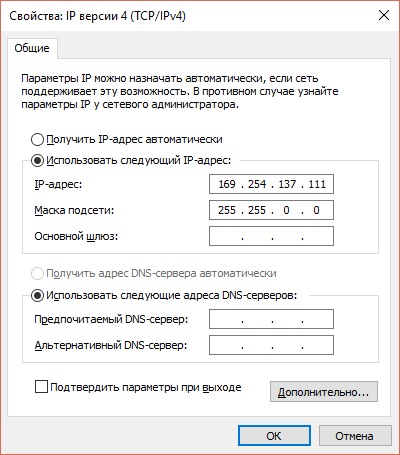
4. In the properties, manually enter the network details of the adapter, specify the following values:
IP address: 192.168.137.111
Subnet mask: 255.255.255.0
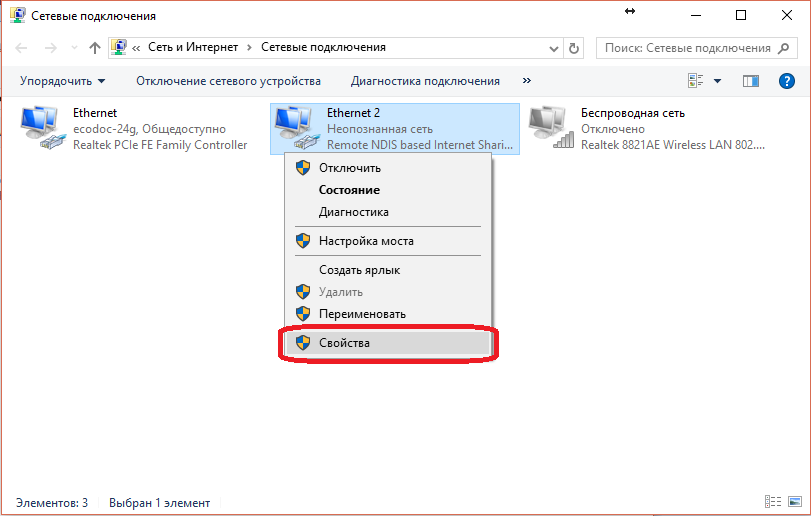
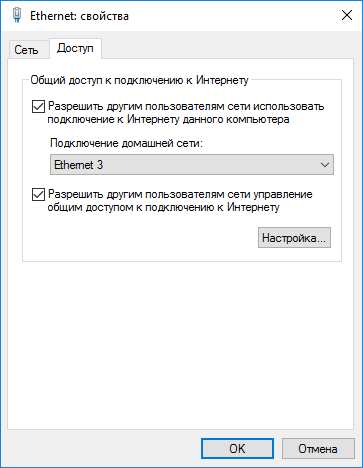
5. In the properties of the active connection (through which the computer has access to the Internet)

In the "Properties" window, open the "Access" tab, check the box and select from the list the connection in which the name RNDIS was displayed. Confirm the window that appears.
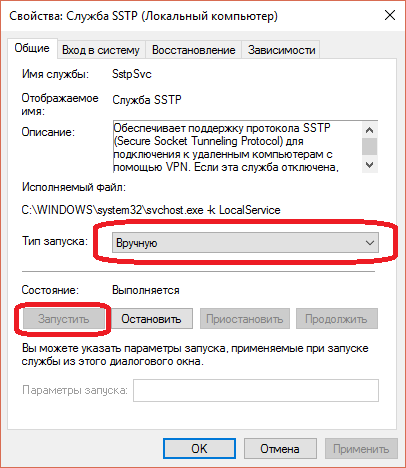
Setting up services
To configure, you need to go to the Services console. Launch Start->Run and enter services.msc. For correct operation printer, you must enable the following Windows services:
- Internet Connection Sharing (ICS)
- SSTP service
- Remote Access Connection Manager
- Dispatcher automatic connections remote access
Setting up the printer in the FR Driver program
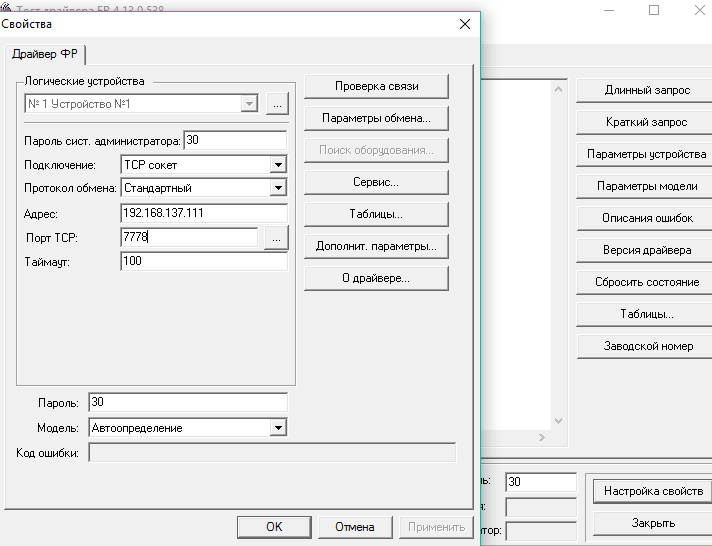
When you first start the program, you need to configure communication parameters. To do this, go to “Properties Settings”
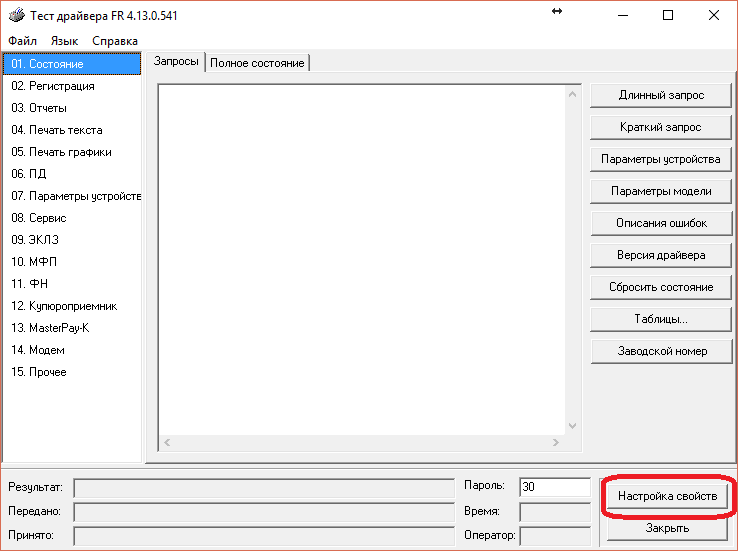
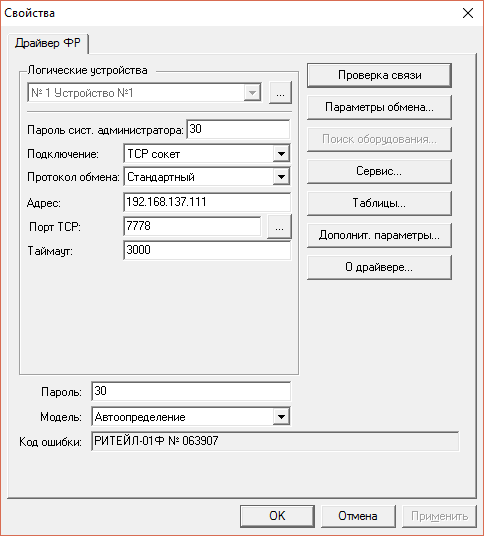
In the window that appears, select:
- Connection – TCP socket
- Exchange protocol – standard
- Address – 192.168.137.111
- TCP port – 7778
*After setting up the printer, do not forget to select the printer to use in the Mercata back office at app.merkata.ru in the section in “Directories” - “Cashiers”.